When constructing houses and other work on landscaping, it is often necessary to do round holes in the ground for pillars, supports, arches and other parts that make up the exterior. An ordinary shovel will not help dig a deep hole, so the owners rent a drill and hire a specialist who knows how to operate the tool. To drill wells, you can also use a homemade pole drill.
Design features of the device
A hand held post drill is designed to create holes in the ground at the location level columnar foundation. That is why the design includes a significant cutting part, which differs in different types devices. Very important nuance thing is during rotation Soil masses must be excavated with further accumulation in the receiver.
First stage - correct selection unit design. There are some assembly features on which the further functionality of such a tool as a hand-held earth drill depends:

Before you make a drill for poles with your own hands, you must prepare drawings. They directly depend on what requirements are put forward for the design.
Types of tools
One of important parameters- the shape of the cutting plane and its location on the rod. If the planned volume of work is insignificant and the diameter of the wells will not exceed 20 cm, then you can focus on the auger model.
This design is characterized by relative ease of manufacture; there is a significant selection of materials for the cutting part. But it is worth considering some of the following features:
- To remove soil residues, the post drill must be constantly removed from the holes;
- the lower extended part of the foundation is missing;
- If the auger cavities are completely filled with soil, significant effort will be required to remove them.
 An alternative is a device having a set of replaceable knives. They are installed on special mounting platforms, positioned at an angle to each other. The unique shape allows you to obtain different wells using the same device. Additionally, it should be noted that there is minimal labor involved in manufacturing and the ability to install new parts to replace those that are broken. The disadvantage is the same as that of screw products - low productivity.
All these disadvantages are absent from hand drill for earth with cylindrical cutting edge. The lower part is made up of two planes located at an angle. The soil is collected into a receiver of sufficient capacity.
Main feature - presence of a mounted plow, with the help of which the diameter of the well expands directly near the base. It can be installed on all models, but only the last one can achieve maximum efficiency.
Once the design has been determined, the manufacturing itself can begin. You can’t do without consumables, a good welding machine and a cutting tool - an angle grinder or a hacksaw.
The simplest model is the one that uses replaceable blades. As a starting material for production, metal discs of unequal diameters (160−350 mm) can be used. Dimensions of internal landings holes must be different. This is the only way to maintain the main advantage.
In the process of manufacturing a structure, you cannot do without the following components:

The angles between the planes of the two halves of the cut disks of the post drill should be 30 degrees. This is necessary to ensure optimal soil cutting without putting in significant effort. If you take on the production of a plow structure, then order the cutting parts separately or purchase ready-made ones.
Reading time ≈ 10 minutes
Residents of the private sector are very familiar with situations when something needs to be built or installed, but the base of such a structure will be in the ground. In this regard, many are wondering how to make a drill for drilling holes for pillars (piles) with their own hands, using materials that may be available in household. In addition, without excessive modesty, it can be argued that in some cases, self-made instruments exceed the quality of factory products. The thing is that a standard is produced at the factory, and at home you can adapt such a device to specific needs, taking into account the condition of the soil.
Homemade hand garden auger
Dependence of design on purpose
For household needs, you can make a hand drill with your own hands for various purposes, although in any case, such a tool is intended for drilling holes. But at the same time they are distinguished by appearance and operational characteristics are:
- ordinary garden auger;
- auger garden auger;
- drill for TISE piles (Technology of Individual Construction and Ecology).
To assemble such a tool you will definitely need welding machine, operating on alternating or direct current.
Common garden auger

Earth garden auger
For making regular garden borer, which is most often used for not very deep holes, holes need a powerful rod, made of solid (scrap) or hollow pipe profile. In addition, you will need semicircular cutting discs welded at a certain angle of attack (it is best if it is alloy steel). Using this tool, holes are made for planting plants (usually seedlings of shrubs or trees), as well as holes for installing fence posts or other light architectural structures.

Homemade auger hand drill
The word "auger" with German language(“Schnecke”) is translated as “snail” and this perfectly characterizes the configuration of the cutting device. The blades are arranged like a right-hand thread with a large pitch, which allows you to pull the drill out of the ground much less frequently, since the soil rises to full height blades without interfering with drilling. The functionality of such a tool is practically no different from the device described above, but labor productivity is in this case almost doubles. If, for example, you build a fence around the perimeter of the site, you will have to install a lot of supports, so speed will only bring benefits. Certainly. It is better to use an automated drive for the auger.
Homemade drill for TISE piles

This tool is used to make wells with expansion at the bottom
The TISE pile drill fully complies with the technology individual construction and ecology of work production, and in living conditions, as a rule, is used for pouring pillars with an expanded base underneath. Its uniqueness lies in the fact that near the cutting blades there is a folding blade (knife), with the help of which an expansion is formed. If we talk about labor productivity when pouring such foundations, then such tools are simply irreplaceable.
Making an ordinary garden auger at home
Below we will look at how you can make such a design at home, provided that you have a workshop (for many car enthusiasts this is a garage).
Components

The constituent elements from which the entire assembly is made
List of elements:
- The cutting parts are two semicircles made of alloy steel, with sharpened edges. Depending on the purpose of the tool, its diameter is also determined. In some cases, semicircular blades are fixed with a bolted connection so that they can be replaced with a different diameter.
- The rod is a round or square pipe profile, although sometimes such a part is made from scrap, but this significantly increases the mass and complicates the work process. The length of the rod depends on the need, but most often it is made for pits 50-80 cm long and up to 1.5 m (if this parameter is reduced, you have to constantly work in a bent position). But if one and a half meters is not enough (the depth of the hole is 80-100 cm or more), then it is better to make a prefabricated rod with extendable rods (they can be joined using a nipple).
- The crossbar for the handle is welded to the top of the rod in the shape of the letter T, where optimal length crossbars 25-30 cm in each direction. If you make these levers shorter, then scrolling will be much harder.
- The tip is made sharp; it serves as a drill, which centers the blades in relation to the surface of the earth. That is, they will not move to the side, since they are a single unit with the drill.
What materials will you need?

Square pipe profile
To make a rod, as mentioned above, a square or square pipe profile is suitable round section. If the wall of such a profile has a thickness of 2-2.5 mm, then a section of 20×20 mm or ø20 mm is suitable, but if the walls are thinner, then the section should be increased to 30×30 or 35×35 mm, ø30-35 mm. In the event that during work there may be a need to screw on an additional rod, then only a round pipe profile is suitable for the rod.

Flat tip in the form of a lance with central and side sharpening
A sharp tip must be welded to the end of the rod, which can be made from a piece of a thick drill with Pobedit soldering– they are used for drilling concrete with a hammer drill. But you can also make such a point from thick reinforcement or a piece of steel, sharpening it in the form of a flat peak, as in the top photo.

The cutting part is made of a disk for manual circular saw
The most crucial moment is the manufacture of cutting blades and they can be made from:
- sheet steel 3-4 mm thick;
- saw blade from a grinder (diamond) or a hand-held circular saw.
In this case, it is most convenient to use discs from a diamond-coated grinder, designed for cutting concrete, or from a hand-held circular saw. When the diamond coating is applied, a thin strip of no more than 1 mm remains around the circumference and it is easy to grind it off, making the edges sharp, and the toothed disk from the circular saw can only be cut in half.
For reference. Inner diameter disk or mounting hole standard is 22.5 mm.
And a few more words about the handle - it should be from round pipe and under no circumstances should you put any plastic on it, much less wrap it with electrical tape.
Method of fastening knives

Removable bolt-on blades
If it is planned to drill wells of different diameters, then the blades on the tool can be made of a removable type. For this purpose, two shelves are welded to the rod and knives are bolted to them, as shown in the top photo.

The optimal angle of attack is 30-40⁰
If you are not going to change the diameter of the blades, then most best option, this is ø120 mm and for this purpose a saw or trimming disk ø125 mm (5 mm width of diamond coating and it will no longer be) is best suited, which needs to be cut into two semicircles. Seatø22.5 mm will have to be adjusted to the rod, cutting off the excess using electric welding. For soft soils, the angle of attack is usually 30⁰, and sometimes even 40⁰, but for hard soils it is better to lower it to 22-25⁰.

Components of a garden auger: 1) rod with a point, 2) cutting discs, 3) handle for rotation
Here is a drawing of a homemade garden auger with ø120 mm blades (according to the diameter of the used cutting disc on concrete with diamond coating). Below is a video on how to make such a tool:
Video: Do-it-yourself garden drill in a home workshop
Auger drill

Schematic diagram of the manufacture of an auger drill
Now let's figure out how to make an auger drill for drilling holes for pillars with our own hands. Such a tool does not have to be removed from the hole every 5-10 cm of passage, since the soil dump moves during rotation to the upper blades of the auger. This significantly speeds up the process, but to work with it you need a lot of physical strength Therefore, in most cases, such installations are used in conjunction with an automated drive.

All disks are clamped in a vice and the same sector is cut out for rotation
Now the most crucial moment: you need to cut out a trapezoidal sector from all the disks folded together, although these inclined ones will intersect in the center, forming an acute angle. The bottom line is that when turning each upper disk, the left edge of the cut sector should coincide with the right edge of the lower one. It is, of course, better to first do such things on paper and if everything matches, transfer the markings for cutting to the metal. The number of screw turns will correspond to the number of disks.
Attention! Do not lose sight of the fact that for docking the lower disk uses the right side of the sector, and the upper one the left. If you do the opposite, you will have to drill counterclockwise.
Now the welding work begins:
- place a disk on a plane, and place another one on top of it, but so as to overlap the cut sector, that is, the left edge of the upper one should adjoin the right edge of the lower one;
- this joint is welded by electric welding and the next disc is placed on top, acting on the same principle;
- This is how all the disks are joined and welded, making a compressed spring out of them.

The compressed spring is stretched using a winch
Finishing welding work, this homemade spring you need to stretch it to make a screw. To do this, the assembly is put on a rod and the lower disk is welded at the desired angle, for example, 30⁰, and something like a ring can be welded to the upper disk so that it hooks onto the winch hook. The rod is fixed on the floor (figure out how to do this yourself - circumstances vary) and the spring is stretched with a winch, after which the upper disk is welded. The rod is released and the entire structure is scalded in a spiral.
Video: Making an auger drill
Drill for TISE piles

Operating principle of the TISE pile drill
The drawing above shows the principle of operation of the TISE pile drill: first it makes a shaft required diameter, and at the bottom the well is expanded using a folding knife. But perhaps I will disappoint you, since in order to make such a design at home, you need, at a minimum, a workshop with tools and professional mechanic skills. To consider such a build, you will have to post a separate article, even a small one, but here we will limit ourselves to showing a video on self-assembly Borax TISE:
Video: Homemade drill for TISE piles at home
Conclusion
From this material you learned how to make a drill for drilling holes for poles with your own hands. You won’t use a drill for TISE piles to install a fence or build a foundation, so for a house an ordinary drill or, if you have something to make a drive from, an auger drill is quite enough.
This is what the new drill looks like
Surely, at least once in their lives, owners of land plots have had to deal with the need to dig holes, which are required to install pillars, supports, arches and other parts involved in the arrangement of the exterior. Narrow holes and wells sometimes have to be made in inconvenient places or difficult soils. An ordinary shovel cannot cope with digging deep holes, so the owner has to rent a drill or hire a specialist to handle the tool.
Garden auger – useful tool for a summer resident. It is light and compact, easy to transport and easy to use. Made from hard metals, it splits small stones and plant roots hidden in the bowels of the earth. It is used for digging holes, substituting it for to the right place and after doing a few rotational movements similar to a kitchen corkscrew.
Description of design
The main purpose of the drill is to dig wells to the depth of a columnar foundation. The holes are made by the cutting part, the shape of which can be different:
- In the form of a screw;
- Two-blade;
- Helical;
- In the form of half-discs;
- Multi-tiered;
- Removable or fully welded.
Some models start with small blades with  gradually increasing to the largest ones at the top. But factory-made drills do not always turn out to be functional in practice, because the tool may not penetrate into the ground to the required depth or its attachments may not coincide with the expected diameter of the hole. And although the price finished product is small, it makes sense to learn how to make it yourself. The technology for creating a drill at home is simple and inexpensive; it is only important to decide on the configuration of the model.
Let's look at a few differences different designs responsible for the functionality of the tool:
- Baking powder. The item looks like a pair inclined planes or auger. In the second case, a spiral-shaped knife is located on a rod.
- Ground receiver. Soil accumulates in the so-called storage facility. The part facilitates work when drilling holes with a diameter of 35 cm.
- Shaper plow lower extended zone. The use of the structure helps to strengthen the columnar foundation, which is important when constructing massive structures.
The bolted connection of the drill secures the auger part to the handle. The length of the assembled product slightly exceeds 1 m, thanks to which the tool makes holes up to 700 mm. If you need to dig holes of greater depth, the structure can be supplemented with a connecting tube (500 mm). The element looks like a part with a bolt and nut, the location of which is the end sections of the pipe.
Manufacturing and selection of components
When making a hand drill for digging wells under pillars with your own hands, there are usually no difficulties. But during the production process, the craftsman will need parts and materials from which the finished product is made.
Parts List
- Bolt and nut M20
- 2 discs with a diameter of 100 and 150 mm
- Tip and drill 20mm diameter
- Three pieces of pipe: two - 500 mm each and one piece of 400 mm. Additional parameters: wall thickness – 3.5 mm, outer diameter – 40 mm.
Necessary materials
The requirement for the wall thickness of iron pipes (3.5 mm) is explained by the strengthening of the product and the ability to work in hard soil. Discs for work can be removed from the circular saw or made independently. They will need metal sheets With minimum thickness 3 mm.


Tools that will be useful:
- Hammer and grinder
- Welding technology
- Locksmith kit
- Electric drill with metal drills
- Sharpening wheel for cutting elements.
If there is no tip with a drill, they are replaced with a drill with a tapered shank. The diameter must match the screw part. To avoid injury in home production use soft bicycle handles.
Step-by-step description of tool manufacturing

Application of protective coating
To prevent corrosion processes, all parts of a hand drill made for installing poles with your own hands must be cleaned with sandpaper, treated with a phosphating solution and primer. After this, the product can be painted.
Already during operation, after each work, the drill must be disassembled to clean the bolted connections from dust and coated with waterproof lubricant. Don’t be lazy - careful care of the tool prevents jamming of bolted joints and guarantees long-term operation of the entire structure.
Methods to improve tool performance
In the process of work, builders have to deal with an abundance of roots of various vegetation lying in the ground. The sharply sharpened edges of the knives make the drill easier to operate. Also, for ease of work, you can cut teeth on the sloping part of each blade or round off the cutting area.
Ways to improve the design

Drill with replaceable cutters
The first “highlight” will be the manufacture of a drill with replaceable cutters. Thanks to this tool, the master will be able to dig holes of any diameter. In addition to making spare elements, it is important to provide a method for attaching them to the collar. The easiest way to connect products is with two welded iron plates. In relation to the plane of rotation, welding is performed at an angle of 20°.
Holes for bolts are drilled in the blades and mounting plates - 2 pieces each. on every detail. The cutters are screwed with M6 bolts with washers and nuts. To prevent the bolts from interfering with drilling, they are inserted with the threads facing up.
The second way to improve the drill is to enhance the functionality of the lower end of the driver. A narrow plate of 10 x 2 cm is cut out of sheet iron and ground into a cone with a grinder, giving it the appearance of a point. No cuts are made at the end of the knob - a turned plate is inserted into this part of the product, welded and flattened. The result should be something like a peak.
This is how the pike is made differently. The plate is cut longer (about 17 cm), heated and rolled into a screw (like a corkscrew). Work on creating the peaks continues, as in the first version.
Under the auger, you can use a drill of a suitable diameter that can handle wood or metal. An unusual tool can easily be inserted into the ground and drill it to the desired depth without problems.
 Third tip useful for builders working on compacted deep soil layers. If a small flat cutter is welded between the peak and the cutter, the device can be used to perform preliminary loosening of the soil and additional centering during drilling. To make this part you will need 2 plates measuring 8 x 3 cm. It speeds up the work process.
Fourth: you can get friezes from grinder discs designed for 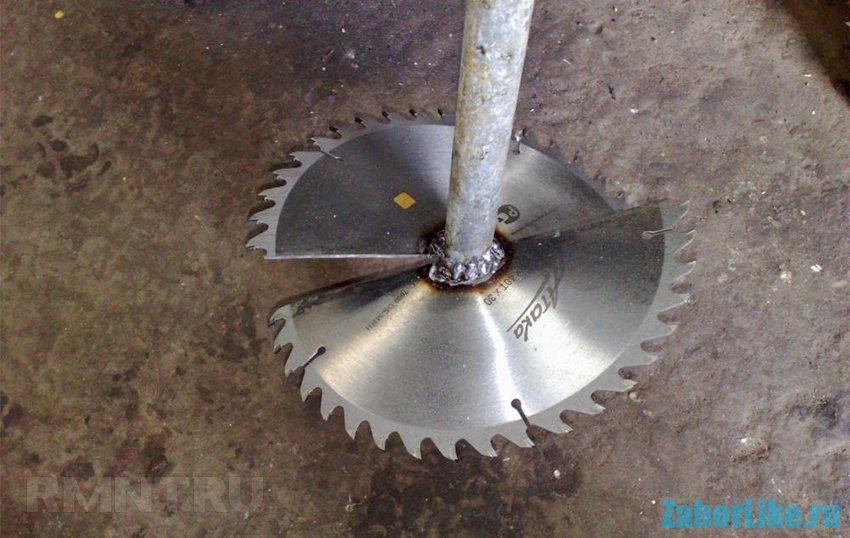 stone processing. The circles are cut along the radius line and the central hole is expanded, adjusting the hole to the diameter of the knob. Its extension with the ends moving apart in different directions gives the appearance of a screw. All that remains is to weld it, as described above.
Making a cutter can be easily done from a circular saw blade. The sharp teeth of the modernized model will easily cut through unruly roots of even the strongest vegetation. What you choose for yourself, decide for yourself. In general, making a drill is not difficult and requires minimum costs. The whole process takes about 2 hours.
DIY hand drill
The operation of a universal hand drill will be more productive if the auger blades are removable and not tightly coupled to the stand. And if you supplement the product with round blades of various sizes and configurations, the drill will become a truly multifunctional device that will be useful to a person in many household matters.
Experienced craftsmen say that blades with a diameter of 9 and 12 cm do an excellent job of drilling holes for water wells and seedlings, arranging holes for the construction of greenhouses and for installing tunnels for laying underground communications. Large knives with a diameter of 17 and 25 cm will serve rational decision for those who fill fence supports and small buildings, arranges compost pits and plants plants with powerful rhizomes, builds wells and surrounds the area with a fence.
Step by step photo guide:
To maintain a given angle of inclination of the lever, which will serve as a handle, when connecting the part to the stand, it is recommended to use a welding clamp. The handle must be attached to the stand itself at a right angle.
And one last piece of advice: on the eve of drilling, loosen it with a shovel upper layer soil. Then the tool will go into the ground easier. We hope our recommendations will help you, without any extra effort, make a functional drill that will last for many years and bring many benefits to your household.
The construction of a full-fledged columnar foundation is a complex job that requires experience and professional tools. To drill wells, you can use special equipment or make a drill yourself. This is especially true for large volumes of construction.
Drill design
drill application technology
The drill is designed to form wells in the ground to the depth of installation of a columnar foundation. For this purpose, the design provides a cutting part, which can have different shape. It is important that during rotation the soil is excavated and accumulated in the receiver.
At the first stage, you need to choose the right configuration. There are several differences in design that will subsequently determine the functionality of the drill:
- Baking powder. It can be in the form of two inclined planes or in the form of an auger - a spiral-shaped knife located on a rod.
- Availability of a soil receiver. It is designed to collect soil and remove it after filling. Convenient for forming wells large diameter from 35 cm.
- Plow for forming a lower expanded zone in the soil. This is necessary to strengthen the future columnar foundation. The element is required when constructing buildings with a large mass.
The manufacture of a drill should begin with drawing up a drawing. It directly depends on the design requirements.
Types of drills
One of the determining criteria is the shape of the cutting planes and their location on the rod. If the amount of work is relatively small and the diameter of the well does not exceed 20 cm, you can make an auger model.

This design is relatively simple to manufacture, and there is wide choose cutting part material. However, the features of its use should be taken into account:
- To remove soil, it is necessary to remove the drill from the well each time.
- It is not possible to form an extended area at the bottom of the foundation.
- When filling the auger planes with soil, great efforts will be required to remove the soil.
An alternative to this model is a device with replaceable blades. They are installed on special mounting platforms located at an angle relative to each other.

Replaceable knives
 This shape allows you to make wells of different diameters using the same drill. It should also be noted the minimal labor intensity of manufacturing and the possibility of installing new cutting parts to replace failed ones. The disadvantages of a product with replaceable blades are the same as those of the auger model - low productivity and the ability to drill wells with a standardized diameter along the entire length.
A drill whose cutting part is made in the shape of a cylinder does not have these disadvantages. Its lower part has two planes located at an angle. The soil is collected in a receptacle that has sufficient capacity.
A special feature is the mounted plow, which is designed to expand the diameter of the well at its base. It can be installed on all of the models described above, but it is for this particular plow that it is most effective.
Self-production
After selection optimal scheme Borax, you can proceed directly to its manufacture. For this you will need Consumables, welding machine and cutting tool- or a hacksaw for metal.

The simplest manufacturing option is a scheme with interchangeable blades. As their source material production, you can take metal discs of various diameters - from 160 to 350 mm. The size of the internal mounting hole must be different. This is the main advantage of replaceable blades.
For production you will need following materials:
- Barbell. It is made from a round or square pipe. They weld to it mounting plates for installing two halves of disks, as well as a platform for attaching the handle.
- Handle. Made from the same pipe as the bar. For connection, it is best to weld the flange onto the 4 mounting bolts.
- Disks. Their thickness must be at least 2.3 mm. This is necessary for structural rigidity. They are cut into two halves, in each of which mounting holes are made for attaching to the plates on the rod.
The angle between the planes of the disk halves should be 30°. This will ensure optimal cutting of the soil layer without much effort. If the structure is manufactured with a plow, it is recommended to order it cutting part separately or purchase a ready-made model.