Puttying of gypsum board structures.
In what cases is putty necessary?
Creating structures from plasterboard can be worn by the most different character, but in all cases this material needs putty.
Some examples of the use of this finishing material for walls should be given:
- Wall decoration in residential premises with subsequent decorative treatment.
- Creating ceilings in various rooms.
- Creation of structures performing various household and decorative functions.

The room is ready for puttying.
In all of the above cases, you must know how to putty drywall and process all the seams that form where the sheets join.
Why putty drywall?
You need to understand that drywall consists of sheets of cardboard, between which a layer of gypsum is laid. If you glue wallpaper directly onto drywall, then later it will no longer be possible to replace it with others. The glue will saturate the cardboard layer, and the wallpaper cannot be torn off in any way.
In the case of applying paint or decorative plaster, putty is even more in demand. Even the slightest flaws in the structure and surface are visible under these types of finishing materials, so it must be prepared for painting. The rest of the article will discuss how to properly putty drywall.
Ceiling or walls
It must be said that the principles of puttying a plasterboard ceiling are not much different from the same process in the case of walls. The only difference is in this case is the complexity of the work. It is clear that working on the ceiling will be associated with great inconvenience and its implementation will require more strength and skills. Whereas working with walls will be easier and will not take as much effort.

Preparing material for putty
Start
- Before starting the finishing putty plasterboard walls, it is necessary to carry out some preparation of the material.
- From the entire surface of the drywall you need to sweep away or wipe off dust and construction garbage.
- After this, it is necessary to prime the entire structure.
This measure will create a thin crust on the surface of the cardboard layer, and it will absorb less moisture. Only after the primer has completely dried can you begin to putty.
Advice: the primer should be applied before each layer of putty, that is, if the surface is puttyed again, then it is necessary to go through the previous layer with a primer.
Choice of putty
First of all, you need to calculate the approximate amount necessary putty. You need to purchase this material with some reserve, but you shouldn’t take too much either. Drywall putty in most cases is a dry mixture that must be diluted with water. It should be noted right away that the result should be a very liquid mixture like sour cream, so the material consumption is small.
Tools
If everything is quite simple with the material, then with the choice of tools the situation is a little more complicated. For this work you will need both power and hand tools.
A list of them should be provided
1. A hammer drill with a nozzle for stirring solutions.
2. Several types of metal spatulas:
- wide
- average
- narrow.
3. Sandpaper or a special grouting abrasive mesh.
4. Construction knife.
5. Roller or brush for applying impregnation.
6. Metal building rule.
7. Self-adhesive “serpyanka” tape for processing seams.

Puttying tool.
Solution
How to prepare the solution
- In order to make a high-quality putty mixture, you need to carefully read the instructions on the material itself.
- Traditionally, putty is diluted as follows: take a bucket, the size of which depends on the volume of work, and fill it a quarter with water.
- The putty is gradually poured into the water in portions and mixed.
- The mixture should be thick enough to resemble sour cream.
To prevent lumps from forming, mix the solution using a hammer drill with a special attachment. Now we have to leave ready solution on 3-5 minutes and mix it again. After this, the entire resulting mass must be worked out, since it is no longer possible to beat the putty again - it will lose all its properties. Since the price of this material can vary, you should be careful not to waste it in vain.
Tip: if you use to mix the solution simple drill or a hammer drill, then it is necessary to put it in reverse mode and at minimum speed so that the vortex flow emanating from the mixer is not upward (clockwise) but downward (counterclockwise). Then the putty will not scatter all over the walls.
Seam processing
Preparing for work
- Before you begin to putty the walls under wallpaper or other finishing material, it is necessary to go through all the seams of the structure with a special mesh tape - “serpyanka”. This must be done without fail, since such a measure will strengthen the entire structure and prevent the formation of cracks.
- The mesh is sold in convenient rolls and is self-adhesive so it is easy to apply.
If you take your time and are careful, this work will not take much time; instructions are given below:

Application of serpyanka.

Applying putty.
You should also start putting putty by treating the seams and screws; these places are treated first. Sometimes craftsmen immediately putty the entire surface once and immediately rub it down. This approach generally has its place, but if there is a desire for quality and reliability, then it is better not to rush.
Putty
How to apply putty
- After the putty areas of the seams and screws have dried, you can begin next stage. Use a large spatula to scoop up a portion of putty.
- Place it vertically on the drywall surface and begin to stretch the putty.
- You need to have two spatulas in your hands, a wide one and a second one narrower, so that you can pick up excess putty.
- The movements of the spatula should be wide and sweeping, evenly distributing the putty over the surface.

Putty.
I must say that this DIY work requires some efficiency. You can stretch the surface putty in just a few steps.
Nuances
To make the surface more even, you can walk over putty. metal rule, you just need to accurately and evenly distribute the pressure. After the entire surface of the drywall has been covered with putty, you must wait one day. After checking that the surface is dry, you can carefully cut off the traces left by the spatula using a small metal spatula.

Subtleties of the process.
Please note: many people think that after applying putty they should not open the windows, since a draft can spoil the result of the work - this is not true; the putty is not afraid of drafts and the room can be safely ventilated.
Grout
To bring the surface to a perfectly smooth state and prepare it for decorative processing you need to wipe it down. This is done using sandpaper or a special abrasive mesh.
- You need to evenly cover the entire surface with sweeping movements.
- Then wipe off the resulting dust with a dry, clean broom.
- Complete drying of the putty surface can be determined by its uniform color without the presence of dark damp spots. See photo:

Grouting the ceiling.
Advice: if the ceiling is rubbed, then do not forget to wear safety glasses and a mask to protect yourself from dust.
Joints and corners
Corners and all kinds of joints that are present in any plasterboard structure deserve special attention. To strengthen such connections, special ones are commercially available. metal corners various modifications. To internal corner The design of the plasterboard was reliable; a special inner corner was placed in it before puttying.
It can be secured with screws, or directly with putty. For external corners special decorative round corners or metal corners are used. In order to understand how to putty a plasterboard arch, it must be said that a wider plastic flexible corner is used here. It is also applied directly under the putty.
Decorative finishing
When all the stages of putty are behind you and the result is a perfectly flat ceiling or walls, you can begin decorative finishing. If you subsequently want to stick wallpaper, no matter the ceiling or wall, the surface must be treated. You can cover the entire surface with a primer, or you can use wallpaper glue. But it should be noted that such work should only be done on a completely dry wall.
Conclusion
If there is a desire to create high-quality surface under finishing, you should approach the putty process with all responsibility. A careful selection of materials and tools, as well as a diligent attitude to work will allow you to achieve good result. The video in this article will answer all remaining questions.
Arched openings have become popular today. They are erected in any apartments and houses, regardless of the size of the premises. Therefore, the question of whether it is easy to build a plasterboard arch with your own hands is one of the most frequently asked questions today.
That is why there is a need to understand this issue and consider the technology so that it can be used in the future as step-by-step instructions.
First of all, you need to prepare for the process itself, that is, purchase necessary materials and decide on the shape of the future arched opening. Why is shape so important?
The point is that an arch is not just a semicircle. That is, it is a semicircle, but this particular shape is the simplest.
Increasingly, our ordinary people, despite the difficulties and financial expenses, give preference to unusual designs. Beautiful, non-standard forms are at a premium today. They are difficult to manufacture and install, but even this does not stop many owners of houses and apartments.

Therefore, plasterboard arches are currently one of the most popular interior design elements. In addition, it should be noted that installing a plasterboard arch with your own hands is a simple process. And, as practice shows, even a beginner who wants to not only learn how to work with drywall, but also save a little can handle it.
Necessary materials
Now let's turn to the materials for the arch.
- Drywall. The question of which drywall is better will probably not be posed correctly here. Most likely, it is necessary to determine what thickness the sheets will be just right. As experience shows, plasterboard arches are practically not loaded with anything, so even ceiling plasterboard, although a thickness of 9.5 millimeters would be normal.
- Metal profiles. Can also be used wooden slats, but creating a semicircle from them is quite difficult. Required here great experience working with wood, so metal profiles are an ideal option.
- Self-tapping screws and plastic dowels. These are standard products.
- Putty and sickle tape. The first is intended for leveling plasterboard surfaces, the second is for sealing and reinforcing seams. Let's add it here a large number of primer, with which it will be necessary to treat all surfaces of the arched structure.
Tools

But you will need a lot of tools. The most important thing is that you know how to work with them:
- hammer drill and screwdriver;
- metal scissors, a hacksaw (you can use a jigsaw) and a construction knife;
- level, tape measure and pencil;
- paint roller or brush.
Stages of arch construction
As mentioned above, first of all, you need to decide on the form. Let's not bother ourselves complex structures, we will consider an ordinary simple arch. For example, which can be built in the hallway or in the kitchen, where the openings have a standard small size (width).

So, first of all, the height of the arched opening is determined. Everything will depend on how tall the owners live in the house.
If they are of average height, then you can reduce the doorway by a couple of tens of centimeters. If the owners are tall enough, then it is better not to build an arch, since reducing the height of the opening can lead to inconvenience in passing through it.
Frame installation
Once the shape and dimensions have been decided, you can begin construction. metal frame. To do this you will need a profile from which you need to make a letter "P".
Note! The top horizontal crossbar should be equal to the width of the doorway, the letter posts should be equal to the height of the arch.

To do this, you need to make wedge-shaped cuts on the profile on both sides along the slats, in which the profile will bend. Be sure to prepare two of these elements, because you will have to install them on each side of the doorway. If everything is ready, then you can install them and fasten them to the opening with self-tapping screws.
There is one small nuance– be sure to shift the structures slightly inside the opening, thereby leaving space for drywall (the size of the displacement is the thickness of the drywall sheet).
Both the top crossbar and vertical racks. The more fasteners, the better.
Now you need to make an arched frame, that is, a semicircle. To make it, you can use a special metal corner; it can be solid or perforated.
To do this, you need to make wedge-shaped cuts on it, with small increments along the length, along which the profile can easily be bent into any shape, and even more so into a semicircle. The length of the profile used will depend on the length of the semicircle.
It’s okay if this element turns out to be a little larger - you can always adjust it to the required size. But if it turns out to be smaller, then you will have to make a new one (by the way, there should also be two such elements).

Now you can start installing them. To do this, a semicircle is installed along the edges of the U-shaped structure, an arc is formed required height and attach it to it with self-tapping screws.
To make the structure of the entire frame more durable and rigid, it is necessary between the two installed metal arched elements attach cross members from the same profile. For greater reliability, the arches themselves are attached to the U-shaped structures with small jibs.
In words, all this may seem complicated. But we assure you: you will not have any difficulties. Don’t let the large number of names scare you: all these elements are made from profiles and corners.
Arch frame cladding
The entire structure now needs to be covered with plasterboard. How to sew? This is a serious question because you will now need to be very careful. First of all, you need to cut out the arch profile from the plasterboard sheet.

How to bend drywall for an arch quickly and easily
There are several options here, each of which is interesting in its own way. They are used by masters, and each specialist often finds his own method. But the basis of everything is the size of the arched opening.
- If the doorway is small, then one solid side of the arched opening is cut out of a sheet of plasterboard.
- If the opening is large enough and one sheet cannot cover its width, then you will have to cut the arch out of two parts and join them in the center of the structure. Then the latter will have to be strengthened with a vertical central cross member, on which the two parts of the plasterboard arch will meet.
- Let's look at the first option as the most common. A simple way is to place a frame, for example, cardboard or thin plywood on the wall, make marks on it, that is, transfer its shape. This is a kind of template that is laid on a plasterboard sheet, and the arch profile is cut out from it.
- The second method is more difficult. To do this, draw an arch profile on drywall with exact dimensions frame. And already pruning is done on it.

By the way, the question of how to cut and with what is also a common question. There is no need to focus on this Special attention, because gypsum craton is easy to process. Therefore, an ordinary hacksaw for metal will cope “excellently” with the task assigned to it.
Now there is one more element that needs to be cut out - this is the ceiling of the arch. Coping with this task is much easier.
The length of the ceiling will be equal to the length of the semicircle - you know it. And the width will be equal to the width of the doorway.
And now - a very important question: how to bend drywall for an arch? In principle, there is nothing complicated here either.
To do this, start cutting the prepared strip crosswise on one side. construction knife to several areas. The more of these sections there are, the easier the strip bends.
Please note that only the cardboard layer needs to be cut. The gypsum layer must not be touched.
After this, you need to moisten the plasterboard strip (not too much) and bend it to the shape you need. After drying, the element will not lose either its strength qualities or shape. This is the advantage of drywall.
Now you can proceed to installing the prepared plasterboard elements. Installed first side elements. They are attached to the frame with self-tapping screws.

Please note that the distance from the edge of the drywall to the fastening point should not be more than 1.5 centimeters. The distance between the screws will be determined by the range of 8-12 centimeters. The screw caps must be deepened by 0.5 centimeters.
Now you can install the ceiling. All dimensions are identical to those described above.
Arch finishing
Now you can move on to finishing work.
- The entire surface of the plasterboard structure is primed. Be sure to wait until the primed surface dries.
- Next, the seams and joints are sealed. Basically, these are the joints at the corners where the side elements connect to the ceiling of the arch. Therefore, it is recommended to stick self-adhesive reinforcing tape on them and carry out the process of puttying the joints.
- After drying, you can putty all surfaces. And it will be better if you apply two layers to even out side surfaces arched opening with wall surfaces. This is about the question of how to putty correctly. For this you can use finishing ready-made mixtures or dry solutions.
- After the putty has dried, you need to go over the arch with fine-grained sandpaper to sand it a little, preparing it for painting.
- The next stage is another primer, with the help of which the putty surface of the arch is strengthened and a layer with a high adhesion rate is created.
- After the primer has dried, you can begin painting.

Now - to the questions, what to paint with and how to paint? Everything will depend on how the walls of the room will be painted. Usually this water-based paints. They fit best on plasterboard structures.
The process of painting with water-based emulsion is based on applying the material “wet”. That is, there is no need to wait for the previous applied layer to dry, as usually happens with other types. Therefore, the process of painting a plasterboard arch in an apartment is quick.
Sometimes designers offer to complement the opening small elements and accessories. For example, backlighting.
Such indoor plasterboard arches with lighting are most often used in the construction of partitions with through niches. It's easier to do the wiring here.

Conclusion on the topic
It is difficult to perceive verbal instructions that are not confirmed by photos or videos, so we have posted all the video materials especially for you on our website. All this together is a kind of master class for beginners. Read, watch, learn and be sure to use the acquired knowledge and information in practice.
Content:
Any room sooner or later requires renovation, and here the design question becomes extremely relevant: combine rooms or zone the space, or maybe make an arch instead of a standard opening? Speaking of the arch... It's very interesting element a design that will not only look beautiful, but also create a feeling of chic. At first glance it may seem that making an arch is difficult, but this is absolutely not the case. You just need purpose, patience, useful tips and great desire.
How to make an arch from plasterboard - Photo 1
How to make an arch
The first question that needs to be resolved, in fact, is how to make an arch with your own hands? In the world of construction, there are many ways to make this a reality, but the most popular material for construction is interior arch is drywall .
To make an arch from plasterboard you will need the following materials:
- A sheet of drywall intended specifically for building arches (its thickness should be 6.5 mm).
- Reinforced arched corners in the amount of two pieces.
- Plasterboard sheets (their thickness is 12 mm) in the amount of two pieces
- Rack profile
- Guides in the amount of 4 pcs.
- Flexible self-tapping screws.
- Jigsaw (as a last resort, hacksaw)
- Screwdriver or screwdrivers.
How to make an arch from plasterboard video
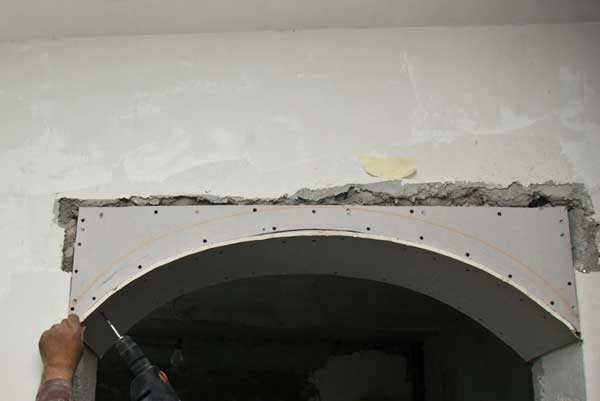
Now you can start building the arch. First, measure the width of the doorway, take 2 sheets of drywall and adjust their dimensions according to the measured data obtained. A semicircle is applied to each sheet the right size, and then very carefully cut out the arch using a jigsaw. The result should be two identical sheets.

Making an arch from plasterboard with your own hands - Photo 2
Prepare the walls and ceiling in advance where the plasterboard arch will be installed, drill required amount holes for plastic dowels and attach metal guides to them using self-tapping screws. In this case, you need to retreat 1.5 cm from the edge.

How to make an arch from plasterboard with your own hands, attaching sheets - Photo 3
Now you need to attach sheets of drywall with cut out arches to the guides. In this case, “flexible” metal screws, 32*25 mm in size, are used, which are placed 10-15 cm from each other. In this case, you need to make sure that the head of the screws is immersed in the drywall.
We fix the plasterboard sheets for the arch with our own hands - Photo 4
The next step in creating a plasterboard arch is to measure the length of the arch of the arch. According to the data obtained, the guide profile is cut off, giving it the contour of an arc, cuts are made on it, and then securely fixed by placing it in drywall.
We make an arch from plasterboard between the rooms - Photo 5
To give the plasterboard arch strength, on the arch with inside, using self-tapping screws, attach jumpers made from a rack profile to the metal guides.
Now you need to determine the size of the arch arch, and then, based on the numbers, cut a strip of arched plasterboard. It should be understood that the width of the strip should be the same as the width of the doorway.

We cut the profile for the vault of the plasterboard arch - Photo 6
The cut strip must be bent, observing the radius of the future arch, and then attached to a metal frame using self-tapping screws.
Advice! To make arched drywall bend well, you can moisten it with a little water.
That's it, the plasterboard arch is built and now all that remains is to finish it.
How and with what to finish a plasterboard arch
For finishing an interior arch, the material can be varied, but we will consider the most common one, which you can use for independent work.
Decorative plaster for finishing the arch
In this case, finishing begins with plastering the plasterboard that makes up the arch. This will make the surface of the arch perfectly smooth. The plasterboard is coated with a primer on top, which will ensure excellent adhesion of the plaster to the surface on which it will be applied, which means the finishing of the plasterboard arch will last a long time.
Finishing a plasterboard arch with plaster and painting - Photo 9
We made an arch and finished it with plaster and covered it with paint - Photo 10
Beautiful plasterboard arch between rooms - Photo 11
After the time allotted for polymerization of the primer has expired, plaster is applied. If there is a need to give it relief, then a sponge or spatula is used for these purposes. When all layers have dried well, paints intended for painting plaster are applied.
More details about the consumption of gypsum plaster
Wallpapering plasterboard arches
This method of finishing an arch is the simplest. All you need is glue, the wallpaper itself, a wallpaper spatula, scissors and a pencil with a ruler.

Finishing a plasterboard arch with wallpaper - Photo 7
Before you start wallpapering a plasterboard arch, you need to prepare thick glue. In this consistency, the glue will not set quickly, which will allow the strips to be freely moved to match the pattern.
They begin to paste over the arch in in a certain order. First of all, a sheet of wallpaper is glued to the wall near the arch. Then the next strip is glued, leaving it hanging from the arch. The excess sheet is cut to the size of the arch, leaving a gap of 2.5 cm. The latter will need to be cut in increments of 2-2.5 cm, bent to the slope and firmly glued to the plane. The top of the wallpaper will need to be ironed with a wallpaper spatula. Continue working in this manner until the entire arch is covered with wallpaper. Similar manipulations are carried out on the other side of the arch.

Wallpapering an arch - Photo 8
To finish the vault of the arch, you need to cut a strip slightly longer than itself. This will allow you to match the drawing. Moreover, the width of the cut strip must correspond to the width of the opening. Now attach the strip to the side walls of the opening, as well as to the arch.
Decorative stone finishing
This method of finishing the arch will retain its original appearance for the longest time, but at the same time it is durable. One disadvantage of this method is the difficulty of finishing the arch with stone on the inside, as well as the vault. But at the same time, strict requirements are not imposed on the material used in installation, since the stones do not require smoothness.
When choosing a material, you must remember that the stones must be light enough so that the arch does not fall apart under their weight.
Arch finishing decorative stone- Photo
Decorating the arch with decorative stone - Photo
Decorating the arch with decorative stone - Photo
Finishing an arch with decorative stone begins with filling the surface of the arch and priming it. After this, you need to prepare a solution intended for working with stone. Its composition can be varied and depends on the facing material used.
The very first stone needs to be placed at the junction of the arch opening and the wall, leveled and pressed firmly. Levelness is checked by level. Then the remaining stones are laid. Those that will be located inside the arch and on its plane must be glued with an overlap. This will make your job easier because you won't have to fill the corner again.
Decorating the arch with decorative stone - Photo
Decorating the arch with decorative stone - Photo
Decorating the arch with decorative stone - Photo
Decorating the arch with decorative stone - Photo
The stones placed along the arc of the arch will need to be cut according to the radius of the arch, and then carefully sand the cut edges using a file. Pruning is performed grinder corner type or with wire cutters.
When all the stones are laid, the seams between them will need to be sealed using a solution specially designed for this. Only in this case it is necessary to prevent the latter from getting on outside stones.
(for sealing all joints of gypsum boards and places where screws are screwed in).
Finishing putty Vetonit LR +
(for puttying gypsum boards).
Primer KNAUF - Tiefengrund
(for priming all gypsum board sheets before each new layer of putty).
(self-adhesive fiberglass tape).
You can find out more about the profile for drywall by clicking on the link
We also need the following tool:
- Narrow and wide spatulas.
- Wide brush.
- Roller with telescopic handle.
- Grater and mesh for grinding.
- Phillips screwdriver or screwdriver.
- Scissors.
- Staples and construction stapler.
- Mixer and drill.
- Roller tray.
You can view all photographs of materials and tools by clicking on the link below.
Let's start puttingtying the plasterboard arch
It is necessary to inspect and check the entire plane of the drywall before starting work, check the integrity of the sheets, and use any spatula in the places where the screws are screwed in to secure the drywall to the guides. The screw should not interfere, but if the spatula gets stuck on one of them, then it should be screwed inward by about 1 or 2 mm relative to the plane of the drywall. There may be other defects, if possible, eliminate them!
I. Apply primer to the arch
- Take the KNAUF - Tiefengrund primer without opening the lid, mix by shaking the container.
- Take the roller tray and pour the primer into it, after opening the lid.
- Next, take a roller with a telescopic handle and a brush, coat all joints and places where the plasterboard is attached.
- After applying the primer to the drywall sheets, you should wait a little for absorption.
II. We putty all the joints of the gypsum boards and the places where the screws are screwed in using Knauf - uniflot
- After this, take a small container for mixing, pour Knauf-uniflot putty into it (do not stir a large amount of the mixture at once, as it sets quickly! Practice with a small amount first). Stir using a narrow spatula by adding water until a homogeneous mass without lumps is obtained. The mass should not be liquid or watery, it should be easily applied to drywall and not fall off!
- Apply the putty, inserting it as deep as possible into the joint of the gypsum board, coat it on top and then apply self-adhesive fiberglass tape, pressing it into the putty and then leveling it using a 15 cm wide spatula.
How to putty a plasterboard arch
Buy putty on a plasterboard arch in Petrovich - https://goo.gl/GU7ja2 How to putty on a plasterboard arch! Installation...


III. Putty using Vetonit LR +, first layer
- Take a larger container for stirring and pour into it finishing putty Vetonit LR + (do not stir a large amount of the mixture at once! Practice with a small amount first). Stir using a drill with a mixer attachment by adding water until a homogeneous mass without lumps is obtained. The mass should not be liquid or watery, it should be easily applied to drywall and not fall off!
- Now you can apply it to the gypsum board. For best results when puttingtying the surface, use a bright light bulb.
- The first layer of Vetonit LR + putty should give the surface a smooth appearance as much as possible, but if this cannot be achieved, then points V and VI are for you!

IV. Apply the primer to the arch (the stages of applying the primer are described above).
V. We putty using Vetonit LR +, the second layer (the putty method is described above).
VI. Apply the primer to the arch (the stages of applying the primer are described above).
After that, you can start hanging wallpaper or painting the arch!
Thank you for your attention!
 Interior decoration of premises with plasterboard is often accompanied by the problem of how to putty plasterboard. After all, in fact, it is absolutely flat and there is nothing to level on it. However, if you delve into the intricacies of the process, the characteristics of the material are revealed that force the master to carry out this process. You have to putty the ceiling, walls and all additional structures such as boxes, arches and columns.
How to putty plasterboard walls
Before answering the question of how to putty plasterboard walls, you need to determine what is required for this. First of all, you will need putty. There are several types of it, which are selected depending on the purpose of the room. For rooms with high humidity select a composition based on cement or polymers; for the rest, a mixture based on gypsum is suitable. Vetonit putties are a good finishing material.
They all dry quickly, so preparing a large volume of the mixture is not recommended. The preparation recipe and proportions are usually given on the packaging of the dry mixture, but a ready-made solution, which is sold in plastic containers, can also be used.
 Before puttying, the walls are treated with primer. Its drying time is about 12 hours. It is not necessary to completely treat the entire surface. The process depends on the subsequent decorative treatment of the walls. It is important to carefully process the edges of the gypsum board ( plasterboard sheets), especially if they are cut. Such joints require additional preparation.
Before priming, the edges are cut at an angle of 45 degrees to ultimately form a joint with a rectangular gutter. It is this that is filled with putty, which is leveled with a wide spatula. Also, the joints of the gypsum boards are subject to putty using screws. Their cap should not protrude beyond the gypsum board plane. If it is deeply recessed, the screw will need to be replaced. The screw heads are puttied in two layers. The first is applied from top to bottom, the second - from right to left or vice versa.
How to putty a plasterboard ceiling
The ceiling is puttied if it is to be covered with plaster or painted. If it will be mounted suspended ceiling, then this procedure is not necessary. The preparation process is similar to working with walls. In this case, the putty is applied in two layers. First, the joint is filled with putty, leveled, then a second one is applied and re-leveled. It is also recommended to use serpyanka mesh. This painting mesh comes in two types: regular and adhesive.
Video on how to properly putty a plasterboard ceiling
The second is glued to the prepared surface at the joint of the plasterboard, after which it is treated with putty. The first one is attached after applying the first layer of the mixture. The mesh is pressed down flat surface spatula, while simultaneously leveling the putty underneath. After this, the next layer is applied, which masks the fiberglass mesh itself and smoothes the transition between it and the gypsum board. Instead of a grid, it is allowed to use masking tape on paper based or paper tape glued to PVA. Anyway upper layer putty should be as thin as possible, no thicker than 1 mm.
How to putty corners of drywall
Particular difficulties arise when processing corners. Internal and external corners are processed using two different techniques. Internal corners are processed by gluing a strip of mesh to each corner plane, after which the joints are leveled with a second layer of mortar.
Aluminum profiles are used to process external corners. Most often, simple corner perforated profiles are used, but there are also profiles equipped with a sickle tape on each plane. Such profiles are attached to a still damp layer of putty and pressed in from above. Excess solution is distributed from above to level the surfaces. A layer of putty is also applied on top.
Video on how to properly putty drywall corners
If the corners have a rounded shape, for example, when forming curly cutouts, sides and arches, do not use metallic profile, but plastic. It fits tightly to curved lines and adheres easily to putty. If there is no such thing, use the same one aluminum profile, but in the place where the trajectory changes to a curve, transverse cuts are made on it. If the angle has complex shape, then trimming is done on both planes, but more often trimming is required only on one side. The frequency of cuts varies based on the trajectory.
How to putty drywall for painting
If drywall is puttied before painting, this process is treated with the greatest responsibility, because Even under a thick layer of paint it is difficult to hide the slightest errors. The disadvantages are most noticeable when finely dispersed paint, such as acrylic, is used.
Video on how to properly putty drywall before painting
In this case, it is impossible to do without fiberglass mesh at the joints in order to obtain an imperceptible transition between different gypsum boards. The use of a mesh will avoid cracking of the solution. All irregularities, including those resulting from unsuccessful installation or unloading, namely cracks, chips and depressions, must be puttied. After the solution has dried, the surface is sanded. To do this, use 0-grit sandpaper. Large grain sandpaper may damage the surface.
Do I need to putty drywall?
The need to putty drywall is determined by only one factor - decorative properties finishing coating. If, for example, you use it as a visible layer ceramic tile, then this process can be omitted. But if another type of coating is used such as wallpaper, paint or decorative plaster, its use will be mandatory.
Putty allows you to make from separately sewn gypsum boards monolithic wall, regardless of the characteristics of its shape. At the same time, it protects them from penetration under the outer layer of moisture, which can destroy it. Also, in addition to the joints, the heads of the self-tapping screws connecting the wall, frame and gypsum board must be puttied, because During operation, they can cause rust to appear on the surface. Well, how to putty drywall is described above.
- Spatulas – large for working on open areas and small, for processing seams;
- Starting putty, finishing putty and for sealing seams;
- Reinforcing tape;
- Electric drill with a nozzle for stirring the solution.
- Primer.
Take a small portion of putty from a container with ready-made composition, or prepare a limited amount from a dry mixture. Using a spatula, apply thick strokes between the screws and smooth them, carefully pressing the solution into the perforation holes to ensure sufficient adhesion to the base. In this case, the mixture should also lie on top of the corner, grabbing it to the surface of the drywall.
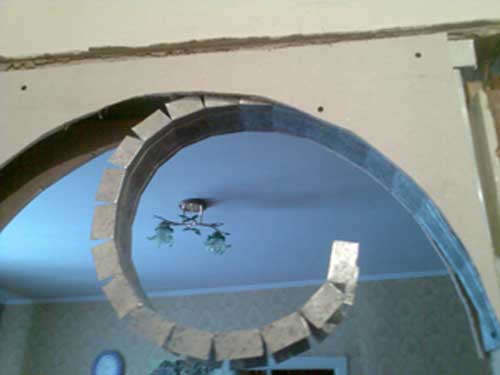
When creating a mixture it is necessary achieve a uniform consistency, for this, use a drill with a mixer attachment, apply the solution with a small spatula onto a large one, and then rub it over the surface of the plasterboard. A plasterboard arch does not have to be an arch in the standard sense; it can be installed not only in doorway, but also, for example, in the middle of the room, she makes the interior design unique. We glue the edge of the plasterboard arch with serpyanka, or use a special arched corner and fasten it with a construction stapler. It is necessary to strictly ensure that the surface to be finished with putty does not protrude as a bump and is at the same horizontal level with the wall and arch.
Excess material is carefully removed with a special plasterboard knife. Leveling should be done while the mixture is still wet; after drying, it will be impossible to smooth out the protrusions.
How to putty drywall
When conducting finishing works Craftsmen are often faced with the question of how to putty drywall. This question is relevant, since today this material is very widely used in the decoration of residential premises and work with it is carried out constantly. To bring the surface to a perfectly smooth state and prepare it for decorative processing, you need to rub it. This is done using sandpaper or a special abrasive mesh. Tip: the primer should be applied before each layer of putty, that is, if the surface is putty again, then it is necessary to go through the previous layer with a primer.
I must say that this DIY work requires some efficiency. You can stretch the surface putty in just a few steps. It can be secured with screws, or directly with putty.
For external corners, special decorative round corners or metal corners are used. In order to understand how to putty a plasterboard arch, it must be said that a wider plastic flexible corner is used here. It is also applied directly under the putty.
When carrying out finishing work, craftsmen are often faced with the question of how to putty drywall. This question is relevant, since today this material is very widely used in the decoration of residential premises and work with it is carried out constantly.
In what cases is putty necessary?
The creation of structures from plasterboard can be of a very different nature, but in all cases this material requires putty.
Some usage examples should be given:
- Wall decoration in residential premises with subsequent decorative treatment.
- Creation of ceilings in various rooms.
- Creation of structures performing various household and decorative functions.

In all of the above cases, you must know how to putty drywall and process all the seams that form where the sheets join.
Why putty drywall?
You need to understand that drywall consists of sheets of cardboard, between which a layer of gypsum is laid. If you glue wallpaper directly onto drywall, then later it will no longer be possible to replace it with others. The glue will saturate the cardboard layer, and the wallpaper cannot be torn off in any way.
In the case of applying paint or decorative plaster, putty is even more in demand. Even the slightest flaws in the structure and surface are visible under these types of finishing materials, so it must be prepared for painting. The rest of the article will discuss how to properly putty drywall.
Ceiling or walls
It must be said that the principles of puttying a plasterboard ceiling are not much different from the same process in the case of walls. The only difference in this case is the labor intensity of the work. It is clear that working on the ceiling will be associated with great inconvenience and its implementation will require more strength and skills. Whereas working with walls will be easier and will not take as much effort.

Preparing material for putty
Start
- Before you begin, it is necessary to carry out some preparation of the material.
- Dust and construction debris must be swept away or wiped off with a dry cloth from the entire surface of the drywall.
- After this, it is necessary to prime the entire structure.
This measure will create a thin crust on the surface of the cardboard layer, and it will absorb less moisture. Only after the primer has completely dried can you begin to putty.
Advice: the primer should be applied before each layer of putty, that is, if the surface is puttyed again, then it is necessary to go through the previous layer with a primer.
Choice of putty
First of all, you need to calculate the approximate amount of putty needed. You need to purchase this material with some reserve, but you shouldn’t take too much either. Drywall putty in most cases is a dry mixture that must be diluted with water. It should be noted right away that the result should be a very liquid mixture like sour cream, so the material consumption is small.
Tools
If everything is quite simple with the material, then with the choice of tools the situation is a little more complicated. For this work you will need both power and hand tools.
A list of them should be provided
1. A hammer drill with a nozzle for stirring solutions.
2. Several types of metal spatulas:
- wide
- average
- narrow.
3. Sandpaper or a special grouting abrasive mesh.
4. Construction knife.
5. Roller or brush for applying impregnation.
6. Metal building rule.
7. Self-adhesive “serpyanka” tape for processing seams.

Solution
How to prepare the solution
- In order to make a high-quality putty mixture, you need to carefully read the instructions on the material itself.
- Traditionally, putty is diluted as follows: take a bucket, the size of which depends on the volume of work, and fill it a quarter with water.
- The putty is gradually poured into the water in portions and mixed.
- The mixture should be thick enough to resemble sour cream.
To prevent lumps from forming, mix the solution using a hammer drill with a special attachment. Now you need to leave the prepared solution for 3-5 minutes and mix it again. After this, the entire resulting mass must be worked out, since it is no longer possible to beat the putty again - it will lose all its properties. Since the price of this material can vary, you should be careful not to waste it in vain.
Advice: if a simple drill or hammer drill is used to mix the solution, then you need to put it in reverse mode and at minimum speed so that the vortex flow emanating from the mixer is not upward (clockwise) but downward (counterclockwise). Then the putty will not scatter all over the walls.
Seam processing
Preparing for work
- Before starting any other finishing material, it is necessary to go through all the seams of the structure with a special mesh tape - “serpyanka”. This must be done without fail, since such a measure will strengthen the entire structure and prevent the formation of cracks.
- The mesh is sold in convenient rolls and is self-adhesive so it is easy to apply.
If you take your time and are careful, this work will not take much time; instructions are given below:


You should also start putting putty by treating the seams and screws; these places are treated first. Sometimes craftsmen immediately putty the entire surface once and immediately rub it down. This approach generally has its place, but if there is a desire for quality and reliability, then it is better not to rush.
Putty
How to apply putty
- After the putty areas of the seams and screws have dried, you can proceed to the next stage. Use a large spatula to scoop up a portion of putty.
- Place it vertically on the drywall surface and begin to stretch the putty.
- You need to have two spatulas in your hands, a wide one and a second one narrower, so that you can pick up excess putty.
- The movements of the spatula should be wide and sweeping, evenly distributing the putty over the surface.

I must say that this DIY work requires some efficiency. You can stretch the surface putty in just a few steps.
Nuances
To make the surface more even, you can go over the putty with a metal rule, you just need to accurately and evenly distribute the pressure force. After the entire surface of the drywall has been covered with putty, you must wait one day. After checking that the surface is dry, you can carefully cut off the traces left by the spatula using a small metal spatula.

Please note: many people think that after applying putty they should not open the windows, since a draft can spoil the result of the work - this is not true; the putty is not afraid of drafts and the room can be ventilated safely.
Grout
To bring the surface to a perfectly smooth state and prepare it for decorative processing, you need to rub it. This is done using sandpaper or a special abrasive mesh.
- You need to evenly cover the entire surface with sweeping movements.
- Then wipe off the resulting dust with a dry, clean broom.
- Complete drying of the putty surface can be determined by its uniform color without the presence of dark damp spots. See photo:

Advice: if the ceiling is rubbed, then do not forget to wear safety glasses and a mask to protect yourself from dust.
Joints and corners
Corners and all kinds of joints that are present in any plasterboard structure deserve special attention. To strengthen such connections, special metal corners of various modifications are available for sale. To ensure that the internal corner of the drywall structure is reliable, a special internal corner is placed in it before puttying.
It can be secured with screws, or directly with putty. For external corners, special decorative round corners or metal corners are used. In order to understand how to putty a plasterboard arch, it must be said that a wider plastic flexible corner is used here. It is also applied directly under the putty.
Decorative finishing
When all the stages of putty are over and the result is perfect flat ceiling or walls you can start decorating. If you subsequently want to stick wallpaper, no matter the ceiling or wall, the surface must be treated. You can cover the entire surface with a primer, or you can use wallpaper glue. But it should be noted that such work should only be done on a completely dry wall.
Conclusion
If you want to create a high-quality surface for finishing, you should approach the putty process with all responsibility. A careful selection of materials and tools, as well as a diligent attitude to work will allow you to get a good result. The video in this article will answer all remaining questions.