A hip roof is one of the types of roofs that has four slopes. But at the same time, two slopes are made in the shape of a trapezoid, and the other two are triangular (instead of pediments), which are also called hips. Hence the name - hip roof. The main thing is that the end slopes occupy the entire space from the cornice to the ridge. If they do not reach the eaves, then such a roof will be called half-hip. If a hip roof is cut, then in this projection it will look like an ordinary triangular gable roof.
Hip roof- rafter system
A hip roof is not only durable protective structure for a building, it is also intended for its decoration, and is also capable of giving it a special charm and personality.

On a note! In Russia, more often are used simple options roofs - for example, gable. But in Europe, hip roofs are very widespread. However, in our country we can see such roofs in last years possible more and more often.

Advantages hip roof are primarily as follows:
- beautiful appearance;
- excellent protection of the structure from the effects of precipitation;
- high strength and ability to withstand wind and snow loads;
- the hip roof structure is very rigid due to the presence of corner ribs;
- such a roof can have far protruding overhangs, and this is additional protection buildings from precipitation.

But, as usual, even the best option always has its drawbacks. For example, a hip roof is a rather complex structure, so it’s difficult to install it. Due to the fact that more material is spent on it, it will cost more than a regular gable. It is also important to understand that attic space underneath it will be small due to the installation of additional supports. Therefore, by the way, it is impossible to create a full-fledged attic under such a roof. In general, in a number of cases these shortcomings are not critical, and the hip roof is equipped Lately Often.

The design of such a roof
As already mentioned, such a roof has complex design. And first of all, the difficulty lies in the fact that the roof has a lot of fastening points, components, which will be extremely difficult for a person without experience to install into a single system. The hip roof design includes the following elements.
- Mauerlat as the basis and support for the entire system. It is made, as a rule, from powerful timber with a cross-section of 10x10 or 15x15 cm. The Mauerlat helps to evenly distribute the weight of the entire roof along the perimeter of the building. And it is to it that they are attached during the construction process and rafter legs.

- Lezhnya- a relative of the Mauerlat, which is mounted on internal partitions and has the same function as its brother. It is also made of timber, usually with a section of 10x10 cm.
- Ridge run is a support beam for the upper parts of the rafters. Vertical support posts are installed under it.
- Rafters diagonally oriented in the amount of four pieces they help to form just the hip slopes. Such rafters are fixed so that they continue the ridge, but at the same time diverge towards the corners of the house. Fixation is carried out on the ridge and Mauerlat. They must be very strong and thick, as they are subject to a lot of stress. These are very long rafters.
- Ordinary rafter legs hold the stingrays trapezoidal shape. As a rule, they are made from boards with a cross-section of 5x15 or 10x15 cm. They are fixed on top to the ridge, and from below to the mauerlat. The distance between adjacent legs is from 60 to 120 cm.
- There are also shortened rafters - narozhniki, - which are attached to the mauerlat and diagonal rafters. A distance of 70-80 cm is established between adjacent roof panels. They do not experience heavy loads, but are indispensable when creating a hip roof. The spigots are mounted either by cutting or by installing support bars for half-legs.

- Racks, acting as supports, are made of timber and installed on a bench. Their purpose is to support the rafters or the ridge in the middle.
- Between the elements of each pair of rafters are installed puffs, which act as horizontal jumpers. They help to pull the rafters towards each other and reduce the load on the walls. The tie in the ridge area is called a crossbar, and the one below can be used as a floor beam.
- Rafter legs or struts are installed at a certain angle to the rafters themselves and help them not to bend under their own weight.
- Vertical supports or trusses needed to support diagonally located rafters. They have the shape of an upside down letter T. The base of the truss should be perpendicular to the slanted rafters.

Important! Some of the hip roof parts can be very long, depending on the size of the roof itself. But all lumber is limited in size. In this case, you can use typesetting or glued rafters.
Also, a hip roof, like any other type of roof, must be equipped with a water drainage system. Snow guards and others can be installed additional elements.

Types of rafter systems and hip roofs
Hip roofs depending on their design features may have a different rafter system, and also belong to a certain type of roof. The table below shows the types of hip roofs.

Table. Types of hip roofs.
| Variety | Description |
|---|---|
| The overhangs of such a roof are at the same height relative to each other. The pediments have the shape of a triangle, the slopes are trapezoidal. Diagonal ribs rest on the ridge. |
| This roof has vertical gables; windows can be inserted into them and improve the lighting of the attic space. |
| This type of roof does not have a supporting ridge beam. Diagonal rafters converge at one point, then ordinary ordinary elements are installed. An ideal roofing option if the house has a square shape. But making a ridge unit in the center of the roof is very, very difficult. |
| This is the most complex version of such a roof. Here the rafter system is very complex, since all the slopes differ in area and angles of location. But inside under the roof you can in interesting ways use the free space, and make the house spectacular and memorable. |


Also, a hip roof may have different rafter systems as a whole.
- Hanging when the rafters rest on the ridge and the mauerlat. Here there is a large load on deflection and expansion. So you will have to install tightening. This option rafter system It is not recommended to use it for a hip roof. But the system can be used for buildings no more than 6 m wide.
- Layered, when the rafters rest on the mauerlat, ridge and stand installed in the middle on the load-bearing internal wall. The load on the system in this case is less. It is reliable and durable option, and even easier to install. This option is suitable for buildings up to 12 m wide or more, depending on the number of additional supporting elements.
- Combined system has both hanging and layered elements. All beams will be visible, they will not be covered by the sheathing, since the racks in this case rest on columns or pillars, and not on internal partitions.

Materials and calculations
You can create a rafter system for a hip-type roof from either wood or metal. For independent work wood is preferable, since it is much easier to make anything from it. A good option- pine. It is light, durable and low cost.
Important! In order for the tree to serve for a long time, before work it is important to treat it with special protective compounds, which will help prevent the onset of the rotting process.
If the rafter system is made of metal, then it is important to choose a galvanized version, which will be able to resist corrosion and will last for many years, and can also withstand heavy loads.

The most difficult thing in creating a hip roof is its correct calculation. It is important to take into account not only the size of the house, but also the wind load in the region, the amount of precipitation during the year, the type of material from which the roof will be made, as well as the need to install additional elements, perform insulation work, etc.
In any case, the calculation is made according to certain formulas. And here it is important to consider optimal slope roofs. You can select it based on the table. The slope will also help you navigate with regard to the laying of the rafters.


Table - roof inclination angle depending on roofing material
The distance between the rafters can be seen in the table below.

Calculation of rafter cross-section
The laying of the rafters and the relationship between their lengths can be calculated using the coefficients in the table below.

So, the formulas used to calculate a hip roof are as follows:
- H = D*tan a / 2, where H is the height of the ridge, D is the width of the house, and is the angle of inclination of the slope;

- L = l – D, where L is the length of the ridge, l is the length of the building, D is the width of the house;

- L c = H 2 + d 2, where L c is the length of the central rafters. Ordinary rafters are calculated in the same way;
- ∆L = k/cos a, where ∆L is the required length of the rafter extension for the overhang;

- B = 90 0 – a, where b is the slope of ordinary elements;

- LD = √(L 2 + d 2), where LD is the diagonal length of the shaft rafters;

- L1 = 2/3L and L2 = 1/3L, where L1 and L2 are the length of the spigots (the first short and the second short);

- The roof area can be calculated as ∑L * (2B + 4k).

The result of all calculations can be detailed drawing hip roof, indicating all the dimensions and parameters that will simply need to be transferred to the roofing material. By the way, based on these calculations, it will be possible to calculate how much you need to buy in order to make such a roof yourself.
Important! After self-creation drawing, it is strongly recommended that the diagram be checked by experienced specialists. Errors made in calculations can lead to dire consequences.
The hip roof is very practical and looks elegant. But it takes a lot of effort and expense. It is possible to erect it with your own hands, but the main thing here is to have certain construction engineering skills and strictly follow calculations and diagrams.
Specifics of this type of roof
She is one of the types hipped roof . The top view of the house with it resembles a closed envelope. Specialists called two slopes of a small area, having a triangle format, “hip”. The shape of the other pair of slopes is trapezoid. Their size is larger.
The hip roof is formed by the following units (diagram):

Horse serves as the top of the roof. This is a line formed by rafter tandems in the area where they are fastened. The specificity of the ridge is that it is inferior in length to the structure it covers.
Hips. These are triangular shaped slopes. They are positioned above end walls and are used instead of a pediment. They are made up of diagonal and intermediate rafters (DS and PS).
Stingrays. Their shape is trapezoid. Their beginning is from the ridge, and their end is in the overhang.
Ribs. These are the angles formed in the areas where the hips and slopes are fastened. The number of hips is equal to the number of DS. Their total number is 4.
Drainage network. Its components: funnels, pipes and gutters. It allows you to drain unnecessary liquid from the surface of such a roof into the sewer system.
Important! The hip roof does not provide for the creation of a residential attic in it. Reason: its two slopes significantly reduce the height of the ceiling in the under-roof area.
Rafters and supports
The differences in the installation of a complex hip roof from a gable roof are the presence of a larger number of components. They are as follows (diagram): 
Ridge run. This is a special beam. Rafter duets are mounted on it.
Diagonal rafters (DS). They make up the ribs of the hips. From the end of the ridge they follow to the corner nodes of the Mauerlat, connecting to it. They are longer than standard rafters. The material for their creation must have a large cross-section. And this is usually what double boards become. When drawing up drawings, it is important to take into account that the angle of position of such rafters is flatter than that of standard (intermediate) rafters.
Standard or intermediate rafters (RS). The place where their apex is attached is ridge run, and the zone where they end is the Mauerlat.
Central standard rafters. There are usually 6 of them. They are connected to the end of the ridge and DS. This connection takes a lot of effort. This requires absolute concentration and adherence to precise markings.
Spawners or legs of short length. On the upper side their contact with the ridge is not allowed. The place where they are connected is the diagonal rafters. The lower the position of the sprig, the shorter it is.
Puff. This is a timber lintel. It is positioned between the standard rafter duo.
Rigel. This is a tie installed in the upper zone of the roof, right under the ridge .
Floor beams. These are puffs mounted below, at the base of the rafters.
Rack. This is a vertical beam. It serves as a support for the ridge and distributes the mass of the roof onto the load-bearing elements. If you need to make the attic area more spacious, the racks can be concentrated in the middle of the rafters.
Strut. These are supports fixed in a perpendicular position to the rafters. They keep them from sagging. A brace is extremely necessary if the roof slopes reach a length of 4.5 - 5 m.
Sprengel. This is a device for supporting diagonal rafters. The sprengel is formed by two beams. One mounts two parts of the Mauerlat. The second with emphasis enters the first and also into one DS. 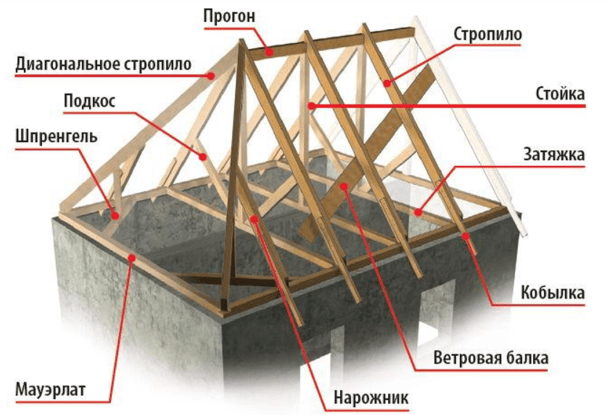
Calculations, drawings, projects
Before creating a hip roof, it is necessary to carefully calculate its constituent structures. How to do this correctly? Before calculations, a diagram of the building to be covered with all parameters is created. Then, using simple formulas based on the Pythagorean theorem, you can calculate:
Diagram with parameters:

- Ridge height value. The data here is: h = b x tanα/2. Here b is the length of the structure between the rafters from the end plane. And a is the angle of position of the slopes.
- Length of standard rafters. Data: e = b / 2 x cosα. Here b is the same length, a is the same angle, e is the length of standard rafters.
- Area of slopes. Data: S = 2ea. Here S is the total surface area of the slopes, e is the same parameter from point 2, and is the length between the rafters along the length of the building.
DS length:

Hip roof with parameters:

These diagrams help to calculate the length of the specified rafters only with the availability of data on the parameters of standard rafters.
The required pitch between rafter tandems is also often found in reference books, based on the type and thickness of the working material (wood) and the length of the slopes. The calculation results are reflected in the drawing. Next we mark the roof using it.
It is also very convenient to perform the above calculations on a calculator.

Mauerlat installation
Mauerlat is the basis for installing the roof. It is needed to distribute the mass of the roof over all load-bearing elements. It is usually created from wooden beam, and hardwood is used. The greater the mass of the roof and the more complex its configuration, the larger the cross-section of the Mauerlat. As a rule, craftsmen use pine beams with minimum parameters of 15 x 15 cm.
The installation of the Mauerlat takes place before the construction of the house. How to do:
- Working with timber. It is measured and sawn to the required length. In the corner areas, the mauerlat is attached to each other using the “claw” method. To cut out a groove for fasteners, markings are made.
- On the last laying line board formwork is created. It is filled with viscous concrete. Metal spiers are inserted into it to fasten the necessary timber.
- After the concrete has hardened, a waterproof layer. Here you can apply bitumen mastic or roofing felt.
- Should treatment of timber with protective agents. You need antiseptics and a fire retardant with powerful penetration, as well as a moisture-proof varnish.
- In the Mauerlat holes are marked and created for metal spiers. A marker will do for marking. To create - a drill.
- timber is placed on these spiers and firmly secured with anchor-type bolts.
Construction stages
Here it is imperative to follow the instructions and technology. The stages of work are as follows:
- Pulls are placed. They are floor beams. At least two of them are required. Racks are placed on them. Specialists install a boardwalk on top of them. This way the rafter network is built more conveniently and safely.
- Attaching the posts to the tie rods. More racks can be used. But excess weight for the structure is needed only when absolutely necessary. While the network is not stable, the racks are fixed for a while with vertical struts.
Scheme step by step:


To create a hip roof, you usually use soft roof. It is easier to cover slopes with complex configurations. For such a roof, a continuous sheathing is prepared from layers of moisture-resistant plywood.
- For fixing roofing material to sheathing special fasteners are used. Its composition: stainless steel with a rubber cap. The method of positioning the sheets is with an overlap of 10-15 cm. This creates protection against moisture ingress. The steeper the slope, the more you need to follow this method.
- After laying the roof, the roof is insulated from the inside. You can create windows, a drain and even a chimney in it.
For the gazebo
Hip roof – perfect option for private houses. Its competent creation is impossible without special skills, calculations, hard work and patience.
Hip roofs can also be created on smaller buildings, for example, gazebos. But only the following types of gazebos are suitable for such a roof:
- Square shape. Here the roof is made up of four slopes - triangles same sizes. They connect at one point. The horse is not created. Scheme:

- Rectangular shape. The roof is formed by two slopes - trapezoids and two slopes - triangles. At the top is a skate. It follows the long plane of the rectangle. Photo:

Mandatory building materials
We build a hip roof from the following materials:
- Wooden beam. Suitable parameters: 10x10 cm or 15x15 cm. A power plate is formed from it, as well as vertical posts and puffs.
- Boards. Required section: 5x5 cm and 10x15 cm. Rafters are formed from them. Diagonal rafters require boards of greater length and thickness. Therefore, the option with double boards is popular.
- . Required dimensions: 3x10 cm or 4x10 cm. The sheathing is mounted on them.
- Reiki. Parameters: 3x3. They will serve as a counter lathing.
- Wind board.
- Board for cornice.
All wooden elements must be treated with antiseptics and fire retardants.

Rafter network design
Scheme: 
Creating a hip roof for a gazebo is also impossible without the stage of drawings and calculations. Calculated:
- slope angle;
- ridge height;
- load (to determine the cross-sections of the rafters).
A drawing is made based on the calculated data. It reflects the parameters and mutual arrangement components of the rafter network. It has many analogies with the rafter network used to cover a house. As can be seen from the diagram, the composition here is almost the same. There are just a few nuances:
- Roof support and weight distribution- This is a function of the upper harness.
- Step between standard rafters, which rest on top on the ridge girder, and on the bottom on the base (mauerlat), is as follows: 60 - 120 cm.
- Narozhniki, forming a slope, are placed in increments of 60-80 cm.
- There is no need for formwork or concreting.
Hip roof and bay window rafter system from Anton Weber:
Stages of erecting a hip roof on a gazebo
A gazebo with a hip roof is built according to the following rules:
- Intensifies top harness gazebo frame. A board is needed here. You can also use two layers. The boards can be overlapped on top of each other. Along the longest side of the structure, a tie beam is mounted to the frame. The fasteners here are metal corners.

- You need to retreat half a meter from the middle of this puff. Two meter stands are placed at this distance. Their verticality is maintained by temporary struts. Their tops are then fastened with a ridge girder.
- Installation of standard rafters. Given a run of 1 m, it is necessary to mount a pair of rafters on each side, along the edges of the run. There will also be a meter interval between them.


- The sheathing is being laid. It should be solid. She is nailed down.
- The roofing material is being cut. It is secured with galvanized fasteners (screws). The joints are covered with sealant.
The following is an example of a well-designed hip roof on a gazebo: 
How to create a project
About creating a hip roof project for a bathhouse in SketchUp program says the author of the blog “ Frame bath in the village with your own hands!”
(hatched, hipped) roof is one of the design options when additional slopes are built in place of the gables.
Nevertheless, hip designs are widespread, especially in areas with frequent changes in wind direction.
The result is a roof with inclined planes, What creates a lot of advantageous positions:
- The absence of gables makes the load on the foundation less, and it is distributed absolutely evenly.
- The wind load on the slope is much lower than on the vertical plane.
- The costs of finishing the gables are excluded from the total repair estimate.
- Decoratively, the hip roof looks more solid and assembled.
The disadvantage of this design is:
- Increased complexity of the rafter system design.
- Higher flow rate, which creates additional dangerous areas of possible leaks.
- The presence of thrust loads on load-bearing walls, causing the need to tie the lower bases of the slopes.
The main design feature of a tent-type rafter system is the presence of diagonal edges, connecting the corner points of the roof with the ridge beam, which has a shorter length than the entire roof (the classic hip roof does not have a ridge at all, the ribs converge at one point).
In the rafter system, these ribs are called corner or diagonal. Their presence requires installation as full rafters, going from to the base - the Mauerlat, and shortened elements- splices connecting the base and diagonal rafters.
Hip roof scheme
Hip roof: elements of the rafter system
The elements of a hip-type rafter system have a more numerous composition than with gable design. The rafter system consists of the following parts:
- Mauerlat. A beam laid along the perimeter of load-bearing walls and serving as the basis for the entire rafter system.
- Sill. A horizontal beam of the same cross-section as the Mauerlat, located along the longitudinal axis of the roof and serving as a support for the purlin posts. A layer is required between the ceiling and the floor.
- Sprengel. Element that binds and strengthens corner connections Mauerlat bars. It is made from the same timber as the Mauerlat and is installed diagonally to it.
- Puff. Connecting elements connecting the parallel bars of the mauerlat along the long side. Remove the bursting load from load-bearing walls.
- Rack. A vertical element supported by a tie and supporting a ridge beam.
- Run. Ridge beam.
- Diagonal (corner, slant) rafters. Connects the corners of the Mauerlat with the ends of the purlin, forming ribs - the junction of the roof planes.
- Rafters. Inclined elements resting on the mauerlat from below and on the purlin from above.
- Narozhniki. These are the elements that rest on top of the diagonal edges. Essentially these are rafters cut to the length required at a given point.
- Struts. Reinforcing elements, spacers located perpendicular to the rafters and resting at an angle on the tie rods.
The designs of all elements may have deviations from the generally accepted design due to the necessity caused by the features of the project of this building, but the scheme as a whole almost always consists of the named parts and does not have any radical changes.
Hip roof rafter system: diagram and photo below.

Rafter system diagram

Photo of the rafter system
Diagonal rafter legs
 The elements of the rafter system that form the ribs connecting the planes of the slopes are called diagonal (oblique, corner) rafter legs.
Strictly speaking, diagonal and oblique - not entirely identical elements, since the former are attached to the outside of the corners of the Mauerlat, and the latter - from the inside.
Otherwise, all properties are the same.
Corner elements have certain features:
- The length of the diagonal rafter legs significantly exceeds the length of the straight rafters.
- Diagonal rafter legs serve as support for the frames on both sides of the connecting planes.
The presence of such features creates an increased—about one and a half times—load on slanted rafters compared to conventional ones. Their length exceeds the usual length of the boards, from which the rafters are made, therefore, to make the slope boards, they are welded together - they are connected along the plane in two layers.
This solves several problems at once:
- You can make beams of any desired length.
- Ability to use one modular material size.
One or two supports must be installed under the diagonal rafter(depending on the length), and the point of support is not in the middle, as it would seem at first glance, but at a distance of one third to a quarter of the entire length of the slanted rafter, counting from the top point, since it is in this area that the place of greatest stress is located.

Diagonal rafter legs
Supports for diagonal rafters
Either struts or vertical posts made of timber or paired boards can be used as support for diagonal rafters. The stand can rest directly on the ceiling, through a layer of waterproofing and a wooden lining.
This requires sufficient rigidity and strength of the floor. If such conditions do not exist, then a strut is used, resting on the beam and supporting the slanted rafter at a given point.
The angle of inclination of the strut does not play a role in this case., the main thing is the connection point, i.e. Load concentration location. For a rafter length of up to 7.5 m, a brace from the top point is sufficient maximum load, and with a length of more than 9 m, an additional stand is required at the bottom.
This can be either support on the ceiling, if it allows, or support on the truss - the so-called. truss truss - a stand reinforced with struts on the sides.

Supports for diagonal rafters
The device of the narozhniki
In the lower part there are rafters - the same rafters, have a completely similar method of attachment to the Mauerlat, same installation step. Mounted strictly at right angles to the base, the upper part - to the corner rafter leg.
Fastening is carried out with at least two nails or other elements. The upper part of the splice is cut at the desired angle to the horizon and to the diagonal rafters to ensure a tighter connection and guarantee resistance to loads.

The device of the narozhniki
Hip roof over bay window
A bay window is a solid-looking structure that decorates a building, which is a small extension, a protrusion in the wall, performing mainly decorative functions. The section of the roof above the bay window can be of any type of structure, but most often the option most suitable for the shape and cross-section of the bay window is used.
The hip roof above the bay window may have an adjacent form, i.e. be half of a hip roof, a complex of three planes. Alternatively, there may be a dominant dome over the bay window, rising above the main roof.
Anyway, erection of such a structure - difficult task , and the complexity is not in the technical sense, but in design and calculation work. The combination of several planes into one ensemble is a complex problem that requires precise and careful thoughtful work.
ATTENTION!
Lack of experience combined with haste can cause inconsistencies or miscalculations, leading to violations of the roof's tightness and a decrease in the strength of the structure.
Available important points, playing a significant role - for example, the angle of inclination of the bay window slopes must correspond to the angle of inclination of the main roof, the length of the fillies must also be in harmony with all the roof overhangs.
The main feature is the combination hip elements with the valleys, therefore the construction of the main rafter system should be carried out parallel to or up to the bay window to avoid unwanted discrepancies in the system geometry.

Hip roof over bay window
Step-by-step instructions for installing a hip rafter system
 The description will begin from the moment the mauerlat is laid, all previous operations are considered completed, the ceiling is completely ready.
All calculation and design work has also been completed.
There is prepared (dried) material - timber and edged board from coniferous species, as the most suitable for the construction of a rafter system in all respects.
For proper installation of rafter system elements, you need to stock up on connecting elements, allowing some movement of parts relative to each other.
This is necessary to compensate for the shrinkage processes of the walls, foundation and the system itself. This is especially important for some load-bearing elements resting on the Mauerlat.
Movements of the base with fixed connections of the main components can lead to weakening of the connections and the formation of leaks.
Let's consider the stages of constructing a hip rafter system:
- Mauerlat installation. The timber is laid on a waterproofed base and secured with studs. If necessary, the segments are connected along the length of the “half-tree”, with the connections reinforced with nails. The fasteners are installed immediately.
- The corners of the Mauerlat are reinforced with trusses And.
- Installation of the bed. One or two (depending on the project) planks are laid on a waterproofed base.
- Racks are being installed, on which the purlin is attached. In this way, the supporting skeleton of the rafter system is created.
- Diagonal rafter legs are being installed. Immediately, depending on the length, struts and (or) racks are installed.
- Rafters are installed according to design data. The length/angle is immediately adjusted and the spigots are installed. All elements are, if necessary, reinforced with struts.
- The rafters at the points of attachment to the base and to the purlin are additionally reinforced with brackets, wooden blocks and other fasteners.

Actually, the installation of the rafter system is completed at this stage. Further work consists of creating roofing pie, construction of sheathing, roofing, etc.
It is necessary to take into account the impossibility of complete and detailed coverage of all the nuances and details, on which the quality and reliable construction rafter system, since there are many of them and they are all worthy of separate consideration. Nevertheless, the general sequence is reflected in sufficient detail.
Creating a hip rafter system is not so much a complex process as it is responsible and dangerous because mistakes made in the early stages become noticeable much later.
That's why it is very important to draw up before starting work detailed plan works, ensure full compliance with the project and do everything as carefully as possible. Everything depends on connections wooden parts Therefore, it is advisable to have experience and skills in working with wood.
Without possessing this knowledge, it is better to seek help from specialists, since the responsibility of the rafter system for preserving the functional qualities of the entire building is too great.
Hip roof: drawing of the rafter system below.

Drawing of the rafter system
Useful video
In this video you will learn everything about the hip roof rafter system:
In contact with
The hip roof is one of the varieties of hipped roofing structures. In terms of complexity of arrangement, hip roofs are superior to classic and gable roofs, - placing four slopes on a house, exactly coordinated with each other and docked at the same angles, is not very easy. But with a strong desire, even the most difficult activities become understandable and simple. Read the guide and get started.
A hip roofing system has a number of distinctive features. Thus, a hip roof includes a pair of long slopes, which have a pronounced trapezoidal shape, as well as a pair of short slopes, made in the form of inclined triangles.

The main difficulties in arranging a traditional hip roof arise at the construction stage truss structure, consisting simultaneously of sloped, ordinary and external rafters.
Hip roofs perfectly withstand wind loads and generally have high performance characteristics. To finished roof served as long and efficiently as possible, at the design stage it is necessary to resolve a number of important issues, namely:
- choose optimal material for arrangement roofing structure;
- determine the intensity of precipitation characteristic of the construction region;
- set average and maximum wind loads.
Taking into account the above indicators, you can calculate the optimal values for the slope angles and the height of the roof structure.

To perform calculations and draw up a project, you can contact a specialist or find a suitable project in one of the many open sources. If you have the proper skills, you can handle the mentioned activities yourself.

The roof in question, as already noted, has a very interesting design. And if large slopes can be seen on almost all roofs, then short slopes make the system in question truly unique.
The design of the roofing system is such that the slopes do not cover the length of the house area and the remaining free place filled with two short hips.

When drawing up a diagram of a hip roof structure yourself, you will need to use a marking strip and Pythagorean tables.

It is important that the roof design is as accurate as possible - this is the only way you can make the correct cuts from the rafter elements yourself and install all the components of the system yourself.
What do you need to know before starting work?
To ensure that the system fully meets all the requirements, remember the following recommendations:
- the intermediate components of a hip roof rafter system are steeper when compared to corner parts, therefore, the boards used for arranging intermediate elements must have a size of at least 5x15 cm;
- fastening of short elements is carried out to the corner rafter components, and not to the ridge board. Intermediate boards must be fixed with the same slope as the short beams;
- ridge roof system and rafter elements must be made from the same material;
- intermediate rafter legs are fixed at the edges of the ridge board. They must simultaneously connect to the upper end of the trim and to the ridge board;
- rafter elements and ridge beams must be of equal thickness. Only if this rule is observed can you count on the reliability and strength of the roofing system. If any rafters are thinner, over time the roof frame will deform and the integrity of the system will be seriously compromised;
- hip roofing system can be almost any height. However, when arranging a roof that is too low, it is necessary to use additional supports;
- to ensure maximum long term operation of a hip roof, for its arrangement it is necessary to use thoroughly dried and quality timber coniferous species. Before assembling the structure, all wooden components must be treated with antiseptic impregnation.
Guide to constructing a hip roof
Start arranging the roof. Start by creating a construction site layout.
Marking


Well-done markings correct drawing and the most reliable calculations - these are the three fundamental factors for successful construction. Carry out markings in accordance with the drawings. Follow the following sequence.

First step. Mark the axle along the highest trim with end side building;
Second step. Calculate 50% of the thickness of the ridge and determine the location of the first element of the rafter system.
Third step. Place one edge of the measuring stick against the previously marked line. Place the second end along the line of the side wall. This will establish the placement point for the intermediate rafter element.
Fourth step. Determine the length of the rafter overhang. To do this, place the beam with one edge on outside corner walls, and install the other on the roof overhang.
Fifth step. Calculate the next component of the central rafters. Move the batten to the edge of the side wall and mark where the rafter will be attached. The element will be located between the top roof trim and the side wall.
Repeat for the remaining three corners. This way you will know where the intermediate rafter legs and ridge ends will be installed in the future.
Calculation
First step. Take a marking rod and determine the value horizontal projection intermediate rafter element. Using standardized documentation, find the appropriate roof slope for your situation and multiply the determined values.
Second step. Measure the length of the rafter. Do this from the sampling at the roof ridge to the sampling at the place where the support is fixed. Measure along the bottom line.
Third step. Determine the length of the overhang in the same way. To do this, multiply the horizontal projection value by the appropriate correction factor. You can use the Pythagorean theorem, known since school days: c2=a2+b2. In the situation under consideration, a is a vertical projection, and b, accordingly, a horizontal projection.
Fourth step. Proceed to the calculations of the angular components. On one side of the rafter legs there are oblique cuts, which ensure reliable fixation of the elements to the roof ridge. Directly at the ridge there is an undercut with a special double bevel, used for attaching corner components.
Corner rafter legs are calculated in the following order:
- The length of the rafter element is measured from any corner of the house;
- a projection is established equal to the squares of the length of the projections of the central rafter legs used, multiplied by each other;
- the resulting value is multiplied by a correction factor, which allows you to determine the length of the corner rafter leg.
Installation of rafters

First step. Proceed with installation vertical racks, due to which the ridge beam will be supported. Attach the elements to the central beam using a miter system.


Second step. Install diagonal rafters. All elements must be the same length. In the case of roof overhangs, the figure will vary from 500 to 700 mm. Pay attention Special attention correct joining of the hip, diagonal rafter elements and ridge.

Third step. Install slanted rafters, and then ordinary rafters with a pitch of about 600 mm. Attach ordinary rafters to the Mauerlat and ridge beam using the cutting method. To strengthen the fixation, use crossbars and ties.

It is important that ordinary rafters do not come into contact with the studs that secure the Mauerlat to the walls of the house.
Fourth step. Attach splices to each side of the diagonal strips, due to which the slanted rafters will be connected to the mauerlat.
Both ordinary rafter elements and frames must be mounted strictly perpendicular to the ridge.

Strengthening the truss structure
When choosing a method for strengthening rafters, focus primarily on the size of the building. Among the most popular methods of amplification, the following options should be highlighted:
- At the corners of the roof, trusses with a special stand are fixed, which serves as a support for the diagonal rafter element. The sprengel in this situation is a beam that you need to throw between the two corner arms of the support mauerlat. If the truss installation has to be done at a great distance from the mentioned corner, professionals recommend installing a reliable truss truss;
- By reinforced concrete floor or the racks are filled by tightening. They will perform the function of the so-called. “shelf” supporting the rafters in the middle;
- if the diagonal rafter elements are too long, double beams should be used instead of one beam.

Ventilation
To provide the required level of ventilation of the under-roof space, make a hole in the windproof film for air entry. It must be placed on top, closer to the roof ridge.
If the wind sheathing is made of wood, it is enough to simply fasten the boards with a gap of 2-3 mm. If, however, for the manufacture of filings they are used plastic products, the elements must first be perforated.
If the wind roof lining has already been assembled, you can install ordinary ventilation grates. The standard diameter of such gratings is 50 mm. The mesh of the product can be of any color. Place the gratings along the entire length of the wind tunnel with a pitch of about 800 mm.
At the end, all you have to do is lay the insulation, arrange the waterproofing layer, fill the sheathing boards and install the selected finishing coating.

Now you know the main features and procedure for arranging a hip roof yourself. The work can hardly be called too easy, but using the knowledge gained in practice, you will be able to cope with all the related activities yourself.

Good luck!
Video - DIY hip roof
This roofing option has four slopes. Two long ones inclined surfaces have a trapezoidal shape, and the other two, smaller ones, have the shape of a triangle - they are called hips. They are located along the gables of the building and connect the ridge to the cornice. Trapezoidal planes have a large area and a slope, also located from the upper horizontal edge to the cornice.
The hip roof has several different designs:
- Traditional with two trapezoidal slopes and two hips, it is called a “Dutch” roof.
- Tent - has triangular-shaped slopes of the same size. Ideal for square-shaped buildings.
- Half-hip - the hips cover only the upper part of the end no more than to the middle. Suitable for the construction of houses with an attic; it is called “Scandinavian” roofing.
- Semi-hip - the hips are not triangular in shape, but are in the shape of small trapezoids. Such a roof gives great attic room, it is also called “Danish” roofing.
Like any other type, the hip roof type has a frame and rafter system - the entire structure rests on them.
Construction of the rafter system
The rafter system is the main component of the entire roof structure.
Unlike a gable roof, the structure of the supporting structure of a hip roof is more complex.
Regardless of whether the building is rectangular or square, the shape of the slopes will not change.
Considering the structure of the hip roof rafter system, we can determine that it consists of several elements:
- Mauerlat is the base for the rafters, the connecting link between the load-bearing walls and the rafter system.
- Oblique or diagonal supports - have the greatest length and carry the greatest load.
- Central rafters - serve to connect the ridge with the mauerlat on the sides of the slopes, converge at the corners of the ridge on 3 sides.
- Intermediate rafters - connect the ridge and cornice.
- Struts - create not only rigidity, but also provide confrontation to wind loads from the gables of the building, are located under different angles to the rafter legs.
- Narozhniki are the shortest rafters.
- Sprengels or truss trusses - enhance the load-bearing capacity of the roof structure. They are a beam made of timber located at the corner of connecting external walls.
- Racks - give the legs of the supports additional stability; they are installed at the junction of two rafters and a ridge beam.
- Corner rafter (rib) - located at a smaller angle than the intermediate elements of the system.
- Short rafter legs - fixed to a corner support board.
- Horse.
- Tightening - performs the function of a floor beam.
- Wind beam - attached with a slope on the windy side of the roof.
- Purlins - the distance between the connection of supports to the ridge.

Installation of rafters
Once the type of roof has been determined and all the necessary building materials have been purchased, you can proceed directly to the construction of the frame.
Before starting the construction of a supporting structure, it is necessary to draw up its design and drawing.
So, the design of the support system consists of several stages:

- Before starting construction, a wooden beam should be laid around the perimeter of the outer wall - a mauerlat. To install it, you need to equip reinforced belt from reinforced concrete structure, enhancing load-bearing capacity walls You should pay attention to ensure that the Mauerlat is securely fastened, preventing the slightest movement.
- If the walls are made of stone or brick, formwork is erected on top of them, into which a reinforced frame is mounted using galvanized threaded rods with a caliber of at least 10 mm. The upper part of the studs should protrude 4-5 cm from the base for the supports (mauerlat).
- After installing the frame, fill it with cement mortar.
- Then, as the concrete hardens, its surface is covered with bitumen and covered with a layer of roofing felt or other waterproofing materials.
- Beams with drilled holes are placed on the protruding part of the studs. Secure the structure with nuts.
- The Mauerlat is made from 10*15 or 15*15 cm pine needles, dried and impregnated with anti-corrosion and fire-retardant agents. The humidity of the wood should not exceed 20%.
- The next step is installation central beam on the Mauerlat, which is located parallel to the ridge. Stands are attached to it. These posts serve as support for a specific part of the support system.
When starting work, you need to check and double-check everything step by step. This is the only way to protect yourself from mistakes and ultimately achieve the most durable structure possible.
Types of hip roof rafters
Hip roof supports are divided into two types:
- Hanging - beams are located on a beam ceiling two external walls without additional support.
- Layered – along the top edge interior walls located horizontal beam, to which the vertical supports are attached. The basis for the end part of the beam is the external walls.
The layered type of supports is suitable for buildings with an intermediate supporting wall or columns.
This supporting structure has more base points, so it can be made much easier.
If the building has two load-bearing walls, a screed is installed to support the rafter legs and distribute the load across all vertical supports.
For a hip roof type, a layered system is considered the most suitable, giving greater strength and facilitating the roof structure.
This modification is used when constructing an attic or mansard roof.
How to calculate the rafter system of a hip roof
Calculation of the supporting structure is the main stage of roof design. The slightest miscalculation can cause deformation or destruction of the roof.
After studying the roof structure, it is necessary to calculate the angle of inclination of the rafter system. The higher it is, the more the roof is exposed to winds, but it clears itself of snow and ice on its own.
The angle of inclination of the slopes can be 5-60 degrees, it depends on the load of wind and snow.
After determining the angle of inclination, calculations should begin to determine the main loads to which the roof is exposed. These include the weight of the roof itself and natural phenomena - wind and precipitation.

The total weight of the supporting structure, sheathing, covering and insulation is divided by the area of all inclined planes. The resulting value shows the load per 1 m2 of roofing. For a residential building, it must withstand a load of 45-50 kg/m2. This figure is the same for any area.
Sediment loads vary depending on the area and range from 80-150 kg/m2. This value can be found using " Building codes and rules."
The load value must be multiplied by the correction factor:
- At 1.0, when the angle of inclination does not exceed 25 degrees;
- By 0.7 if the angle is 25-60 degrees.
If the roof is subject to regular heavy snowfalls, it is recommended to install double supports or continuous sheathing.
Determining the wind load involves using the wind pressure coefficient.
The load indicator (wind and snow) is multiplied by the index, equal to value pitch of the rafters. The pitch of the rafters is determined in meters.
The final stage is the calculation of the quantity and criteria of materials.
After calculating all the loads per 1 m2 and the area of the entire roof, determine the cross-section of the supports (smallest values):
- Mauerlat – 10*10 cm.
- Tightenings and purlins – 5*15 cm.
- Fillers, struts, crossbars – 10*10, 15*15 cm.
The number of beams on which the sheathing and additional elements are attached is calculated by the length of the roof. For example, the length of the roof is 12 m, the pitch between the rafters is 1 m. Based on this, you will need 24 construction legs, 12 on each side.
When carrying out calculations for large-scale projects, it is recommended to use special computer programs for design.
All obtained indicators must be plotted on the drawing.
Nodes
Precisely calculated nodes make it possible to achieve strength and attractive appearance roofs.
The connection of roofing structural elements is carried out in accordance with certain requirements.
Main components of the supporting structure:
- ridge unit - a pair of supports are fastened with nails or bolts, and reinforced with bolted beams;
- the beam support unit on the Mauerlat is strengthened metal corners, construction staples, nails or bolts;
- rafter connection unit with a tightening, which is located in the middle of the rafter - carried out using nails or bolts;
- the combination of the strut, rack and support is done using a die cut and reinforced with construction staples.
Rafter system
The quality of the roof directly depends on the frame and base for the roof deck. The supporting structure of the roof serves as the basis and determines its service life.
Rafter system for mansard hip roof
This support system is resistant to strong wind loads due to the absence of a roof façade wall.
A roof of this form makes it possible to build large plumbs that protect the walls and foundation of the house from rain, snow and ice.
Components of the attic roof rafter system:
- Mauerlat.
- Ridge and side girders.
- Support beams.
- Layered and hanging rafters.
- Struts.
- Support posts.
- Diagonal rafters.
A distinctive feature of the mansard hip roof is the use of layered and hanging rafters. The upper slope is made from hanging rafters supported on racks or a side girder.
To avoid bending, they are equipped with drawstrings. When installing the lower slope, layered rafters with a base on the Mauerlat are used, and a horizontal beam connecting the rafter system in its middle part.
The lower sloping surfaces have an inclination angle of about 60 degrees, and the upper ones – at least 30 degrees.
Strengthening the rafter system
To ensure the strength and durability of a hip roof, it is not enough to manufacture a rafter system; it must also be strengthened.
The most common methods of strengthening are:
- Installation of trusses at the corners of the roof with a stand supporting the diagonal support. If the truss is located far from the corner, it is best to attach a truss truss to it.
- Installation of racks connected from above by a beam on the ceiling (reinforced concrete) or tightening. They act as supports and ensure even distribution of the load on the house.
- The use of double beams instead of one beam if the diagonal rafters are too long.
- Usage wooden planks 40*40 or 50*50 mm for the construction of sheathing.