Not only children love to drive mini cars, but also adults. That’s why they go to a karting club and rent a karting, and some want to make it themselves. In order to make a go-kart yourself, you will need certain knowledge, materials and tools.
What is karting
Karting is car racing using mini cars (karts). A kart is a mini sports car simplest design without a body with a small engine. But there are such cars with powerful engines, this will already belong to the class of “superkarts”. Cards of this class are capable of reaching a maximum speed of up to 260 km/h.
Device card
PIONEER class karts
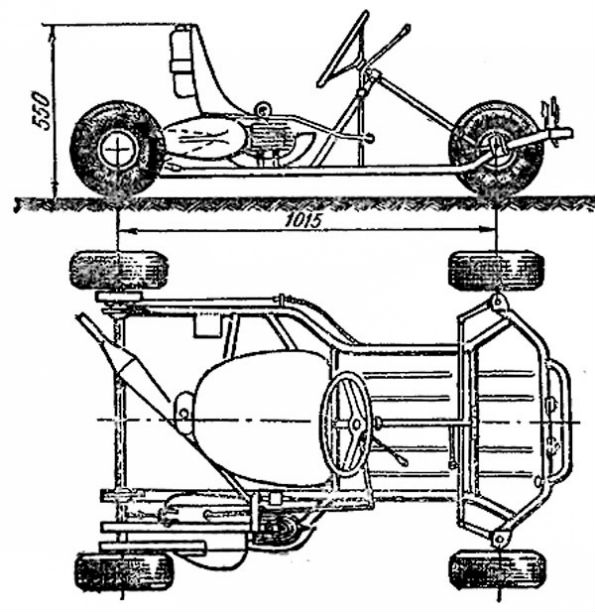
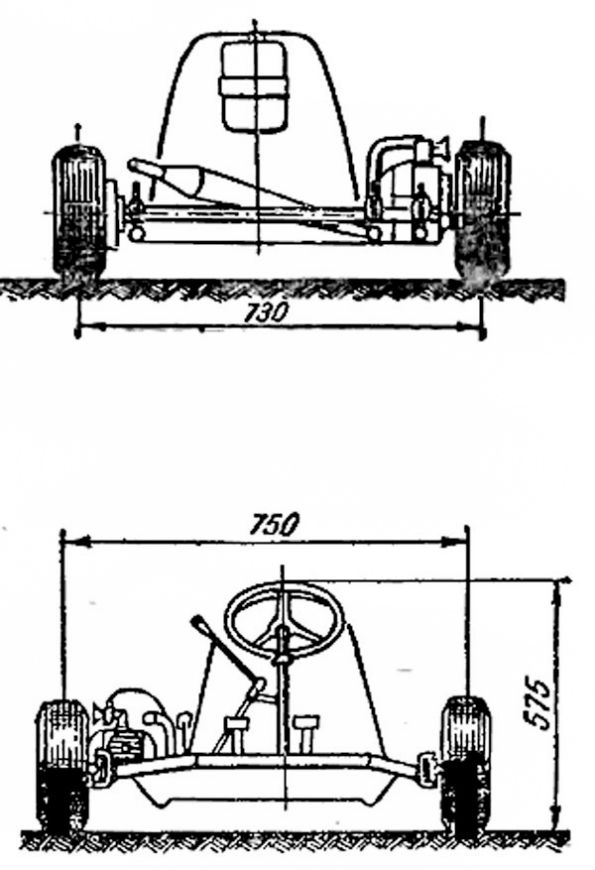
1 — front upper bumper; 2 — gas pedal; 3 — brake pedal; 4 — gear shift lever; 5 — rear bumper; 6 — brake disc; 7 — main brake cylinder; 8 — frame (chassis); L — steering column bearing; B — steering column thrust bearing.
Overall dimensions of the go-kart:
- Length: 1015 mm;
- Front width between wheels: 750 mm;
- Rear width between wheels: 730 mm.
Even small children can take part in karting races. Below is a table of ages and racing units corresponding to power.
| Class | Age of participants | Machine frame | Engine | Rules |
|---|---|---|---|---|
| Micro | 6-8 | Homologated | IAME Parilla 60 (Italy) | The speed is about 60 km/h, competitions are local and throughout Russia. The technology is reliable. There are many participants. |
| Mini | 9-10 | Homologated | IAME Parilla 60 (Italy) | There are many participants, the speed is about 80 km/h, competitions both in Russia and local ones. The technology is reliable. |
| Super Mini | 10-12 | Homologated | IAME Parilla 60 (Italy) | There are many participants, competitions both national and local, the equipment is reliable, the speed is about 100 km/h. |
| Pioneer | 8-11 | Any | Domestic 50 cm³ with gearbox | An outdated class, there are few participants in all-Russian competitions, the equipment is unreliable, speeds are about 60 km/h. |
| Cadet | 10-13 | Any | Domestic 50 cm³ with gearbox | An outdated class, there are few participants in all-Russian competitions, the equipment is unreliable, the speed is about 80 km/h. |
| Mini Rocket | 8-11 | Any | Raket-85 (Sweden) | Outdated class, only local competitions, reliable equipment, speeds about 60 km/h. |
| Rockets | 11-13 | Any | Raket-85 (Sweden) | Outdated class, only local competitions, reliable equipment, speeds of about 80 km/h. |
| EasyKart-50 | 5-8 | Birel E.K. | IAME Parilla 50 EK (Italy) | Mono series, only local competitions, reliable equipment, speeds of about 40 km/h. |
| EasyKart-60 | 8-13 | Birel E.K. | IAME Parilla 60 EK (Italy) | Mono-series, many participants, reliable equipment, speeds of about 80 km/h. |

Karting project
The materials you need to assemble a mini car can be bought cheaply at a salvage yard or bought new.
You will need the following parts:
- steering wheel (for convenience, it is better to buy one ready to make yourself from leather, fur or wire);
- armchair;
- pedals;
- steering column (shaft);
- steering knuckles;
- steering rods;
- pins;
- axle shafts;
- pedal mounting block;
- master and working cylinders of disc brakes;
- wheels.
It’s better to get the seat from a foreign car to make it more comfortable to drive. Such old rotating parts as the kingpin and steering knuckles must be checked for functionality so that they do not jam. Check brake cylinders, tubes and hoses for leaks. The remaining parts should preferably not be rusty.
At scrap metal collection points (scrap of non-ferrous and ferrous metals) you can buy the following parts inexpensively:
- metal sheets, strips, tubes;
- bearings;
- gears;
- chains;
- wheels;
- motor.
 To represent the kart device, it is advisable to have a diagram or drawing of the kart project. There are no clear dimensions for amateur cars. Everyone does at their own discretion, chooses the sizes for themselves. The main criterion for designing a go-kart is the height of the person who will be driving it. Better yet, install a chair with a slide to adjust the length of the pedals.
Instead of creating a diagram from scratch, it’s better to download finished project on the Internet and modify it, change some dimensions.
For steering rods of homemade karts, steel rods with a diameter of 8 to 15 mm are usually used. The steering pendulum is made from a metal plate 5-7 mm thick.
The general finished drawing looks like this:
 Sizes can be changed, but it is better to stick to standard sizes so that the dynamic and technical characteristics do not change.
- Regular dimensions karting for teenagers: length - 1.3 meters; width - 0.76 meters.
- Overall dimensions of a mini sports car for an adult: length - 1.8 meters; width - 1 meter.
With a kart length of 1.32 meters, the longitudinal distance between the front and rear axles ranges from 1.00 to 1.22 meters.

If possible, we buy new parts. So, a list of devices and parts for creating a map with your own hands:
- Transmission, steering and brake systems:
- Transmission;
- hand brake;
- steering wheel;
- wheels;
- steering and drive shafts;
- gas and brake pedals;
- bearings.
- Motor:
- engine (you can use the engine from a chainsaw or lawn mower-trimmer);
- chain;
- gas tank;
- fasteners (bolts, nuts, washers).
- Chassis card:
- 2.5 cm square pipe(inch), 9.2 meters long;
- steel pipe diameter 2 cm, length 1.8 meters;
- pipe with a diameter of 1.5 cm, a length of 1.8 meters;
- a steel plate slightly larger in size than the engine and 0.5 cm thick;
- metal or plywood for the bottom and seat;
- seat (preferably sports). By the way, it wouldn’t be a bad idea to bet on cards.
- Transmission, steering and brake systems:
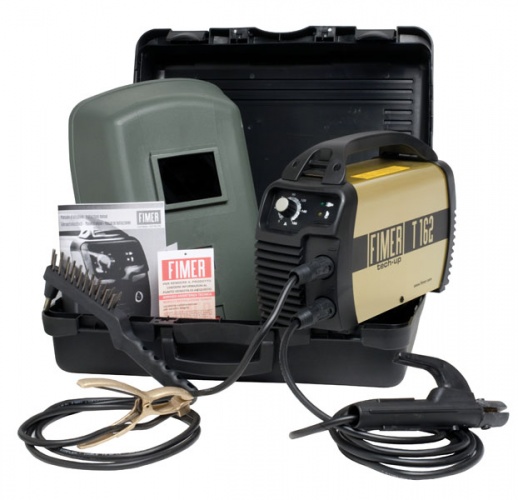
Except necessary materials and parts you will need welding machine. The kart chassis must be welded with high quality so that the welding seams are not destroyed by vibration.  To purchase all the necessary new materials you will need about 30,000 rubles. But it’s more convenient and easier to make from new parts.
How to make a go-kart frame
It is better to cook and assemble according to the drawing. Put all the dimensions on the diagram in advance.
- Cut the pipes to the specified dimensions and clean them.
- Weld the frame.
- Reinforce with stiffening ribs where it makes sense.


After welding work, you should get a frame like this for the map. 
What engine is on the go-kart?
The most suitable engine internal combustion for karting is a chainsaw motor and a trimmer (lawn mower). After disassembling the saw, all unnecessary parts must be removed from its engine: handle, chain, tank, etc.
The difficulty here arises in remaking the sprocket. You need to sharpen the teeth of the chainsaw sprocket a little. Two holes must be drilled in the cooling system casing for mounting to the subframe. 
The internal combustion engine of a go-kart is installed at the rear. To do this, you need to weld a thick plate on the back of the frame. The motor must be secured so that its sprocket is in the same plane as the wheel sprocket.
If you buy everything necessary details In the store, it may be more advisable to immediately buy a ready-made racing unit for karting.
One of the car map options looks like this:

Probably every ardent motorist, not necessarily young, but also adult, sooner or later thinks about how to assemble a real sports kart with his own hands. There is a certain group of people who are seriously interested in this hobby and hold weekly Sunday races at a paid karting track.
It turns out that anyone can make a homemade kart. You can learn how to assemble a kart from this article, which was written jointly by highly qualified designers and those who assembled such equipment with their own hands.
In general, the pedal assembly card is a fairly simple and reliable design. Pedals are often made from steel or even aluminum rod with a diameter of 8 mm.
Particular attention will need to be paid to the location of the control cables, where there should be no sharp bends, and the cables should not hang freely and get tangled.
The rear axle deserves special attention. For elasticity and, it will need to be made with an open rear axle from 18HNVA steel. Special bearing grooves at the end of the axle are also required.
The video shows a kart assembled with your own hands:
Also, the hubs are threaded onto the conical components of the rear axle not only with bolts, but also with a chain sprocket, the number of teeth of which can be changed depending on the power of the unit installed on the homemade kart.
As for, it will need to be bolted to the frame.
Almost everything is done. All that remains is to install the finished seats, steering wheel, and other important details. Having learned how to do a go-kart with your own hands of a conventional design, you can later get the hang of it and assemble real professional samples that will be the envy of many to win races.
You can make a go-kart with your own hands if you have a simple fleet of machine tools. The design of the KS-76 model with minor changes is taken as the basis.
The picture shows overall dimensions of the map and its components:
- Rear wheel.
- Front wheel.
- Frame.
- Hydraulic brake drive.
- Rear axle.
- Steering.
- Seat.
- Bottom.
Design map.
Wheels.

The presented model uses wheels of two types (in width).
Front wheel:
- disk 4 J - 4.5 PCD = 6 x 76 ET = 4 DIA = 55
- tire 110 / 60 R 4.5
- disk 6.5 J - 4.5 PCD = 6 x 76 ET = 4 DIA = 55
- tire 168 / 40 R 4.5
Before you start designing, you need to know exactly the dimensions of the wheels and tires used. The selected wheel sizes should determine: ground clearance of at least 30 (mm); shaft length rear axle; height of bushings on the frame for fastening rotary mechanisms front wheels; location of the rear axle axis in the brackets.
Frame.

- Brackets (supports) for rear axle mounts.
- Hydraulic brake drive mounting plate.
- Fuel pump mounting bracket.
- Mounting point for the chain tensioner.
- Engine mounting plates.
- Bottom fastening gussets.
You can bend pipes using a homemade one.
In the presence of attachments, fasteners are welded to the frame: seats; master brake cylinder; expansion tank for liquid; tubes; accelerator and clutch cables and pedals; gas tank; gear shift knobs; chain tension adjustment devices; stops limiting the angle of rotation of the steering mechanism.
Hydraulic brakes.

- Caliper housing.
- Working cylinder.
- Piston.
- Rubber cuff.
- Brake shoe.
- Friction material.
- Brake hose fitting mounting location.
- Pad guide.
- Pressure spring.
- Brake bleeding valve.
- Cotter pin.
- Castle nut.
- Guide finger.
When braking, the liquid in the cylinder, expanding, presses on the cuff (4), which pushes the piston (3) out of the working cylinder (2). The piston (3) moves the brake pad (5) to one surface of the brake disc. With a constant increase in fluid pressure, the caliper (1) moves along the guide pins (13) until the other pad is pressed against the opposite side of the disc, after which braking occurs with uniform pressure.
Rear axle.

- Rear wheel hub.
- Housing with bearing.
- Pressure sleeve.
- Fuel pump drive eccentric.
- Axle (shaft).
- Rear wheel brake disc.
- Mechanism for attaching the brake disc to the shaft.
- Chain sprocket.
- Clamp (collet).
- Washer.
- Castle nut.
- Cotter pin.
Front wheel swivel mechanism.

- Cotter pin.
- Castle nut.
- Bearing No. 201 with protective washers.
- Hub.
- Trunnion.
- Bearing No. 104 with protective washers.
- Kingpin.
- Rounded fist.
- Brake drive device.
- Front brake disc.
Steering.

- Steering wheel.
- Rotary mechanism.
- Steering column.
- Emphasis.
- Main thrust.
- Intermediate row (trapezius).
- Rubber-metal hinge.
Karting is one of the most popular hobbies today. Not only children, but also adults do it. These small but very fast cars give you the first driving skills and also allow you to get a dose of adrenaline during an exciting race around the circuit.
What is karting or kart? A go-kart is a mini sports car that has no suspension and is capable of reaching high speeds in a short period of time. Often, karting enthusiasts have the opportunity to buy their own personal karting or want to create an exclusive karting with their own hands. Of course, making a homemade go-kart is not only cheaper, but also very exciting at any age.
In addition, if we recall the history of karting, this sport originated precisely as racing on homemade go-karts. Only over time, karts were put into production. Let's consider the main stages of design.
Design
Below is a list of the necessary materials to make a go-kart with your own hands.
- Steering/brake system:
- Transmission;
- handbrake;
- steering wheel;
- wheels;
- steering and drive shafts;
- gas and brake pedals;
- bearings.
- Engine:
- engine (you can use the engine from a chainsaw or lawn mower-trimmer);
- chain;
- fuel tank;
- bolts and washers.
- Chassis:
- 2.5 cm square pipe, 9.2 meters long;
- steel pipe with a diameter of 2 cm, a length of 1.8 meters;
- pipe with a diameter of 1.5 cm, a length of 1.8 meters;
- a steel plate slightly larger in size than the engine and 0.5 cm thick;
- metal or plywood for the bottom and seat;
- the seat itself.
To make a go-kart with your own hands, you will need a welding machine. The chassis is the basis of the go-kart. They hold you during the ride, and they also house the engine. If you have never done welding work, then it is better to use the services of a professional, because parts welded by a non-professional may only seem durable, but in practice they will have microcracks and cracks, as a result of which your kart can become a deadly vehicle. If the chassis will consist of several parts, then welding must be carried out at high temperature and deep penetration, welding seams should be as neat as possible. If you decide to carry out welding work yourself, then it is better to practice welding small products and only after receiving good experience start welding the kart.
One of the options for assembling a homemade go-kart is to purchase ready-made parts. So, if you don't want to suffer with independent creation parts and their subsequent welding, then you can purchase a ready-made construction set that can easily be assembled according to the diagram using simple tools and without welding work. The approximate cost of such a constructor for a homemade go-kart is $550.

Chassis and steering column assembly

Advice: do all the difficult and important work Firstly, additional details It's better to add it at the end.

Installing the engine and steering column

Tip: the above instructions are designed for the fact that when creating a homemade go-kart, parts from old broken motorcycles, lawn mowers, etc. will be used. If you use only purchased ones finished parts, then it will probably be cheaper to buy a ready-made kart.
Warnings:
- Before you go to the race track, make sure that your homemade kart is in good working order, as parts may break or become detached;
- Always wear a protective devices, such as helmet, lining, etc.;
- You should not accelerate in a homemade go-kart to a speed of more than 30 km/h. This may cause mechanism failure or parts breakage, since this model does not have high-tech design and engineering solutions;
- remember! A go-kart is not a real car. Under no circumstances should you drive it on the road.
Video: homemade karting. Assembly.