A glazed balcony or loggia not only provides additional thermal insulation and protects against extraneous noise from the street. Such a decision makes the owner square meters the owner of an additional (albeit small) room, which can be equipped to your own taste and according to your needs. A bunch of construction companies In this regard, they offer their services, as do sellers of PVC and aluminum profile structures. However, often the financial situation forces you to look for more cost-effective options that involve doing most or all of the work yourself. This article will talk about how to glaze a balcony yourself.
Important: glazing of balconies requires official approval from the relevant authorities. If you do everything “according to the law,” then first you will have to take care of additional “permitting” documents.
How best to glaze a balcony
There are quite a lot of methods, we will list all the main ones and give a little idea about them, which will allow you to decide on the direction of work in the future.
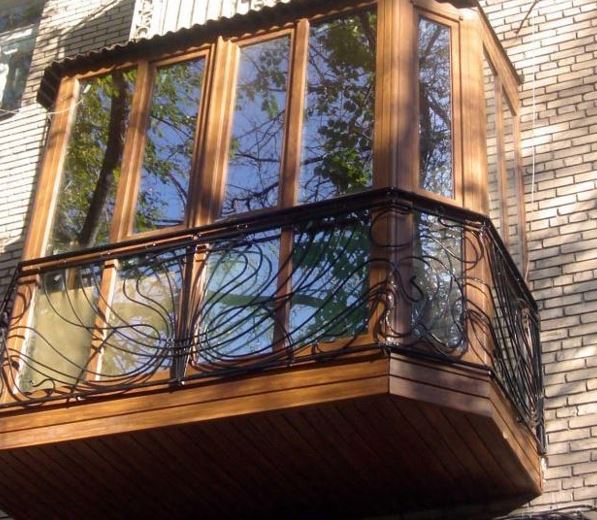
Glaze the balcony photo

- "Cold" glazing, regardless of the method of opening the frames, suggests that the balcony can be used as an additional “livable” room only in the warm season. This is the most inexpensive option, since aluminum profile structures, which are most often used for these purposes, are quite affordable. Among the positive qualities of this type of glazing is its low weight, so if there are doubts about the reliability of the support, then aluminum will the right choice. TO external influences the material is very resistant to humidity and low temperatures not afraid, although it can still become deformed from sudden jumps. Sometimes wooden frames with one glass are used for the “cold” method.
- There is also an option with "warm" aluminum profile. It uses double frames and double glazed windows. And in addition, special plastic placed inside the profile keeps heat inside and does not let cold air in from the street. But this design is almost not in demand due to its high cost.
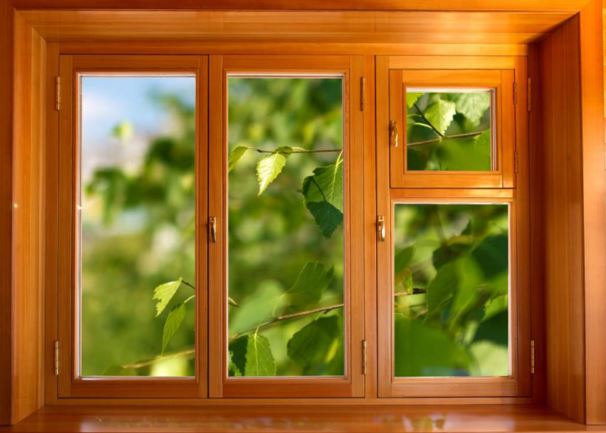
- Usage wooden frames is considered a budget option, but labor-intensive in terms of caring for them: you will have to renew the paint once a year if appearance has the meaning. To reduce the cost, some use used wood. With proper care it will last quite a long time. If your income allows, then you can, as they say, install wooden “Euro-windows” once and for life. Their production technology makes them durable, and they look very impressive.

- Panoramic view glazing assumes that special glass, additionally processed to increase its strength characteristics, serves as the basis for assembling a balcony fence from floor to ceiling. From the point of view of creating a spectacular space, this method takes a leading position. Due to the thickness of the material, the apartment becomes protected from heat loss and the noise insulation performance increases. The partition can be made of tinted glass and looks especially stunning when assembled without frames.
- Frameless method Balcony glazing requires certain skills and literacy during installation. But the complexity is justified by the result when the “output” is a light, as if weightless, structure made from one glass. The lack of frames is compensated by special metal guide profiles. It is in them that the glass sections are fastened and moved along them. Special tempered glass is used for such tasks.
- PVC profile frames are a popular and practical way of glazing. The ability to install a double-glazed window with three air chambers significantly insulates the room, especially in combination with a wider profile. Installation is simple and quick, and the service life is quite long, and all this splendor will not require complex maintenance. For those who do not want to install plastic windows because the sashes “eat up” a lot of space when opened, you can opt for the option with sliding sashes.

- If you want glaze the balcony “with the extension” of the structure, then you should be very confident in the strength of the parapet, because the load on it in this case will increase in two directions at once.
Important: it is better to carry out work on the exterior finishing of the balcony with siding or other materials before glazing. This sequence will make the cladding work easier.
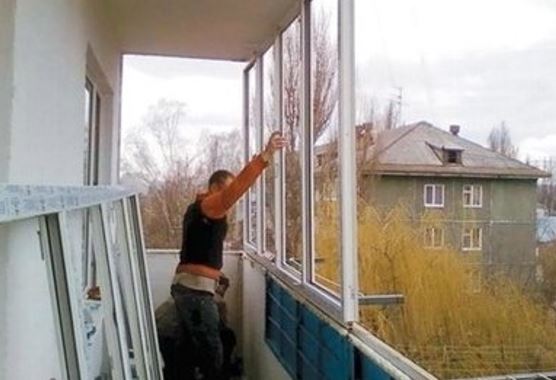
How to glaze a balcony with plastic windows
- This process is not very difficult, especially since the manufacturer itself carries out measurements, so there should be no mistakes in this area. So, the finished PVC structures have been delivered, the decision has been made to abandon installation, what next?
- The existing old sashes are being dismantled and at the same time the balcony must be freed of all objects and things that may interfere. The space on the balcony can’t be called large anyway, so ideally it’s worth taking everything out of it. How else is the stage useful? deep cleaning"? All the nuances that require improvement and elimination during insulation, waterproofing, and so on become immediately visible.
- A wooden beam is secured along the perimeter of the balcony using mounting dowels. When measuring, the presence of beams is taken into account. That is, the height finished design will be equal to the height from the side of the barrier to the top plate minus the parameters of the crossbar. It is worth checking with a representative of the supplier company what thickness of beam he includes in the calculations.

- First, the PVC frame itself is installed without sashes. First of all, the main and largest front part is mounted. And then the side one. In order to save money, many people abandon glass on the side in favor of sandwich panels. This, of course, is a matter of taste.
- On the street side, a flashing is attached under the frame. If a balcony with a roof is glazed, then the canopy must also be secured. It is placed under the structure and secured with self-tapping screws, and the cracks are filled with sealant. The visor will protect against moisture ingress and leakage into the profile and into the room. Therefore, issues of tight fit should be given more attention.
- When the frame is level and secured, you can begin installing the sashes in place. After installation, you should check them for tightness. Important indicator and smooth operation when opening and closing. If everything is done correctly, the frames will open easily and close without effort, fitting tightly into the opening.
It is important to think carefully about the options for opening the doors. This structure will have to be washed, and it is better to plan it so that from the tear-off section you can easily reach the adjacent “blind” one. It’s unlikely that anyone would want to risk their life cleaning things up.
- From the outside it is convenient to hide the joints using additional decorative elements. They can be purchased independently, or “included in the kit” when ordering from a company that supplies PVC frames. All gaps from the inside are sealed using polyurethane foam. When it dries, it is trimmed and removed from the frame and sashes. protective film. Next, work continues on the final decoration of the room.

Glaze the balcony video
Glaze the balcony with an aluminum profile
Another advantage of a lightweight aluminum structure is the sliding opening system. It saves space, however, it also causes problems with the folds freezing in winter. If the choice is still made in its favor, then we learn how to properly glaze the balcony.
- We dismantle the previous glazing.
- If the parapet is made in the form of metal handrails, then an “apron” made of galvanized steel must be installed on top of them. If the barrier is concrete, this is not required. The profile will fit right on it.
- The visor is mounted.
- A window sill is being installed.
- To secure the frame, anchor plates are installed in the opening. By using anchor bolts a frame structure is installed on them.
- The ebb is attached to the frame.
- Sashes are installed in the openings.
- All seams are sealed using polyurethane foam and covered with flashings (optional)
- The final step is to adjust the fittings. The doors should move apart smoothly without making any noise. This indicates correct installation.

Glaze the balcony with wood
It's good if you home handyman Carpentry skills available. Then the option with glazing with wooden frames becomes cheaper. After all, using wooden beams, glazing beads and ordinary glass 4 mm thick, he can assemble the sashes, providing them with the simplest fittings from the nearest store. However, even in the absence of such talent, you can order an inexpensive finished product from a workshop. After which you can begin installation.
It is important to consider that a large structure can “sail”. Therefore, despite the visual appeal of large and wide openings, this unpleasant effect is worth remembering.
- Preparation has already been written above, so we skip this stage.
- There are no special tricks in installing such a structure; moreover, the process itself differs little from, say, installing a PVC profile. Using metal fastening plates and screws, we install a wooden frame without frames.
- The ebb, canopy and window sill are installed similarly to the glazing methods described earlier.
- The seams are foamed and subsequently hidden under the finish.
- The sashes are fixed in place, the fittings are adjusted.

For a long time, this was the only way to glaze a balcony in a Khrushchev building. Of course, such glazing will never become the object of envy of neighbors. But if done carefully and securely fastened, it can protect against dust, falling leaves and change the microclimate on the balcony by a couple of degrees.
How to glaze a balcony with your own hands using a frameless method
- A very impressive type of glazing, but it also requires some effort and courage. The first thing many homeowners fear when they are offered this option is safety. If we are talking about installing “full-height” glass, then it may be worthwhile to provide some kind of removable structure, reaching a meter in height, and attached to the walls or floor at a time when, for example, children are playing on the balcony. It is quite easy to cook from metal pipes small diameter.
- The second not entirely desirable effect of a magnificent view of the surrounding area is an equally wonderful view of the privacy of the apartment. Especially in the evening with the lights on. Those who do not want to provide neighbors and random passers-by with the opportunity to watch the reality show “live” can choose the following “rescue” options.
- Consider a system of curtains or blinds. The second option will be expensive, given non-standard sizes opening, and you will have to suffer with a fabric solution.
- At the planning stage, you can choose the type of glass with one-sided transparency. They look good, on sunny days they are very good, but in the fall and in cloudy winter weather such glazing evokes melancholy due to the low bandwidth Sveta. Alternatively, the presence of such glasses can be combined with regular ones.
- If we are talking about frameless glazing of a balcony only in the part where most people are accustomed to seeing the window opening, then the difficulties described above do not arise.

Important: glazing into the floor requires dismantling the parapet. Before carrying out work, you must make sure that the demolition is legal and will not cause negative consequences for the whole house.
- For all its attractiveness, the panoramic method requires additional expenses for insulation, well, you shouldn’t choose it if the balcony offers a “wonderful view” of the factory complex or the dull neighboring multi-story buildings.
- An aluminum panoramic profile will be cheaper, but its ability to retain heat, let’s say, tends to zero and you should think carefully before installing it.
There are many options, but each of them can be implemented on your own. Therefore, balcony glazing can be considered a type of work on which you can save money.
Proper glazing of a balcony with your own hands will not only provide your home with additional characteristics thermal insulation and sound insulation. But thanks to the fact that the balcony will be glazed correctly, corresponding to all its main characteristics, you will also have an additional, albeit small area. She can serve you extra space for personal recreation or a place to store things (warehouse).
Most companies offer their own services for glazing balconies and loggias, most of them are those that manufacture plastic pvc structures with their further installation. But many people think that the company’s services are expensive, so you can read the presented article and do full glazing of the balcony yourself.
To glaze a balcony, a permit is required, which must be agreed with the relevant authorities, they must also give you permission and indicate the characteristics of the house and review your balcony slab. If you do not complete this procedure completely, your balcony will be considered illegal. But before glazing the balcony,...
Do-it-yourself glazing of balconies and loggias
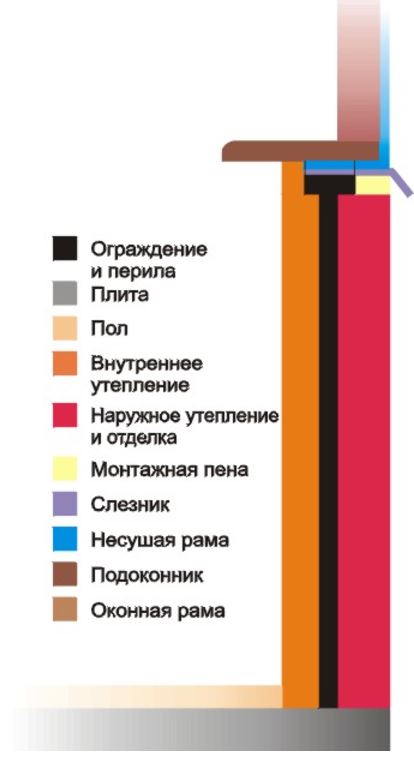
Each type of balcony glazing presents its own special category of complexity and requires certain skills, due to which certain difficulties may arise. Depending on the type of glazing you choose for your balcony, you will need to adapt to its structure and do it in a certain sequence. Thanks to the presented article, you will be able to fully overcome all the difficulties and take into account all the factors that you will need to glaze your balcony or loggia yourself. First, you should familiarize yourself with a small diagram of the arrangement of glazing elements:
Measurements and ordering of designs
After you have chosen which profile your balcony or loggia will be made from, you need to order the structure from the manufacturer. But, to do this, you must first take all measurements from your balcony and perform the appropriate calculations. To do this, it is necessary to completely dismantle the old glazing, if any. The previous glazing must be completely removed. You need to remove all the frames and all the fastenings until you go through the entire area from the ceiling to the parapet.
The next step will be taking measurements from the resulting balcony after cleaning. To do this, you need to use a tape measure to accurately measure all the distances from the base of the parapet to ceiling slab, and then, from one wall to another.
All measurements must be as accurate as possible, because sometimes this can lead to huge problems. Initially, this will not have any effect and will not be noticeable, but when direct installation, even a few millimeters can ruin the installation and deliver a huge amount various problems. It is worth noting the fact that when placing an order with a company, people are not completely trusted and they send their own measurer to check the correctness of the measurements.

In addition to the fact that the person sent from the company will independently take all the measurements again, he will also look at the general picture of the balcony. Further, he may say that your loggia does not meet all standards. This may be due to the fact that the parapet has been standing for quite a long time and may not support the entire weight plastic construction.
In the presented case, you can fix this problem by forging the parapet to the desired state or even pour a new parapet. Another option is to install not a plastic structure, but an aluminum one, which is much lighter.
There is an option where the balcony slab cannot support the weight of the structure. It will be quite difficult to correct this issue, but it is still possible with the help of additional reinforcement of the floor covering.
In order for the company’s expert to make a final decision, he needs to take all the dimensions from your balcony and carry out the appropriate calculations.
If everything is fine and your balcony is completely ready for full glazing. You and a company employee draw up an order for the structure, calculating its approximate cost.
Preparatory work
After the specialist has made his satisfactory decision, you need to move on to the stage of preparing the premises for further reconstruction. First, you need to completely check the parapet and find out the presence of all the cracks on it, even very small ones. Next, you should purchase galvanized metal and completely seal them.
You need to clearly measure the gap, cut the required piece from the galvanized sheet and seal the crack. It will need to be inserted from the outside under the railing, and then finally secured using self-tapping screws. This process is quite difficult to complete on your own, so you will need a little help.
If your parapet is not approved by a specialist, then you need to build a new one. To do this, you need to completely demolish the old parapet and build a new one from scratch. A standard parapet is laid out one brick wide. Its installation takes place on sand-cement mortar, one after another.

During the construction of the parapet, you need to constantly monitor its level, because in the end, it should be completely horizontal design. The clearly horizontal design will help you easily install the glazing.
After completing the manufacture of the parapet, you need to purchase a metal strip or corner with a cross-section of 5 mm. One of the selected materials will serve as a frame to which the structure frame will be attached.
The manufactured frame, using dowels and self-tapping screws, is attached along the entire perimeter of the balcony opening.
Additional preparation for glazing installation
So, let's proceed to the actual installation of the glazing of your balcony with your own hands.
- A manufactured structure has been delivered to you from the company and your balcony is fully prepared for installation.
- First, you need to remove the glass units from the frame. This process is quite important before installation, because the weight of the complete structure is quite large, and it will complicate the installation process.
- Usually, in companies that manufacture double-glazed windows, initially, the glazing beads are not hammered in completely; this is done to easily detach the double-glazed windows from the frame.
- To remove a double-glazed window, you need to pry off the beads that hold it in place with a spatula, and then remove them. It is necessary to pry starting from the middle and moving to the edges. This must be done in the following order, first the side beads, then the bottom one, and then last resort upper. Next, hold the glass and carefully remove it.
- Removed double-glazed windows must be placed on a clean and level floor, free of debris and other things.
- Next, you need to remove the sashes from the frame. There is a rod in the upper loop that must be pushed down and then pulled out completely using pliers or pliers.
- Next, you need to remove the sashes from the frame. To do this, you need to remove the latch, which is located in the upper hinge of the sash. After which the sash itself should be slightly tilted towards itself, then lifted and removed from the lower hinge.

Frame installation
- The frame comes with a stand profile that needs to be installed. It is a plastic strip that should be attached to the bottom of the structure. Turn over the already lightweight frame and, using a mallet, insert the bar into the grooves. Turn the frame over to its standard position.
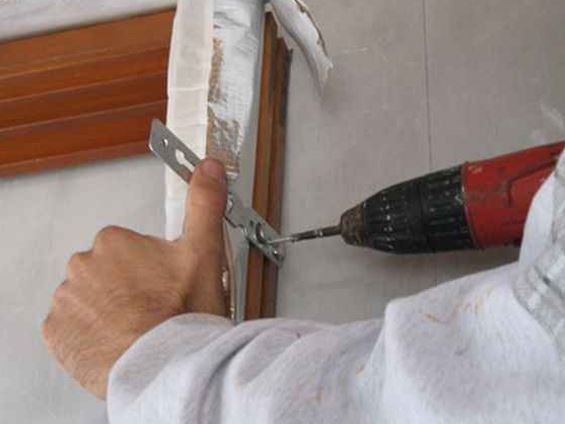
- Now it’s time to install the frame fastenings. From each edge of the window frame you need to retreat 15 centimeters on each side and secure the plate tightly in this place. A special hole must be drilled for each fastener. The part of the fastening that will protrude must be bent at a right angle; this part will be attached to the concrete surface.
- Installing a frame in a window opening. This stage requires additional help, it is almost impossible to do it yourself. It is advisable to have three people. The three of us install the frame in the designated place, after which it must be completely leveled in both vertical and horizontal positions.
- After complete alignment, using wooden stands, we fix the frame in its place.
- We attach the frame to the parapet. This must be done using anchors, which will need to be driven into brick or concrete at least 6 centimeters.
 Frame fastenings when installing glazing
  Installing a frame in a window opening
Installation of ebb tides
After the frame is installed, there are only a few details left that are also important to consider:
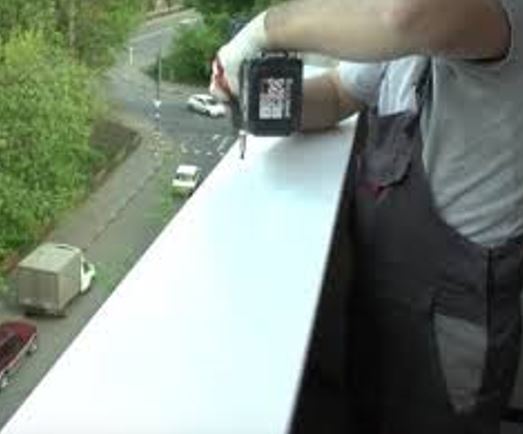
- Once the frame is completely secured in place, you need to install the canopy. It will serve as a drainage basin. Installation should take place in the upper, outer part, installation is carried out using self-tapping screws.
- The cracks are being blown in. This is done using polyurethane foam.
- Insulating glass is installed into the installed and secured frame.
- Next, installation is carried out on the hinges of the tilt and turn sashes.
- We secure the folding mechanism to the sash and frame.
- The last stage is a complete check of the tightness of the fit and full-time job valves
 Installation of ebb tides
  Installation of low tide on upper floors
 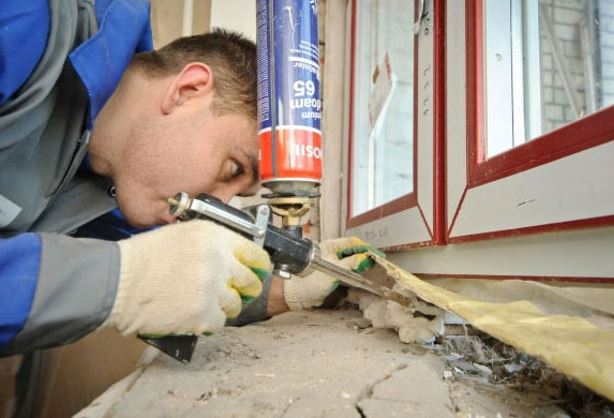 Sealing cracks with foam
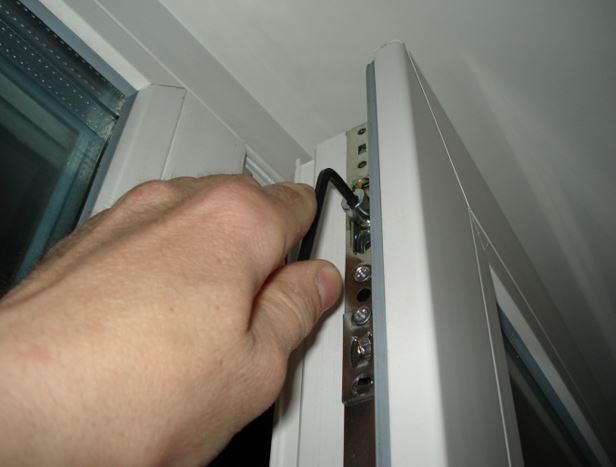
If the doors move with extra effort or are difficult to open/close, then they need to be adjusted as in the photo.
Self-installation of PVC structures for balcony glazing
This process is quite simple, although they charge a lot of money for its work, which is why we recommend that you install the windows yourself. This will not only save your finances, but will also help you buy additional accessories or something else altogether. The company you contact to order windows will have to send you a measurer who will independently take all the dimensions and transfer them to the company so that the direct craftsmen can make you a window structure. Once the order is completed and delivered to your home, the direct work, related to complete, independent, and most importantly correct glazing of your balcony or loggia.
A complete installation of PVC window construction is described above, only a few can be noted here individual characteristics and interesting points when installing a window structure from PVC profiles with your own hands.
Glazing of a loggia using an aluminum profile
Glazing using an aluminum profile is not a more complicated installation system compared to plastic, but each has its own nuances. By giving preference to the presented type of profile, you can also easily carry out a complete and completely correct installation yourself, saving the same money that can be used for other items and the like. So, let's get started, all the work coincides with general options glazing except:
- If your parapet is initially made in the form of standard metal handrails, then you will need to install an “apron” on top, preferably made of galvanized steel. If a concrete barrier is installed, no additional actions are required. The profile will be installed directly on it.
- For a complete correct installation frames, you first need to install anchor plates. Next, the structure is secured using special anchor bolts. You need to pay special attention to this point, because it differs from installing a plastic profile.
After all the above steps have been completed, the doors should slide apart smoothly and not create noise when closing. If these factors are normal, then you have done everything correctly and can continue to arrange your loggia (balcony).
Wooden window structures
In order to glaze a balcony or loggia yourself with wooden window structures, you will need some carpentry skills. If you understand this, then this installation option will not only be easier, but also cheaper. In order to install wooden window structures yourself, you need to assemble the sashes correctly and as accurately as possible.
For a carpenter, this will not take much time and high costs. He will be able to assemble the sashes himself using timber, ordinary glass with a thickness of 4 millimeters and glazing beads. But if this talent is not present, then you will have to order the presented product from a separate workshop. And only then begin the glazing of the balcony.
An important point, also, sch
There is also the fact that a large structure can “sail” a little. No matter how beautiful and attractive a large or wide space looks, you should never forget that if you do not pay due attention to its features, serious problems may arise.
Glazing of a balcony using a wooden profile
- Using metal mounting plates and using self-tapping screws, you need to completely install the structure frame and secure it.
- All fittings are fully adjusted and checked.
Enough for a long time for glazing in Khrushchev-era houses, this was the only possible variant. Such designs do not look very prestigious, and the neighbors will not envy him.
But even this glazing option allows you to protect your balcony or loggia from unwanted dust and dirt, water and falling leaves, and much more. And in the housing itself, the temperature will rise by several degrees, due to which heating costs will be reduced.
Frameless window designs
The presented type of glazing looks as impressive as possible and is very beautiful. But in order to do it, appropriate efforts are needed. Also, it is important to take into account the fact that this option is not the safest, especially in those moments when children are playing on the balcony. Since the windows will be full height, it is often proposed to make or purchase an additional removable structure, for example, a meter high. At such moments, as indicated above, you can install it and no longer worry about the further actions of the children. Usually, this design, is made of metal pipes with a small diameter.
Another point that is worth paying attention to when glazing a balcony is that not only from the apartment you will be able to see as much as possible everything that happens on the street. But even from there one can see one’s entire personal life. All housing will be especially visible in the evening when the lights are on. In order to avoid the “reality show” effect at home, there are several options:
- You can think it over separate system curtains and blinds. This option is quite common, but here it is worth considering the fact that blinds will become quite an expensive pleasure. And when choosing a fabric, it should be completely opaque, even in the light.
- The second, more popular solution to this issue seems to be the choice of a design with one-sided transparency glass. IN summer time, they will be as beautiful and efficient as possible, but in other seasons, they will be a little dim, and there will not be enough light. As another small variation, we can say that such glasses are combined with ordinary ones, that is, you can make some single-sided and some ordinary double-glazed windows.
Interesting facts about frameless glazing
When considering frameless glazing, more high floors, and without being nearby standing houses, the above incidents do not occur. An important point is the fact that installing frameless glazing will require demolition of the parapet. This small factor can have a unique impact on the overall structure of the house, so it is advisable to contact the appropriate service and find out all the details.

Beauty is beauty, but it is worth paying a lot of attention to the insulation of this balcony, because the glass itself will not be able to protect the home as much as possible from the winter cold. An unpleasant moment may also be that the balcony goes directly to another house or to a nearby factory.
The aluminum panoramic profile does not have high thermal insulation characteristics, due to which it is also worth thinking about before choosing it.
Features of glazing with and without extension
You should also consider some features of installing remote glazing along with standard glazing. Of course, there are not many of them, but you should know them..
- First of all, for carrying out glazing with removal, especially when working in old houses, you will need to strengthen the parapet, since this type glazing has a slightly greater load than standard options.
- In addition, we further suggest looking at the diagram of the remote version of the balcony, to understand some of the differences in the structure compared to conventional balconies.
- In addition, it can be noted that here you will need additional arrangement of a larger and more durable visor.

Conclusion
Glazing a balcony yourself is not a difficult task. With its help, you can save your finances well and buy something else. Now, having studied the installation of each of various designs, you can easily glaze the balcony yourself. We also suggest watching a short video tutorial on how to glaze a balcony yourself:
If you properly insulate and properly glaze the balcony, the open area will turn into an additional living area. Armed with the necessary knowledge, you can do it yourself, following the instructions for performing the main stages of work on installing the selected balcony structure.

A glazed balcony will not only expand the space of the room, but also protect additional area from exposure to bad weather outside, will reduce heat loss in the room. To decide on the direction of work, you need to know what types of glazing in an additional room exist and what type your balcony is.
Choosing a glazing method
For cold type glazing, single glasses framed with lightweight window frames are used. An inexpensive do-it-yourself glazing option, suitable only for summer time, is made with an aluminum profile that does not load the support.
When choosing a warm glazing option, you will have to install double frames with special plastic inside the profile. This design reliably protects from the cold from the street, but has high cost and more weight.

The French type of glazing is made of windows with transparent mirror glass. Frames made of high-strength glass are installed along the perimeter of the balcony space along the entire height. The solid glass sheet creates a stunning viewing effect.

Important. For comfortable use of the balcony at any time of the year, the space should be protected from condensation. They implement the task by using high-quality insulation with double sealing, as well as the presence of an adjustable ventilation system.
Which double-glazed windows to choose?
- Plastic structures with single glass for low-budget reconstruction are considered to be the most convenient for installation on a balcony. The option of massive windows with the installation of double-glazed windows is more expensive.
- Lovers of antiquity prefer double-glazed windows framed with wooden frames. Massive structures made of natural wood look good, but have a significant drawback - the need for careful maintenance.
- A current option for glazing loggias in old houses can be considered aluminum profile. Installation light frame the weakened ceiling will not be heavily loaded on the balcony base slab and parapet.

How to glaze a balcony with your own hands
Before the beginning installation work you need to decide on the option of installing balcony frames. Among the methods of self-glazing an internal or hanging balcony, the following methods are the most popular.

It is important to take care of external cladding balcony It will be difficult to do exterior finishing from an already glazed room, but to perform external work it is better to contact craftsmen who have special equipment for working at heights.
Construction Work Guide
Getting started with glazing own balcony with your own hands, you need to decide on the scope of preparatory work. Step-by-step instruction:
- Having cleared the room of things and debris, assess the condition of the external and internal structures;
- if defects are found (irregularities, cracks, bevels), they must be leveled so that there are no problems during operation;
- if you choose to install frames on a metal parapet, insulate it before starting glazing work;
- when leaving the old fence, take care of the strict horizontality of its surface and strength;
- if old frames are installed, dismantle them; in the case of a balcony on top floor– install the visor.
Having completed the preparation, they begin to measure each surface, not forgetting the space from the processed parapet to the installed canopy. The dimensions of the side windows and the front area must be done especially carefully. Control is carried out according to the difference in diagonals - no more than 2.0-2.5 cm.
Measurements and ordering of designs
Inaccuracy of measurements threatens problems after installing frames; it is better to entrust the measuring work to a professional measurer. If you are not a professional, taking your own measurements will help you estimate the estimated cost of glazing a balcony space.

Measurement plan:
- the height of the balcony is measured as the distance from the plane of the parapet up to the bottom of the balcony slab located above;
- for a plastic structure, subtract 8-10 cm from the resulting height, in the case of an aluminum frame - 3-4 cm;
- The width of the loggia is determined by taking measurements in the horizontal plane along the parapet between its edges;
- at plastic version glazing subtract 5-6 cm from the resulting length, for aluminum type - 2-3 cm.
Advice. Measurements are taken with a construction tape; it is important to monitor the tension of the tape. If the balcony room is wide, height measurements are taken at a distance of a meter from each other. By choosing the smallest value among the obtained values, you will determine the height of the balcony.
Before placing an order for the production of balcony windows and supporting structures frames, it is necessary to decide which of them will remain stationary and which will need to be equipped with sashes. If deviations are found, they will need to be taken into account when ordering the manufacture of frames with double-glazed windows.
The accuracy of measurements can only be guaranteed by a professional who will take into account the features of the structure, suggest the volume of necessary components, and give advice on finishing and insulating the interior.
Additional preparation for glazing installation
When taking the dimensions of a hanging balcony, before measuring the front and side railings of the balcony, you should make sure that the roof of the balcony overhangs its vertical fence with railings. This is checked using a plumb line. Also check the calculated value of the upper perimeter with the lower one, they should match.
To install windows on an open balcony or loggia with your own hands, you need to prepare a set of tools in advance:
- a reliable hammer with a hacksaw, nails, screwdrivers;
- hammer drill with a powerful drill (8 mm), dowels, set of self-tapping screws;
- gun for construction work, spatula;
- varnish and brushes, high-quality sealant, polyurethane foam.
Important details. From a legal point of view, work on glazing a balcony is classified as redevelopment of an apartment; permission must be obtained for this. To ensure safety, you will have to stock up on a safety belt and find a partner to install heavy frames with glass.
How to properly glaze a balcony with your own hands
If the parapet is not to be dismantled, it will have to be additionally insulated to retain heat in the constructed room. Cracks in the vertical fencing of the loggia are sealed, surface unevenness is leveled, insulated and insulated.
Frame installation rules
The installation of the balcony begins after installing the canopy. We take out double-glazed windows with non-opening sashes, and remove the hinged ones from their hinges. Such actions will protect the glass from damage and lighten the weight of the window product. What to do next:

Upon completion of the above operations, the window sill (inside) and drainage (outside) are installed. After this, the installation of the balcony with glazing is considered complete.
After sealing all the cracks with polyurethane foam, you can return the double-glazed windows to the frame, not forgetting about the flaps. They need to be hung back, making sure that the opening mechanism is working.
Installation of ebb tides
To reliably protect frames from moisture penetration, choose ebbs made from a material with long term services. What do protective elements provide:
- upper - drainage protects the window structure from the weather outside;
- the lower one - to protect the junction of the window frame with the railing of the balcony frame.

The top ebb panel along the balcony perimeter is secured with galvanized screws to the surface of the top floor slab. The lower ebb is fixed under the lower part of the window frame with self-tapping screws designed specifically for the type of material from which the ebb is made. The do-it-yourself drainage system is sealed.
Advice. For reliable protection against shifting of the “dew point” and the formation of condensation, balcony walls must be insulated not only from the inside, but also from the outside. If you are getting rid of the old parapet, you should take into account the weight of the material of the new structure so that it does not load the base of the balcony.
Installation of wooden window structures

First you need to install a box made of wood. After fixing the lower beam (railing) and the upper part of the structure (ceiling), the side elements are fastened with brackets to the walls.
Step-by-step instructions for glazing a balcony with your own hands:
- installation and fastening of support posts made of wooden beams - corner, end, intermediate;
- insert the frames after first removing the glass, install the front glazing first, then the side glazing;
- if distortions or other defects are found, they are removed by leveling with wedges;
- Having fixed the frames with self-tapping screws and anchors, seal the seams using polyurethane foam;
- return double-glazed windows and removed sashes to their place, making sure that the glazing beads fit snugly to the frames.
Advice. Before installing the wooden frame, treat the mounting surface of the main beams with sealant and antiseptic. This will help protect the structure, which can be pre-painted, from the accumulation of moisture penetrating from the outside, and will make the balcony room much warmer.
Glazing of a loggia using an aluminum profile

Lightweight aluminum construction is most popular today due to the low cost of a fairly durable product. The high-strength structure chosen for the cold method of glazing the balcony space will last at least 80 years if it is installed correctly:
- we install the prepared wooden frame, seal all the cracks;
- We dismantle all sliding elements, remove glazing that is not tightly secured;
- We fix the visor on the top plate with a special fastening fittings, and also install ebb tides on the parapet;
- along the perimeter of the wall panels we attach mounting plates to the frame at pre-marked places;
- we return the previously dismantled elements of the balcony system, filling all the voids with polyurethane foam.
Video instruction:
Thanks to its modern design and extensive color scheme aluminum profile easily adapts to any option home interior. A significant disadvantage of aluminum structures is low noise insulation and a high probability of negative consequences associated with changes in ambient temperatures.
Installation of frameless window structures

The frameless method of glazing balconies has a spectacular appearance, but creating a home panorama will require a lot of effort. It is also important to take into account that when installing a full-length glass panel, neighbors and passers-by on the street will become witnesses of your private life in the apartment.
What else will lovers of viewing the surrounding area have to do:
- take care of the safety of the space when people are there;
- ensure reliable insulation of the room, which will increase the cost item;
- choose a glass shading option - curtains, blinds, tinted glass.
Advice. When choosing frameless glazing, which you will do yourself, you will have to dismantle the balcony parapet. For this type of work, it is necessary to obtain a permit, as well as a conclusion that dismantling the structure of the house will not result in negative consequences for its residents.
Features of glazing with extension

If on glassed balcony you are going to work on the device winter garden, it is wiser to choose the glazing option with offset. But you will have to take into account some restrictions - a ban on installing the extension for old houses and the maximum extension, it should not exceed 35 cm.
When there is no ban on removing the balcony, you can implement the idea in one of the following ways.
- on the windowsill. An additional metal structure, on which double-glazed windows are installed, but the floor area remains unchanged.
- Expanding the balcony space along the floor line will require more time and effort. As a result, the owners receive not only a visual expansion of the balcony space, but also real additional meters.
Remote glazing work on this type of balcony can be done independently if you have the appropriate knowledge and experience. But you can’t cope with the vast scope of construction work alone; for installation load-bearing structure you will need two people.
Glazing an apartment balcony with your own hands will significantly reduce costs and allow you to gain pride in your own work. But this is only if you have sufficient knowledge of the construction specialty and can quickly assemble a small team of professional builders. Otherwise, problems are guaranteed at the very beginning of glazing work. It is much safer to spend money, but order a high-quality product created by time-tested craftsmen of a well-known company.
Reading time ≈ 3 minutes
An unglazed balcony does not fully perform its functions. It seems that you can perform some actions on it, but there is always a fear that the weather is bad, or the neighbors are upper floors will make some adjustments to your plans. It cannot be used as a place to store things either. In order to protect a piece of your space, the right decision is balcony glazing.
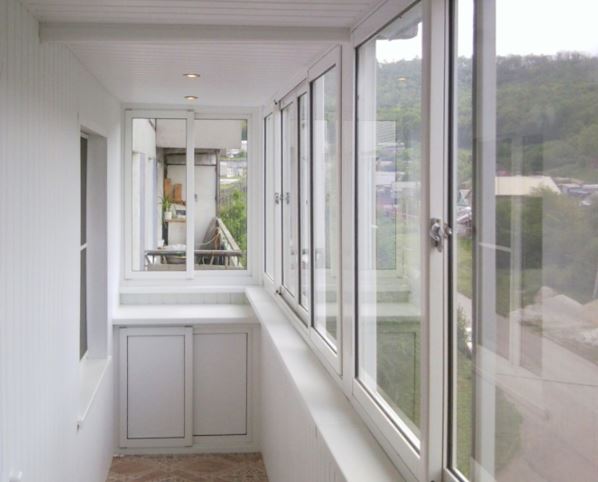
There are a huge number of options for glazing balconies, you can see this by looking photo in the article, but the most interesting thing is to carry out such repair work yourself.
Preliminary measurements and calculations
Before you perform plastic glazing balcony, you need to clearly understand what dimensions windows are needed. To do this, we remove the previous glazing, if there was any, of course, and dismantle the frame and fastenings. We remove everything completely so that the ceiling from above and the base of the parapet are visible.

The next step is to directly measure all the required dimensions: from the ceiling to the parapet, and between two walls. It is also important to make sure that the parapet is horizontal using a level. After all, if there is a misalignment of more than 15 mm, the frame may simply not fit into the slot.
Preparatory work
At DIY balcony glazing preliminary work boils down to preparing the parapet for the future installation of a window frame. Carefully inspect the parapet; if you have any doubts about the strength and stability of its base, it is better to make a new one. To do this, we remove the old one, and in its place we put a new one in one brick, everything is strictly level.

After this, we make a frame to install the frame around the entire perimeter of the parapet. For this purpose, a metal corner with a cross section of 0.5 cm, which is screwed to the parapet using dowels, is perfect.

If you are satisfied with the old parapet, then if there is a gap, you need to seal it using a galvanized sheet. To do this, we measure the size of the gap, after which we place a pre-cut piece of galvanized steel on the outside under the railing and fix it with self-tapping screws. This type of work is best done with a partner.

The process of glazing a balcony with your own hands

- We take the glass unit out of the frame to lighten the weight by 25-30 kg. To do this, pull the glazing bead that is directed along the window, pull out the glass and place it next to it on the cleaned floor. The opening doors can be left with double-glazed windows.
- We remove the sash from the frame: push the rod in the upper hinge towards the bottom, then tilt the sash and lift it 3-5 cm, finally removing the sash from the lower hinge.
- We attach a plastic stand profile for the bottom of the frame.
- We install fasteners for the frame. Step back 150 mm from all extreme positions of the frame and, using silver self-tapping screws and a drill at least 3 cm long, secure the fasteners.
- We mount the frame into the opening. To do this, we secure the mounting plates with self-tapping screws.
- We assemble the frames into one whole using self-tapping screws. Check verticality and horizontality.
- We attach the frame to the parapet with anchors.
- We foam the cracks and install the canopy.
- We insert double-glazed windows and hang the sashes.
- After checking the tight fit of the closed sashes and the full functionality of all elements, we install the ebb and window sill.
Balcony glazing allows you to turn an open, undeveloped area into comfortable room. Provided that the glazing is done correctly, the balcony can become an extension of the room, which will significantly expand the living space.
It is possible to handle balcony glazing yourself. To do this, you need to familiarize yourself with the features existing varieties balcony designs, choose suitable option and complete the main stages of work in accordance with the instructions.

Types of balcony structures
Today, there are 3 main methods of glazing balconies: using wooden frames, using metal-plastic structures, as well as the frameless glazing method.

Modern wooden balcony systems are different high quality, reliability and long service life. Such frames are in many ways superior to outdated analogues, effectively coping with the suppression of street noise and thermal insulation.
Significant disadvantages appear only when sliding wooden frames are used. They are designed in such a way that water can penetrate into the sliding elements. When the temperature drops below zero, this will cause icing of the window system, which will not in the best possible way will affect her condition.
Metal-plastic systems

Modern metal-plastic systems are well-known long-livers. The average service life of such structures is 40 years or more. The risk of frames freezing is eliminated due to the presence of a drainage hole in the design of the system.


Frameless glazing, despite its apparent lightness and airiness, provides reliable protection from precipitation, muffles street noise and transmits more solar heat.

The glazing procedure is as follows:
- lower and upper guides for window sashes are installed. IN in this case the functions of guides are taken over by aluminum profiles;
- Tempered glass is fixed to the guides, which is characterized by very high strength and resistance to various types of damage.
However, frameless glazing has a significant drawback: the temperature on such a balcony will be only 2-3 degrees higher than the street temperature, so it will not be possible to fully use the balcony as a living and furnished space in cold weather.
Concepts of cold and warm balcony glazing


Cold balcony glazing performed using single glasses installed in lightweight window frames. In summer, such a room will be quite comfortable, but in winter, such a balcony can only be used as a storage room.
It is important that the supporting frame for such glazing is sufficiently reliable. Save too much on this structural element no need, because it is the frame that takes on the bulk of the wind load.

Warm balcony glazing, equipped taking into account all the rules and technology requirements, allows you to comfortably use the premises at any time of the year.
When performing such glazing, it is important to create conditions under which the dew point cannot move inside the room. Otherwise, condensation will begin to form on your balcony, which will nullify all efforts to increase the usable area. In addition, the dew point should not penetrate between installed glass. This condition is especially difficult to comply with if the balcony is located outside the contour of the building.
To avoid problems that can result from condensation, 4 basic conditions must be met, namely:
- provide high-quality moisture and parapet. Any kind of cracks or thermal paths from outside to the room will lead to the appearance of condensation;
- install frames with double glazing and the same high-quality sealing. In the case of using ordinary wooden frames, it is necessary to create a double seal when installing swing doors and seal all the cracks in the blind structural elements;
- provide for the possibility of providing regulated natural ventilation. Modern balcony systems made of metal-plastic are usually equipped with dampers from the start. In the case of installing wooden frames, the valve is installed in the parapet;
- ensure the required level of air exchange between the balcony and the living space. To achieve this, the design of the window connected to the balcony is supplemented exhaust fan. In addition, a special ventilation grille is installed at the bottom of the door.

Once completed, run necessary measures to protect the structure from penetration of atmospheric moisture. To do this, fill the existing cracks with foam and sealant.
High-quality sealing will contribute to an additional increase thermal insulation characteristics designs.
Good luck!
Prices for mounting foams and cleaning gun cleaners
Polyurethane foams and cleaners for construction guns
Video - Do-it-yourself balcony glazing


