A bathhouse is a place that often comes into contact with water. Moreover, this happens both outside and inside. AND protect wooden walls waterproof coating is not enough- it is necessary to organize high-quality drainage to avoid frequent repairs foundation, damage to the bathhouse by pathogenic fungus and wood rotting.
Water is drained from the washing room directly into the drain tank or into a place designated for drainage. Options for organizing a water intake system may differ quite significantly depending on the conditions in which the bathhouse is built and the type of drainage.
First, you need to know the answers to several important questions regarding the conditions for constructing a branch:
- Where will the drain be located and what area should be allocated for it?
- What type of soil is on your site where the bathhouse will be located?
- Is it possible to connect to the central sewer?
- What budget are you looking for?
- Will you build the drain yourself or use hired labor?
From proper organization drainage communications The longevity of the building and the quality of the bath procedures themselves depend. Even if the volume of wastewater is small, you should not hope that the soil will absorb all the liquid: the remaining water will still spoil the foundation and the soil itself, which can cause shrinkage of the structure. The only case when a drain may not be necessary is if the bathhouse itself will be used no more than once a month by a small number of people (2-3 people). Here you can use a so-called leaky floor, with widely laid boards. In all other cases, this is the first thing you need to plan after laying the foundation. Therefore it is very useful to know various ways organizing a drain for a bathhouse, even if you do not do it yourself, but order it from a construction company.
Autonomous sewerage system with settling well
The first and most labor-intensive method is a filter settling well based on autonomous sewerage. Here the system consists of two tanks, preferably made of plastic. The first tank filters wastewater from coarse particles by simply mesh filter, arranged in a container. The second tank carries out the second stage of cleaning Wastewater before sending them to the waste pit. But for any option of drainage with sewerage, a special floor design in the bathhouse is required.
The whole point of such a floor is to tilt towards the center of the room at the initial stage of construction. A fitting is mounted in the center of the floor, which fits closely to the connector in the floor, tightly sealed with sealant around the installation site. The fitting funnel is selected within 5 cm, with slight deviations. Drain pipes from all rooms, if several, are connected by a splitter. But it's worth knowing that construction cesspool advisable only in the case of deep groundwater, at least 4-5 m deep. Otherwise your pit will be flooded. all year round and the odors of putrefactive bacteria from it will haunt you until each subsequent cleaning. If the conditions for sewage pit favorable, then the second point in calculating the flow will be to determine the volume of the pit according to several criteria: the number of people in the bathhouse, frequency of use and water consumption.
Next, when the drainage project is ready, the location of the pit is calculated: it should be no further than 2 meters from the bathhouse. If the drain is placed too close, there is a possibility of water penetrating into the foundation. If it is too far away, then it will not be possible to make a sufficient slope for water to drain naturally.
When laying the foundation, you most likely have already become familiar with the type of soil on the site and its properties. When creating a drain hole important to understand physical properties land, since taking this into account, accompanying measures will be selected to strengthen the pit frame. However, if the soil is not loose and does not crumble, then nothing will need to be strengthened. But too dense clay soil also has a drawback in the case of arranging a drain - it does not absorb well. Sometimes in areas there is a successful combination of fairly dense soil with good absorbent properties. Then work with the hole will be limited to the fact that you just need to dig it and arrange filtration according to one of the described methods. But such conditions occur very rarely. Most often, the soil crumbles and you have to resort to strengthening the boundaries of the pit. For strengthening, brickwork is often used with gaps to absorb water, or wild stone(any waterproof material). The easiest option is to use a large plastic tank with many holes as the internal frame of the pit.
 It is also important to choose optimal size for holes in the tank. The optimal shape for the tank in in this case is a streamlined cylindrical, since it in the best possible way holds created by water pressure. It is also necessary to provide the pit with a heavy ceiling made of or iron.
When the tank is ready, filtration material (broken or) is poured into the bottom of the pit and then covered with a layer. The waste pipes, previously connected under the floor of the bathhouse into one, are discharged at a slope to the pit. Moreover optimal slope required for rapid drainage varies within 1 cm per 1 meter of pipeline.
Arrangement of a simple drainage pit
This method of organizing drainage is simpler than the first one due to the elimination of several stages of filtration. It involves all the stages of organizing drainage in the bathhouse itself and digging a hole, but in this case only a septic tank without filters will be used. The method is used if there is no desire to bother with replacing the filtration material and it is possible to use a sewage machine to pump out wastewater.
But in this case, you should think about approaching the pit within reach of the car’s arm. The second way to clean a simplified pit system is application special bacteria for processing rotting residues in a septic tank. Its effectiveness is, of course, several times lower than complete waste removal or natural filtration, but it also has its place.
Ground filtration method
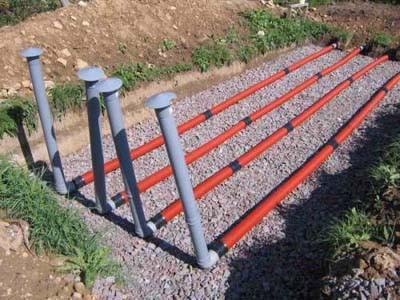
In this method, the main thing is the organization through which the liquid will be supplied to the sewer. The system will be distributed over the entire area of the site so that the water has time to go through several stages of filtration before draining.
Filtration is carried out according to the principle of drainage: the first stage is to install a grate on the pipe (in the initial section) to catch large waste. Then, later on, the water is flowing through a section of pipes covered with large filter material. Final stage- fine filter, that is, coarse sand.
Thus, the water from the wastewater will be filtered throughout the entire area at the same time creating an additional source of irrigation I. This method is suitable only in case of low groundwater, since the location of the pipes must be more than 0.5 meters above the water level.
Drain pipe method
In general, this method is similar to the previous ones and differs only in the type of materials and slight differences in the design of the septic tank. Longer pipe length is important here. At the same time, it is important to install the pipe itself at the stage of pouring the foundation with a slope towards the area for building a sump.
The sump is made on the basis that make up the walls of the pit. The bottom, in turn, should not be covered with anything for better absorption of waste. The pipe is laid without corners or bends, and the diameter of the pipe is taken to be the maximum possible among sewer pipes for domestic waste. When installing a pipe, it is important to insulate it, since when the soil freezes and deforms the plastic, at best.
Drainage material (crushed stone, broken brick, or slag from the combustion of coal), is covered with a small layer of sand on top. Afterwards, a drain pipe diverted from the bathhouse is laid at the bottom. The pit will be designed for a small volume of waste, no more than 100 liters. Therefore, you should think carefully before choosing this option.
If there is at least some possibility of connecting your drainage system to the central sewer system, then this is the most optimal and most effective option for organizing wastewater. If the site is located in an area that is not suitable for this, then you will have to carefully study the soil characteristics, the slope of the site, internal communications, the presence and level of groundwater, and correctly calculate materials and energy costs. Bathhouse owners are often faced with a choice: septic tank or well? Both options have their pros and cons. Setting up a well, for example, will take more time than installing a septic tank. But correct well provides best filtration water and practically does not allow the appearance unpleasant odors. A septic tank is more suitable for frequent use baths, as it ensures faster absorption of water. IN financially, the organization of a septic tank and a well are almost the same.
The drainage ditch, which was described in the last, fifth method, is permissible only in the case of a small volume of water and the absence of cultivated plants on the site. Otherwise, they will simply be poisoned by detergents coming from the drains, although the water will undergo filtration to some extent. Nevertheless, this is the cheapest and quick option organization of drainage.
In general, despite the apparent ease of performing the task of organizing a drain, It’s not so easy to calculate all communications correctly. Therefore, if you do not have experience in construction, it is better to hire a team of builders - today this service is not too expensive.
One of the stages of building a bathhouse on personal plot is the construction of a sewerage system. Draining a bathhouse for wastewater disposal can be done in many ways, but the most popular at the moment is. Due to the fact that bathhouse wastewater is slightly contaminated, this option is the most appropriate.
Ready-made brick drainage pit
Since a simple drainage system for a drainage pit can cope with the filtration of wastewater, which, as a rule, contains only water and detergents, the construction of other types of sewage systems for a bathhouse is not economically justified.
The only thing that needs to be taken into account is the groundwater level - if it is shallow, then the drainage in the bathhouse will have to be organized in some other way. If there is a drainage pit not far from the bathhouse, intended for other buildings on the site, then it is possible to use it, you just need to lay the necessary communications.
Anyone who wants to make a drainage pit on their own is faced with the task. It is not at all necessary to be a designer, it is enough to have some construction skills.
 Diagram of a drainage pit for a bathhouse
 To begin with, you need to decide on the following parameters:
- The volume of water that will be used for water procedures in the bath. Depends on the frequency of visits to the steam room and the number of people washing in it;
- Type of soil on the plot;
- It is also necessary to know how deep the groundwater lies.
For an average family of four, as practice shows, the volume of water used will be small and its use will not be daily. Therefore, the optimal size of the drainage pit will be two meters deep and one and a half meters wide. If you plan to receive more visitors in the bathhouse, then it is best to increase the size of the drainage pit.
It should be understood that baths that have swimming pools, fonts and other water reservoirs consume much more water due to the need for periodic cleaning.
An important issue in the preparation of construction flush bath is to determine its location.
 Project of a bathhouse made of timber with a swimming pool
 There is a recommendation to place the drainage hole no closer than three meters from the building. If it is located closer, there is a threat of destruction of the base of the bathhouse; in addition, bathing procedures can be overshadowed by the unpleasant odor of wastewater.
It is also not recommended to drain far from the building, as this will entail unnecessary expenses for laying communications. Because the pipes from the bathhouse to the drain must be laid at a certain slope, this operation is very difficult to perform.
As noted above, if there is shallow groundwater on the site, it will be impossible to make a drainage hole - otherwise it will be constantly filled with water. To solve the sewerage issue in such areas, sealed tanks should be used, which will have to be emptied from time to time, or other types of wastewater disposal should be provided.
Read also
Bathhouse projects with barbecue
Materials needed for construction
If the soil on the plot is strong enough, then there is no need to strengthen the drainage pit. In this case, construction is limited to digging a hole in the ground and installing a gravel-sand cushion for drainage.
However, the type of soil is not always favorable for such developments. Typically, some strengthening work will be necessary. The walls of the drainage pit are best reinforced with brick or slate. You can also make plastic or iron tanks.
At their bottom it is necessary to provide drain holes so that the water goes into the ground. Concrete rings are also used, but their use will entail significant costs. In any case, a gravel-sand cushion is needed at the bottom of the drainage hole. 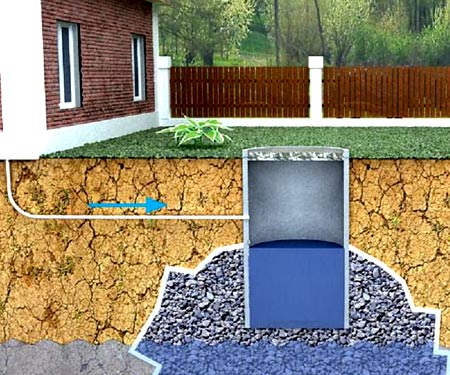 To lay the necessary communications, pipes from various materials: metal, asbestos. However, the most acceptable in terms of quality and price are plastic pipes.
The process of constructing a drainage pit
When all preparatory work carried out, it is necessary to excavate the soil and build a pit with a trench for communications. Next, the pit is strengthened; if brickwork is used, it is recommended to make it half a brick.
When strengthening the walls of the pit, holes should be made at a certain distance to drain water into the ground. Natural stone is more preferable than brick, as such material will last much longer. It is worth noting that limestone under conditions high humidity use is not recommended.
 Example of a cinder block cesspool
 After the work on strengthening the walls is completed, a gravel-sand cushion about 20 cm thick should be made. Then the drainage pit is covered concrete slab, or the screed is poured to the top. A very important point is the organization of a hole in the “lid” of the drain pit to allow gases to escape.
In order for the owners to be able to control the filling of the pit, it is necessary to make an inspection hatch on top. In order to disguise an unflattering drainage hole on the site, you can place a flower bed with flowers on its cover.
Communications are laid in the ground at a depth not less than the freezing depth of the soil, as a rule, at least 0.5 meters.
Having your own bathhouse is the dream of most homeowners. Many of them are starting self-construction to make your dream come true. One of the most important moments during construction, the organization of water drainage is considered. Well designed and installed structure will protect the foundation and wooden parts from destruction, will prevent the possible appearance of fungus and unpleasant odors. How to drain a bathhouse according to all the rules? Let's figure it out.
Wastewater collection in the bathhouse can be carried out different ways. The choice of the optimal option depends on what kind of floors you plan to lay. They may or may not leak. In the first case, it is assumed that a special reservoir will be installed to collect water, from which the wastewater will go into the sewer system. In the second case, an inclined floor is installed, and gutters and ladders are installed through which the water will drain.
In any case, the drainage system must be installed before laying the floors. General scheme its installation looks like this:
At this point, the installation of the sewage system inside the bathhouse can be considered complete. All that remains is to connect sanitary equipment and a toilet to the system, if necessary. Now it's time to tackle the outdoor drainage.

Video - the process of installing a sewer system in a bathhouse with your own hands
Prices for pipes for external sewerage
pipes for external sewerage
How to choose a wastewater disposal method?
There can be many options for organizing an external bath sewer. When choosing one of them, be sure to consider the following points:
- expected intensity of use of the bathhouse;
- dimensions of the building;
- type of soil on the site;
- soil freezing depth;
- presence or absence on site sewer system;
- ability to connect to centralized system sewerage.
This is the most important aspects, which will allow us to determine the best way water drainage. For example, for small bathhouse where two or three people will wash once a week in the warm season, there is no need to equip a complex sewer system using ground filtration. A drainage hole or even a pit under the building will be quite sufficient here. Whereas for a bathhouse in which you plan to wash all year round, you will need a more complex drainage system.
The type of soil is also important. For highly absorbent sandy soils, a drainage well is the optimal solution. This is not suitable for clay soils. Here the best option a drainage pit will be constructed from which wastewater will be periodically removed. When installing the system, do not forget about the level of soil freezing. If this is not taken into account, the water in pipes laid above this level will freeze in extreme cold and destroy the sewer system.
Methods for arranging wastewater disposal
There are several effective and relatively low-cost ways to organize the drainage of water in a bathhouse. All of them are quite easy to do on your own. Let's look at their main advantages and disadvantages.
Drain well
It is a sealed container in which wastewater coming from the bathhouse accumulates. When the well is full, it is emptied using a special machine. Advantages of the system:
- simplicity in arrangement;
- It does not require special care;
- low cost.

The disadvantages include the following:
- need for regular calls sewage treatment plant cars, which entails certain expenses.
- organizing convenient access for special equipment to the well;
- the drainage well should be installed at the lowest point of the site.
Drainage well
It is made in the form of a pit filled with filtrate, which cleans the wastewater. Sand, crushed stone, small fragments of brick or furnace slag can be used as filler. Design advantages:
- low cost;
- simplicity in arrangement.
Drainage well - as an element for draining water from a bathhouse
The system has one drawback - the need to change the contaminated filtrate or clean it approximately every six months, which requires serious labor costs.
Pit
A hole dug directly under the floor of the washing room in a bathhouse. Its bottom is filled with filtrate, through which wastewater passes, is cleaned and gradually passes into the lower layers of the soil. Advantages of the system:
- the use of pipelines and other structural elements is not required;
- low installation cost.
A pit is the easiest way to arrange a sewer system in a bathhouse
Disadvantages include:
- low throughput;
- the technology is unsuitable for use in the construction of a bathhouse with a slab foundation;
- Suitable for use only on highly absorbent soils.
Using the ground filtration method
It is a system consisting of a septic tank and pipes diverging from it, through which purified water is discharged. The pipes are laid at a slope so that the liquid flows by gravity and is absorbed by the soil. Design advantages:
- completely autonomous operation;
- can be used to equip a full-fledged sewer system with several points for collecting waste;
- the ability to purify not only “gray” but also “black” wastewater; in this case, at least an anaerobic septic tank is installed.
Significant disadvantages:
- the need to allocate a site for a septic tank;
- labor-intensive installation process, the need for a large number of earthworks;
- quite high cost of equipment and consumables.
As an option, you can consider connecting to a centralized sewerage system. This optimal solution wastewater problems. In this case, no external devices for receiving and processing wastewater. Another plus is the ability to connect several water intake points at once. The disadvantages of this option can be considered high cost services of contractors and bureaucratic red tape, which often arises when obtaining permits.
Drain well: manufacturing technology
Drain pit – practical solution for wastewater disposal. It can be arranged in different ways. The simplest one is to dig a plastic or metal container into the ground. You can make a pit from reinforced concrete rings, fill the walls with concrete or line them with bricks. Let's consider the last option in detail.

Drain well is an excellent solution for draining sewage
Let's start with choice suitable place. It should be located at the lowest point of the site, since the wastewater will have to move by gravity. In addition, we take into account that the pit will regularly need to be cleared of waste, so it is necessary to provide convenient access for sewage treatment plant cars. Having outlined the location, we get to work:
The drainage pit is ready for use.
Drainage well
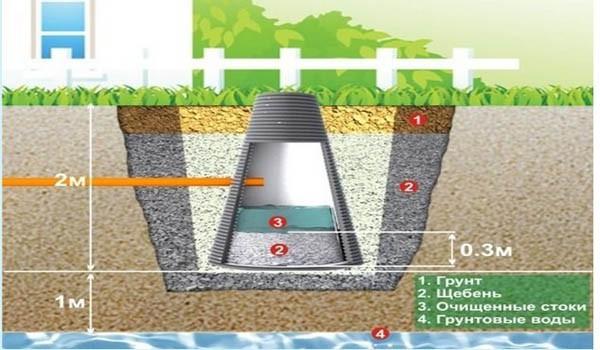
Such a system can only be installed in an area with deep groundwater. Otherwise in force design features drainage well it will be constantly filled groundwater, and there will be no room left for waste. Before starting work, we determine the place where the well will be located. It is optimal to place it 2 meters away from the wall of the bathhouse. If the distance is greater, certain difficulties will arise with organizing the necessary slope of the drain pipe, which is necessary for the waste to drain by gravity.
A drainage well is great way arrangement of sewerage in the bathhouse
In addition, the close location of the well threatens the foundation with wetting or subsidence. Having decided on the installation location, we find out what materials we will need for installation. It depends on the type of soil. If it does not crumble, we will not need to strengthen the walls of the pit. However, such soils are not found everywhere. Most often, the walls need to be strengthened. This can be done in different ways:

Let's get started:


The drainage well is ready for use.
Tip: If the site has sandy, well-absorbing soil, you can install a horizontal drainage pad instead of a well. It is a trench about 1 m long, 0.3 m wide and 1 m deep. A cushion of crushed stone 20 cm high is laid at the bottom, and soil is poured on top. The wastewater is discharged directly onto this pad, cleaned and absorbed into the soil.
Prices for a drainage well
drainage well
Pit
The pit is a wastewater reservoir located directly below wash room. You need to understand that such a system will only be effective for small baths, which are used infrequently. Work on arranging the pit is carried out in the following sequence:
- We dig a hole under the future floor, the volume of which will be sufficient to collect water.
- We strengthen the walls of the pit with any in an accessible way: brick, wild stone or slate.
- We place a filter pad at the bottom of the resulting tank. First, a layer of crushed stone, broken brick or expanded clay is laid. Place sand on top of this layer.
- We install logs on top of the pit. We lay a wooden floor on them, the floorboards of which should not fit tightly to each other so that water can drain into the pit.
Tip: Floorboards wooden floor, laid above the pit, does not need to be nailed to the joists. In this case, they can be removed if necessary and taken outside to dry.

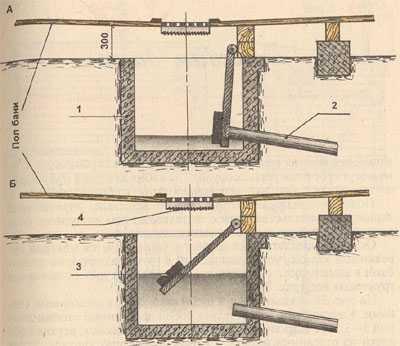
There is another option for arranging a pit, which in this case plays the role of a water collector, from which the wastewater, having reached a certain level, is discharged into the sewer or septic tank. Such a system is usually installed under “leaky” floors. Let's get started:

We install a water seal. This element is necessary to prevent unpleasant people from entering the bathhouse. sewer odors. The simplest option homemade water seal - a metal plate installed at an angle. We fix it to the pipe in three places, leaving the lower part unfixed. Important: there should be 5 cm from the bottom of the pit to the bottom edge of the plate. Another option for a homemade water seal is a children’s rubber ball, fixed above the pit drain. When the tank is filled with water, it floats up and opens the drain. As soon as the water drains, the ball descends and closes the pipe.
Ground filtration
One of the main elements of such a system is an autonomous septic tank, which is both a septic tank and a distribution well. They are moving away from him drainage pipes, which distribute purified water throughout the area. A septic tank can be purchased at a store or assembled yourself. In the latter case, the simplest option for self-made– construction made of plastic or metal containers. A septic tank made of concrete rings works effectively, as does a structure made of concrete or brick.

Septic tank – perfect solution for drainage of sewage
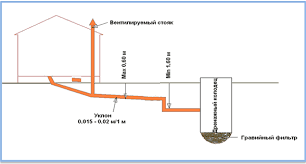
In any case, we begin the installation of the system with the installation of the septic tank. We install the tank at a depth of 1.2-2.5 m. There is no need to lower the tank deeper, otherwise a problem may arise with the post-treatment of wastewater, which is carried out anaerobic bacteria. We connect a sewer pipe to the septic tank. It must be buried below the soil freezing level. After installing the septic tank, we begin preparing the drains, as drainage pipes are called.
Their length and diameter depend on the number of drains. Most often, standard plastic pipes with a diameter of 11 cm are used. You can take ordinary plastic sewer pipes and make holes in them. You need to know that in the upper part of the part the diameter of the holes should be smaller than those located in the lower part. This is done to ensure that the outflow of water is uniform. The number of holes at the beginning and end of the pipe also differs. At the very beginning, perforations are performed more often, and at the end - less frequently, and most of them occur in the lower half of the pipe.

To properly arrange drainage, several rules are used:
- the length of each drain cannot be more than 25 m;
- the pipe laying depth is about 1.5 m, always below the soil freezing level;
- the minimum distance between drains is 1.5 m;
- the minimum width of the trench for the pipe is 0.5 m, optimal width- 1m.
After the pipes have been prepared, you can begin their installation:


Scheme - using a septic tank as an element of sewerage arrangement in a bathhouse
Important: The ground filtration system requires periodic maintenance. It consists of replacing the silted sand and gravel cushion and the soil underneath it. Depending on the load on the system, such work is carried out once every 10-15 years or less.
Competently organized drain water in the bathhouse is the key to its long and trouble-free functioning. It will protect the building from the destructive effects of moisture and prevent contamination of the site with wastewater. Even for small bathhouses, the installation of a sewerage system is mandatory, especially since it is necessary for large premises with separate shower room and toilet. The organization of drainage should be taken with full responsibility, avoiding mistakes and omissions. And then new bathhouse will only please its owner with long, impeccable service.
Drain pit for a bath: expert advice
A bathhouse is an almost obligatory attribute on summer cottage. No showers or baths can replace the healing effects of a steam room, so a bathhouse is often built before a house is built. Do not forget that even the smallest bathhouse requires the removal of used water. The simplest and, at the same time, practical option local sewer- drainage pit for a bathhouse. Let's consider how this structure can be built.
An example of a drainage pit for a bathhouse
There are different ways to organize the removal of waste water from the bathhouse. If it is possible to connect the drain to the central sewer system or organize the discharge of water into a common drainage ditch, then this option would be preferable.
But, if this is not possible, it is necessary to build local wastewater collection systems. Let's consider how to equip a drainage pit if this particular sewerage option is chosen.
What needs to be done before construction begins?

The neck of a hole filled with soil
Everyone knows that the construction of any object or communication must begin with design. The construction of a treatment plant for a bathhouse will not be an exception.
GWL assessment
First of all, you need to find out at what level the groundwater lies. If this level is high enough, then the construction of a traditional drainage pit will have to be abandoned, since it will be filled with soil water.
How can you determine at what distance from the surface soil waters lie? As a rule, to obtain this information it is necessary to carry out a hydrogeological study, including drilling ores. However preliminary assessment provisions can also be made using ancient folk methods:
- If there are wells nearby, then based on the level of water in them, one can draw a conclusion about the groundwater level.
- Another sign is that with a high groundwater level, many plants grow on the site that need moisture in large quantities. For example, horsetails, coltsfoot, reeds, sedge, etc.

Brick drain pit
Determining the volume of chambers and other construction nuances
The volume of the receiving chambers depends on how many people the bathhouse is designed for - the drainage pit should be larger, the more people will use the washing room.
If the volume of the pit is insufficient, the wastewater simply will not fit in it and will flow over the edge. Also, you should evaluate the quality of the soil on the site; this determines whether it will be necessary to strengthen the edges of the pit.
The location of the treatment tank should be determined in advance. As a rule, it is recommended to place the pit at a distance of 2-2.5 meters from the bathhouse. Otherwise, it will be difficult to build a pipeline with the required slope.
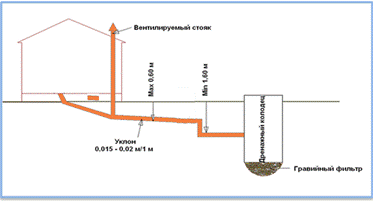
Laying a drain pipe from a bathhouse

Exit sewer pipe into the hole
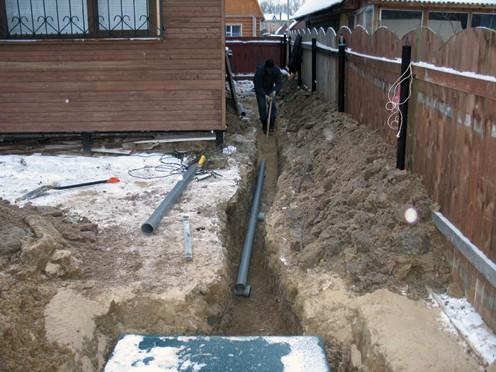
The arrangement of drainage pits begins with the laying of a drain pipe, which will lead from the bathhouse to the treatment plant.
- The construction of the drain pipe begins when building the foundation for the bathhouse.
- When laying the pipe, no turns, bends or joints are allowed. Failure to comply with this requirement may result in blockages.
- After installing the drain pipe, the floor in the bathhouse is poured concrete screed, in this case, the floor is made with a slope towards the pipe. After the screed has dried, you can lay it on the floor. tiles or other moisture-resistant finishing material.
- The drain hole of the pipe should be protected with a grill to prevent debris from entering the pipeline.
Advice! Insulation of the floor in a bathhouse, as a rule, is not done. Since a properly constructed floor quickly warms up when the stove is fired and does not allow outside cold to pass through. A drain pipe laid with the required slope also does not require insulation.
Construction of a drainage pit

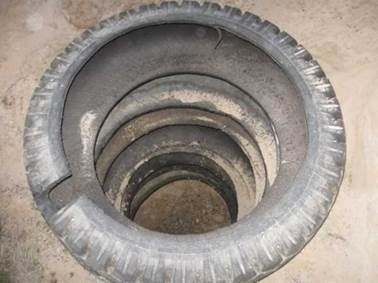
An example of a tire cesspool
If the soil on the site is strong and, at the same time, has excellent filtering properties, then the construction of a pit consists of digging a pit and constructing a drainage layer of crushed stone or gravel.
However, such ideal conditions are extremely rare. As a rule, well-draining soils tend to crumble, so when constructing a pit, it is necessary to provide for strengthening its walls.
Options for materials that can be used to lay out pit walls:
- Moisture-resistant brick (ceramic).
- Slate sheets.
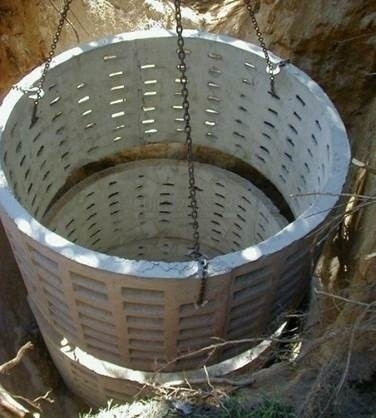
- Reinforced concrete well rings.

Example of a finished cesspool
You can also use available materials:
- Old car tires with the rim cut off on one side.
- Barrels made of plastic or metal. The bottom of such barrels is removed, and holes are built in their lower part for the passage of water.
Installation stages
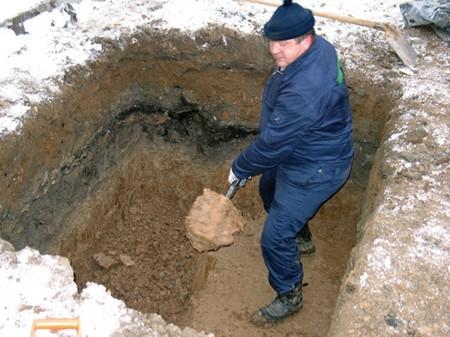
- The first and most labor-intensive stage of construction is preparing a pit for constructing a pit and trench for laying a pipe. The excavated soil should either be scattered around the site (if it is high-quality soil) or transported beyond its boundaries.
- When building a brick tank, the walls are laid half a brick thick - this allows you to save material. In the ranks brickwork make five-centimeter intervals to drain the fluid.
Advice! Masonry can be made not only from brick, but also from natural stone.
- When constructing a tank from concrete well rings, you should choose products with perforations. If you were unable to buy them, you will have to form the holes yourself using a hammer drill.
- After completing the process of strengthening the walls of the pit, the formation of a drainage layer at the bottom should begin. To do this, sand and crushed stone are poured into the pit, the layer thickness is at least 20 cm.
Advice! If there is no crushed stone, you can use construction garbage– broken brick or concrete.
- Strengthening the walls of the pit is completed at a distance of 40 cm from the ground surface. At this level you should arrange an overlap - lay the finished reinforced concrete slab or pour the mortar onto pre-built formwork.
- A hole should be provided in the ceiling, which will be used to control the filling of the pit with wastewater, and, if necessary, to pump out water. The hole is closed with a secure hatch. After this, the drainage hole in the bathhouse is ready.
When building a bathhouse, a system for discharging used water should be provided. An inexpensive and practical option for waste disposal is a drainage pit for a bathhouse. You can build this structure yourself, without involving a team of builders, since there is nothing complicated in its design.
http://kanalizaciyam.ru
Proper installation of sewerage is the key to convenient and comfortable operation of the bathhouse. After all, you can truly enjoy the cleansing of your soul and body only if the washing process is not overshadowed by extraneous irritants - unpleasant odors, water collecting on the floor and dirt in the room. Read our material on how to properly arrange a sewer system for a bathhouse. In this article we will talk in detail about general structure sewerage in the bathhouse, organization of water drainage, drainage, installation of a septic tank and other options.
Sewage system for a bathhouse
It is important to think about the design of the bathhouse sewerage system even at the stage of laying the foundation, then the type of sewerage system will be selected correctly, and all work will be completed with the highest quality and in a timely manner. Before arranging a sewer system for a bathhouse, you need to carefully study some points in order to choose the right type of waste system:
- maximum number of visitors (this determines what type of sewage system is suitable for a particular bathhouse and what tank volume to choose);
- seasonal use of the bathhouse - winter, summer or all year round;
- joint sewerage for the entire site or arrangement of a separate wastewater system for the bathhouse;
- availability of a toilet in the bathhouse building;
- soil type;
- soil freezing;
- groundwater level.
After studying all the features of the site and implementing necessary calculations, you can think about what type of sewer system is suitable for your bathhouse - simple drain design, waste (drain) pit, drainage system or a large and complex septic tank.
Important. Regardless of what type of sewer system you choose, a well-thought-out scheme for recycling used water helps solve most of the problems. Make sure that all drains leading from the steam room and shower are installed before laying the floors.
How to drain a bathhouse
If you are planning to build a seasonal bathhouse without a toilet, then the most best option- the simplest drainage system (drain), which involves laying waste pipes with a slope towards the storage tank. To do this, place a storage tank at some distance from the bathhouse building (optimally 2-3 m) and lead the waste pipe to it. As storage tank Any reliable container can serve - a can, a bath, a barrel made of plastic or metal, the main thing is that it has a suitable volume. After settling in a container, the water can be used for watering flower beds and beds or for household work.

Important: you can calculate the volume of the storage tank if you consider that washing two people requires about 30 liters of water. Thus, if the bathhouse is designed for 4-6 visitors, you need to select a tank with a volume of at least 100 liters.
Drain pit
Another option is a regular drainage pit, however, such a sewer can be installed in those areas where the groundwater in the area lies quite deep. Otherwise, the drainage pit will fill with underground water and there will be little space left for water from the bathhouse.
How to make a drain hole correctly
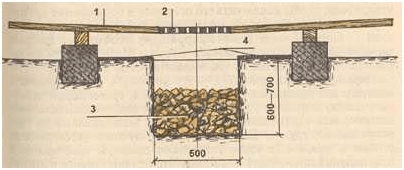
Calculate the volume of water that will be consumed per wash, and dig a pit at a distance of three to four meters from the building, the dimensions of which will correspond to the approximate volume of wastewater. A drainage pit for a small bathhouse is usually made with a height, width and depth of 1 meter.
If the soil is sandy, then the sides of the pit must be strengthened, otherwise the earth will settle, crumble and damage the structure. The walls are reinforced with boards or slate, covered with bricks or installed concrete rings, and in some cases they use tires. You can even fill it with cement, having first made the formwork. Loam and sandstone do not need to be strengthened - water will easily seep into the soil through the walls and bottom of the pit.

Drainage sewer system
Usually a bathhouse on a personal plot is built for a limited number of people, not exceeding 6-8 people. Therefore, most suitable option for your own bathhouse you will have the simplest drainage system.

To begin, select on the site comfortable spot near the bathhouse for a drainage well. The depth of the well is calculated depending on the freezing of the soil in winter period. If the ground freezes to 70 cm, then the well must have a depth of at least 1.5 m.

A drainage well is made according to the principle of constructing a drainage pit - they dig a hole of the required size and lay sewage pipes to it. The main difference is filling the well with drainage, which is used as gravel, expanded clay, crushed stone or broken brick. So, the procedure for constructing a drainage well:
- Place a 10 cm layer of clay at the bottom of the hole.
- Cover the trench that will be used as a drain with the same 10 cm layer of clay and give it the shape of a gutter. If you provide a slight slope to the side when digging a trench sewer pit, the water will flow down the gutter without stopping or accumulating in one place.
- Lay out 0.5 m of drainage (expanded clay, crushed stone or gravel mixed with sand) on a carefully processed clay cushion, then carefully sprinkle it with a layer of earth and compact it thoroughly.
- It is advisable to insulate the drain pipe laid from the bathhouse to the pit well so that the water does not freeze in winter.
If a mixture of gravel and sand was used as drainage, you need to remember that it quickly becomes dirty and will need to be cleaned periodically.
Septic tank for a bath
For a large bathhouse with a toilet and a rest room, a simple drainage pit will clearly not be enough, so a good owner needs to install a reliable sewer system - a complex and high-quality septic tank for a bathhouse. If funds allow, then you can buy a septic tank - there are modern installations of any size and level of complexity. But even the most complex treatment plant can be built with my own hands, so usually site owners prefer to install septic tanks themselves.
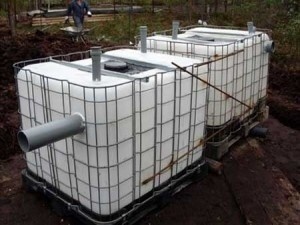
Eurocubes for septic tank

For device homemade septic tanks Eurocubes are often used - plastic containers volume of one thousand liters.
Eurocube is a tank with a rigid steel lathing, designed for the transportation and storage of bulk and liquid cargo. Eurocubes are made from polyurethane, plastic, wood, high-carbon steel and aluminum. In the upper part the container is equipped with a neck with a polyethylene lid and an o-ring, and in the lower part there is a drain valve with valve and seal.
In order for the Eurocube to perform its functions efficiently, it must be prepared:
- A tee is installed in the neck located in the upper part of the cube.
- At the end of the tank, at a distance of 25 cm from the top edge of the tank, make a hole for the inlet supply pipe.
- A hole is cut in the upper horizontal part for ventilation pipe, which is then connected to the tee.
- If two tanks are installed, they must be connected. To do this, make a hole for connecting pipes. In the first container, a hole is cut 20 cm below the supply pipe. The second tank is located below the first.
- After preparation, the containers are connected to each other with pipes and secured with fittings.
- In the second tank, 30 cm below the top edge, a hole is made for the outlet pipe.
Important: if the neck is too narrow and it is not possible to insert a tee into it, you can make a cut around it. After installing the tee, seal it securely.
Carefully lubricate all connections of the structure with sealant, and then begin preparing the pit.
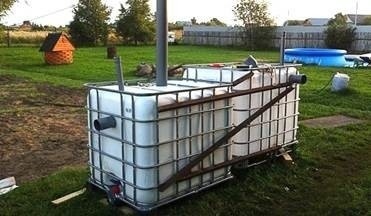
First of all, you need to correctly calculate the size of the hole. The pit should be such that there is about 15 cm between its walls and the walls of the container free space, and at the bottom there was a concrete slab 15 cm high. The Eurocubes will stand firmly and reliably if the walls and bottom of the pit are concreted.

Installation of tanks
After the concrete in the pit has dried, tanks are installed and filled with water. The gap between the tanks is concreted so that when the soil moves, the structure does not collapse. The upper part of the septic tank must be insulated by laying foam sheets on top. Then fill the tanks with soil, leaving only the ventilation pipes on the surface.
Installing a septic tank has its advantages and disadvantages. Among the main advantages is the ability to collect in a storage container a large number of water, absence of unpleasant odors and cleanliness of the site. The disadvantages of a septic tank include:
The need to equip the installation on the lowest part of the dacha to ensure natural flow of water into the tanks;
Organization of free passage of the sewage disposal truck to the site and directly to the sump;
The need to regularly order the services of vacuum cleaners, which creates an additional expense item in the family budget.
How to connect a bathhouse to the central sewer line
The presence of an autonomous or centralized sewer system can facilitate efforts to arrange sewerage. By connecting drain pipes directly to the finished system, the owner gets rid of the problem of arranging a wastewater system.
If the site is located next to the central sewer line, it is quite possible to connect to it. To do this, you need to write an application to the appropriate department, draw up a package of permits and carry out some actions:
- Draw up an agreement for installation and excavation work with design organization, carrying out its activities in full compliance with the law and possessing all the necessary certificates.
- If work will be carried out next to residential buildings, obtain written consent from neighbors to hold the event.
- Install a special inspection well designed to monitor the sewer system and check sewer pipes.
Only after all measures have been completed can permission be obtained to connect the bathhouse sewer system to the central main line.
As a rule, owners of small bathhouses try to equip the sewer system themselves, since the small volume of wastewater from the bathhouse makes all the time and effort spent on visiting establishments and drawing up contracts impractical. Building a high-quality sewer system with your own hands will cost an order of magnitude less and will not require much time.
We also recommend: