Landscaping a children's playground in your yard is not only useful way improve the area, but also the opportunity to free up a lot of time for childcare. A well-maintained place for children to play is unthinkable without a sandbox and fun decor made from plastic bottles, benches and swings. An original do-it-yourself children's sandbox is available to everyone home handyman, and the ideas and secrets of the structure are worth discussing in more detail.
How to decorate a playground with your own hands?
No matter how much parents wait for a kind uncle to come and arrange a place for children to play near a multi-story building, it is much faster to do it on their own. The warm season passes quickly, and there is no need to waste time at your summer cottage or in your garden. country house. Moreover, it is not wise to leave children or grandchildren without such an exciting game as the construction of fortresses and “paskas” from sand. The choice of parents depends on the general concept of the playground:
- sandbox design;
- its size and shape;
- materials for manufacturing;
- type (closed or open sandbox).

For landscaping a playground and a children's sandbox with your own hands from scrap materials, many of the things you were planning to throw away will be suitable. Some materials were gathering dust in the garage or on the balcony, some had long been wanted to be given to someone, but then put aside. Some items awaiting recycling will be excellent material for beautifying your yard. Suitable:
- plastic bottles;
- bald tires;
- awnings and nets;
- edged board;
- wooden blocks and other lumber.
Labyrinths, crossbars, slides, horizontal bars, trampolines, play tables and benches are mandatory attributes of a landscaped area. Children grow and develop, and every day is filled with new achievements, which they willingly demonstrate to each other, parents, grandmothers or nannies. And for the sake of healthy mental development, you cannot compare children with each other; it is better to praise them for their current successes. Let this be the first neat “paska” made of sand on the side of a children’s sandbox with your own hands - there is a reason for praising the baby and a tasty treat for his efforts.
A sandbox can be a self-sufficient object on a site or fit organically into the overall landscape design. But much more important is how comfortable the children will be in it. In summer, the bright sun is blinding, and well-designed shade is half the success, since children's entertaining games and their heads must be protected from the scorching sun.
The lid for the sandbox can be made of thick polyethylene, tarpaulin or awning. You can also adapt a ready-made large cover, for example, from an inflatable pool. A shield made from the remains of a board will also work, but The best decision- do-it-yourself sliding seats at the children's sandbox, photo:
What is important to consider when creating a children's sandbox with your own hands?
The sandbox is perhaps the most important attribute for summer games children. It is not so important what idea will become the basis of the design on local area, the main thing is that the playground and sandbox should not be dangerous for children and beautiful for everyone.
1. Sand quality.
Clean sifted sand is a guarantee of children's safety. Do-it-yourself closed children's sandbox for a summer residence - the most suitable option, although the most labor-intensive. Coarse river sand should be sifted and should not contain fragments of freshwater shells or glass, so that children do not cut themselves.
The sand gradually mixes with street dust and spreads from the main place. It is advisable to replenish the sandbox's reserves at least once a summer. It is better to completely replace it with a new and clean one, and fill the paths or playground with dusty sand.
2. Alley to the sandbox.
The site where it is located favorite place children's games, must be well compacted. But it is better when there is a path leading to the sandbox, so as not to have to get to it through mud after rain or thickets. If this is a private household, then the sandbox should be part landscape design, and when the child grows up, you can make a flower garden in this place. In an ordinary courtyard, it is better to arrange a sandbox next to a path or paved area.
3. Benches and tables.
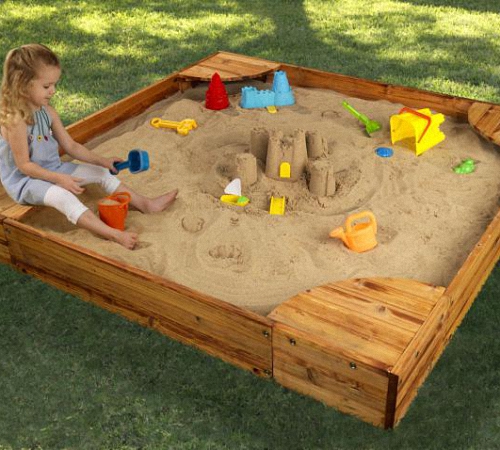
Children should not constantly sit on cold and wet sand, and they should be taught to take care of their health. Therefore, the side of the sandbox is made wide enough so that children can sit comfortably and lay out sand figures from molds next to them. But it’s better to make a well-appointed bench and table. There are other ideas for a children's sandbox with your own hands, for example, with triangular crossbars in all corners. In a polygonal sandbox, benches are made for 2-3 opposite walls kah.
Advice: It is advisable to arrange it nearby separate place for scoops, molds and buckets, so that the equipment does not “sink” in the sand without a trace.

4. Sun canopy.
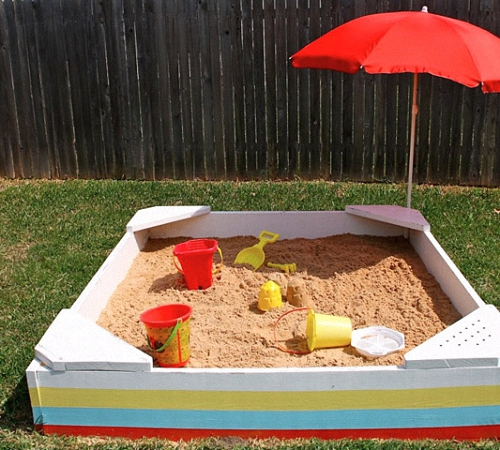
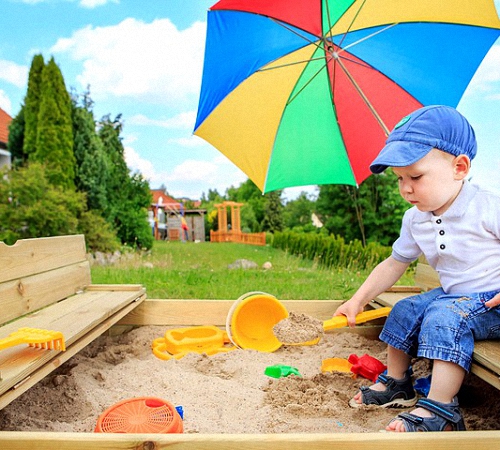
This is a mandatory attribute of the classic “mushroom” sandbox. But a square wooden roof on a high pillar in the center of the sandbox is only partially convenient. It should be made above head level so that children and adults entering the sand do not worry about hitting their heads. But the high roof casts shadows in different parts of the sandbox during the day. Make a stationary one in the courtyard of a private house wooden canopy not necessary. It is enough to install a folding beach umbrella on a tripod on the southern side of the sandbox or pull up an awning while the child is playing.
5. Sandbox location
If there is not enough space in the courtyard of a private house, but the choice is small, and the sandbox has to be built right under the window or opposite the threshold. Children in plain sight is much better than a sandbox located behind outbuildings, which is difficult to observe while doing housework. It is better to place a large box of sand near a high, blind fence, which will additionally create shadow. And the fence itself over the sandbox can be turned into a board for drawings with colored chalk. The side boards are equipped with benches.
A tall, spreading tree creates a ready-made shadow over the sandbox, but dry branches, inflorescences and leaves, as well as caterpillars falling from it, will not add comfort when playing. Such a sandbox has to be frequently cleared of plant debris. If the tree above the sandbox blooms profusely and is pollinated by bees, this can be dangerous for babies. Sweet fruits falling from the tree, near which wasps often swarm, will also create inconvenience. If the tree blooms in early spring with “catkins” and does not “litter” until the fall, then this option is quite acceptable.
6. Ready-made or purchased sandbox?
Children's sections of hypermarkets offer everything, including swimming pools and ready-made plastic sandboxes. Such a purchase will attract children with a fairly bright island. The finished colorful product with a children's design remains to be fixed on the site and filled with fresh sand. However synthetic materials cannot be considered environmentally friendly, and bright colors can evaporate chemicals when heated. And a broken sandbox is unlikely to be repaired. But if there is no man in the house who can build even an ordinary children’s sandbox, then they give preference to a purchased model, which is attractive and quite convenient.

Attention: When painting wooden sandbox The same problems may arise - evaporation of volatile substances in the sun. It is advisable to complete all work and painting in early spring or in the absence of children.
7. Sandbox paint.
If you decide to make a children's sandbox with your own hands from wood, then carefully choose varnish or paint. In construction supermarkets there are harmless, quick-drying dyes, and there is eco-paint - based on natural resins. Check the instructions for drying time, and until it is completely cured, you should not allow children to play in the sand. Most paints stick to your hands after application, and children tend to lick their fingers. The same applies to the construction of a sandbox from large tires that crumble bright colors.
8. Sandbox dimensions.
If you have enough building materials to build a favorite place for children to play, then you shouldn’t make it too big. The sand gradually spreads, it has to be removed and new ones brought in. The dimensions and shape are arbitrary, there are no standards, and for young children there is enough space of 1.75 x 1.75 meters. And if there are several children, then “proprietary” disagreements often arise between them, and it makes sense to make a multi-section children’s sandbox with your own hands by drawing up a drawing.
9. The bottom of the sandbox.
Parents often lose sight of the fact that sand poured into open ground, worms and other orgasms come out natural environment. This is what they did in Soviet times in kindergartens and courtyards. Today it is possible to purchase thick film or agrofibre. By stretching it and securing it to the bottom of the sandbox with a construction stapler, the easiest way is to isolate your rectangle.

But there is one drawback - if there is no canopy, then a heavy rain will quickly fill it. Such a system requires a slope and the ability to drain water, for example, through holes at the bottom of the sandbox walls or in the corners. The bottom of the protected sandbox is filled with crushed stone for drainage or lined with hollow brick.
10. Sides of a homemade square sandbox: the simplest option.
They are usually made of wood - from timber or edged boards. With a minimum of building materials, 4 identical boards, 4 corners for fastening, 2 or 4 boards for a side in the form of a seat, plus reliable bars in the form of pegs are enough to fix the structure. An important condition is that all boards must be carefully sanded so that children do not get splinters. Before painting, cut boards or the finished structure are treated with an antiseptic against rot and fungus and coated with drying oil a couple of times. It is better to paint it in any cheerful color.
11. Design and decoration of the sandbox.
This is the most interesting part of building a sandbox, where you have the opportunity to use your creative talent and give free rein to your imagination. Ready sandbox and the fence near it can be repainted and drawings can be applied in a general manner:
- stenciled prints of children's hands;
- funny people in colorful clothes;
- emoticons or animal faces;
- geometric figures;
- letters and numbers.
With proper design of the sandbox, it can become not only a comfortable place for children to play, but also a worthy decoration of landscape design.

Fantasy sandbox options
The sides of the sandbox do not have to be made of wooden board, processed bars driven into the ground with a picket fence are a great idea. They can be made different heights, like steps that children willingly step on or run along. With this design, the size and shape of the sandbox can have variations in size and configuration, as when implementing the idea of a children's sandbox with your own hands in the photo:
A polygonal sandbox is not so common, and in the courtyard of 3-4 apartment buildings several sandboxes are often made. Another option is to make several different colored polygons with sand.
There are many others interesting ideas How to make a children's sandbox with your own hands. Caring parents understand that children do not just spend time in the sandbox, but here their creative inclinations develop and skills are formed. Sand is an excellent material for creation, but the aesthetics of the environment shapes their taste and craving for beauty. The most complex option is a round, rotating sandbox in the form of a transformer, consisting of several sections.
Wide pallets are used as containers for sand, wooden frames, heavy truck tires and other materials. The most popular solution is an original sandbox made of tires, which is laid out in a polygon and painted in different colors.
The most labor-intensive thing, but interesting solution- build a sandbox with a mobile lid in the form of a tower, which moves to reveal the sand. In this case, the rear legs should be on wheels, and the top side will serve as a guide.
You can place a table in the center or side of a large sandbox, and build benches on the sides. In this case, it will be easier for children to work with sand, collecting it under their feet and laying it out on the table. A children's sandbox with a do-it-yourself lid in the form of a bench is convenient for children to play for long periods of time.
The most ineresting design option- multi-level sandbox. It’s easy to make it from an old boat, design it in the shape of a ship and add comfortable seats. Then there will be sand both in the lower pan and in the upper part of the boat. A sail-shaped awning will protect playing children from the sun.
Children are also interested in structures in the form of recognizable objects:
- rocket;
- mansion;
- car;
- train;
- a slide or maze with landing in a sandbox.
More detailed master class on how to build a children's sandbox with your own hands - video:
Children love to play - and play is one of the methods of exploring the world and developing imagination, creative thinking, memory, and attention.
There's nothing better than playing outdoors using imagination: invent a sand city, populate it with interesting creatures, create a highway for toy cars, because the child needs to reveal his creative potential.
What can I say - play is very important for a child and is a way of understanding the world. It is very good when a child is in nature and plays, then this is doubly beneficial, because children at this time are still close to nature and they need to maintain contact with it.
The role of the sandbox in a child’s life
In order for a child to have a place to play, it is not at all necessary to build expensive slides.
In order to have a children's corner at the dacha, it is enough to make a sandbox where the child will frolic, because there is nothing better for a child than to create, create sand castles, sculpt Easter cakes, dig secret passages, make “secrets”.

Let's talk about building a sandbox for children.
But, also, for the sandbox they use brickwork, metal, plastic. It is very good when the space around is sown with clover or grass that is resistant to trampling.
The size of the sandbox is directly proportional to the number of children who will play in it, and also depends on the age of the kids (the older the children, the larger the dimensions). If the area where the sandbox is being placed is vast, then you can make a green zone in the center.
List of what is needed for construction
What we need to build a sandbox:
- shovel;
- Bulgarian;
- bars;
- door handles (for the lid);
- gate hinges (for the lid);
- cord;
- pegs;
- sanding machine and dust collector;
- antiseptic;
- varnish, paints;
- geotextiles, agrofibre, paving slabs or plastic film.
For what purposes it is used and how it is manufactured - details in the article on our resource.
Any summer resident who knows how to hold a drill and hammer in his hands can make a gate from corrugated sheets with his own hands. .
Sandbox placement rules
You should never hide the sandbox behind outbuildings or bushes, children must be in sight.
It is advisable that the sandbox is located not far from a spreading tree (you can also install a fungus or any canopy if there are no trees nearby; no need to place it near old trees to avoid that a branch may fall at any moment).
It is very important that the sandbox is not located in the open sun, because this will make the place for games practically hell on hot days. But you should also not install the sandbox in excessive shade, because it can be damp in the fall and spring.
The ideal placement of a sandbox is when half of its area is in the shade, half on the sunny side.
Making a sandbox
Of course, you can buy a sandbox, but wooden ones have astronomical prices, and plastic ones are very short-lived, so it’s better to do everything yourself, using your imagination.
So, we choose where our sandbox will be located, following the recommendations given above.
Using such simple devices as pegs and cords, we mark the perimeter of our future sandbox.

Marking the perimeter of the sandbox
Then we dig out the soil inside the fence a quarter of a meter deep (we make a hole about 170x170x25 cm - standard size; a sandbox with these dimensions is very well suited for games of 2-3 children; for the youngest from one to three years, a playground in the sand with sides of 1.5 meters is very good.). Carefully level the walls of the pit.
We make the base
Then we move on to the base. Before laying, pour about 5 cm of sand onto the bottom and begin leveling.
To make it easier to care for the site, you need a flat and dense base such as agrofibre or textiles (then secured with furniture stapler from the bottom of the frame), so the soil does not mix with the sand.
Thanks to these materials, the sandbox will allow water to pass through well, and not a single invertebrate or mole will be able to get into the sand where children play (instead of agrofibre, you can use film or plywood with holes made there drainage holes, paving slabs are also suitable).

Cover the bottom with textiles
Creating walls
We make the walls from four bars (pre-treated with an antiseptic, it is good to use bitumen), having dimensions of 45x5x5 cm.
We hammer each block to a depth of 15 cm in the corners of our future sandbox. Then, to these bars, to make walls, we nail four boards 150x30x2.5 cm.
You can use boards of smaller width (for example, 3 boards of 10 cm each, in the photo, or one board 30 cm wide). But it is best to assemble the frame together with the beams, securing it with screws and corners.


Sandbox walls assembled
Then you need to make sides from 4 boards, which are laid around the perimeter (then the sand does not crumble and the children can sit comfortably); we fix them with self-tapping screws, you can strengthen them with corners (you need to make sure that the heads of the screws are tightly pressed into the wood so that children cannot get hurt).
The most optimal height sandboxes - a quarter of a meter, which equals two boards (in this case, a total of eight boards will be required).
The best thickness for boards is 32 mm, which reduces the likelihood of the boards cracking. The sand layer should be from 15 cm. After final assembly It is best to thoroughly compact the sand near the walls and sprinkle it with gravel.

River sand, which contains almost no impurities, is best suited for filling sandboxes. Can be bought in the store quartz sand.
There is a special quartz sand for filling sandboxes, which contains a high percentage of clay and contains additives to repel cats and dogs.
You can also use quarry and sea sand (but judging by the reviews, it is best to use quartz sand for filling).
Any sand must be completely sifted to remove debris before being poured into place.

You should know one thing when buying sand: it is usually delivered wet, so you must first wait until it dries and then sift it.
Children's sandboxes made with their own hands can be seen in the photo selection:
Requirements for the playing area
The most important requirements for a nursery play area- this is strength and safety, so you need to secure all the parts well and smooth out all the sharp corners and nicks using a grinder or grinder.
Then, after assembly, it is advisable to paint the sandbox oil paint, and it will not only be beautiful: the colorful coating protects the wood well (you can also turn the sandbox into a work of art by painting it with patterns and drawings).
This was considered the simplest option for a sandbox that you can make yourself; other options will be given below.
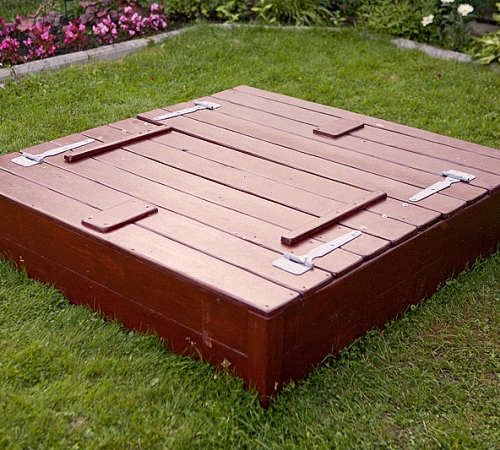
Advantages of a sandbox with a lid
It is very good to cover the sandbox with film or awning fabric to prevent contamination of the sand with various debris (therefore it has to be changed from time to time, which requires sufficient costs) and to protect it from animals that can simply “do their thing”; It is also thanks to the closed sandbox that the sand remains dry, which is important for children's health.
You can make a sandbox with a lid yourself using this drawing:

But it’s best to make a special door that will cover the top of the sandbox, but the most the best option of two halves-shields that form a kind of door; they need to be installed on hinges and provided with handles; The best option for a transforming lid is when the doors can be easily converted into benches for comfortable sitting of children.

You should always make lids that can be easily handled by a child's hand.
A very good option for a lid that becomes a bench in one motion: for this, hinges are attached between the boards, thanks to which the lid can be folded into something like a bench.
In the video there is a sandbox with a lid:
Useful little things and sandbox ideas for imaginative parents
For parents with imagination, you can go all out, because square sandboxes are too common, so you can make round sandbox from logs driven around the perimeter or make a polygonal sandbox from boards.
To make it interesting for children, you can make a whole labyrinth in the sandbox, then the child will definitely have the opportunity to plunge into Fairy Tale and Magic.
You can decorate the sandbox space with animals, mills, houses - but this is only as long as you have enough strength and imagination. It is very good to have a path leading to the sandbox so that the child can better walk to the place of play.
It is advisable to purchase the necessary inverter: buckets, shovels and others. It’s good to brightly paint the walls of the sandbox so that it is the entrance to the Fairy Tale. Such a sandbox will become not just a playground for children, but a real decoration of a garden or summer cottage, and will be an example for other people.
There are very simple circuits sandboxes, even simpler than mentioned above, for example - from bottles, from tires, but still, for our flowers of life, everything needs to be done well and not spare material.
It is very convenient when thick grass, resistant to trampling, grows around the sandbox: lawn or clover.
Sandbox in the form of a boat:

You can play and ride:

By following these tips and instructions, you can now completely make your child’s dream come true and occupy his leisure time. interesting games, which are possible precisely thanks to the sandbox; and this develops creative thinking and motor skills.
Children's games in the sandbox have still not lost their relevance in our age high technology and continue to delight our children. It would be great if, after reading our article, you are inspired to build a children's sandbox on your property.
Good luck and success to you in creating joy for children, creating a truly happy childhood!
The cost of building a sandbox is minimal, and children will enjoy it immensely. Of course, you can buy a ready-made structure and simply fill it with sand, but a sandbox made by yourself is much more interesting and convenient.


Before you start building a sandbox, you need to find the most suitable for it. appropriate place, because the comfort and safety of the baby depends on it. There are several rules for sandbox placement:

To protect from the sun, you can place a sandbox under a small strong tree or build. But you shouldn’t do this under old trees: at any time a heavy branch can fall from a tree onto a child.
Prices for children's sandboxes
Children's sandboxes
Sandbox construction

If a place for the sandbox has been chosen, you can begin the main process. First you need to calculate the dimensions of the structure, choose a shape, and properly prepare the base. The size of the sandbox depends on the age and number of children who will play in it. For three children aged 1-3 years, an area of 1.5x1.5 m is sufficient; for older children, it is recommended to make sandboxes 2x2 m, and standard designs have dimensions of 1.7x1.7 m.
Most often, the sandbox has a rectangular or square shape, but sometimes round and hexagonal designs are found. Here a lot depends on the imagination of the master and his skills; if your experience in such matters is minimal, it is better to stick to the standard square shape. As building material wood is used, namely pine boards.

Additionally you will need:
- shovel;
- roulette;
- pegs and rope;
- geotextiles;
- sand;
- tamping;
- timber 50x50 mm;
- hacksaw;
- antiseptic impregnation;
- liquid bitumen;
- sander
Step 1. Site preparation
The selected area is cleared of stones, branches, weeds, and the surface is leveled. If the dimensions of the sandbox are 1.5x1.5 m, then the cleaned area should be 10-15 cm larger on each side - this is necessary for more accurate marking.
Step 2. Marking

Now you will need 4 pegs, a tape measure and a long rope. Visually determine the location of one of the corners of the structure, drive in a peg, draw two perpendicular lines from it, and mark the location of the last corner. A rope is pulled between the pegs and the length of the diagonals inside the markings is checked. They must be absolutely the same.
Step 3. Preparing the base
Inside the fence, a layer of soil is selected to a depth of at least 20-25 cm. The walls of the pit must be leveled so that they are strictly vertical. When all the soil has been removed, the bottom is trimmed and compacted. sifted is poured on top fine sand layer 5 cm, compact well.
Step 4. Making the frame

The timber is sawn into pieces 45 cm long, the lower ends are sharpened, ground, treated with impregnation and coated halfway with liquid bitumen. Now you need to install them at the corners of the perimeter and bury them 15 cm into the soil. The next stage is attaching the boards: they are knocked down in pairs and screwed to the bars with self-tapping screws. You can do it another way: first, completely assemble the frame, and then install it above the pit.


The boards can be narrow or wide, the main thing is that the width of the walls is at least 30 cm. Be sure to treat the surface of each board with a sanding attachment on both sides, then soak and dry. After this, the boards are knocked down into a square box and reinforced at the corners with bars, which on one side should protrude beyond the perimeter of the box by 15 cm.


Step 5. Installation of sides
For the convenience of the child, small sides need to be made around the perimeter of the frame. To do this, take 4 boards 20cm wide, sand them very well, coat them with an antiseptic and cut the edges at an angle of 45 degrees. Lay the boards on top of the walls, align and align the joints, and screw tightly with self-tapping screws. The heads of the screws should be well sunk into the wood so that the child does not get hurt. Sometimes, instead of sides, they make corner benches: they take a board of short length, process it well, lay it on two adjacent walls, stepping back a few centimeters from the corner. After this, the board is nailed on both sides, and the edges protruding beyond the perimeter are cut off.
Step 6. Finishing the structure

Now the sandbox needs to be painted correctly. To do this, choose paints of 2-4 colors, always bright and contrasting. The sides or benches can be not just painted, but painted with ornaments, images of animals, flowers. As soon as the paint has dried, the structure is filled with sand.
Prices for various types of construction boards
Construction boards
Making a lid for a sandbox
An open sandbox gets clogged very quickly, so you have to periodically sift the sand or change it altogether. To avoid such problems, it is recommended to install wooden cover. It’s not difficult to make, and the result is not only good protection from debris, but also comfortable benches. It is best to install the cover before installing the frame in a permanent place.
To work you will need:
- pine boards 25 mm thick;
- jigsaw;
- long loops;
- bolts with nuts;
- self-tapping screws;
- timber with a section of 30x50 mm;
- primer;
- dye;
- drill.
Step 1. Preparing the material
The boards are cut to the width of the sandbox, and all surfaces and edges are treated with a sanding attachment. After this, it is primed, dried and covered with two layers of paint. The hinges also need to be painted, otherwise traces of corrosion will appear after the first rain.
Step 2: Assembling the first half of the cover

Assembly of the first half


On one side, two boards are screwed onto the sandbox frame with self-tapping screws. Two more boards are connected with bars and attached with hinges to the first ones. In this case, the bars should be at the bottom, and the hinges should be on top of the lid. They take two more boards and connect them with bars, the length of which exceeds the width of the shield. That is, on one side the bars protrude beyond the edge of the board by a third. This shield is also connected to the previous one using loops, only this time the loops should be at the bottom and the bars at the top. The hinges are screwed to the wood using bolts, since the screws quickly become loose.

Step 3. Assembling the second half

This half can be made without a backrest, which makes the process a little easier. On the free side of the frame, not 2, but 3 boards are stuffed, then a shield of two boards is knocked down and secured with loops, as in the previous case. To prevent the lid from bending under the weight of children, it is reinforced in the middle with a block. Now, when opened, the first half folds into a comfortable bench with a backrest, and the second simply reclines to half its width.


Frame installation
For installation, you will need an assistant: the structure is lifted, turned over with the protruding bars down and carefully lowered into the pit. The edges of the frame must coincide with the edges of the pit. To ensure that the sandbox stands level, you should check the location of the walls with a building level. If necessary, remove excess soil or add more, leveling the frame horizontally. After this, cover the bottom of the future sandbox so that its edges extend 3-5 cm onto the walls on each side. Dense material will protect the sand from erosion, will not allow moisture to accumulate, and will not allow insects and moles to crawl through from underneath. Finally, the soil is compacted from the outside and backfilled with gravel or sand.


The layer of sand for playing should be about 15 cm thick; for filling standard sandbox it will take about a ton. It is recommended to choose river sand or quartz sand, which does not caking. Before filling, it must be sifted through a fine sieve to remove debris, plant impurities, and insects.

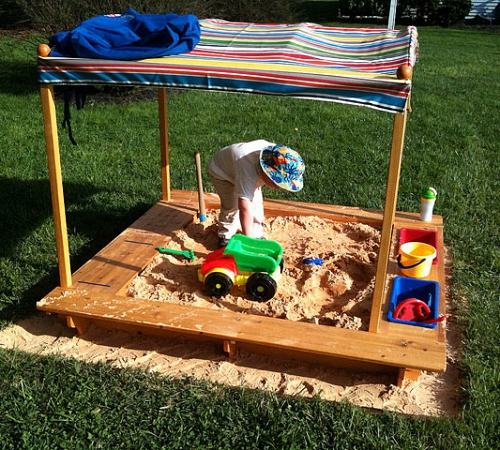
Canopy installation
Canopies for sandboxes can have a variety of shapes and are made from different materials. The most common option is fungus. To make it, you will need a beam 3 m long and a cross-section of 100x100 mm, boards and plywood. This fungus is installed at the stage of preparing the base, since it needs to be dug in the center of the sandbox to a depth of 1 m.
The manufacturing process is very simple:
- the timber is polished and treated with an antiseptic;
- the lower part is coated bitumen mastic to a height of at least a meter;
- 4 triangles are knocked out of boards and covered with plywood;
- connect the triangles together and attach them to the top of the beam using spacers;
- in the center of the pit they dig a hole 1 m deep;
- insert the beam, level it using a plumb line;
- fill the hole with crushed stone and soil, compact it.
There is another canopy option: vertical posts are bolted in the center of two opposite walls of the frame. Height of racks 2 m; in the upper part, the supports are connected by a horizontal rail, over which a rectangular piece of dense fabric or a special canopy is thrown. The ends of the canopy on each side are fixed metal hooks to the walls of the sandbox.

The described options are the simplest and most popular; if desired, they can be supplemented at your discretion. The most important thing is that the structure is as safe as possible, then the baby will be happy to play in it, and the parents will be able to relax a little.
Video - DIY sandbox
The sandbox brings so much joy to children! But it’s very easy to build it yourself, you only need a little material, skill, imagination and skillful hands.
Theory
Sandbox placement
First you need to decide where to organize a cozy corner for your baby. When choosing a location, follow these rules:
- The sandbox should be located in plain sight so that adults can control baby's activities. There is no place for a children's play area behind a barn or tall bush.
- Think about shadows. The play corner must be arranged so that one half of it remains in the sun, and the other allows you to hide from the scorching rays. It’s good if a tree with a lush crown grows nearby.
- Or create a shadow yourself. There are no tall trees on the site or you are not ready to constantly sweep fallen leaves from the sandbox? No problem: make a cute umbrella-shaped canopy.

Size and preparation of the sandbox base, protection from moisture
Anyone can make a children's sandbox with their own hands! If there are a lot of kids, then, of course, it should be more spacious. However, the most common are square structures measuring 1.7 x 1.7 m - both two-year-old toddlers and already grown-up tomboys will be comfortable here. It is not difficult to build such a structure. But first you need to mark the area and do basis. To do this, you need a cord, marking tape and pegs.

Preparation of the base is carried out in several stages:
- Fence the desired area around the perimeter.
- Remove upper layer soil - about 30 cm is enough.
- In the center, dig a hole with a diameter of 40-50 cm and a depth of 60-70 cm, fill it with small bulk material, for example, crushed stone, and compact it. This is necessary to ensure that excess moisture does not accumulate in the sandbox.
- From the sides to the center, make a slope along which it will flow rainwater.
- When everything is ready, you can begin building the base of the sandbox.
Sandbox base
Anyone can play this role dense material: polyethylene, plywood (just don’t forget to make holes in it, otherwise water will constantly accumulate in the sandbox), paving slabs. The main thing is to add a small layer of sand before laying the material.

DIY sandbox photo step by step
The base performs several important functions. Thus, it protects the play area from mice and insects that are not averse to settling in the sand. And film or plywood will help keep the sandbox clean, preventing earth and stones from getting into it.
Sandbox sides
It's time for the sides for the sandbox. They help mark the territory of the playground, prevent sand from crumbling, and are actively used by children as an “exhibition area” for Easter cakes or just for relaxation.
For the sides you will need:
- bars 45x5x5 cm;
- boards 150x30x2.5 cm (you can replace them with narrow blanks 10 cm wide);
- wide boards for horizontal benches.

DIY sandbox photo step by step
Since do-it-yourself wooden sandboxes are usually square, 4 pieces are required.
The material must be carefully processed, otherwise the wood will quickly deteriorate and children will get a few splinters. Take a grinder or electric drill, put it on sanding attachment and walk along the boards for the horizontal edges. It is not necessary to sand the remaining boards and bars, but it is necessary to cover them in several layers with drying oil or any antiseptic. Bitumen works great.
To obtain the base, the bars are dug into the corners of the future sandbox to a depth of approximately 15-20 cm. Boards are nailed to them. Finally, horizontal overlays are fixed around the perimeter.
Sandbox cover
An important design element is lid. In principle, you can do without it, but in this case, garbage, branches and leaves will constantly get into the sand, and animals will probably choose it as a toilet. Therefore, it is better to make a lid for the sandbox. This role may include:


Sandbox decoration
The children's sandbox with their own hands is ready, but will the child be interested if you leave it without decorations? You can simply paint the structure in any color or draw an ornament on it, various pictures, letters, funny faces - whatever you want!


The final “touch” is filling the sandbox. Usually, high-quality river or quartz is used for this. bulk material, in which insects will be uncomfortable, and children, on the contrary, will be safe and fun!
DIY sandbox photo
Let's move on to practice
Sandbox materials and sizes

DIY sandbox photo step by step
So, you've decided that your child needs a sandbox. You don’t have to do it yourself: now any children’s goods store sells ready-made structures that just need to be installed in the chosen location. But this product is expensive, and it’s more pleasant to make a playground with your own hands. Moreover, it is easy to find hundreds of photographs on the Internet that will inspire and help you easily decide on the materials and sizes of the sandbox.

Before you start work, find the boards of the required sizes and polish them so that children do not get splinters. The width of the workpieces should not be less than 30 mm.


Now draw up a drawing, choosing the location of the playground and deciding on the size. Typically, sandboxes are made in the form of a square with a side of 1.5-2 m. Sufficient depth is 20-30 cm.

DIY sandbox. Drawing
How to make a children's sandbox?

When the materials are ready, it’s time to start creating a wooden sandbox with your own hands. It's not difficult at all if you follow the instructions:

Define place for the playground. As mentioned above, the sandbox should be installed so that children do not suffer from hot sun rays and were visible. An open area is not suitable - choose a corner under a spreading tree that provides enough shade. And don’t forget: the site must be clearly visible.

If the shade is not enough, docanopy. It will perfectly protect both from the scorching rays of the sun and from rain if it suddenly catches the kids while playing, and, in addition, will increase the service life of the sandbox.
Treat the woodantiseptic composition, which will not allow the material to rot and suffer from insect attacks. The sandbox is located outside, so the protection must be of high quality, otherwise precipitation will quickly render the boards unusable.

Prepare the surface and do base for the sandbox. It should be such as to prevent the penetration of insects and rodents, as well as the mixing of sand with soil. Agrofibre, which is attached to the boards using a regular furniture stapler, is good for this purpose.


DIY sandbox photo step by step
Install sides sandbox, connecting the boards with self-tapping screws. This is the most convenient and affordable mounting option, which will give the structure the necessary strength. Even the constant pressure of a mass of sand will not be able to deform it.


Secure wide horizontal boards around the perimeter of the playground so that children can rest while playing. You can also sit on comfortable benches with backs, which can be easily installed on both sides of the structure.


To understand how to make a sandbox with your own hands and find answers to all questions that may arise during the process, it is better to watch a video with explanations of all stages of installation. You might find some ideas for different sandboxes made by yourself useful.
A simple do-it-yourself sandbox made from large logs
The design is slightly reminiscent traditional log house. Whole logs were used as walls, wide boards covered with light paint and used as benches were fixed on both sides. Flooring became an excellent base that prevented soil from getting into the sand.

Transformable sandbox with folding lid
Perhaps the most practical and interesting option. It is done like this:
- As with a regular sandbox, a box is assembled from prepared boards.
- Materials for the lid are being prepared: 12 narrow boards (6 on each side) and hinges - standard door hinges and with one long shelf (4 pieces each).
- Two boards are nailed to the finished box on both sides.

Short shelves of hinges are attached to the resulting parts of the future lid, and the next pair of boards is screwed to the long ones. Keep in mind: the size of the blanks should be such that the long loop covers no less than half the width. This is necessary for structural strength.

The next board is attached using a regular loop, so that the shelves remain on the other side. To install the second workpiece, you will need a small block, which is stuffed on both sides, spaced approximately 15 cm from the edge.

On the first pair of boards, a suitable piece of wood is stuffed, which will not allow the lid to sag and put pressure on the hinges when folded down.

It turns out to be an interesting do-it-yourself sandbox with a lid, which all that remains is to paint. Even at the preparation stage, you can use a special impregnation that not only protects the wood, but also gives it a particular shade. The paint can be anything, the main thing is that it is intended for outdoor use and does not deteriorate under the influence of the sun and precipitation. Use your imagination and turn the sandbox into a little miracle for your child!

To make the play area even more practical, we recommend using the space under the seats to store toys, partitioning off the space like a compartment. Anyway, children mostly play in the center of the structure, and they can save on sand.

Do-it-yourself sandbox-boat
A wonderful option for little tomboys is a sandbox-boat. Probably every boy dreams of going sailing at least once in his life, so why not give him such an opportunity? How to build a sandbox with your own hands:
A regular square base with low sides is constructed.
Two blanks are driven into the ground near one of the sides of the hull, to which boards for the “nose” of the future ship are attached. It is made in the form of a triangle with sides whose height should be noticeably higher than the main part. The corners of the boards must be fastened by driving nails diagonally.

We make a ladder of 2-3 steps so that the child can easily move from the sandbox itself to the “nose” and back.

The top of the triangle is sewn up with boards.
Decor and additional equipment are built: equipment, masts, etc. The resulting boat is painted.

If desired, the design can be supplemented extension, which is installed on the other side of the sandbox. It is made from beams that are driven into the ground as pillars, and sheets of plywood. In such a house it is convenient to store toys and play a variety of games.

DIY sandbox truck. Step by step photos
The playground is a favorite place to play for kids. For adults, it won’t be difficult to make it bright and cozy. For example, it’s not at all difficult to make it yourself interesting element- a sandbox in the shape of a truck, which will bring a lot of joy to the children.

What you will need
Any important undertaking begins with planning. To create a sandbox, you need to prepare materials and design the structure.
For this you will need:
- sheet of plywood 1.5x1.5 m thick 1.8 cm (several sheets);
- fastening elements (self-tapping screws, screws, metal corners);
- jigsaw;
- slate pencil, drawing instruments, whatman paper;
- primer;
- exterior paint;
- unnecessary car parts (steering wheel, wheels, toggle switches, headlights, etc.)
Manufacturing process
The sandbox in the form of a truck consists of two large parts - the cabin and the body. They can be made from 13 parts:
- Body side (2 pcs.)
- Hood
- Front
- Body seat
- Body seat bottom
- Side with doorway (2 pcs.)
- Steering wheel panel
- Roof
- Cabin seat
- Bottom of cabin seat
- Back wall


DIY sandbox drawings. Photo
In order not to make mistakes with the calculations, it would be advisable to first draw sketches of the parts on paper and find optimal location them on plywood. Then transfer the image to wood and cut along the lines with a jigsaw.


Using fasteners, we assemble the structure, process the edges and protruding parts to avoid injury to children.

Since the sandbox in the form of a truck will be used in street conditions and exposed to weather conditions, it should be treated. To do this, the entire surface is first coated with a primer, followed by a second layer of exterior paint.


DIY sandbox truck. Step-by-step instruction with photo
All that remains is to add realism to the truck by installing a steering wheel, switches, and you can also attach real wheels and headlights.
Thus, it will only take a few hours to make a sandbox with your own hands. And how many happy minutes will happy children spend in it?
Sandboxes with canopy. Photo
A sandbox with a canopy is very practical and decorative. There are many options for execution:
A simple wooden structure with benches around the perimeter and a fabric canopy. To construct it, holes are made in wide horizontal boards on both sides of the sandbox, through which long thin slats pass, serving as the base. The roof is attached to them.

Sandbox with canopy. Photo
The sandbox is shaped not like a square, but like a boat. To do this, two boards connected by a triangle are attached to one side at once. The steering wheel is placed in the “bow”. The fabric canopy is installed on four supports.

Sandbox in the form of a house: foundations are placed in the corners wooden poles, mounted on them gable roof with a carved ridge and other decorations. An interesting effect is created by the sides of the structure, which are made not from boards, but from many bars placed in a picket fence.

Sandbox with a roof. Photo
Another boat. As in the option above, a base of the appropriate shape is made, a fabric triangular canopy is installed (two supports are driven in on the sides near the “nose”, and another one in the center of the board on the opposite side). A “captain's bridge” with a steering wheel is being built.

A laconic do-it-yourself sandbox with four supports, on which a waterproof fabric is stretched on top so that the edges are formed into sides. You can make a lid from the same material: you just need to stretch the fabric, tying it to the pillars in the corners. 
A playground with supports driven into the corners, on which a wooden gable roof is installed. On low altitude Wide boards are attached between two pillars opposite each other, serving as benches. 