A bench made of logs attracts with its originality, ease of creation and low cost. You can make it from scrap materials in just 1 day! See the article for possible design options and how to make them yourself.

Regular log hardwood The wood does not need to be processed. You just need to cut down the twigs and branches. And here are the logs coniferous species Before using for construction, benches should be treated with acetone and water in a ratio of 4 to 1. This will clean the trunk of resin.

Required Tools
To make a bench from logs you will need:
- saw or chainsaw;
- rasp;
- sandpaper.
In some cases, fasteners (nails, wood screws) and appropriate tools will be required.
A chisel, chisel and jigsaw can be used for decoration.
Design No. 1
The most basic option for creating a bench from a log is to simply dig in a log of large diameter and cut it down from above or leave it in its original form:
Design No. 2
To make such a bench you will need two two-meter logs. Perhaps you still have them after construction, or you bought materials for a couple of benches in the same style.

Regardless of the origin of the materials, creating such a bench with your own hands only takes a couple of hours! It is enough to cut one of the logs into 2 parts. They will become supports. In order for the bench seat to stand clearly on the supports, you will need to make recesses corresponding to the log for the seat. They will be somewhere like 1/3 or ½ of the diameter. If performed correctly, no fastening materials are required. The bench can be easily disassembled and moved to another place or reused for construction.

If you have one large diameter log, you can use it for 2 benches by sawing it in half. Smaller diameter timber can be used as legs.
Design No. 3
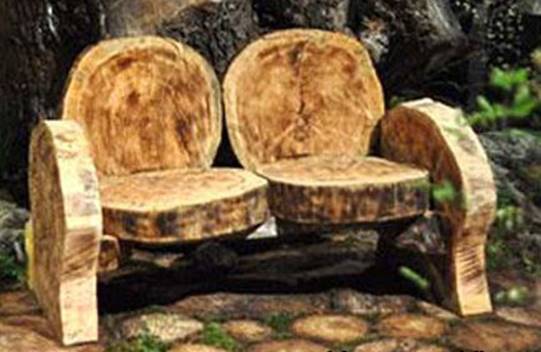
From solid log With a large diameter, you can quickly make a bench with a backrest with your own hands. It is enough to carefully cut out the core to get a convenient design.

If you use a log with thick branches, they can become legs.
If there are no branches, the collections can be replaced by logs as in the first design option or wooden blocks inserted into special holes.
Design No. 4
You can build a bench from rounded logs with a diameter of 160-180 mm. You will need 3 two-meter logs or 2 and several shorter logs to create the legs. To fasten the elements you will need several boards with a thickness of 40-50 cm.

Design No. 5
How to make a bench from a log with a back without a single nail, watch the video:
Of course, for a beginner this will be a little difficult, but not impossible.
Design No. 6
You can make a bench from a log using the same technology as when building a house from rounded timber. Study the design and you will quickly understand how it can be repeated:

Design No. 7
Using a log as a support, you can quickly make a backless bench with your own hands.
Not only a log, but also an old stump can serve as legs:

More ideas for making a bench from a log with your own hands
Such interesting benches can be made from logs if you add a little imagination:


And here are whole compositions for relaxation made from logs:


Final preparations for operation and some tips
When making benches from logs, experts recommend:
- Follow safety rules when working with power tools.
- Draw up a preliminary drawing before starting work.
- For convenient cutting of logs, prepare supports. They can be made from small cuttings with a V-shaped notch.
- If the log cut is uneven, an electric planer will help correct the situation.
After making a bench from logs with your own hands, you need to sand it using a sanding machine or sandpaper. Without this, its pleasant use is impossible.
Protecting the bench from external influences and decorating
Like, it is advisable to paint benches made of logs with varnish upon completion of production. This way you will protect it from bugs, moisture and other adverse effects external environment and extend service life. It is advisable to renew the varnish layer every new season, that is, at the beginning of spring.
Decorating log benches, in fact, is not required, but their authentic appearance can be complemented by clay jugs and bowls on the table or back, carvings, a blanket made from pieces of fabric and climbing plants, planted nearby.
And finally small idea: a bench made of logs is an original Russian piece of furniture. It can be used not only in the garden, but also in the bathhouse, kitchen or on the veranda.
All photos from the article
Often, most of our compatriots get rid of trees cut down on their property or scaffolding remaining after the construction of the log house, simply using them for firewood. This is certainly fast, but not entirely rational. The specialists of our site analyzed what can be made from a log with your own hands. We have collected some of the results of these studies in this article.

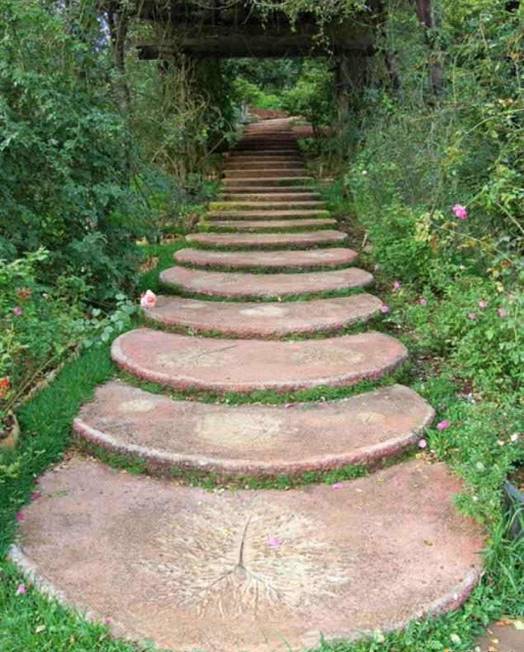
Practical and inexpensive garden paths
Undoubtedly, paving slabs it's beautiful and reliable, but the price is quality material quite high, plus it is not suitable for every landscape. In addition, it should be taken into account that although the installation instructions are not very complicated, without the proper experience and dexterity, it is very problematic to lay the tiles efficiently.
If you are lucky enough to live next to a planting or forest, it is quite possible to create original garden paths from cuts of fallen trees and thick branches.
Moreover, the cost of such a nature trail will be several times lower than that of industrial options.

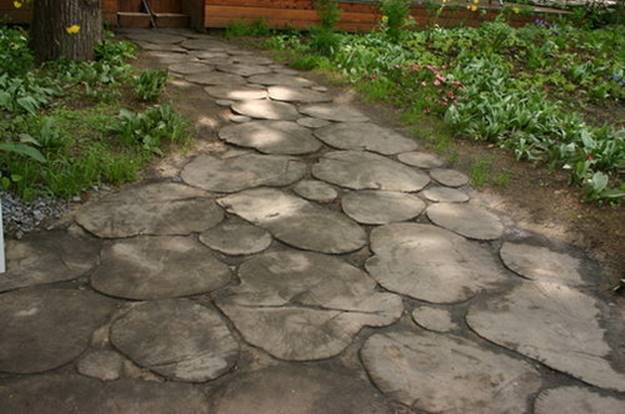
- Theoretically, any wood can be used here. The whole question is how long such flooring will last. After all, the denser and harder the array, the longer it will last in the ground. Ideally, it is better to use water-resistant species, which, according to their characteristics, are initially less afraid of mold, fungus and biological pests. Decent option Larch, aspen or acacia are considered.
- IN in this case It is better to take wood of different diameters Thus, it will be much easier to fill the voids between the cuts. It is advisable to remove the bark immediately, since it is porous and quickly absorbs moisture, as a result of which the saw cuts begin to deteriorate.
- The cut thickness is at least 100 - 150 mm. Of course, you can cut more, but in this case you will need to make a deep pit. Plus, the longer the logs, the more wood will leave.

Advice: having decided on the size of the cut, you should immediately make a template with which it will be convenient to cut identical segments.
The easiest way is to saw off the standard and nail a bar to it on top, in the form of a corner.
- Having marked the place for the path, you should build a pit. Standard width garden path 50 - 70 cm. But if this path leads to a toilet or other popular place, then it should be at least 1 m, so that two adults pass each other.
- The depth of the pit is 100 mm greater than the bottom cut of the log. On clay or sandy soils, you can leave 50 mm; for swampy places and peat bogs, the pit can reach 200 mm from the bottom of the log.
- Some people prefer to install wooden formwork from 40 mm thick boards. This is more impressive and it is easier to install such a track, but it will cost more.
- The wooden surface of the path should rise slightly above the ground so that it does not silt and dries faster after the rain. As a rule, 30 – 50 mm is sufficient.

Important: all wood material must be treated with impregnations.
There are many options.
Of the most affordable, can be treated with a solution copper sulfate, and when the wood dries, further impregnate it with waste machine oil.
- Some recommend laying waterproofing made of polyethylene or roofing felt at the bottom of the pit, but we do not support this point of view, since moisture will not be able to penetrate into the ground. On hard clay soils It is enough to simply compact the bottom of the pit well. If you are afraid that growth will emerge from below, cover the pit with geotextiles.
- Further it's simple, but routine work. You need to make a drainage pad from crushed stone, gravel or sand with gravel. Compact it and you can lay the prepared cuts, the tighter the better. The space between the cuts is immediately filled with sand.
- After laying the path, you need to water it generously and leave it for a couple of days. so that the sand is compacted. Next, the resulting voids are filled with sand.

Making furniture and swings
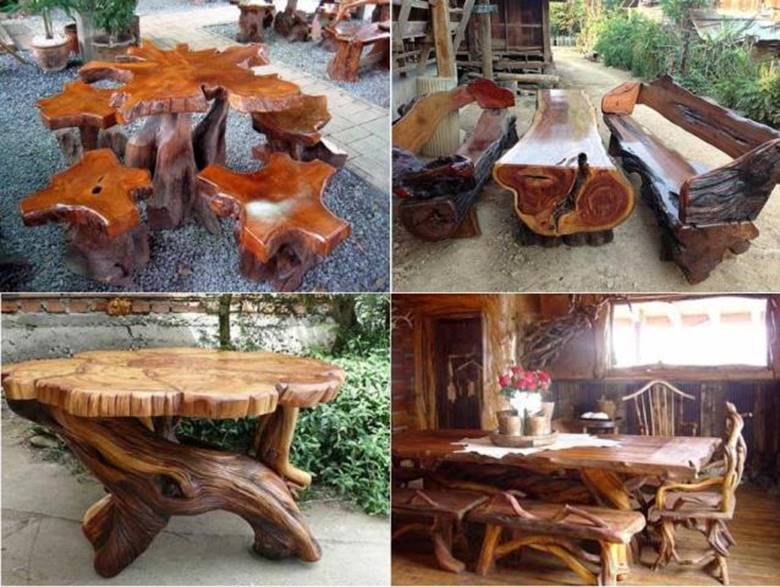
Paths are not all that can be made from logs. If you have artistic taste, imagination and basic carpentry skills, you won’t have to spend money on garden furniture or a children’s swing. In addition, there are a lot of fun crafts made from logs, some of which are shown in the photo.

Garden furniture made of logs
Apart from crafts, which for the most part have only artistic value, decorating the area, garden furniture is quite practical and useful thing. Of course, products made from rounded logs look much more attractive and are much easier to work with. After all, this material has clearly fixed dimensions.

Tip: To make most types of furniture you will need to spread the log lengthwise.
Theoretically, this can be done hand hacksaw, but in practice, you can’t do without an electric or chainsaw.
Such log products attract with their simplicity. Already at the first glance at the photo, a man fluently wielding a chainsaw general outline will understand how to make a table or bench.
As a rule, for the horizontal surfaces of the bench, one or several trunks spread lengthwise are used. Folded and fastened with dowels, self-tapping screws or large nails are used as legs.

The video in this article shows the practical side of the issue. But competent surface treatment is still important for furniture. The use of copper sulfate as an antiseptic for wood is not entirely justified here, since after treatment the wood loses its natural color. If you do not take special primers, then as an economical option you can use a solution of potassium permanganate.
After potassium permanganate, the array will darken a little and the structure will stand out. As a rule, any transparent or translucent varnish for exterior woodwork is used as a finishing layer. It should be noted that experienced summer residents do not recommend digging in such furniture, so you will always have the opportunity to move it or turn it over to dry.

Tip: the type of wood also plays an important role here.
It is better to take hardwood.
But if you still decide to make furniture from solid coniferous wood, then it must first be deresined.
Suitable for this water solution acetone 25% or acetone mixed with caustic soda 5:1.

Building a swing
A balancing type swing made of logs can be made stationary or portable. For the manufacture of stationary structure A pair of logs are dug into the ground and a strong crossbar is made between them.
To install a board or log on which the kids will actually swing, it is better to purchase special metal hinges. Their price is low, and such swings will work for many years.

There are baby rocking chairs that are even simpler. Since we are talking about what you can make from a log with your own hands, we should not forget how our ancestors made such swings.
The design is ridiculously simple. TO round trimming logs of an acceptable diameter, a straight board or a thinner log was rigidly attached. The swing worked due to the spherical shape of the support.
It is somewhat more difficult to make a pendulum structure. Ideally, you will need 5 - 7 straight logs with a diameter of at least 100 mm. Each support here is made from two crossed trunks dug into the ground.
The supporting horizontal beam on which the swing itself is mounted is mounted on top. In some massive structures, 2 additional beams are installed to laterally strengthen the supports, as shown in the photo.

In this case, the supports must be dug into the ground to a depth of 50 - 70 cm. Taking into account this immersion, the length of the supports is taken to be at least 3.5 m. Underground part logs are impregnated with an antiseptic, processed and wrapped waterproofing film. Some people recommend filling them with concrete, but often well-compacted gravel or clay is sufficient.
If top beam fasten from below or in the center between the rafters load-bearing supports, then the entire burden will fall on anchor bolts. It is much safer to make supports in the form of a disproportionate letter “X”. Then the horizontal supporting beam fits perfectly into the upper sector and is securely fixed with anchors.

All photos from the article
Interesting stuff- wood. At the right approach the remaining trimmings can bring many benefits to home owners or cottage owners. Crafts from logs for the dacha are easy to make with your own hands, and how much joy they can bring to children.
Let's not rely only on sensory perception, let's turn to practice.

Functional and decorative

First, let's decide on a plan for covering the problem.
We will be interested in the following aspects:
- Construction garden furniture;
- Construction of garden paths and flower beds from logs;
- Construction architectural forms small ones for kindergarten;
- Construction of fences, or rather fencing;
- Crafts for a playground made from logs.
For your information! Today we are not considering the construction of wardrobes, beds, and cabinets, although they can be easily made from wooden cylinders. This was done purposefully so as not to overload the article and not turn it into a small carpentry encyclopedia or a crafts section.
Sit in style

Going out into nature on weekends, it’s nice to sit under flowering trees, or just in the shade in summer. Having planned a recreation area in it, you can permanently place garden furniture.
But first of all it needs to be collected.
- Log benches. These elements of garden furniture can be placed separately, or they can be combined with tables. The whole ensemble looks very good on terraces, separate semi-open or closed areas, in separate gazebos.
- Separate tables, tables + benches. The structures themselves are quite heavy and have little lifting capacity, so they require permanent place placement. Logs can make a wonderful garden workbench; if you place it under a canopy and cover it with special impregnations, it can serve for a very long time.

The instructions will look like this:
- For simple designs for the two stumps + board type, projects are not required; for more complex models, especially compositional ones (a table with benches together) - it is still better to paint the diagram;
- The preparation of furniture bases can be done in two ways:
- or inserts are attached to the lower log, which are actually legs;
- or material is removed from the lower cylinder and a U-shaped stand is formed.
Of course, the first method is the simplest. Difficulties can only be caused by the formation of semicircular grooves in which the first log will be fixed. And there are variations here.

After removing a little material from the cylinder and forming a flat area (10 cm is enough), you can safely attach the bases. For example, the remains of the logs are 50x100 mm timber. If you prepare the lower log as a base and select wood, preparing products of the above form, then you cannot do without a saw, plane and abrasives;
- The set of side parts is not difficult. The cylinders are stacked on top of each other and secured with conventional connectors. In tables there is a need to lay a perpendicular connecting beam, which will strengthen the strength of the entire structure. In this technique, laying is similar to laying logs in the corners of buildings, using the “bowl” method;
- Installation of table tops or seats. Does not cause any problems: they are laid on top of the side posts, fixed with any connectors - nails, galvanized self-tapping screws, screws;
- The joining of the backrests and side restraints on the benches occurs in the same way as the selection of material for the side supports. To avoid making additional grooves, the connecting bars can be fixed at two points to the seats and support sides.

Advice! Any Street furniture it is located in an open space or under a canopy, so it must be impregnated with antiseptics and, at a minimum, be covered with varnish or paint. This determines the lifespan of your design.
Landscape design
An original exterior and full functionality are the characteristics of homemade products in the garden.
There are a lot of ways to use logs in the country, we will look at the most popular:
- Design of garden paths;
- In the form of decorative containers for garden crops.
- Let's start with the tracks. Fragments of logs can be used as borders or for lining paths directly. Borders are prepared very simply, the cylinder is sawn into small fragments of 20-25 cm, soaked in the most simple view composition - working out, for example. Installed along the perimeter of the bed or flower bed. Pancake slabs for the paths are also being prepared.

Practical observation! Want to forget about the weeds on garden paths, you will be interested in the following technology. The earth is excavated with a half shovel.
The top layer is fertile, you will find a use for it. Place a cellophane sleeve in the finished ditch.
It should line the bottom and sides of the ditch. Then install wooden cylinders vertically around the perimeter. Fill the gap between them with screenings and crushed stone.

- Decorative pots. You can use both fragments placed vertically and horizontal logs. It is necessary to hollow out holes, soak the wood from rot, and fill the container with earth.
Children's buildings
Crafts made from logs are interesting, first of all, for children if they are brightly colored and allow them to arrange various games. The most interesting will be wooden huts, similar to those in fairy tales, or wooden forts from adventure works.

Assembling a log structure is similar to home construction techniques, but here's what to remember:
- In assembled buildings, it is desirable to exclude sharp ends, for example, palisades or decorative posts;
- Existing doors must be made wide so that an adult can get in and evacuate a child if necessary;
- It is not advisable to do big windows, if they are above the first level.
All these simple rules can protect children. Prevent injuries and other surprises.
Fencing at the dacha

Sometimes it becomes necessary to build small pens for animals or to separate an area on the site for some needs. The simplest method of zoning is cylinder fencing.
These parts can be used as supports for a small fence, and for a set of fence spans.
Don't forget a few rules:
- Using logs as supports, treat them well with an antiseptic; when digging in the cylinders, make them an additional “sock” of roofing material;
- When forming a span of logs, parts in contact with the surface of the earth, in addition to processing, must additionally be removed from contact with the soil sponge. The most simple method The solution is to install an additional rail. It will rot within a year, but it can be replaced;
- If you want to enclose a children’s corner with such a fence, paint it brightly – with all the colors of the rainbow. The price of such an event will not be so burdensome, but children will be interested in playing in such a town.
All the best for children

And again to the playground.
In addition to huts and fences, wooden logs can be used to construct:
- Swings and carousels;
- Funny characters and decorative figures.
Considering the first point, take a look at the table:
Funny characters are bright figures, various little men, forest dwellers and other fairy-tale characters. Although you can use interesting models active inventions, for example, making a composition from logs.

Finally
Any homemade product is, first of all, your fantasy embodied in reality. And let’s not forget to add tools and skills to use them.
The video in this article will show what else you can do yourself from “unnecessary” scraps of logs.
Dacha is the most appropriate place for experiments. Here you can place traditional and creative wood crafts. It doesn't matter whether they are successful or not.
Any item made with my own hands, will give the site color and originality. Below are photos of wood made by yourself. They can be copied or used for inspiration when creating your own products.
Varieties of wood crafts
Wood is an excellent material for making various crafts. It is cheap and easy to process. To make things from wood, it is enough to have the simplest tool. The material can be fastened in any way you like: gluing, driving in nails, screwing in screws, tying parts together with cords.
Wood is the most accessible material in the country. Being in nature, it can be found everywhere. There is no need to specifically go to the store and buy something. Good raw material for creative crafts to the dacha can be found literally under your feet or, armed with a saw, you can get it in own garden with your own hands - logs, birch and fruit logs, branches, saw cuts, bark will do.
You can use any wood in your work:
- logs;
- hemp;
- roots and driftwood;
- branches;
- boards;
- plywood.
The following types of wood crafts are most often found in summer cottages:
- frame for ;
- hollowed out logs and stumps used as plant containers;
- garden figurines in the form of animals, fairy-tale characters, huts, mills;
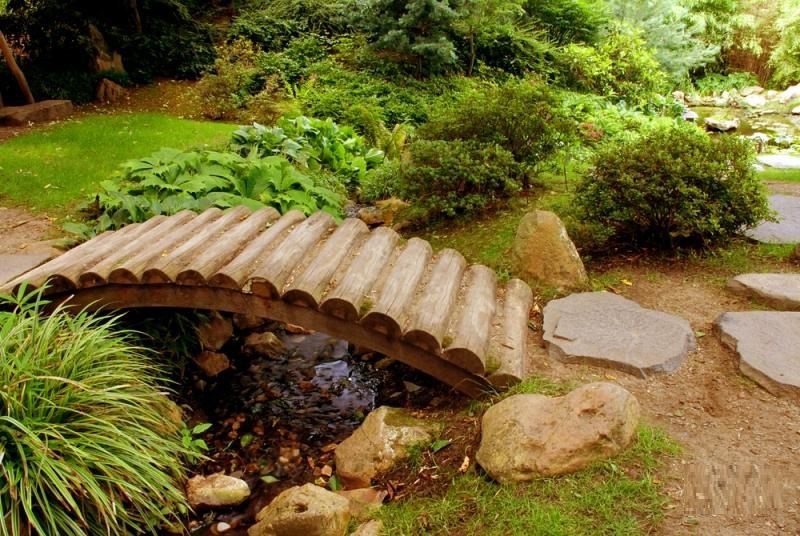
- small architecture buildings –, decorative bridges, paved with boards or sawn logs.
When working with wood, it is not necessary to concentrate only on the land plot. Interior garden house can also be decorated great things, which will look beautiful, be useful on the farm and fit into life in nature.
Wood can be used to make kitchen utensils:
- bread bins;
- rolling pins for dough and pestles for chopping vegetables into puree;
- dishes;
- spoons and spatulas for turning food in a frying pan.

Even an inexperienced craftsman can put together a stool or chair for a summer house. Boards and plywood can be used. But to make a wood vine garden with your own hands, you will need good literature or watching video classes.
Weaving furniture, video tutorial:
Wood is indispensable when decorating. All types are built from it. All parts need to be sanded well and painted so that the children’s hands do not become covered with splinters.

What can be made from plywood?
Crafts for the dacha made of wood in the form of animal figurines, made with your own hands, unusually decorate the area. They can vary in complexity of production. Some are available for beginners. For others you will need special tool: cutters, and sometimes a carpentry machine.
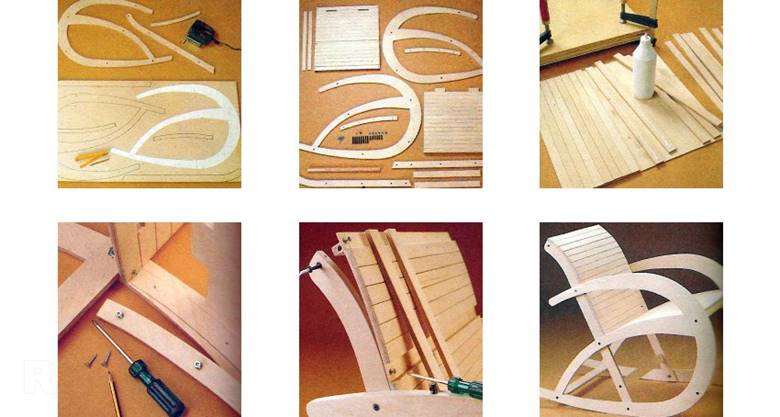
Plywood is the easiest to work with. This material is easy to saw regular jigsaw. The work becomes much easier if the farm has electric jigsaw. Plywood can be glued and joined with metal fasteners. It is very easy to make garden figurines from it - to do this you just need to cut out the parts and then connect them in a certain order.
Making a chair from plywood in the photo:
Transformable plywood chair, video:
Crafts for the dacha made of plywood and wood can be painted or burned into the desired pattern using an electrical device. Making a figurine from plywood takes only a few hours.
Plywood consists of veneer sheets glued together. The material is afraid of moisture, so ready product it must be immediately varnished or painted with moisture-resistant paint.
If the product consists of small parts, you need to choose the highest quality types of plywood. They are especially durable and will not crack under the influence of a jigsaw.
You cannot cut wet plywood. The tool will break. Those who plan to immediately start making crafts need to purchase a dried sheet. Wet will have to be kept in the sun for two to three weeks.
Tools for work:
- jigsaw with a set of files;
- drill;
- awl;
- ruler;
- burner;
- Grinder.
The last two devices may not be required.
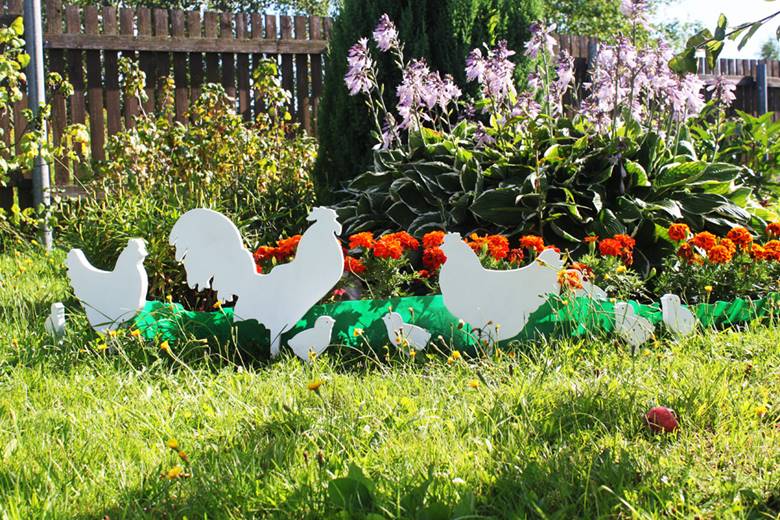
The most budget-friendly ones are made from plywood garden figures. They are placed at key points on the site to add emphasis.
Despite their simplicity and flat configuration, plywood figures fit very harmoniously into landscape design. They are installed leaning against any support. If there is no support, a peg is provided at the base of the product, which can be stuck into the ground. It must go into the ground at least 50 cm. This will allow the figure to withstand the pressure of the wind without falling under its gusts.
Photos of plywood figures that you can make yourself:


You can get a stencil from gardening magazines or make it yourself. First, all the details are cut out of paper, and then the patterns are placed on plywood, outlined with a pencil and cut out.
Sawing out of plywood with a jigsaw, video tutorial:
Stumps and logs
If you passed in the garden spring-cleaning, the gardener may have a stump or a whole log at his disposal. They can be used for firewood, but it is better to create a beautiful and unique thing. Stumps and logs are suitable for making garden furniture or crafts.
Only dry wood is suitable for work. She should stay in the sun for at least 1-2 months. Otherwise, the finished craft may crack, which will overshadow the joy of creativity.
It is better to throw away rotten material immediately. If the rot is only on the outside, the stump can be cleaned with a grinder and then used for work.
It is better to remove the bark. To do this you will need a chisel and a hammer. If the craft is supposed to be made with bark, it needs to be treated well right away. iron sulfate and varnish to protect against rotting.
Any stump can be used: wide and narrow, high and low. It doesn’t even have to be uprooted from the ground. But the dug up stump can be used in more different ways.
To process stumps and logs you need:
- Grinding machine with brushes and discs.
- Sandpaper.
- Burner for a beautiful, aged look. appearance. The burned surface is cleaned sandpaper or a sanding disc.
- Chainsaw. It can simply be used to split a log into pieces, but in the hands of a virtuoso it turns into a sculptor’s tool. Shaped cutting Operating a chainsaw requires skill and safety precautions. Before starting work, it is better to outline the contours of the future product with a pencil, and then all that remains is to remove all that is unnecessary.
- Brushes, varnishes, paint, wax. They protect against rotting, give beautiful view. The varnish is applied in at least two layers, the second only after the previous one has dried.
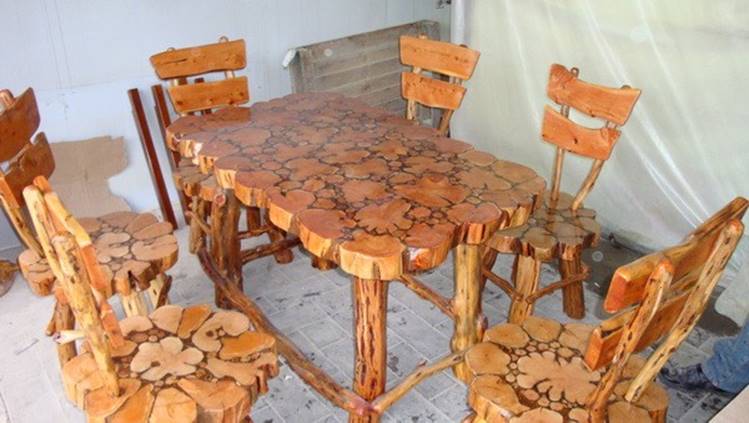
Using a stump or log as a basis, you can create complex designs. The parts are attached to the base with glue, self-tapping screws and metal ties. Wood can be combined with metal or made beautiful table with glass table top, attached to a stump instead of a leg, as in the photo.


One hemp will make a simple one coffee table or a stool, and from several - a wide dining one, if you use them as legs.
Photos of tables and chairs made of wood that you can make with your own hands:
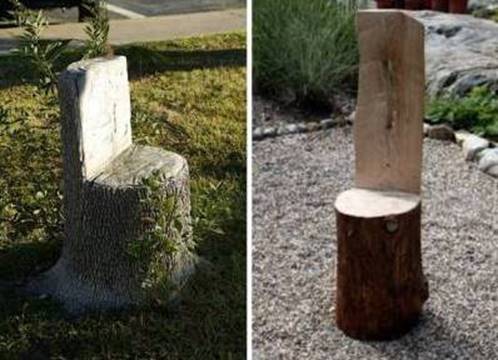
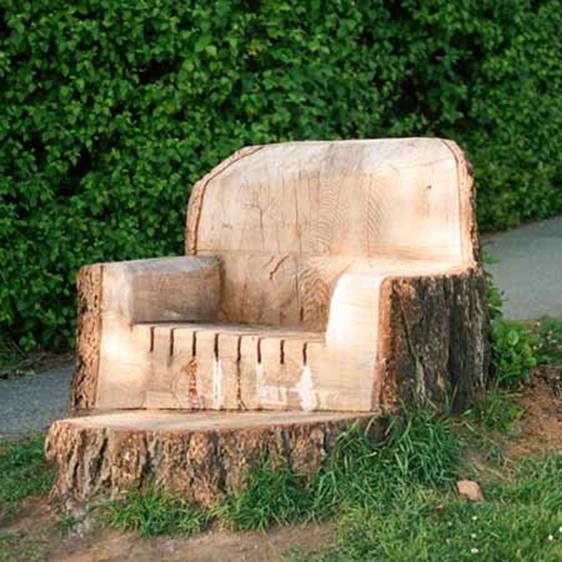
Especially large stumps can be turned into unique armchairs, similar to a throne. To do this you need to work well with a chainsaw.
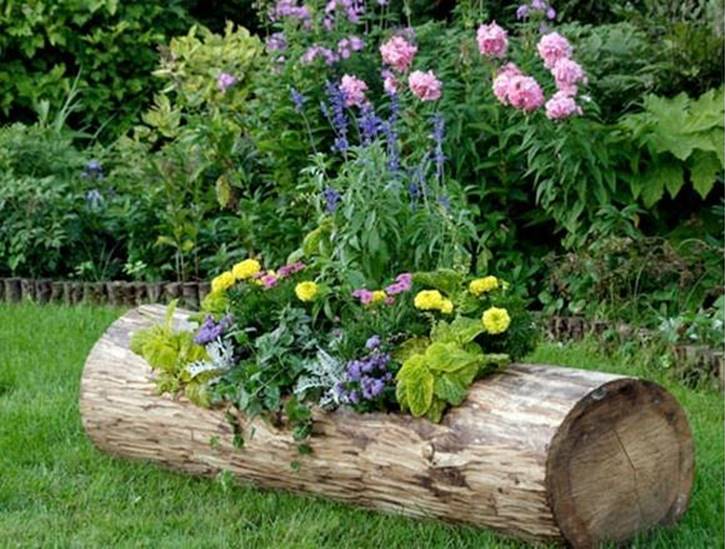
It's very easy to transform a tree stump into a unique flowerbed. To do this, you need to hollow out the core and fill it with earth. To make this pot last longer, the inside is lined with polyethylene.

Traditionally, logs are made from logs. This could be the frame of a well or interesting flower bed. The log house is installed on sand-cement mortar or stones. To preserve the natural style, it is better to caulk the cracks with moss. It is not forbidden to paint the logs themselves with varnish or paint.


A small log can become a flower pot. Using an ax or hammer and chisel, the core is removed and plants are planted in the resulting niche.

If you cut a log into logs, you will get blanks for a variety of garden figurines. They are mainly used to make animals and people, trains, cars and other mechanisms.
Blocks of wood can be used on the sides of flower beds or sandboxes, bridges and even a completely original chaise lounge.
Crafts for a summer cottage made from logs that you can make with your own hands, photo:


Bark and branches
Not every summer resident has logs on hand. But bark and branches are truly publicly available material, which is abundantly available in the nearest forest belt. The only limitation is that you should not take openly rotten wood for work.
To do it yourself interesting crafts For a summer residence, you need to be able to see the potential in a piece of driftwood. What was once a semi-finished product can turn into original decor in the now fashionable eco-style, which, moreover, will not cost its owner anything.
From branches you can make:
- furniture;
- flower vases;
- table setting items;
- landscape figures.
All objects made from branches will have the most bizarre shapes. They are truly unique and creative. Crafts from branches and bark are an excellent hobby that help emphasize the individuality of the site and the interior of the garden house.
Before work, branches and bark need to be prepared:
- inspect for cracks;
- clean from dust, dirt, debris;
- sand the crumbling areas.
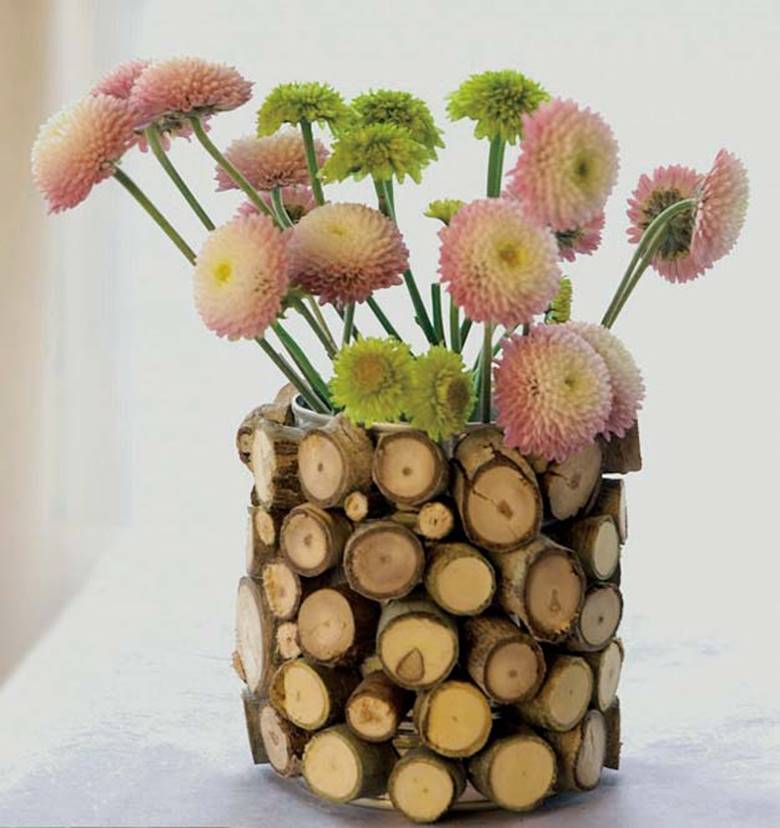
The easiest way to use small branches is to make a vase for the garden in which you can put a bouquet. To do this, take any moisture-proof container (glass or plastic) and cover its walls on the outside with vertically arranged pieces of branches. For decoration, the vessel is tied with braid, ribbon or twine. The same method can be used to decorate ceramic flower pots. Such simple crafts quite in the spirit of country life.


To make a more sophisticated vase you will need glue gun and wire cutters. As a base, you can take any container, for example, a glass jar that is unsuitable for preservation due to its non-standard neck.
Manufacturing:
- The branches are cleared of bark. It is better to do this while they are still raw, as the shells are harder to remove from dry ones.
- Using pliers, cut the branches into short sticks.
- Allow the material to dry.
- Using a glue gun, glue each piece to the base, creating a cross-shaped lathing.

Branches for crafts do not have to be strong and massive. The most beautiful crafts wood for the dacha is created from fragile twigs. Even thin shoots of willow will do. Painted in gold, they create an elegant frame for candles. To prevent a fire, after painting the branches must be treated with a fire-resistant compound. It can be purchased at a hardware store.
If you glue the cuttings of branches into a massive cube, you will get an ottoman or a coffee table. It can be installed directly on the street.

To create this pendant garden lamp it only took half an hour. The branches are fastened together using a glue gun.

Glass candlesticks were purchased from a nearby interior design store. The fastenings are made of cotton utility tape. The chandelier can be hung anywhere on the site - where the owners usually spend evenings in the fresh air.
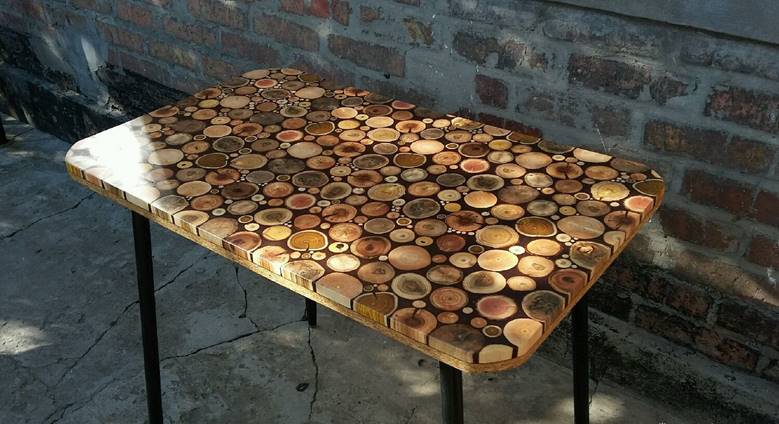
Crafts from saw cuts
The most popular use of saw cuts in the garden is paving paths. The path made of round stones looks beautiful and is easy to use. Unfortunately, its service life is only 3-5 years. Rotten pieces of wood must be constantly replaced with new ones.
It is better to use saw cuts for making furniture and interior crafts. It can be varnished and the piece of furniture will last for decades. If you need to connect the sections at the end ends, they are placed on glue.
Photos of crafts from saw cuts:


To make a lot of rounds you will need a chainsaw. An ordinary hacksaw will not work, as it takes a long time to work with it and the products will turn out uneven. The log is placed on the trestles, clamped and pieces cut off required thickness. Then the workpiece needs to be dried. This will take a couple of months. The wood is turned regularly so that it dries evenly.
The round wheels are polished with a grinder. It is important that the bark does not fall off. Without it, the saw cut does not look as beautiful as the natural one. For impregnation you can take linseed oil. If you cover the bark with transparent acrylic varnish, it will not crumble.
Wooden furniture for the garden
You can make exclusive furniture from free building materials found in every garden. Snags, stumps and logs can be used. Wood needs to be cleared of bark - harmful insects usually hide behind it. Then everything is carefully treated with stain and antiseptics.
Wooden furniture for a summer house in the photo:


A selection of ideas to create wooden furniture to the dacha, video:
When cleaning or beautifying your summer cottage Never throw away or burn any logs, stumps or driftwood. This is all creative material for future crafts for the playground or design elements for the site itself. In this article, we decided to present for you crafts made from logs for the dacha.
How to make crafts
In order to make products from logs, you need to perform some steps. First, carefully clean and separate all the excess, in your opinion, now it becomes clearer what a log or driftwood looks more like. Perhaps it will not be a whole image, but one of its parts, but you can fasten the parts together using:
- Specialist. glue.
- Small carnations.
- Using a drill (when in drilled hole another part is inserted).
The finished figure is coated with varnish for protective purposes. We wait for it to dry, now with the children you can decorate your hero with multi-colored paints.
You can also make a lot of things from solid logs. These include swings, labyrinths/ladders, small houses/huts. Log playground will keep children occupied for a long time, while adults can calmly go about their business.
Craft ideas
Well, the time has come to demonstrate crafts made from birch logs for the dacha. Surely, you will like our ideas.
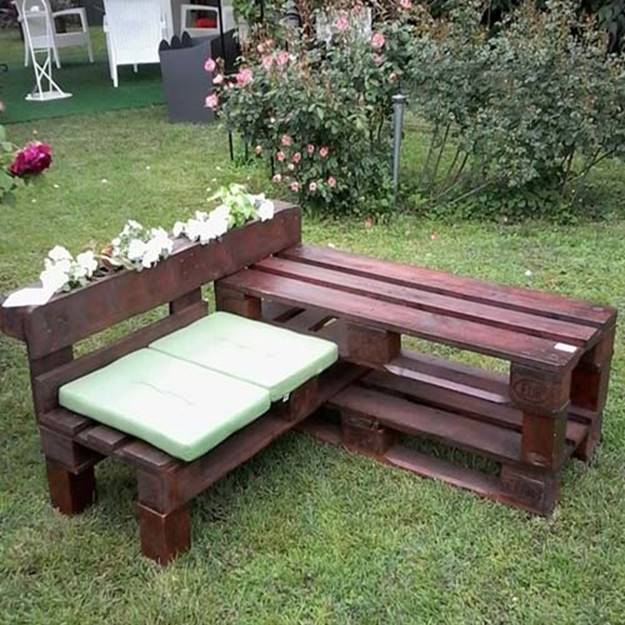
Stylish country furniture.
If plastic furniture It’s not comme il faut for your estate, but you don’t have enough money for expensive designer furniture; making garden furniture on your own is your option. The main difficulty is to deliver heavy stumps or logs to desired point summer cottage plot. And then stock up on tools, choose suitable option, and remember the ancient motto - “I take a stone and cut off everything unnecessary from it,” only in this case you have not a stone, but a wooden material. 
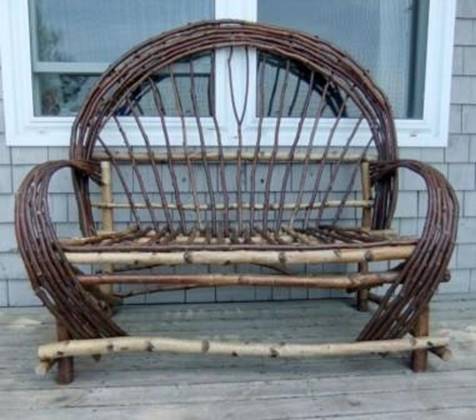
Let’s say you can make an intricate bench out of a solid log, and a table and chair out of stumps, perhaps an option for kids.
A children's kit can be made as in simple version, when only the upper surfaces are processed, and more complex, with cleaning of bark and unnecessary details, and with backrests, sides, etc. attached to them.
But you can even make a couple of benches from a log if you can evenly divide the log lengthwise into two parts. On the semicircular side you can make recesses, due to which the bench can be installed on two small logs; if calculated correctly, it will stand quite stable. And it will last for many years with minimal care.
Log flower bed.
This option will require less time to create than a flower bed made from PVC bottles or tires. Using a chisel and hammer, we make the necessary indentations in the log or stump, fill them with soil and plant flowers in it. And how impressive they will look!
Log dog house.
As an option for making children's houses or huts from logs, there may be a doghouse option. The principle is absolutely the same. Only you don’t have to make windows, and the hole is lower. The roof is also covered with roofing felt or tiles, and your pet will be grateful for such a reliable and durable home. In fact, it can be made in one ensemble with the entire estate and can even be its decoration.
Log fence.
Remember the palisades in the fencing of ancient fortresses from the course school history? Using the same principle, you can build a fence around your site, or make small fences inside the site itself. But the appropriate processing prior to installing the palisade will require considerable and expensive work, so consider your strengths, including financial ones.
Country bridges made of logs.
What crafts to make for the garden from logs with your own hands? This question is of interest to many. Just imagine the delight of your guests over the original log bridge over an artificial pond on your site, where you can fish or take a spectacular photo! Even in the absence of a reservoir, a bridge can still be built as an element of a unique design. The main thing here is the reliability and strength of the structure, no matter whether it will perform decorative or direct functions. If it is expected to be at least
25 meters, then it would be advisable to pour a foundation at the base of each end, and install intermediate piles in the gaps under the span. Metal carcass will only strengthen the structure and give it a more fundamental look. A wooden railings will give it a unique charm.

Houses made of logs.
So, we’ve already got our hands full on children’s houses and huts for playgrounds, as well as on doghouses; it’s time to move on to more serious buildings. For example, residential building. By the way, before this you can test your design and construction skills on a gazebo, bathhouse or garage, if the estate is supposed to be in the same style.

Pros log house are its environmental friendliness, unnecessary decoration, such a house always looks respectable and fundamental.
For the construction of houses, as a rule, logs of two types are used - rounded or planed.
The last option saves all beneficial features wood, although construction from them will be somewhat more labor-intensive than from rounded logs. No additional coverage with various protective compounds such a house will not require either. But it needs to stand for about a year to a year and a half, and only after that can doors and windows be installed.
Figures made from logs.
Wooden men, fairy-tale characters or forest dwellers will be a wonderful addition to the playground. Don’t chop off unnecessary branches, it’s better to think about how to fit them more harmoniously into the character and use them as a nose, horns or arms - legs, maybe a tail. Ordinary flower pots or children's buckets will serve as an excellent headdress; use sponge or straw to make hair, mustaches and beards for them. You can draw faces with paints, and the reinforcement in the structure will only strengthen their position in their place.

Wooden bunny.
It is very easy to make a variety of garden crafts from logs with your own hands. If you like a wooden bunny, then feel free to start making it. What we need:

- A log with a diameter of 16 - 23 cm and a length of 35 - 55 cm.
- Plywood sheet 4 - 6 cm thick.
- Nails.
- Facade paint.
Progress:
- For stability, we cut the log from below very evenly, and the cut from above should be at 45 degrees.
- We sand the log properly and dry it in a warm room for several days.
- We cover the log with special varnish.
- Using a plywood jigsaw, we cut out the muzzle (with the same diameter as the top cut) and ears. You can use both templates and pre-draw everything yourself on a plywood sheet.
- We first paint the cut-out parts in the background color, and after drying, add the necessary elements, eyes, nose, antennae.
- Now we fix the corresponding elements in in the right places, first we drill holes, then we attach the muzzle and ears with glue and nails.
Wooden homemade product in the shape of a man.
What we need for this craft:
- A pair of logs of different diameters.
- Branches.
- Perks are special drills.
- File or hacksaw.
- Carnations.

Progress:
- The log ratio should be approximately 2:1, but this is not necessary. The larger part will become the torso.
- We fasten the logs together with a branch, which is inserted into holes drilled in the ends of both logs.
- Now the face - we drill out indentations for the eyes in the appropriate places on the face and insert small, pre-painted blocks there.
- All branch inserts must be properly dried to prevent them from quickly falling out of their places.
- We put the little man on a bench; to do this, we fill a board on a log fixed in the ground, and attach our little man to it with nails.
- We fasten the arms and legs from the corresponding branches with self-tapping screws so that, if necessary, they can be tightened.
Log benches.
You can start with a simple option, then move on to more intricate designs that will allow the master’s talent to unfold to the fullest and will delight guests with its originality of solutions.

Log well.
It doesn’t matter whether it’s a real well or a fake one, it’s important that it will become a genuine decoration of your site, a decorative element next to which everyone will immediately want to take a photo.

Garden swing.
Oh, this idea will appeal not only to children, but also to adults! Robust design will attract well-deserved attention, and if ladders and ropes are additionally installed nearby, then it will already be a whole sports ground.

Finally
With some effort, you can create beautiful crafts from thick logs for the garden. And you were able to verify this. In general, prepare everything you need and spend your free time with benefit.