Each of us strives to arrange the interior of the room in such a way that it is not only cozy, but also comfortable. This is quite logical, since after hard days at work you want to relax in a comfortable environment, so that nothing disturbs you. A cocoon chair can become such a favorite place.
Previously, such designs were used only on suburban areas, today it has become fashionable to hang them in urban dwellings. And why not, if space allows?
A hanging cocoon chair is not cheap, so it is not available to every ordinary resident. What should I do? Everything is obvious: you can make a chair with your own hands, because it is not as difficult as it might seem at first glance.
Types of hanging chairs
- A chair with a rigid frame.
The frame is usually made of rattan and wicker, in some cases acrylic and plastic. Pillows and small mattresses are used as seats.
- Hammock chair.
The design of such a chair is similar to hammocks, the only difference is in size and fastenings.
- Cocoon chair.
The peculiarity of the model is that 3/4 of the chair is closed. Basically, the walls are made wicker in the macrame style.

- Drop chair.
The model is similar to a hanging house, especially suitable for installation in a children's room.
- Chair on the counter.
The main feature of the mounting is that due to the wide, stable leg, there is no need to attach it to the ceiling; the structure is placed on the floor. The advantage of such a chair is that it can be placed anywhere in the house.
Features of creating a hanging chair
Today, there are more and more craftsmen who have managed to make a master class on the manufacture of such a design and talk in detail about this process.

A distinctive feature of the chair is its resemblance to a spider cocoon. Such an element will decorate absolutely any interior and become a favorite relaxation spot. In terms of its structure, it is an unfinished ball braided with ropes.
The most simple technology creation looks like this:
- First of all, a frame is created. As a rule, 2-3 hoops are used for this same size, which are connected to each other to form a ball. In order for the ball to better hold its shape, several more half rings are installed inside.
- To make it comfortable to sit in a chair, you need to put a seat there. It can be a pillow, a board, or you can simply weave it.
- In order to be able to sit quietly in the ball and not fall through, it is necessary to cover it with mesh. Here, too, there are several options: you can buy a ready-made mesh, you can weave it yourself, or you can simply cover the chair with rope.
- The chair must be suspended from the ceiling. This will not be a problem if you initially provide hooks or brackets on the product, through which you can attach the chair. After all, the main thing in a hanging chair is the ability to swing from side to side. In some cases, a spring is used to allow it to swing up and down in addition.
How to make a chair using macrame technique
Anyone can make a cocoon chair with their own hands, a master class of the process itself, the main thing is to have it at hand.

You will need:
- two with a diameter of 90 and 110 cm, a cross-section of 35 mm;
- polyester cord with a diameter of 4.5-5 mm;
- crochet hook No. 8-9;
- slings - 12 m;
- 2 wooden rods 60-80 cm;
- tape measure, scissors.
The bottom of the chair can be crocheted or woven using the macrame technique.
First of all, you need to wrap the hoop with a cord, tying every tenth turn with a knot.
Starting from the center, tightly crochet a circle of air loops and single crochets. After 6-7 rounds, you can move on to making a seat with a tight knit, as well as a back, which can be made with a mesh.
Knitted product in finished form should not reach 10 cm to the edges of the circle. Knitting will require about 120-160 m of cord.
The seat should be secured to the hoop from the side of tight knitting; at this time, it is necessary to evenly stretch the napkin along the diameter of the hoop.

Making a hanging chair seat
A seat made using the macrame technique is much more economical; you will need the following parts of the cord:
- 8 pieces of 6 m;
- 4 to 5;
- 4 to 4.5;
- 2 to 4.
Now you need to place the blanks on the hoop. 8 threads are attached in pairs in the center at a distance of 6 cm from each other. All others are fixed with the same distance on the sides.
To secure the cable, it is necessary to make a knot on each thread. We knit with a knot at a distance of 6 cm, periodically doing a stretch.
In order for the cocoon chair to have fringe, it is necessary to extend each thread by a meter and not cut the end.
How to make the frame and back of a chair
To make a hanging cocoon chair with your own hands, you need to take care of a solid frame. Wooden rods should be wrapped with cord and inserted into the back; they should be secured before knitting the back.
The hoops on the opposite side must be secured with a cord. The frame is knitted in the same way as the seat - with a network of knots.
The next step is the placement of the straps on the seat and the suspension of the chair.

Making a hanging hammock chair
To make a frameless cocoon chair with your own hands, you will need to acquire the following materials:
- two meters of thick fabric;
- wooden stick;
- drill;
- carabiners for attaching rope;
- climbing rope;
- sewing accessories.
It’s not difficult to make a cocoon chair with your own hands; this master class will help you with this.
So, fold the fabric in half, count 18 cm from the top corner, mark a triangle on the fabric to bottom corner, cut off.
Fold the sides 1.5 cm and hem the fabric.
We drill two holes on a wooden stick on both sides at the same distance, thread a rope into the nearest holes and secure with knots. The carabiner will be located in the center of the cable, so we mark this place with a knot.
Fabric is pulled into the threaded ropes on both sides, and the ends of the cable are inserted into other holes in the stick and secured with a knot.
To fix the chair to the ceiling, a hook and two carabiners are installed on it, and the rope of the chair is threaded through the lower one.
All you have to do is put a pillow on the seat and you can relax.
Hanging chair with cover
In order to make your own cocoon chair with a cover, you will need:
- 2 m of dense fabric;
- metal hoop with a diameter of 90 cm;
- zipper 1 m;
- carbine;
- 10 m of rope;
- sewing tools.
Fold the fabric in half and cut out a circle so that it is 25 cm larger than the hoop.
We sew in a zipper.
We cut out 4 holes along the edges of the product and grind it down.
We thread the hoop into the case, insert the rope into the holes and attach it to the carabiner.
Choosing a cocoon chair is a matter of taste
The manufacturing options described above are not the only and unique ones. Can be added already existing technologies your own ideas or even come up with something new. The main thing is to approach this process with imagination and desire.

You can especially often find hanging chairs made from wicker or wooden slats.
Instead of hoops for the frame, you can use anything that comes to your mind or comes to hand. You can also choose absolutely any option for weaving, be it ordinary ropes, fabric or a fishing net.
In any case, it’s up to you to decide whether to buy a cocoon chair or make it yourself. The variety of materials on the market allows you to create hanging chairs from whatever your heart desires. IN Lately More and more attention has been paid to products made from natural materials, they do no harm environment and owners and looks aesthetically pleasing. For example, excellent option there will be a rattan cocoon chair.
Earlier similar designs were usually installed in country houses and on personal plots, however, in modern times they have become frequent guests in modern designs apartments
Having done hanging chair-do-it-yourself cocoon, you can create a master class after this event yourself. Then many people who were hesitant to make such a seemingly complex decorative element will follow your example.
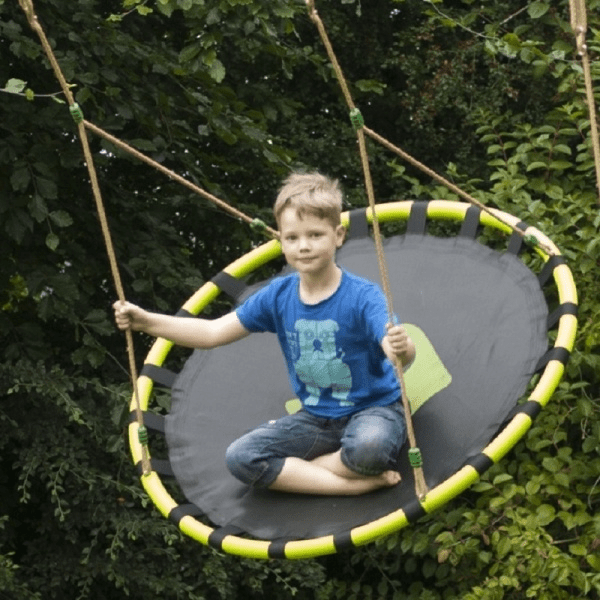
Active children's holiday most often requires considerable effort and labor on the part of parents. The restless nature and energy of real adventures and attractions. Of the entire list of children's swings that can be made and installed on a home or country site, the most interesting are the children's nest swings. You can make them without special costs, especially since most of the materials can be found in the garage or purchased on the market for little money.
What is the secret of the swing nest
The main difference between a hanging nest swing and the usual bench or basket versions of carousel swings is the unusual round shape of the seat, for which the children's attraction received such a unusual name. At first glance, the swing nest is nothing special, but this is not entirely true.

Thanks to the specific shape support platform and the method of hanging it, children now have several additional options:
- The design allows you to swing both longitudinally and transversely, rotate and even jump;
- A round nest swing with a sufficiently large seat diameter can accommodate several people at once, which eliminates competition and children’s grievances;
- The oval version of the swing can easily be transformed into a regular hammock or a place for a child to rest during the day.
For your information! The load on the ropes and cords of the nest swing is several times higher than the force on the suspensions of conventional amusement rides.

Therefore, safe polypropylene ropes or metal chains with fabric braiding are used for the suspension system. Children like polymer ropes best because there is no bounce or shock absorption on the steel hangers in the nest.
Children's attraction device
In order to make a swing nest with your own hands, you will need to make four main parts:
- A support structure made of wood and metal, to which the ropes and the nest itself will be attached;
- Hanging system with loops and rings;
- The central part of the attraction is the seat. For home option The easiest way is to make a round swing nest.

Most of the creativity and effort will need to be devoted to creating the nest itself. Children will agree to ride on simple suspensions like car tire, but there will be much more positive emotions and joy if you don’t limit yourself to creating fabric version, but try to make a round swing nest with a net in the central part of the seat.
How to make an attraction for the whole summer
In order to make the swing as safe as possible, without the risk of cuts or injury to hands and knees, the seat and suspension are covered with fabric, and the central part is woven from towing or climbing rope, which is very durable and flexible.

Choice of mesh and solid foundation the seating is large enough, for example, patchwork, macrame or tatting. If you have the skills, you can even knit a cover for the nest from nylon threads, which can be easily removed and, if necessary, cleaned and put in order.

Make the main part of the swing
There are several options for making a nest, all of them equally follow the same pattern. In order to make a beautiful and at the same time durable and comfortable seat, you will need the following materials:
- Steel water pipe 3.5-4 m long or a pair of gymnastic hoops;
- Thin felt, synthetic tent fabric, preferably in bright colors, and a sheet of foam rubber, at least 30 mm thick;
- Climbing safety cord or repik, 5-6 mm in diameter. The amount of material will have to be selected experimentally, based on the density of the knitting and the size of the metal frame;
- Safety steel locks or carabiners with a mesh size of at least 50 mm.
Advice! The suspension mount can be made from three or four mounting clamps used to assemble exhaust pipes on small cars.

The mounting diameter of such ties ranges from 50 mm to 90 mm, so you will have to make several selections before you can choose the optimal size.
At the first stage, you will need to make a steel frame for the nest. Despite the fact that it is planned to make a swing nest with your own hands for children no older than 10-11 years old, practice shows that older children also enjoy playing on the attraction. So an extra margin of safety won't hurt.

The simplest version of the nest frame can be made from folded steel hoops. Metallic profile You cannot drill to connect two hoops into a frame; it is best to use clamps or loops. You will get a nest for a swing designed for the weight of one baby, but it is unlikely that he and you will be satisfied with this option.
If you need a nest for a swing large diameter, for example, 100-150 cm, the ring frame can be bent from steel pipe on a pipe bending machine. Optimal diameter pipes 12-15 mm. After rolling and welding the ends, you will need to clean the seam, and at the same time the entire surface of the metal for painting.

In this version, the rings for hanging the seat from the swing frame can be made from steel wire and immediately welded to the steel pipe of the frame. It's time to make the swing frame and suspension system.
How to attach a nest hanging system to a swing
After completing the hardest part of the work, the hands themselves quickly reach out to finish the swing nest with a net and hang it on anchor hook for the first try. In fact, there is no need to rush to do the finishing; you will still need to select a place, hook the slings to the seat and check the operation of the swing in the rough version.

To install a swing, it is best to make a classic one support frame from timber with a cross section of 100x100 mm or profiled steel pipe. To do this, you will need to make two supports in the shape of the letter “A” and one crossbar; you can use the same beam, but it is better to install a two-inch steel pipe. The distance between the supports is chosen equal to the height of the swing.

Suspension slings made of polypropylene rope or covered with fabric The chains can be attached to the crossbar pipe in pairs.
Under the tied knot, you can make a lining of polyester fabric, this reduces abrasion of the rope. The socket itself is attached to at least four carabiners. If there are problems with the correct separation of the lines on the crossbar, you can make a suspension according to a combined pattern, as in the photo.
After assembling and hanging the nest on the swing, tests need to be carried out. To do this, it is enough to lay several boards on the frame hoop and load it with a weight of 100-150 kg. At the same time, it will be possible to determine how much to tighten the suspension lines in order to withstand optimal distance to the ground.
Finishing and decorating the swing nest
IN classic version similar attractions are made like a nest swing with a net. Mesh weaving provides a comfortable fit on the seat, allows children to grab the ropes with their hands, does not collect water in the rain, and is almost impossible to slip off the nest mesh.
Weaving a seat can be done in several ways. The most popular option is “Spider Web”, which is at the same time the simplest, most durable and reliable.

Initially, you will need to pull two loops of rope tightly. For weaving, it is best to use jute ropes, since polypropylene has a lot of stretch. Each loop must be aligned so that the intersection is in the center of the socket and secured to the hoop. To prevent the ropes from weakening, the knot on the hoop can be impregnated with an emulsion of PVA glue and water. After all the loops of the nest are stretched, you can make a braid of the web from more soft material, for example, a rope covered with soft fabric.
If desired, you can make other weaving options; on a swing they will work no worse than a spider’s web.
Before finally hanging the nest on the swing, the hoop is covered with a two-layer protection. Initially, foam rubber is glued to the metal, then polypropylene foam thermal insulation for pipes, after which the hoop is wrapped with rope, as in the photo.

The outer edge of the socket should be soft to prevent bruising and injury, and at the same time resistant to abrasion. Most of the load when children ride on a swing falls on the frame of the nest, so you can additionally make several replaceable covers from polyester fabric.

An unusual swing option
For relaxation and active pastime at the dacha, you can make unusual versions of a home attraction - a cocoon swing. Initially, the design was conceived for use as an alternative to a rocking chair, but later the children were successfully able to make their own version of a swing out of it. If there is no swing nest at your dacha, you can make a cocoon in which it is equally comfortable to swing and relax.

Building a cocoon, unlike a nest, will require significantly more effort and money. It is necessary to bend a dozen arcs on a pipe bending machine, with a profile resembling a drop or a cocoon.
The most difficult thing is to weld the arcs in the form of half a cocoon. After assembly, you will need to correctly determine the line of the center of gravity and attach a suspension, preferably a cable or chain one. After painting and equipping with cushions, the swing chair can be fixed to the frame. Unlike a lightweight nest, the weight of a cocoon is several tens of kilograms, so the suspension must be done on a very strong floor.
Conclusion
According to numerous reviews from parents, the nest swing is very popular among children. In some cases, the kids got so used to the nest that they completely ignored the usual swing-carousel with wooden seats. But it is worth remembering that any children's attraction requires constant attention; you have to constantly adjust and tighten the lines, clean the nest pads and check the fastening of the carabiners, so the work on the swing never ends.
Making furniture is a complex and labor-intensive task, and it is mainly done by men. But some things are accessible to gentle female hands. For example, frameless or hanging chairs. The latter will be discussed in this publication, which contains several examples of their manufacture. Some of them are accompanied detailed master classes. Among the proposed options are different models both in form and appearance, and according to manufacturing technology. So everyone can choose the right one according to their handicraft talents.
Frameless hanging chairs
Products that do not have a rigid frame are made from durable fabric and suspension ropes or slings. Depending on the hanging method, the design may include some other elements.
For example, a chair on next photo- This is an ordinary rectangular pillow with metal eyelets installed in the corners.

A chain is passed through them, attached to ceiling beams. As you can see, the design is extremely simple, but very comfortable to use.

For the manufacture of next model all that was required was fabric, rope and a strong wooden rod, which can be used as a handle from a shovel or other gardening tools. Four holes are drilled in it with a diameter equal to or slightly greater than the thickness of the rope.
The fabric is folded on both sides and sewn with a double seam on a machine so that a rope can be threaded into the resulting drawstrings. After which it is threaded through the holes of the rod and tied with large and strong knots that prevent it from slipping out.

Note! It takes no more than an hour to make such chairs if you have all the materials sewing machine and the ability to handle it. But they can only be hung at home, on a terrace or in a gazebo, as they will quickly become unusable due to rain and sun, especially if the cover is filled with something soft.
Prices for hanging chairs
Hanging chairs
Hanging chairs on a frame
The frame for can be made from different materials– it all depends on the intended shape of the product. And it can be either traditional rectangular or round. Of course, these are very conventional names, because a chair can resemble a hammock, an ordinary chair or a chaise longue, have a back and armrests, or look like a ball or cocoon.
For straight frame elements, wood is most often used, which must be sanded smooth and treated with impregnations that protect it from the sun, moisture and insects.

The situation is a little more complicated with round elements, and yet they are most often the basis for hanging chairs. But nothing is impossible. If there is a man in the household, welding machine and a pipe bending machine, you can make circles and ovals of any size and thickness.

This option simple solution you can’t name it, and besides, it’s not available to everyone. Therefore, metal can be used as a frame gymnastic hoop. Or make it yourself from metal-plastic pipe large section. Thin pipes do not have sufficient strength.

Such pipes are sold in spiral-coiled coils, so there are no problems with giving them the desired shape will not be. You can connect the ends of the pipe to close the ring using wooden insert, fitting tightly into its cavity. The insert is secured with self-tapping screws screwed into both sides of the joint.


Returning to the welding option, we’ll take this opportunity and offer men a brutal model of a hanging chair that only they can make. To do this, you will need to weld a structure of several rings connected at the top point and diverging downward.
At the bottom to internal parties rings are welded thick a metal sheet, and a wooden seat is placed on it, which, if desired, can be made soft by gluing foam rubber to it and covering it with leatherette.


Now that we’ve sorted out the materials for the frame, we can move on to the chairs themselves and the methods of their manufacture.
The frame structure for this model is assembled from four straight parts. They can be wooden or metal - whichever you prefer.

In total you need three thick strips and two thinner ones. It's better that they are round section. You will also need a strong cord for weaving the seat and slings, a screwdriver with a drill equal to the diameter of the thin cuttings, and self-tapping screws.

Prices for popular models of screwdrivers
Screwdrivers
We drill two holes at the ends of two large-section cuttings. We insert thin cuttings into the outer ones and secure them with self-tapping screws. The frame for the chair is ready.

We hang the frame at a convenient height. We cut 16-20 pieces from the cord of such length that it is four times the height of the frame. You can make more sections depending on the desired weaving density. The main thing is that their number is a multiple of four. We fold them in half and hang them on the top part of the frame. We tie a flat knot on every four threads.

Under the first row of knots we knit a second one offset by two threads. Each odd row repeats the first row, each even row repeats the second row. In this way we knit the entire fabric, which should be 15-20 cm longer than the frame. This process will be shown in more detail in the video at the end of the master class.

We secure the ends of the threads to the lower part of the frame with strong knots and cut them evenly. The slings can be woven with continuous flat knots of four strands, or simply take a thicker and stronger rope.

We thread it through the holes on the frame and into top bar, tying thick knots underneath them at the desired height. And we hang the hammock chair in a convenient place.

Video - Macrame “Chess” from flat knots
Advice. For those who do not know how to weave, but love to sew, it will be easier to make a seat from durable fabric. To do this, you first need to thread the horizontal frame parts into the drawstrings on the seat, and then connect them with the transverse bars.

Using the macrame technique you can make more comfortable armchair on a round frame, for the manufacture of which you will need the following tools and materials:
- two rings with a diameter of 100-110 cm and 65-70 cm. Large for the back, small for the seat;
- 900-1000 m of clothesline or polyamide cord 4-5 mm thick;
- rope or slings for hanging - about 12 meters;
- tape measure or tailor's tape measure;
- wooden plank along the height of the back;
- scissors.
We cut the cord, the length of which should be 40 times longer than length circumference of the hoop for the seat. We fold it in half, hang it on the pipe, threading the ends into a loop, and wrap the hoop in tight turns in both directions. Having made several turns, we secure the cord by threading the end into the previous turn of the winding and tightening it. We braid the back frame in the same way.

We cut the cords for weaving the seat; their number should be a multiple of four. We hang them on half of the hoop with a double loop.

We weave the mesh with flat knots, as described in the previous example. First, we tie a knot on the four middle threads from two adjacent hinges, then we connect two threads on each side to the weaving, gradually expanding it to the diameter. After “crossing the equator,” we tie the ends of the threads released from the weaving to the second half of the hoop.

We fasten the frames of the back and seat to each other, tightly wrapping them with a cord. To raise the backrest to the desired position, we temporarily install one or two wooden spacers in the rear of the frame.

We hang the cords on the upper part of the backrest and weave according to the already familiar pattern, tying the ends to the back of the seat. Together with those tied in front, they form a fringe around the entire circumference. If desired, it can be made thicker by hanging short pieces of cord in between. Once weaving is complete, the spacer can be removed.

The chair is ready, all that remains is to hang it using a braided cord or slings.
Note! The cord or rope for braiding should not be very smooth, otherwise the knots will slip and unravel.


Video - Hanging chair hammock. Wicker swing
Hoops come in different diameters. Choose the appropriate size or make your own from a pipe, depending on who the chair is intended for. It can be used as a children's swing.

The fabric for the cover should be dense and not unravel when cut. You can take quilted lining fabric with synthetic padding. Its length and width should be half a meter larger than the diameter of the hoop, and two such cuts will be needed.
In addition to the basic materials, you will need something else:
- a zipper with a length no less than the diameter of the frame;
- slings, carabiners for hanging;
- padding polyester with a large canvas for the inside of the chair and strips for braiding the hoop;
- strips of fabric for a hoop;
- interlining or bias tape for processing cutouts;
- sewing supplies;
- marker.
| Step by step photos | Description |
|---|---|
| Spread the fabric on a flat surface and place the hoop in the center. |
| We mark a circle on the fabric with a radius 25 cm larger than the radius of the frame. This margin is necessary so that the fabric is not stretched over the hoop, but sag, creating a comfortable seat. |
| We cut out two identical circles from fabric according to the markings. |
| Fold one of the circles in half and cut into two parts along the fold line. | |
| We attach a zipper to the cuts, retreating from the edges by 25 cm, taken for reserve. That is, the lock should be exactly the diameter of the hoop. |
| Further, if desired, each fabric circle is quilted with padding polyester, but you can do without soft padding. Then both pieces are folded facing each other and stitched in a circle. |
| Unzip the zipper and turn the cover inside out. Fold it in four and iron the fold lines so that they become noticeable. From these lines we set angles of approximately 30 and 45 degrees in both directions, as shown in the diagram, and mark the points at which we need to make cuts for attaching the slings. |
| We cut the fabric according to the markings at the marked points in the shape of the letter Y, bend the petals inward, glue them with non-woven fabric and stitch them. Or we make semicircular cutouts and finish them with bias tape. |
| We wrap the hoop in strips of padding polyester for softness. The smaller the diameter of the frame, the more layers it is better to make. |
| We cover the hoop with fabric over the winding. |
| We insert the hoop into the case and fasten it with a zipper. |
| We cut off the slings or ropes on which the chair will hang. We make two segments different lengths. For example, 2 meters for the back and 2.5 meters for the front. But it’s better to try them on on the spot and decide on their length depending on the height of the attachment point. |
| We fold the slings in half, fasten them with a loop on the hoop through the cutouts made in the case and tie the ends with a knot. |


If textile or canvas slings are chosen for hanging, their ends are folded and sewn to form a loop into which a carabiner is inserted. This method will allow you to remove the chair and bring it into the house in case of bad weather.
Advice. You can also buy ready-made slings with carabiners that can be adjusted in length.
Video – Hammock chair made of metal hoop
Wooden hanging chair
Don't skim through this master class without barely reading the title. This wooden chair It's very easy to do, even a woman who has never handled it can handle it. carpentry tool. You will only need to practice a little drilling holes with a screwdriver and spend a little time sanding the boards with sandpaper.
Planks can be bought ready-made at a hardware store. Can you make it out? wooden box or construction pallet. The main thing is that they are strong, dry and without cracks.

Approximate dimensions:
- length 70-80 cm;
- width 12-15 cm;
- thickness not less than 20 mm.
With this width, 15-16 planks will be required. They need to be aligned in length with a jigsaw or hacksaw, carefully sanded, rounding the edges, and impregnated protective agent or varnish for exterior use.
For assembly you will also need a nylon or nylon cord.
| Step by step photos | Description |
|---|---|
| On the treated boards we mark points for drilling holes with a step of 5 cm and a distance of 2 cm from the edges. You can mark only one board and drill it with a drill with a diameter exceeding the cross-section of the cord. And then put it on the second one, align it and make holes in it and all the others through the already prepared ones. This will ensure precise symmetry and alignment of the holes in all elements. |
| We lay the boards close to each other and thread the cord through the holes in a checkerboard pattern, as in the picture. |
| Having reached the opposite edge, we go back, stretching the cord into the remaining empty holes. This is all very similar to lacing shoes, so it just seems complicated. There is no need to tighten the cord too much; it should provide some freedom of movement for each structural element. The ends of the cord are tied to back side a strong knot. |
| To attach the rope for hanging the chair, drill holes in the first (top) and penultimate board. There should be two of them on each side, the distance between them and to the edge is about 4 cm. We stretch the ropes through the finished holes, bringing the ends to the front side. |
| We take four more boards and drill the same holes in them through which we pass the ropes. These boards will serve as a frame that will prevent the slings from abruptly converging on the hanging point. Although you can hang the chair by attaching it at four points, then you won’t need a frame. |
|
| For convenience, we place sofa cushions on the seat. |


How to attach a hanging chair
The methods for hanging such structures depend on what they will be attached to. If it is a tree branch, a horizontal bar or a beam under the ceiling, then the slings can simply be thrown over them and tied. Or make a loop and put it on the beam.
Another interesting option– use of a special stand that can be moved along with the chair to any convenient place.

But it’s difficult to make such a stand with your own hands, and you also need to accurately calculate its parameters so as not to fall along with it and the chair when you try to sit down and rock.
At home, chairs are most often suspended from the ceiling, and the method of fastening will depend on what it is made of.
Prices for popular hammer drill models
Hammers
Now you are convinced that both the manufacture of a hanging chair and its reliable fastening– a task that is completely solvable not only for a specialist, but also for anyone home handyman. Or a craftswoman who knows how to sew, knit or weave.
Video - Example of attaching a hanging chair
People are constantly coming up with new devices that can provide complete rest and relaxation. A hanging chair is just one of these wonderful inventions, which you can even make with your own hands and then hang it in your country house or in a city apartment. In such a cozy nest you can always take a nap, read your favorite book and simply meditate, forgetting about all your pressing problems. Making such a chair is not at all difficult, this photo will help you.

Making a wicker chair
A rather original and convenient design can be made using two hoops, which are beautifully braided with cord using the macrame technique. Such a hanging chair will look quite interesting in the interior of any apartment, adding a bit of bohemian charm and lightness.

So, to make a structure with your own hands, you need to prepare:
- two metal-plastic hoops, one of which will have a diameter of 110 centimeters, and the second – 70 centimeters. In principle, you can take smaller hoops;
- polyamide cord approximately 4 millimeters thick. It is worth considering that to create a chair you will need a lot of cord, about 900 meters;
- two thick and durable cords that will hold the hoops together;
- 12 meters of sling.

Now you can proceed directly to making a hanging chair, following the photo instructions. All work will be carried out in stages:
- First you need to tightly braid the hoops with a cord. It is advisable to fasten the winding approximately every twenty turns. Ultimately, the braid should be smooth and durable;
- then, right on the hoop itself, begin to weave the mesh, fixing it to the braid using a double loop. The weaving pattern is checkerboard. The ends of the knots do not need to be trimmed, then you will get a playful fringe;
- Next, two braided hoops must be fastened into one structure, that is, a chair. So, on one edge of the rings should be secured with a strong winding, on the opposite edge two wooden rods with cuts on all four ends should be fixed - this is necessary in order to prevent the hoops from slipping;
- All that remains is to weave the back, choosing any pattern you like. The cord is fixed to the upper part of the back of the chair, the mesh itself will weave down towards the seat, then the cords are tightly tightened;
- the resulting structure needs to be reinforced with thick cords that connect the back and seat.

The elegant hanging chair is ready, all that remains is to tie the slings to it and hang the structure on a metal ring anywhere in the apartment, for example, in the living room or on the balcony. This master class will seem very simple for those who are at least a little familiar with the macrame technique. In the photo, this chair looks very unusual; it really transforms the interior, making it a little playful and light.

Making a chair with a cover
Another interesting manufacturing option suspended structure- this is a chair with a cover, which can also be created with your own hands, and a master class will help you with this.

So, you will need:
- a steel hoop with a diameter of about 90 centimeters;
- cut durable material(approximately two to three meters);
- eight meters of slings;
- metal buckles;
- sewing supplies.

The first stage of work will be cutting and sewing a cover for the future chair. From a piece of fabric you need to cut out two squares with a side of one and a half meters, making sure to leave seam allowances. Each square will need to be folded into quarters. From the central corner, mark a quarter circle with a radius of 65 centimeters. Now draw a line along the marks and start cutting out circles. Step back 4 centimeters inward from them and draw a dotted line.

Now mark the holes for the slings on the top circle. Fold the fabric in four and iron, the resulting folds will be considered guidelines. As a result, you should have four axes, and mark rectangular slots of 15x10 centimeters on them. Inside the resulting rectangles, make markings in the shape of the letter Y.

Place the circles together, the circle with the markings applied should be located on top. Make the cuts. Bend the resulting “petals”, then make a full slit and stitch along the edge. Now the circles should be stitched, retreating the previously planned 4 centimeters. Don't forget to leave a hole for the hoop to fit into.