The question of installing a full-fledged bathroom in a private house faces every owner. Technologies make it possible to equip household sewerage without special investments, both material and temporary. And fewer and fewer residential private buildings remain with amenities in the yard. In this article we will look at such popular questions: what types and types of sewerage systems exist, do-it-yourself sewerage system in a house, what is a septic tank and how to make one, how to make a septic tank from concrete rings, what is a cesspool and how to make one, as well as related questions.
Types of sewerage for private households are divided into two parts.
For cottage villages or urban areas where private sector close to apartment buildings, sewerage for a private house is connected to centralized drainage collectors. This solution is convenient, since all the difficulties consist only in high-quality laying of sewer pipes to the insertion point. However, there is also negative side connecting a private house to the city sewer network - payment for sewerage services. For apartment buildings a tariff is established and the total volume of water disposal corresponds to the total amount of water consumed. Accounting is carried out according to the number registered, according to standards or according to water metering devices.
For a private home, where the lion's share of the water used is not drained into the sewer, charging based on water meter readings can significantly complicate life. To many, this issue will seem unimportant, but some owners strive for autonomy, so it remains relevant.
The traditional method of drainage in private houses is a cesspool, also known as a septic tank, also known as a sewer pit.
Before you start detailed manual for its creation and arrangement it is necessary to carry out everything plumbing work in the house.
Do-it-yourself sewer system in the house
Most private sector buildings have one floor. Where there are two of them, the bathroom is located on the first floor. Modern private development projects provide for the placement of plumbing on each floor, but all objects are adjacent to a common riser. As an example, consider a standard one-story building where you need to install a sewer system yourself.
So, you need to place a sink in the kitchen, a washbasin and a bathtub/shower in the bathroom, and a toilet in the toilet.
The bathroom and toilet can be combined or separate. In any case, the drainage for them will be common, therefore the distribution of drainage points in the room must be done in such a way that the distance to the “riser” (the main pipe with a diameter of 110 mm, which will discharge the wastewater to the street) is minimal.
According to design documents, the kitchen where the sink is located often has an adjacent wall with a bathtub or toilet. In this case, no difficulties arise. If the kitchen is remote from the main riser, it is necessary to lay a separate drain before connecting it to the riser. Depending on the situation, this can be done both in the perimeter of the house (the drain connection is included in the riser, which includes drains from the washbasin and bathtub/shower), and outside the perimeter (if the placement of the kitchen and bathroom does not allow the pipes to be connected in the perimeter, they are led outside boundaries of the house, where they can connect or enter the drainage pit separately).
The difficulties described above are caused by the fact that for high-quality water flow it is necessary to maintain the sewer slope, which is not always possible to do in situations where the distance from point to point is large. The slope of the sewer must be a certain percentage depending on the diameter of the pipe. See the sewer slope values depending on the pipe diameter in the figure below.

Sewerage pipes are laid under the floor. Most buildings have wooden floors, raised above ground level. The cavities under the floor are empty, which gives a lot of options for solving the problem. The slope is measured building level or marks on the masonry along which the pipe should pass. The assembled pipe spans are tested at intermediate stages by pouring water into the system and monitoring its drainage. It is important that even a small part does not stagnate anywhere, since a blockage will form there, which will be difficult to remove after laying the floor. Sewage slopes of more than 5% are permissible if this is dictated by the convenience of placing the system or the amount of space available under the floor.
Final assembly
When the wastewater from each drainage point is brought to its final location, final assembly awaits. PVC pipes for sewerage have all the necessary elbows and adapters, as well as tees with various transitions, allowing you to join together drains from sinks, showers and washing machine. Next, the riser and toilet drain are combined. After completion of the work, a final high-load test is required to eliminate any leaks if any occur and to avoid blockages and water accumulation.
The sewage system is discharged beyond the perimeter of the house at a depth of at least 300 mm. It depends on the climatic characteristics of the region, as well as on the slope of the site, proximity groundwater, which affect the depth of the drain pit.
At each of the drain points, except for the toilet, an elbow is made from a flexible hose, in which there is a permanent a large number of water, the so-called water seal, which prevents the penetration of unpleasant odors from the drain. If necessary, clearing the blockage in such a knee takes 10 minutes.

Drain system
It is this that becomes a stumbling block for many homeowners when it comes to installing domestic sewerage in a private home. Technologies have significantly simplified the work with the contents of such pits, allowing them to go without maintenance for many years.
Domestic sewerage is divided into two types - a septic tank and a traditional drainage pit.
Septic tank
A technological solution promoted in the construction of cottage communities and small country houses. Are plastic or metal container, which collects all waste and organic waste. It uses only its useful volume, which is partially increased by the use of microorganisms (septic) that process organic matter into gas (excreted through ventilation duct, does not harm the environment) and clean water (suitable for watering the area using a small pump). For a full-fledged residential building for a large family, large capacity models are offered.
Bottleneck of this type sewerage is its price. The cost of the containers is quite high; moreover, it comes with transportation and installation, which must be carried out in compliance with the technology so that the container remains intact.
An advantage worth noting is that the septic tank can be installed in areas with high groundwater levels. The containers are sunk in dug holes, then loaded with a load so that flood water does not push them out of the ground.
Average service period at correct use and adequate saving of useful space is 2-5 years.

Septic tank made of concrete rings
One of the subtypes of a septic tank is a device made from factory-made concrete rings. This type of septic tank is quite popular, because... it is relatively cheap, fast and easy to install. Making a septic tank from concrete rings with your own hands is quite simple. To do this, dig a hole of sufficient depth. To cut off water, a layer of crushed stone is placed on the bottom.
Usually they put 3 one and a half meter rings on top of each other, then cover them with a lid with a hole. Another small ring is placed on this hole to provide access to the septic tank. This ring closes sewer hatch. The rings are fastened together with cement mortar. If you are making a septic tank with an overflow, then you need to make 2 or 3 such pyramids of rings. The more overflow chambers, the cleaner water will be on the way out. The bottom in the first chamber is waterproofed and concreted. At the top of the top big ring a hole is punched and a 110 mm pipe is inserted onto which tees are put on on both sides.
If you want to make 3 chambers, then we repeat the procedure with the hole and pipe, but place them just below the level of the overflow from the first chamber to the second. A pipe is taken from the last chamber to the drainage field, or the bottom is left open and large crushed stone is laid on it. On the outside sides, the rings are filled with sand to cut off water. Don't forget to take them out of the cells ventilation pipe outside for air access.
Video about a septic tank made of concrete rings
cesspool
It has been used for many decades without any complaints or particular problems. Even in areas with high groundwater levels that fill such pits during flood periods, a solution was found in the form of placing the pit at a shallow depth, but with a large area.
The location for placing the pit and draining the sewer from the house must be determined before the start of all work, since reorienting the system already installed under the floor will require recalculating the slopes and additional time.
The pipe leading from the house to the pit is deepened by 500 - 800 mm, if the water level allows. Otherwise, it is necessary to insulate it as much as possible and leave inspection windows (a special joint block with an opening lid) for convenient cleaning every 3 meters of pipe length.
The average pit volume for this type of sewer is 5 cubic meters per adult. At the same time, you should not neglect organic septic tanks, which will allow you to do without pumping out the contents for decades.
We build a drainage pit
Having chosen a place, you need to determine the linear dimensions and depth, dig a hole and carefully level the walls. The perimeter near the walls at the bottom is dug under the edge by 300 mm and deepens approximately 500 mm in depth. A small layer of crushed stone is placed on the bottom, then 2-3 rows of half-blocks without holes are laid on top of the solution. This will be the basis for the walls of the cesspool.
Walls (only he long time able to withstand the microenvironment), making gaps between bricks 20 - 25% of their length, starting from the 5th-6th row. Water will drain out at these intervals, which will allow you to less frequently service the pit.
The masonry is not brought out to the edge of the pit, but with a shortfall of 400 mm. The main thing is that the sewer outlet pipe is completely lined.
At the bottom of the pit, medium crushed stone is laid out in a layer up to 200 mm thick; on top it can be reinforced with stones collected from slag heaps, similar to pumice for feet. This trick allows you to pump out the pit even less often, since microorganisms that absorb organic matter develop well in the pores of such drainage.
The overlap can be anything, from a shaped finished reinforced concrete slab to a self-poured product. This product is created from flat slate or galvanized sheet laid on top of the masonry edge. The future ceiling should protrude at least 250 - 300 mm beyond the edges of the masonry. Reinforcement from rods is laid on top. A mesh made of reinforcement with a diameter of 8-10 mm with a cell of 20 by 20 cm will be sufficient. The lower edge of the mesh must be raised from the base by at least 20 mm (it is better to lay it on stones or protective layer clamps). We build formwork on the sides of the reinforcement and fill everything with a 100 - 200 mm layer of concrete.
If the linear dimensions are large, a support made of brick or cast iron pipe on which the ceilings rest.
It is imperative to leave a hatch to allow access to the pit, as well as to pump it out if necessary.
An excellent solution would be to make the upper edge of the ceiling below ground level and fill the space around the hatch with turf.
It is imperative to leave an outlet pipe for ventilation (standard sewer PVC pipe). Many people make gazebos or parking spaces for cars on top. But in this case, the reinforcement and the slab above the pit must be seriously strengthened.
We hope you have understood the basics of plumbing in your home. If you still have questions, ask them in the comments to the article, we will definitely answer them.
The outdoor toilet with a cesspool is gradually becoming a thing of the past. New home and even small dacha should delight owners with comfort and amenities normal for the 21st century. The device is a completely affordable and safe event for construction if you approach the design wisely and use modern materials and technologies. When building a house, the drainage system is laid out at the design stage, along with other engineering communications, but even in an old house it is quite possible to organize the construction of a bathroom with an urban level of comfort.
All private houses can be divided into two categories - those that can be connected to a centralized city or village sewerage system, and those that cannot. The progress of work and the installation of communications inside the premises will be the same for these cases; the only significant difference will be in the organization of wastewater disposal.

General principles for installing sewerage in a private house
Fundamentally, the sewer system in a private house, as in a city apartment, consists of a vertical riser and pipes of smaller diameter, through which wastewater from a sink, toilet, etc. flows into it by gravity. The wastewater then flows into horizontal pipes large diameter, and from them - into the centralized sewerage system or local autonomous treatment facilities.
When planning a sewer system in a house under construction, it is worth placing the kitchen and bathrooms nearby, preferably near the place where the sewer line goes out onto the street. If the house is two-story, then the bathrooms should be located one below the other to reduce the number of risers and simplify the installation of the system and its subsequent maintenance.
IN big house with a large number of bathrooms, with a complex sewer system, rational installation sewage pump. A pump may also be needed if the area has absolutely no slope.

When designing a sewer system, the following are also taken into account:
- landscape of the site - wastewater flows downwards and the septic tank or cesspool should be located at its lowest point,
- the type of soil, its freezing and the height of groundwater - the depth of the pipes depends on this external sewerage and choice treatment facilities
Selection of materials
On modern stage polypropylene or polyvinyl chloride are the best option. They are inexpensive, easy to transport and install, and do not require a welding machine for assembly. In addition to pipes, you will need connecting elements: elbows of various configurations, fittings, tees, inspection hatches. The joints are additionally treated with sealant.
The diameter of the pipes depends on the volume of wastewater and the number of devices connected to the system. In any case, the diameter of the pipe from the plumbing fixture must be equal to or greater than its drain pipe. The diameter of the pipe for the riser should be from 100 mm if a toilet is connected to it, and from 50 mm if there is no toilet. The length of the pipes from the device to the riser should not exceed 3 m, and from the toilet - 1 m. If this distance needs to be increased, then pipes are taken of a larger diameter.

Installation of pipes and plumbing connections
Before assembling the system, it is better to draw it in detail or design it in computer program. All horizontal pipes internal sewerage should slope from the device to the riser at the rate of 2-15 cm per 1 m. If you need to turn the pipe 90 degrees, it is better to do it smoothly, using 2 elbows at 45 or 3 elbows at 30 degrees, to prevent blockages.
The toilet is connected to the vertical riser separately to avoid emptying the siphons in the plumbing when draining the water. Moreover, the remaining devices must be connected above the toilet to prevent waste from entering them.
The sewer risers on each floor in the lower part are equipped with inspection hatches. For sound insulation, they can be wrapped in a layer of mineral wool or covered with a plasterboard box.

Sanitary fixtures are connected to the pipes through a U-shaped siphon, the lower part of which always contains some water. Foul gases from the sewer system cannot pass through this barrier. Some sinks and bathtubs are sold already with a siphon, for others you will need to purchase it additionally; toilets have a built-in siphon.
The riser is connected to external pipes using horizontal pipes of the same or larger diameter located in the basement, basement or under the floor. Such pipes are also equipped with inspection hatches (mandatory at turns). When connecting them, you should avoid right angles and complex turns. If the pipe runs in the ground or in an unheated room, then it must be well insulated. At the exit point from the house, all sewer pipes are collected together and connected to the external sewer system through a hole in the foundation.
Sewer pipes are attached to the walls using clamps. Additional fastenings are installed near the points of insertion into the riser, connections and transitions.
Sewage ventilation
A large amount of abruptly drained water, for example from a toilet cistern, moving through a pipe, creates an area of discharged space behind it. If there is no air entering the system, water leaves the siphons of plumbing fixtures along this pipe, and appears bad smell. For this reason, the sewer system must be equipped with its own ventilation.
For the pipe, the risers are extended to the roof; the upper end is not closed, but is reliably hidden from precipitation and debris. You can do it differently; an aeration valve is installed at the top of the riser, which does not release odors, but conducts air inside, which prevents the air from becoming rarefied in the pipe.

External sewerage
Outside the home, it is also optimal to use polymer pipes. To lay them, a trench is dug to the depth of soil freezing, a sand cushion is poured onto its bottom, and then pipes are laid at a slope of 2-3%. If it is impossible to ensure a sufficiently deep burial, then it is necessary to carefully insulate the pipes.
At the point of connection to the house and near the junction with the central sewerage system or autonomous treatment facilities, they are installed inspection hatches. It is advisable to install a check valve in the pipe. It will protect the house sewer system from the ingress of sewage from the outside, for example, when the cesspool overflows, and from the penetration of rodents through the pipes.
Treatment plants
An autonomous sewer at the end may have:
- cesspool,
- station biological treatment.
Each of these options has its own advantages and disadvantages, but, in general, a cesspool can only be recommended for dachas where people do not live permanently, or for small houses for 1-2 people. A biological treatment station is expensive, but after its installation, maintenance and emptying will have to be resorted to extremely rarely. The septic tank is the best option, you can buy it ready-made or make it yourself.
A properly designed and installed sewer system will make living in own home even more comfortable.
Regardless of whether it is connected a private house to a central or autonomous sewer system, a wastewater disposal system on the street must be equipped independently. Before you begin this work, you need to develop an installation scheme that allows you to get by with the minimum size of the pipeline and sewer network connections.
This will reduce the cost of purchasing material and increase the efficiency of the wastewater disposal system. Special attention you need to pay attention to the depth of pipe laying, their angle of inclination and reliability flange connections, since the performance of the sewage system depends on these parameters.
Connecting a private house to the sewer systemCircumstances and layout of external sewerage
The external part of the sewer system in a private house connects the outlet of the internal drain with a pipeline network to a waste storage tank located on the site, or to the central sewer system. ABOUT internal wiring in the house, read the article. Laying outer sewer pipes carried out according to a pre-developed scheme, taking into account the following circumstances:
- terrain features;
- weather;
- remoteness of wells and reservoirs;
- the total volume of wastewater, depending on the number of people permanently residing in the house;
- the depth of soil freezing and its composition;
- access paths for a vacuum truck, if necessary.
In the layout of the external sewerage system, it is imperative to provide for its ventilation, since otherwise, over time, unpleasant odors will penetrate into the living quarters. Read about the rules for sewer ventilation in the article. Ventilation is arranged using fan pipe, which can be placed on the lid of the septic tank or on a section of the pipeline running from the house to the wastewater storage tank.
 Scheme of arrangement of autonomous external sewage system
 The septic tank is equipped at the lowest point geological relief area of the site. This arrangement allows for the most optimal installation of external sewerage. It should be laid in a straight line to the location of the outlet pipe internal system wastewater disposal.
Choosing a drain location
When choosing the location of the drain, you should first of all make sure that the unpleasant odor does not penetrate into the living quarters. As a result, it should be located no closer than five meters from the house. The optimal distance would be ten meters; it is also not worth placing the septic tank too far away, since this significantly increases the cost of laying the pipeline network. The external sewage system should not be connected to the house at a right angle. In addition, the following must be taken into account:
- water sources should be located no closer than thirty meters;
- a septic tank cannot be installed on the border of a neighboring plot;
- for ease of pumping out sewage, it is better to locate the drain close to the road;
- Particularly careful sealing of the storage tank is necessary when soil water is close to each other;
- The laying of the pipeline network is facilitated by the natural slope of the area.
 Rules for placing a septic tank on the site
 The cesspool for sewage has been used since ancient times. Previously, no effort was wasted on sealing its walls, and when the hole was filled, they covered it with earth and dug a new one. Now the walls are laid out of brick, concrete rings and other building materials.
Liquid fractions of waste seep through the soil at the bottom, filtering, solid components gradually fill the mine, and after some time they need to be pumped out.
Arranging a cesspool is advisable if the volume of wastewater in a private house does not exceed one cubic meter per day. If this norm is exceeded, pollution will occur. environment.
Instead of a cesspool, you can equip a sealed container to accumulate wastewater. In this case, the bottom and walls of the shaft are thoroughly waterproofed. This prevents the possibility of soil contamination and drinking sources. The disadvantage of this system is the need for frequent cleaning, since the sealed container fills up quite quickly.
Deciding on the type of treatment plant
Sewage treatment plants for a private home are equipped in the form of a simple cesspool without a bottom or a sealed container for wastewater. A single-chamber septic tank with soil treatment or two-chamber septic tank with filter well. It is possible to build three chambers with a filtration field, as well as using a biofilter and an air supply system.
 Septic tank with filtration from tires
 A single-chamber septic tank is essentially a cesspool with a drainage layer. Crushed stone or gravel mixed with sand is poured into the bottom of the well. Passing through the filter layer, liquid waste fractions are purified before entering the soil. After some time, the drainage layer needs to be replaced, as silt deposits are deposited on it. A single-chamber septic tank is suitable for a private house with a small volume of wastewater.
A two-chamber septic tank consists of a storage tank and a filter well, which are connected by an overflow pipe. In the settling tank, the feces are partially clarified and then fall into a shaft with a drainage layer at the bottom. They seep into the soil already sufficiently purified.
A two-chamber septic tank is a popular sewerage option for a private home, as it does not require large financial costs for its equipment and works efficiently.
Installing a septic tank with two or more chambers, as well as a filtration field, virtually eliminates the possibility of environmental pollution. After settling in the first container, the partially clarified wastewater flows through the overflow pipe into the next chamber with anaerobic bacteria that decompose organic residues. Read about how to make a septic tank with your own hands from scrap materials in the article
Having sequentially passed through all sections, the wastewater enters the filtration field, which is an area underground of about thirty square meters, where the final soil cleanup takes place. If available on site free space This method of arranging a sewer system is optimal.
 Diagram of a septic tank with a biofilter
 A septic tank with a biofilter is a deep sewage treatment station. Its operating principle is similar to treatment system with a filtration field, only in this case it is replaced by a water separator and anaerobic bacteria added at the outlet of the overflow pipe to the fourth section, purifying the wastewater by approximately ninety-five percent. This water can be used for technical needs.
It is irrational to install deep cleaning stations in private houses with periodic residence, since if the sewerage similar design do not use constantly, the bacteria that decompose organic residues die. In addition, they are quite expensive.
Laying depth of sewer pipes
The depth of soil freezing is a fundamental factor when burying sewer pipes into the ground. They need to be laid below the freezing point, otherwise they will freeze in winter, and it will be impossible to use the sewer until the spring thaw. The appearance of even small ice build-ups on the internal surfaces of pipelines leads to a decrease in their permeability and the formation of blockages.
 Map of standard freezing depths
 In the southern regions, the depth of laying sewer pipes is fifty centimeters or more, in the central regions - seventy centimeters or more. You need to know exactly the depth of soil freezing in your region so as not to go deeper into the ground than necessary, since in this case the costs of doing the work will increase.
Organization of sewer pipe removal from the house
The organization of the removal of the sewer pipe from the house depends on the stage of readiness for operation of the building. If the house has just been built, the foundation may shrink, so it is necessary to drill a hole in it for the outlet of the sewer pipe with a noticeably larger diameter than the cross-section of the pipe itself.
 Options for drainage schemes from the house
 If the house is just being built, the outlet pipe can be walled up during the process of laying the foundation. The foundation of a house built several years ago will no longer settle, so the diameter of the hole drilled for the outlet pipe does not need to be increased. Plumbing fixtures should be located at a short distance from the common drain, since in this case it is easier to connect them to the common outlet. If the house has two or more floors, the bathrooms should be placed one above the other, and in this case you can get by with one riser.
Do-it-yourself installation of external sewerage in a private house
The external sewerage system consists of a cleaning tank and a pipeline system connecting the septic tank to the house. Before execution installation work A diagram of the external sewerage system is drawn on the site plan.
 Practical options removal of sewerage from the house
 Then special pipes with a diameter of at least 100 mm are selected, intended for outdoor use. Usually they have Orange color. A trench is dug to lay the pipeline. Its depth is selected depending on the climatic characteristics of the area, the composition and characteristics of the soil, as well as other factors. If necessary, the pipeline network is insulated.
The most labor-intensive part of the work when installing a sewer system with your own hands in a private house is digging a pit for a cesspool or septic tank. The optimal distance at which the septic tank is removed from the house is about ten meters.
The volume of the storage tank directly depends on the number of people permanently residing in the house and the frequency of their use of plumbing fixtures.
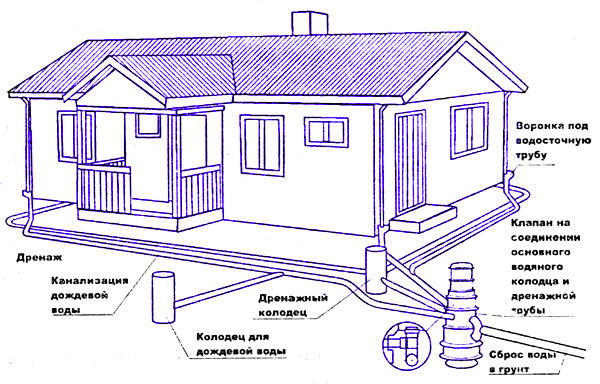
It is best to connect the storage tank to the outlet of the internal sewer drain in a straight line; bends and turns of the pipeline system increase the likelihood of clogging. For ease of cleaning, a long line in places where the direction changes should be equipped with inspection hatches.  This is what a properly equipped outdoor sewer system looks like
Wastewater moves through the pipeline system by gravity, under the influence of gravitational forces, so it is necessary to withstand correct angle tilt If it is too small, large pieces of waste will be retained and the drain will become clogged.
If the slope is too great, solid fractions will be thrown towards the walls of the pipe, and again it will become clogged. You will find information about the correct slope of the sewer in the article
The required angle is maintained and controlled by the building level when digging a trench; its depth increases as it approaches the storage tank or central sewer. A shock-absorbing cushion is placed at the bottom of the ditch, which is a filling of sand, and pipes are laid directly on it. If it is necessary to change the slope angle of the pipes, sand in in the right place pours in.
An important operational parameter of the sewer system is the depth of the pipeline network. It must be below the freezing point of the soil in a given region. Otherwise, in winter, frozen wastewater may break pipeline network and disable the sewer system. To carry out repair work, you will have to wait for the spring thaw.
How to properly insulate a pipe
To prevent emergency situations during the cold season, it is better to insulate the sewer system. Many modern materials have good thermal insulation properties, for example, polyurethane foam, fiberglass or mineral wool. You can properly insulate a pipe by simply wrapping it with insulation and placing it in a shell made of a mixture of asbestos and cement.
 Options for insulating external sewerage
 Can also be secured over thermal insulation plastic film. In cold northern regions, to protect sewer pipes from freezing, the insulating layer is additionally equipped with an electric heating system. In any case, the pipeline network must be laid below the level of soil freezing depth, especially if snowdrifts that melt in the spring form on the surface. Interesting experience You can learn more about laying external sewer pipes from the following video.
It is difficult for you to imagine your private home or cottage without autonomous water supply and sewerage? Agree that a well-maintained home is many times more comfortable to live in than a building devoid of all amenities. But you don't know where to start and how to implement your plans?
We will help you deal with this issue - the article highlights popular schemes and options for arranging a sewer system. The planning stage, selection of a treatment plant and the order of work are considered in detail.
Contrary to popular belief, the sewage system of a country house can also be perfectly equipped with your own hands. If you design and build the system correctly, it will serve no worse than a professional one. For a better understanding of the material, we have selected diagrams, thematic photos and videos with expert advice.
“Amenities in the yard” can only satisfy if we are talking about summer cottage without running water, where the owners appear occasionally and for short periods of time.
Work on improvement of a residential building primarily involves the installation of water supply and sewerage. They are designed simultaneously. If the water is already connected, then the sewerage system is “adjusted” to the existing network.
There should be no mistakes when choosing a sewerage scheme for a residential building. An incorrectly assembled network will not work or problems will arise during its operation (+)
Experts remind you that work on laying external sewerage pipes begins from the point of insertion into the centralized sewerage system or from the septic tank and moves towards the house.
Installation includes several stages:
- A trench of pre-calculated depth is dug. It is advisable to immediately maintain the desired slope. It is not advisable to backfill a finished trench. This is quite labor-intensive, given the need for additional compaction of the bottom.
- A sand cushion is poured. The height of the structure is 0.1-0.15 m. The sand is well shed with water, after which it is thoroughly compacted.
- Pipes are placed on the prepared base. The presence of a specified slope is checked.
- A layer of sand about 0.1 m high is poured in. The backfill is again spilled and compacted.
- The soil is being backfilled.
When laying external sewerage, you need to remember the need to arrange inspection wells. They are placed at all turns and in areas where there are differences in depth. In addition, such structures are also installed on straight sections every 25 m.
Image gallery