A do-it-yourself kitchen sofa is an opportunity to independently make a piece of furniture that will have the ideal balance of design, quality and price. When arranging a dining space in the kitchen, many are faced with the problem that store-bought models do not fit into the dimensions of the kitchen. So, the sofa may look too bulky, or, conversely, unnecessary gaps remain during installation. In such cases self-production will allow you to perfectly fit upholstered furniture into the size of the kitchen, making the place as comfortable and cozy as possible.
What to consider when choosing materials
The choice of a kitchen corner should be approached responsibly, because this piece of furniture is made using long years, and how comfortable and enjoyable breakfast, lunch, and evening tea will be depends on its appearance and convenience. In addition, making furniture yourself means feeling like a designer and acquiring a source of pride.
As for upholstery, it is better to prefer synthetic materials, leatherette, because they are more practical: they retain their appearance much longer and are easy to clean. The material must have dirt-repellent properties, be moisture-resistant, and withstand regular cleaning. The upholstery must be durable and able to withstand the weight of people sitting on it.
- Microfiber. This fabric is durable, stain-resistant, and has a non-fading color. If there is a Teflon coating, then drops of water are not absorbed, but roll off along the surface.
- Velours. It is not recommended to choose velor as upholstery for kitchen upholstered furniture due to its impracticality. Although the cost of the material is low, food particles and liquids easily eat into the structure, and frequent washing and cleaning renders it unusable.
- Flock. This material is an excellent choice for pet owners. Not only does no hair remain on it, but claw marks are almost invisible. Flock is a durable, practical option for upholstery and does not require serious maintenance.
- Faux leather. Resistant to temperature changes, suitable for frequent washing with detergents, does not fade.

- Genuine Leather. High price The material makes up for it in durability, but leather care isn't the most practical. It should not be rubbed, because the area where it was cleaned may change color or become deformed.
Before you start work, you need to prepare everything necessary tools, materials that will be required to make the sofa. For the frame, you can choose laminated chipboard; it has a number of advantages: affordable price, wide choose shades, as well as resistance to high humidity.
Foam rubber or polyurethane foam is used to fill the backs and seats. To avoid deformation, the material must be sufficiently rigid.
The width of the seats should not exceed 40-45 cm, and the legs of the sofa should be under the vertical profile of the seat, otherwise there will be inconvenience when sitting at the dining table.
Materials and tools
To make a sofa for the kitchen with your own hands, you do not need serious professional skills and a large list of tools; it is enough to have detailed drawings and a little patience. By following the recommendations, you can easily create a beautiful, comfortable corner.
Required:
- electric jigsaw;
- screws, dowels;
- metal corners, hinges;
- glue for attaching foam rubber;
- upholstery material;
- nichrome thread to make precise cuts in the foam;
- thrust bearings;
- edge for end processing;
- foam;
- stapler, staples;
- roulette;

You must remember that you should purchase material in reserve. So, about 5% of the volume will go to waste.
It is important to choose a comfortable seat height. To do this, you can take a chair or stool as a sample that is comfortable to sit on.
When choosing a soft corner, you should decide on the direction of the corner; they can be right-handed or left-handed. If necessary, the sides can be swapped in the future. It should be noted that soft foam seats are suitable for homes and apartments, but for verandas and summer kitchens it is better to make a corner with a hard seat.
You must first complete the drawings, noting all the dimensions and dimensions of the future sofa. This will help you decide on the quantity necessary materials.
As for colors, there are a huge number of options. So, if the family has small children or pets, light-colored fabric upholstery can quickly get dirty and will have to be cleaned frequently. Therefore, the beauty of the material must be combined with its practicality.
High-quality room design consists of a harmonious combination of furniture and decor with the color of the walls, floor, and ceiling. It is important that parts of the interior look organic and have the same stylistic orientation.
Assembling the sofa
As an example, consider a corner with the following dimensions: height - 80 cm, length 100 cm, depth 40 cm. It consists of 3 parts: a long, short sofa, a connecting corner.


Long part of the bench:
- Seat – 96x30 cm.
- Back – 96x26 cm.
- Front part niches 96x31 cm.
- Sidewalls – 80x40 cm.
- Taking into account the main dimensions, width, height, depth, we make marks for milling. Then you should mark the holes for the screws and the joints with other parts. It is better to practice in advance on chipboard scraps.
- Using glue, we glue the edge to the sides, and screw the bearings to the lower ends using self-tapping screws.
- Using 2 sheets for the sides and 1 for the bottom, we construct a niche. The bottom is made of plywood.
- To secure the lifting seat with metal hinges, you will need a bar, its dimensions will be 96x100 cm.
- The thrust strip has dimensions of 96x60 cm; when measuring, you should subtract 2 cm. After all, it will be additionally covered with filler and upholstery.
- According to the measurements, the backrest is made and attached to the sides using dowels.
- The thrust and top bars are attached to the backrest.
- Next we secure the corners. Wooden bars will be cheaper, but it is better to give preference to metal ones - they securely secure the structure.
- After the frame is assembled, you can begin upholstering and softening the seat and back. The foam rubber is placed on glue, and the fabric is secured with a stapler.

The short part of the bench is mounted in the same way as the long one. Its dimensions are:
- Height – 80 cm.
- Length – 60 cm.
- Depth -40 cm.
The connecting part combines the long and short parts of the bench:
- Length – 45 cm,
- Height – 80 cm.
So that the corner can fit tightly to the wall, you need to cut off the sharp corners.
We attach the cut parts to each other using dowels or self-tapping screws. Next, we cut out the thrust bar and combine it with the seat. After the seat and back are made, you can attach the side parts. First, you should fix the parts of the back and sides using dowels and corners.
When the main structure is assembled, you can fix the foam rubber and cover the sofa with fabric. Foam rubber large thickness cut with hot nichrome thread, thanks to which high precision can be achieved.
There is no need to think that making a sofa for the kitchen is a complex technological process. If you take into account all the rules and follow the recommendations, you can create a solid, high-quality design. And the stage of finishing a piece of furniture will be the final fireworks.
In this article we will try to figure out how to properly make a sofa with your own hands.
A sofa is a necessary thing in everyday life. There are many variations of a piece of furniture. Due to the fact that it allows long-term, repeated use, the wear threshold increases sharply.

For this reason, sofas are in great demand.
home positive side sofa installation with your own hands – this is an opportunity not to overpay in a store for an item that costs much less than a “designer” one.

So, having purchased the necessary materials and prepared construction utensils, you can make a corner sofa in a home workshop in a matter of hours.
Factories produce monotonous models. If you make furniture with your own hands , it can be made in the type and design that you have outlined in your fantasies. This is another advantage of creating the design yourself.The variety of construction department stores and supermarkets determines the availability of any of the materials.

Thanks to this, the choice of lumber, fasteners, and finishing elements for the future product has expanded.
The most popular practical option is a kitchen corner sofa. This design can be used by disassembling into separate sectors or placed in one piece, along the perimeter of the wall.

In addition, the models are suitable for kitchen interior, practical in everyday life.
So, having covered wooden panels varnish the sofa, you can protect it from the influence of humidity, dampness, and excessive dry air. Corner installation, consisting of two benches with a rounded middle, will take up a small space in the kitchen, which is very convenient.

Aesthetically pleasing gloss finish for easier removal greasy stains from the surface.
There are two types of corner sofa: stationary and sliding. The first one is easier to install, so it will perfectly “teach the hand” of a novice master. Sliding design– troublesome to perform, but outwardly quite presentable. Following the diagrams and recommendations, it is possible to do both types the first time with your own hands.

Since most dining tables are wooden, the base and handrails of the corner should be made of a similar material.
When designing the kitchen sofa of your dreams, you need to decide on the upholstery. It is this detail that will create an original, interesting piece of furniture. The choice of cushioning material can be microfiber or artificial leather.To make the sofa seats as soft as possible, it is important to choose the filling wisely. There are materials that are normal, increased rigidity, soft, hard, elastic. All types will provide additional comfort and softness.

You should choose the filler based on your preferences.
Necessary materials
The choice of manufacturing materials is an important step, since the durability of the structure and reliability depend on their quality. When buying lumber, you need to take a slightly larger quantity. This causes the presence of defective elements.
For the kitchen structure you will need:
- Bars 15*15 mm – 1.2 m;
- Bars with a cross section of 40*40 mm – 0.135 m;
- Bars 25*25 mm – 3.6 m;
- Bars 30*30 mm – 1.2 m;
- Board with a section of 20*350 – 1 m;
- Rail 20*60 mm – 2.1 m;
- Plywood 1.2*45*255 cm;
- Foam rubber;
- Plugs for fastening;
- Piano hinges;
- Angles;
- Euro bolts;
- Wood glue.
- Chipboard.

Materials for making a corner sofa.

Various types of fastenings.
Before starting the main work, it is important to decide on the size of the sofa. Masters do not recommend performing it according to standard parameters, since the slightest deviation from the norm can ruin the design.
Dimensional plan of the kitchen sofa:
- Main sofa: length 1.2 m, height 0.85 m, back height 0.3 m;
- Side sofa – 0.45*0.45 m;
- The width of the side panels is 0.45 m;
- Seat height – 0.4 m.

Required Tools
In the conditions that the kitchen corner will be manufactured with your own hands , in the carpentry you need to take a set of tools:
- Wood file;
- Drill;
- Electric jigsaw;
- Screwdriver;
- Electronic planer;
- Building level;
- Ribbon;
- Sandpaper;
- Scissors;
- Stapler with staples.
- Knife for foam rubber.

This is the main list. Be sure to prepare safety glasses, gloves, a simple pencil for marking, and a ruler.
Preparing the frame, backrest made of timber and plywood
DIY sofa for the kitchen start with installing the frame. The process consists of the following steps.

As a result of simple carpentry operations, you will get a three-section furniture device.
Assembling a sofa for the kitchen
Construction of the structure body is 50% of the implemented idea. To form a sofa you need to make seats.You need to make “skeletons” from a 25*25 mm bar. They are sewn up with plywood sheets 25 mm thick. Unevenness and joints are rubbed with sandpaper. A prerequisite is the treatment of wood elements with an antiseptic solution, a layer of stain, and varnish.

Foam rubber is attached to the front side of the lid with a stapler or lowered with glue.
Piano hinges should be strengthened along each one. Afterwards they will connect the main module with the seat.Before upholstery, all open areas of the modules are covered with plywood, and the seats are attached to the frame. The wood is covered with varnish color.
Kitchen sofa upholstery
DIY kitchen sofa almost ready. The next stage is upholstery. The material chosen is synthetic winterizer or foam rubber. Each element of the sofa is measured.

The upholstery material is cut out according to the parameters, attached directly to the furniture parts with glue.

We do the back upholstery in the same way.
Next, you should cover the lining with fabric. In this regard, the most used fabrics are jacquard, velor, microfiber, flock. To perform processing, cut out parts of the selected material according to the dimensions of the sofa elements with allowances.

The material should be attached to the backs of the modules and the joints with the seats.

The final stage of making a corner sofa with your own hands is assembling all the parts into one whole.
The last stage is decoration
To make the corner sofa unique and distinctive feature, it is subjected to additional transformation.

Decorating the sofa is the most interesting part, so you can do it while taking a break from the main work.

Sofas with their mere presence can change the atmosphere, making it cozy and harmonious.
VIDEO: How to make a corner sofa for the kitchen with your own hands.
Sofas in the kitchen interior – 50 photo ideas:
Takes ~3 minutes to read
 Not many people can boast of having free space in the kitchen for large furniture. In small kitchens, every centimeter has great importance, especially in the area where the table is located. In the kitchen you always want to accommodate as much seating as possible. A soft corner sofa can cope with such a task, which will allow you to use the space to the maximum. At the end of the article you will find a drawing of a kitchen corner, a diagram and step-by-step instructions that will help you make it yourself with your own hands.
Having decided to make a sofa with your own hands, it will not be superfluous to take a closer look at ready-made examples of home “sofa” creativity.
Let us note the main features of this type of furniture so as not to confuse it with a regular bed in the future. The main distinguishing feature of the sofa is not the soft bed, but the backrest on which you can lean. The bed does not have this element. Side rails with armrests are another classic element of a sofa design.

In modern models, armrests are often abandoned, leaving only the backrest. In some designs, it can be swiveled and turned into a mattress.

This system is called the “Eurobook”. The principle of its operation, as can be seen in photo No. 2, is very simple: a block with a seat on wheels moves forward, and the back, with a slight movement of the hands, rotates on hinges and turns into an additional sleeping area. Anyone who decides to make a sofa at home can take note of this option.
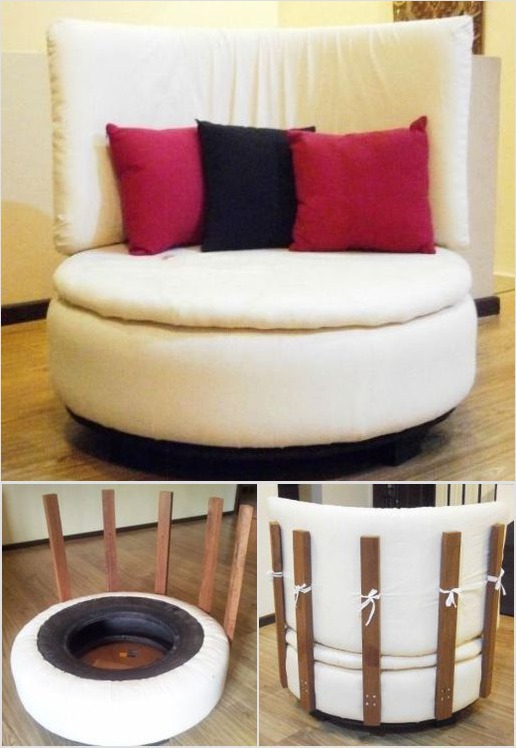
It is not for nothing that wooden pallets attract the attention of home furniture makers. These are ready-made durable modules. From them you can build an original bed with minimal cost and time. Sofa made of pallets, made in a deliberately rough manner fashionable style“loft” looks great with a dump truck wheel serving as a coffee table.

All you need to assemble such a structure is a screwdriver and a jigsaw. Having secured the base pallets with screws in pairs, the sidewalls are attached to them. They are made from the same pallets, cut at the level of the “bobs” - thick wooden inserts. This sofa has no back. It is replaced by two wide pillows leaning against the wall. Two thick foam mattresses add a pleasant “softness” to the entire structure.
When planning to make a simple sofa, try to enlist the help of your spouse. Her sewing machine will save you from having to go to a workshop to sew covers. If your wife does not share your grandiose plans, then buy a construction stapler. With its help, you can carefully and quickly complete the upholstery of the frame.
Some people like wood, while others cannot live without metal, making everything they need from it, including a sofa. If yours is old cast iron bath has not yet been scrapped, then use the original way of turning it into a comfortable bed. There is no better material than enameled cast iron for a garden patio.

Such an outdoor sofa is not afraid of either snow or rain, regularly bringing its owner respect from guests and neighbors.
Modellers and designers make not only models of ancient ships, tanks and aircraft. Furniture items often fall into their sphere of attention (photo No. 6).

Why don’t we make such a sofa by increasing its miniature layout to the required size? The idea of this design is simple and rational: the base is made of profile pipe, to which thick plywood is attached or OSB board.
After practicing assembly techniques on a smaller copy, it will be easier for you to work with a full-size sofa.
If the farm does not old tire, then making an original round sofa is not easy. If rubber “shoes” of the tractor are available, you can cover them with fabric and attach a high back. A stand with legs and soft foam cushions will give the structure an ideal appearance.
How to make a corner sofa yourself?
You cannot begin this work without a detailed assembly diagram. A corner sofa consists of several parts, the manufacture and joining of which require precision. The best fastening material for a beginner is self-tapping screws. The tenon joints of the frame are at the level of an experienced carpenter.
So, to assemble a corner sofa you will need the following materials:
- wooden block (section 30x50 mm);
- board (25x80 mm);
- plywood or chipboard (thickness 12 mm);
- plywood (thickness 5 mm);
- foam rubber 10 cm thick;
- thin foam rubber or batting (for making a lining for the casing);
- PVA glue for attaching the soft lining;
- furniture upholstery fabric.
To work you will need the following set of tools:
- screwdriver;
- jigsaw and hacksaw with miter box;
- construction knife for cutting foam rubber;
- scissors for cutting furniture fabric;
- stapler;
- self-tapping screws;
- sewing machine.
Before making a corner sofa yourself, you need to clearly define its layout diagram and once again look at all the prepared drawings.
The base of each corner sofa block is a frame made of plywood or chipboards, fixed to a timber frame. If the thickness of the slab is large enough (from 16 mm), you can do without a block. In this case, the self-tapping screws are screwed directly into the ends of the slabs, drilling guide holes of small diameter into them to prevent splitting of the material.
For rational use internal space in blocks No. 1 and No. 2 you can make removable covers. To support them from the inside along the contour of the frame, you need to secure a block with a cross-section of 2x3 cm, lowering it below the upper cut of the slabs to the thickness of the lid (12 mm). In order for the lid to be easily lifted, two holes are drilled in it for the fingers.
The design of blocks No. 1 and No. 2 is the same, but we will make block No. 3 with a drawer-seat, which increases the usable area of the sofa. This is the simplest option that does not require the installation of transformation mechanisms (retractable or rotary). Their correct installation and adjustment for beginners is a complex process.
Our drawer will have a lid made of chipboard or thick plywood. Assembling it is not difficult, but making comfortable folding legs is a problem. They will interfere when sliding the drawer into the sofa body. Instead, we will increase the height of the drawer face plate. It will play the role of a support platform when unfolding the sofa.
For easy pull-out reverse side On the front panel of the drawer you can attach two wheels from office chairs. The wheel body will not rest against the bottom of the sofa if a small cutout is made in it in advance.
The lid on block No. 3 can be made removable so you can put it there bed sheets.
The dimensions of the seat cushion should be equal to the dimensions of the drawer platform. Having pulled out the drawer of our corner sofa, we remove the back cushion and place it in place of the mattress.
Next, our step-by-step instructions contain a description of assembling the backs. For all corner sofa blocks, their design is the same: vertical posts connect three boards. The two lower ones serve to secure the backrest to the sofa, and the upper one provides rigidity and serves as the basis for attaching the upholstery.
Having assembled the back frame, the front and back need to be sheathed with plywood 5 mm thick. All sharp corners are processed with sandpaper to avoid snags and unevenness when installing the upholstery fabric. For all facial and side surfaces you need to glue batting or thin foam rubber to make the upholstery softer and more voluminous.
The last stage of production is covering the sofa with fabric. You can buy it in a specialized store, having made a preliminary calculation of the sheathing area and not forgetting about the 5-10% reserve required for cutting and turning on the frame.
To do this, all the front parts of the body and back need to be measured and pieces of material cut out according to the resulting dimensions. They are attached using a stapler to the invisible ends of the panels. To prevent the fabric from wrinkling at the corners, make cuts in it and pull it tightly before shooting the staples.
Cushions for the back and seat of a corner sofa are best made from foam rubber with a thickness of at least 10 cm. Optimal design covers for them - a removable zipper with a lock. When dirty, the covers can be easily removed and washed. If you do not have experience in sewing, then draw a simple sketch of a pillow and order the sewing of covers in the studio.
Video on the topic:
Soft corner using shelves from Ikea
To minimize carpentry work, you can use ready-made shelves from Ikea as a frame. To make such a corner with your own hands you will need the following materials:
- Chipboard or plywood.
- Ikea shelves with fronts.
- Upholstery fabric.
- Furniture foam rubber.
- Electric jigsaw.
- Drill.
- Construction stapler.
- Bolts and nuts.
Installation and fastening of the frame

When choosing the size of shelves, you should take into account such standards as: the height and depth of the seat should be 40–45 cm. The convenience of using shelves is that you can easily create not only an L-shaped structure, but if the space and area of the kitchen allows, then U-shaped.
All structural parts are connected to each other using bolts. But before that, you need to drill holes of the appropriate size in the side walls. If the drill does not fit in the shelf, then the hole should be drilled from the outside, separately in each wall. It is very important to take clear measurements so that there are no problems when connecting the structure.
To prevent the wood from deteriorating when the bolts are tightened too tightly, it is recommended to additionally use spacers under the bolt heads and nuts.
Installation of fronts and seat bases
After the frame is installed, the shelf fronts must be secured. You can do without this, which will make the design much cheaper, but if necessary extra bed to store various things, you still need to install doors.
The base for the seats is made from sheets of chipboard (OSB) or plywood. Plywood with a thickness of 10 mm or more can withstand high loads and has good moisture resistance. Most economical option- use particle board or oriented strand board.
The board is cut to the size of the corner using a jigsaw. Next, you need to sand the edges with medium-grit sandpaper.
Upholstery with soft material

This stage of work is the most labor-intensive. Furniture foam rubber should be cut in the same way as a sheet of plywood. Next it is glued to the base.
It is important to use a special glue in your work, designed for strong bonding of foam rubber to a wooden surface.
The next step will be covering it with fabric using construction stapler. The distance between the staples should be 1–2 cm. Even an inexperienced person in this matter can do upholstery with a plain material, but you will have to adapt to a complex pattern, because this task is no longer an easy one.
The finished seat can be supplemented with soft pillows, which will also serve as a backrest.
Simple DIY kitchen sofa made from furniture board

A do-it-yourself kitchen corner made from furniture board is one of the most budget options this idea. For work you will need the following materials:
- Acrylic paint.
- Textile.
- Drill.
- Jigsaw.
- Self-tapping screws for wood.
- Furniture panel (18 mm).
- Foam rubber (80 mm and 20 mm).
Cutting the shield and fastening the parts
Before you start cutting the shield, you need to draw up drawings of a homemade kitchen corner with cuts. The project must be developed in such a way that at least 3 people can comfortably fit on the sofa.
It’s better to start cutting the shield with a jigsaw, but you can also get by with a hand saw. During the cutting process, the tool should be held strictly perpendicular, and the ends of the shield should be located strictly at an angle of 90° in relation to the main plane.
The parts are fastened with self-tapping screws, and to prevent cracks from forming, you must first make a hole for the screw. The diameter of the drill should be 0.5–1 mm less than the diameter of the screw.
Hull painting

Can be used for painting alkyd enamel or acrylic. It is better to choose acrylic enamel, due to its stability, durability and lack of a strong odor, which will allow you to use the enamel directly indoors.
Before painting, it is necessary to treat the surface of the body with a primer to increase the adhesion between the varnish and the wooden surface. We apply the coating in 2 layers, and for a more saturated color - in three.
Making soft pillows
To sew pillows we use foam rubber, which, unlike padding polyester and holofiber, has a better density and is more comfortable to sit on.
For the backrest, you can use thinner foam rubber, and for the seats you will need foam rubber at least 80 mm thick.
If you have the opportunity to work on a sewing machine, it is best to sew removable covers with zippers or buttons. This option is convenient because old fabric You can always replace it with a new one at no extra cost.
DIY kitchen corner made of wood
A very simple but original kitchen corner can be made from a wooden board with your own hands. To work you need:
- Foam rubber.
- Wooden board 100x40 mm.
- Plywood or chipboard.
- Round dowel with a diameter of 15 mm.
- Drill with 15 mm crown.
- Jigsaw.
- Construction stapler.
- Batting.
- PVA glue.
- Upholstery fabric.
- Varnish and stain.
Sawing and grinding parts
First, you should create a drawing on paper or in a special program, and then you can start cutting the board into parts. To give the corner a more elegant look, you need to carefully cut out the shaped parts with your own hands. To make the elements smoother and neater, use a flexible ruler to draw lines on the surface of the wood.
All parts are sanded several times with sandpaper of varying degrees of grit. Next, according to the drawing, the entire corner is assembled using dowels and glue.
Staining and varnishing

Instead of enamel, it is best to use stain for coating. The stain does not create an unnecessary film effect on the surface of the wood, but, on the contrary, preserves its structure. The color can vary from light to dark red. The stain has the peculiarity of raising the wood pile during the painting process, so after drying it is necessary to sand the surface again.
Like stain, varnish should be applied in several layers. To speed up the process, you can use a water-soluble varnish, the drying time of which is no more than 30 minutes.
Frame assembly
Before using glue to fix the ends of all structural elements, it is recommended to assemble it “dry”. It is necessary to ensure that all frame parts fit without gaps.
If everything fits perfectly, you can start assembling the frame using glue. For reinforcement, you can use 4x4 metal corners that are attached to the inside corners.
The bottom of the boxes can be made of plywood or chipboard sheet. The selected material only needs to be placed on the furniture corners attached to the frame below.
Seat installation
From the same sheet of plywood or chipboard from which the bottom for the drawers was cut, you can make a base for the seat according to the dimensions indicated in the drawing. Progress:
Step 1. Take the foam rubber and cut out a piece from it, which should be 2-3 cm larger than the base on all sides.
Step 2. Glue the foam rubber to the chipboard.
Step 3. Cut out the batting along the contour and glue it to the seat with the same glue.
Step 4. Using a staple gun, attach the upholstery fabric.
The result is an excellent corner sofa that can decorate any kitchen.
How to make an original corner sofa from pallets

The direct purpose of wooden pallets is
transportation of goods. But this one simple design may serve reliable material for making furniture.
Perhaps such a sofa will not fit in every kitchen, but it is also perfect for a gazebo in the garden, especially since a sofa made from pallets is not particularly difficult to assemble.
Selection and fitting of pallets
The first thing you need to do is inspect the pallets that will be used to make furniture for chips and damage, so that no troubles occur during operation.
A corner sofa is designed according to the size of the pallet. If space allows, you can make furniture from solid pallets, otherwise you will have to resort to using a circular or hand saw.
Connecting parts
Making a corner for a kitchen or gazebo is not difficult, because all you need to do is connect the finished parts together with screws.
To make the back, you need to attach the pallet in a vertical position to the base. This completes the assembly.
Photo - homemade kitchen corner: drawing and dimensions, diagram, step-by-step instructions


Master class on making a chair from plastic bottles with step-by-step photos

To create furniture from old plastic containers, you will need a large amount of it. It all depends on the size chosen for the manufacture of furniture.
You may be interested in: How to make a chair for a doll from plastic bottles: a detailed guide with step by step photos
The manufacturing process itself:

MK on creating a sofa from plastic waste
The process itself:

You may be interested in: DIY decorative tree: step-by-step instructions for making topiary with photos and videos
This sofa will be a shining example of the fact that furniture can be not only cheap, but also very beautiful!
A variety of ideas for home crafts
There are a large number of technological techniques for home crafts that can make the interior not only more decorative, but also functional.
By connecting the ends of thick branches together, you get a hot stand. Such a product can even be made from paper folded in several layers. The resulting strips are glued together in a spiral or formed into products in the shape of a square, rhombus, or rectangle.


Even photocopying techniques are available for home crafts, allowing you to transfer designs onto fabric. The design is attached to the fabric requiring renewal with the front side. On the reverse side it is pressed with an ironing press or iron until the image is completely transferred. All that remains is to dry and iron the product.


- From the usual glass bottle Unusual vases are beautifully shaped. To do this, the outer surface of the bottle, in a spiral, needs to be tightly wrapped with decorative rope, fixing it with glue.
If you don't want to bother with rope and glue, you can paint the bottles in bright colors, decorate them using decoupage technique or make an interesting painting on them.


- Concrete, plaster and clay certainly provide room for creativity. These materials are used to make unique stucco elements for interior decoration. They also create beautiful garden lamps, original vases, fancy candlesticks, exclusive figurines and other decor.
- Such handicrafts can not only become an excellent decoration for your home interior, but also be useful in everyday life. For example, for safe movement around local area V dark time days, garden lamps can be placed along paths and paths.


Homemade crafts are a fun activity. From the variety of ideas, it is easy to choose an option suitable for a specific interior in order to add a touch of individuality to it in the form of an original homemade product.
Try, experiment and you will definitely succeed.
Coziness and comfort in an apartment largely depends on the quality of the furniture. Exclusive furniture made independently has undeniable advantages. Therefore, the question of how to make a beautiful, high-quality and reliable corner sofa with your own hands is relevant for many.
What's so good about a homemade sofa?
It should be noted right away that making a corner sofa is not a very complicated process. Anyone with a minimum level of training in the furniture manufacturing industry can handle it well. In addition, this task does not require the use of overly complex professional tools. A sofa in the living room, made independently, will even surpass in quality some of the proposals found in the modern furniture industry.
What are the advantages of handmade?
- Significant savings Money. A product made by yourself will cost you at least three times less than a ready-made analogue from a furniture showroom.
- By making a corner sofa with your own hands, you guarantee the strictest quality control.
- You are absolutely free to choose the design, shape, size and color of future furniture.
- The manufacturing process itself is very exciting - so it will bring you a lot of moral pleasure.
We select suitable materials
Quality, reliability and durability depend on how responsibly you approach the selection of materials. future design.
If this is your debut in furniture making, in no case should you use too expensive materials, as well as those that are characterized by an increased level of complexity in processing.
Materials you will need:
- high-quality timber with a cross-section of 30x50 mm - it is best to use timber made from pine or other coniferous species;
- birch plywood;
- Fiberboard and chipboard;
- self-tapping screws or self-tapping screws suitable for working with wood;
- nails;
- padding polyester, batting and foam for filling;
- glue designed to work with foam rubber;
- wood glue;
- foam crumbs;
- fabric for upholstery;
- lifting mechanism;
- durable furniture legs - their height should be approximately 5 cm.
When creating a corner sofa, follow certain rules that will make it stronger and more durable. In order to reliably and efficiently fasten the parts of this structure to each other, only self-tapping screws should be used. If you use regular nails instead, the furniture can very quickly become loose and become completely unusable.

Some types of parts need to be joined using high-quality wood glue. If you are going to use non-laminated boards, be sure to cover them with a layer of varnish - this will prevent the spread of harmful formaldehyde through the air.
What tools are needed?
To make a corner sofa with your own hands, you will need the following set of tools:
- saw with manual mechanism actions;
- electric drill with a rotation speed control function - it can be used as a screwdriver;
- sewing machine;
- special stapler for processing furniture;
- a well-sharpened knife for cutting foam rubber.
Manufacturing process
Before you begin manufacturing, you need to determine what its design will be and where you plan to place it.
To do even simplest option for a room or for a kitchen, the drawings must be as accurate and detailed as possible.
The creation process consists of several stages, which include:
- production of armrests;
- assembly of the left and right parts;
- filling frames with foam rubber;
- fabric upholstery.
Use of pallets
Currently, more and more more people wondering how to make a high-quality and attractive corner sofa from pallets. The process of making such furniture is simpler than in the first case.
To do this, you will need square or rectangular pallets, as well as a set of tools consisting of a saw, hacksaw, hammer, and screwdriver. To make a sofa backrest, you should use high-quality boards. In addition, high-quality fittings, filling and upholstery fabric are required.
- Before starting work, the pallets must be properly prepared - thoroughly cleaned, all uneven areas smoothed out and cracks sealed. A primer is used for these purposes.
- After these parts have dried, screw the legs to the sides of the two pallets. You can use small blocks of wood as legs.
- For high-quality assembly of a corner sofa, it is necessary to firmly fasten the pallets together using self-tapping screws. It is recommended to additionally use wood glue directly at the joints.
- Using strong metal fasteners, attach a back made of boards to the pallets.
- Finally, quality upholstery should be done.
A sofa made by yourself is a special piece of furniture that will certainly delight all your household members!
Materials and tools needed to create a blanket using the patchwork technique
A blanket for a sofa with your own hands can be made from a single piece of fabric and batting or other insulation, and the thickness of the batting or padding polyester should be chosen according to the future purpose of the product and climatic conditions.
So, for work we will need:
- a sheet of batting or other insulation, the size of which matches the product being manufactured;
- fabric for lining;
- patchwork scraps;
- fabric for lining the product.
Tools:
- sewing machine and iron;
- sewing supplies (needles, threads, scissors, pins, etc.);
- measuring tool;
- white mercerized thread for decoration.
Manufacturing instructions
Before you make blankets for the sofa with your own hands using the patchwork technique, you need to take care of a sufficient number of scraps of different colors, which, by the way, any housewife always has enough of.
- We cut 288 square pieces, the size of which should be 8x8 cm.
- We sew two squares together in the desired sequence with a seam allowance of 5 mm. All seams are pressed in one direction. We assemble the blocks, selecting colors in pairs according to the tone chosen color scheme. The result should be 72 squares.
- We assemble all the blocks into a single canvas, periodically smoothing the seams to the right and left.
- The result is a solid canvas made in the chosen color scheme.

Connecting all the elements of the bedspread

Bedspread tie

Hemming the bedspread along the edge

Now you know how to make a sofa bedspread yourself. Try using the instructions and patchwork techniques provided. All it takes is a little experience and perseverance, and you’ll be special costs Get a fashionable and original accessory that will not only decorate your living room, but will also warm you up on a cold winter evening.
A sofa is a very necessary type of furniture, so it is widely used. Because the furniture stores cannot always offer exactly what they would like to buy at the moment, then buyers are sometimes unable to make the appropriate choice.
At the same time, people have the idea of making a sofa for the kitchen with their own hands. This idea sometimes develops into a dream because it may seem overwhelming. If you immediately note to yourself that you will not need any special materials or tools to implement it, then you can make your own sofa according to your own dimensions.
That’s when a man’s ingenuity, acumen, knowledge and skill come to the rescue in order to make a unique masterpiece with his own hands, that is, a sofa for the kitchen own home. The main thing is that you will know for sure all its advantages, the materials from which it is made, while spending very little money and choosing the color of the sofa to your taste.
Choosing a sofa design for the kitchen
Before starting work related to the manufacture of a sofa, you should design its appearance. It should be remembered that the conditions for making a house will not allow you to do something very complex. You can really create a simple but comfortable sofa for the kitchen with your own hands.

Typically a sofa has a frame mounted on legs. Sometimes a roller mechanism is used. The folding seats of the sofa allow you to have access to its niches, which can be located on the side, in the form small boxes. They can also be placed on top of the back of the sofa.
You should plan the size of the sofa with great responsibility, because if it does not fit into the prepared area of the kitchen, then all your efforts will be in vain. All necessary sizes should be selected individually, coordinating them with your wishes, hobbies and the size of the kitchen area. This step involves having a drawing prepared in advance for the manufacture of upholstered furniture.
Next we visit a building materials store. If you plan to carry out work on installing a sofa for the first time, then the most convenient option There will be a design of a folding rather than a corner structure. The frame of the sofa model consists of a rectangular frame on legs, which has a suitable size.
You can use timber to make the frame. Pine beams that are secured with screws are best suited. Fasteners are usually placed at different levels, otherwise longitudinal cracks will begin to form. To give the frame the greatest strength, the bars should be screwed to the corners of the frame, which have a cubic shape.

Screws are used as fastening elements. The bottom of the sofa structure will be made of plywood, the sheet of which will correspond in size to the area of the frame. The plywood sheet must be nailed, which also should not be placed at the same level. The sofa manufacturing process is usually divided into three stages:
- Prepare materials with tools that are needed.
- Making the frame.
- Sofa upholstery.
You might be interested in: How to choose a table for the kitchen: practical tips
Let's look at each of these stages in more detail.
Return to contents
Preparing the necessary materials
It is possible to make a sofa yourself without using any special materials, preparing only ordinary pine beams with sheets of plywood. First, the sofa must be designed in detail on a sheet of paper. You will need to take into account every detail, for example the level of inclination of the sofa back, the specific height of the legs, general dimensions designs, etc.
It is necessary to take into account that sufficient load will fall on the back and legs of the sofa, so it must have a solid base.

The strength of the back and seat must be adequate, and the legs of the sofa must be firmly secured. It should be remembered that the small cross-sectional size of each beam should be 60x60 mm, and the thickness of the plywood sheet can be equal to about 12 mm. These are common types of materials that are offered by any hardware store at reasonable prices.
The required materials usually include screws and steel angles, and the tools include a saw and a screwdriver. It is best to upholster the sofa with foam rubber, synthetic padding and tapestry. You can strengthen the fabric by making covers with zippers. To make the frame, you will need to buy beams that will be different from hard wood and will not have any defects. All wooden elements should be coated with varnish that preserves the beauty of the appearance of the wood.
Return to contents
The main stages of assembling a sofa
The following main elements of the sofa are distinguished:

- Railing.
- Pillow.
- Frame.
- Legs.
Creating a sofa can be roughly divided into 4 steps:
- Assembling the sofa frame. For a wooden frame, beams should be prepared, which should be smooth and free of visible defects. They are made from stronger wood species. The prepared tools are used to cut the beams. Next, the frame is fastened. If self-tapping screws alone are not enough for fastening, then it is better to treat all joints with special wood glue, which is non-toxic and most suitable for this purpose. tree species.
- Creating the seats and back of the sofa. It is possible to make a sofa seat using foam rubber, which is more economical. You can use its analogues: polyurethane foam or holofiber. The latter material has sufficient elasticity, but at the same time flexibility, is able to quickly restore its shape, and does not absorb water. If the filler moves along the frame, it should be glued to the frame.
- Sofa upholstery. For upholstery, you can choose leather or tapestry, which is the more economical option. Everything here depends on your wishes and payment abilities. To cover a sofa, cut out the material, it is best to process its edges and use a construction stapler to fix the covering on the wooden parts of the sofa. It is enough to reupholster the sofa once, and then you won’t have to waste money on reupholstering it. This can be done without the help of others. You can cover the sofa, as indicated above, or you can make covers for it, for which you need to make soft seats, which will be separate cushions.
- Finishing processing. It is best to treat all visible wooden elements of the sofa with stain and varnish; this must be done immediately before assembling the frame.
Return to contents
You might be interested in: How to properly assemble and install a kitchen unit
Preparing the frame and back from timber and plywood
Prepare required kit tools should be used independently. It should include:

- A hacksaw (possibly an electric hacksaw, which is even better). The main thing is not to forget about the width of the cut.
- Electric drill.
- Fraser.
- Screwdriver.
- Roulette and see
- Pencil.
- Ruler.
- Sandpaper.
- Scissors.
- Cutter for cutting foam rubber.
- Construction stapler. Not to mention iron fastenings, you can use glue that will combine each of the elements with each other. This will make the structure safer and stronger. The joints should be glued with a suitable glue that will be ideal for the selected wood species. Otherwise, it will be uncomfortable to sit on the manufactured sofa.
https://site/youtu.be/As_14476OTc
In order to assemble a sofa from bars, you will need to make three similar frames, which will have a size of 72x1860 mm. The corner elements are fastened identically, that is, by installing them on a tenon with glue. 2 frames make up the base of the sofa. The frames should be fastened together using 4 bars 60x60 mm, the length of which is about 200 mm. In this case, the height of the frame will be 320 mm.
The part of the sofa on which the mattress will lie must be covered with glued plywood, that is, covers made from it. Hinges should be strengthened to its frame. The third frame must be covered with a board, like the side walls of the sofa. The backrest is secured to the wall with 5-6 hinges, guaranteeing a load-bearing capacity of 150-200 kg. When unfolded, the backrest should rest on the posts on both sides.
Once the frame of the sofa is completed, construction of the backrest can begin. This is done in the same order as the seat. Since the kitchen sofa model will be foldable, the back must be firmly fixed. This is done using iron angles with thick walls. It is not recommended to make the back clearly vertical.
Without a kitchen corner - a corner sofa in addition to and chairs or a bench - modern life is already unthinkable. Making a kitchen corner with your own hands makes sense not only for the sake of saving money: not every commercial model will definitely fit into a free corner of the kitchen, and the one that is suitable in size may not be suitable in design or price. A kitchen corner piece of furniture is not a complex one, but a novice master, not properly equipped with rather expensive equipment, is on the way to translating it into a product will encounter many pitfalls. This article is about how to bypass them and still make a corner in the kitchen at home that is not inferior to the factory one.
Note: The secret of the comfort that a kitchen corner creates is its aesthetic self-sufficiency. A corner sofa with a table and stools/bench is a self-zoning piece of furniture; it will create an area of calm and well-being, a kind of virtual bay window or alcove, even in an open field or barn.
Which one to do
It is possible to make a kitchen corner in different types execution. The main requirements for a kitchen corner are compactness, convenience (ergonomics) and hygiene in the kitchen. We still need to achieve maximum savings in money, materials and labor by working as a public tool. Based on this, we will choose which one can be made simpler and better.
The main types of kitchen corners are shown in the photo. Pos. 1 – bay window corner, round or faceted. Each rider is allocated an optimal seat width of approx. at knee level. 400-450 mm. The bay window corner is extremely convenient and cozy, but, alas, it is complicated, expensive and requires an extensive kitchen.

A semi-bay window corner will fit into the kitchen of a modern apartment above the middle class: the side sections are straight, and the width of the corner at knee level is 200-300 mm, pos. 2. For a person of average build, sitting in the corner of a half-bay window is almost as comfortable as in a bay window. In a kitchen of normal dimensions, corners with a beveled corner are most often installed instead of half-bay windows; in them, the rider’s knees have 150-200 mm, pos. 3. You can’t move much anymore, but sitting quietly, no thoughts arise about where to put your knees.

Lovers of small-sized kitchens most often make straight corners, pos. 4, with backrest wedge in the corner, pos. 5, and with a beveled back, pos. 5. Their convenience, technological complexity and cost are increasing in this series, but straight kitchen corners have a common positive property: if instead of a pair of stools on the long side of the kitchen table, the height of the bench is the same as the seats of the corner, then by moving the table and moving the bench, you can get a bed with a width of 600-850 mm. Very expensive and equipped with complex mechanisms, branded kitchen corners with a sleeping place are no more convenient, see fig. left. A corner with a beveled corner also has the property of transforming into a sleeping place without additional devices, if the corners of the seat of the complete bench are appropriate. beveled way.
Note: in Fig. on the right is a perverse product of modern marketing - an expensive straight kitchen corner. In fact, the straight angle is the most uncomfortable of all. Much more inconvenient than its closest relative - a corner with a wedge in the back. A straight kitchen corner is only good for placing an unwanted guest in the corner. But he will not be able to leave in English; he will have to push the owners away.

Corners with a beveled corner and a back are often complemented by a table and/or bar in the corner, pos. 7-9. The first two are not an option: getting something out from behind your back is inconvenient, but pushing it or accidentally knocking it over is easy. If the owners are firmly subject to prejudices and do not want to put anyone in a corner, then it is better to equip a mini-sideboard with a chest and a bar in the corner, as in pos. 9.
At pos. 6, 7 and 8 show corners with the so-called. hanging angle, i.e. without a separate support. Kitchen corners with hanging corners, made of laminated chipboard, are no less strong and durable than those with supporting corners, but they are cheaper and more technologically advanced to produce. However, they cannot be modular (see below), because initially performed only by the right or left. For the consumer, their cheapness is apparent, because... The hanging corner angle cannot be transported assembled and requires assembly on site.
Modular corners
Kitchen corners made from pieces of furniture that are not connected to each other (modular, see fig.) are good to produce and sell: there is no need to make right and left versions. They are also appreciated by those who often rearrange furniture; modular kitchen corners look good in studio apartments of laconic styles, such as loft, high-tech, minimalism. But the functionality and ergonomics of modular kitchen corners, simply put, are non-existent - you can’t put anything in them, and it’s uncomfortable to sit in the corner.

Note: Traditional kitchen corners are also made modular, consisting of 3 separate items - a pair of sofas and a corner. They are placed right or left, turning the corner by 90 degrees, and one of the sofas by 180. However, such corners are more expensive, because Extra material is required for the corner and its design becomes more complicated. It is very difficult to make a modular kitchen corner at home, because... To the required accuracy of pairing of parts within 1 item (see below), the accuracy of pairing of objects with each other is added.
What to do and what not to do
The first mistake when designing a kitchen corner is a table with legs and straight front seats, pos. 1 in Fig. The secret of the comfort and self-zoning of a kitchen corner is its compactness and convenience, but here the table cannot be really moved, and its legs get tangled in the knees of 3 people sitting. The corner for the kitchen should be made under the table of a beam-and-panel structure, pos. 2 and 3, and the facades of the seats are either sloping (pos. 2) or with raised bottoms of the chests under the seats, pos. 3.

The second mistake is not to make drawers under the seats, pos. 4 and 5. They interfere with each other and spoil the floor. To get to the contents of the drawers, you need to move the table far away and kneel down. If the house is run by a maid and a housekeeper, and the owner does not care about their worries, then a kitchen corner with drawers is a matter of taste. And we need to make a corner for ourselves in the kitchen with chests under folding or removable seats.
Get to work!
What kind of kitchen corner would you like? would be better suited- at your discretion. And here we will see what difficulties you will encounter when making it at home without experience, and how to cope with them. The analysis will be based on the example of a design known in RuNet, the drawings of which are given below; The main materials are laminated and simple sanded chipboard with a thickness of 16 mm.


On the one hand, this corner requires minimum costs materials, labor and can be made much more convenient, see below. On the other hand, the prototype is oriented towards industrial technology, its design is rational and well-developed, but we need to get a product no worse than that, assembling it at home on the knee and in weight. This particular sample was also chosen because it is capable of acquiring all the best qualities of a corner with a beveled corner, plus the ability to serve as a sleeping place, but technologically it is not much more complicated than a right corner. In addition, there is a generally correct specification for it with statements of material and fittings, see fig. on right.
Note: If you check/refer to other sources with descriptions of this sample, keep in mind that in some of them, and quite a few, in the drawings of the parts the dimensions are given mixed for sofas 100 and 60 cm long. It is, of course, impossible to assemble the blanks cut out from them into a product.
For example, in the top row of Fig. Assembly diagrams are provided with the drawings, clear as day to a factory technologist. But how to deal with them without having production equipment? The sample under consideration is a panel box-shaped structure, similar to the power circuit with load-bearing skin in the aircraft industry. Box-panel structures save material and labor as much as possible, resulting in very durable products, but their manufacturing technology is subject to a number of specific requirements. There are a lot of invisible tricks here, but we can deal with them, and we will do it. First for the sofas, in this order:
- Selection of fasteners;
- Adjusting dimensions for a specific room;
- Cutting laminated chipboard and chipboard into blanks, marking and drilling holes;
- Trimming the edges of beveled parts and edging;
- Covering the parts for which it is required with soft covering;
- Assembly.
Next, let's see how we can simplify the manufacture of a corner section (corner) and make it more convenient. The original design is modular, but in our apartment the corners of the walls do not change places by themselves. Knowing exactly where the corner will go, whether it will be right or left, the corner can be made hanging (see below), and this will make the work much easier and cheaper.
Fasteners
The main fastening elements of this kitchen corner that absorb operational loads are confirmed furniture screws and steel corner connectors; dowels play a supporting role, keeping the parts from moving. The specification above contains a list of accessories for assembly in industrial conditions, but for home performance some things will have to be changed in it.
Note: in products made from laminated chipboard and chipboard, it is possible to replace confirmats with wood screws to connect parts through the face into the edge occasionally. In this product - under no circumstances is it possible, because... the boards are very thin, 16 mm. The connecting corners are attached to the parts using wood screws, see below.
Confirmations
The standard size of confirmats 7x50 specified in the specification is the maximum permissible for a given chipboard/laminated chipboard thickness. This makes it possible to transport the corner modules in assembled form and reduce its cost somewhat, because there is no need for on-site assembly, and any of the modules is carried into the apartment by hand by a person with physical development office type. But marking and drilling for the thickest possible fasteners also requires production precision (see below), which cannot be achieved by working at home with your hands. For example, can you, when working with a hand-held electric drill, feed the drill perpendicularly or parallel to the face of the board with a deviation to the side of no more than 0.1 mm? The question is rhetorical. Therefore, for manual work, provided that the product will not be transported over long distances with shaking and jolts, the size of the confirmats should be reduced to 6x50 or even 5x60. Otherwise, i.e. If you take fasteners according to industrial specifications, some of the parts may delaminate during drilling or assembly. If the chipboard/chipboard is taken from eco-friendly brands E0 or E1, then it will definitely delaminate, so the chipboard/chipboard should be taken from the household brand E2, and if you want E0/E1, then the thickness of the boards needs to be increased to 24/20 mm, adjusting accordingly. dimensions, see below.

The height of the screw neck H is important for the strength of the confirmed connection, see pos. 1 in Fig. H must be exactly equal to the thickness of the overlay board, on the right in pos. 1. Sometimes H is indicated by the 3rd digit in the name of the screw size, i.e. you will need confirmations 6x50x16 or 5x60x16 for the original structure or 6x50x24/6x50x20 or 5x60x24/5x60x20 in the case of using boards of greater thickness.
The confirmation drill must be taken exactly for the given screw size. The height of its skirt should be equal to H (in the center in position 1), the diameter should be equal to the diameter of the screw body without thread, and the length of the spiral part of the drill L (without cutting tip) should be equal to the full length of the threaded part of the screw. If the heel of the screw rests on the residual conical hole in the hole, then hidden delamination in thin boards is guaranteed, and it is only a matter of time before it spreads outward. Small.
Dowels
In all sources on the topic of the kitchen corner in question, photos of wooden dowels are given as illustrations with enviable consistency, but without proper understanding. This is a gross mistake in this case. Wooden dowels are designed for connecting wooden parts: they dry out along with the base material, and the connection remains strong for many years. Or centuries, if the furniture was made by an outstanding master.
Chipboard/chipboard do not dry out and are therefore connected with plastic dowels. If you take slightly more expensive propylene ones, then there is no need for rather labor-intensive and careful gluing of joints. For the reasons stated above, the diameter of dowels for manual production must be reduced to 6 mm, leaving their length the same. In the edges of the boards, holes for dowels are drilled only along the jig (item 4 in the figure); diameter - 5.3 mm, drilling depth 22 mm in the edges and 12 mm in the faces.
The seats (see below) can be made not folding, but removable, by placing them on dowels with round heads for detachable connections (above, position 2). This will allow you to avoid the rather complex installation of piano hinges, the costs of them and fasteners for them. And if they decide to rearrange the corner in a hurry, then the likelihood of damage to it is reduced: they grabbed the seat without thinking, it remained in their hands, and the sofa did not jump or hit anything. Getting something out of the chest under the seat on piano hinges is no more convenient, because... The seat cover reclines less than 90 degrees. It’s easier to remove it and lean it against the back than to rummage through the chest while holding the lid with your hand. But in the design under consideration this, unfortunately, is impossible, see below.
It is better to take other dowels for our kitchen corner with faceplates, at the bottom at pos. 2. Washer thickness 0.5-0.7 mm; At first such gaps will not be visible. After some time, the washers will be pressed into the chipboard (the parts are tightly tightened with confirmats), the gaps will converge, and the entire product will acquire additional strength. Another advantage of dowels of this type is different corrugations on the long and short parts, which provides even higher strength of the connection without the danger of delamination of the boards. You just need to select dowels of the required size: with a 20 mm long part and a 10 mm short part (for 16 mm boards). For boards 20/24 mm, the long part needs 30 mm, and the short part 12/16 mm.
Corners
For the design in question, you will need steel isosceles corner connectors 30x20x2 (for fastening obliquely) or 30x15x2 for fastening in a row. The first number indicates the length of the corner shelves, the second their width, the third – the thickness of the material. During assembly, the corners will have to be partially bent to install inclined parts, so you need to take them white or gray from viscous “raw” or moderately annealed steel. The presence of stiffness stamping on the bend for bent corners is unacceptable, pos. 4 in Fig. The internal and external folds of the corners should be smooth, without tears or wrinkles. The corners of burnt steel, yellowish with spots of tarnish, even if they bend, will then crack. Black phosphated corners from the so-called. Overdried steel is very strong, but when bent, it breaks immediately.
Note: plastic furniture corners, so you know, you can bend them after warming them up thoroughly household hair dryer on full power. But plastic corners They last no more than 3-5 years, and then they dry out and crack.
Dimensions
Let's look again at Fig. with drawings (duplicated on the right). The dimensions have been corrected: the length of a sofa 1 m long is shown in black; red and blue next to the “black” ones for a small sofa 60 cm long. The green marks will come in handy later when we get to the corner seat.
The “red” dimensions are basic: you need to add to them the missing amount of 600 mm for longer sofas. For example, for a sofa 1.3 m long, you need to add 700 mm to the “red” dimensions. The longest possible length of a sofa of this design is 1.5 m. “Blue” dimensions are relevant for sofas up to 750 mm long. If the sofa is longer, you need to take “black” sizes instead of “blue” ones.
6th position
There is no 6th part in the drawings. This is a seat blank, a simple board without any holes. Its length is equal to the length of the lengths of the sofa (968/568 mm in the drawings) minus the double thickness of the upholstery fabric, it is kept within 1-3 mm. The thickness of the optimal flock and microfiber in the kitchen is approx. 1.5 mm taking into account folds, so in this version the seat length will be 965 mm for a large sofa and 565 mm for a small one. Minimum seat width 297 mm, including fabric upholstery and installation on piano hinges, see below. If the dimensions of the kitchen allow, the width of the seat can be increased, then an overhang will form in front. With the corner seat option discussed below, the maximum width of the sofa seats is 444 mm; then the seat bevel of the corner section is reduced. In this case, the width of the bed can be up to 900 mm.
Cutting and Sawing
Sawing chipboard/laminated chipboard sheets into parts is done using a jigsaw along the contour. The contour is drawn according to the template, so the jigsaw file must be guided along the inner edge of its line. The upper and lower edges of parts 2 (chest front) and 8 (back base) in Fig. with the drawings you need to cut it obliquely, for which you need a jigsaw with a tilting shoe or you will need to buy a shoe for the existing one. The angle of inclination of the front of the chest is 10 degrees, and the back is 5 degrees. Some shoe scales are graduated in units of relative inclination; for an angle of 5 degrees it is 0.085, and for 10 degrees it is 0.177. Not 0.175, as it might seem, since the relative slope is nothing more than the tangent resp. corner.
The jigsaw file for trimming is beveled inward from the edge to be trimmed. For children 2 (facade) the upper edge is cut from the face so that the upper outer corner remains intact, and the lower edge, on the contrary, from the underside (wrong side), so as not to cut off the inner bottom corner. The edges of the backrest, because it is tilted back to the facade, cut in the reverse order: the top one from the back, and the bottom one from the front.
Edging
The free edges of the kitchen corner parts need to be covered with something that matches the overall tone. Edging kitchen furniture PVC edging A T-shaped profile is undesirable, not because the groove for the edge needs to be selected with a milling machine, but because dirt will accumulate in the edge gaps. By the way, for the same reason, it is advisable to make a kitchen table under a ready-made postforming tabletop: it does not require edging at all and is equipped with a drip tray.
The visible and touchable edges of kitchen furniture are covered with a tape made of complex ABS plastic (ABS, acrylonitrite butadiene styrene) up to 2 mm thick, and the back ones and those above the floor are covered with crepe paper tape. ABS is absolutely safe, hygienic and environmentally friendly; it is also used to make medical equipment. ABS and paper edges are produced dry and self-adhesive. The first ones are intended for industrial use with a separate supply of glue, so you need to get self-adhesive ones. Edging a kitchen corner with self-adhesive edges is done as follows:
- The edge strip is cut from the roll to the required length plus 2-3 cm. It is convenient to measure the lengths of curved edges with a tailor's meter.
- Peel off 2-4 cm of protective film from the end of the segment without touching the adhesive layer with your fingers.
- Place the end of the tape on the edge exactly lengthwise and press.
- Holding the tape with your hand, pull it out from under it with the other hand. protective film for the initial “tail”. The tape should lie on the edge itself.
- When the tape is all on the edge, it is rolled with a rubber roller.
In general, the procedure is the same as for high-quality self-adhesive gluing. By the way, this is a good finishing option if you decide to make the entire kitchen corner from inexpensive sanded chipboard: there are few visible parts in it, and the textured self-adhesive underneath acrylic varnish from natural wood Not even an experienced carpenter can tell the difference right away. Self-adhesive gluing is done after sawing and trimming the edges before edging. In this case, the inside of the chest can simply be varnished.
Marking and drilling
The accuracy of marking parts of box-panel structures made of chipboard/laminated chipboard is required to be no worse than +/-0.5 mm, but how can it be maintained on edges and sanded chipboard if the size of the material fibers is of the same order? There are no problems with this at the factory; there are no markings as such - they cut and drill using automatic machines. In handicraft production, they use templates, but in order to check each one, you have to ruin up to 2-3 blanks. For piece production at home, this is unacceptable, if only because you need a lot of templates and so much time is required to make them that it is easier to buy a ready-made corner. Moreover, the quality of the product from parts marked according to templates turns out to be in best case scenario for 3+.

Firstly, the marking of holes on the parts of the kitchen corner made of chipboard/laminated chipboard should be done so-called. a marking caliper with sharp jaws for measuring external dimensions and a vernier for precise installation of the carriage (on the left in the figure). Experienced mechanics sometimes make a marking caliper from a regular one, sharply and very carefully sharpening the tightly knit outer jaws on fine sandpaper, but manually align the tool carriage exactly according to Vernier is difficult.
Note: electronic booms, incl. The marking ones (on the right in the figure) are actually not so convenient to use, and the marking accuracy is worse. Here electronics have not yet caught up with good old mechanics.
Next, marking the holes on all parts is done from the bottom. When marking asymmetrical sidewalls, keep this in mind so that it does not turn out to be a mirror image. The right and left sidewalls are, of course, mirror marked.
Then, between the centers of the outer holes for fastening the mating part, axial lines are drawn into the edge with confirmations and beaten from them to the sides along half the width of the attached board. The extension of the attached part is marked along the center line and is also marked to form the contour of its edge. On the bottom of each board, you need to mark the contours of all attached edges in this way, this is necessary for accurate assembly. The accuracy of beating edges is required +/-0.5 mm, which in this case is ensured by a fitter's angle with millimeter divisions and a steel fitter's ruler.
Sverlovka
Drilling of blind holes for dowels is carried out immediately along the required diameter to the required depth, as described above. But for now we drill holes for confirmations only through the faces of the boards and only with the spiral part of the drill, i.e. not to full diameter. We will drill it completely later, in the order of assembly, so the entire kitchen corner will turn out without distortions and cracks.
Upholstery and upholstery
Before assembly, the sofas need to have their backrests and seats completely covered, and the corner seat parts also require backrest segments separately. We will talk about covering and assembling the corner of the kitchen corner later, but for now we will limit ourselves to sofas.
Holofiber, which is excellent for interior furniture, does not fit well in the kitchen; in the local microclimate it is not particularly hygienic. The soft padding of kitchen furniture is made from low-permeability foam rubber of the EL2240, EL2540, EL2842, EL3050, EL3245, EL3550 and EL4050 brands. The first 2 digits characterize the hardness, and the last 2 indicate the density in kg/cubic meter. m. Load bearing capacity within this range it grows from 60 to 120 kg per square meter. m, this means that this material is able to withstand such weight indefinitely, completely straightening when the load is removed. Foam rubber EL2842 is universal; lower brands go to the backrest, EL3050 and EL3245 to the seat, and EL3550 and EL4050 are intended for furniture in public buildings or for particularly heavy riders.
The thickness of the foam layer is 20-40 mm. It is recommended to cut this evenly with a heated nichrome thread. It’s also not difficult to make a machine for cutting polystyrene and foam rubber with your own hands, but it’s still extra work. In addition, for the machine to be safe, the thread must be powered from a 12V 5A power source, and this is more serious work or a significant waste of money. However, cutting pieces of foam rubber with fairly even edges can be simpler:
- A steel bench ruler is taped along the cutting line;
- The cut is carried out with a new, absolutely sharp mounting knife in several steps along a ruler;
- For the first cut, the blade is extended 5-7 mm, and the knife clip rests on the ruler. Take a closer look at your knife - the end of its clip is at an angle, this is just for such cases;
- For subsequent cuts, the blade is advanced further by the same amount until the entire layer is cut.

The seats of the kitchen corner are covered with foam rubber with a fold along the front edge. For the hem you need to give an allowance of 2-3 times the thickness of the board. Sheets of foam rubber for the backs are cut exactly to the size of the base. The foam rubber is glued with 88-grade glue, the folds are glued last. If the seat has a offset, then before gluing it is better to round its front edge, and give the foam allowance equal to 4-5 times the thickness of the board, see fig. on right. It will be much more comfortable to sit on such a seat.
tight fitting
Conventional upholstery fabrics are rarely used in high-quality kitchen furniture, because... quickly become saturated with fumes and get dirty. Leatherette is more hygienic, but sitting on it in the heat is unpleasant, and installing air conditioning in the kitchen is not advisable for many reasons. It is best to cover the kitchen corner with flock or microfiber.
Flock is available in plain and colored, smooth and embossed, on the left and in the center in Fig. Dirt becomes entangled in its fibers without migrating back, and is removed during mandatory regular cleaning at least once every 2-3 months. Flock upholstery of kitchen furniture lasts up to 10 years or more.

Microfiber works on the same principle, but its fibers are regular plexuses of the finest fibers. Microfiber seems to draw dirt into itself and hold it firmly; This material was originally developed for cleaning optical glasses. Microfiber is available only in single-color, modest colors (on the right in the figure); does not require maintenance at all times of operation. Unfortunately, this material is expensive and lasts no more than 3-5 years, and then you need to completely change the upholstery: microfiber cannot be cleaned, because... in this case, its structure is disrupted.
Fasten the flock and microfiber upholstery as usual, using a furniture stapler to the underside of the base. The folds at the corners are glued with 88-grade glue: the fold is turned away, glue is dripped onto the fabric adjacent to the base, left until tack-free, and the folded fold is pressed. There is no need to glue PVA, it can cause stains visible from the outside.
Assembly

Before final assembly, thrust bearings are placed on the legs of the sidewalls. Any board as wide as thick will do, but it’s still better to use round ones with threaded or dowel heads instead of those recommended by the authors of the original design: there will be fewer nooks and crannies for dirt to accumulate. Dowel bearings are cheaper than threaded ones, and they are easier to install: holes are drilled in the edge of the leg for dowels (6 mm in this case), and the bearings are simply pushed into place.
How to assemble homemade box-panel furniture without distortions, cracks and without using complex production equipment, this is, as they say, another question. In this case, you cannot do without a pair of corner furniture clamps, see fig. on right. Welding corner clamps with a common clamp are not suitable, they cannot accurately bring together the parts to be connected, but with the help of furniture clamps this is not so difficult:
- They put dowels in the children. 4 in the drawing, lightly tapping with a rubber hammer or mallet;
- One of the sidewalls (part 1 in the drawing) and the back wall of the chest (part 4) are tightened with clamps so that the edge of the part. 4 entered the contour marked for her on the underside of the child. 1;
- Drill holes for confirmations and screw them in;
- Without removing the clamps, they place the children on the dowels. 3 – bottom of the chest;
- The upper clamp is removed and moved to the far corner of parts 3 and 4;
- Connect parts 3 and 4 (with additional drilling of holes for confirmations). The clamp from their corner is immediately removed, otherwise it will remain in the sofa;
- Remove the remaining clamp (don’t forget!), put the child. 5 (lower backrest brace) and attach to det. 4;
- They put children. 2 – façade of the stall;
- Attach the second side panel without screwing the confirms all the way. You just need to bait so that the dowel heads fit slightly into the holes;
- Assemble the backrest (inset at the bottom right in the figure with drawings) and put it in place, then pushing the sides of the backrest apart. The confirmations on the 2nd side are holding up;
- The seat is hung on piano hinges, see below.
Here a possible question may arise: why use clamps if there are already dowels? The dowels are not guides, they do not hold the angle and can break during hanging. Taking into account the fact that marking and sawing were done by hand, it was impossible to do without clamps. Conscientious professional furniture assemblers use clamps with all their might, but why do we need to hack around for ourselves?
Seats
In our case, it will not be possible to place the seats on dowels with rounded heads, because The façade of the stall is slanted. If you limit yourself to dowels on the edge of its rear wall, they will quickly break out even if you carefully remove the seat cover. The seats of the sofas in the kitchen corner are hung on piano hinges, but it’s not worth taking 1-2 long ones (item 1 in the figure): it’s difficult to hang the lid of the chest on these so that it lies in place evenly and does not warp when folded back, without special equipment. You need to take 3-4 short loops for fastening in a row, pos. 2. Loops for fastening with a zigzag (item 3) are not suitable - how to attach them to a 16 mm board? The same applies to card loops, pos. 4, strongly recommended by a number of authors.

The wings of the seat hinges should be as wide as the thickness of the board. First, the hinges are placed on the seat, aligning the edges of the wings along the bottom edge of the board along with the upholstery. Then an assistant is needed: he will hold the seat, and the master will align the edge of the wing of one of the outer hinges with the lower edge of the board of the lower backrest screed (detail 5 in the drawings) and attach a pair of screws, not reaching them all the way. Then the other outermost loop is attached in the same way, and after that the rest are fastened to full tension and the outermost ones are pulled out. The assistant keeps the seat reclined all this time.
Corner
The corner module of the original design is quite complicated (item 1 in the figure), not entirely convenient and not very hygienic: along the gap between the back and the seat, dust and crumbs will fall just where it is difficult to remove them. Since in our case the entire corner is made at the place of constant use, it would be more expedient to build a hanging corner for it, tightly fastened to the sofas. Drawings of its 5 parts - seat, support bar and 3 back segments - are given in Fig. The bevel of the corner seat with sofa seats 400 mm wide is 210 mm, and this is considered a half-window window that fits in a small-sized kitchen. The bevel can be straight, convex or concave. The most convenient thing is a slightly convex bevel, but then it will not be possible to attach a bench to arrange a sleeping place. The backrest has an upward camber, which further improves ergonomics.

The dimensions of the back segments must be verified according to the location. reasons. First, small parts are greatly affected by the thickness of the skin. Since the sofas were covered earlier, this value will be known by the time the corner section is manufactured. Secondly, all the dimensional errors accumulated in the sofas will converge into one in the corner.
And yet, the seat and backrest segments need to be trimmed freely, without tension, so that the backrest does not overtighten the fabric when assembling. The lower edges of the segments need to be beveled inward by 2 mm (at an angle of 10 degrees, this is with a margin). The tops of the segments can be figured (options in positions 4 and 5 in Fig.), as long as the contours converge at the connecting points.
Note: rear support posts can not be installed if there are no suitable scraps and the riders weigh less than 100 kg. If they are installed, then they are attached in pairs of confirmations through the face into the edge. The heel of the lower support is sealed with a piece of ABS and just stands on the floor.
Corners in a corner
This corner also has 2 secrets. The first is a nook under the seat. From the point of view of a domestic animal, this is a reliable reserve den at a safe distance from the main house. And from the point of view of the owners, it does not cause them unnecessary trouble.
Second. The middle segment of the backrest does not bear operational loads. If you place it on friction pins instead of self-tapping screws, a hiding place will form in the cavity behind it. You will just need to sew an outward-facing tongue-strap made of durable fabric to the upholstery of the lower edge, and sew up the corner section from the rear with fiberboard. When closing the cache, the tongue is tucked inward so that it is not visible. To open the cache, the tongue needs to be pryed and pulled out with a fork or something like that. Remove the segment by pulling the tongue and the top of the back. This cache is unlikely to hide anything from an experienced burglar or a professional search, but it is quite reliable from an amateur thief or overly curious household members.
The old fashioned way
A kitchen corner made of wood looks chic in any setting, whether it is made from solid wood or boards from unusable construction pallets - pallets, see fig. And making a wooden kitchen corner with your own hands may not be more difficult or more expensive than the one described above.

To start carpentry on wood, and not on viscous and fragile chipboard, it is not necessary to immediately buy an expensive triad of a jointing machine - a manual milling machine - a sander. You can get by with traditional hand (and non-volatile!) hand tools. Processing small parts in piece production with it often turns out to be easier and faster than readjusting the machine for the next operation.
To begin with, in addition to a jigsaw (we are not pedants, this tool is not very expensive, is often needed and is better than a bow saw in all respects), you will need a regular carpenter's plane, a hand jointer and a set of wood rasps. At first, one so-called will be enough. cabinet rasp, flat-convex with a tapered end, on the right in the figure:

You will also need selected (emphasis on the “s”) straight and beveled chisel planes (on the left in the figure). Using a straight chisel, remove the folds and select grooves along the fibers, and with an oblique blade across and plan the ends.
For primary processing of knotty wood, you need a sherhebel plane in the center. The sherhebel is used with a slight sliding to the side, as if cutting off and trimming knots. You can turn an ordinary plane into a sherhebel by placing a “piece of iron” knife with a rounded blade in it.
Having gained a little skill, it will be possible to replenish the tool park with another 3-4 types of selected planes with replaceable pieces of iron for them, see next. rice. Take a closer look at antique furniture: it was made with just such a tool, and not with modern machines with shaped cutters.

The last point is the assembly (pulling together) of furniture panels from boards, they are also an array of furniture. In theory, this requires special devices - clamps - 3 per tabletop, 4 per cabinet sides and 2 per smaller panels. Here, firstly, one clamp can be replaced with a pair of jaws with clips for mounting on a rod, and a piece of timber of suitable thickness for the clips will go onto the rod, see figure; usually 60 mm. Sets of jaws for clamps and long clamps are sold separately.
Finally, wide panels are not needed for the kitchen corner; Most often, a shield for 3-4 boards is required. In this case, a shield from boards can be assembled without any special equipment at all, see video:
(1 ratings, average: 5,00 out of 5)