Self-installation electrical panel in the apartment - good decision. At least limit the need to develop your own apartment power supply scheme to the lack of free space there will be no need for it in the driveway shield. And it definitely won’t be enough, since most houses were built according to outdated projects, and no one imagined that in the future we would have such a variety of household appliances.
Moreover, individual (powerful) devices require their own connection lines and various protective devices in the form of individual AVs, RCDs or differential circuit breakers. It all comes down to assembling the electrical panel. And not just complete it, but install it correctly. How to do this is the topic of the article.
What to consider when installing the shield
There are still shields of the old modification on sale, in which “sockets” are mounted for installing so-called “plugs” (disposable or automatic fuses). There is no fundamental difference, but since the dimensions of modern boxes are somewhat smaller and the safety class is higher, the choice, especially for an apartment, is obvious.
There are two types of shields - built-in and wall-mounted. The first ones are recommended for hidden wiring, therefore, they are suitable for apartment schemes. The question just arises - how to create a niche for such a box if there is none? No one will chisel masonry or reinforced concrete products - that’s understandable. Therefore, you should purchase a hinged shield. And how to connect the wires to it is not difficult to guess. Available for sale Various types connecting products (boxes, blocks, adapters), so this problem is solvable.
Buying an electrical panel based on today’s requirements is not entirely rational. Any scheme undergoes changes, and there is no guarantee that the apartment will not soon be replenished with a new acquisition in the form of some type of equipment, for which it will be necessary to install another personal line with the installation of additional and AV.
Or old model will be replaced by a more advanced one with increased power. It is not a fact that the previous protective devices on this line will correspond in their characteristics to the changed parameters of the circuit. Consequently, these products will also have to be changed, and the dimensions of the new ones may turn out to be larger. Will it be possible to place them in an existing apartment electrical panel, taking into account its already dense layout?
But the recommendations found on the Internet to install several spare machines and RCDs in advance are, for the future, very doubtful. Which products exactly? At what current? Is it worth spending money if it is still unknown whether their characteristics are suitable for connecting a new line.
The installation location of the box is chosen so that you can freely approach it, without any delays. It is rare, but it also happens that the circuit breaker simply does not work, and it has to be turned off manually. By the way, if for assembly electrical panel the owner, in order to save money, focuses on cheap machines, and even those of dubious origin, you need to be prepared for this a priori. Or vice versa - the AV has worked, and after eliminating the defect on the line, it needs to be turned on again.
Rules for assembling an apartment electrical panel
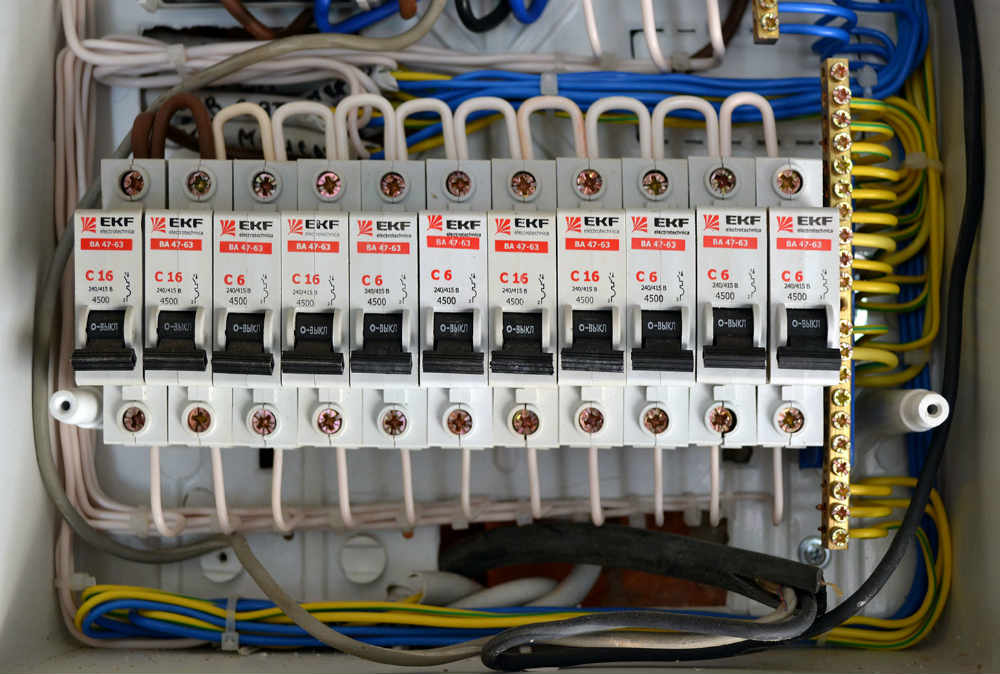
The input (central) machine is always placed at the top left. If the panel also provides for the placement of an electric meter, then to the right of it (an example is shown in the photo). It should be understood that only a place is marked for the meter, and it is installed only after the panel has been assembled and all connections have been made. That is, immediately before. Otherwise, there is a risk of breaking the factory seal. No one will register the device in this form, even if it does not have any damage. This means you will have to buy a new one.

The connection lines for sockets and lighting must be “untied”. Each has its own machine gun. If the apartment has powerful household installations, then for one sample - your own personal AV, connected separately, directly from the central output. A properly designed indoor electrical circuit takes this into account.
In addition to the DIN rails, the electrical panel must have a grounding block. Boxes are sold in various configurations, often in the form of an empty box, which is assembled from scratch. Tire "ground" from mounting strips It is easy to distinguish visually - by color (yellowish tint of the metal), shape (narrow, elongated) and the presence of sockets (for connecting wires) and clamping screws. If it is not known according to what scheme the power supply is organized apartment building, then when assembling the electrical panel, you should install 2 blocks - for “ground” and “zero”.
Correct assembly of the box also includes the application of explanatory notes. In the absence of " home handyman“Any member of the household should be able to easily figure out where each machine is installed. And your own memory can sometimes fail you. Simple marking with alphabetic or numeric symbols is the most common option, given that there is little free space in the electrical panel, and applying full inscriptions is by definition impossible. Therefore, it is enough just to make a table symbols and stick it on the inside of the box door. The author did just that. It’s convenient and understandable to all family members.
To save money usable space and reducing the dimensions of the box, in some cases it is advisable to replace the pair AB - RCD with 1 differential circuit breaker. About such protective devices.
All protective devices are mounted on DIN rails so that the “input” terminals are located at the top. Accordingly, below is the “exit”.
Several of the most common diagram options will help you figure out the correct assembly of an apartment electrical panel.

Correctly assembling an electrical apartment panel is possible only if a competent electrical wiring diagram has been developed, taking into account comprehensive protection chains. The installation work is easy to do yourself. Here the skills of a professional do not play a big role.
The main thing is attentiveness and accuracy. But it is better to entrust the drawing up of the diagram to a specialist, since you will need not only a drawing, but also an accurate calculation of all its parameters. If you have no understanding of electrical engineering, then you should not take on this work yourself. And even more so, do not copy the layout and connection of panels installed in the apartments of friends, acquaintances, and the like. This won't end well.

Exist certain requirements to the place for installing the electrical panel in the apartment. Although this is not directly related to the topic of the article, it would be useful to remind you of them.
- Firstly, at a level of at least 150 cm from the floor covering.
- Secondly, the maximum curvature of the base on which the box is attached is 1.50.
- Thirdly, the shield should be located as far as possible from engineering communications(gas and water supply). Minimum – 1.8 m.
- To make it easier to understand the electrical wiring inside the panel in the future, you should adhere to generally accepted standards. Wires are used for various circuits a certain color. Strength (phase) - red, zero - blue (blue), earth - yellow-green.
On a note!
Connection power cable to the apartment's central circuit breaker is carried out after completing the assembly and checking the correct installation of the circuit.
see also video assembling a panel for an apartment:
The massive construction of the housing stock and the ongoing reconstruction of old buildings push apartment owners to the need to independently understand the implementation technologies electrical work in their premises. This allows you to create an individual electrical system, meeting the specific needs of the owner, rather than using standard diagram, designed for the average consumer.
How to choose the location of the electrical panel
In order to properly assemble an electrical panel in a newly built apartment, before starting work, it is necessary to draw up a plan in which to provide in detail for the implementation of your needs inside each room, think over the location of lamps and switches for them, and the number of sockets for portable and stationary electrical appliances.
At the same time with electrical wires often it is necessary to lay water supply, heating, telephone lines, antenna cables, computer network, alarm and other low-current circuits. Optimizing the routes of all these systems is precisely part of the project development.
The electrical panel is the place where the cable coming from the energy supply organization is connected to the electric meter for further distribution of electricity to the consumers of the apartment through switching machines.
The task of the project comes down to determining the most suitable place location of the incoming electrical panel. IN Lately it is customary to install it not on landing, as they did in the last century, but inside the apartment. This eliminates access of unauthorized persons to the equipment and creates certain convenience.
Usually the location of the shield is chosen in the corridor near front door at face level because it is so convenient for residents to turn off unnecessary consumers when leaving the apartment. And during installation, the length of the power cable is reduced.
Owners of a cottage and private house, when choosing the location of the panel, should take into account the safe organization of the input device into the building, the design of the branch from overhead power line or cable line, coordinate their arrangement with the energy supply organization.
How to choose an electrical panel design
There are two types of electrical wiring used in residential buildings:
external, laid on the surface of the walls;
internal, hidden in grooves and cavities.
Electrical panels are produced for them, which can simply be attached to outside wall or mount it inside it, making an appropriate recess.
The material of the shield box is intended for long term operation. It could be:
durable plastic.
External and internal decorative finishing, made in different shades of color, allows you to make quality choice to suit the design of any room.
Responsible devices are located inside the shield. Access to them by strangers and children should be limited by closing the door with a lock, the key to which must be kept in separate place. To monitor the meter readings, it is enough to have a window on the door.
Almost the majority of modern panels are produced for convenient and reliable placement of electrical devices on. Such designs should be used. They significantly save space and allow you to easily dismantle a faulty device.
To secure the machine, just place it with the rear groove on the rail, pull off the fastening latch with a screwdriver, slightly press on the body and release the latch. Removal is carried out in reverse order.

How to perform internal installation
The sore spot of the majority is not professional assembled circuits is a continuous tangle of mixed wires, which is difficult for even good specialists to understand. Internal installation needs to be thought through in advance.
To do this, it is advisable to run the input cable from the top or side on your side, and the outgoing cables from the opposite side. This technique also saves cable length.
When installing, it is advisable to adhere to the example given for the input cable. When this cannot be done, the ends of the wires are signed with a non-fading marker or black dichloroethane ink.
The tires for the working and protective zero are located on the side, providing easy access to them. The use of special designs of terminal blocks for busbars in the housing facilitates installation and makes it more understandable.
When a differential circuit breaker is used instead of an RCD with a circuit breaker, the working zero after it is output directly to the load cable, and not to the busbar. Otherwise, the operating algorithm of the automatic machine will be changed, and the circuit will not work correctly.
The design of circuit breakers requires their installation in a vertical position with input contacts on top. When placed differently, they work, but their resource is reduced. Only famous brands companies such as Siemens or Legrand allow you to arbitrarily target expensive models of their products.
The connection of incoming wires to the machines is carried out on the upper contacts, and the outgoing circuits - on the lower ones. This is customary according to electrician etiquette: it makes it easier to find faults that arise within the circuit.
In addition, the designs of most automatic machines have fixed contacts located on top. Arc extinguishing devices and a movable contact part are located near them. The passage of current from bottom to top can cause loss of electricity.
In any case, the main principle of installation should be complete uniformity in the methods of connecting conductors on all elements inside the panel body.
Only two wires can be connected to one terminal. Larger amounts may weaken the electrical contact over time and are therefore prohibited by regulations.
To connect machines to each other, many electricians make jumpers. Aesthetic appearance and reliable connection provide electric combs, which are produced by manufacturers circuit breakers. They speed up installation and save space for wires.

All work inside the shield is carried out according to the approved scheme electrical connections, a copy of which should always be on hand. It is often convenient to stick it on the door with inside. In this case, all installation connections of the diagram are transferred with markings to the operating equipment.
Each element of a working circuit must be labeled so that its purpose is clear even at a quick glance. To do this, you can type text on a computer and print small explanatory notes on a printer.
When there is no space for such labels, then a bright digital designation is applied to all equipment, and an explanatory table with detailed transcript necessary information. It is convenient to store such a sheet near the electrical panel.
Detailed documentation, clear markings and clear installation increase the reliability of operation of electrical equipment, give the electrical panel an aesthetic appearance, and ensure quick fix emerging malfunctions.
After graduation installation work All installed equipment must be inspected and areas pressed electrical connections and fastening of elements, correct installation is carried out and fully assembled chains are measured. Only after this is it possible to test switch it on under load and test it in operation.
During operation, it is necessary to perform periodic preventive inspections and condition checks. threaded connections in the terminals. This will be a guarantee reliable operation During a long time.
Shield diagram — First stage assembly of the electrical panel, without it you simply cannot assemble anything. The shield circuit can be single-phase or three-phase, complex and simple. When I order I have the assembly electrical panel additionally for electrical diagram I don't take money.
If you need this work, in addition to assembling electrical panels, I also do to order. An example circuit is shown below.
Essentially this is wiring diagram, which makes it easy to assemble the shield yourself.
Moreover, if you order the shield diagram separately from professional designers, then the price tag starts from 4,000 rubles for a 1-room apartment and upwards. At the same time, as the practice of communication on forums and what customers send me shows, the switchboard diagram made by such designers or taken from power supply projects for private houses or apartments, almost always wrong.
The most common mistakes in such schemes (projects):
- Discontinued equipment(i.e. it is no longer in any catalog, and they continue, without thinking, to copy their old projects). Sometimes you can see devices in the circuit that stopped being produced 5 years ago.
- Widespread use of differential machine guns. After all, it’s much simpler; I copied circuit elements from old power supply projects and pasted them into new scheme, well, the fact that a good (not Chinese) automatic differential costs from 3000 rubles for 1 piece, they don’t know this, so they get shields for the differential. vending machines small apartments under 40-50 thousand rubles. I always remake such shield schemes.
- Lighting without differential protection(without RCD and differential circuit breakers). Of course, there are no PUE requirements regarding the protection of lighting lines, but there is common sense, because lighting cables are the same cables as those for sockets, and they can also “burn out.” Again, when replacing an ordinary light bulb (does everyone turn off the circuit breaker for this line in the panel or at least the switch on the wall?) it can give a good shake, or even with worse consequences for life. Moreover, almost always “installation” of the differential. line protection does not incur any additional costs.
In my article “Shield Diagram” I will try to describe how to correctly compose it yourself. I myself don’t make diagrams in addition to the boards, after all, this is a lot of additional work, but I draw up for the customer, in addition to the list of lines and the board plan, a block diagram in which the board diagram is graphically built.

Introductory machine. Shield diagram
Any switchboard circuit begins with an input circuit breaker or switch that completely turns off the shield. Its installation is not even discussed; it must be chained in any case. The rating of the input machine depends on the allocated power.

In apartments the ratings of the machines are included in the power supply projects for houses and they can only be changed with permission management company or HOA, under no circumstances should you do this yourself. For apartments with electric stoves with a cross-section of the input copper cable of 10 sq. mm. the nominal value of the input machine should be no more than 50A (11.5 kW). For apartments with gas electric stoves with an input cable cross-section of 4 sq. mm. should be no more 25A (about 6 kW), with a cable cross-section of 6 sq. mm. - no more 32A (about 7.5 kW). It is worth noting that these ratings and capacities are quite sufficient. Therefore, in order to determine the rating of the input machine, you need to know the cable cross-section. In older housing stock, often only one 2.5 sq. mm cable goes into an apartment (almost always aluminum), so the situation there is completely different.
In private houses (cottages, dachas) it all depends on how much power has been allocated to you by the network organization, Chairman of SNT, DNT, etc. If this is a network organization, then in our country, according to Decree of the Government of the Russian Federation of December 27, 2004 N 861 “On approval of the Rules of non-discriminatory access...”, three phases of 15 kW are standardly connected for 550 rubles. regardless of the region, be it Yakutia or Moscow. If you want more power than 15 kW, then you need to pay extra and the prices vary by region, in Moscow and the region it can reach up to 100,000 rubles. for + 1 kW.
SNT has its own rules, somewhere they turn a blind eye to power, according to the principle “take as much as you can carry,” but somewhere they count every kW. In general, if you have a house in SNT, then you have a direct path to your chairman, who will explain everything to you. The cross-section of the input cable or wire is usually laid at least 10 sq. mm. for copper or 16 sq. mm. for aluminum, i.e. The rating of the machine can be selected up to 50A, if, of course, they are allowed to install one.
The question often arises, Is an introductory circuit breaker (switch) needed in the panel board at home?, if there is already one in the metering panel (with). The answer is clear of course you need it, you will not constantly run to the power line support (pole), where the metering panel is installed, in order to turn the switchboard on and off in the house. The exception applies to apartments; if you have an input circuit breaker in the floor panel, which is a few meters from your apartment, then the input circuit breaker (switch) does not need to be installed inside the apartment.
Another question that concerns more private houses, if the machine is already in the metering panel, then You can install a switch in your house, not a machine. But it definitely won’t be worse if there is a second machine in the chain.
The installation of a switch is often motivated by the fact that it is preferable to turn off the load using the switch that is intended for this purpose. But machine- it's the same switching device, which is designed for turning off and on, its difference from a switch is only that it also has protection. A house or apartment is not a production facility and the currents are small, good European machines have a lifespan of tens of thousands of off-on cycles, so what problems could there be?
In addition, good switches are almost always more expensive than automatic machines, but take up the same amount of space. Another installation of a second machine explained by selectivity, i.e. they say, if you put the machine in the house one step lower than the machine in the metering panel, for example, 25A in the house, and 32A on the pole, then in the house 25A will turn off first and you won’t have to run to the pole to turn the electricity back on. This is only partly true, only when the machine turned off due to overload (when many devices were turned on at the same time), if there is short circuit Short circuit, then in 90% of cases both machines will turn off simultaneously.
Conclusion: The rating of the input circuit breaker is selected according to the cross-section of the input cable, provided that the power is not limited. If the power is limited, then we select the rating of the input circuit breaker based on the limitation, and do not forget about the cross-section of the input cable.
Selective RCD. Shield diagram
Next in the shield diagram after the introductory machine, can stand . Why did I write “may”, because according to the correct rules, the selective RCD should be located in the metering panel, i.e. at the beginning of the line. But it often happens that it is not possible to install it in the metering panel, because... either there is not enough space in the shield on the pole, or the shield is sealed, or the customer simply does not want to install an expensive device outside the house.

Selective RCD more often they place to private homes, in apartments there is no particular need for this. If you decide to install a selective RCD, then it is better to choose its nominal value is 63A, even despite the rating of the input circuit breaker, for example, only 25A. I have not seen incoming circuit breakers for private housing above 63A, and the RCD at 63A will not have to be changed when the power increases, i.e. if you decide to replace the 25A input circuit breaker with a 50A one, you will not have to change the selective RCD, because 50A<63А. Также по цене, селективное УЗО достаточно дорогое, например, АББ-шное стоит около 6000 руб., но разница между УЗО 40А и 63А не очень существенна, менее 1000 руб., а вот если поставите УЗО на 40А, а потом решите увеличить мощность, то УЗО 40А придется выкинуть и поставить на 63А.
The selective fire RCD setting for a house or apartment can be selected as 100 or 300 mA.
Conclusion: Selective RCD must be installed, backup protection has never been superfluous, especially if the shield is assembled on Chinese devices and especially if you have a fire-hazardous wooden (timber, log or frame house). In addition, in private houses, when a selective fire protection RCD is installed in the metering panel, it alone protects the input cable from current leaks.
Protection against power surges. Shield diagram
The next element in order on the shield diagram is . There is also a lot of debate surrounding the appropriateness surge protection, to put it or not to put it. My opinion is, of course, to bet. Judge for yourself, the average price of one voltage relay is about 3,500 rubles. with installation, how much do your household appliances (TVs, computers, refrigerators, freezers, etc.) cost? On the market of devices, there are already such reliable and time-tested, as well as by specialists from forums, such as UZM-51M from Meander, Zubr/Rbuz, RN-106 from Novatek.
Their principle is simple - when the voltage goes beyond certain limits, the voltage relay turns off the load, as a result of which your household appliances will not burn out due to increased or decreased voltage. You’ve probably heard more than once how houses “burn out zero” and whole house-entries drag household appliances to workshops and services for repairs. In the private sector, such a problem also exists, but here it is necessary to approach it comprehensively, for example, if the overhead line in the village is old and long, then low voltage at the end of this line is inevitable, and installing a voltage relay in the distribution board in the house will not solve the problem . It’s just that the relay will constantly turn off at the lower limit, in such cases it is already necessary to install voltage stabilizers.

I often see diagrams of three-phase switchboards sent, or questions on forums: “Is it possible to install a three-phase voltage relay in a house?” My answer is, of course, no. Judge for yourself whether the voltage will decrease or increase beyond the permissible limits on one phase, and a three-phase relay will completely cut off the entire shield. Such three-phase voltage relays are installed on three-phase motors/pumps/compressors, where voltage loss on one phase is unacceptable.
Usually in private houses and apartments there are three-phase loads - electric boilers for heating and water heating and electric hobs (electric stoves). You can install a three-phase voltage relay on them, but I don’t see the need for this; previously installed single-phase voltage relays for individual phases will be suitable to protect the electric boiler and cooker. After all, what is an electric boiler or cooker in terms of its structure? These are single-phase heating elements or “pancakes”, which are each connected to one phase, i.e. one phase will turn off due to power surges, and only one heating element in the boiler will turn off. The exception is control units; if the phase that powers them is turned off, everything will turn off.
Of course, if there is a financial opportunity, then perhaps it would be more correct to install electromechanical magnetic undervoltage and overvoltage releases, which are in the product line of every serious manufacturer. In this case, 6 devices must be installed in a three-phase switchboard: three maximum releases (overvoltage) and three minimum releases (undervoltage). But they have a significant drawback: they will turn it off, but they do not turn back on by themselves, only manually. Therefore, if you are not at home, then you risk ruining your refrigerator-freezer with rotten food or defrosting your house in winter.
Conclusion: Surge protection is essential, and it’s better not to save on this (it will end up being more expensive)!
SPD. Shield diagram.
Continuing the topic of surge protection, briefly about SPDs ( Surge protection devices). Pulse overvoltages can be caused by lightning hitting an overhead line or electrical equipment of a substation, as well as during operational switching at substations, in which case a short-term “fly” to your house high voltage pulse(small lightning) and everything that is plugged into the sockets can burn out. To protect against such voltage surges install SPDs.

Conclusion: SPDs / surge arresters are needed, but it is correct to place them at the very beginning of the diagram, i.e. right after the electricity meter. Not every SPD can be installed in a panel inside a house or apartment.
Voltmeters/Ammeters. Shield diagram
Often additional devices are included in the switchboard circuit: ammeters and voltmeters, both separately and in one device. Voltmeters are needed to monitor the voltage in your network, ammeters to monitor the load, this is especially true when there is a power shortage, which will help to correctly distribute the load across phases(i.e., for example, transfer the washing machine to another phase) and understand the reason why the overload occurs.

If you have voltage relays in the distribution board, then they already have a voltmeter. UZM-51M does not display voltage, so usually voltammeters (voltage and current) are installed immediately.

Conclusion: At the discretion of the customer, usually relevant in private homes when there is a shortage of power.
Generator. Backup power supply.
This concerns private houses, we have never seen gasoline or diesel generators in apartments. Many people start building houses when there is no electricity on the plots yet, for which they buy portable generators; when construction ends, then generators can be used as backup power sources for home. To do this, a reversing switch (switch) is added to the switchboard circuit, which has three positions: 1 - power supply from the 220/380 V network, 2 - everything is turned off, 3 - power supply from the generator. Those. Physically, the main power supply and the backup power supply cannot intersect; this is a very important point, i.e. when the voltage goes out, at that time you can use your generator (if the connection is incorrect) to supply voltage to the general network, where at that time the electricians are making repairs.
I usually use or ABB reversing switches at 40 and 63A or manual entry into reserve from Legrand. According to the diagram, you can connect the entire load in the house from the generator, or you can select separate generator lines. It is not necessary to buy a three-phase generator for a three-phase network; you can also connect a single-phase generator in the switchboard so that two or three phases are powered from it.


Conclusion: If there is a generator in the switchboard circuit, it is necessary to install a three-position switch (reversing switch). In this case, it is necessary to switch the neutral conductor!
Non-disconnectable lines. Shield diagram
This is what I call the lines on the shield diagram, which, when disconnected by a general switch (switch, contactor), remain energized. Those. a special group is allocated, usually this is a refrigerator, freezer, light in the corridor (so as not to enter or leave a house or apartment in the dark), heating boilers so as not to defrost the house in winter, alarm system, video surveillance, pumps and some others in your opinion consumers. It turns out that there is a general input circuit breaker on the panel diagram that turns off everything, and there is a non-switchable circuit breaker/switch that turns off EVERYTHING except the refrigerator, alarm, etc.
What does this give? In such cases, you are guaranteed to know that the lights are turned off everywhere, that you did not forget to turn off the iron from the outlet, etc. Everything is individual and everyone has their own wishes in the scheme. For more information about non-disconnectable lines, read.
Group lines. Shield diagram
Further along the diagram there are ordinary lines for which and are needed. This is the end point of the switchboard circuit; cables will already be connected directly to the machines. There are usually no difficulties here; everyone has long known that on the line where there is sockets install machine guns no more 16A, and on the line lighting — 6 or 10A.
Single-phase shield diagram It turns out simpler than three-phase, in this case there is no need to distribute the load evenly. Three-phase shield circuit - more complicated, there are some nuances. For example, I try to distribute the light and sockets of one room into different phases, so that if the light goes out, there would be voltage in the socket and vice versa.
For powerful household consumers, separate lines are needed: washing machine, dishwasher, air conditioners, oven, sauna stoves, dryers, storage and instantaneous water heaters, etc.
For individual buildings, such as bathhouses, garages, sheds, workshops, they also lay separate lines, for which a separate machine is needed in the switchboard diagram. The rating of the machine is selected in this case according to the cross-section of the cable or wire that you have laid. It is impossible to overestimate the rating of the machine relative to the cable cross-section, but, of course, it is possible to underestimate it. For example, you supplied a cable with a cross-section of 4x6 sq. mm to the workshop with a reserve, in this case you can install a 32A circuit breaker, but at the same time you have an input circuit breaker of only 25A, so a 20A circuit breaker for the workshop will somehow be more logical.
On average, one group RCD produces 4-6 lines. A 30mA RCD is installed on ordinary lines; on “wet” consumers (washing machine, dishwasher, boilers, etc.) I install a more sensitive 10mA RCD in accordance with SP 31-110-2003. “Design and installation of electrical installations of residential and public buildings”
SP31-110-2003 p.A.4.15 For sanitary cabins, bathtubs and showers, it is recommended to install an RCD with a rated differential breaking current up to 10 mA, if a separate line is allocated for them, in other cases, for example, when using one line for a bathroom, kitchen and corridor, an RCD with a rated differential current of up to 30 mA should be used.
It is important to choose the correct RCD rating. Below, I hope, are fairly clear examples of selecting an RCD based on current:
Examples of how to choose the right RCD based on rated current:


Wherein remember, that if “on top” the RCD is already protected by a circuit breaker whose rating is less than the rating of the RCD, then after that the RCD can be connected to machines with the sum of ratings of at least 1000 A.
Often, some designers simply mathematically distribute machines into phases, etc., I don’t understand why this is necessary, because in everyday life it is difficult to achieve a clear distribution of the load among the phases.
A simple example, today you are ironing things in the kitchen, as a result, the phase from which the sockets are connected received a load of + 2 kW, and tomorrow you are ironing in the Living Room, which is from a different phase - as a result, 2 kW went from one phase, and appeared on the other.
Of course, this does not mean that now you need to connect the washing machine, dishwasher, and water heating boiler to one phase. Large consumers need to be distributed as evenly as possible across phases, but there is definitely no need to count the power of light bulbs, television sets, and computers.
Non-disconnectable lines, what are they and what are they for? Often, when designing electrical distribution panels, I, dear customers, or you yourself ask me what these lines are, why they are needed and whether they are needed at all.
Actually, the meaning of these lines is contained in the very name “non-switchable”, i.e. These are the lines that are not disconnected. Non-disconnectable lines are needed primarily for lazy and forgetful people, i.e. almost for all of us)). They are needed so as not to walk around the apartment or house and not check in each room whether we have turned off everything before leaving (iron, light, cooker, etc.).
Non-disconnectable lines- this is a special group of electrical receivers that remains turned on when you are away from home for a long time. To disconnect all other electrical receivers (disconnected lines), a separate switching device (, or) is installed. This is what it looks like in the diagram, in this case we control a contactor that turns off all lines except those connected to RCD No. 6.

You can completely turn off the shield using the input switch (switch), which is the very first switch in any switchboard circuit.
By the way, the contactor can be controlled either by a regular key switch, as in the diagram, or by a card switch (often found in hotels). I have a card switch at home, I did it that way on purpose, because... in my opinion, if you install a regular switch, then 100% one of the guests will definitely turn it on or off, which will turn off almost the entire apartment, but hardly anyone will touch the card, which is actually confirmed by a couple of years of personal use , so far no one has ever pulled out a card by mistake.


Which consumers are classified as non-switchable:
- Refrigerators - freezers so that food does not defrost or go to waste.
- Lighting a corridor or other room where the electrical panel itself is installed, so as not to turn the panel on and off in the dark.
- Gas and electric boilers, so that, above all, the house does not freeze in winter. You can also add convectors.
- Pumps that work together with boilers.
- Water leakage protection systems Hydrolock, Akvastorozh, etc.
- Alarm system so as not to leave the house unprotected.
- Video surveillance is the same as alarm system.
- Video intercom so that in your absence, you can know who came to you, because... The video intercom takes pictures and records video when you press the calling panel.
- Electric gate drives so you don't have to walk or lift them with your hands.
- Street lighting. For some customers, additional time relays (timers) were installed for lighting, which turned the light on and off in the dark and simulated the presence of the owners of the house.
- Server equipment.
- A socket on a DIN rail in a panel, especially important during repairs. I turned off everything except the non-switchable lines, and you can safely drill, tap, and chisel without fear of getting under voltage, but here, of course, you need to be without fanaticism, otherwise you will have to restore the damaged electrical wiring for a very long time.
Disadvantages of non-disconnectable lines.
In addition to, as it seemed, the obvious and main advantage - the guarantee that we have turned off everything unnecessary in an apartment or private house, non-disconnected lines, in my opinion, also have a number of disadvantages:
- Forget about the electronic clock on household appliances in standby mode; after switching off, they will always be reset.
- Warm floors, if they are not included in the NON-switchable group, will be turned off, and when turned on, they do not heat up very quickly, so you will have to walk on a cold floor for some time. The same applies to electric heated towel rails.
- Increases the cost of the electrical panel. On non-switched lines you need to install your own RCD, as well as an automatic switch-contactor, it turns out that the minimum is +5000 rubles. to the price of the shield.
- You cannot leave your computer in sleep mode; it will still be turned off.
- It will not be possible to use UPS on disconnected lines (which we turn off), because they will “squeak” and discharge.
I hope I succeeded in clearly explaining why lines that cannot be disconnected are highlighted. Well, whether you need them or not – the choice is yours.
Thank you for your attention.
Unswitched lines in the electrical panel- what they are, why they are needed and how to organize them in an apartment electrical panel.
Undisconnected lines- this is a conditional name. These lines (or groups), just like those that are disconnected, are protected by separate protection devices, but are connected to the general circuit of the electrical panel differently. Next we'll look at how.
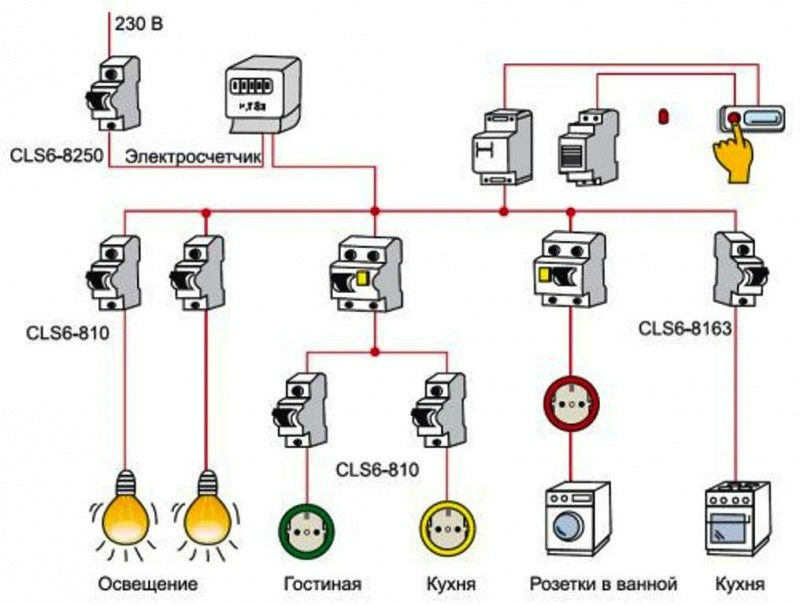
A standard simplified (without differential protection and other devices) circuit looks like this. In the floor distribution board of the ERShch or the metering board of the ShchU for a private house, from the input circuit breaker through the electric energy meter, electricity is supplied to the RShchK installed in the apartment. Group protective devices are usually installed in it and lines from end consumers are connected. See more about this in.
When the switch inside the apartment electrical panel is turned off, all electrical wiring and all consumers in the apartment are de-energized. When turned on again, power is supplied to all groups. This is the standard scheme.
Let’s assume that when we go on a business trip, vacation, or simply when leaving for work, for the sake of greater safety, we want to turn off the power to the entire apartment. Moreover, do this by pressing the key of one switch, and not turn off unnecessary groups with separate machines. But at the same time, we want our refrigerator or freezer filled with food to continue to work and keep the food safe. If we have a security alarm or video surveillance system installed at home, or a leakage protection system, then it would be great if they continued to work and perform their security functions.
For these purposes, in electrical panels they use the so-called non-disconnectable lines.
All consumers inside the electrical panel are divided into two categories:
— non-switchable;
— disconnected lines(consumers, groups);
Undisconnected lines are connected in the electrical distribution panel to the switch that turns off all disconnected lines, as shown in the diagram. You can install two switches - one will turn off the entire panel, the second will only turn off the groups being switched off. There may be different options here, I showed the idea, the basic principle.
Now, when leaving the house, you can press the lever of one switch and turn off the power to the entire apartment at once, and the non-switched lines in the apartment, which should provide power to non-switched appliances and devices, will remain connected to the power grid and ensure the operation of non-switched equipment.
You can organize the control of disconnected lines in different ways :
- an ordinary switch, as shown in the diagram above;
- a regular switch installed on the wall when leaving the apartment. The so-called “VACATION” button or . This scheme uses
- using a security alarm. When arming, everything is de-energized except for the non-disconnected lines. When disarming, the disconnected consumers are reconnected to the power supply;
- using a mobile phone via GSM;
- from a tablet via the Internet;
- in various other ways.
There are three main ways to arrange non-disconnectable lines. For details about each method, its advantages and disadvantages, see.
If you are interested in how to connect non-switchable lines, relays, etc., write in the comments and follow the release of new materials on the site.
If you are experiencing difficulties with dividing electrical wiring into groups, calculating and selecting the necessary protection devices, you are unable to draw up a diagram of the electrical panel and place the equipment in it - you can order these services from me by writing me feedback in the sectionCONTACTS.
Watch the video for more details:
Unswitched lines in the electrical panel part 1:
Unswitched lines in the electrical panel part 2: