Heating radiators are made from various metals and alloys (read also the article - thermostat for a heating radiator). The shapes and sizes of batteries are also not uniform. However, not all elements heating system houses are in harmony with the interior, often negating all the costs of repairs and furnishings.
Cast iron “accordions” look especially annoying, reminiscent of the times Soviet Union. Old batteries heat well, but are not aesthetically pleasing. There are many ways to disguise radiators protruding from the wall, most of which are quite economical and original.
- Fabric radiator cover. With a little effort and spending a certain amount of thick fabric, pieces of fur, leather, accessories, you can sew an interesting cover that will hide the radiator underneath and serve additional protection for little fidgets.

Fabric radiator cover
- Similar products various forms and colors in a wide range of stores, but if you are inclined towards this option, learn that even through thick frosted glass The old battery will be visible, and the wooden trims on the radiators will even look like “patches.” Metal screens are more aesthetically pleasing, but you should take care to combine the shade of the wall behind the radiator with the color of the metal, so as not to attract attention with contrasting surfaces.

- False walls and niches made of gypsum plasterboard. Plasterboard structures are not difficult to make. Accordingly, you can hide the heating pipelines behind a neat false wall yourself. However, you should not completely cover the entire battery with panels, because this will lead to heat loss and a decrease usable area premises.
- This method is creative and does not require much financial costs. It is very simple to apply a beautiful pattern, turning the radiator into a decorative element. But preparation and a responsible approach to the quality of materials for work will be required.

Decoupage is an imitation of painting. And any painting requires a flat base. New radiators are produced with smooth-walled sections, so the pattern will fit perfectly. But you will have to work on old cast-iron rarities to level the surface as much as possible and remove layers old paint, drips and rust stains.

Old batteries require preparation for decoupage
Step one. Removing old paint
Old paint is not easy to remove.
You can try using a solvent, applying it to the surface of the radiator and scraping off the softened enamel with a metal spatula. But if there are too many layers of paint, the option is too tedious. Plus, the pungent odors of solvents have a detrimental effect on health.

Another method is mechanical. Sandpaper with different sizes grains and an angle grinder with abrasive attachments.
Many craftsmen advise cleaning the surface of batteries using a drill and a brush attachment (wire or polymer-abrasive). Old paint will fly off in no time, but it’s worth coordinating noisy work with your neighbors.

Repair and auto repair shops often offer sandblasting services. This method is highly effective, but will require dismantling and transporting a heavy radiator.
And another option is thermal. Old paint can be removed by heating the surface of the radiator construction hairdryer, and then scraping off the loose enamel with a spatula. If there is an opportunity and desire to dismantle the radiator and take it out of the room, then a burner is used for cleaning. All you have to do is walk a little sandpaper on a cast iron surface.
Note! If the old paint could not be removed for some reason, the surface is leveled with putty and sanded with fine sandpaper. It is not recommended to apply a thick layer of putty, as this will reduce the heat transfer of the radiator.
After removing the old paint, the radiator should be degreased with white spirit, and then coated with a layer of anti-corrosion primer on alkyd based to improve the adhesion of the paint layer to the metal. The drying time of the putty is from 20 minutes to several hours.
Step two. Radiator painting

First of all, you should choose a paint that will meet the following requirements:
- wear and heat resistance;
- non-toxic;
- no change in the shade of the coating over time.
In addition, it is recommended to choose paint that matches the wall located behind the radiator. Plus, it is advisable to purchase matte water-dispersion paint (labeled “for painting radiators”), decoupage will look more impressive on it, and during the painting process unpleasant chemical odors will not bother you.

The most convenient way to apply paint is with a fur double-sided mitten. Puts on your hand rubber glove, and on top is a fur mitten. This makes it very convenient to paint hard-to-reach areas. Don't forget to place oilcloth or newspapers under the radiator so as not to stain the floor.
Note! Painting and decoupage are carried out strictly after the radiator is disconnected from the heating. Close the valve and wait for the battery to cool down. Otherwise, the paint will lie unevenly.
Video - Painting the radiator
Step three. Preparation of materials

To begin, take a napkin with the desired pattern and separate the layer with the pattern. We measure the battery sections (length and width) in order to cut the napkin exactly to size. We cut the napkins based on the measurements obtained.

If you don’t have ready-made napkins, you can make them yourself. To do this, find the desired drawing on the Internet. Take a two-layer white paper napkin, place it on top of the printed design and fix it on one side masking tape. We cut off the excess napkin. Now print out the design you like on a sheet of paper with a napkin attached. Peel off the tape and the napkin is ready.

Video - How to make a napkin for radiator decoupage
For the living room, it is best to select images of nature and abstraction, for the nursery, cartoon characters are appropriate, and in the kitchen, floral motifs and still lifes will look best.
This completes the preparation. Let's get started with creative design.
Step four. DIY decoupage of a heating battery

We take a strip of napkin and glue it with the wrong side to the section of the radiator coated with glue. Smooth the napkin with your hand or a wide brush with soft bristles. If some areas of the strip do not stick, coat these areas with glue directly on top of the napkin. We make sure that no bubbles or unevenness are formed during the process.

The work should be done carefully, since in case of an error it will not be possible to remove the damaged strip without damage.

We rinse the brush from glue and open it acrylic lacquer for decoupage, which can be glossy, matte or with various holographic effects. Using light, precise movements, coat the battery with varnish. The varnish will fix the design and give the work a finished look.

If desired, you can acrylic paint apply any lines or additional drawings on top of the napkins to make the work truly exclusive.
We wait until the varnish dries and turn on the heating. The work is completed.


Video - DIY decoupage of a heating battery
It's hard to find a more boring item in the house than radiators.
It doesn’t matter at all what style the interior of the room is designed in if the view is spoiled by the awkward structures placed in each room of the home. They can be covered with decorative elements, but if you have imagination, you can actually come up with them interesting design an integral attribute of the apartment.
At a stable financial situation You can purchase elegant radiators from popular brands that will be designed in any suitable interior style (retro, art deco, hi-tech, modern, Provence). If your soul asks for something unusual, you can create radiator decor with your own hands.
Making a reading place above the radiator by the window To disguise an unsightly heating radiator, a reading bench is made. It will be a stylish detail in the bedroom. The best option for decorating the battery is to install a special neat grille directly under the window. Thus, the heating element will not be visible at all: instead of it there will be a neat decorative lattice.
The advantage of this design solution is both aesthetic and practical: thanks to the battery under the window sill, you don’t have to worry about a cold seat in winter. The radiator will warm up the place to relax, so you can comfortably spend time with a book in your hands. The grille is selected to match the overall color scheme interior White color will look best.


The decor of a radiator involves the use of various screens. It is important not to block the flow of warm air and use materials that do not lose their basic qualities due to constant exposure high temperatures.
Structures can be hinged and supported flooring. Spectacular design solution is to use a screen-box in the form of a cabinet with doors. It can become a kind of table. A decorative screen is needed to make the room look aesthetically pleasing.
Most of the available radiators are not aesthetically pleasing and have some problems due to functional features. A radiator is a product that has a complex design and is necessary to ensure high heat transfer rates between the battery body and environment. This interior element has two significant disadvantages.
The first is sharp corners, which can hurt you, tear clothes, curtains, expensive curtains. The second is an inconvenient design that is constantly clogged with dust. Because of this, it is difficult to clean the radiator, and with an impressive accumulation of cobwebs, it looks ugly. There are two criteria according to which they can be divided into the following: by type of construction and the material from which they are made.


If you pay attention to the principles of division into categories, you get the following: By design, screens are:
Flat
Such decorative elements are more often used for batteries in a niche, when they are located in the area under the window sill and framed by a wall. It should immediately be noted that ventilation holes must be installed in the window sill itself. This is necessary for air circulation from the radiator. Otherwise, the feasibility of mounting the battery will be minimal. At the moment, this type of screen is considered the simplest and most accessible.
Mounted
Used for radiators that are installed on the plane of the wall. The screen is mounted on the radiator itself and acts as a so-called housing. A significant disadvantage of this design is that the radiators must also be designed for the weight of the screen. When choosing such a design, you need to pay attention to the fact that the plane of the screen must have holes. This allows warm air to circulate better.
Attached
More developed complex design The screen actually frames the battery housing. The cost of such a design is high, due to the complexity of execution and expensive appearance. It has several significant advantages, one of which is the independence of installation relative to radiators, when there is no need to install special hooks.


Based on the material, screens can be made of plastic, metal, MDF, wood, and glass:
plastic - affordable designs that are not environmentally friendly. During operation, the material will constantly release harmful compounds. After a certain period of time has passed, the structure will lose its original shape. In addition to other characteristics, the screen will change color to a more faded, unattractive one. White will eventually turn yellow. This is facilitated by heating of the entire structure. The only positive aspects regarding the purchase of this decorative element are accessibility and resistance to moisture. You can safely dry wet items of clothing on this design after washing.
metal - the advantages of this material include lightness, rigidity, strength, environmental friendliness, and durability. Screens are suitable for people with average incomes. They are made from special of stainless steel. If desired, you can give it any desired color. You can dry wet clothes on them. Among the significant disadvantages: if damaged protective coating the structure will quickly begin to rust and lose its former attractive appearance.
MDF - you can create any kind of material from it interesting shapes, which will become an interesting addition to the interior. The material is cheap. Contains glue. When heated, the toxic substance will evaporate and enter the air in the room. MDF is afraid of moisture, so it can become deformed over time.
wood - screens have spectacular design, but they are short-lived. This applies to cheap designs. Cons: wood cannot come into contact with a humid environment. glass - the designs look impressive. Due to the fact that they are hardened, the likelihood of cutting yourself is reduced. Among the disadvantages of such screens is fragility.


When deciding to create a battery screen with your own hands, do not forget that plastic is not the best option. It is a poor conductor of heat and tends to change its original shape when exposed to high temperatures.
DIY painting ideas
Updating the radiator decor is carried out in compliance with the interior style. Designs painted in the same color as the walls look impressive. With proper design, you can divert attention from the shortcomings of the interior. As for painting ideas, multi-colored sections are used, giving the radiator a piano look, and applying a modular pattern.
The main thing is that the type of coloring fits perfectly into the overall concept of the room. To paint a radiator “to look like a piano,” you need to think through everything so that the resulting pattern resembles the keys of a popular musical instrument. You will need two colors of paint: black, white.


Decoupage - step-by-step master class It will help give the radiator a certain chic. Decoupage involves selecting drawings and then gluing them onto the surface to be restored. The resulting image is fixed with varnish. Today in stores you can buy special multi-layer napkins with a pattern.
Step-by-step master class:
- The battery is cleaned using detergents. Areas with peeling paint are cleaned with sandpaper. The radiator is coated with paint.
- You need to start applying the drawing after the coloring composition has completely dried.
- Unroll the prepared napkins and cut out the required fragments. Excess layers of paper are completely removed. The image is coated with PVA glue and applied to the radiator sections. Gently press the napkin onto the battery. Air bubbles are removed. After the layer of paper has dried, you can complete the missing elements with your own hands.
- The completely dry image is covered with two layers of varnish.


Decorative lattice - master class
To make a screen for a niche radiator design, you need to take several steps:
- Making a template in the form of a design you like from waste plywood.
- Going through the template with a jigsaw.
- It needs to be processed with a milling cutter. It is important to achieve ideal transitions between the details of the ornament.
- To close the niche with the battery you need to prepare several templates. Depending on the width of the niche, you should choose your number of fragments.
- They need to be sanded and coated with special enamel. It is important to make special holes for fastening.
- After the enamel has completely dried, the parts are sanded and painted with the required shade of paint.
- The parts are secured using fasteners.


False fireplace - master class
This option is suitable for masking a radiator located in the center of the room.
Making a fireplace is as follows:
- Need to prepare furniture board, plywood 1 cm thick, bars the right size, wooden layout.
- You should create an approximate layout of the fireplace that covers the radiator. It should be a special square with a window in the center. The design of the structure depends on the preferences of the performer.
- The box is fixed on the wall. Shelves on the fireplace, pre-made from furniture board, are screwed on. The entire structure can be decorated with special polyurethane skirting boards.
- We go through the joints with self-tapping screws with putty. We sand off the excess and paint the surface of the fireplace with acrylic paint.

You can install a lamp in the firebox that will serve as an imitation of fire. If desired, you can install a garden trellis on top of the niche. The battery should be covered with imitation stone.
Plasterboard finishing
Using drywall you can easily hide an unsightly battery. You must have minimal skills in repair and construction work. The method allows you to completely close the radiator and niche. To disguise the battery, you need to make a plasterboard box attached to metal profiles. It is attached to the wall, all holes from the screwdriver are carefully puttied and sanded. The structure is covered with a primer, and then with a layer of paint. It is necessary to leave windows for ventilation, thanks to which warm air will circulate in the room.
Pipe decor
If you paint walls, radiators, pipes in the same color, then visually they will merge into one plane. You can use one ornament for decoration, which will allow the latter to get lost in the background. For painting, you can use special stencils (vinyl), which can obtain the desired shape.
Finish options a large number of: It all depends on the design style. If the interior is made in an oriental style, you can use a bamboo trunk to hide the radiator sections. You need to vertically saw the bamboo trunk, open it, and insert a pipe there. You can wrap the pipes with a beautiful rope - you get an interesting composition.


Application in the interior
Below are the most interesting ideas:
Living room.
You can decorate the radiator using a decorative false fireplace or a special plasterboard box. It all depends on imagination style direction interior
Kitchen.
You can cover the heating element with a special screen, which is consistent with the overall interior concept. If desired, you can simply paint it in a contrasting color.
Bedroom.
A decorative grille, screen or false fireplace will fit here. You can paint the batteries with an interesting design or use the decoupage technique.
Children's room.
An interesting option would be to design it using decoupage technique. The child really likes to look at the beautiful modular pictures.
Transform the radiator by making it into a false fireplace, sleeping area. Battery decoupage, decorative screen will turn this heating device into a work of art.
DIY decorative radiators

There are several ways to transform this heating device, these are:
- decoupage;
- painting;
- decorative screens;
- pasting;
- camouflage behind a false wall.

With such an interesting bronze tint, it will end up looking like an object made of a noble metal. Before you begin the conversion work, you need to prepare:
- gauze;
- latex gloves;
- acetone;
- black and red paint in a can or gold paint in a spray can.
If the battery has not been painted before, it must first be treated with an alkyd primer. If on heating device There is rust, it needs to be removed.

Next, the surface to be treated is degreased with acetone; you can also use blowtorch. If you want to paint the battery so that the paint adheres thin layer and evenly, take a rectangle of fur, fold it in half, stitch two sides. You will get something like a bag. Put it on your hand and have fun painting the battery.
To get a beautiful bronze color, you need to mix black and red paint. If you wish, when decorating the battery, use spray paint.
If you have artistic abilities, then transform this heating device by drawing something suitable here. Look how nice these pencils look, each of them is made on a specific section of the battery.

If you have a modern radiator, turn it into a small piano by drawing the keys here.

If you want to cheer yourself up, then use paint in several colors. To be smooth transitions, you can mix color additives with white paint and change the consistency. This way you will get lighter and darker shades of the same color.

This option and the other are suitable for those who are not confident in their artistic abilities. Draw white and black stripes on the protruding parts. Cut a tail out of cardboard, paint it, stick it in place and you have a zebra. If you want to go even further, make the head of this animal out of cardboard or plastic, decorate it, and attach it to the side of the battery opposite the tail.

If you have a modern battery that is time to upgrade, then take:
- acetone;
- stickers;
- scissors;
- soft cloth.

This is how the heating radiator is decorated. You can turn it not only into a blooming oasis, but also into a cozy fireplace.

Perhaps for some the radiator will become an imaginary cellar for storing wine.

This way you can decorate the battery in the nursery using large or small stickers.

But if your heating radiator is made of cast iron, this method of transforming it may not be suitable, since the surface is uneven and voluminous. In this case, it is better to repeat the following idea.
You can use stickers that will turn the battery into musical instrument. If you have an unnecessary button accordion whose bellows are torn, you can make another creative idea, glue one and the second part of the keyboard to the radiator.

Battery decor using decoupage technique
This option is also suitable for those who have long-lasting cast iron batteries. Here's how to do decoupage in in this case. Take:
- decoupage cards;
- acrylic paints;
- sandpaper;
- decoupage varnish;
- PVA glue;
- brush;
- light enamel.

Enamel has a strong specific odor, so work in a ventilated area. It's even better if you cover your breathing organs with a respirator.
While the enamel is drying, open up the decoupage cards so that each piece covers part of the radiator. After the paint has dried, glue the prepared parts using PVA mixed with water.

If you want, leave the painted fragments (not decorated with a blend) light, cover them with white acrylic paint. You can use the same shade as in the picture; in this case, blue acrylic paint was used. Once any of these solutions are completely dry, coat the radiator with 2-3 coats of varnish, allowing each coat to dry.

You can use napkins for blending and decorate a heating device with them.

To do this, only the top layer with the pattern is taken and glued to a pre-painted, dried battery. After the glue has dried, to secure the decoupage, you need to cover the radiator with a couple of layers of varnish. But you need to choose one that can withstand the intense heat of the heating device.

If you want to give the batteries a chic look so that they look like antique ones, then use a self-hardening mass and a stencil to apply a design. Then cover with paint. Such stucco molding will adhere firmly to the battery, as it adheres well to similar metal surfaces.

The next type of radiator decoration is making a screen for it. Moreover decorative panel you can buy, there are some that are inexpensive, and make a box for it with your own hands.
Making a screen for decorating a battery
Before you start making it, prepare:
- waterproof plywood 2 cm 2 mm thick;
- paint;
- board of painted plywood, finely divided wood shavings or edged board;
- connecting elements measuring 50x32 mm made of pine;
- brackets;
- wood glue;
- screws;
- wooden corks dowels.

To enter the room in heating season If it doesn't get cool, when installing the screen you need to ensure that warm air circulates unhindered. To do this, space must be left between the battery and the screen.

Determine the size of the panels. You already know the width of the radiator, and if its height, as in the figure, is 72 cm, you need to add 8 cm for air circulation, so the height of the vertical panel will be 80 cm.

If the radiator has a temperature control, or a pipe fits here, then you need to determine where these components are located in order to then make cutouts in the screen edging at this place.

Now you need to attach connecting elements, which act as bars, to the vertical wooden sides using wood glue and wooden plugs or screws.
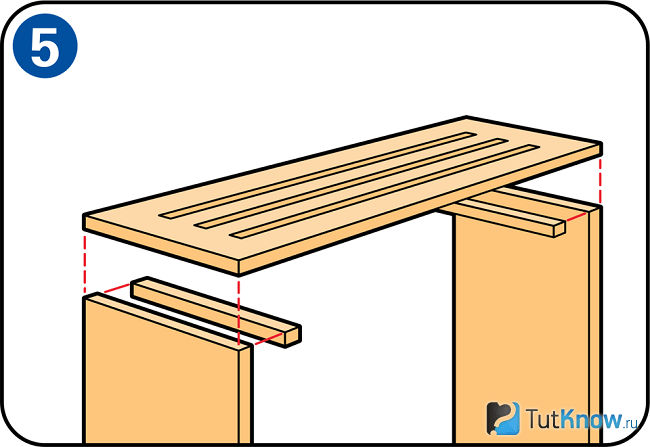
Attach the top panel to the sides.
If you make the front panel yourself, then use a horizontal strip 18 cm wide and two vertical strips, each 12 cm wide. They are attached to each other using holes and dowels.

Look in more detail at how panels need to be prepared for this. First, mark with a pencil where the end holes will be located. In another board you need to do them at the same level. Pour wood glue here, insert wooden plugs into the holes on one side first, then attach the second board. To ensure the attachment point is secure, carefully pull the two boards together by lightly tapping first one, then the other with a rubber mallet.

In the same way, you will attach the four horizontal crossbars using dowels and holes. Please note that 60mm wide gaps are left between the cross members for air circulation. You can make adjustments to these parameters or make the screen for the battery more elaborate, for example, by stuffing slats here in the form of a sheathing.

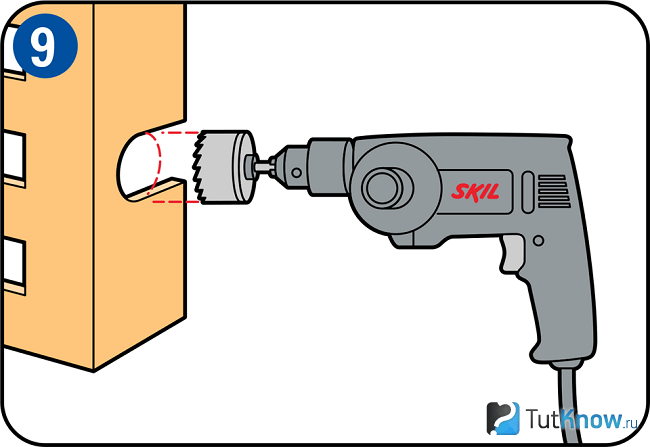
You have determined in advance where you need to make cutouts in the sidewalls. Using a drill attachment, complete this part of the job. To make the hole more even, after cutting it hole saw need to be processed with a hacksaw.
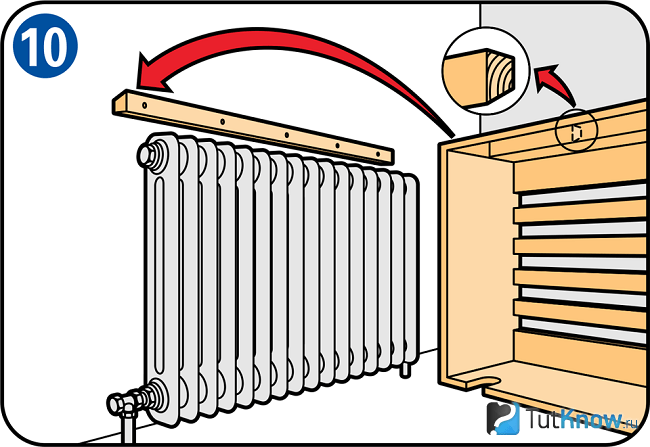
To install the battery screen, you need to provide it with support bars. First, they are fixed inside the screen at the top. Then you need to determine the location of the support strips on the wall, above the battery.
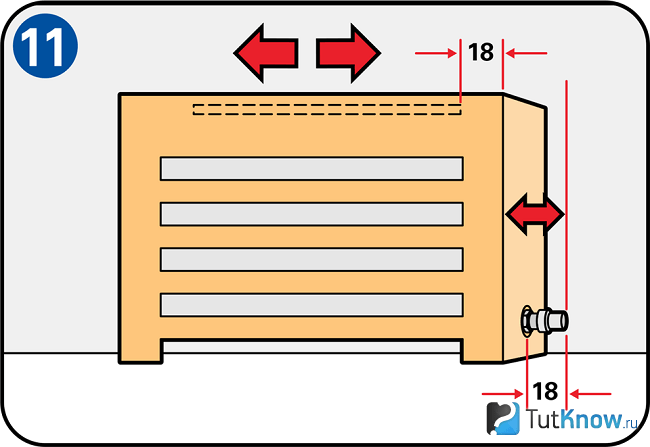
Determine the length of the support bar, do not forget to leave room for the tap that regulates the temperature. If it is located on the side, then leave a distance of at least 18 cm so that the support bar can move freely. If you wish, you can use a magnetic one instead of such a mount.
If you assemble the box yourself, and you already have a decorative panel, then the screen for the radiator may look like this.

Should I buy a false fireplace or make it myself?
This question invariably arises among those who want to create an atmosphere in a city apartment country house. At the same time, you can “kill” two birds with one stone, not only create such a piece of furniture, but also hide an unsightly battery. Not everyone has it under the windowsill; for some, this heating item is mounted almost in the most visible place in the room.

See how such an unsightly sight can be turned into a cozy, almost fairy-tale corner. To do this you will need some materials, these are:
- plywood 9 mm thick;
- wooden layout;
- bars with a cross section of 50 mm;
- self-tapping screws;
- fragment of a garden fence;
- construction glue gun;
- decorative plastic panel, where brickwork is shown;
- furniture stapler;
- stain;
- polyurethane skirting boards;
- putty;
- fine sandpaper;
- acrylic paint;
- brush;
- long lamp;
- bath stones.

Mark the location of the front part of the fireplace. Cut a rectangular hole in the center of the plywood.

With help furniture stapler attach a decorative panel to the center of the portal, trim it with a wooden layout, attaching these elements to a glue gun.

Paint the furniture panel with stain, when it dries, attach it with self-tapping screws as a shelf on. Glue the polyurethane baseboard to where the plywood meets the floor and to the top. If they do not hold well here, then additionally secure them with self-tapping screws. You will cover these places with putty; when it dries, carefully go over it with fine sandpaper.
If it happens that there is no putty on the farm, you can replace it with sealant or liquid nails. After these dry soft materials, you need to make the surface even with sandpaper.

Now paint the fireplace portal with the first layer of white acrylic paint, when it dries, apply the second.

To simulate a fire, place a long lamp in the firebox so that you can plug it into an outlet. Nearby, closer to the viewer, you need to put stones for the bath. All that remains is to attach one more element - this is part of a decorative garden fence, in this case, it will perform the function metal grating. In this case, you can even use a plastic fence, covering it with metallic or golden paint.
This is how unusual and very stylish a DIY battery decor can be.
This option is suitable for those who have a lot of heat in winter. It will not be cold in such a room, the radiator is closed, but warm air will escape through the rear side openings. But if the boiler room does not work at 100%, in the cold season without hot battery there is no way around it, then don’t close it almost completely, as in the option presented above. The following idea will suit you.
To implement it you will use:
- drywall;
- metallic profile;
- self-tapping screws;
- drywall knife;
- putty;
- acrylic paint white and golden;
- sealant in a tube;
- construction gun;
- polyurethane skirting boards and glue for them.
- As in the first case, cut a hole in the drywall sheet. From metal profile make a base, attach a plasterboard blank to it using self-tapping screws. From the same material, make a rectangular shelf that will become the top of the false fireplace.
- In this part you need to connect the front and top elements by gluing here polyurethane skirting boards in front and two small ones on the sides. These same parts need to be attached between the floor and the sheet of drywall below.
- Put the sealant in the construction gun, feel like a real sculptor, as now you will make various monograms on the top of the fireplace. If something doesn’t work out, remove the excess before the composition hardens. The end of the extruded strip will be straight if you simply trim it with scissors.
- Allow the sealant to dry thoroughly. Now paint the fireplace portal with white acrylic paint in two layers. When it dries, take a thin brush and use it to paint the monograms with golden paint. If you want to decorate the top of the fireplace, you can use a laminate board for this.
- Of course the battery must also be painted suitable color.

By making a fireplace portal from plasterboard, you can show your imagination. The inner hole does not have to be cut rectangular; it can be of a slightly different shape.

If desired, you can not only decorate the battery, but at the same time turn this part of the room into comfortable table or a cat bed. After all, these animals love to take a nap in the warmth and lie on the windowsill.

To implement this radiator decoration option, take:
- thick sheet of foam rubber;
- thick fabric;
- drywall;
- polyurethane ceiling plinth;
- drywall saw;
- acrylic paints;
- metallic profile;
- self-tapping screws
- Assemble a rectangular base from a metal profile, use self-tapping screws to attach it to the sides of the wall, top to the window sill, and bottom to the floor.
- Now, again using self-tapping screws, you need to attach a sheet of drywall to this metal base; of course, you first need to cut out windows of this size or smaller ones in it. You need to glue the baseboard onto the top of the drywall, and then paint this decorative element with white acrylic paint.
- Cut a sheet of foam rubber to the size of the window sill and sew a cover of thick fabric on it. Insert a zipper on one side so that this part of the mattress can be removed and washed. You can also make rollers from foam rubber. To do this, you need to connect the small edges of the rectangle and roll it up. A pre-sewn cover is placed on top.

If you attach shelves made of wooden planks to the side, then you can store newspapers, magazines and other small things here.

Here's how, if you wish, you can decorate the battery, turning this not always attractive element into an object of your joy and pride.
If you want to see a few examples of converting a radiator and window sill into a sleeping place, bench, table, then watch the following video collection.
If you want to carefully study how to decoupage a battery, then the next review is especially for you.
Battery decor is interesting option for those whose radiators or batteries have unpresentable appearance or simply do not fit with the interior, standing out too much and spoiling the overall appearance.
Beautiful radiators in the house attract attention and make the interior more colorful.
Many people have old Soviet batteries at home, and it is simply not possible to replace them with new ones, so we recommend that you decorate them in various ways.
Battery decor
To make radiators and radiators less noticeable, you can purchase paint that will match the color of the walls.

So, if your walls are painted in one color or covered with plain wallpaper, you can easily choose the right color by visiting a specialized paint store.
Today there is a great variety of shades, among which everyone can choose the right option.
It is worth remembering that radiators need to be painted with specially designed paint; moreover, it will look more even and neat on their surface.
If the walls in your room are not monochromatic, the paint color is selected based on the prevailing colors in the wallpaper patterns.
If the surface of the heating device is not very presentable, uneven or lumpy, additional decoration of the battery pipes will help to divert attention from the shortcomings.
If you draw beautifully, you can paint a pre-painted battery with various patterns and colors.

A great idea for decorating a battery is to buy or make a case yourself.
Of course, it will be difficult to find it on sale, but making it yourself is very easy.

Just choose the color suitable material, calculate the dimensions of the battery and make a blank. So that the battery heats in the same mode as before, and the cover does not interfere with the spread of heat, you can make its front part mesh.
To do this, either buy thin fabric in the form of a large mesh, or sew your own frame in the form of squares fastened together.
This option for decorating the battery may be more labor-intensive, but you will have the opportunity to decorate the case with bows, artificial flowers, beads and other elements.
Animal-shaped covers will look perfect in a child's room.

Decoupage batteries
To decorate a battery using the decoupage technique, you need the following materials:
- drawing for decorating a battery using decoupage technique;
- acrylic paints;
- PVA glue;
- white enamel;
- brushes;
- sandpaper;
- heat-resistant varnish.
In order to decoupage the battery, you need to prepare it. To prepare, you need to clean the battery, go through sandpaper and remove excess old paint and create a smooth, even surface.
After sanding, wash the heating radiator and wait until it dries completely. Only then start painting.
To paint the battery, it is better to use white enamel, but not nitro.
After knocking, when the battery is dry, take a drawing or napkin for the battery decoupage technique and measure the width of the outer surface.
It all depends on the design you choose. We glue our drawing in the center of the edge of the battery.
To glue the drawing, take PVA glue and dilute it with water in a 1:1 ratio, in this state it will fit better on the paper.
Having thus glued the entire drawing, you need to finish painting the part of the battery remaining without a napkin with acrylic paints. If you draw well, you can complement the decoupage of the battery with brushes.
When the decoupage on the battery is dry, coat it with heat-resistant varnish.

You can also decorate the battery with other designs. Usually used various flowers and patterns.
Pipe decor
Pipes, like batteries, can be decorated in an original way. There are several options for decorating pipes with your own hands:
- wrap the pipes with thick threads or ropes;
- knit a pipe cover that will be applied to the pipe;
- paint the pipe in original colors, for example, multi-colored stripes.
The last option, which involves painting, may require different paint colors, but is ideal for a child's room.

How to decorate a pipe using a hook and thread
It is enough to simply knit a long knitted strip, the width of which will correspond to the size of the girth of the pipe. The strip may not be circular, and it is not at all necessary to make a cover out of it.
To decorate the pipe, you will only need loops placed in a certain sequence, but you can make them during the knitting process in accordance with the chosen pattern.
A rope similar to a lace will be threaded through these loops, which will be tied either at the bottom, or at the top, or in several places into a beautiful bow.
Pipe decor with rope
Another option for decorating unattractive pipes is to use beautiful structural rope.
It simply needs to be tightly wrapped around the pipes with vertical stripes. To secure the rope while threading its ends, you must use glue.

Decoupage pipes
You can decorate pipes using the decoupage technique. To do this, you will need either a special film for decoupage, which is sold in a craft store, or ordinary napkins with a suitable pattern.
As a rule, shabby chic decoupage involves the use of light, warm and delicate colors. To decorate a pipe, you need to perform the following sequence of actions:
- pre-clean the surface for decorating the pipe;
- apply glue to the pipe;
- cover the surface with a napkin;
- apply glue again so that the entire napkin is soaked through for better adhesion;
- varnish.
You can cut out a design on a napkin if it shows a pattern that specifically suits you. As a background, you can use another napkin with soft colors, which under no circumstances should be cut.
The ideal solution for decorating a pipe using the decoupage technique is to tear it, so the background borders will be smooth.

The decor of pipes can be very different. For example, you can paint a pipe in the shape of a birch tree trunk, and attach sheets of paper cut out to the walls, which will create an original image of a tree, or replace the sheets with artificial ones.

Decorative grille for radiator
The radiator grille is an excellent decoration and a way of camouflage. The simplest option for creating such a lattice is a structure made of bamboo rods. The rods should be thick, and they should be easy to cut, adjusting the size of the grille to the size of the radiator.
The rods can be secured with wire or glue, but the glue will, of course, be less noticeable.

The radiator can be disguised as a fireplace by making a wooden mesh for it, decorated with different patterns. This fireplace fits perfectly into almost any type of interior if it is placed against the wall.

Like door decor, decor of pipes, radiators and radiators may require painstaking work, imagination and a lot of time, but with the help of decor you can hide what spoils the appearance of your home.
Design options modern interiors are very diverse, and if you have applied skills, then you can easily decorate your home the way you want. Gaining more popularity different types handicrafts. These decorative elements are highly valued. They bring personality and comfort to the house. If you have been wondering how to refresh the interior without resorting to repairs, decoupage a heating radiator with your own hands.
To do this, you will need nothing at all: a primer, napkins with a pattern, glue and varnish. And, of course, a little patience and perseverance.
What is the essence of decoupage technique?
Decoupage is a technique of transferring drawings from colored paper to any surface: wood, ceramics, metal, etc. In this way you can decorate anything, from dishes to pieces of furniture. The technology itself is several hundred years old. The fashion for such decoration arose in the Middle Ages in France and does not fade to this day. Some craftsmen even decorate clothes in this way.
They usually try to update with elements of decoupage old furniture or decorate unsightly interior items. Many people are especially dissatisfied with the old cast iron radiators. They cannot be hidden behind furniture, as it may block access to warm air. Painting doesn't help the situation either. White color makes you bored. Craftsmen found a way out of this situation and turned ordinary radiators into a work of art, decorating them with beautiful and stylish designs.
How to choose the right decor
There are a huge number of design options for decoupage batteries. In handicraft stores you will find hundreds of different napkins. The most interesting compositions are obtained from combined fragments and colors. Here you are limited only by your imagination.

Before you plunge into creativity, decide what exactly you want to do: disguise the battery or make it a bright accent in the interior?
For the first option, it is better to choose paper that matches the primary colors you use in the interior. For example, you can take colors and patterns that match the wallpaper or curtains. To select a radiator as a separate one decorative element, use contrasting shades and original designs.

Preparatory stage
Before you start decorating the radiator using the decoupage technique, clean the radiator with soapy water. Don't be lazy to clean everything out hard to reach places. The surface must be perfect. It is better to clean the depressions and spaces between sections with a brush. Let the radiator dry completely and sand the surface well, getting rid of any bumps and cracks. You don't have to get rid of all the old paint. It is enough to wipe down the places where there are cracks or the paint has begun to peel off. After you finish sanding the battery, wipe the surface with a dry cloth to remove any remaining dust and dirt. Oily stains removed with a solvent.

The last stage of preparation is applying a white primer. For these purposes, select heat-resistant enamel that will not burst when heated. The paint should not be glossy or shine under the decor. Once you've finished painting the battery, let it dry completely. This will take a day.

Decoupage process
The simplest technique with which you can perform decoupage is pasting. It will not require any special artistic talents from you, you just need to do everything carefully and choose materials harmoniously. This method will not take much of your time, but the result will be great.

In decoupage, rice paper or simple napkins with a printed pattern are used. The paper parameters are 34x100 cm. This is not enough to cover all the edges. You will have to join several sheets with your own hands or complete the pattern with a brush. If you doubt your artistic abilities, choose paintings where the upper and lower elements are extremely simple: sky, grass, etc.

Measure the width of the heating radiator section, draw a pattern on paper and cut it into strips of the required size. Paper strips glued using the simplest PVA. Make sure there are no bubbles left. When the glue dries, you can finish painting the pattern with acrylic paints in places where there is not enough paper.


You can use ordinary table napkins for decoupage. In this case, only the top layer is glued to the battery. It is very thin, so working with it requires special care. Better practice on small area, because in 90% of beginners the napkins tear during the gluing process.

In order for the paper to hold well and not fall off the battery, it must be secured with two layers of varnish. Choose a coating that can withstand heating up to 150 degrees. If you want to achieve an interesting effect, use craquelure varnish. After drying, it will become covered with tiny cracks, like in old paintings.

Additional decor
You can decorate heating radiators with your own hands using mixed media, combining decoupage with paint painting or stucco.
Paints
Acrylic paints do not fade for years, and therefore are excellent for decorating surfaces. You can complement the design on the napkins with new patterns or brighten individual details by highlighting them with silver, gold or copper paint. When choosing a paint, make sure that it is suitable for the work in the room.
Stucco molding
For three-dimensional patterns, a self-hardening mass is used. It can be applied using stencils, and then additionally painted with paints. Some types of such mass are produced in different colors: with mother-of-pearl, metallic, etc. Stucco molding is not afraid of high temperatures, easily adheres to metal surface and dries quickly.

- If you apply several layers of wipes, do this only after the glue has completely dried. Otherwise, the paper will warp and you will have to redo everything.
- If you made a mistake and noticed it already when everything was dry, don’t be upset. Paint over the defect with white acrylic paint, and then glue on a new layer of paper.
- Too sharp transitions of color or fragments can be softened by carefully matching the tone, lightly tapping the brush. You can use a sponge for these purposes.

Do-it-yourself decoupage of heating radiators is not only quick and inexpensive way refresh a boring interior, but also an exciting activity that the whole family can do.


