Children are our everything. For them we are ready to create best conditions accommodation. Special attention addresses the comprehensive development of the child. After all, parents want their children to receive everything they need at every stage of their lives. Quite a lot important role plays and physical education, which is the guarantee of the child. That is why most children are sent to sports clubs, dances and other clubs. However, it is possible not to send children to such institutions. It is enough to make a children's sports corner in your room or home. This is a kind of sports section that will be located at home. You will always know how and what your child is doing.
Still, the question arises: how to make a sports corner for a child at home? This is exactly what we will look at in our article. To make things easier, corresponding photos and drawings will be shown. If you have children, this information will be very relevant.
A gym for a child at home - is it necessary or not?
Children's sports corners for the home are quite popular and have been used for many years. They are comfortable and practical. The child will be glad that he will have his own corner in the apartment or house where he can play sports. And it doesn’t matter what the weather is like outside, because the house will always be warm and cozy. Just give children space, and their imagination will develop as it pleases. On average, a sports corner at home for children will occupy 2 m2 or more.

Let's look at the factors that speak in favor of making it in your home or apartment:
- A child can actively develop any time he wants. This could be morning, lunch or evening.
- The child will spend time not only fun, but also beneficial for his health. In addition, when receiving guests, the children will not disturb the adults, having their own corner.
- Children will be able to develop coordination of movements and develop their vestibular apparatus. The cardiovascular system improves.
As you can see, the presence of this corner in the room will only benefit both children and parents. The only negative is that the corner takes up space and can be dangerous for children. But, this is how to submit it. After all, the room still has a corner for children’s games. As for falls from the structure, it is enough to simply place mats on the floor to protect those playing.

I would like to note that parents can buy a ready-made corner and install it in a suitable place, or they can make a children’s sports corner with their own hands. It will be cheaper, but you will need to have manufacturing instructions, drawings, materials, tools and free time. And some skills in working with wood are also welcome. However, before moving on to the instructions, you should consider the requirements for a children's sports corner.
Features of the corner and requirements for it
Everything that concerns children should be safe and not harm their health. And here there are several points that are taken into account when creating a children's corner. Let's start with the fact that all structural elements must be reliable, strong and durable. All parts are connected to each other securely so that when playing sports the child does not fall and injure himself. In addition, the wall or other elements must be secured to the floor or wall.

The second point concerns the finishing of products. All paints and varnishes or other compounds that will be used in the future for processing wood or metal should not emit toxic substances. Children will constantly be in contact with the elements, so their safety must be appropriate. Well, as we mentioned above, it is important to take care of mats and soft surfaces.
If we conclude, it is not difficult to make such a sports corner. It is only important to choose appropriate place and follow the instructions. Let’s say right away that to accommodate all the elements of the corner you will need at least 2 m2 and an additional 1 m2 of free space around for games and unhindered movement.

But it arises next question: What is included in the package of the sports corner? To create a functional corner in the apartment, you cannot do without:
- Swedish wall;
- small horizontal bar/bars;
- gymnastic rings;
- swing or rope ladder;
- soft sports mat on the floor.
Below is shown what a full-fledged complex for children should look like.
Thanks to this set of sports elements, you can make a complete structure so that your child develops and leads an active lifestyle. Now let's look at how to create a corner with your own hands.
Creation of a Swedish wall
It is the main element, without which not a single sports corner in the apartment can do. The Swedish wall takes up little space, is functional and easy to create with your own hands.
Tools and materials
Here's what you'll need to create a wall bars:

With this set you can create a Swedish wall. But, you also need a product layout. DIY children's sports corner drawings.

Manufacturing technology step by step
Now let's start with the DIY manufacturing process:


That's all, the staircase is ready. To complete it, all that remains is to create a horizontal bar for it.
Making a horizontal bar for the wall
While the varnish is drying on the ladder, you can create a horizontal bar. You can buy it and install it on the wall, or create it yourself. We will make the horizontal bar a stationary part of the stairs.

Here's what you'll need for the job:
- two wooden boards, the size of which is 600x250x50 mm. This is not a standard, so the size can be customized. These will be the side bars to which the horizontal bar itself is attached;
- crossbar - 2 pcs., length 60 cm, diameter 4 cm (so that the child can hold on comfortably). Again, the length is selected depending on the size of the wall. For example, if its width is 50 cm, you need to add another 10 cm (5 cm width of the sides);
- the same wood glue;
- 12 bolts, nuts and washers;
- wrench;
- sandpaper;
- drill screwdriver.

Creating a horizontal bar step by step


The Swedish wall is ready. We will install it later.
Note! Making the rings is a little more difficult. It is much easier to buy them and install them in the right place. However, below is a video on how to make them yourself.
Making a Rope Ladder
The last thing we will do for the home sports corner is a rope ladder. This is a useful detail, as it helps develop the child’s coordination and strengthens his spine and shoulder girdle. That's why we recommend doing it.

Tools and materials
Now let's consider necessary tools and materials:
- round slats made of wood (you can use mop handles);
- strong rope, at least 6 m, it depends on the desired height;
- drill-driver;
- sandpaper;
- hacksaw or jigsaw;
- rings made of brass or duralumin to secure the product at the end of the slats.

Basically, you need wooden sticks and strong rope. They can be used to make a wonderful staircase.
Step-by-step creation of a staircase

Installing a ready-made sports corner
Now that you have made a sports corner with your own hands, you can install it. As stated at the beginning of the article, it will be installed on spacers. To bring this to life, these same spacers are screwed into the upper and lower parts of the wall bars, and the structure is installed in in the right place and the spacers are screwed in to the limit. This way the sports corner will be absolutely motionless.
Note! Spacer quality better time Check from time to time by tightening the nuts. This also applies to the bolts in the sidewalls that hold the horizontal bar to the wall.
If you need to perform installation in a different way, you can do this:
- If the wall is made of brick, then the sports corner is secured with dowels.
- If the wall is made of concrete, then the sports corner is secured with anchors.
- At plasterboard walls Only spacers are used.
That's all, all that remains is to buy the mats and install them in their places. Then you can minimize all injuries to the child. Children's sports corner for apartment photo.

Conclusion
A children's room with a sports corner is every child's dream. We looked at the benefits of having a sports corner. And if you work with your head, hands and brains, you will get a durable, reliable and functional product for children to play with. When working, you only need to remember that this is a sports corner for children. Therefore, its creation is a responsible matter. But as a result, you will receive a lot of joy and appreciation from your child.
Comprehensive development of a child at every stage of his life - the main task for each of the parents. And physical education in this case is not in last place. Sports clubs and dance lessons become an integral part of the life of almost every child. But what should those parents do who do not have enough free time and the necessary “arsenal” of grandparents, aunts and nannies. There is an exit. You can equip a small sports section directly in the apartment!
Home gym: pros and cons
A simple design in a minimal area will greatly help in the development of the child
By offering your child his own sports corner in the apartment, you provide him with the opportunity to actively move, regardless of weather conditions outside the window. Rest assured: it’s worth giving the fidget room for movement, something, and his imagination will be enough for fun and useful games. Think for yourself, you only take up 2-3 sq.m. the baby’s room, and the benefits from this will last for the rest of his life.
Significant factors in favor of creating a sports corner in the house are:
- Possibility of active movement of the child at any time convenient for him (during breaks between preparing lessons, in the morning instead of exercises).
- A great option for having fun and working on physical fitness with friends or relatives.
- Excellent preparation of the body for future stress at school during physical education (for a preschooler) or additional classes for a schoolchild.
- Confident coordination of movements and well-developed vestibular apparatus and cardiovascular system.
Perhaps the only argument against installing such a house structure is possible injury due to a fall. But this problem can be solved by equipping the site with a high-quality mat. Plus dad's support during classes with a very young athlete.
Note that today you can purchase a children's playground for your home already in finished form and in any configuration. But if you have the material at hand and the desire to tinker with the tool, then it’s time to save family funds and please your child with a homemade wall bars.
Design requirements
In almost all models, the basic elements are unchanged
Equipping a gym with your own hands at home is not at all difficult. The main thing is to choose the right place in the child’s room for its location. Please note that you will need at least 2 sq. m for the structure itself and at least 1 sq. m around the sports ground. This is necessary for the child’s free movement.
The main elements included in the sports corner set are:
- Swedish wall;
- Small horizontal bar/bars;
- Gymnastic rings;
- Rope ladder or swing (optional);
- Soft sports flooring.
This is exactly the set sports equipment will allow your baby to fully realize the potential of his physical activity at any time convenient for him.
Swedish wall
One of the main elements of the home gym
To make a wall bars (or simply a sports ladder) you will need:
- Side bars made of wood. The height of the material can be arbitrary (depending on the height of the ceilings in the children's room), but, as a rule, the height of the finished staircase is 2.5 m. In our case, the finished structure will be installed on spacers, and therefore accurately measure the distance between the floor and the ceiling minus 10 cm. This indicator will be optimal for your stairs. The width of the beams should be from 10 to 15 cm, and their thickness should be 2 cm or more.
When choosing wooden blocks, you should not save money - buy the highest quality wood
- Wooden round slats (diameter - 2.5 cm; length - 40 cm; the quantity is calculated based on the height of the sidewalls divided by 30. In this case, the number 30 is the step length of the stairs).
- Sandpaper.
- Wood glue.
- Drill/driver for drilling holes in the sides.
- Construction or simple pencil.
- Self-tapping screws (optional for securing the steps of the stairs in the sidewalls).
- Roulette.
- Varnish for treating wooden surfaces.
Stages of staircase manufacturing
- After the wooden blanks have been carefully processed, using a tape measure and a pencil, we mark on the sides the places for drilling holes for the crossbars.
- Using a drill-driver using a special attachment, we form the joints of the crossbars with the sidewalls.
Drilling holes for steps using a special nozzle
- We coat the finished round slats-steps well with wood glue and drive them into the resulting grooves.
Fastening steps with glue
- Thus, we assemble the entire structure and leave it until completely dry.
- If desired, you can additionally secure the steps in the stairs with self-tapping screws outside sidewalls
- After two or three days we cover the entire staircase thin layer varnish This will add color and additional smoothness to the structure.
We varnish the finished structure
Horizontal bar
While the finished staircase is drying, it’s time to start preparing the horizontal bar. It will be part of our wall bars.
We will need:
- Wooden boards measuring 60x25x5 cm (if desired, the parameters can be changed in a direction convenient for you) - 2 pcs. They will play the role of side bars for attaching the horizontal bar.
- The crossbar itself, the length of which should be 60 cm, and the diameter 3-4 cm (for children's hands - the most convenient option). We calculate the length of the crossbar in this way: the width of the finished staircase = 50 cm + 10 cm (which falls on the two side crossbars of the horizontal bar).
- Wood glue.
- Bolts, nuts and washers - 12 pcs.
- Drill-driver.
- Wrench for fixing bolts and nuts.
Stages of work on the manufacture of a horizontal bar
- We carefully sand the wooden sides of the horizontal bar. If desired, on the sawmill you can give the parts a rounded shape on one side.
- We apply markings to the inside of the sidewalls and use a drill to form holes for the horizontal bar.
- We coat the crossbar on both sides with wood glue and firmly drive it into the formed grooves.
- Now you need to apply markings to the sides of the stairs and the sides of the horizontal bar in such a way as to form symmetrical holes for fasteners. Try to place six bolts on each side and at the same time evenly distribute the load of the horizontal bar sidewalls on the staircase structure by rational arrangement hardware. Let's say there are three of them along each edge of the side of the stairs. Total - six bolts on each side of the ladder for reliable fixation of the walls of the horizontal bar.
- Using a drill, we make holes for the bolts and securely connect the ladder to the horizontal bar at the top of the wall bars.
- After drying finished design Cover the horizontal bar with varnish and leave it aside for now.
Ideally, we should end up with something like this:
After finishing the work, the horizontal bar should look like this
Rings
To wall bars for a child was as complete and functional as possible, all that remained was to equip it with rings and a rope ladder. Creating step by step sports complex for the baby, for now let's move on to making rings.
For this we need:
- Plywood sheet 75x75 cm - 2 pcs.
- Construction compass.
- Wood glue.
- Press or bolts.
- Jigsaw.
- Milling machine.
- Rafters.
- Drill-driver.
Step-by-step production
- We draw each sheet of plywood into six equal squares and cut it with a jigsaw.
Production of plywood blanks
- We glue each of the six squares together with wood glue, laying them one on top like a sandwich. You should get two such plywood “sandwiches”.
Gluing plywood blanks
- We send both structures under the press or securely tighten them in the corners and center with bolts, leaving them for a couple of days until completely dry.
For maximum tightening of the workpieces when gluing, it is best to use bolts or self-tapping screws
- As soon as the wood dries, we draw rings on the plywood, inner diameter which will be equal to 18 cm, and along the outer edge - 20.5 cm.
- Cut out the rings with a jigsaw.
Cutting rings with a jigsaw
- By the way, in the same place (if there is no milling machine) you can ask your friends to give the rings a circular cross-section along the entire perimeter of the workpiece.
- All that remains is to sand the rings and coat them with varnish.
- Now in one of the sides of the horizontal bar we make holes with a drill at a distance of 40 cm from each other.
- We pass the rafters through them and hang the rings at the desired height. By the way, it is better to purchase good rafters at a sports store. After all, they play an important role in ring training, taking on the entire load. If you can’t afford it, then limit yourself to any rope that is convenient for you. It's inexpensive for you, and it's fun for your baby to be a monkey.
Video: how to make wooden gymnastic rings
Rope-ladder
The last step is a ladder made of rope and wooden beams. This exercise perfectly develops coordination and strengthens the spine and shoulder girdle. So you can’t do without it.
You will need:
- Wood slats round section. Mop handles are great.
- Rope - at least 6 m (or depending on the height of your ladder).
- Drill-driver.
- Brass or duralumin rings (optional) for fixing at the ends of the slats.
In fact, to create a rope ladder you only need wooden sticks and strong rope
Stages of work
- We cut the sticks into pieces, the length of which will correspond to the future steps.
Cutting steps from wooden sticks
- So, every wooden blank carefully grind and use a drill to form holes along the edges of the steps. The diameter of the holes should correspond to the diameter of the rope, but not exceed it.
Painting the steps
- Now we begin to string the steps. Divide the rope in half (these will be the sides rope ladder). We tie one piece of rope at one end with a knot and pass the other through the hole in the step. We do the same with another piece of rope, threading it into the second hole of the same step. We have the first step of the ladder ready.
- We measure 25-30 cm up from it and tie knots on both pieces of rope. We string the step again. We already have two steps of the ladder. To ensure that the distance between all steps is the same, you can make a fairly simple device.
Two bars stuffed onto the plank will help make all the steps the same
- In this way we put all the slats on the rope, securing them from below with strong rope knots.
- We also fix the last step with a knot. At the end of the ladder there must be at least 30 cm of rope left for reliable installation of the rope apparatus to the general structure of the wall bars.
- If desired, the edges of the steps can be trimmed with duralumin or brass rings.
- Using a drill in the second side of the horizontal bar, we form two holes at a distance identical to the width of your stairs. And with the help of a rope we securely attach the projectile to the general sports facility.
This is what the finished staircase should look like
Installation and installation of a finished wall bars
So, the whole structure is ready. All that remains is to install it on the spacers. To do this, we screw spacers into the upper and lower parts of the sidewalls of the wall bars, install the structure in the desired location and then unscrew the spacers to the limit, ensuring the absolute immobility of the structure.
It is important to remember that it is advisable to periodically check the spacers and, if necessary, tighten the nuts.
And for those who still want to install a ready-made corner by attaching it to the wall, we inform you:
- It is better to install the structure to a brick wall using dowels;
- TO concrete wall- on anchors;
- Plasterboard walls are just spacers.
And be sure to equip the children's sports corner with soft mats. You don't have to worry about possible injuries to your baby and his friends.
Share with your friends!In the summer, when hot days arrive, most city residents tend to spend their weekends at the dacha. After all, here you can sit comfortably in a hammock, hide under the treetops or in a gazebo and have a wonderful rest. Adults will definitely find summer cottage something to do. But the kids need to create special conditions. In order for the baby to fully rest, it is recommended to build a playground for him. Children's sports complexes for the dacha allow you to have fun in your free time. At the same time, the child develops physically.
Planning stage
Children's sports complexes for the street and cottages can be very diverse. They can be easily purchased at the store. But more pleasure will come from a structure assembled with your own hands. Initially, you should consider the functionality of such a platform.
For older children, children's sports complexes for the dacha are preferable, containing:
- small football field;
- strength training equipment;
If the child is still small, he will be delighted with the complex that will be equipped:
- sandbox;
- slide;
- swing;
- small strength training equipment;
- a small house (hut).

All these elements are easy to create with your own hands. But initially it is necessary to carefully plan the drawings of all devices.
Selecting a territory
This is another one important point, which needs to be given the closest attention. Of course, outdoor children's sports complexes for a summer residence can be located in any area of the garden. However, the child should feel comfortable on such a playground.
- The sports complex must be in the shade. But you should not choose the north side for it. Otherwise, no rays of light will enter the area at all. The best option is considered to be the southwest direction. You can use a canopy to create shade. It’s a good idea to place the platform under a spreading tree. However, in this case, in order to avoid injury, it is necessary to cut off the interfering branches.
- It is recommended to choose a place for the site near the house. In this case, you can easily watch children playing from the mansion.
- You should not place flower beds or a vegetable garden near the site. By following this rule, you will protect the child from injury, and plants and flowers from damage.
- Be sure to consider the direction of the wind. Outdoor children's sports complexes for dachas are not placed in drafts.
- Carefully consider the dimensions of the site. Some swings and exercise equipment must be kept at a certain distance for safety reasons. This will help avoid injuries in the future.

Sandbox equipment
If the children are small, do not forget about important element for games. When planning to properly equip a children's sports complex for your dacha with your own hands, be sure to set aside a place for a sandbox.
It's easy to build:
- Dig a hole 40 centimeters deep.
- Create drainage system. It is recommended to add a layer of pebbles. You can use small crushed stone or rubble.
- Determine the area allocated for the sandbox. Drive 4 bars into the corners.
- Nail 4 sanded boards to them.
- Place 2 or 4 more horizontally on the resulting vertical ribs. These should be smooth boards. After all, they will become seats.
- All that remains is to fill the sandbox with sand.
To protect it from debris and uninvited “guests” (cats, dogs), it is recommended to consider a lid. In this case, the sandbox will always be clean. And you won’t have any hassle with cleaning.
How to make a slide?
It is difficult to imagine a children's sports complex for a summer residence without this element. The photos posted in the article allow you to get acquainted with the original and good options arrangement of sites.

So, building a slide for children is not difficult. You can make the stairs and frame yourself. It is best to buy stingray in a store. You can choose straight, helical or pipe-shaped. Do not forget that it is the stingray that will protect the baby from injury.
Let's look at how to make a slide:
- For the frame, use a beam with a section of 10x10 cm.
- Be sure to make the surface smooth.
- To connect the timber from below and above, use boards hardwood(2.5x10 cm).
- To make a staircase, 2 bars should be attached to the frame at an angle (approximately 45 degrees).
- Steps are nailed to these boards. They are made from support bars.
- Let's move on to attaching the slide. We install the guide bars at an angle.
- At the same time, we place and secure boards on them. It is on them that the ramp will be placed.
- All wooden components must be treated with a protective compound.
The design should not contain sharp corners. If it is high, it must be equipped with railings.
Vertical swing
Children's metal sports complexes for the garden benefit greatly. You can, of course, use wood. But it is better to prefer metal. After all, he is the most reliable and durable material, allowing you to withstand any load. In addition, a child will never drive a splinter on such structures.

You can make a vertical swing as follows:
- The support pillars must be dug approximately 60 centimeters into 2 holes.
- The crossbar can be a wooden beam or a galvanized water pipe with a diameter of 5-8 cm. It should be firmly secured to the supports.
- Ropes are tied to the crossbar. It is recommended to use synthetic ones.
- A seat is secured between the ropes. For babies, make a backrest. Original version could be a seat made from an old car tire.
- Be sure to check that the swing has a streamlined shape. Smooth all corners.
Rings trainer
Take a closer look at your child. Which exercise equipment gives him the most pleasure? They are the ones that should be organically integrated into children’s sports complexes for the street and the country house.
The “Rings” simulator is very popular among children. They will need strong chains. It is desirable that the height of the rings can be adjusted.
"Rukokhodki" for children
The kids really like this simulator. To create it, you can use cuttings of shovels. The main thing is to choose the required diameter. Place them at a low height.
The wavy structures will delight kids greatly.
Exercise machine "Climbing wall"
You can perfectly diversify children's sports complexes for your dacha using original ideas. The climb up the hill is usually equipped with a simple staircase. But it is very interesting to arrange it as a “Climbing Wall”.
For this you will need boards. Cut holes in them for the legs and arms, randomly located. It is desirable that such a “climbing wall” be inclined.

Be sure to think about it safety rope with nodes.
Exercise machine "Log"
This is another good idea that allows you to create unique children's sports complexes for the garden that will delight children. Create a great exercise machine for developing balance. It is very easy to make.
Take a regular log and peel the bark off it. After sanding, coat with a protective compound.
Install the log on metal or wooden supports. It should not be raised high above the ground.
"Rope" for the guys
This is a favorite exercise machine for older children.
Tie the end of the rope into a large knot. In this case, the child will feel comfortable leaning on it.
You can tie knots throughout the entire rope (every 50-70 cm). This will provide additional support for your legs and arms.
Create original design not difficult. The main thing is to plan correctly and select the most interesting simulators.
It's no secret that for a child's harmonious development, regular exercise is required. But what to do if working parents have absolutely no opportunity to take their child to classes at least two or three times a week (this minimum required for a growing and developing organism)?
A specially equipped sports area can be a salvation and way out. Spacious or quite compact - depends on the free space in the apartment or house. What arrangement options are possible? And where should you start?
Two in one. If the baby has own room, then you can purchase a combined modular bedroom-game room. It is very convenient, although not cheap.Exact calculation
To begin with, deal with general characteristics and expert recommendations.
■ Square. The sports corner can be from 2.4 to 2.9 m in height and from 0.5 m in width.
■ Safety. This is the most important requirement. Firstly, it is very necessary reliable fastening. Secondly, it is important that all elements are at the correct ergonomic distance from each other (the child should not hit anything while playing).
■ Material. Now the most environmentally friendly - wood - is in great demand. And for good reason, today very often in interiors (not only country houses, but also city apartments) use the so-called “ Scandinavian style“- a wooden corner will fit into such a space just perfectly. On the other hand, the second most popular, metal, is much easier to maintain and more durable (which is important - after a while the structure will be easy to sell!). However, it is more bulky and will be more difficult to dismantle.
■ Interior. Many parents admit that they do not buy a sports corner for fear of spoiling the entire interior. Like, how to enter Gym V classic bedroom. In fact, this task is not easy, but quite feasible. Just before purchasing this or that option, carefully study the assortment of stores - you can always find something suitable. Perhaps it will be a little more expensive, but here everyone makes their own decision.
Which is better to choose?

Floor-standing. They are the most mobile, do not have any fastenings; if desired, such a corner can be transported to the dacha, easily sold or given as a gift if the child has already grown up. Most often, such structures consist of ladders, slides, ropes and small swings. The disadvantage of this option is that it can take up about 2 m2 of floor space, which is unrealistic for a small room.
Mounted or attached. Their basis is a Swedish wall. All accessories are already attached to it: slides, horizontal bars or a punching bag. Such a corner does not take up any floor space at all.
Spacers. They are installed in the spacer between the floor and the ceiling (which saves the walls from drilling). The corner, as a rule, consists of a wall bars and several additional equipment: a swing, gymnastic rings, a rope or a rope ladder.
And finally, no matter which option you choose, it is important that the structure is installed by a professional! It is necessary to strictly observe safety standards, check the load with increased weight, swing the corner (to see if it will fall).
Alternative
Is there simply no space to install a stationary, full-fledged complex? We offer small ideas of what else you can come up with for games and activities for your son or daughter.
Swedish wall. A kind of ladder (fixed to one of the walls).
Horizontal bar.(design, installed anywhere depending on the child’s height).
Rope, gymnastic rings or punching bag(attached to the ceiling).
Pediatricians are sounding the alarm!

In the 21st century, it has become very fashionable to pay maximum attention from the first days of life intellectual development children, but few people think about physical activity... And in vain, it is the lack of exercise that becomes the cause of common “youthful” diseases.
Getting a student interested in sports is not difficult. Watch a good movie: “Legend No. 17” (Russia, 2013), “Champions” (Russia, 2014), “Faster, Higher, Stronger” (Russia, 2016), “Moving Up” (Russia, 2017). And when your child becomes interested in something, continue to fuel his interest: go to performances, buy books. For example, “Football for Children” from EKSMO.
1 of 4

Lime Velvet bean bag chair, www.superpuff.ru, RUB 4,099.
It is necessary to train a person to monitor own health from early childhood. It will be very good if you make a special one for your child in the house. playground. It can be performed with a sports direction for the purpose of developing your baby, but for high-quality execution necessary the right approach. It should be taken into account certain rules security and make this place attractive in terms of design.
Step-by-step creation of a children's sports corner with your own hands using a specific example
First of all, you need to decide future idea for a child. Often, children's sports corners with their own hands are a Swedish wall, which looks like a ladder with a horizontal bar. This is one of the simplest and most necessary solutions, so we will provide step by step instructions creating such a project. You will need the following tools: drill, saw, sandpaper. The materials needed will be two beams up to the ceiling, 5-8 shovel handles, 5-6 iron corners and screws for fastening to the wall.
Children's sports equipment children's sports corner do-it-yourself sports corner
Stages of self-execution of the Swedish wall:
- Initially, you need to adjust the timber to the height of your ceiling.
- By using sandpaper you need to achieve the desired smoothness of the timber. Try to remove possible unevenness as much as possible to avoid subsequent injuries.
- Make 10 holes in each of the bars into which the crossbars will fit.
- Then the corners are screwed to the bars and the entire structure is pressed against the wall.
- Using glue in a lying form, you need to glue the crossbars, and then firmly attach them to the wall.
- Using screws, it is attached to the structure, which should protrude forward by 60 cm.
- You can make pendants from cables and belts and attach gymnastic rings to the horizontal bar.
Another good idea would be to create a rope ladder using rope and wooden steps. For complete safety, it is advisable to lay a soft mat under the children's sports corner, made by yourself.
Wall bars - drawings of a sports corner in the children's room  sports section
Unique ideas for a children's sports corner with your own hands with a description
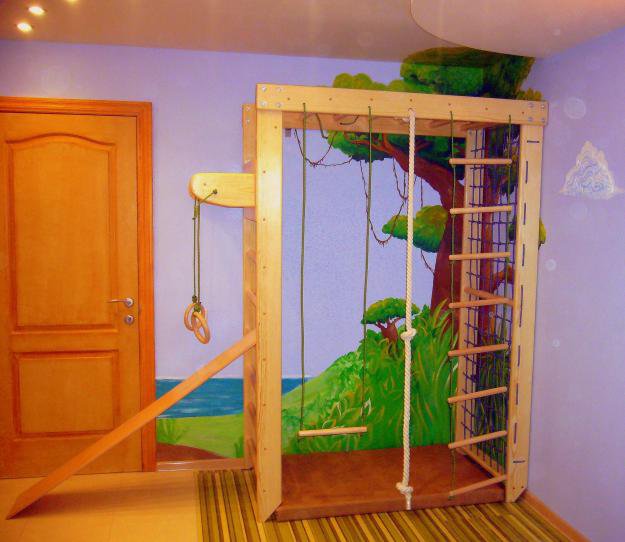
It is best to place a playground for a child in one of the corners of his room so that he can play sports at any time. You should not be afraid to make your own adjustments to the implementation of this project, since interesting idea Your baby might like it. Designers advise adding to this small world bright colors. Modern solution is the use of photo wallpaper as a background behind the installed structure.
We provide you with some great ideas for creating a children's sports space at home:
⇒ You can directly use existing furniture, to which ropes or ladders are easily attached for an active pastime
⇒ Pirate ship from bunk bed will be a pleasant surprise for any child
⇒ The sports corner can be made in the form of a jungle so that the baby can move around in it, feeling like a resident of the forest kingdom
⇒ For a small room after all the best option is considered a Swedish wall, which can be performed in folding form
⇒ A basketball hoop on the wall and a soft mat on the floor will allow you to create an economical type of children's sports corner with your own hands without extra costs
⇒ You can easily make a whole sports complex out of wood, with a house, a slide and a horizontal bar
⇒ Metal horizontal bars can be painted in the desired color. They can withstand heavy loads, so several future generations will be able to play sports here. However, for the younger preschool age it is better to prefer wood.
Self-execution sports ground for a child can save money and help implement a high-quality idea on an individual basis. It is advisable to initially get to know the baby’s personal preferences, and then equip this place accordingly. Of course, it would be nice to place drawings of your favorite heroes or cartoon characters there, which will once again attract the child.