Plywood is a very accessible, relatively inexpensive material for various crafts. Things made from it can have not only decorative value, but also be useful in our Everyday life, at home.
Plywood is an easily processed building material, which is produced by gluing together several layers of veneer and specially treated wood chips.

Introduction
These sheets, which can be used for making crafts and structures, may differ:
- number of layers of veneer - three-layer, five-layer and multi-layer;
- the type of wood from which the multilayer sheet is made (deciduous or coniferous);
- according to the degree of processing (polished on one or both sides, not polished).
Building codes and standards
To learn more about the subject in question building material(on the classification of the entire plywood nomenclature, grade, standard sizes produced), which can be purchased for the manufacture of many products and crafts, it is recommended that you familiarize yourself with the following documents:
- GOST 3916.1-96 “Plywood general purpose with outer layers of hardwood veneer.”
- GOST 3916.2-96 “General purpose plywood with outer layers of softwood veneer.”
Schemes, drawings and patterns for products made from plywood sheets

Computer drawing programs
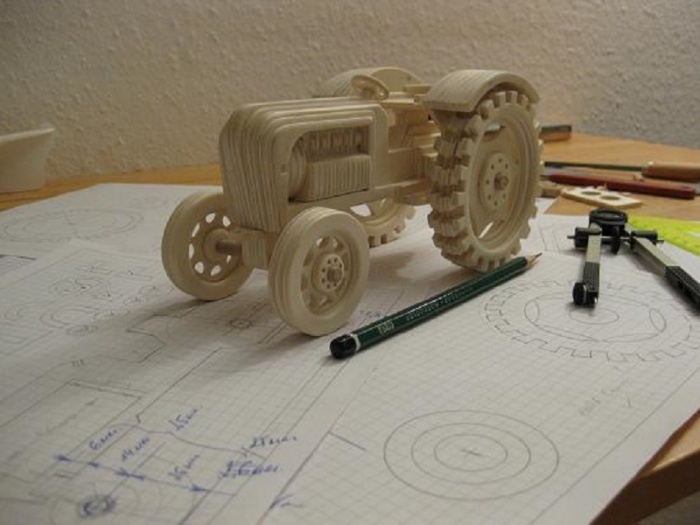
Today you can easily find a diagram, a pattern for a plywood structure, so that you can then prepare any drawing using computer-aided design systems (including the above cat pattern). Next, use a plotter to display paper sheet required format.
Popular drawing programs are the easiest to learn and can be used in 2D and 3D modeling, including for plywood structures:
- "KOMPAS" - complex automated systems, with the possibility of drawing up drawings in accordance with the standards of the ESKDI and SPDS series;
- AutoCAD is a two- and three-dimensional computer-aided design and drawing system.
So, if you cannot find a detailed drawing of the plywood product you need, then the application capabilities of the given software will help you make a full-fledged drawing using any diagrams and patterns posted on the Internet.
Kayak
Price construction plywood, from which the kayak is made, is simply incommensurate with the pleasure that the person who made it with his own hands, who loves water trips on rowing boats, will receive. 
The Eskimo kayak is the same kayak among the Aleuts - a traditional rowing boat of the Arctic peoples. This boat can be single, double or triple. Let's post drawings of a plywood kayak for one person. 
The algorithm for building a rowing boat from plywood sheets is, in principle, general, with the exception of some nuances. Step by step order Actions for cutting, processing and assembling a kayak can be seen in the video in this article.
Plywood table - simple and functional

Clear drawings of a plywood table with your own hands, which will be easy to implement even for a person without special carpentry skills and experience.  Table cover (1 sheet) - 1300 x 600 x 16 (mm)
  Inner wall (1 sheet) - 1170 x 400 x 16 (mm)
Plywood constructor
Various plywood construction kit drawings are now gaining more and more popularity. Assembling such models from safe material A very useful activity for children and teenagers. Such crafts will become good examples of collections and will decorate the modellers' corner.
Tank


The stages of work on installing a tank model are as follows:
- The plywood is sanded (first with medium-grain sandpaper and then with fine-grain sandpaper);
- The drawings are carefully transferred through carbon paper onto sheet plywood material sanded with fine-grained abrasive.
- Drill into the corners of the contour transfer through holes(drill 3 mm or more);
- Attach the file to the jigsaw and start cutting out the elements of the tank;

Note!
Cutting out parts must begin inside the contours of the tank blanks, and only then around the office itself.

Advice!
When assembling the model's plywood assemblies, have different types of needle files on hand so that you can fit the elements together at any time.
- After adjusting all the parts, you can start gluing them (for example, with PVA glue, “Titan”);
Advice!
In order for the components and elements of the tank to grip each other more firmly and reliably, you can tie them with thread or rope for a while after gluing them.
- A cannon can be made by cutting wooden handle brushes for watercolor paint or other auxiliary material;
- If desired, you can apply a side number or other inscriptions and patterns to a tank, or any other model, using an electric burner;
- For greater preservation and decoration of the model, they can be coated with varnishes and paints.

Car – retro (old Mercedes)

Note!
When you transfer these drawings of a plywood machine with your own hands onto the plywood sheets themselves, do not forget to transfer the numbers.


When assembling the model itself, look carefully at the numbers.
IN in this case the process is carried out according to the following algorithm, in accordance with digital notations:
- the part or assembly numbered 1 must be connected to another number 1;
- and part number 2 is attached accordingly to the next number 2 and so on until the machine is assembled.
Gun

Drawings of a pistol made of plywood model "Bulldog". When assembling, we follow the same rules as when assembling a machine: the same numbers must be mounted with each other. 

Advice!
This model of pistol is best coated from a bottle of spray paint; for a better resemblance to the original, layers of black paint can be applied.
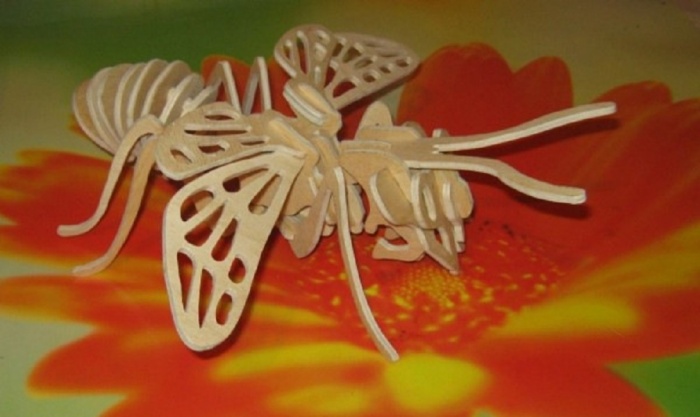
Dinosaur

When designing, drawings of plywood dinosaurs, for example, those presented below, can be made in any scale you need according to the presented pattern in a drawing program for a computer.
Preparing the material, model elements and the assembly itself is not difficult, but you will have to have some patience when working with a jigsaw and adjusting the model components to each other. 
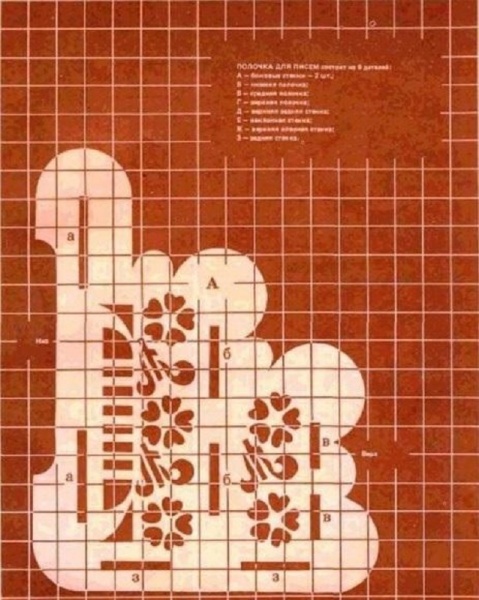
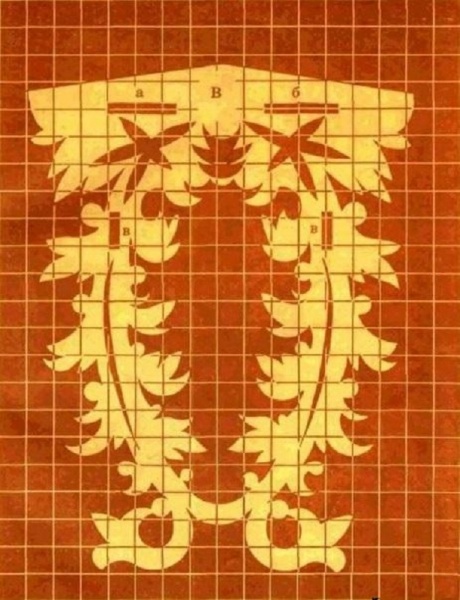
Napkin holder – “Grape leaves”

This item in the shape of grape leaves will always come in handy in household for its intended purpose - for napkins, and for storing, for example, sheets of paper of the selected format: 

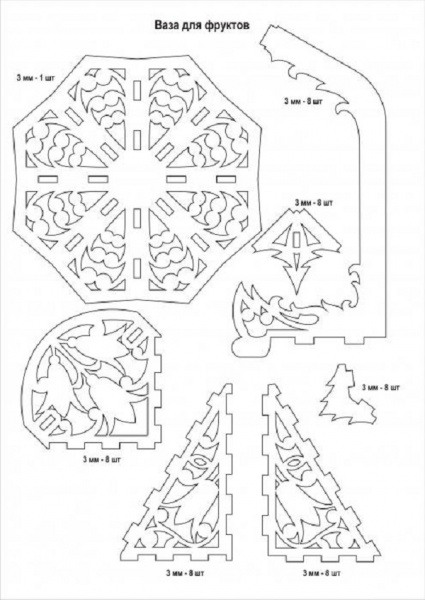
Vase, stand for pencils, pens, brushes

Drawings of a plywood vase, from which you can easily cut out a craft of the size you need: 

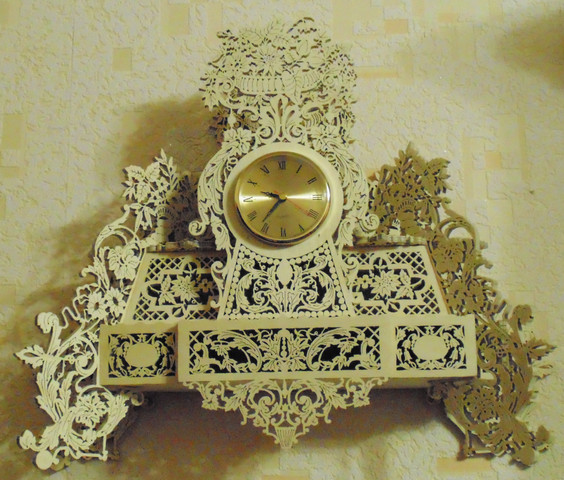
Plywood panel
It is the ease and simplicity of cutting with a jigsaw from plywood sheets of various configurations with different sizes, installation from them various designs, allows you to perform a variety of decorative panels for the walls of our home. Any panel made carefully is an excellent gift for family and friends. 
Drawings of a plywood panel, which also serves as a shelf in the household: 

Some useful tips and warnings:
- When transferring patterns and drawings onto plywood, use the thinnest and sharpest pencil lead. It's even better to use a used ballpoint pen, then the lines will always be the same and the copy paper won't be torn by the ballpoint. It is convenient to transfer drawings to plywood using laser printer.
- For better fastening of parts, where possible, it is recommended that the width of the grooves correspond to .
- There are two types of files with large and small teeth. It is more convenient for beginners to learn how to use a thick file, and cut out small parts with a thin file, already having some experience and skills in using a jigsaw.
- The files must cut from top to bottom, so pay special attention to correct fastening files in a jigsaw.
- Files can easily break, so cut carefully and do not allow parts to hang on the saw blade.
- When purchasing a file, make sure that the teeth are sharp, and that the file itself should not bend easily, but rather be firm. It’s not the flat ones that are easy to use, but the so-called “twisted” files – they can be used to make cuts in any direction.
- For those who enjoy cutting out structures from plywood sheets as a hobby, there is no need to purchase a band saw; it is enough to purchase a jigsaw. Although everyone is an amateur, some craftsmen still often resort to a hand jigsaw when they “need to get a feel for the material.”
conclusions
- Before choosing, purchasing and direct work With the material from which you will cut models, panels, designers and structures, familiarize yourself with its types, classification according to construction documents (GOST).
- For sawing, purchase quality tool, equipment and accessories for it.
- Make your choice responsibly quality plywood. Don't limit yourself to it visual inspection, tap it for internal voids and delaminations due to poor gluing of the veneer layers.
- Before working with a jigsaw, optimally equip your workplace. Special attention Give it good lighting so that the cut and markings are clearly visible and your eyes don’t get tired. It’s not a bad idea to use a strobe light to illuminate the area where you’re working with a jigsaw. Convenient and comfortable sawing!
Wood and sheets (plates) based on it are one of the cheapest and most pliable materials. For those who like to work with a jigsaw, plywood is primarily of interest.
It is precisely this that home craftsmen most often choose to make various crafts. If you organize your work correctly, you can create real masterpieces.
Crafts made from this material are made for various purposes, but basically they can be divided into two groups - for decorating premises or areas (for example, fences with inside, garden plot and so on).
Type of plywood
If you focus on optimal combination such indicators as quality and price, then FSF or FC products are selected. It is characterized by resistance to dampness and temperature changes. This alone is enough to ensure the durability of a handmade craft. But between these varieties of plywood there are fundamental difference– in the component composition of the glue that holds the veneer layers together.
In the first case, it is toxic, so FSF sheets are used only for outdoor work. But for crafts intended to be placed in the house, FC plywood is quite suitable. Its analogues are much more expensive, and therefore are not considered as a material for simple, easy-to-make crafts.

Type of sheet sanding
It’s not difficult to figure it out: Ш1 and Ш2 – respectively, one- and two-sided; NSh – rough-processed plywood. That is, the craft will still have to be “brought to mind” and polished. The choice of this parameter depends on how it is planned to be designed and placed in the future. A sample mounted on the wall and, for example, a figurine (stand, vase, toy, or other) that is visible from all sides are different things.

Plywood texture
A lot depends on personal preference here. If you plan to keep the crafts when applying a protective coating natural look wood, then it is better to purchase birch veneer plywood for varnish. But for subsequent painting it is advisable to choose pine.
For various crafts made from plywood, it is advisable to focus on oil or acrylic base. The explanation is simple - they are less susceptible to fading in the sun, and therefore do not have to be updated frequently outer covering; it will not change its original appearance for several years.
Plywood grade
When choosing a sheet for crafts, you must first inspect it for knots and inclusions. Significant defects will not only complicate the cutting of the material, but also initiate the appearance of cracks or “holes” (as a result of the same knots falling out). Next is an inspection of the end surfaces. During the cutting process, plywood is subjected to dynamic loads (vibrations). If at least signs of veneer peeling are noticeable on the side parts, you should not purchase such material, even if its price is too tempting.

In the future, in the process of making crafts, many problems will arise. As a result, plywood is rejected and its consumption increases. In total terms, the money will be approximately the same compared to purchasing high-grade material, but in terms of time spent and quality of work, it will be a big minus.
Sheet thickness
If crafts are cut out with an electric tool, then it is limited to 30 mm. For a hand jigsaw, it is advisable to use relatively thin plywood; maximum three layers. That is, no more than 9 mm thick.
What you need for work
Jigsaw
This is a priori, since we are talking about making crafts using such a tool. The question is different - which one is better to work with. Electric models are much more expensive than their manual counterparts, but have many advantages. About in .

For example, high speed and cutting accuracy, clean edges, the ability to change cutting parameters and a number of others. If crafting from plywood is not a one-time, short-term hobby, then it’s worth spending money on an electric jigsaw. It is universal and will come in handy on the farm more than once, since depending on the type of file it can “work” not only with wood, but also with non-ferrous metals, plastics, and plexiglass.
It is somewhat more difficult with a hand jigsaw. Its design is quite simple - a frame with screw clamps and a handle + a file.

The nuance is that cutting blades break quite easily (from excessive pressure, changing the position of a hand tool), and therefore it is advisable to purchase them with a reserve; Fortunately, they are cheap.
Hacksaw
It is needed only at one stage - when cutting dimensional sheet into separate fragments. Doing so with a hand jigsaw– an occupation with little prospects and unprofitability; A lot of time and files will be wasted.
Stand
No one will cut plywood by weight; It's clear. Cutting out parts by laying the sheet on the tabletop risks damaging it. It is precisely in order to ensure the “safety” of the latter that the stand is needed. You can make it yourself from scrap boards. What such a device looks like (one of the options) can be seen in the figure.

The stand is fixed to the base using clamps (on a non-working table) or self-tapping screws (if there are carpentry workbench). Although these are not the only mounting options. It is not difficult to understand what to do, depending on local conditions.

Skin
The ideal tool for fine woodworking is the . But for crafts made from plywood that do not have large areas, it is not suitable. Therefore, only sandpaper; medium-fraction - for primary grinding of workpieces and with fine grain - for finishing.
Additionally
- Files and needle files.
- Awl.
- A simple pencil and carbon paper.
- Glue, if the craft is created as a composite or multi-level one, that is, with two or more shaped fragments fixed on separate areas.
- Varnishes, paints, stains.
Examples of drawings and sketches of plywood crafts


Copying “one to one” in this case is hardly advisable. Any work done with your own hands is a process with a creative component. That is why the dimensions should be determined independently, depending on where you intend to place (or how to use) the craft. For example, will it “look” in a particular place, will it fit organically into the interior of the room.
Even if you liked the drawing, it is not difficult to change the geometry of the figure by applying the scaling rules. Especially when it comes to drawing a contour on plywood with a simple pencil; It’s quite easy to correct any mistake, or to correct anything in certain areas. It is not much more difficult to modify any sketch, introducing something of your own, original into the sample.


There is another solution - you can download any picture you like from the Internet. Printing it to the required scale is not a problem. All that remains is to transfer it onto the plywood using carbon paper and shade the areas that need to be cut out. This is if we are talking about figurative crafts. It's even easier with a contour pattern; cut exactly along the line - and that's it, ready. All that remains is to work on the artistic design of the product.


Basic rules for cutting with a jigsaw
- Laying under a sheet of rigid backing. It is to ensure the hardness of the surface under the plywood that a stand is used. A sheet, even a small one, bends quite easily (under pressure), so without this device a high-quality cut, strictly along the line, will not work.
- The working body of the jigsaw (file) must be strictly perpendicular to the end of the sheet. And constantly, throughout the entire process of cutting the material.
- The tool is fed along the line forward movement, but without effort. Otherwise, the file will break immediately. The same goes for when it deviates from the “vertical”.
- Sawing out “blind” holes, that is, somewhere along a sheet of plywood, indented from its edge, is done as follows. A “hole” is drilled at any point on the outlined contour with a slight offset towards the center of the fragment. The diameter is chosen so that the file can easily fit into it. After attaching it to the tool frame, you can cut in any convenient direction.
- A figured cut in plywood involves sharp turns, smooth bends, and so on. First, at the point of change of direction with a jigsaw, without changing its position, you need to make a small hole in the material. To do this, you need to continue cutting with a file, strictly maintaining the orientation of the tool, and at the same time rotate the piece of plywood. As soon as the plane of the cutting part coincides with the required direction for further cutting, it can be carried out along the intended line.
Having mastered production sufficiently simple crafts made of plywood, you can take on more complex options. As an example, self-assembly of furniture (shelves, bookcases, original hanging shelves). With a skillful approach to business, plywood produces excellent countertops, cutting boards, window frames and so on. It’s easy to make a folding chair from this material, in various modifications. Who is interested in this?
Plywood also makes excellent frames for paintings and photographs. Those who have a plot will be able to do some decoration outbuildings; the same gazebo, a house over a well or something else. There are many options. The main thing is to want to learn.
In the process of preparing for cutting with a jigsaw, you should not forget that all drawings and drawings are nothing more than the basis for developing your project. A little imagination, time, effort, and you can make a truly real masterpiece from plywood.
- Hand tool
- Jigsaw
- Preparing the stencil
- Sawing process technology
- Defects in work
Wood carving with a jigsaw is rapidly gaining popularity: many people want to purchase an interesting decorative item to decorate their home, furniture, and even clothes! Carved objects of various thicknesses fit organically into any interior style; people often purchase photo frames for photographs with ornaments, cut-out words and letters, or order intricate shelves and other interesting products. Few people know that artistic cutting out of plywood with a jigsaw is a task accessible to anyone, even the untrained and inexperienced. You just need to understand how to work with the tool.
What is a jigsaw: general description
A jigsaw is a tool designed for cutting out plywood various contours, including curved ones. It is equipped with a blade with fine teeth that can make an even cut of plywood without the formation of significant burrs.
Hand tool
The ancestor of this type of tool is a manual jigsaw. It consists of a metal arc in the shape of the letter “U”, between the ends of which a sawing blade is stretched and attached to clamps. They securely hold the file during operation and allow you to adjust its tension. On one side of the frame there is a handle.

The clamps on the tool can rotate, creating different planes for sawing, thereby providing the opportunity for wood carving of varying complexity.
When cutting from plywood with a hand jigsaw, you need to be careful: its design is quite fragile, and during intensive work, the blade often breaks from force and heat, so it has to be replaced. To do this, each master must have several dozen spare files.

When working with a jigsaw for carving internal contours It is convenient to use such an auxiliary board, as in the photo: it will help both protect the table and solve the problem of convenient placement of the workpiece.

Jigsaw
The tool runs on electrical network. It is a housing in which the working mechanisms are located, and there is also a handle for control on it. The sawing organ is located in the lower front part. The blade is often protected by a foot, which allows you to cut the contour exactly along the line without deviation. Advanced and professional models jigsaws have various attachments that facilitate the cutting process and straighten the edges of plywood.

Blades can have different teeth in shape and size. It is necessary to select saw blades that are appropriate for the material being processed so that damage and damage to the plywood sheet does not occur during operation of the mechanism.
Classification of jigsaws by power and application:

The instructions on how to use a jigsaw, or the technical data sheet, should describe the main parameters of the tool that must be taken into account when using the mechanism.
Wood carving tools
Sawing with a jigsaw is a creative process, but it requires preparation and additional equipment. What you will need for work:

Preparing the stencil
Drawings for cutting with a jigsaw can be different sizes, depending on the scale of the product being manufactured. To create a diagram of a shelf, a piece of furniture or a composite three-dimensional toy, you can take large leaf Whatman paper A1 or A0, the wallpaper remaining after the renovation will also work; for small figures, use regular A4 paper or another suitable format.

Using a bright pencil or marker, draw the outline of the future product on the surface, following the dimensions. This could be an element for assembling furniture, a shelf or another large product.

There are such a wide variety of templates for cutting with a jigsaw that it can be difficult to choose the right one. It is much easier to come up with your own cutting patterns and transfer them to paper.

Transferring an image to the surface of plywood or boards
Before you start cutting with a jigsaw, you need to transfer the image from the stencil to a piece of wood or plywood. To do this, cut out a shape from a sheet, apply it to the surface of the plywood and carefully trace it. It is desirable that the line be smooth and accurate. We use a simple pencil so that, if necessary, we can correct the line by erasing it with an eraser.
We apply the outline from the back side so that finished product no remnants of the lines were visible. The internal area can be shaded so as not to cut off excess and to mark untouchable areas.
It is important to transfer the design in such a way as to minimize cutting along the grain with a jigsaw - it is so difficult to get an even line.
Sawing process technology
Many people have probably heard how to use a jigsaw. Working with the tool will not cause difficulties if you prepare for it correctly.

Plywood carving begins with the inner contours of the design. To do this, you need to make slots for inserting the tool blade:
- The plywood is often taken thin, and when cutting a large contour there will be no problems, but tension may arise in a small remainder. Sawing with a jigsaw inside can damage the product - chips, burrs, cuts;
- It’s easier to work this way: you always have something to hold the workpiece by. A large sheet is much easier to handle than trying to hold a small sawn piece while shaping its interior.
How to saw with a jigsaw:

Working with a jigsaw is much easier than hand tools, there is no need to make physical efforts and the process goes faster.
How to saw with a jigsaw:

As you can see, there is nothing complicated in this process.
Defects in work
If you did not follow the technology or hold the tool incorrectly, the saw may simply move off the line. Why does a jigsaw cut crookedly:
- tilted the tool while working;
- the tension of the file has weakened;
- With an electric saw, the fastening of the saw may become loose.
To avoid such problems, before starting sawing, be sure to check the tension of the saw and the fastening of all working elements. If the blade is beveled and stuck, it is better to start over and make a line parallel to the defective one.

A little about safety
Safety precautions when working with a jigsaw for cutting plywood and wood are simple:
- Use protective equipment- glasses, gloves, robe. These things will protect you from dust and small chips.
- Sawing with a hand jigsaw should be done carefully so as not to damage your fingers with the saw. Maintain a distance between your body and the tool.
- If you are a beginner, carefully read the instructions on how to use a jigsaw and the main characteristics of the tool. This information will help avoid accidental injury and unit breakdown.
Wood carving with a jigsaw requires care and attention. Both your health and the integrity of the finished product depend on these qualities.
What can be made from plywood: interesting ideas and drawings
Sawing wood with a jigsaw or hand tools is a creative process. You can create many decorative items different directions:

Drawings of plywood crafts do not have to be made in exact dimensions. Even taking an example from the Internet and changing its proportions, you will get a unique product that no one else has in this form.
DIY plywood crafts can be painted or left in a natural color; you can glue buttons, beads, ribbons and other decor onto them to liven up the product. To do this, it is worth involving children in the work; their imagination is a bottomless well of interesting ideas.

We offer you diagrams with photos for cutting out of plywood with a jigsaw.
You can come up with your own idea of what you can cut using a hand or electric tool, make your own sketch and transfer it to paper, then to a piece of wood or plywood.
Carving plywood with a jigsaw requires certain knowledge and skills. If you don't have them, consider the following rules:

One of the most luxurious products, valued for their originality and handicraft, are rightfully considered to be products made in the form of wood carvings. Since ancient times, with the help of this type of art, unsurpassedly decorated towers and huts have been created.
Some of them are currently considered architectural monuments. This art is beginning to revive in the modern world. Excellent helpers in this case are stencils for wood carving.
In contact with
What is a stencil for?
First, let's try to figure out what stencils for woodworking are. These are special ones that are used to apply pattern elements to the surface of wood.
They are much make it easier to repeat identical characters and allow you to speed up your work. For example, the most popular stencils for are samples for platbands.
With their help, quite complex interior and facade design work is performed.
Stencils are divided according to their purpose for creating interior elements:
- ribbon carved ornament;
- carved platbands;
- pilasters;
- towels;
- carved balusters and more.
All varieties are considered professional templates. You can use them create several ornaments for wood carving of a voluminous nature and significantly facilitate the task assigned to the master. There is no need to create them yourself. On the Internet you can find and download the option you like.
Prices for wood carving kits
wood carving kits
How to choose a stencil
Wood carving patterns are so diverse that they can be used by both beginners and advanced professionals. With their help, both simple ornaments and high-level works of art are created.

The main thing is to make the right choice. To do this, you must adhere to certain rules:
- if you started using incisors quite recently, then Don’t choose intricate patterns, since it is quite difficult to work with them, and the workpiece can be damaged;
- for each type of wood carving they choose their own stencil;
- Before starting work, you must apply a stencil design to the workpiece; the lines must be neat and clear.
 Finding stencils today is easy. This can be done using electronic libraries.
Every decorator will appreciate the convenience and wide selection of this source. Here you can choose drawings from a bygone era as well as modern masterpieces.
When making a choice, be sure to compare the dimensions of the workpiece and the image itself.
You also need to choose a sample that will look appropriate on an element of the interior. We pay attention to the nuances:
- for a large product, you do not need to choose a stencil with small elements or openwork patterns;
- for small items, stencils with large designs are inappropriate;
- proportions must always be observed.
All these tips apply to any drawings.
Types of wood carving
Wood carving does not have a narrow direction; on the contrary, it has several varieties:
- slotted;
- flat-relief;
- embossed.
Slotted carving on plywood
 The key to success in execution slotted thread – right choice ornament. Thanks to it, plywood carving sets the overall concept and adds aesthetics to the product.
Drawings and ornaments on floral or animal themes are standard representatives classic style and are suitable for any direction in the interior.
Very often used slotted inscriptions. In this case ready-made stencils difficult to find as they are created individually for each occasion. This is due to the fact that it is necessary to maintain the size, style of the font, and the set of words is always different.
Important! The situation is completely different with patterns of plant, animal and fantasy styles. Many options for this topic can be found on the Internet. Some options are shown in the photo below.
House wood carving
Brownie is the main focus of the design of huts, which is very common in the Nizhny Novgorod region. It is she who can boast of various lace patterns. To perform it yourself, you should select the appropriate sketches.
The main condition for house carving is to avoid small parts. They will get lost on the facade of the house, and will not last long.
Options for house carvings can be selected on websites dedicated to wood carvings. But there are craftsmen who can make a template to order. In this case, you can realize exactly your idea and get an original pattern.
Attention! Patterns for house carvings are applied using tape stencils.
Through wood carving
A distinctive feature of through thread is complete wood removal from the inside of the picture.

Through threads come in different styles:
- simple, in which elements are cut out along the contour of the design;
- openwork, when the pattern is created with a volumetric effect due to multi-level cutting.
Through carvings are used to make frames, various overlays, door panels, and decoration elements.
Through carving in oriental style is done using a jigsaw.
Sawing with a jigsaw
Sawing with a jigsaw is mainly carried out on plywood. For execution quality work must have at least the slightest experience with the tool. Also an important factor is the presence of an original stencil depicting animals.

Commonly used stencils:
- a pair of swans;
- head of a deer, wolf;
- cockerels on a knitting needle;
- a horse standing on its hind legs;
- butterflies.
It all depends on the style of the interior that needs to be complemented decorative elements. You can easily find examples of templates on the Internet.
 Most suitable material for sawing – birch plywood 3–10 mm thick. In addition, for work you need to prepare:
- copy paper for interleaving the pattern;
- special paper for sanding parts;
- wood glue for joining parts;
- clear varnish to give a decent appearance.
Before starting work, the workpiece is carefully polished with glass paper, only then do they begin to transfer the design.
Floral ornament
Often, floral or foliage patterns are made in the form of stripes or borders consisting of repeating patterns. Can be made in an individual composition that contains an image trees, fruiting plants, various floral elements And so on.

The work is done in various ways:
- display in a naturalistic form;
- simplified plant elements.
Floral ornaments for carving wood are in second place in popularity after geometric pattern. Favorite thematic elements at all times are lilies, grape leaves and berries, oak, hops, ivy, etc.
Sketches for patterns
Stencils for wood carving are quite diverse in their subject matter. Some of their variants are used in a narrow direction, and some can be found on any interior elements.

Here are several sketch options that can be used for a specific purpose:
- Wooden patterning is used to decorate the facade of houses. It looks perfect on both doors and walls.
- cutting artistic style used to decorate dishes and furniture.
- Products made using intricate openwork cutting are especially held in high esteem. Most often it is used for household items.
Important! A correctly selected sketch will help you complete wood carving quickly and accurately.
Useful video: templates for wood carving
Each type of cutting has its own processing technology, and detailed elements are maintained. In some cases, several techniques are used simultaneously, which are subsequently transformed into a three-dimensional canvas with the presence of smallest fragments. This characterizes a true master.
Crafts made by craftsmen with a jigsaw look elegant and stylish. IN in capable hands ordinary tool turns into a miracle jigsaw, with the help of which incredible masterpieces are created. Artistic sawing maybe just a hobby or professional activity, because products self made are always appreciated. About the features of the miracle jigsaw and the order of execution interesting crafts will be discussed further.
Characteristic features of a jigsaw
The miracle jigsaw provides convenient cutting of lines on wooden base, this is facilitated by a narrow cutting blade. More useful for woodworking band-saw, but cutting out plywood is a better miracle with a jigsaw. The main advantages of the tool are as follows:
- Accurate cutting of parts, the cut line comes out quite smooth and does not require grinding.
- Thanks to the narrow blade in the miracle jigsaw, cutting out sharp corners and small parts is possible.
- Processing of internal grooves begins with a hole prepared with drill number 3.
Relatively technical characteristics the miracle of a jigsaw, the following features are noted:
- Easy stretching and fixing of the fabric.
- The cutting process is much easier than with a band saw.
- Cutting out a miracle with a jigsaw creates virtually no risk of injury.
- The tool does not require frequent adjustment.

There are several parameters that you should focus on when choosing a miracle jigsaw for cutting:
- The main thing is capacity; this indicator indicates the size between the rear wall and the cutting blade. There are miracle jigsaws with sizes from 12 to 26 inches.
- The thickness of the material that the tool can process.
- Number of moves in 1 minute.
- Saw stroke height.
To cut complex elements from plywood using a miracle jigsaw, two types of saws made of steel are used.
Advice! For beginners, it is better to practice on a large-toothed blade designed for thick plywood. It is also used for making cutting boards. Small teeth on a thin file allow you to cut out filigree elements of crafts from thin plywood.
The result of the work of a top-class professional is presented in the photo:

Preparatory steps
Sawing out a miracle with a jigsaw requires painstaking work from the master and develops perseverance and patience. Initially, you should take care of organizing your workplace. Prerequisites for comfortable work - high-quality ventilation and lighting. A private house provides more choice utility room, in the city suitable for apartment glazed balcony.
Second important stage is the purchase of material. High-quality plywood reduces the risk of part delamination or cracks appearing when cutting out a miracle with a jigsaw. The second reason for violating the integrity of the material is an incorrectly selected canvas or unprofessional actions. For cutting crafts, plywood with a thickness of 3-4 mm is intended. The following steps will help prevent delamination:
- Depending on the area of the surface to be treated, dilute the required volume of the mixture of water and PVA glue. For small areas, 2 tablespoons of water and a few drops of glue are enough.
- After thorough stirring, the solution is applied with a brush to the back wall of the plywood workpiece in 2-3 layers.
- The material is left until completely dry.
Comment! Glue solution will successfully replace furniture or parquet varnish.

Before cutting out the miracle with a jigsaw, the plywood needs to be cleaned. Chips, microscopic cracks, dark marks from knots are removed sandpaper different grain sizes. To give the surface maximum smoothness, stripping the plywood against the grain helps. First, work with medium-grain paper, the final touches are applied with fine-grain sandpaper. The complete absence of burrs allows you to move on to the main stages of work.
A simple example of a craft for beginners is presented below:


The process of creating crafts
Preparing a drawing, cutting out a miracle with a jigsaw, assembling parts and decorative finishing are the key steps in creating original crafts.
Translation of the drawing
A well-executed drawing will ensure quick assembly of finished elements into a single figure. Otherwise, after painstaking work with a jigsaw miracle, there is a risk of encountering the problem of misaligned grooves and the need to remake individual parts. You can take drawings of crafts from this article or try to create a unique sample for cutting. After printing or drawing on paper, the drawing is transferred to plywood using one of the convenient ways. In the first case, the drawing is secured with buttons on plywood and copied using a pen and ruler.


To cut out crafts with a miracle jigsaw, the technology of thermal transfer of toner from paper to plywood can be useful:
- Select a material with a low toner retention rate (like glossy paper).
- In the printer settings, high-quality printing is selected to get more toner. In this case, the procedure for cutting out a miracle with a jigsaw is easier.
- The printed image is attached front side to plywood and ironed. For A4 format one minute is enough. Instead of an iron, a hair dryer is suitable.
- After the paper has cooled, it is removed. If there are gaps in the outline of the sketch for cutting out a miracle with a jigsaw, they are completed with a pencil.

Making holes and sawing
Cutting out the internal grooves with a miracle jigsaw is preceded by the design of the holes. The process includes the following steps:
- Prepare a drill with a drill diameter of 3 mm or an awl of appropriate sizes.
- The tool is placed in the middle of the groove and a hole is made.
- It is recommended to first protect the desktop with a board.
- Having an assistant is welcome.
To make a miracle with a jigsaw into internal grooves, a nail file is inserted into the hole and secured in the upper part of the tool. After processing small area about 2 cm check the evenness of the cutting. If the cut is of poor quality, it is better to replace the blade with a more suitable specimen. If the cut is not smooth enough, try correcting the imperfections with a flat file.
Important! Follow safety standards and do not let your fingers get caught in the file.


Cleaning parts
Upon completion of cutting out the miracle with a jigsaw, small chips on back side parts are cleaned with sandpaper. Also, the prepared craft elements need polishing. The ribs and back of the parts are first treated with medium-grain paper, and at the final stage fine-grained sandpaper is used. It is convenient to clean the internal grooves cut using a miracle jigsaw with a rounded file. Strive for a complete absence of irregularities and burrs at the end of sawing.
Having achieved the desired result, they proceed to assembling the parts of the craft, prepared with a miracle jigsaw. Interesting drawing for cutting and photos of the shelves are presented below:


The final stage
After assembling and adjusting all the parts, the crafts proceed to gluing using PVA or Titan glue. Depending on the design, it is recommended to tie multi-layer elements tightly with strong thread and leave to dry. The process lasts no more than 15 minutes. An example of a product that is difficult to cut out with a jigsaw is shown below in the photos and drawings:


You can add decorativeness by burning patterns onto individual elements crafts. First, the drawing is applied with a pencil, after which they work with an electric burner. An openwork vase for sweets will become worthy decoration table:


Sawing out a miracle with a jigsaw is a painstaking task. For the product to last long time, it needs decorative processing. Preservation of pristine beauty natural material varnish on wood helps. For work you will need high-quality composition varnish and a convenient glue brush. Try to ensure that there are no scratches or visible marks on the craft. When cutting out animal figures or models of mechanisms with a miracle jigsaw, sometimes they resort to fragmentary coating of the product with paints. This technique brings the craft closer to the original.