Add site to bookmarks
- Kinds
- Choice
- Installation
- Finishing
- Repair
- Installation
- Device
- Cleaning
Installation wall hung toilet
Installation of a wall-hung toilet
Consumers are increasingly choosing wall-mounted toilets for bathroom equipment. Of course, installing a wall-hung toilet is a little more complicated than installing a regular one. floor-standing toilet in the apartment.
Before installing a wall-mounted toilet with your own hands, it is advisable to have an idea of its design.
The entire structure is based on a rigid steel frame, equipped by the manufacturer with a special device for height adjustment. This frame is securely attached to the floor and to a wall built of concrete or solid brick. Such equipment cannot be attached to plasterboard false walls. The toilet bowl is suspended from a steel frame using special pins. The toilet bowl is the visible part of the entire structure after installation.
Built-in flush cisterns for wall-hung toilets differ from conventional ones in that they are made not of ceramics, but of plastic. Their depth is 9 cm, and their width varies. The plastic drain tank is additionally insulated with styropol, a material that protects against the formation of condensation. The cistern is placed on a steel frame. The front part of the tank is equipped with a special cutout through which a push-button water drainage device is installed.

During operation, this hole provides access to the mechanism for repair and maintenance in case of replacement of faulty parts. Modern models equipped with a function for dosing the volume of drained water using buttons. By pressing one, 3 liters are drained, and the other - 6 liters.
Before installing a wall-mounted toilet, make sure you have the necessary tool and material.
So how are u different manufacturers the equipment is different, first it is better to buy a toilet, and then buy everything necessary materials for its installation and connection, recommended by the manufacturer in the instructions. To implement installation work you need to prepare:
- drill;
- concrete drills;
- hammer;
- screwdriver with bits;
- adjustable wrench;
- FUM tape (to seal the thread);
- core;
- corrugation for sewer pipe;
- building level;
- sheets of double waterproof plasterboard.
Return to contents
Toilet installation

Fastening diagram: 1 – Rods for fastening; 2 – Monolithic concrete base; 3 – Pipe.
Installation begins with the need to install a rigid steel frame (installation), which must be firmly installed and secured with dowels to main wall and to concrete floor. A sewer pipe with a diameter of 110 mm must be installed at the place where the toilet is installed. It is also necessary to provide for the supply of a water pipe.
The installation should be installed level relative to the horizontal and vertical planes; for this, a building level is used. Installation is very easy, since the steel frame design has retractable rods, as well as special studs for attaching the frame to the wall.
The height of the bowl can be adjusted according to the height of the people who will use the sanitary product. The optimal installation height for a wall-mounted toilet can be determined experimentally. It is usually done in such a way that the seat is approximately 40 cm from the floor.
The next stage of installation is connecting the outlet of the wall-mounted toilet to the sewer outlet, in which case you need to use corrugation. To check the functionality of the connection, attach the bowl to the frame and perform a test drain. Then the bowl must be removed, since its installation is carried out at the very last moment.
Then the installation site of the frame is sheathed with sheets of double waterproof plasterboard, which is directly attached to the installation and to the wall metal profile. The instructions supplied by the manufacturer with the hanging equipment contain a template for easy cutting of the front part of the casing. Its use facilitates the process of cutting out the required technological holes in a sheet of drywall.
After this, surface finishing work is carried out. ceramic tiles, color matching with common interior bathroom.
After the tile adhesive has completely dried, the toilet bowl is secured by hanging it on 2 studs. They are wrapped in a metal frame of the installation system, which is located under the cladding.
Return to contents
Features of installing a wall-hung toilet

Diagram of a simple toilet for comparison.
- All installation systems for connection to sewer pipes are equipped with nozzles with a diameter of 110 and 90 mm and an adapter coupling for connection to a plumbing fixture.
- The installation itself uses a pipe with a diameter of 90 mm to make it easier to obtain a small bending radius.
- The flush button is installed in the center of the front or top panel tank. In the event of a breakdown, by removing this key, you can gain access to the internal fittings of the toilet cistern. Usually the key is not included in the kit, but is sold separately.
- If the float mechanism fails, there is a built-in drainage hole, through it excess water is drained into the toilet.
- Almost all modern tanks modular systems equipped with a water saving function. It can be presented in two options: a double flush key (the larger part of the key is a full flush, the smaller part is an economical flush); Push/Stop system, which allows you to independently regulate the duration of the drain (pressing the button again stops the drain, and if you do not press again, all the water from the tank will be drained).
- For high-quality tiling, it is necessary to correctly set the location of the installation system relative to the facing joints. Yes, button cistern it must be placed either in the center of the tile joint or in the center of the tile (otherwise there will be unaesthetic asymmetry). Therefore, the installation is installed with an allowance of 2 mm, and the laying of tiles always begins from the button.
- When using a mechanical flush key, the thickness of the wall that covers the structure should not be more than 6-7 cm.
Suspension systems are becoming increasingly popular. This is not surprising, since a wall-hung toilet takes less space, compared with floor systems. In addition, they simplify the cleaning process, since there are no hard to reach places. Considering that a wall-hung toilet looks much more aesthetically pleasing, such a high interest in suspension systems. But the process of installing a wall-hung toilet often raises questions, so it is necessary to consider this process.
- Preparatory work.
- Installation installation
- Toilet installation.
Each stage does not cause any difficulties for a person who has experience working with the tool.
Preparatory work
First you need to determine the place where the toilet will stand. If redevelopment is not planned. If only the equipment is replaced, it is natural that the location will not change. Otherwise, everything depends on the future interior of the room. It is important to know which wall is located behind the future location of the toilet. This is due to the fact that it is attached only to the main wall. Plasterboard partition will not work, as it simply will not withstand the weight of the system and will break. 
When the place is determined, it is necessary to lead to it cold water and a sewer outlet for waste disposal. This must be done before installing the installation system, since after it the work will be difficult. 
When the location is determined and prepared, you can proceed to install the installation.
Installation of an installation system under a wall-hung toilet
In order to install the installation correctly, it is important to carefully approach the marking process. This stage is very important, since an incorrectly marked system will not fit correctly and, as a result, everything will have to be redone. 
Therefore, before installation, you need to carefully measure everything and determine the height of the future toilet. Experts recommend that it does not exceed one meter, but if the family is tall, this number can be increased. When the location and height are determined, markings are applied for fastenings and holes are drilled. It is preferable to use special anchor bolts rather than ordinary dowels, since the load will be static and constant and quite large. Dowels will not be able to provide sufficient reliability of fastening, so distortions of the system are possible in the future. 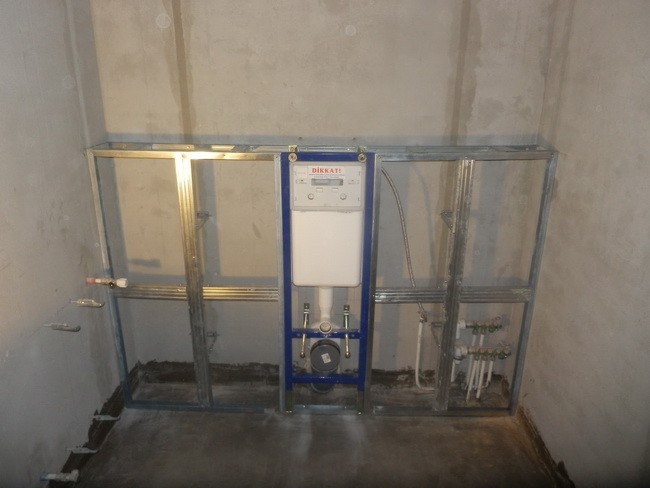
Special attention should be paid to the reliability of fastening and immobility of the structure, since the system will function long years and must be well secured. If desired, it can be further strengthened to achieve complete immobility. 
When the installation system is installed, it must be vertically aligned in the front plane, the top plane must be horizontal, and the supporting frame itself must be securely fastened and motionless. This is the only way to ensure good view and normal operation of the system in the future. 
Bowl installation
After all the installation work has been completed, the niche is sealed with plasterboard. It is advisable to use moisture-resistant material so that it does not swell from moisture. At the same time, we must not forget about the need for access to the drain tank, so it is necessary to provide a hatch in the finishing.
After finishing is completed, the toilet bowl is installed. This stage of work is carried out in accordance with the manufacturer’s instructions, since different models may require different actions. But the differences are not significant; the actions differ only in small details. 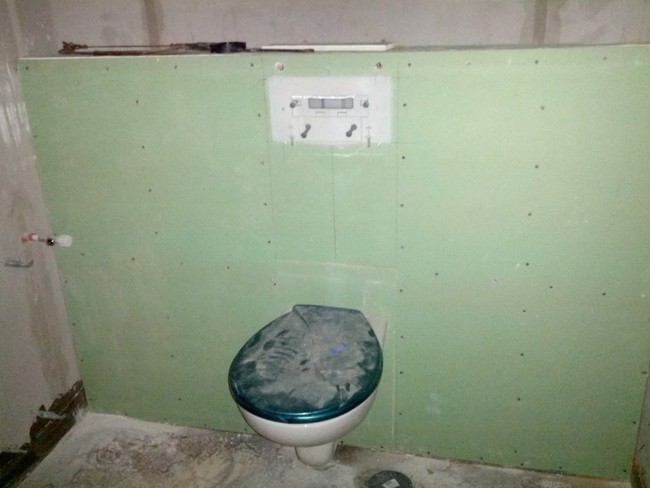
If preliminary calculations and measurements were made correctly, then the height of the bowl will be about 40 centimeters from the floor. This value is considered optimal and most convenient for ordinary people.
If you follow the instructions and carry out the work carefully and carefully, the process of installing a wall-hung toilet will not cause any difficulties. As could be seen, complex work no, so almost anyone can install a toilet with their own hands.
Video How to install a wall-hung toilet
Setting up a GROHE installation
If you have chosen for your bathroom wall-mounted toilet, then you should remember that the installation process is very different from traditional options. It is much more complicated, and the work requires much more time. But it should be noted that even inexperienced craftsmen can do the work, provided that they know all the basic features of the work process and perform all technological actions in the correct sequence.
Main elements of the system
First, let's figure out what the structure consists of and what parts you will have to install during the work process:
| Basic structure | It is a durable metal frame, which experts call an installation for the simple reason that it is on this frame that the toilet is placed. When choosing, pay special attention to strength, since this unit will bear the main load. It is also important to have a system that allows you to adjust the height of the bowl, since the floor level in the room may be different |
| Tank | It is made of plastic and has a shape that allows it to be placed inside the installation. There is a button on the front that is connected to the drain mechanism, through which access to the inside of the system is provided for maintenance and repair, so it is better if its size is large. It’s good if the design is two-button, this saves water |
| Toilet bowl | It can have a variety of configurations and colors; you choose the option that will suit the interior. It is also important that the design ensures ease of use, so it is better not to buy outlandish shapes. The manufacturing material is most often earthenware or porcelain; the second option is more expensive, but it is also performance much higher |
| Fasteners | It should be included in the kit, you need to check the presence of all the necessary components, their number is stated in the accompanying documentation. If the fasteners raise doubts about their strength, then it is better to purchase more reliable options with the same configuration |
Important!
In addition to everything described above, you will need a branch to connect to the sewer pipe, as well as a water supply in.
These are the basic elements, although anything else may be used depending on the specifics of the object.

Description of work
Now let's figure out how to properly install a wall-hung toilet; the whole process can be divided into two parts - installation of the supporting frame and work on finishing and fastening the outer part of the structure.
Installation installation
If everything required is at hand, you can begin to carry out the work; they are carried out in the following sequence:
- First of all, the location of the structure is determined, it is important that all communications can be brought there without problems, and that the structure does not interfere with movement. The system can be hidden behind flat surface walls, when the walls are made of plasterboard, and may have the form of a protrusion if you do not want to reduce the space in small room. Marks are made on the surface that will serve as a guide for further work;

- Next, you need to bring water and sewer pipes to the approximate location of the toilet. If they will go through the wall and screed, then take care of this issue in advance so that later you do not have to make the grooves with a hammer drill. The sewer outlet requires special attention; it must be positioned as accurately as possible, so when installing the liner, place the frame against the surface to make sure that everything is clear;

- Then the frame is set and an inspection is carried out to determine whether it fits tightly to the surface, and whether there are any obstacles that need to be removed (mortar sagging, screed unevenness, etc.). After this, the holes that will need to be drilled to attach the structure to the wall are marked; accuracy and precision are important here;

- Drilling is done with a hammer drill, holes are made in the floor and wall according to the previously applied markings. The diameter of the drill must correspond to the size of the dowels used or anchor bolts. When working, try to always hold the tool so that the drill is positioned strictly perpendicular to the surface of the wall or floor, otherwise the fasteners will be positioned crookedly;

- After drilling, you need to attach the frame and make sure everything is fine. Next, fasteners are taken, and the structure is carefully fixed to the surface of the wall and floor; it is important, before final fixation, to check the position of all planes using a building level, so that you do not have to redo the work later;

- Do not forget to fix the tank and other components on it before attaching the installation., since it is much more difficult to do this later. At the end of the work, make sure that all connections are reliable and there are no backlashes;
- Next you need to set the corrugation correctly, which will connect the toilet to the sewerage system, everything is produced for this necessary measurements and the element is placed at the desired height. You shouldn’t fix it right away, as you need to make sure that everything is correct. You put the toilet bowl on the studs, and if all the elements fit together exactly, then the bowl can be removed and the liner can be fixed in the desired position;

- Naturally, before installing a wall-hung toilet, you need to supply water to the tank. If for floor options optimal solution is a flexible liner, then for wall systems experts recommend using the rigid version. It is much stronger and more durable, which is very important, because the system will be hidden behind the finishing, and problems that arise may lead to the need to disassemble part of the wall.

Finishing and fastening of the bowl
Installing a wall-hung toilet is a time-consuming process, mainly due to the fact that you need to finish the structure and close it.
Let's describe the workflow step by step:
- First of all, you need to build a frame from a plasterboard profile around the structure; this process is simple; it is important to use reliable elements, take accurate measurements and securely fasten them both to the wall and to each other. If the space is not wide, then the entire surface is sewn up; the photo below shows exactly this option for carrying out the work;

- After installing the frame, you can begin to cover it, for this you need to take moisture resistant drywall 12 mm thick, it is a durable material that works perfectly in rooms with high humidity. Measurements are taken and the sheet is cut into pieces of the desired configuration, Special attention pay attention to cutting out the hole for the button, it is better to do this in a single sheet than to combine several pieces around it, the fewer seams the better;
- Fastening is done using special self-tapping screws with fine pitch; they are located at a distance of 20 cm from each other, thus ensuring high reliability of the structure. Do not press the fasteners into the surface too much - you will simply push through the drywall;

- Further work depends on which finishing option you have chosen. If the option is to be painted, then the base is puttied until a perfectly flat plane is obtained, if applied decorative plaster, then again you need to putty the surface, and then apply one or another composition. If you decide to do tiling, then there is no need for leveling; you can simply seal the seams and prime the structure;
Important!
To make the tiles stick better, some experts recommend drilling holes in the drywall, glue will get into them, and the ceramics will stick much better.

- When the finishing is complete, you need to install the button, or rather its decorative top part, in place and attach the bowl. This is done very simply: it is carefully hung on the studs, after which you need to combine and fix the sewer outlet and the water supply for flushing - everything is quite simple, accuracy and precision are important here. After making sure that all joints are secure, you can attach the toilet;

- The last stage is to turn on the water and test flush; it is important to check whether there are any leaks and whether the system as a whole is working normally. If everything is as it should be, then the work can be considered successfully completed.
Conclusion
It’s not enough to choose a high-quality wall-hung toilet - how to install it will take much longer to figure out, but you’ll get excellent result. The video in this article will help you understand the issue even better, but if you still have questions on the topic, then ask them in the comments.
Wall-hung toilets with installation are the most modern, compact, and attractive appearance plumbing fixtures. Installing a wall-hung toilet takes more time and effort, but we still prepared this article with step-by-step instructions with our expert master.
The cost of such toilets is much higher than standard plumbing, but all costs are justified by comfortable operation.
Despite all the difficulties, home craftsmen, after studying detailed instructions, successfully carry out the installation with their own hands.
Design Features
The design of the wall-hung toilet is distinguished by many elements hidden in the walls. The frame is based on a durable metal frame installed inside a wall niche.
For reliable fastening, it is fixed to the floor and wall.
Another element is the tank; as a rule, it is made of plastic and has flat shape. The tank is usually already fixed to a metal frame. The main element of the toilet is the bowl. Its installation is carried out outside the wall, that is, after all processes are completed, the user will only see the bowl and flush buttons (located on the wall). All other parts will be covered with a plasterboard partition and tiles.What to consider in advance
When installing a wall-hung toilet with installation, much more attention is paid to the preparatory work:
- choice of location;
- installation of water supply and sewerage systems;
- Carrying out accurate measurements and calculations to determine the installation height of the toilet;
- preparation and purchase of the necessary set of tools and installation kit.

Installing a metal frame
The metal frame is the basis of the installation, on which all structural elements are fixed - the tank and the bowl. Considering the type of toilet in question, it is important to note that the frame will be located in the wall, in a pre-formed niche. This must be foreseen in advance, even at the renovation planning stage.

You can purchase a metal frame either complete with a toilet or separately. When buying a frame, the main attention should be paid to the quality of the metal, and dimensions, in particular depth. In standard models, it is in the range of 23-25 cm.

Frame assembly and installation steps:
First of all, we fix the hidden plastic tank, using bolts ( if the tank was supplied separately from the frame).We place the frame into the niche and attach it to the floor and walls with brackets. It is important to immediately set the levels correctly (vertical and horizontal).

After installation, the height of the frame is adjusted according to previously made measurements and a schematic illustration. Typically, the installation is height-adjustable using special “legs”-brackets on its lower part. By unscrewing or tightening them, we adjust the height of the installation communications to the desired level.

A guide cuff is placed in the sewer drain, which is usually included with the frame. A drain pipe is fixed to the frame.

When performing all manipulations, it is also necessary to monitor the evenness of the entire structure horizontally, vertically and on the walls. To obtain an accurate result, the master uses a building level.
Wall cladding
After assembly metal frame and its reliable fixation, special long bolts are attached to the frame. These are special, especially strong bolts that will connect the installation in the wall with the toilet bowl from the outside.

Following the diagrams and instructions included with each model, the remaining parts are assembled, the installation of which is hidden. So, you need to secure the buttons and a special cover for them so as not to damage them while covering the walls.

Let's complete the process of assembling the main structure and move on to covering the walls. In other words, you need to hide the built-in niche. Which ones to choose for this Decoration Materials depends directly on the owner of the house. As a rule, the walls are sheathed with plasterboard and then finished with tiles.

For sheathing, you need to install metal guides, which are sheathed with moisture-resistant plasterboard.
In this article we will not describe in detail the process of covering a wall with plasterboard; for this we have a separate detailed article. Technical holes are cut in the drywall:- for fastening bolts;
- for water supply pipes to the tank, sewer;
- for a panel with flush buttons.

Installation of a wall-hung toilet bowl
The final stage of installing a wall-hung toilet with installation is installing the bowl in the intended place and mounting the flush panel. You can continue working only until the tile adhesive has completely dried.

The wall-hung toilet bowl is hung and secured with special long bolts. The outlet is connected to the sewer pipe.
A panel with buttons that regulate flushing is installed on the control panel.
After completing all the work, you must check the functionality and tightness. Open the tap to supply water to the tank. After waiting until the tank is completely filled, flush. If there are no problems or leaks, then all manipulations were performed correctly.
Reading time ≈ 3 minutes
Space saving and aesthetic features are the main advantages of a wall-hung toilet, therefore, choosing this option, its owner certainly will not go wrong. If there are no special issues with the installation of the toilet, then its wall-hung “brother” will require sleight of hand due to the presence of an additional link in the bathroom - the installation. Installing a toilet installation with your own hands is not difficult if you have all the necessary Building tools and carry out the work step by step.
The uninterrupted functioning of the plumbing product depends on the installation sequence of the toilet installation. First of all, its installation itself is carried out, then the connection of the sewerage system, camouflage of visible elements and finishing are carried out. For clarity, below are photos and videos of installing the installation under the toilet, which will make it much easier to perceive the information.
Preparatory stage

First of all, you need to purchase an installation system along with the toilet. Unlike bidets, today there are wide choose their manufacturers. By their principle, they all represent a frame hidden installation. But here, as they say, to each his own.

The tools you will need are a hammer drill or a drill, a concrete drill with a diameter equal to the hole of the fasteners, spanners, building level, pencil and tape measure.

When all the necessary construction equipment is at hand, we begin marking and preparing the fastener system. It is important to measure the distance from the installation system to the wall surface and mark the location of the cistern. It would be correct to install it at a height of 100 cm from the floor.

Do not forget about fastening the installation itself: it is necessary to mark points for fastening elements on the surface of the wall and floor. In this case, special attention should be paid to fasteners. Using a hammer drill, holes are drilled along the previously made marks, where anchors with dowels are inserted.
Installation of wall-hung toilets

The toilet installation diagram has a clear sequence:
- a frame is installed in a pre-prepared place, which is fixed with special adjusting nuts and screws;
- the installation body is adjusted horizontally and vertically;
- The horizontal level is set by adjusting the design of the legs, and the vertical level by adjusting the anchor thread.

After installing the installation under the toilet, you need to connect the toilet to the sewer pipe. It was important to pre-install a drain pipe with a diameter of 110 mm and connect the water supply.

Regarding the water supply to the tank, experts recommend using a rigid pipe instead of a flexible pipe. Pipes from the cistern and sewer pipe are attached to fixing plastic clamps.

Finally, before installing the plumbing product, we once again check the tightness of all elements. Finally, we put on the PVC couplings, install the shock-absorbing gasket and the toilet bowl.