Moreover, we are not going to touch on this topic at all. Of course, from time to time we share with you step-by-step instructions that allow you to independently perform some of the not particularly complex operations.
Such as, for example.
In the case of a heated towel rail, the situation is different. First, instructions on how to self-installation There are already a lot of them on the Internet. Secondly, solving this problem requires certain skills, and any of the mistakes made can lead to a significant loss of money and time, so you should not organize a “Do it yourself” home circle; it is more profitable to immediately turn to professionals.
Our material is addressed to those who do not have such skills and plan to invite masters. However, even in this case it is necessary to have a set of knowledge. A device for drying towels and heating a bathroom is structurally, of course, not as complex as. However, it is part of the plumbing, so there are a few things to keep in mind before purchasing it.
Choosing a heated towel rail: which one is right?
To begin with, let us clarify that we are not interested in an electric one, but a regular one, which fits into the hot water supply system. It is this circumstance that sharply narrows the boundaries of choice.
Despite the abundance of sparkling imported samples, it is advisable to purchase domestic ones, and here’s why:
Our stainless steel heated towel rails are designed for water supply conditions apartment buildings and are able to withstand both high pressure and hydraulic shocks. They are made from solid seamless pipes, so you can safely count on them to last at least 40 years
Most of the imported ones are designed for insertion into the heating system. The pressure in it is lower, and the water undergoes deaeration, so corrosion in heating pipes almost not. Therefore, foreign heated towel rails are made of thin-walled steel. In our conditions, such a one will rust through within a year.
The best solution, as is already clear from the above, is a domestic stainless steel heated towel rail. There are also steel and brass, chrome-plated. In their case, the relatively low price against the backdrop of excellent appearance is not a sufficient argument for a purchase decision.
Modern steel heated towel rails are not protected from corrosion from the inside. They were once made from galvanized pipes, but is it worth remembering what happened before? Brass itself does not corrode. The problem is that they are made from thin-walled (thick-walled are expensive) pipes, and this is fraught with another risk. You may know that the water supply system always contains electric currents. If the pipes are poorly grounded, and this happens all the time, if water flows in the system, Foucault eddy currents are formed. This means that small holes may form in the brass device. What this will lead to is clear.
The shapes of heated towel rails are varied, and the choice depends on personal preferences. The main thing is that the model you like has a “Maevsky tap” (air valve). With its help, when filled with water, it is removed excess air. If there is no such valve, an air lock will form, due to which the device will not work at full capacity.
There is one more important nuance - it is better if the diameter of the heated towel rail pipes corresponds to the diameter of the riser. Otherwise, you will have to use adapters, which will make installation more expensive.
That is why, before going to the store, you need to make a couple of measurements - the diameter of the riser and the distance between the pipes into which the heated towel rail will be embedded. The diameter of the pipes is usually measured with a caliper, but a simple tape measure will do. If the measurement shows 32 mm, this means that the riser is 1 inch in size; 25-28 mm – 3/4 inch; 16 mm 1/2 inch.
Installation details
A conscientious plumber will himself assess the need for additional work. You should not refuse if the technician offers to install a bypass. It is a pipe that connects the gap in the riser directly. Using valves installed in the middle of the bypass and at the entrances to the heated towel rail, you can close the water supply to it, which is important in case of any accidents.
A heated towel rail is a useful device, and in many cases, necessary. It does not take up much space, does not require complex care, and it dries wet towels perfectly without large additional costs.
In some houses old building The installation of a heated towel rail was provided for by the project, but most such devices are outdated both morally and technically. Modern models are much more convenient and reliable.
There are two main types of heated towel rails: electric and water. Both the first and second ones are performed in the very different designs, different sizes, colors, configurations: from a simple curved tube to sophisticated models that look more like an interior decoration, but do their job quite well.
A beautiful heated towel rail can become stylish decoration bathroom interior. It is believed that chrome models work longer and are somewhat more efficient.
Design of heated towel rails different types, of course, is fundamentally different.
In the first case, the device is heated using electricity, in the second it circulates through the pipes hot water. The installation procedure for electric and water models also has significant differences.
What should you consider before installing a water model?
The coolant in water models of heated towel rails is hot water. Most often, the device is connected to a hot water supply system, but this is not always possible. When deciding how to properly install a heated towel rail in the bathroom, such points should be clarified in advance.
For example, in houses where there is no central heating, they use geysers. In such rooms, water heated towel rails are connected to the central heating system. This is not very convenient, since the heating device only works during the heating season; the rest of the time it is a regular towel rack.
If an electric boiler is used to heat water in the house, it makes sense to purchase a special double-circuit model.

In such boilers, one circuit is used for heating tap water, and the second is designed specifically for the heated towel rail
But owners of private houses with a completely autonomous heating and hot water supply system are much more free to choose.
If you decide to make the heated towel rail part of heating system apartment building, it's worth installing in the summer, bye heating season not started yet. Typically, utility workers are extremely reluctant to agree to turn off the heating of the entire house during the winter cold in order to install this device that is not necessary for life. And the neighbors will hardly be happy about the lack of heating for several hours.
Before installing a heated towel rail, you need to find out whether there is water in the heating system. Usually it is drained in the summer, but this is not always done. You'll have to ask local utility workers to check this and turn off the water if necessary.
When installing a heated towel rail as part of the house water supply, you will also need to shut off the hot water entering the house. Older models of heated towel rails are usually not equipped with taps and a bypass that allows water to bypass the device, so you cannot simply remove it, you will have to ask local plumbers for help.
In some cases, you can turn off the water in the water supply or heating system yourself, but to do this you need to know exactly how to do this, and also inform local utility workers about your “independent activity” and obtain their consent.
When figuring out how to install a suitable heated towel rail in the bathroom, even before purchasing it, you need to decide on how to connect it. It could be:
- bottom;
- lateral;
- diagonal (for “ladder” type models);
- in the center of the bottom.
In the first case, the connection point of the device to the water supply is at the bottom, and in the second - on the side. Today, water pipes are hidden in the wall or masked with a partition, leaving only places outside for connecting the necessary plumbing. This is how models with side connections are installed, although the process is quite labor-intensive. Still, it makes sense to try: the bathroom looks much more attractive this way.

A heated towel rail with a side connection is installed on the wall so that DHW pipes were hidden. It is important to carefully seal all connections
The lower connection is typical for old houses in which the design provides for the installation of a heated towel rail. The power of models with a bottom connection is approximately 10% lower than that of analogues with a side connection.
To increase the efficiency of the equipment, it makes sense to consider modifying the water supply and installing a model with a side connection.
The power of a heated towel rail with a bottom connection is usually about 10% lower than the power of a similar device with a side connection, however, these are the models that are usually installed in old houses
Sometimes the diameter of the heated towel rail pipes and the corpse pipe do not match. To connect them, special adapters are used. The diameter of such an adapter must be equal to or greater than the diameter of the water pipes. Otherwise, the system may experience overpressure, which is fraught with accidents, leaks and other unpleasant problems.
An important parameter is the axial dimensions of the heated towel rail, i.e. the distance separating its entrance and exit. Be sure to consider the diameter water pipe to select a heated towel rail model of the appropriate size. The presence of adapters complicates the installation process and worsens appearance devices.
In addition, the risk of leaks increases. If you can’t do without adapters, it’s worth paying attention Special attention sealing each connection. When selecting taps and fittings, you should take into account the material from which the water pipes are made.
The combination of different metals can cause electrochemical corrosion. In this regard, working with plastic pipes is much easier.
It is believed that chrome-plated heated towel rail models are more durable than other options. In addition, such devices have higher heat transfer.
Installation procedure for a water heated towel rail
Installation of a water model of a heated towel rail is carried out in several main steps:
- Removing the old device.
- Bypass installation.
- Installation of upper and lower faucets.
- Installation of a heated towel rail.
- Check connections for leaks.
Step #1: Removing the old device
So, by the time work begins, the water in the system should already be reliably shut off. You can remove the old heated towel rail, if it is welded to the pipes, using an ordinary grinder, simply cutting it off. It should be remembered that parts of the pipes will have to be threaded, so you need to cut them taking into account these dimensions.
A grinder will also be needed to remove a device with a threaded connection if it has become “stuck” to the pipes over time. In other cases, the old heated towel rail is simply unscrewed from the pipes and removed from the brackets on which it hung.
Stage #2: Bypass installation
A bypass is a special jumper connecting the inlet and outlet of the pipe to which the heated towel rail is connected. It is installed in front of the taps so that the flow of hot water through the pipes is not interrupted when the taps that separate the device from the hot water supply system are closed.
If there is no bypass in the system, for repairs or other manipulations with the device, you will have to shut off the water.

The bypass can be welded to the main pipes or screwed using threaded triple adapters. The diameter of the bypass pipe must be smaller sizes main highway
To install the jumper, you will need a piece of pipe of the appropriate size and diameter. Typically, a pipe of smaller diameter is used than the size of the main line pipes.
The bypass is welded to the main pipes or screwed using a threaded connection.

As a reliable seal for threaded connections Most often, regular linen winding is used. If the amount of winding is sufficient, screwing occurs with little effort
Step #3: Installing Top and Bottom Faucets
Before installation, you should purchase two shut-off valves, the thread diameter of which matches the diameter of the pipes on which it will be installed.
You can choose conventional taps that move only to two positions: “open” and “closed” or use screw designs to regulate the flow of coolant entering the device, i.e. the degree of its heating.

To be able to shut off the water supply to the heated towel rail at any time, you can use conventional shut-off valves, which are moved to the “open” or “closed” position.

This valve is designed to remove air from the device that has entered the system. It is mounted on the top of the heated towel rail. If an air lock has formed in the device, preventing the circulation of hot water, just open the tap and bleed off excess air
Automatic models of the Mayevsky crane cope with this task even without human intervention. It is very easy to determine that air has entered the device; in this case, the heated towel rail does not heat up enough or cools down completely.
If the pipes do not have threads, they should be cut using a die with the appropriate characteristics. If there is a thread, but it looks old and worn, it also wouldn’t hurt to update it with special tool to improve connection quality.
Stage #4: Installing a heated towel rail
Before installing a heated towel rail, you should consider its placement on the wall. To do this, use special brackets, telescopic holders or clamps. Usually models good producers are completed necessary materials and fasteners.
The brackets should be installed on the wall. Usually, to do this, fixing points are marked on the wall, holes are made using a drill, then the brackets are screwed. Before starting work, you should study the manufacturer's instructions.
In some cases, a heated towel rail is first installed, and only then is it fixed to the wall.

Straight or corner fittings for a wall-mounted heated towel rail should be selected taking into account the size of the device and the aesthetics of their appearance
When installing a heated towel rail, you must remember special standards. If the pipe diameter is less than 23 mm, a distance of more than 35 mm should be left between the pipe and the wall, and if the pipes of the device are thicker - more than 40 mm - the distance to the wall should be increased to 50 mm.
To connect the heated towel rail to the hot water supply system, you will need fittings. Whether angular or straight fittings are used, it depends on the design of the device and the type of its connection. Of course, all connections must be properly sealed to prevent leaks.
Regular threads are traditionally sealed using linen winding. If enough material is used for this purpose, after screwing it will protrude slightly from under the thread.
If screwing is significantly difficult, there may be too much winding, but if the connection is easy to screw, it most likely needs to add a little more flax sealant. For conical threaded connections, use FUM tape.
When installing the heated towel rail, do not use excessive force to screw in all connections, so as not to accidentally damage the threads. The installation process for a water heated towel rail is presented in more detail in the following video:
Step #5: Check connections for leaks
After all work is completed, water should be supplied to the system again and the operation of the device should be checked. It is advisable to provide maximum load on the device to detect even small leaks. In a situation where the heated towel rail is built into the heating system of the house, it is difficult to carry out such a check, because installation is usually carried out in the summer.
Leaks may appear only before the start of the heating season, when utility workers check the system's readiness for winter, subjecting it to increased loads. To prevent a leak from occurring while the apartment's residents are away, the heated towel rail taps should always be kept closed.
Although the description of the procedure for connecting a heated towel rail looks simple, in practice, performing all operations requires a professional approach. If home owners do not have the appropriate skills, it makes sense to consult with an experienced plumber or entrust him with the entire range of work.
Installation of an electric heated towel rail
The main advantage of an electric heated towel rail is ease of installation. Like any wall-mounted electrical appliance, it needs to be hung on the wall and connected to the power supply. All that remains is to turn on the device itself and use it for its intended purpose. Important Requirement– compliance with electrical safety rules.
Such a device should be connected only through a so-called “automatic machine” or RCD - residual current device. If the socket for connecting the device will be installed directly in the bathroom, be sure to use a special device protected from moisture.
This socket is mounted in the thickness of the wall and has a special cover. In addition, the electrical appliance must be grounded.

When installing an electric heated towel rail, you should use special sockets with increased protection from moisture. Such a device is connected via an RCD
It is believed that the option with an electric heated towel rail is not economically profitable compared to water models, as it increases heat bills. However, the power of such devices is not so great, as is the electricity consumption.
This is quite enough to dry wet terry cloth, but it does not cope very well with the role of a bathroom heater.
For home handyman who has the skills to perform plumbing work, installation heated towel rail is not over challenging task. Before you begin installing the device, you need to decide optimal model drying and connection method.
You should develop a wiring diagram and become familiar with the installation steps. Compliance with requirements and installation technology will ensure uninterrupted operation heated towel rail.
For bathroom
The durability of plumbing equipment depends on its initial characteristics and compliance with installation technology. Quite a lot important role will reflect the compliance of the selected model with operating conditions.
- The installation location is selected taking into account the level of protection of the device from moisture. The distance to the bathroom or washbasin is at least 60 cm.
- The minimum distance to the floor is 20 cm, to the wall – 30 cm, to the surface of furniture – 75 cm.
- The heating device must not be placed directly under the outlet.
Connection to the electrical network is carried out in accordance with international standard NFC-15-100.
Electrical wiring under heated towel rail carried out in compliance with electrical safety standards in rooms with high humidity:
- connection via a three-wire cable with grounding;
- Only hidden electrical wiring is allowed;
- the socket must have rubber compressor and a cover covering the contact holes;
- used for electrical networks copper wires brands VVGng and VVGng-LS.
A prerequisite for the installation and operation of electrical appliances is the use of an RCD, which turns off the device when the current operating characteristics are exceeded.
Oil heated towel rails require rigid fixation, while cable radiators can be installed in any position
Conclusions and useful video on the topic
Water installation process heated towel rail shown in the video clip:
Installation technology heated towel rail depends on the selected model. The performance of a water device is determined by a well-designed and executed installation diagram.
When installing electric model special attention is paid to operational safety. It is better to entrust the installation of a combined “coil” to professionals.
There is a heated towel rail in every bathroom.
Installing a heated towel rail is not a difficult task, which every man who has no experience in this matter can cope with.
We will tell you how you can do this yourself.
You won't have to turn to professional plumbers for help if you read this article.
Preparatory stage
 What you need to do first is decide on the design.
It should not only be comfortable, but also beautiful, and also choose the mounting method and select the optimal size hollow products for the battery.
It is required for:
- drying small personal items,
- reducing the percentage of humidity,
- reducing dampness in the room,
- creating a certain microclimate.
At the moment, models of heated towel rails in the shape of the letters “P” and “M” are in particular demand among ordinary people.
But despite such preferences our compatriots, there is a wide assortment on the market, there are samples in the shape of a “ladder” and corner specimens.
It's no secret that each product has its own characteristics, mounting options and cost.
When choosing the product you need, you need to take into account a large number of different factors.
Not always your favorite model may be ideal for installation in your bathroom (read about premium bathroom partitions in the article).
Most important point - these are the dimensions of the room and, of course, the diameter of the pipes.
For a small bathtub, it is best to buy M-shaped and U-shaped dryers.
In large and spacious rooms Telescopic, rotating samples and “ladders” will look more advantageous.
Products can be quite impressive in size or very small. I would especially like to note the corner structures.
Despite their compact size, they look very impressive. In addition, these devices perform the functions assigned to them “excellently”.
We will not talk for long about the beauty and attractiveness of appearance various heated towel rails, and we will pay more attention to the fastening elements with which they are installed.
Fittings (about crimp high pressure written) play an important role in creating the aesthetic appearance of the entire structure.
Pipes hidden in the wall look especially nice, while all fasteners (including fittings) are also hidden.
However, this type of installation is considered complex and is used very rarely. More often, heated towel rails are attached to external pipes. In this situation, the fasteners are open.
What fasteners are needed
 If you decide to replace a towel dryer in your bathroom, you need to take a responsible approach not only to the choice of material from which the product is made, but also to the fastening elements.
Since the beauty, functionality of the design, and the overall practicality of the entire drying system as a whole will largely depend on this.
Perhaps those who are faced with assembling a device for the first time do not quite understand what fittings are.
Information for the uninformed:
- fittings are small parts (most often chrome-plated), which are very difficult to do without during assembly.
The choice of fastening components should exactly match the design you like and the material from which it is made heating device.
The optimal option is when the entire device is made of the same material.
Types of fittings
- Sectional extension cord.
A representative of this category will help you, if necessary, adjust the distance from the heating device to the wall to which it will be attached.These fittings act as a kind of bracket, the connection of which requires at least several fasteners.
Extended collapsible fittings are connected only in front of the pipe bends.
This modification of connectors has one minor flaw - they have too long threads.
However, this problem can be quickly resolved (threaded fittings For copper pipes described in the article).
How?Excess grooves can be quickly and easily removed (cut off or sharpened).
- Rewinding made of polymer materials.
This type of fitting eliminates the possibility of play at the adjusting connections.If the winding is done correctly, it will take the look you want.
It is also worth taking into account the following fact: the above-mentioned part will not compact over time.
- Angle tap.
It is used to connect a tubular radiator directly to a central heating pipe.Depending on the size of the hollow products used, you can use either standard modifications of the corners or choose the option that you find more convenient.
With the help of corner fittings, you can change the direction of the pipes at your discretion.
- Tee.
This simple connecting element will be very useful to you if you need to make a number of branches from central highway in various directions.Using this fitting, you can directly connect the heating device and the riser.
At the same time, do not forget to install a bypass.The bypass line will allow you to turn off the heated towel rail for a while, without creating any obstacles to the operation of other heating devices.
 Cross fittings.
With their help, the system is branched along only two different courses.
- American fitting.
If you need to dismantle the structure, this can be done using a kind of crane called an “American”.It is very difficult to overestimate the ease of use of this fastener - you will not need to completely disable the system.
It is enough just to close this device, unscrew the nut and remove the heating device.
- Connections in this case come in several types:
- nut - fitting,
- nut - nut,
- fitting - fitting.
- Clamping device.
Implements similar functions as the “American” one.Thanks to this coupling, you can quickly disassemble and reassemble any connection.
This part has one feature - it has different diameters on different sides.This property is used when there is a need to join pipes of different sizes. The thread of the clamping ring can be either external or internal.
- Reflectors.
These fittings do not allow moisture to seep into the fastening (read how to fix a leak in a pipe with water). - Limiters.
They are used to seal pipes
 When purchasing chrome-plated fasteners for tubular radiators, you need to pay special attention to the quality of the threads.
ABOUT high quality products can be judged by the uniformity of the grooves.
Another feature of non-chrome-plated connections is that they quickly undergo the rusting process.
Your best decision will be to purchase a heating device along with fittings.
This way, you will save yourself from searching for the parts you need or exchanging existing but incorrectly sized parts.
Step-by-step installation instructions
Since the heated towel rail is mounted directly into the water supply system, it is very important to ensure that the device functions correctly.
If you make mistakes in your work, then not only the drying itself, but also the plumbing system may suffer.
In general, the installation process is not difficult. And it consists of the following: we supply water to one side of the device, and ensure its outflow from the other end.

That's it, the work is finished. Are you wondering how much all this will cost?
It makes no sense to talk about specific numbers.
 Much depends on the complexity of the work being performed, the type of coil chosen, etc.
Please note the maximum distances between the wall and the heating device, which must be observed:
- 5-7 centimeters - if the diameter of the pipes is more than 2.5 centimeters
- 3.5-4 centimeters - with a pipe cross-section of less than 2.5 centimeters.
In order to avoid subjecting the walls to heavy loads that can be caused by hot thermal deformation, the structure cannot be fixed rigidly.
The coil is hung on mounting brackets.
After completing all work, you need to check all connections for leaks. If a leak is discovered, it must be repaired immediately.
Basic moments
- The system may only use components that are made of the same metal.
Otherwise, electrolytic corrosion will inevitably occur.
To prevent this from happening, only Teflon gaskets are used to seal connections.
- If you want the heated towel rail to work all year round, it must be connected to the hot water supply system.
- When connecting a ladder type model, it is better to use the side connection method.
In this case, it is necessary to maintain an interaxial distance of 50 cm. - Would you like to connect a heating device? to the heating system?
A combined model is suitable for these purposes.
Worth knowing! The device must be connected to the riser using “American wires”.
Important point! When carrying out installation work, all docking units must be carefully insulated. If you decide to “burrow” the pipe into the wall, it will be incredibly difficult to fix leaks later.
Watch the video to see how to install a heated towel rail in a new building with your own hands.
A heated towel rail performs two functions: it serves as a place for drying wet things (and not just towels) and additionally heats the room. Old device models, if they were installed, do not satisfy modern users in many respects; they are increasingly being replaced with new ones. And during new construction, the presence of a heated towel rail is prerequisite bathroom arrangement.
Currently available for purchase Various types devices that differ in many respects. In order for the choice to be informed and take into account maximum amount features of bathrooms, heating and water supply systems, you should familiarize yourself with their features and brief operational characteristics.
| Distinctive characteristics | Technical indicators |
|---|---|
| Most often, products are made from thin-walled stainless steel pipes or steel pipes with anti-corrosion decorative coating. By all indicators stainless steel answers existing requirements, this is a material that is very resistant to chemical compounds, does not oxidize, has high strength and thermal conductivity. According to its design characteristics, it can be used in any bathroom interior. In second place are devices made of stainless alloys. In terms of cost, they are superior to stainless steel ones, but in terms of performance indicators they are inferior to them. Main disadvantage, except high price, surfaces gradually oxidize, change shade, and react negatively to direct contact with aggressive chemical compounds. To prevent these phenomena, the surfaces are chrome-plated. | |
| Heating is done by water or electricity. Water can be taken from the heating system or from autonomous system hot water supply. Electrical ones are connected to an outlet. The most modern models can be combined: the user independently connects the devices to hot water or turns on electric heating. Each type has its own serious disadvantages, we will discuss them in detail below. | |
| Can be horizontal or vertical. The final choice is influenced existing scheme hot water supply, size and layout of premises and interior design style. |
heated towel rail
If desired, you can make a heated towel rail yourself from metal or plastic pipes. To make metal ones you will need professional equipment and devices. The plastic ones don't require much effort, but they fall short in many ways. Conclusion - you shouldn’t bother making something that can be bought in stores. affordable price and with excellent quality indicators.
During runtime installation work it is necessary to unquestioningly comply with the provisions of SNiP 2-04-01-85. A very important point to consider when installing heated towel rails in the bathroom. This is especially true for apartment buildings with common system heating and vertical input risers. Incompetent installation of a heated towel rail can cause it bad work or disruption of the heating system or hot water supply to adjacent apartments, and you will have to answer for this. If you change old device new and at the same time you are not redoing anything, then such work can be performed without fear. And if the device is being installed from scratch, then permission must be obtained from homeowners or service organizations.
SNiP 2-04-01-85. Internal water supply and sewerage of buildings
Unskilled actions without taking into account the peculiarities of hot water supply can cause an imbalance in the hydraulic balance of the entire home system. Below we will look at examples of common mistakes. And lastly, remember that heated towel rails will only work when there is coolant. If you are connected to a heating system, then they operate during the heating season, etc. If to a hot water supply system, then only when the hot water tap opens in the kitchen or bathroom. You will have to dry the towel with the tap constantly open, which is very expensive and uneconomical.
What are the connection diagrams for heated towel rails?
The device is at the same time a continuation of the vertical hot water supply riser.
The system does not increase hydraulic resistance, heating operates in design modes. Disadvantage: difficulty in carrying out repair work, during repairs it is necessary to turn off the heating. During installation, it is necessary to ensure that the pipe cross-section does not narrow in the fittings; their flow diameter cannot be less than the diameter of the riser.
Heated towel rail - hot water riser section.png
It is strictly forbidden to install shut-off valves in front of such a heated towel rail - the entire vertical riser will turn off. Installation of shut-off valves is permitted only if there is a bypass of the same diameter as the riser.
The bypass cross-section cannot be narrowed for two reasons. Firstly, it will worsen the heating system. Secondly, it will not have any beneficial effect. The heat consumption in heated towel rails is so small that the existing circulation is quite sufficient. Of course, installing a shut-off valve on the bypass is also prohibited.
Connecting a heated towel rail to the DHW. Scheme
Diagonal or vertical serial connection of the coolant to a vertical riser.
Water supply and drainage is carried out in places of the riser of different heights. The most simple circuit, shut-off valves can be installed at the inlet and outlet of the device. With their help, if necessary, the heating temperature of the heated towel rail is adjusted.
During connection, you must ensure that all pipelines of the device are below the insertion point, otherwise air may accumulate in them. If for some reason it is not possible to fulfill this condition, then a device for bleeding air (Mayevsky tap) must be installed in the highest place. It is advisable to thermally insulate the supply pipes; the maximum distance from the riser should not exceed 4.5 meters.
Connection with offset bypass.
The method is used when connecting devices to old heating systems. To simplify the work and not have to change the riser, a bypass is attached to it, and then a heated towel rail is connected. To improve heating, it is recommended to increase the nominal diameter of the pipelines.
Bottom connection.
The coolant inlet and outlet are located below at the same level. Advantages - the appearance is somewhat improved, the work is simplified. Disadvantages - likelihood of formation air jams. It is used quite often, but requires attention during operation. A narrowed bypass improves the circulation of coolant in the heated towel rail, but can negatively affect the functionality of the heating system. Use it with caution.
Options for connection diagrams for ladder heated towel rails
Practical advice. If you connect the heated towel rail to an already existing system, then we do not recommend either reducing or increasing the diameters of the central hot water pipelines. Such measures should be provided for at the design stage.
What not to do when connecting a device?
- Make a large “hump” in the area of the upper eyeliner. This is what some craftsmen do in order to disguise the pipe under a hinged or suspended ceiling bathroom. Small air bubbles are constantly circulating in the water; over time, they will inevitably accumulate in this loop. It is not advisable to install a Mayevsky valve for bleeding air under the ceiling.
- The insertion point of the lower outlet into the riser is located above the bottom of the heated towel rail. In this case, the movement of water is slowed down due to the pressure difference between cold and hot water. The water that has cooled in the heated towel rail sinks and, instead of entering the riser, is forced to rise again. IN best case scenario Such a heated towel rail works very inefficiently, at worst it does not work at all. The presence of two loops on one device at once most often becomes the reason for the complete failure of the heated towel rail.
Conclusion - don’t rush to make a decision. Before purchasing a heated towel rail, check the existing engineering system, take measurements, think about possible installation locations. Do not forget about our advice, select options that will not disrupt the operation of the existing heating system and at the same time function effectively. And already in last resort pay attention to design characteristics. If, of course, the heated towel rail is installed for use, and not for admiration.
Step-by-step installation instructions
Step 1. Turn off the water supply and install two faucets on the riser. One for the inlet, the second for the outlet of water from the heated towel rail. At the same time, immediately keep in mind that the taps must be at the level of the supply pipes, do not allow elbows to appear. About this typical mistake we mentioned above. The taps should not change the diameter of the riser downward; the distance between them should be equal to or exceed the dimensions of the device.
Practical advice. It is recommended to install taps at the points where pipelines connect to the riser only in cases where, after closing the supply networks, decorative elements have access to them.
In most cases, risers are covered with plasterboard slabs; special inspection doors will have to be made in them. The work is quite complex. If you do not have the opportunity to provide access to the taps on the riser, then it is permissible not to install them there, but to mount them directly at the outlet near the heated towel rail. This makes it much easier and more convenient; you can quickly close the tap in case of emergency. Today there are small cranes with beautiful design, you can choose options that will not negatively affect the appearance. In addition, the valves are located behind the vertical pipes of the heated towel rail and are almost completely obscured by them.
Step 2. Mark the pipelines, do the work efficiently, don’t waste a few extra minutes of time, it will take much longer to correct mistakes later.
How is marking done?
- Swipe on the wall horizontal lines at the level of the cranes, pipelines should be installed along them in the future. Draw lines below the level; they should all be strictly horizontal. The functionality of the heated towel rail largely depends on the quality of the markings.
- Mark the position of the device and draw two vertical lines on the wall along its dimensions. At this stage, you can still change the position of the heated towel rail; choose the most suitable one for it. comfortable spot. But remember that it is not recommended to change the horizontal position of the water supply and drainage pipelines. If this is necessary, then at least avoid knees, let the difference in height be smooth, this will allow air bubbles to remove themselves. As a last resort, consider installing a Mayevsky valve to bleed air. But practitioners do not recommend installation large number additional fittings, the more of it, the higher the likelihood that some element will fail or leak. The dimensions of the heated towel rail circuit are indicated on the packaging.
Step 3. Secure construction clamps along the contour of the device. They are fixed with plastic dowels. Using a corner, adjust the height of the clamps; this will be the distance of the heated towel rail from the wall. Recommended distances are indicated in the manufacturer's instructions and depend on the diameter of the pipes. The number of clamps is at least four, if there are concerns about strength interior partitions, then install more fasteners. The clamps must be supplied together with the heated towel rail.
The clamps are fixed according to the markings
Step 4. Fix the heated towel rail on the clamps and check its position with a level. If there are deviations from the horizontal, then correct the position; the clamps allow you to do this without problems. Note whether the centers of the inlet and outlet holes coincide with the drawn diagram.
Important. When pre-hanging the heated towel rail, take into account the condition of the walls.
If you plan to finish them in the future, then increase the distance between the rough wall and the device by the thickness of the finish. For plastering and further painting the increase is minimal, for finishing plasterboard boards maximum.
Step 5. If the wiring is hidden, then you need to trench the wall along the drawn lines. At the same time, prepare recesses for pipe connection sockets.
Step 6. Insert into prepared places plastic pipes, connect one end to the taps installed on the riser, and the other to the sockets for connecting the heated towel rail. To seal connections, use FUM tape; it has excellent performance in all respects. In addition, unlike traditional tow for sealing, FUM tape does not need to be tightly tightened. And all modern fittings are made of fragile alloys and react very negatively to high forces.
Step 7 Make indentations under mounting sockets pipelines. They are fixed to the wall; the fixation elements must go deeper into the wall. Place them on the surface and beat off the outline, increasing its size by a few centimeters. Using a hammer drill, make neat indentations. Take your time, try on the sockets several times and thus control the installation depth.
Important. Don't forget to take into account the thickness of the wall finish.
The depth of the hole should be such that after finishing the walls in the bathroom, only the end of the threaded part of the socket will be on the surface.
If the hole is deeper, then you need to correct the situation like this:
- drill holes for dowels;
- level the sockets, secure them with dowels, make sure they are on the same line and at the required distance;
- insert pieces of bricks or wooden wedges into the gap between the wall and the sockets;
- place the heated towel rail against the wall and check again that the sockets are positioned correctly;
- Cover the installation areas with solution.
Do not forget to close the inlet holes with plugs immediately after installing the sockets.
Step 8 Cover the grooves with pipes with gypsum or other mortar. The choice of material depends on the method of finishing the walls in the bathroom.
After the solution has hardened, begin covering the wall with ceramic tiles. Everything is ready - you can start hanging the heated towel rail.
Hanging a heated towel rail
Step 1. Remove the plugs from the sockets and clean them of dirt.
Step 2. Check all connections of the heated towel rail and tighten them with a hex wrench.
Practical advice. Due to the fact that sometimes it is necessary to adjust the position of the connecting coupling with force, the rubber gaskets do not always withstand. We recommend that you replace them with plastic or paronite ones; such gaskets can be clamped with great force, which facilitates the process of adjusting the position of the limit switches and eliminates the occurrence of leaks.
Step 3. Screw decorative reflectors onto the transitions, wrap a sealant around the threads, press it tightly and only then screw it onto the threads. Make sure that the tape does not slip or slip. If such a phenomenon is detected, then unscrew the adapter and repeat all operations from the beginning. Install the adapters in a vertical position. Make sure that the top terminals are at the same distance from the wall.
Step 4. Install gaskets inside the adapters, place a heated towel rail and tighten the nuts. If the design of your device has its own fastenings, then use a sharp pencil to mark the installation locations of the dowels. If the structure is fixed on construction clamps, then we described the method of their installation above. Accurately mark the position of the dowels. The adapters have eccentrics to adjust the position, but they can only correct an error of a few millimeters. Live the device.
Step 5. Unscrew the lower nuts and remove the heated towel rail. Drill holes in the wall for the mounting dowels. Work very carefully, do not allow cracks to appear on the ceramic tiles. Remember that the perforation can only be turned on after the tiles have gone all the way through. The length of the holes for the dowels should be several centimeters greater than the size of the plastic parts, this will make their insertion much easier.
We cut off the protruding parts of the dowels with a knife flush with the tiles
Step 6. Again, place the heated towel rail against the wall and tighten it a little with nuts. Secure its position with dowels. There is no need to drive the dowels all the way in until they are all inserted. Thanks to this technology, it will be possible to slightly correct errors when marking and drilling holes. Let metal part The fasteners will go in a little at an angle, it's not scary. The main thing is that after tightening they will all sit in their places.
Practical advice. The stops have two or three holes for dowels, but there is no need to install so many fasteners. Only attach them to holes that are easy to reach. There is no heavy load on the heated towel rail; one dowel can easily withstand it.
Work only with sharp drills and serviceable tools. To reduce contamination of the floor while drilling holes, place pieces of paper underneath. There is one more effective method Avoid contaminating the floor - while drilling, keep the hose from the vacuum cleaner turned on near the drill. But such work must be done with an assistant.
Step 7 Tighten the bottom nuts of the heated towel rail until they stop. Turn on the water and check the tightness of the connections and heating efficiency.
To minimize the risk of air locks forming, the first switch-on should be performed in the following sequence:
- the outlet tap must be closed, open the water inlet tap to the heated towel rail;
- place a bowl on the floor under the outlet pipe and slightly loosen the fastening nut;
- wait until the air leaves the system and tighten the nut tightly;
- open the outlet valve and check the tightness of the threaded connections.
The heated towel rail should warm up. If its temperature does not drop over time, everything is fine, hot water circulates. If the heating decreases, then you need to repeat the process of removing air pockets.

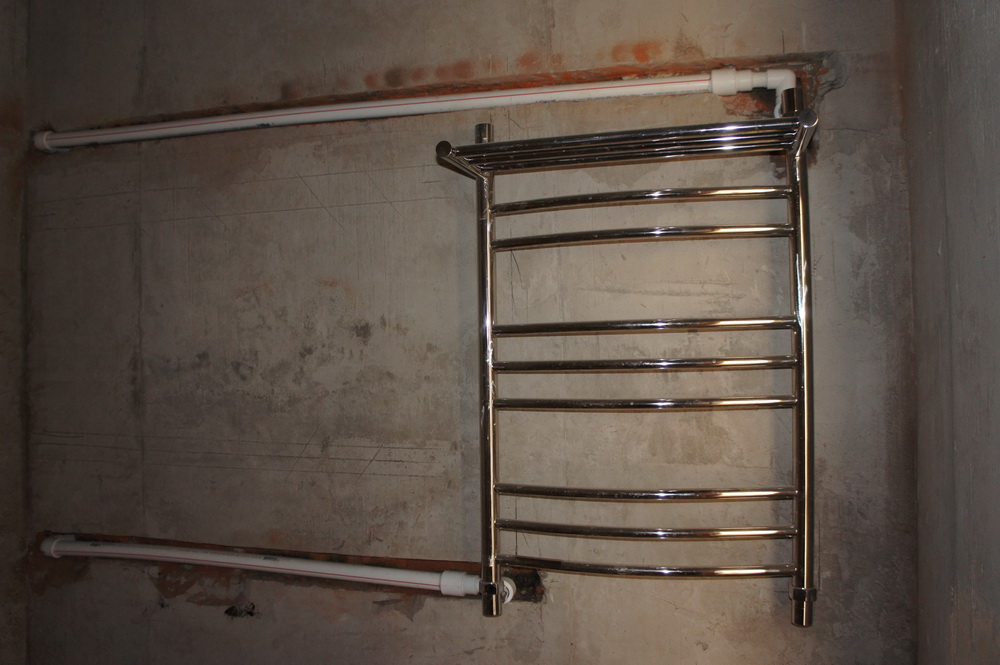
White heated towel rail with side connection
Video - Installing a vertical heated towel rail