This information may be useful to anyone who has ever encountered or will encounter the installation of socket boxes. Let us describe it as briefly and concisely as possible, what is a socket box, how to install it correctly and how much its installation may cost. You will also learn how to put back a fallen socket and what can be used instead.

Remember three basic rules for a quality installation:
You can also add a few nuances that will help you understand what kind of electrical outlets you need; how to prepare holes (sockets) for them; how to properly insert a cable into a socket box; and how to install it correctly.
Socket sizes
Everything about the size of the socket boxes is simple, the most common size of the socket box is 70mm in diameter. In the vast majority of cases, they all same sizes. And the majority modern sockets and switches are designed specifically for these sizes.
 Types of socket boxes
It is important not to forget about such a parameter as socket depth. But even in this case, everything is simple, if you plan to connect several wires in the socket box, in addition to the socket or switch itself (for example, use a socket box instead of a junction box), then you will need a deeper socket box. If possible, use deep socket boxes; they are then easier to work with and install sockets in.
 Switching wires in a socket box instead of a junction box
Remember! - Once, that's right installed socket box, never reminds of himself again.
Installing a socket box in concrete
What needs to be done to install a socket box in concrete? Right! - Hollow out a hole under the socket box! For this, it is best to use a drill with a diamond bit, but this is not the best option in terms of cheapness. A more convenient and practical option is a hammer drill with an impact bit for concrete, or simply cut out the concrete with a grinder and a stone disc (but this is very the dirty way, and dust will be absolutely everywhere: in the ears, eyes and in the entrance).
It should be noted that when gating, a lot of fine dust is formed in the room, and first of all, installers should take care of their health, purchase standard protective equipment: masks, respirators, headphones and construction vacuum cleaner.
Future holes must first be marked. We draw a line along the level and place marks on the wall. If you have 2 or more socket boxes, then the distance between the centers of the circles 71 mm. This is a distance calculated empirically by professional electricians, tested with sweat and blood! Remember 71mm!
The easiest way to make marks is to attach a group of sockets to the wall.

Strobleni e holes
After marking, in the marked centers of the circle it is necessary to make a hole using a drill with a slightly larger diameter than the crown drill (for example, an 8-10mm drill). We drill a hole with a margin, taking into account the length of the drill bit of the crown itself (but do not forget about the neighbors and thin walls). This method is also suitable when working with a diamond core bit in drilling mode.

The process of gating. After drilling holes in the center of the future circle, you need to use a crown to go deeper into the wall a few millimeters (this only applies to the method of working with a hammer drill!). Along the intended circle, you need to drill the maximum possible number of holes to make it easier for the crown to “gnaw” the concrete.

With a diamond crown, you just need to drill - without chiselling, periodically letting the crown cool. It is worth noting that if a diamond bit gets on the reinforcement, its service life is significantly reduced.

When working with an angle grinder, the whole task comes down to making cuts in the wall to the required depth and hollowing out the area where the socket boxes will be located.

What to do if, while drilling, a drill or bit gets into the reinforcement?
There are several ways to remove rebar. One of the fastest and most painless is knocking out the reinforcement with a chisel - an attachment for a hammer drill. If the crown gets into the reinforcement (an indirect sign of it getting into the reinforcement is sparks or a clear slowdown in the drilling process), it is better to remove this reinforcement, otherwise you will ruin the crown.

Second less convenient way, use the old crown. It doesn’t matter which way you do it, with a diamond or a drill bit, in both cases we simply drill out the reinforcement. The metal of the reinforcement is very soft and can be easily “broken” with a hammer drill. And the third, dirty way, is to simply drill out the reinforcement using a grinder with a diamond disc on the stone.

Embedding a socket box in concrete
The best way to secure socket boxes is to embed them in the hole using alabaster or rotband. A small life hack - so that the solution does not harden too quickly and you do not have to wait a day - you need to mix alabaster with rotband.
First, use a vacuum cleaner to remove all dust from the hole and moisten (prime) the hole with water. And only after this, we apply the solution with a small spatula, spreading it along the inner walls of the hole. The solution should be thick enough not to leak out of the wells. It is important to understand that the area of contact between the solution and the socket box should be maximum! Plus, coat the socket boxes themselves with the mixture. The solution will envelop the socket box from all sides and adhere well to the base of the wall, only then can we say that the socket box is installed efficiently!

Using a large spatula, remove excess mortar while leveling the surface of the wall. Before this procedure, it is necessary to remove or screw in all the screws of the socket box.
Laying the cable in the socket box. It is best to lay the cable in an already installed socket box; the windows for the cable are easily knocked out with a screwdriver, and it is better to make channels for pulling the cable between the socket boxes in advance. When the solution has cooled, you can safely insert the cable into pre-made holes or recesses.
If you don’t have that much time and the cable needs to be installed together with the socket box, try to align the socket boxes as accurately as possible. You can insert the cable into any hole, but it is better not to use the side windows for this, so that there are no difficulties with the subsequent installation of sockets.
Important! The entry of the cable into the socket box should not in any way interfere with the future socket, especially from the side of the spacers. Very common mistake when installing socket boxes, this means breaking the wires with a spacer from the socket - in this case, a dangerous potential may appear on the socket body, or a short circuit may occur when the electricity is turned on.

At what stage of repair (finishing) is it better to lay a socket box?
This is one of the most pressing issues that not everyone thinks about at the beginning, but understands how important it is in the end. Ideally, you should comply RULE#1, but this does not always work out.
Therefore, you need to know in advance how much the layer of plaster or another layer (plasterboard, tiles, etc.) will protrude before installing the socket box. As a last resort, you can break this rule and install the socket box flush with the bare concrete wall. But in this case, when plastering the walls, the socket boxes will be recessed into the wall, to the depth of the plaster layer. It will not be easy to properly install sockets in such a socket box, but our electricians know how to do it correctly.
Installation of socket boxes in gypsum board

When working with drywall, the cable is laid in advance or pulled through using technical holes and broaches. In the places of future switching (connections) of the cable, or in those places where there should be a socket box, leave a supply of cable, and mark outside where this cable is located. Mark the location of the future hole for the socket box in any way convenient for you, for example, screw in a self-tapping screw in this place.
Markings for socket boxes are made in the same way as markings on concrete. The distance between the centers of the circle is the same 71mm. It is important to consider that drilled hole it is already impossible to fix (or rather, nothing is impossible for a good electrician), but before you call an electrician, you need to try to do it yourself.

Holes in drywall can be made with a regular wood bit, diameter 68mm, using a screwdriver or drill.
After drilling the hole, you need to find the necessary wires, which should be right behind the wall. It happens that they are hidden in a junction box, or hang on a cable, with the help of which the wires can be pulled to the hole. Each master has his own way of pulling wires into hidden cavities, but that's a different story.
You need to insert the wires into the socket box BEFORE installing the socket box itself, otherwise it simply cannot be done.

Now comes the fun part. The most painful procedure is correct installation socket box in plasterboard. This is due to the fact that different manufacturers socket boxes for plasterboard (or wood), there are lugs for securely fixing the socket box to the ceiling wall (plasterboard, plywood or whatever you have). In some cases, because of these ears, the rosette does not fit into the prepared hole, but this problem does not occur on all rosettes!
It is best to take care of this in advance when buying socket boxes. Make sure that the ears, when open, do not go beyond the circumference of the socket itself, for example, like here

If, nevertheless, you manage to buy the “wrong” socket box, then you can use one little trick: eyelets are made in plywood or drywall at a slight angle (it is enough to make them only on one side), after which the socket box can be installed normally. The socket box should fit into the hole normally at an angle. The main thing is not to overdo it and not make the hole more large diameter than the outer edges of the socket box
 After all the procedures, we fix the socket box by tightening the screws
What to do if the socket box pops out of the wall
In cases where you are faced with a dropped or poorly secured socket, there are several ways you can correct the situation. The simplest and most reliable - screw the self-tapping screw into the base socket box (if it is concrete, a self-tapping screw with a dowel). The second method is glue gun Before gluing, it is necessary to remove all dust from the hole. More difficult situations when, for example, the base is plaster and it crumbles. Help here plaster solution, the base must first be primed, for example with PVA glue.
The mortar method can also be suitable for plasterboard structures. In general, the solution is, in principle, a panacea for fallen socket boxes. In some severe cases, you can screw the socket or switch itself to the base of the wall.
Installation of socket boxes in tiles or wall panels

It is better to lay the cable and install the socket boxes in advance, before laying the tiles. But if the tiles are already in place and you need to make a socket or switch, then crowns for ceramic tiles. The drill bits will help you carefully drill holes in the tiles.
The hardest thing is if there is concrete under the tiles that needs to be tapped. In this case, it is best to use a diamond crown, otherwise there is a chance of damaging the tile (when chiselling with a regular crown).
There is a cheaper and dirtier way, this is drilling a hole with a grinder, the main thing is to drill everything out as carefully as possible so that the hole is covered by the frame from the socket.
Conclusion
That's all, I hope this article will help you in our difficult electrical work. Like and subscribe to us on in social networks. And if something doesn’t work out, you can always get highly qualified help from professional electricians.
And the most important! When carrying out any work with working wires, do not forget to turn off the electricity!
The installation of not a single new point in the electrical network will be complete without a socket box - this is plastic or metal box, a wooden plank acts as an intermediate link in the wiring and is responsible for reliable fastening socket or light switch.
This electrical element is irreplaceable, so it is important to know everything about installing a socket box into a wall with your own hands, so that when planning a new line or replacing an old device, you do not waste time and money calling an electrician.

Below we will discuss the main types and sizes of mounting boxes offered by stores, as well as step-by-step instructions for installing them.

Understanding the types and types
Socket boxes are classified according to many criteria, but the main one is their division according to the material of manufacture. So, the following models are found:
Plastic, which are the most convenient and practical, since the base is made of non-flammable material, which increases the safety of the wiring and makes it possible to use it on wooden surfaces.


Metal boxes are more durable, but due to their ability to heat up and conduct electricity, fade into the background, giving way to safer and practical options. However, these models have not been discontinued since the installation of hidden sockets in wooden houses only possible with a metal socket box.

Wooden pads were previously often used when setting up wiring open type, being a convenient intermediate base for attaching the socket directly to the wall. Nowadays they practically never occur, only when installing homemade wiring in bathhouses, garages and other outbuildings.
The products also differ in their shape: round (universal), square (more spacious) and oval (or “double” socket boxes for installing a double socket or a set with a switch).

Models also differ in design features:
- The presence or absence of fixing tabs (in hollow plaster walls they are necessary, and socket boxes for plasterboard, concrete, brick and aerated concrete are secured with a layer of alabaster).
- Open or hidden.
- Single and composite (composite ones have special fastenings that allow you to assemble up to five glasses into one block).
- Standard and advanced.


The sizes of socket boxes may also vary. A round model with a diameter of 65 cm and a depth of 40 cm is considered standard, but there are narrow options 25 mm high or 80 mm deep. Box dimensions square shape most often 70 by 70 mm, but there are also deviations from the standards.

We mount the socket box
Installation of this product does not differ in complex manipulations, however, for wooden, concrete, brick and plasterboard walls, the algorithm of actions will change slightly. Below are step by step instructions how to install a socket box with your own hands in each in this case with detailed description and photo.


Preparation
On preparatory stage it is necessary to choose the right type of socket box depending on the required functionality and wall material. Also common to all cases will be a set of tools and consumables:
- Hammer or drill;
- Suitable attachment for wall slitting;
- Building level;
- Meter;
- Pencil;
- Chisel;
- Hammer;
- Putty knife;
- Putty.

Installation of a socket box
At this stage, the procedure and technology of actions for each type of wall will differ.
When installing in concrete and brick, the following must be taken:
- Mark the outline of the future wiring on the wall surface in accordance with the previously planned diagram.
- Determine the location of the outlet or switch, mark the area with a cross.
- Attach the purchased socket box to the “cross” (so that the mark is strictly in the center) and trace the outline.
- Drill a groove, where the drilling depth for the socket box will be the sum of the height of the glass and a margin of 5 mm.
- Clean the resulting hole and try on the socket box.
- Bring the wires inside the drilled circle, also make a hole in the back wall of the socket box and pull the wires through it.
- Moisten the hole and apply thin layer putty and carefully place the glass.
- Level the surface, remove excess, wait until dry.

It is somewhat easier to install a socket box in drywall:
- Apply markings and mark the outline of the socket box.
- Cut a hole of appropriate size.
- Make a hole in the glass for the wires and pull them out.
- Insert the socket box into the groove.
- Tighten the screws located on the sides of the housing until the glass sits tightly.

Installation of a socket box in a wooden wall is considered unsafe even with the use of metal protection. If you nevertheless decide to do hidden wiring, then drill suitable sized grooves, bring the wiring out and install metal cups.

It is important to act absolutely precisely, as with drywall, since it will be problematic to disguise unevenness or extra centimeters. However, it is still recommended to install exposed wiring on wooden surfaces.

When installing a socket box, it is a good idea to follow some tips that will significantly save effort, time and money.

Install mounting box after applying plaster to the wall, but always before finishing with putty and gluing wallpaper. This procedure will eliminate errors, will not spoil the interior, and will help hide errors in local repairs.

Check that the markings are correct with a level so that you don’t end up with sockets placed at an angle. This is especially true for installing socket blocks.

It is not necessary to use the old holes when replacing sockets and switches - it is enough to cover up the old entrance.
If the wall is too thin for the socket box standard size, then it is recommended to install overhead sockets. As a last resort, it is allowed to independently trim the height of the mounting cup.

It is not advisable to use for fastening polyurethane foam because it is a fire hazard.


The following step-by-step photographs of the installation of a socket box clearly demonstrate that its installation is not difficult, even for a beginner in electrical engineering. If there is a need for such repairs, then feel free to get to work, armed with the instructions, tips and recommendations described above.


Photo of socket boxes


A socket box is a plastic cup into which a socket or switch is mounted. Installing a socket box is a fairly easy process, the technology of which depends on the material from which the walls are made. Learn about methods for installing a socket box with your own hands and get valuable advice from experts with a brief description of each of them.
DIY installation of socket boxes in a brick wall
The main rule high-quality installation installing a socket box into a brick wall is a responsible and careful approach to this process. Installation of socket boxes is carried out in several stages:
- before installing the wires - in this case, first the crowns are made, the socket box is installed, and then the cable is connected to them;
- most often, socket boxes are installed after laying wires and determining the locations of switches and sockets;
- installing a socket box after completing the rough work - first, the cables are laid out in the room, then leveling plaster is applied, and only after it has dried, the socket boxes are installed.

- the presence of a flat plane that only needs finishing, so the socket box will not be recessed into the wall; when installing the socket box before finishing with plaster, there will be difficulties in finding it;
- is improving appearance socket box, it does not get dirty with the solution.
Work on the installation of electrical outlets should begin with the preparation of materials and tools, such as:
- crown for socket for brick walls, with a diameter from 65 to 85 mm, for ease of installation of the socket, choose a socket box with a slightly larger diameter, because cables and cables are also installed inside additional details;
- construction or laser level - allow you to install several socket boxes in a strictly horizontal position;
- use a tape measure or ruler as a measuring tool, you will also need a pencil to mark the installation locations of the socket boxes;
- stock up on socket boxes, earlier certain sizes;
- A gypsum compound will help fix the socket boxes; to apply it, prepare a spatula, and to mix the compound, prepare a container and water.

Instructions for installing socket boxes in a brick wall with your own hands:
1. Make a drawing of the preliminary location of socket boxes in the room. According to the data received, make markings on the wall.
2. Prepare a hammer drill with a special nozzle with a diameter of 0.6 cm. Mark the drilling location and begin the process. The crown should be centered on the brick, thus simplifying the work process.
3. Do not press on the hammer drill, work in hammer mode in combination with drilling. Remove the central part from the prepared hole. If there are several socket boxes in the same plane, remove the jumpers between them.
4. To remove dust, use a regular or construction vacuum cleaner. After this, treat the hole with primer. After the primer has completely dried, continue working.
5. The socket boxes are installed freely inside the hole. After this, fill the hole with the previously prepared gypsum-based compound, spreading it evenly over the wall. Install the socket box, press it into the hole, remove excess mixture with a spatula. Level the device in relation to the level, check the quality of installation after an hour.
Installation of socket boxes in a brick wall, the price is determined by the amount of work, the type of socket box and the complexity of the work.

Technology for installing socket boxes on concrete
There are two types of socket boxes:
- old;
- new generation.
The first ones are made of metal, are distinguished by the presence of steel stops, are not securely fixed to the wall and easily fall out of it. It is recommended to use for installing sockets in wooden buildings. In other cases, install new plastic socket boxes - they are held well in the wall due to the mortar used to fix them.
In the process of installing a wall socket, you will need a hammer drill, which has a special crown, as well as Pobedit drills and teeth. The diameter of a standard plastic socket box is 6.8 cm. Make a hole with a slightly larger diameter so that the socket box can easily fit into it.
Please note that plastic socket boxes are used for installation only in concrete or brick walls. If you need to replace an old outlet with a new one, first turn off the power to the room and remove the old outlet.
A screwdriver is used for these purposes. Remove the cover and disconnect the screws on the wires. Remove the old socket, remove the old base that is held in place by dowels.

This is the case if the old outlet was external. Install the crown into the hammer drill and drill a hole for the socket box. Its depth should not exceed five centimeters. Vacuum away the concrete and debris, and use a hammer and chisel to reshape the hole. Build an entrance for the power wires and connect them to the electrical outlet. Build a plug on the side where the wire is installed.
Put it in a spray bottle hot water and wet the hole. Combine plaster and putty, mix the solution, apply it inside the hole. Level and fix the socket box in relation to the level, additionally fix it with a solution. Wait until it dries completely and only then install the socket. Installing socket boxes in a concrete wall is a fairly easy process, for which it is enough to study all the technological aspects associated with the correct drilling of a hole in the wall.

We install a socket box on drywall - the cost of installing a socket box in a block
On plasterboard walls install special socket boxes. The principle of fixation of this device is based on special paws installed on the side or rear. The front part of the part is distinguished by the presence of four screws, twice as many as in concrete.
Two outer screws secure the appliance and socket or switch. The remaining screws are slightly recessed into the mechanism; they perform the function of fixing the frame. The screws are responsible for the tabs on the socket box; when they rotate, they fix the device in the desired position.
By turning the screw with a screwdriver, the foot begins to move and secure the socket box to the wall. The back of the device is distinguished by the presence of special holes and blanks for wires. Cut one of them and install the cable. Try to make sure that the wire goes into the socket from the back. Thus, the process of installing sockets or switches is greatly simplified. To cut the hole, use stationery knife.

Instructions for installing a socket box on a plasterboard wall:
1. Prepare a tape measure and take measurements at the location of the outlet.
2. As you perform these activities, be guided by the following standards:
- the socket must be at least 300 mm from the floor;
- in the presence of washing machine in the bathroom, install the socket 100 cm from it;
- The distance between the floor and the socket in the kitchen should be at least 120 cm.
3. Create a hole in the drywall. There are different ways for these purposes:
- use a stationery knife, with its help a hole is cut along a pre-drawn diameter;
- drill a hole with a drill and then cut with a knife;
- crown for spotlights - perfect option, with the help of which a high-quality hole with smooth edges is obtained.
The crown is mounted on a screwdriver or electric drill.
There are situations when a hole in the wall is already ready and a previously removed wire sticks out of it. In this case, first a hole is cut out in the socket box for the wire, and then fixed on the wall.
One pair of screws secures the socket box to the wall, and the second pair adjusts the claws that also hold this device. When the socket retracts a little into the hole, loosen the screws a little and check the quality of fixation. Next comes the process of installing switches and sockets.

Features of installing sockets in socket boxes
Aluminum wire, which comes out of the socket box is connected to the outlet. However, if its length is insufficient, an intermediate terminal block is installed, which performs the function of a conductor. choose black wires that have contact paste. They combine well with aluminum and copper elements.
A single-core rigid copper wire must have a current reserve and high strength. The terminals are placed on the bottom of the socket box. Length copper wires should not exceed 1.5 cm.
Connect the terminals to the wires and secure the socket. Check the evenness of the socket fixation using a level. To install self-tapping screws, you will need a screwdriver. Be sure to turn off the power to the room before performing work.
Please note that sockets are installed after finishing.

Installation of socket boxes before plaster
Installation of any socket box begins with the construction of a hole. To fix the device in the wall, use a solution based on alabaster or gypsum. There are three ways to create holes for the socket box:
1. Using a crown with a diameter of 7 cm. This part is characterized by the presence of teeth that easily pass through the wall. The crown is mounted on a drill or hammer drill. To avoid damaging the outlet, take the wire from it to the side and turn off the power to the room in which you are working. Push the crown completely into the wall. To drill the central hole, use Pobedit-based drills. To adjust the size of the hole and make it more accurate, use a chisel.
2. The second method involves using impact drill or a hammer drill. In this case, the socket box is installed on the wall and its contours are outlined. Using a Pobedit drill, drilling is performed along the contour of the socket box. Using a chisel and hammer, remove internal filling holes.
3. Creating a hole with a grinder - this method relevant if you have neither a drill nor a hammer drill in your house. Using a grinder, a hole is cut in the concrete along the previously outlined contour. Pay special attention to the areas where the wire is located. The depth of the circle should be less than the diameter of the socket box, bring it to the right size chisel

Next stage This just means adjusting the hole for the socket box. The socket box should fit freely into the hole. A gypsum solution will be installed in the inside of the socket box to perform a fixation function.
Prepare a gypsum-based solution; for this you will need:
- gypsum of two types - construction and medical;
- alabaster with water.
Place the plaster in a container, gradually stirring it and add water. Prepare the solution in small portions, as its shelf life does not exceed 7 minutes. Fix the socket box with this solution. Apply the solution into the hole, install the socket box and check its evenness with a level. Please note that the screws must be positioned horizontally in relation to the floor.

After the solution has set, continue working. Place plaster in the side parts that are not filled with mortar. Coat it around the socket. After the solution has dried, remove excess.
To connect two socket boxes together, use a butterfly. This is an additional connection element. With its help, several socket boxes are fixed. Double and triple socket boxes are installed in the same way as single ones. The main requirement is the evenness and horizontal position of the screws.
Installation of socket box video:
How to install socket boxes
It is very possible that you already do not have enough sockets in your apartment and want to add a few, especially if renovations are underway. How and with what to drill a niche for socket boxes? Do I need to buy an expensive crown or make do with hammer drills? You will learn about this further in this article.
For cutting holes or niches for socket boxes in a brick wall, an inexpensive hole saw is the best option. Brick is very soft material, compared to concrete or titanium. It is unlikely that you will need to install sockets in a titanium wall. It is unlikely that you have a titanium wall in your apartment. But concrete is quite likely. To drill holes for socket boxes in concrete, you will need a very good crown and a good hammer drill, at least with an active anti-bite system. Otherwise, you are taking a big risk, having an inexpensive but powerful Chinese hammer drill, dislocate your wrist. This is possible if the crown gets stuck in the concrete. And the power of the rotary hammer is 950-1200 W. will provide you with a visit to a traumatologist. A hammer drill of less power simply will not cope with the task.
You can, of course, buy a thousand crown for 5-6 rubles. And a hammer drill, over thirty thousand. Drill a couple of holes, break its teeth and curse the hour when you decided to make these purchases. But if you need to install just 10-12 socket boxes, it’s easier and cheaper to use a regular hammer drill and a chisel for it. And there is no need to buy an expensive hammer drill, which we are amazed by in videos on You Tube.
 First, let's examine the socket boxes for installation in concrete or brick. They have no significant differences. In principle, for a single socket or switch, you can purchase absolutely any socket box. If you need to install several sockets in a row, then it is better to buy models that connect into an infinite number of sockets. You can also find ready-made “double”, “triple” and “quadruple” socket boxes on sale. Their design is more rigid than those connected in a chain. They are easier to install in the wall due to their rigidity in maintaining plane, but they also cost several times more. In general, the choice is yours. I will show you using cheap socket boxes as an example.
 So, you want to move a switch, an outlet, or move an outlet and increase the number of them.
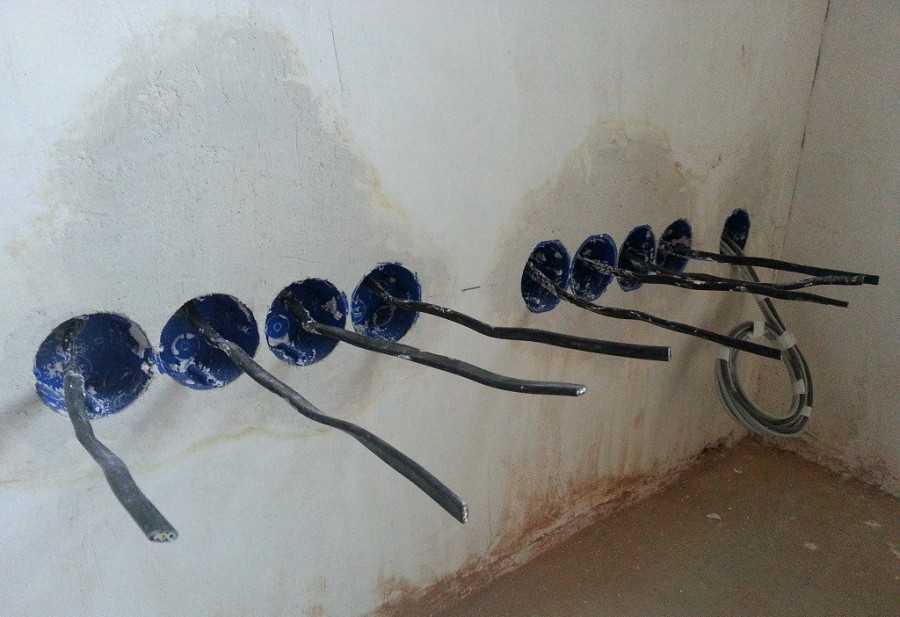
First, of course, you should decide how many sockets or, as they also say, “places” will be located in one place or another. Basic principle here it’s like: “There can’t be too many sockets!” Let me remind you that both power sockets (220 V) and low-current ones, that is, telephone, television and Internet, can be combined into one line. It is better to place low-current sockets on the edge of power outlets. This makes it more convenient and correct to stretch the wire. The distance between the power and low-current wires should be at least some (just kidding). In general, these cables should not be laid side by side to avoid exposure to electromagnetic fields. In the best case, an antenna, telephone or Internet wire should be in a shielded sheath. And the closest distance between them will be two sockets, to which they approach from different sides. Then, guaranteed, your Internet will be free from troubles in the form of electromagnetic waves. I’ll add that there is 15 cm between the shielded low-current cable and power cable at 220 V. sufficient distance for normal operation TV and Internet. Tested by experience. Those who are not satisfied with my statements can turn to specialized literature. So, you have decided how many outlets you will have in this area of the wall. I don't recommend more than five. You simply won't find a strip that combines six sockets. I was not lucky enough to meet one like this on this planet. But maybe you'll get lucky.
Next you need to choose a location for these outlets. Here the most correct thing would be not to adhere to some mythical rules and norms, but to do what is most convenient for you. To make it convenient to turn on the plug and pull it out if necessary. So as not to look for sockets under the table, bed or behind the closet. But you shouldn’t install it in the most visible place, like a painting. I am sure that you are able to solve this problem yourself. That's not what the article is about. Draw a strictly horizontal line along the level. Lean against front side your socket boxes to the wall, centering along the line, and outline them with a pencil. Stand back and admire. Here there will be socket boxes first, and then the sockets themselves.


Load a 6-8 mm drill bit into the hammer drill. and drill, slightly beyond the contour marks of the socket boxes, holes 6 cm deep.
It is better to immediately drill 5-8 mm wider than the mark. When gouging, the chisel will tend to the center, forming a cone-shaped niche. It will be difficult to get the edges inside the niche. Make the niche a little wider.
Everything that will be inside the contour must be hollowed out using a chisel, replacing the drill in the hammer drill with it. To make gouging easier, drill additional holes also in the center of the marked contour of the socket boxes, thereby weakening the concrete. The whole point of this action is to rarefy and weaken the bonds of concrete molecules, if only it consists of molecules. There's more to it than more holes, the easier and faster the breed selection process will be. Feel like a miner!
If you come across reinforcement, cutting it out with a grinder will not be difficult. When you decide that you have worked hard enough, insert the socket boxes into the niche, check their location horizontally and along the plane of the wall. They should be recessed into the wall with a small margin for the plaster solution to which they will be fixed. A small digression. If you are going to plaster a wall, leveling it flat and vertical, then the plane of the socket boxes should be leveled according to the applied layer of plaster. And if the layer is supposed to be large, then less depth will have to be hollowed out. I prefer to hollow out a niche for the socket boxes before applying the plaster. I don't want to spoil it already flat wall such lethal influences. Pieces of concrete come off unevenly and are torn out along with the plaster. This is unpleasantly damaging to my eyes and nerves.
I do this. First I hollow it out, then I plaster it. After which I “freeze” the socket boxes, leveling them along the plane of the plastered wall. If leveling with a plaster layer is not required, then I level it along the existing plane, as in this example.


Now we need a groove for the wire. Draw horizontal and vertical lines from the recess you created to the place where you intend to connect the new wire. IN in this case- this is the old outlet that it was decided to get rid of. According to the rules, you should not make the groove diagonally. This makes it easier to remember the location of the wire hidden under a layer of putty or plaster. If you believe Pythagoras, then the diagonal is much shorter, and if you do not intend to subsequently drill the wall in this place, then do as your reason tells you. Just in case, the grooves with wires can be photographed, adding distances from the corner and from the floor level to the photo. You can also tap concrete by drilling holes 10 mm deep. and the same diameter according to the groove marking, that is, apply perforation with a puncher. After that, with the same drill, drill through all the partitions between the holes, making a continuous groove. It’s easier, of course, to use a wall chaser, but it’s unlikely you have one. Having cut out the wire, do not forget to drill holes in the groove with a diameter of 6 mm. under the dowel there is a clamp securing the wire. After which, it is necessary to sweep out all the dust from the niche and grooves and prime them. After the primer has dried, you can begin attaching the wire.


It is convenient to secure the wire in the groove using dowel clamps. At the points where the wire enters the socket box, use a knife to remove the outer insulation that combines the wires into the cable so that the insulated wires enter the socket box separately. So, later, it will be easier to install the sockets themselves, and in the present - to fix the socket boxes. For ease of installation of the sockets themselves, leave the wire with a reserve, then you can cut it. It will be worse if you do not have enough wire. At the entrance to the socket box, make the groove a little deeper so that the wire does not squeeze the socket box out of the fresh solution. Each socket box has places for wires to enter. Make sure in advance that the groove fits exactly this place. Of course, you should break out the holes in the socket boxes for the wire to enter. They are visually easily distinguishable, it is impossible to make a mistake, unless you are crazy. But, in this case, you are unlikely to take up this matter. Crazy people don't install electrical outlets, and it fills our hearts with compassion for them.


You can secure, or, as they say, “freeze” the socket boxes to the place of its further and lifelong stay, using any solution. The easiest way to do this is with gypsum plaster. In most cases, I use the same one I use to plaster walls. “Rotband” - that’s what it’s called. Do not use stucco (alabaster). It will set faster than you can set it to the desired position. Prepare the solution. The more gaps you need to fill between the edges of the socket box, the thicker and harder the solution is needed. It is easier to fix one socket box than several in an assembly. It is easier to align it with the plane of the wall and horizontally. Before final installation, check whether the socket boxes fit easily into the niche and whether the wires are in the way correct position. If necessary, you can use a grinder or metal scissors to slightly enlarge the holes for the wires to enter.
Thoroughly coat the inner walls of the niche with the solution and fill the niche 2/3 full with plaster. After that, press your socket boxes into the solution, squeezing the excess out. As soon as you achieve a clear position, level the solution along the plane of the wall and let it harden. In the meantime, you can fill the groove with the wire with a solution.


If it is difficult for you to install the boxes together with the wire, then install the boxes themselves first, without wires. Let the solution set, and then install the wire. It's easier that way. Do not remove the solution squeezed into the sockets immediately, but when it dries a little. Otherwise, you will smear it more inside.


The ends of the wires in the socket boxes should be immediately insulated. Now we turn off the electricity and remove the old sockets. In one of the articles, I wrote about how to connect wires correctly. The junction of the wires must be carefully insulated and secured in a niche from the old outlet, and then clogged with a solution. Once finished, you can turn on the electricity and check for voltage at the ends of the new wires. Don’t forget to check their position a few minutes after fixing the socket boxes in the wall. They could have been squeezed out by the solution or wires.


I am sure that you will not have any difficulties, and after everything you have read, you will successfully install sockets throughout your apartment. After all, there are never too many sockets. In the kitchen of one of the apartments where I once worked, I thus installed 14 sockets, one for each electrical appliance. Of course, the devices were not used all at once, but it’s great that you don’t have to pull out one plug and plug in another. Plus, no extension cords under your feet or on the walls.
blogremont.ru
How to install a socket box: choosing a location for the socket, cutting, installing a socket box

The socket box is a special tool mounted in various designs, it is used to install sockets and switches. The question is how to install the socket box so that there are no problems in the future. repair work when old switches need to be replaced.
- Types of socket boxes
- Preparatory work
- Installation of a socket box in concrete
- Adjusting the space for the socket box
Types of socket boxes
First, you need to decide what types of socket boxes there are. They are usually divided into two groups:
- For concrete walls - such products are intended for concrete, brick, foam concrete, aerated concrete and block expanded clay walls. For such socket boxes, you need to prepare a hole for installation in advance, and fix them with a solution.
- On a plasterboard wall - such products are intended for plasterboard walls, chipboard structures, and plywood structures. Such socket boxes are secured using spacer tabs into the mounting holes.
After choosing a socket box, you need to do the preparatory work.
Preparatory work
It consists of assessing the wall on which the socket box will be mounted, as well as selecting the product itself based on size, shape, and material from which it is made. All these parameters are completely different.
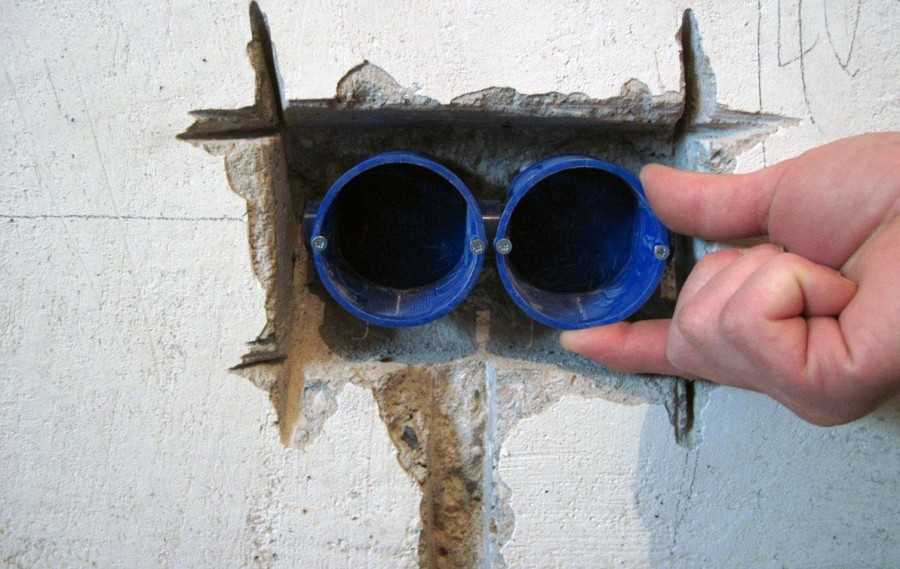
There are situations when you need to install a single unit (these are several socket boxes interconnected). At the same time, it is important to remember about the center-to-center distance (i.e., the distance between the centers of the socket boxes) and the same diameter of the products themselves.
Note!
The installation of the solid block itself is carried out according to the same principle as the installation of a conventional socket box.
The next step is the installation of socket boxes.

Hole for socket box
Installation tools and choice of installation method
The socket box is installed using the following tools:
- Pencil with ruler
- Drill and hammer drill,
- Concrete drill,
- Chisel with hammer
- Crowns for drilling concrete (the diameter of the crown must correspond to the diameter of the socket),
- Grinder (plus a blade for concrete),
- Putty knife,
- Construction or medical plaster, alabaster,
- Paper knife,
After preparing the tools, you need to choose a method for installing the socket box, or rather, how to prepare a recess for the socket box. There are three such ways:
- punch the desired place in a brick, concrete or aerated concrete structure, and then secure it with mortar,
- arrange a niche in a plasterboard wall or plywood structure and secure the socket box with special paws,
- Instead of a socket box, use a mounting platform as a base for a switch or socket.
Having chosen the installation method, you can begin marking the wall for the future outlet.

The photo shows the installation of socket boxes
How to mark up correctly?
Before you begin installation, you need to use a pencil and a ruler to mark the place where the socket box will be located (a cross of two lines with right angles). All measurements are taken from the covered floor, otherwise you need to add about 5 cm more. When making markings, professional electricians adhere to certain standards:
- in rooms, sockets are installed thirty cm from the floor,
- in the kitchen the socket is installed about 120 cm from the countertop,
- switches are installed 90 cm from the floor.
You do not have to follow these rules exactly, and the markings can be applied to suit your requirements. Also, if you don’t have a hammer drill or grinder, you don’t have to immediately run to the store and buy one, because such a purchase will be quite expensive. Tools can be rented.
You can also measure the location for the switch using your own hand. To do this, you just need to go to the wall, lower your hand and make a note in a more comfortable position. If this switch is intended for several people, then the distance can be calculated using the average length of the arm.

Install the socket box at a convenient level
Installation of a socket box in concrete
Installation of a socket box in concrete wall occurs with the help of a special solution (gypsum or alabaster are suitable for this purpose), but before this you need to drill the place where the socket box will be located. There are several ways to do this.
One of them is to install using a crown ( special tool in the form of a piece of pipe), the size of which is 70 mm. The socket box is usually 67 mm in diameter, sometimes a little larger. Along the circle, the crown is equipped with pobedit teeth (cutting segments made of hard alloy), with the help of which the circle is cut. Using this crown and a hammer drill, a hole is drilled in a concrete structure. This must be done carefully so as not to touch the wire. You need to drill until the crown is completely in the wall.
Note!
To make it easier for the crown to cut through the wall, you can make a hole in the center with a drill.
After this, the crown is pulled out, and the hole itself is refined in depth using an impact bit or chisel.
The second method is to drill a hole for the socket box using a drill or hammer drill with a Pobedit drill bit. To do this, the socket itself is applied to the wall and outlined. Then, using an impact drill or hammer drill, you need to drill several holes: in the center and in a circle. The holes should go as deep into the concrete as possible and be close to each other. After this, all that remains is to make a hole of the required size.
The third method is the fastest, but also the dustiest. It will require a grinder. First you need to make the appropriate markings: we already have a cross, now we need to draw a socket box on the wall and draw four lines, making a square out of a circle. Then the only thing left to do is walk the grinder along all the marked lines. The main thing here is not to touch the wire. After this, all that remains is to finish the hole to the required size with a chisel.

The photo shows the installation of a socket box in a concrete wall
Adjusting the space for the socket box
After preparing the place, you need to check whether it suits the socket. If the hole is made with a crown, then the width will be fine, you don’t have to worry about it. Here you need to look at the depth. The depth of the hole should be such that the socket box falls down there by about five millimeters. At the same time, it’s worth remembering one little trick: there is an edge on the socket box that is better to cut off. This way, the socket box will fit completely into the hole, which will allow the decorative frame of the switch to fit snugly against the wall without leaving a gap. After the socket box is installed, a groove is made in the structure to insert the wire into the product. On the reverse side the socket box has slots for wires. You need to insert the wire into this slot, and then install the socket box into the hole. Now all that remains is to tell you how to secure the socket box in the wall.
Making a solution and fixing the socket box
To prepare a gypsum solution, you need to take a container, pour gypsum into it and, stirring constantly, add water. As a result, you need to get a homogeneous creamy mass. You need to start working with the solution immediately, otherwise it will harden after five minutes. With this solution the socket box is fixed in the hole. Before installation itself, you need to wet everything in the hole well and wait for the water to be absorbed.
After this, you need to apply the solution into the hole with a spatula, and insert the socket into it, not forgetting about the wire. You need to insert it so that it does not stick out, so that later there is no lump and unnecessary problems. After this, you need to fill all the side cracks with the solution and putty around it.
Installing a socket box in drywall is even easier. To do this, you need to cut a hole in the drywall the size of a socket box. After this, it is fixed in the wall with spacer legs. Now you need to start puttingty seat(special place for installing a socket box) so that the structure is durable. This installation does not require many tools; all work can be done with a knife, screwdriver and spatula.
Thus, installing socket boxes is not the most difficult, so even an amateur can do it.
How to install a socket box video:
In contact with
anatomy-remonta.ru
Installing a socket box in the wall with your own hands | Construction portal

A socket box is a plastic cup into which a socket or switch is mounted. Installing a socket box is a fairly easy process, the technology of which depends on the material from which the walls are made. Learn about methods for installing a socket box with your own hands and get valuable advice from experts with a brief description of each of them.
DIY installation of socket boxes in a brick wall
The main rule for high-quality installation of a socket box in a brick wall is a responsible and careful approach to this process. Installation of socket boxes is carried out in several stages:
- before installing the wires - in this case, first the crowns are made, the socket box is installed, and then the cable is connected to them;
- most often, socket boxes are installed after laying wires and determining the locations of switches and sockets;
- installing a socket box after completing the rough work - first, the cables are laid out in the room, then leveling plaster is applied, and only after it has dried, the socket boxes are installed.

- the presence of a flat plane that only needs finishing, so the socket box will not be recessed into the wall; when installing the socket box before finishing with plaster, there will be difficulties in finding it;
- The appearance of the socket box improves, it does not get dirty with the solution.
Work on the installation of electrical outlets should begin with the preparation of materials and tools, such as:
- crown for a socket for brick walls, with a diameter of 65 to 85 mm, for ease of installation of the socket, choose a socket with a slightly larger diameter, because cables and additional parts are also installed inside;
- construction or laser level - allow you to install several socket boxes in a strictly horizontal position;
- use a tape measure or ruler as a measuring tool, you will also need a pencil to mark the installation locations of the socket boxes;
- stock up on socket boxes of previously determined sizes;
- A gypsum compound will help fix the socket boxes; to apply it, prepare a spatula, and to mix the compound, prepare a container and water.

Instructions for installing socket boxes in a brick wall with your own hands:
1. Make a drawing of the preliminary location of socket boxes in the room. According to the data received, make markings on the wall.
2. Prepare a hammer drill with a special nozzle with a diameter of 0.6 cm. Mark the drilling location and begin the process. The crown should be centered on the brick, thus simplifying the work process.
3. Do not press on the hammer drill, work in hammer mode in combination with drilling. Remove the central part from the prepared hole. If there are several socket boxes in the same plane, remove the jumpers between them.
4. To remove dust, use a regular or construction vacuum cleaner. After this, treat the hole with primer. After the primer has completely dried, continue working.
5. The socket boxes are installed freely inside the hole. After this, fill the hole with the previously prepared gypsum-based compound, spreading it evenly over the wall. Install the socket box, press it into the hole, remove excess mixture with a spatula. Level the device in relation to the level, check the quality of installation after an hour.
Installation of socket boxes in a brick wall, the price is determined by the amount of work, the type of socket box and the complexity of the work.

Technology for installing socket boxes on concrete
There are two types of socket boxes:
- old;
- new generation.
The first ones are made of metal, are distinguished by the presence of steel stops, are not securely fixed to the wall and easily fall out of it. It is recommended to use for installing sockets in wooden buildings. In other cases, install new plastic socket boxes - they are held well in the wall due to the mortar used to fix them.
In the process of installing a wall socket, you will need a hammer drill, which has a special crown, as well as Pobedit drills and teeth. The diameter of a standard plastic socket box is 6.8 cm. Make a hole with a slightly larger diameter so that the socket box can easily fit into it.
Please note that plastic socket boxes are used for installation only in concrete or brick walls. If you need to replace an old outlet with a new one, first turn off the power to the room and remove the old outlet.
A screwdriver is used for these purposes. Remove the cover and disconnect the screws on the wires. Remove the old socket, remove the old base that is held in place by dowels.

This is the case if the old outlet was external. Install the crown into the hammer drill and drill a hole for the socket box. Its depth should not exceed five centimeters. Vacuum away the concrete and debris, and use a hammer and chisel to reshape the hole. Build an entrance for the power wires and connect them to the electrical outlet. Build a plug on the side where the wire is installed.
Fill a spray bottle with hot water and wet the hole. Combine plaster and putty, mix the solution, apply it inside the hole. Level and fix the socket box in relation to the level, additionally fix it with a solution. Wait until it dries completely and only then install the socket. Installing socket boxes in a concrete wall is a fairly easy process, for which it is enough to study all the technological aspects associated with the correct drilling of a hole in the wall.

We install a socket box on drywall - the cost of installing a socket box in a block
Special socket boxes are installed on plasterboard walls. The principle of fixation of this device is based on special paws installed on the side or rear. The front part of the part is distinguished by the presence of four screws, twice as many as in concrete.
Two outer screws secure the appliance and socket or switch. The remaining screws are slightly recessed into the mechanism; they perform the function of fixing the frame. The screws are responsible for the tabs on the socket box; when they rotate, they fix the device in the desired position.
By turning the screw with a screwdriver, the foot begins to move and secure the socket box to the wall. The back of the device is distinguished by the presence of special holes and blanks for wires. Cut one of them and install the cable. Try to make sure that the wire goes into the socket from the back. Thus, the process of installing sockets or switches is greatly simplified. Use a utility knife to cut the hole.

Instructions for installing a socket box on a plasterboard wall:
1. Prepare a tape measure and take measurements at the location of the outlet.
2. As you perform these activities, be guided by the following standards:
- the socket must be at least 300 mm from the floor;
- if there is a washing machine in the bathroom, install the socket 100 cm from it;
- The distance between the floor and the socket in the kitchen should be at least 120 cm.
3. Create a hole in the drywall. There are different ways for these purposes:
- use a stationery knife, with its help a hole is cut along a pre-drawn diameter;
- drill a hole with a drill and then cut with a knife;
- A crown for spotlights is an ideal option, with the help of which a high-quality hole with smooth edges is obtained.
The crown is mounted on a screwdriver or electric drill.
There are situations when a hole in the wall is already ready and a previously removed wire sticks out of it. In this case, first a hole is cut out in the socket box for the wire, and then fixed on the wall.
One pair of screws secures the socket box to the wall, and the second pair adjusts the claws that also hold this device. When the socket retracts a little into the hole, loosen the screws a little and check the quality of fixation. Next comes the process of installing switches and sockets.

Features of installing sockets in socket boxes
The aluminum wire that comes out of the socket box is connected to the outlet. However, if its length is insufficient, an intermediate terminal block is installed, which performs the function of a conductor. choose black wires that have contact paste. They combine well with aluminum and copper elements.
A single-core rigid copper wire must have a current reserve and high strength. The terminals are placed on the bottom of the socket box. The length of copper wires should not exceed 1.5 cm.
Connect the terminals to the wires and secure the socket. Check the evenness of the socket fixation using a level. To install self-tapping screws, you will need a screwdriver. Be sure to turn off the power to the room before performing work.
Please note that sockets are installed after finishing.

Installation of socket boxes before plaster
Installation of any socket box begins with the construction of a hole. To fix the device in the wall, use a solution based on alabaster or gypsum. There are three ways to create holes for the socket box:
1. Using a crown with a diameter of 7 cm. This part is characterized by the presence of teeth that easily pass through the wall. The crown is mounted on a drill or hammer drill. To avoid damaging the outlet, take the wire from it to the side and turn off the power to the room in which you are working. Push the crown completely into the wall. To drill the central hole, use Pobedit-based drills. To adjust the size of the hole and make it more accurate, use a chisel.
2. The second method involves using an impact drill or hammer drill. In this case, the socket box is installed on the wall and its contours are outlined. Using a Pobedit drill, drilling is performed along the contour of the socket box. Using a chisel and hammer, remove the inner filling of the hole.
3. Creating a hole with a grinder - this method is relevant if you have neither a drill nor a hammer drill in your house. Using a grinder, a hole is cut in the concrete along the previously outlined contour. Pay special attention to the areas where the wire is located. The depth of the circle should be less than the diameter of the socket box; bring it to the desired size with a chisel.

The next stage just involves adjusting the hole for the socket box. The socket box should fit freely into the hole. A gypsum solution will be installed in the inside of the socket box to perform a fixation function.
Prepare a gypsum-based solution; for this you will need:
- gypsum of two types - construction and medical;
- alabaster with water.
Place the plaster in a container, gradually stirring it and add water. Prepare the solution in small portions, as its shelf life does not exceed 7 minutes. Fix the socket box with this solution. Apply the solution into the hole, install the socket box and check its evenness with a level. Please note that the screws must be positioned horizontally in relation to the floor.

After the solution has set, continue working. Place plaster in the side parts that are not filled with mortar. Coat it around the socket. After the solution has dried, remove excess.
To connect two socket boxes together, use a butterfly. This is an additional connection element. With its help, several socket boxes are fixed. Double and triple socket boxes are installed in the same way as single ones. The main requirement is the evenness and horizontal position of the screws.
Installation of socket box video:
strport.ru
How to install a socket box in the wall yourself.
Electrical distribution in the apartment is very important stage repair. To install a socket or switch in a specific location on the wall, you must first install a socket box. This is a special box, inside which the housing of a socket or switch is located and conveniently fastened. How to install a socket box in a wall? Let's figure it out now.
Selecting a socket box.
Before you install the socket box in the wall, you still need to buy it. What to look for when purchasing? There are 2 types of socket boxes: with and without legs. Socket boxes with claws are installed in walls made of sheet materials (gypsum plasterboard, gypsum fiber board, plywood, PVC panels and others). Socket boxes without claws are mounted in solid walls (brick, concrete, foam concrete, plaster, and so on).

Socket boxes with legs are usually round, while those without legs are round or square. As a rule, socket boxes can be joined to each other in order to maintain the same center-to-center distance, otherwise adjacent sockets or switches may not fit into one frame.
Modern socket boxes are made of plastic, but previously they were made of metal. They can be more or less hard (hard is better, but more expensive). That's all the theory, now let's move on to practice.
How to install a socket box in a wall?
Any installation always begins with markings, so before installing the socket box in the wall, you need to correctly mark its location. We measure the required distance from the floor: sockets are usually placed at a height of 30-40cm, switches - 90-100cm, although there are exceptions. Draw a cross with a pencil and start drilling.
How to make a hole for a socket box in drywall?
If you plan to install a socket box on a plasterboard wall, then take a core saw with a diameter of 68 mm and drill a hole. Then we insert the socket box into the wall and secure it. To do this, we tighten the screws, and they, in turn, press the socket box to the sheet of drywall using paws. Sometimes the resulting hole is chamfered to slightly deepen the socket box. If this is not done, the socket may not fit flush against the wall.
How to make a hole for a socket box in a wall made of plaster, brick and concrete?
To drill a hole in a solid brick or plaster wall, you need a special concrete bit. It is inserted into the hammer drill and drilling is performed. In this case, it is advisable to use a combined chiselling and drilling mode. You can drill a hole in a plaster or brick wall using a simple hammer drill.

The technology for drilling a hole for a socket box in a concrete wall is performed in the same way as in plaster or brick. However, for this you will need a more powerful hammer drill.
What to do if there is no crown?
How to install a socket box in a wall without this crown? Very simple! We outline the socket box with a pencil and begin to make holes along the contour using a hammer drill. Then we insert a peak or spatula into the hammer drill and begin connecting the holes. Thus, the recess we need is hollowed out. We take the socket box and try it on: it should be flush with the wall or can be slightly recessed. If it sticks out, you need to hammer it further. When the recess is ready, screw the socket box to the wall using a dowel and a self-tapping screw.
It is not difficult to cut a hole for a socket box in drywall without special devices. To do this, holes are made along the marked circle with a small drill, and then a hole is cut out using a hacksaw file.
How to run a wire into a socket box?
Before installing the socket box into the wall, you need to make a hole in it for the wire. The holes are already marked on the body of the socket box, so you just need to cut out the excess with a knife or carefully break it out. You need to cut from the side from which the wire will enter. Then everything is simple: we wire the wire so that it extends 15-20 cm.

How to cover the socket box in the wall?
The hole that is hollowed out in the wall is always slightly larger than the socket itself. Therefore, after installation, it needs to be caulked around it. In addition, you will also need something to fix the socket box in the recess. Any dry gypsum-based mixture is suitable for this. I prefer to use alabaster for a number of reasons. In many construction stores it is sold in small packages - 1-3 kg. Costs 20 - 40 rubles. Nothing by today's standards. Full time hardening for approximately ten to twenty minutes, which allows you to quickly use the socket or switch.

How to install socket boxes evenly?
The technique of fixing the socket box in the recess using alabaster is very simple. Having prepared a mixture of water and alabaster, we apply it inside the recess, and then we need to press the socket box there. Next, using a level, rule or metal corner align the plane of the socket box with the plane of the wall.

How to install several socket boxes in a row?
So we figured out how to install a socket box in the wall. But what to do if there are several socket boxes? Will the sockets and switches then fit into one frame? For this purpose, the socket boxes are connected to each other.
It's simple. If the socket boxes are mounted in a gypsum board wall, you need to mark them so that the center-to-center distance is 70 mm. That is, we mark a line horizontally on the wall, then put dashes on it every 70 mm. Thus, crosses are obtained in in the right places, along which the crown is drilled.
If the socket boxes are placed on concrete or brick, then we connect required quantity socket boxes together, outline and drill out the necessary recesses.

When installing several socket boxes, be sure to check their horizontal position using any building level. If the socket boxes are crooked, it is better to redo them, otherwise the sockets and switches will also be located unevenly. But this will not suit us!
When is it correct to install socket boxes before or after plastering?
So we learned how to install a socket box in the wall. But many are interested in what is more correct: to install the socket box before or after plastering the wall? It can be done either way.
However, if you install the socket boxes before plastering, then you will have to use longer screws to secure the socket or switch body. In my opinion, it will be much more reliable and smoother to install the socket boxes after plastering the walls.
And in conclusion, I would like to suggest watching a video on how to install a socket box in a wall.
Dear readers, I hope that this article on the site answered the question - how to install a socket box in the wall and, if necessary, you will master this task yourself.
When installing lighting and socket circuits in buildings for various purposes, one of the main elements are socket boxes. They are designed for reliable fixation of sockets or switches, in wooden walls prevent fire in the event of a short circuit. Products come in various types and materials, for hidden and external wiring. Depending on the installation conditions and functional purpose of the network, select certain type and the appropriate installation methodology is applied. In this article we will tell you how to install a socket box in a wall made of different material, let's study the installation features.
All socket boxes for installation in walls can be divided according to the following criteria:
- According to the material of manufacture;
- For open or hidden wiring;
- By design, depending on the building material of the walls;
- By size.

As an individual type, we can distinguish socket boxes for installation in the structure of baseboards, when the wiring is laid in the cable ducts of plastic or aluminum baseboards.
Materials for making socket boxes
The main materials for making socket boxes are metal and non-flammable plastic.
 Metal socket boxes are stamped with a press from galvanized iron sheets.
In most cases, they are used for installing hidden electrical wiring in wooden walls, this reduces the likelihood of a fire due to a short circuit.

 Modern plastic socket boxes are various forms and sizes, depending on the functional purpose, on which walls they are installed.
  Plastic socket boxes for baseboard wiring have a square body and a relief that matches the shape of the baseboard on the back wall.
 Standard shapes and sizes of socket boxes
 Old style metal socket boxes
 When manufacturing socket boxes, manufacturers adhere to the standards of the main models of sockets so that their fastenings and dimensions match.
The metal socket boxes are of the old type and therefore the choice of their sizes is not wide. There are models with an internal diameter of 65 mm, the depth of the glass in all cases is 45 mm.
The technological holes can be closed, but stamped with lines; if necessary, they can be easily opened by squeezing out the closing part with pliers from the desired side. Read also the article: → "".
Plastic socket boxes for installation in concrete and brick walls have several types of designs:
- Standard;

- With increased glass depth;
- Oval shape for installing several sockets from 2-5 pcs;
- Prefabricated blocks on one platform up to 5 pcs.

- Socket boxes for drywall
 Plastic socket box with clamping strips for installation in hollow walls, plasterboard, chipboard and other materials
 - Socket boxes for baseboards

Installation of metal socket boxes in wooden walls
Preliminary markings are made of the installation locations of sub-sockets and wire routes, which are laid in rigid or corrugated metal pipes. The holes for the socket cups are drilled with special wood bits of the appropriate diameter. The wires are laid in cut grooves and entered into the sub-socket through technological holes done from several sides. The grooves are masked with clapboard or other decorative materials. This method significantly complicates finishing.

It is easier and safer to lay external wiring on wooden walls using corrugated pipes and plastic cable ducts made of non-flammable material. Some cable ducts are colored with the structure of wood of various species, which allows you to successfully select harmony with the overall interior. Sometimes wires are laid over ceramic insulators evenly spaced along the line.
 Wooden socket boxes for external wiring are rarely used, mostly for decorative purposes.
 Surface-mounted sockets and switches do not need to be buried; they can be screwed directly to the walls, through a metal or asbestos gasket. Read also the article: → "".
Installation of socket boxes in concrete and brick walls
The difficulty in installing socket boxes in these walls lies in drilling holes in a solid surface.

For this purpose, special crowns with diamond, tungsten or pobedit teeth are used. After drilling, a number of standard operations are carried out:
- Wires are laid along the walls and secured to the concrete with plastic clips and nails. increased rigidity. When struck sharply with a hammer, they penetrate perfectly into concrete and brick surfaces.
- The ends of the wires are inserted 15-20 cm into holes drilled in the concrete, after which the walls are plastered.
- After the plaster has dried, the wires are threaded into the socket box, which is installed in a hole in the wall using gypsum mortar.
- When the plaster dries, they will paint the walls or make another decorative finishing, it will be possible to cut wires, connect and attach a socket or switch.
Tip #1. Please note that the socket box is installed after plastering the walls, otherwise it will be difficult to calculate the installation depth of the glass. If you recess it completely level with the wall surface, it will be 1-2 cm deeper after plastering. Set above level concrete surface This is not possible due to the unknown exact thickness of the plaster in this place. To avoid level changes and to ensure that the socket is pressed tightly against the wall surface, the socket box must be installed on a plastered wall.
Socket boxes with increased glass depth are used when several more sockets, switches or other wiring elements are connected to the network from one socket. In this case it starts a large number of wires, to accommodate them the socket box is made deeper.
Installation of socket boxes in plasterboard, plywood, chipboard walls with hollow space
For this case, the socket boxes have a special design with clamping strips. The installation sequence includes the following operations:
- In most cases, the wiring is installed behind a plasterboard wall;
- When installing the structure, marks are made on the front side of the wall where the socket boxes will be placed;
- Then in drywall special device holes are drilled, wires are pulled out 15 -20 cm;
- Wires are threaded into the technological holes, the socket box is inserted into the hole;
- By rotating the screwdriver of the bolts on the body of the socket box, the strips press it from the back side to the wall surface;
 An example of how a socket box is pressed against drywall
 - After finishing the front surface of the wall, you can install and connect sockets.
Approximate prices for fastening elements and socket boxes for hollow walls
| Elements | Dimensions in mm | COST in RUB. |
| Screw for fixing sockets | 3.1:10 mm | 6 |
| Screw for fixing sockets | 3.1:25 mm | 8 |
| Single box box | Ø 68mm, glass height 50mm | 75 |
| Regular box | Ø 68mm, cup depth 65mm | 90 |
| Box with two glasses | Ø 2x68mm, cup depth 50mm | 180 |
| Box for installing sconces | Ø 35mm, cup depth 40mm | 130 |
Installation of socket boxes for wiring laid in baseboards
Plastic skirting boards with cable ducts provide for the installation of specially shaped socket boxes in their design. These socket boxes have the shape of a box with holes for mounting the socket:
- At the installation site, a hole is made in the plinth for the wires to exit, or on the laying line, gaps are provided between the sections of the plinth.
- The relief of the back wall of the socket box perfectly matches the external relief of the baseboard, so they fit tightly together, the body of the socket box is screwed to the wall or floor;
- The wires are pulled out and connected to the socket terminals;
- The socket is inserted into the socket box and secured with screws.
Tip #2. In the absence of a socket box of the appropriate profile, the socket can be installed closely above the baseboard, with a design for hidden or external wiring. Surface-mounted sockets are easier to install; the wire from the plinth passes through a small recess in the wall into the socket body and looks very aesthetically pleasing.
Tools and attachments used for drilling holes for socket boxes in walls made of various materials
To drill holes, use a conventional hammer drill with replaceable attachments:
- For drilling concrete or brick walls, crowns of various diameters with diamond, pobedit or tungsten teeth are used.
 In the center of the cylinder there is a guide drill, which holds the bit within the specified diameter when drilling.
  After the crown has passed to a given depth, the brick or concrete components inside the diameter are knocked out with a regular chisel and hammer
 Sizes and costs of crowns from different manufacturers
| Brand | Manufacturer | Length in mm | Cutting elements | Ømm | |
| Messer | South Korea | 70 | 3 pcs | 68 | 3 090 |
| Projahn 81565 | Germany | 50 | 6pcs | 65 | 3 310 |
| Versio Projahn 852065 | 100 | 16pcs | 68 | 7 400 | |
| Bosch 2.608.550.0 | 60 | 6pcs | 5 190 | ||
| Practice 035-172 | Russia | 68 | 8pcs | 830 | |
| Master Stayer 29190-68 | Germany | 133 | 740 | ||
| Santool SDS Max | China | 140 | 520 |
- For drilling wooden surfaces The principle is similar, but the teeth have a shape and material suitable for drilling wood.
 The advantage of this design of the nozzle is that there is no need to knock out the internal elements; they are completely cleaned.
 Thickness and other parameters of some types of drywall:
| GKL | |||
| Material grade | Length in mm | Width in mm | Thickness in mm |
GVL | 1500 2000 2500 2700 3000 | 500 1000 1200 | 10 12.5 15 18 20 |
Moisture resistant | 2000 — 4500 | 1200 — 1300 | 6 — 13 |
The plates with teeth must be made of high-quality hardened steel, otherwise they will be enough for 2-3 holes. The depth of the crowns varies and is selected according to the thickness of the material to be drilled.
- Drywall can be easily drilled with any attachments for wood or concrete.
Grooves in concrete, brick and wooden walls are sawn through with a grinder special disks.

There are industrial wall chasers, but they are very expensive and only pay for themselves when working in large volumes. construction companies.
 Wood cutting disc
Errors when installing socket boxes
- Drywall, plywood chipboard are drilled in drilling mode, hammer drills often forget to switch from impact mode, as a result of which the surface immediately breaks, especially gypsum board.
- When installing open wiring on wooden walls, people often forget to install asbestos plates under cable ducts and sockets. This is required by the governing documents of the PUE and is necessary for reasons of one’s own safety. Such measures significantly reduce the likelihood of a fire. Read also the article: → "".
- During installation, the top edge of the socket box should be installed flush with the front side of the wall and decorative coating. Otherwise, the socket may not be attracted to the wall or the mounting bolts will not reach the socket;
- The level of plaster within the socket box must be perfectly level, then the socket will fit tightly to the wall; if the level of plaster changes, gaps may form between the wall and the body of the sockets;
- The wires are inserted into the socket box before it is secured with a plaster solution, the length of the ends is not shorter than 15-20 cm, so that it is enough to remove the insulation and fasten the contacts. With short wires, it will be inconvenient to connect sockets and switches and install them in a socket box.
FAQ
Question No. 1. The wall is made of chipboard, there are no metal socket boxes with clamping strips, can you put plastic glasses on wood?
Most modern building materials are made non-flammable, including plastic socket boxes and chipboard.
Question No. 2. I'm going to plaster a concrete wall, do I need to make grooves for wiring?
It is enough to secure the wire compactly with clips and plaster it, but at the same time make recesses for inserting the wires into the technological holes of the socket cup; they cannot be inserted from above.

Question No. 3. Is it possible to lay a wire between the logs in a wooden house and bury it?
Only in metal pipes or non-flammable cable ducts.
Question No. 4. Can deep socket boxes be used as distribution boxes?
Yes, there is special technique installation in this way, this issue requires separate consideration.