There are times when the entrance is blocked by some elements. This creates discomfort. It is important to consider the recommendations for arranging a check-in and familiarize yourself with the main ideas on this matter.
Stages
It is important to consider the main steps of how to make a good entry into the site.

First you should start filling the pillow. Crushed stone most suitable option in this case. Before filling the bottom of the ditch with it, you should prepare and clean this area.

The functional load of such a pillow is to support concrete pipes. After all, they should not sink into the surface of the earth. The pipe material is most often plastic, the size of which is 0.46/6 m. If we are talking about concrete pipe, then its size fluctuates around 0.5/2.5 m.


The next step is laying pipes using a truck crane. If the passage width is small, it is permissible to use plastic pipes.

Note! Plastic pipe material is not the worst option comparatively concrete material. The load of the passage should be taken into account when choosing.

The second stage of how to make a convenient entry to the site is to install retaining walls. By using them, running water will not wash away pre-sprinkled materials. This also has a beneficial effect on the race itself. It does not break down and can be used for a longer period of time.

Before direct installation The formwork must be installed correctly. A double mesh is installed and filled with concrete-based mortar. Among good brands solution can be distinguished M200, M250 and M300.

At the third stage of creating a drive to the site with your own hands, the solution hardens. The duration of the process is about a week, during which the concrete solution hardens and becomes a certain shape, has the appropriate quality characteristics.

Important! During pouring concrete mortar certain temperature regime. In particular, this applies to temperatures not lower than 5.
Summer, autumn or spring time is considered the most the best option. At temperatures significantly below 5, special mixtures are used that provide for this condition.


The distance between the retaining walls should be filled with crushed stone. Geological textiles are laid on top of its area. Thus, this will increase the service life of access to the site through the pipe.

After a month of carrying out this work, the materials gradually shrink. After three days the end of all installation work check-in can be used.

Price
When performing any work, its cost is of significant importance. According to preliminary estimates from companies that specialize in this area, the average price is in the range of 30,000 rubles. This cost individual order may change.

If you cooperate with your neighbors, you can reduce the price. When using a collective construction of a check-in, the price will cost 6,000 rubles less than an individual construction. This is a significant saving.

By building houses, or cottages, bathhouses, and other outbuildings good companies offer discounts to their regular customers. This condition should be immediately considered as the optimal option.

The photo of arrival at the site shows how important it is to choose a good place for check-in, for comfortable and long-term use. When locating a drive through a ditch area, certain rules must be followed.

Decide on the location of the house. This is especially true for the planning stage.

In the event that the house is deep in the plot, then check-in can be done anywhere. The process is not particularly complicated.

Keep one rule in mind. If your house is located on the right side of the road, then you should enter on the right side.

The drive width is optimal provided it is at least 6 m. The pipe diameter is 9 m.


conclusions
When arranging your entry into the territory, you should carefully consider every detail. The planning process will protect you from extra costs materials, time. Arriving with a pipe is optimal for homemade execution. Option using reinforced concrete slab good, but labor-intensive to use on your own.

Follow the step-by-step recommendations to avoid mistakes. If you are not confident in your skills, you should use the help of a specialist in this field. The team is able to perform all the necessary work efficiently in a short period of time.

You should also consider discounts and savings opportunities cash. In particular, this applies to collective work.

In addition to being durable, a driveway can look attractive. To do this, you can plant trees, flower beds, and make a flower bed.

Photo of arrival at the site


On one's own. Ennobled and harmoniously integrated into the landscape, they are equipped with bridges of varying degrees of decorativeness. Romantic-minded people also build them on the flat surface of the site, over small ditches, flower beds and “dry streams”, because they decorate the site, making it more interesting and well-groomed.
Members of our portal offer many options decorative bridges, embodied in their areas. Let's take advantage of their experience.
The style of decorative bridges depends on the size and composition of the area. It is better to decorate small areas with small bridges; larger objects will fit well into a larger area.
If your house is built in modern style, but has a clear, strict layout, then appearance It is better to choose simple forms for the bridge.
Omi4 made a bridge out of decorative stone and metal
Savelij used wood and stone

Wooden bridges of FORUMHOUSE participants Or And Novikova suitable for any site, even if there is no body of water.

With a country-style house or chalet, where there is a lot wooden parts, bridges in a rustic style go well together. Decor is welcome on a bridge of any style; even the most severe forms of the bridge will harmonize well with openwork casting or forging.
User's universal wooden bridge Grem Suitable for most architectural landscape styles

Chinese motifs of a wooden bridge decorated with decor Prosperitas kept at the gazebo.

Openwork Bridge AdvacedLTD adds tenderness and makes the landscape almost fabulous.

Decorative bridge for a portal participant Agatha made of bricks, bent bars and boards attracts attention to the flower garden.

Wooden brutal bridge Santolia will add personality to a completely flat area.

Minimalist style of a bridge made of painted boards Spring 888, thanks to its strict shape, will suit any landscape.

How to build a decorative bridge yourself
If the bridge, in addition to purely decorative functions, also has serious practical significance, then it should be of medium or larger size. And in this case, it is better to consult with or entrust all the work to them. It is quite possible to make a small bridge over a shallow ditch or a bridge whose only function is to decorate the site yourself, following the flight of your own imagination and the advice of “experienced” portal participants.
You can combine both options by ordering some parts and doing most of the work yourself. This is how the humpbacked bridge did it FORUMHOUSE user IlyaOgnev– he ordered the bent blanks from the workshop, and bought most of the rest himself. Welding of parts, processing of wood and installation of the bridge was carried out by on our own. Useful for installation welding machine, laser level, broken brick, cement, and ordinary working tools.

Finished bridge:

CorsaC939 completely independently and very quickly built several simple but nice bridges for his site - from pine boards, timber, the remains of the flooring from the bed were used for the railing. To fasten the units, hardware, nuts, and bolts were used. Tools - screwdriver, jigsaw, drill - the most common tools for working with wood. The cost of all purchased materials was only 1,000 rubles per bridge!


User Gexx talks about his experience of building a simple bridge on a forest plot from bent one and a half inch pipes with welded jumpers, guides from boards. Handrails were not provided due to the immediate prospect of transporting construction materials.

Wooden bridge FORUMHOUSE member djotr can serve its intended purpose, located above a pond, or simply become a decoration of the site - among a flower bed or above a “dry stream”.

And according to the "recipe" djotr portal participant Yulyunchik33 I have already made a similar bridge for myself.

T-80 made a bridge that combines simplicity, practicality and romance.

The original "birch" bridge from Butterfly29.

Log bridge from Stevedore in country style - reliable and emphasizing the overall “rustic” style of the composition.

Bridge - terrace Sergmishel It will also withstand significant weight.

Sergmishel User FORUMHOUSE
The bridge is on a double corner, a screed is poured inside the first two corners, and flagstone is laid on top between the second two corners.

Safety
It’s not just the reliability of your structure that is important. Any bridge, even the most “toy” one, must be safe, since it will definitely be used in children’s games, and I will test its strength by jumping and running.
Considering that all country bridges are small in width, pay attention to the handrails - it is better to avoid open sharp corners and protruding parts at the level of the child’s head. Iron also heats up in the sun in summer, which can lead to hand burns. Such handrails are unlikely to be pleasant in winter, so it is better to cover them with wood or make them entirely from this material.
It is also important to think about how to protect yourself and your household in the event of a fall on the bridge - the opening between the sides and the bottom should not be too large. Slipping on wet surface, the leg can easily slip into this space, and then injury cannot be avoided.
The surface of the boards should not be perfectly flat if we are talking about a humpbacked bridge. It is important to make the entrance and exit convenient, level with the bridge. And, of course, it must be stable, so it is necessary to take into account in advance the shrinkage of the supports, the effect of precipitation and water on the soil under the bridge.
Budget
The most expensive bridges are made of metal and specially prepared boards. Wooden bridges made from scrap materials will cost several orders of magnitude cheaper. You can build them yourself; hiring specialists will add costs.
A bridge manufactured by a professional company specializing in products and structures made from specially prepared boards.

Practicality
All photos from the article
If your dacha has an artificial or natural reservoir, then it would be quite appropriate to equip it with a beautiful bridge. This item landscape design will help make the site unique and stylish. Let's talk about it in more detail.

What to consider before construction
Most often, such a structure has functional purpose and serves as a crossing point across the pond. However, there is an alternative to this approach. You can build a decorative wooden bridge.
Optimal places for similar designs, according to landscape designers:
- ditches, ravines, dry streams;
- ponds, rivers, canals and lakes;
- beds, flower beds, lawns, flower beds;
- paths nearby decorative arches and gazebos.
Choosing a site for construction

- When the dacha has a stream and a pond at the same time, the best solution will throw a bridge over the stream. After all, a small structure is safer and will not require significant labor and financial investments from you.
- The bridges connecting the islands on the pond are very impressive.
- The basics of engineering, and simple logic, suggest that the crossing should be built at the narrowest point of the reservoir. Most likely, it will divide the water surface into two parts of different sizes. This can be used. For example, emphasizing the main volume of the reservoir and the shallows, or delimiting the garden and a place to relax.
- In a regular garden with an artificial pond, the correct rectangular shape, the principle of symmetry applies. According to him, it is advisable to make a bridge exactly in the middle of the pond. Then, in addition to the crossing, the structure will also serve as an observation deck.
Note!
Like other landscape structures, wooden bridges for a summer residence should fit harmoniously into the design suburban area.
At the same time, the design must be safe and durable.
Material, design and shape of the bridge

Of course, wood is best choice for all buildings on a suburban area. Among other things, it combines perfectly with other types of building materials.
The best types of wood for building a bridge are oak, larch and cedar. The instructions warn that maximum durability of the structure can be ensured if it is impregnated with an antiseptic and a moisture-proofing agent. These compositions will not affect the color and texture of the material in any way, but will protect it from harmful insects and microorganisms and give it moisture-repellent properties.

At the initial stage of work, you need to create a visualization of the bridge in the form of its sketch, drawing, diagram. To do this, you need to know what types of such structures exist. The lower table presents to your attention the main types of small bridges.
| Bridge design | Features of the structure |
| Straight | Most simple design. It is often made without railings, but if necessary, it is equipped with them. The construction is typical for country and rustic styles. |
| Arched, popularly called “humpbacked” | The design is ideal for construction on banks with different height levels. Optimal width structures - at least two meters. The maximum permissible bend is 20 degrees. |
| Stepped | The structure consists of a given number of stairs connected by platforms. The design is relevant if there are significant differences in height between opposite banks. |
| Step by step | Used on shallow crossings. In fact, it is a chain of pillars made of wood, stone, concrete, without a connecting fabric. |
| Suspension | The basis for the safety of such a structure is reliable chains, cables, ropes and a solid foundation, on which the wooden flooring is based. |
| Zigzag | The shape is characteristic of the East, including Japan. This configuration of the structure is considered among Asians better protection from evil spirits. |
Construction of the structure

First of all, for work you will need to prepare tools and materials
What will be needed
- Wooden beams and boards.
- Hammer, screwdrivers, plane, saw, drill, file, nails, screws.
- Tassels.
- Sandpaper of different grits.
- Roulette, pencil,
- Varnish or paint, antiseptic, moisture-proof composition.
Bridge installation

- You should start installing a wooden bridge with your own hands by arranging support platform , as well as strengthening slopes and banks, if necessary. To do this, you can use crushed stone and stone of different fractions.
- Mounted on the support platform, it will serve as the basis of the structure.
- The junction points of these bridge elements must be moisture-proofed using roofing felt or polyethylene.
- To prevent the base from shifting, the beams should be fixed with metal profiles.
- Boards are laid on them and a pressure beam is mounted.
- The flooring can be secured with nails or self-tapping screws.. It is undesirable for their caps to protrude above the level of the boards. Therefore, they should be recessed by 3-4 mm.

- Now you can install the railings. Optimal height their installation is 0.7-1 m.
- IN last resort the bridge is treated with an antiseptic and moisture-resistant impregnation, then painted or coated with weather-resistant varnish.
Note!
Construction becomes more complicated when the width of the reservoir in a suburban area is more than 6 m.
IN in this case wooden bridges for the garden must have a solid foundation made of reinforced concrete, as well as intermediate supports.

Before hitting nails or screwing in self-tapping screws, drill small holes in the boards with a drill. This will prevent the wood from cracking and increase the service life of the structure.
A special case is if you decide to build a stepped bridge. Then risers should be attached to its foundation, which will be the bases of the steps.
Attach narrow planks on top of them, which will create the outer fabric of the structure.
To mount the railings, you can buy balusters (then the price of the structure will increase significantly) or use ordinary timber small section. It should be sanded and impregnated with an antiseptic.
Most simple form– rectangular. In most cases, it is chosen when self-assembly bridge. Round or more complex shape It is best to order handrails from a carpentry workshop.
Conclusion
Now you know how to make country wooden bridges. These structures can simultaneously perform functional tasks and serve as decoration for a suburban area. The video in this article will develop its theme.
Owners of plots, the path to which is blocked by canals, are faced with the following problems: building a house is impossible - special equipment will not arrive (you cannot move the materials manually), if the house is already standing, then the owner himself is not able to drive up to it (you cannot leave the car unattended). Under no circumstances should you fill up the gap. And then the question arises: how to organize a durable platform that can not only withstand the weight of transport, but also allow water to flow freely along the drain? Let's try to deal with this problem further.
We build an entrance to the site through a ditch of small width using reinforced concrete slabs
This option for arranging the entrance to the site through a ditch is the least troublesome, but at the same time it is more expensive. Using it to cover wide barriers is completely unprofitable, since the wider the opening, the larger the slab should be. And the larger its size, the more the purchase will hit the budget.
1. A preliminary analysis of soils along the edges of the canal is carried out. If they are weak, then they should be strengthened. Otherwise, they will collapse under the weight of the slab and transport.
2. Strengthening is carried out by erecting concrete supports next to the canal walls. The formwork is installed, double reinforcement is laid, and concrete is poured. The gap between the supports and the walls is tightly filled with sand or clay.
 how to make an entrance to the site through a ditch (steps 1-4)
  construction of a drive-in from drainage pipe and reinforced concrete
3. Along the width of the product, along the edges of the channel, soil is removed to a depth that is 10 cm greater than the thickness of the slab (standard 22 cm). To construct a platform, products 3 m long and 1.5 m wide are most often used. If the channel width is more than 1 m, then you will need two products that will lie lengthwise rather than across.
4. The site is carefully leveled and compacted. 5 cm of sand and the same amount of gravel are poured on top. Each layer is compacted with a vibrating plate.
5. lays the slab on the prepared area. The discrepancy between the heights of the slab and the soil is leveled by removing the excess or, conversely, by adding toppings.
It is impossible to make an entrance to the site through a ditch using a reinforced concrete slab completely on your own. But this can be done using another method.
 samples of pipes and drainage trays
  schemes for arranging the entrance through the ditch
Organization of a site over a wide canal by erecting sides and an embankment
This method of building an entrance to a site through a ditch is less expensive, but very troublesome. The work can be significantly complicated by the fact that water is constantly flowing in the canal.
1. If there is water in the dug hole, it must be pumped out. Some do not do this and pour concrete into formwork installed directly in the water. The quality and strength of the product obtained in this way is in great question; there is a high risk of their destruction after a short period of time.
2. Partitions are installed at a distance of 50 cm from the intended boundaries of the future site. They can be made of slate, wood and other materials. By blocking the flow, water is pumped out by sediment.
3. The surface of the entire site is covered with sand, and then with gravel. The thickness of the latter layer must be at least 30 cm. Both layers are compacted.


4. The pipe is laid in the intended place and supported with bricks for a while so that it does not move.
5. Formwork is assembled along the edges of the pipe with a height slightly higher than the height of the channel walls. Supports are required due to the mass of concrete that will be poured. Double knitted reinforcement is installed inside. The mixture is poured and it is expected to dry completely.
6. 30 cm of gravel (fraction 70) is poured over the pipe and compacted. Then another layer of the same material, but with a smaller fraction, is compacted again. If the height allows, you need to lay 3 such layers (the last one with an even smaller fraction).
7. Then the entire surface is covered with a 3 cm layer of them granite chips or gravel with fraction 5. Geotextiles are laid on top and poured thin layer sand.
8. Lay on the surface on fragments of bricks 3 cm high reinforcement mesh. Sides are installed around the perimeter of the site. Poured cement mixture 6 cm high.
When calculating the number of layers of all materials and their thickness, it is necessary to first measure the height of the channel. If it is insufficient, then it can be artificially deepened by removing soil from its bottom. Removal should be long and smooth, and also at a slight angle so as not to disturb the flow of water. If you abandon this idea, then you will need to reduce the thickness of the top gravel mound. But in no case should it be less than 50 cm.
There is one feature on my site - a stream flowing from the collective farm fields. In order to somehow fit it into the surrounding reality, as well as to ensure a safe passage, a bridge was thrown across it. It was made from wood about 10 years ago, so it was already quite rotten and lost its former strength. It seems to look organic from the outside, but it’s already scary to cross it. And let the children in even more so! Therefore, I decided to remove the old bridge and build a new one - from metal. Detailed description I would like to bring this construction to your attention.
I immediately decided on the design of the new building - the bridge would be humpbacked, with bent metal handrails and wooden decking. Found suitable drawing on the Internet, slightly altered it to fit existing realities. Then, along the way, some profiles were replaced by others, and the sizes varied. But overall the project turned out to be working and was implemented.

Bridge design on working drawing
The bent parts of the structure were ordered from local craftsmen. Unfortunately, they turned out to be not entirely responsible, so I had to finalize some details myself. I'll mention this later.

Brought blanks of bent bridge elements
So, we brought the parts and unloaded them. For the handrails, I selected 4 arches that were most similar in shape. It turned out to be not so simple - they were all different (thanks, “masters”!). I don’t have a workbench for such structures, so I started welding the sidewalls on a paved area.
I simply laid out the arcs and vertical posts on the surface, achieving horizontality by placing various pieces of wood and plywood under them. It turned out to be quite convenient. Checked against laser level, everything is smooth, no “screws”.

Connection of bent handrails with vertical posts (by welding)
I welded the first side, then laid out the elements of the second side on top of it and also connected them by welding. The lower part of the bridge supports will be underground, they will not be visible, so I made these parts from a corner. I had a lot of it collecting dust in my workshop, there was nowhere to put it, and besides, it was a pity to use pipes for the “underground” parts.
I welded all sorts of metal scraps-fangs onto the legs to better hold the supports in the concrete.


“Fangs” from metal scraps are welded onto the racks that will be concreted
Step 2. Destruction of the old
It's time for dismantling. In a couple of hours, the old wooden bridge, which had become unusable, was dismantled. The site for the new bridge has been cleared.

An old wooden bridge that has served its purpose

The old bridge has been destroyed, the space for installation has been cleared
Step 3. Connecting the sidewalls into one structure
In a wheelbarrow I brought the almost finished sidewalls and various profiles necessary for the design to the stream. On site I welded the gussets and the main elements of holding the flooring to the sidewalls. I welded all the voids where water could theoretically get in.
I did not spare electrodes, since the quality of welding of the holding parts determines how safe movement along the bridge will be. I didn’t clean the seams, I thought that they wouldn’t be visible anyway. And there is no need for extra work.


For rigidity, I welded buttresses on the sides. As for me, they don’t look very organic against the background of the curving sides. They are too straight, sharp, in general, not quite what I wanted. But toughness requires sacrifice. Let them remain like this.

The lower parts of the bridge supports will be in concrete, I covered them with paint - later there will be no access to them.
Step 4. Installation of the bridge and concreting the supports
And then he started drilling wells. I took a drill and drilled 2 holes on both banks of the stream almost to their entire depth (about a meter).

Placed the structure supports in the holes and aligned them vertically building level. For installation rigidity, filled free place in the holes with rubble stone. Now the supports stood like a glove and did not move anywhere.
Next is pouring concrete. At first I made a liquid mixture so that the concrete would seep between the stones without any problems. The next batch was already thicker. I don’t know what grade of concrete was ultimately used, but I’m sure that the bridge will last on such a solution long years and doesn't budge.

The bridge is installed, its supports are concreted in the holes
Step 5. Welding of internal arches and balusters
First, I welded internal arcs onto the sidewalls.

The internal arcs are welded to vertical posts sidewalls of the bridge
Between them, in accordance with the plan, baluster posts should be located. They had to be measured in place and then cut off - not a single one was the same. Step by step, I welded all the balusters.

The balusters are fixed in place - between the internal arches
Step 6. Correcting bent handrail elements
It would seem that with metal elements it's over, but that's not the case. One flaw that my irresponsible metal bending craftsmen made haunted me. I mean the curved ends of the handrails.

They looked just terrible, so without thinking twice, I cut them down. And then I decided to do it myself, in a more decent performance.

I don’t have a bending machine; making one or buying one for these purposes is irrational. The only way that seemed acceptable to me was to cut notches on pieces of pipe and bend the metal along them.
First, I calculated, taking into account the difference between the internal and external lengths of the arcs, the number of notches and their width. On the pipe scraps I marked the location of the notches in increments of 1 cm. I first cut in a circle of 1 mm, and then cut (not completely) a little wider - in a circle of 2.25 mm.

The result was something similar to a washboard, which could already be bent. That's what I did, I recorded it in in the required form and brewed with outside. I didn’t touch the inside; I didn’t want to have to worry about cleaning it later.

Thanks to the notches, I was able to bend the blanks and give them the desired shape
Since initially the blanks for the ends of the handrails were taken with a reserve, after fitting on site, the excess part of the pipes was cut off. The blanks were welded to the handrails.
I also decided to weld the open ends so as not to install plastic plugs. They would look like metal structure foreign and cheap. After welding, the bent parts were carefully cleaned to a shine. They turned out great, almost perfect handrails!

To protect the banks from erosion, they had to be reinforced with pipes and boards. All these reinforcing structures will not be visible, so I did not strive for special beauty. The main thing is that it turned out reliably.

Step 7. Putty and paint
The time has come to correct another shortcoming that was made by manufacturers of metal blanks. Some profiles were of poor quality, with noticeable dents. This had to be cleaned up somehow. Automotive metal putties came to the rescue - I had 2 types.
First I filled the deepest dents with coarse putty and fiberglass, then used finishing putty. At the same time, I also puttied the inner surfaces of the ends of the handrails (where there was no welding). I had to work quickly, as the putty hardens in an instant. I hesitated a little and everything had already frozen, I had to make a new batch.

Now metal surfaces bridges seem almost perfect. Can be painted. I chose for the design classic color- black. All metal surfaces were painted in 2 layers.

The metal parts of the structure are painted black - a completely different look!
Step 8. Installation of wooden flooring
It was time to plank the bridge. For several years I had a very high-quality larch board with a ribbed corduroy surface lying in my shed for several years. That's what I decided to use.

The board has a ribbed surface - the flooring will not be slippery
Unfortunately, larch has one unpleasant feature. When it dries, it releases sharp splinters that can easily scratch and injure you. Having taken the boards out of the barn, I saw that this time all front side was strewn with such splinters. The reverse side was in at its best, so it was decided to use it as a front for flooring.
The boards needed to be prepared. I treated them with a priming antiseptic to prevent rotting and to increase their service life. Dried it out. And then covered it with used machine oil. There was an idea to varnish the flooring, but I didn’t dare. Still, there is a high probability that the varnish will crack in humid conditions.
I didn’t want to jeopardize the work of many days. Therefore, I settled on antiseptic and oil - this should be enough for several years of operation. However, I plan to renew the oil layer every year so as not to worry about possible problems with rotting.

The boards are dried in a vertical position after treatment with an antiseptic and oil
Then I screwed the boards to the horizontal deck holders using metal screws. I left a small distance between the boards so that any water that gets in could flow into a stream and not linger on the flooring. Still wood flooring remains the weak link in the bridge and the possibility of rotting in the existing damp conditions must be prevented by all means.
The result is a good humpback bridge that can be used without fear. And you can walk without getting your feet wet, and decorative function present.
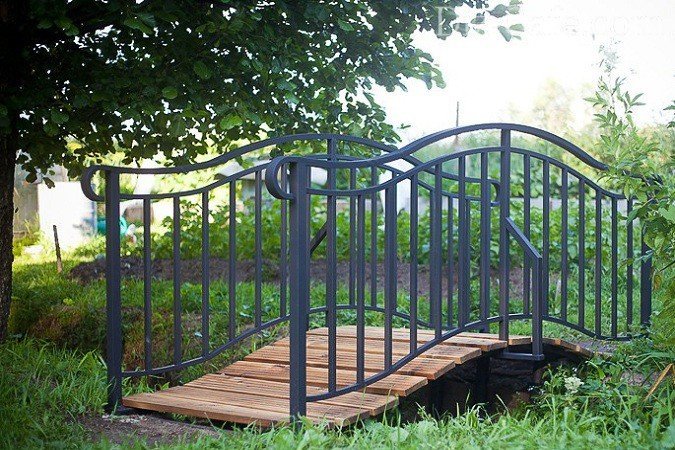
Final view of the humpbacked metal bridge with wooden decking
I hope my master class will not be useless and will be useful to someone in landscape art - I will be only too glad!