To the owners of undeveloped summer cottages or lands with dilapidated buildings, the task is to improve them. First of all, you need to build a restroom on your territory. To make it comfortable and pleasing to the eye in appearance, you should carefully consider your own project or carefully try on a purchased design.
We build from wood according to traditions
Despite the abundance of materials on the construction market, including innovative ones, wood remains the most popular in the construction of toilets.
Advantages of wood:
- Environmental friendliness. When the boards have served their purpose, the latrine can be dismantled and burned in the oven.
- Decorative. Even the most simple wooden toilet fits easily into any design summer cottage, emphasizing its natural beauty.
- Hygiene. Wood absorbs unpleasant odors, masking them.
- Durability. If you use special impregnations against bacteria, fungi and insects or paint that protects against harmful ultraviolet radiation, you can significantly extend the service life of the material.
- Low cost.
The main disadvantage of wood is its increased flammability, which can be reduced by treating it with heat-resistant agents.
A simple latrine can be built in one day
A latrine from boards in the country can be built with cesspool(backlash closet) or with a waste container (powder closet). The first option is necessary for summer residents with big family, permanently residing on the site, and the second is suitable for those who care for the garden several days a year. In this case, the container with biological waste can be emptied approximately once a month. In addition, the type of latrine is influenced by the location of groundwater: if it is close, then you should not dig a cesspool.
Having decided on the design of the toilet, you can begin drawing up a drawing that will simplify the assembly of the frame, or use ready-made plans.
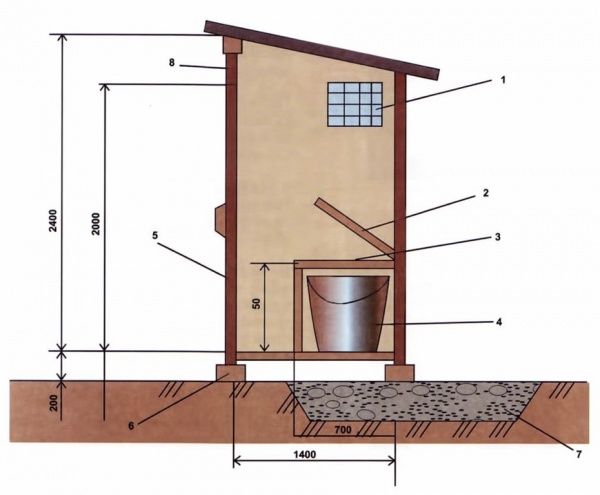
The drawing shows detailed dimensions
In any case, it is recommended to manufacture structural parts strictly according to the drawing in order to avoid inaccuracies and distortions. The simplest model of a restroom, which does not require special skill, is considered to be the “Birdhouse”. Typically its height is two to three meters, width is one meter, and length is one or one and a half meters. If desired, all these dimensions can be increased or a double restroom can be made.
The Teremok toilet looks original, especially with its arrow-shaped shape, which does not retain snow. And also the “fairytale” design is well protected from the wind. Its main element, unlike the Birdhouse, is not the frame and walls, but the roof, fixed to a truncated base.
The structure, lined with a slab, is well protected from snow
Another common type of latrine is the “Shalash”, where the side walls simultaneously serve as roof slopes. This model can be built in just a few hours. Decoration Materials V similar design only needed at the back and front; roofing materials are laid on the sides.
Comfortable sitting - important detail any restroom
We are building a drawing
The development of a drawing of a country toilet should begin with the frame, noting the dimensions of the structure (length, width, height) and indicating the cross-section of the timber or boards. In project wooden building cutting diagram should be displayed facing material, the amount of which is calculated for one side (due to symmetry), front and rear walls. When creating a drawing of a “Birdhouse”, the front wall must be built higher than the back wall for slope if the roof is pitched. In a toilet with a gable roof, the front and back walls are the same height. Those who are planning to make a ceiling in the restroom should also display it in the illustration.
We calculate the amount of materials
Standard set of products for a small country toilet two meters high:
- Two pieces of edged boards from four to six meters.
- Four floorboards of six meters.
- Three-meter lining - two or four packs (depending on the type of internal lining).
- Edged timber with a thickness of at least 50×50 mm or a board - from 20 mm for the frame.
- Glassine - four meters.
- Ruberoid - one and a half meters.
- Twenty special galvanized nails for eight-wave slate or corrugated sheeting.
- Galvanized steel for the ridge.
- Door with fittings.
- Two buckets of sand.
- Antifungal drug packaging.
- Roofing material (120×140 mm).
The list may vary and be supplemented depending on the selected toilet model. The final estimate is drawn up according to a pre-created drawing. To build a toilet roof 1.5 m long and 1.2 m wide, you will need 1.8 m2 of edged boards (calculated by multiplying the length by the width) plus three meters (0.75 boards) for the side rafters.
As a result, 1.75 boards 4 m long and 0.25 m wide are enough to cover the roof. The amount of floorboard is determined according to the same scheme: 0.6 m 2 (1 m x 0.6 m) is needed for flooring and (0.6 m x 0.4 m x 2 + 1 m x 0.4 m + 1 m x 0.6 m = 1.48 m 2) - for a toilet seat, and the area of four boards is six meters long and thick 100 mm is 2.4 m 2.
To cover the back and two side walls of the restroom you will need 7.28 m 2 of boards. The area is also calculated by multiplying the length by the width. As a result, 2 m2 of lining will go to the back wall and 2.64 m2 to one side wall (2.64 m2 x 2 + 2 m2 = 7.28 m2).
For a parallelepiped-shaped restroom model, the length of the lining must be at least 1.24 m (if the products are stuffed crosswise), and the width and thickness can be taken arbitrarily. Calculations are made in a similar way: the area of the walls of the structure is determined and divided by the area of one board of the lining, the number of necessary elements is obtained.
We are building a restroom according to the traditions of Russian architecture
We purchase quality material
If you decide to build a restroom from boards, then it is better to use widespread products made of larch, which does not darken, retains its original appearance for a long time and is durable. Edged boards can be planed or unprocessed. The first ones are more expensive, but they are already dried, polished and do not injure your hands during operation.
The toilet can also be covered with clapboard - thin boards that are fastened together with grooves. It is usually created from coniferous species wood, resists moisture and temperature changes well and does not deform when exposed to sunlight.
The lining withstands weather conditions well
Budgetary and convenient option In the construction of a closet, used pallets can be used - packaging products that are convenient to fasten, break, process and combine with other materials. They can easily be obtained for free by contacting transport companies who do not need “garbage”, or purchase at a bargain price through thematic portals.
Pallets are connected to each other with bolts
You can also cover the restroom with moisture-resistant plywood, fiberboard, chipboard or sealed OSB boards. All of the materials listed are easy to install and resistant to adverse biological influences. However, it should be taken into account that fiberboard and chipboard made from glued sawdust can be damaged when shock loads, especially it concerns thin materials. A toilet with a 0.5 mm fiberboard coating is unlikely to last long.
Modern OSB-3 boards, created from wood chips with synthetic resins in the form of three layers, withstand significant mechanical stress and are easy to construct. Therefore, they are suitable for structures designed for long-term operation. A restroom made from logs or timber will be reliable, durable and pleasing to the eye with an antique style. This design has only one drawback - the high price.
Preparing the necessary tools
In the process of building a toilet you will need:
- building level;
- hacksaw or portable circular saw;
- plane;
- Screwdriver Set;
- self-tapping screws;
- hammer.
Step-by-step instructions for building a country toilet
The following methods are used to construct a latrine cesspool:
- installation of reinforced concrete rings;
- laying out brick walls;
- installation of special polymer tanks;
- concreting using lathing.
Phased construction of a toilet:
- Having prepared the project, you should decide on the location of the latrine, which should not disturb the neighbors, so it will have to be installed at a distance of one to one and a half meters from the fence. If you decide to make a cesspool, provide access for a sewer truck. You should not build a toilet in lowlands that may be flooded by spring floods.
- The construction of a backlash closet begins with digging a hole, which can be with drainage or sealed. The first option is less labor-intensive, and the second is indispensable for high level groundwater spreading sewage throughout the site.
The cesspool should be located no closer than 5 meters from wells, residential buildings and areas with fruit trees
- The pit is dug in accordance with the dimensions in the drawing, compacted, filled with sand and cemented. After this, the walls are covered with lathing and filled with mortar or lined with bricks (as an option: concrete rings). Next, the surface is plastered and processed together with the bottom. bitumen mastic. Do not forget that the walls must rise above the ground by no less than sixteen centimeters.
- A capital pit can be built with a filter bottom by filling it broken brick or crushed stone. Thus liquid waste will go into the ground, so you will need to clean the pit much less often. Installation of a plastic container can be done on any site, observing sanitary and hygienic standards, since in this case fecal matter does not fall into the ground.
Broken bricks are placed at the bottom of the pit
- On next stage the foundation is being installed. For a toilet, it is enough to dig concrete pillars or blocks around the perimeter. The frame, which has four vertical bases, is constructed from wooden beam or specialized metal pipes. The longitudinal rafters of the roof framing should protrude no less than thirty centimeters beyond the perimeter of the building.
The base for the restroom can be made from treated slats
- The base is fastened with four slats at the level of the toilet seat, corresponding to the height for ease of use (usually forty centimeters from the finishing floor covering is enough). After this, the jibs of the side and rear walls are mounted diagonally and vertical supports for the door, fastened with a lintel at the top, no more than one hundred and ninety centimeters in height.
The toilet seat is located at a distance of approximately 40 cm from the floor
- The finished frame is sheathed with clapboard, boards, OSB, etc.
The toilet frame is covered with slats
- There is a door on the back wall for convenient waste removal. It is better to seal the lid with roofing felt or other moisture-proofing material. It is advisable to install a ventilation pipe in the slots of the toilet seat and roof.
The rear door for waste collection is equipped with ventilation
- Next, a door with a window for lighting, equipped with a hook and latch, is hung.
The roof covering is installed using a drill
It is better to make the frame for a parallelepiped structure from larch beams, and pine is more suitable for floors, walls, ceilings and doors. To make the toilet neat, you need to take careful measurements in accordance with the drawing.
The “Shalash” model is built very quickly. Work begins with installing the front and back walls from edged pine boards at least thirty millimeters thick. The material can be attached to both nails and self-tapping screws. Next, longitudinal and cross beams according to the drawing, and the base of the pedestal is mounted on the rear wall and spacer element.
After assembling the frame, the platform and floor are sheathed. For the latter, it is better to take a hardwood board measuring 20x100 millimeters. Ventilation in the “Shalash” is mounted on the back wall. The door, as always, is attached at the final stage.
Video: do-it-yourself country toilet combined with shower
Creating a durable finishing layer
The outdoor toilet is constantly under adverse effects precipitation, wind and temperature changes. This causes the tree to darken and rot. Will help extend its service life protective covering, which must be aesthetically pleasing.
The original design of the toilet can decorate the area
Main types of coatings:
- Oil paints. They impregnate wood well, form a strong layer, and last up to seven years. Have high consumption and take a long time to dry.
- Antiseptics. They penetrate to a depth of approximately one centimeter and protect the material from blue staining, mold and rot. Preserve the natural color of the wood or slightly tint it.
- Glazing paints. Translucent, last up to five years, do not change the surface texture.
- Topcoat paints. They also preserve the relief of the material, do not lose their appearance for up to seven years, and form a very durable layer.
- Acrylic paints. They can last up to ten years, allow the wood to breathe, and retain color perfectly.
Fans of the natural shade of wood are better off using antiseptics and special impregnations. Those who want to give free rein to their imagination can use dark colors that will not become dirty. Designers do not recommend covering the toilet with flashy, bright colors that catch the eye. It is better if the restroom is hidden from prying eyes.
In most cases, buildings are painted after assembly. However, this has its downsides. After all, the edges of the boards and other hard-to-reach places will remain unprotected. It is more correct to process the material before constructing the restroom.
People who know how to draw well can decorate a toilet in an original way. Birds, insects, flowers on a dark background and other images will make your closet different from others.
“When painting toilet walls, you should not use varnish, which traps steam and street work doesn't fit."
It is recommended to apply the products to a clean, well-sanded surface. First, an antiseptic treatment is carried out, and then a finishing coat is applied in two or three layers with drying. You cannot paint boards under the scorching sun, otherwise cracks will appear after drying. The primer must match the tone of the base paint. During operation, the product must be constantly stirred to achieve an even layer.
Natural dark tones are optimal for the restroom
It’s not difficult to build a comfortable wooden toilet in your country house. Even a beginner can cope with this task. However, in order for the result not to disappoint, a number of simple conditions must be met. It is not forbidden to use ready-made drawings, but before you begin to implement the project, you need to thoroughly understand them. Better yet, make the necessary modifications to finished drawing(size changes, design adjustments, etc.). Creativity allows you to get the best result.
There is a lot of information on the Internet about how to build a bathhouse or gazebo in the country. But almost nothing is known about the object, which is needed in the first place and often appears on the site before the house itself. The topic is, of course, sensitive, but no one can argue that the restroom is simply necessary. And since it will be an integral part of the landscape, I want to have a beautiful garden toilet that would complement and not spoil the landscape.
Choosing a place for a toilet in the country
No matter how beautiful and successful the planned toilet design may seem, it must be installed in a secluded place on the site. Firstly, no one likes to get to it in front of everyone, and secondly, it is quite difficult to build a toilet in the country that is completely free of unpleasant odors.
If the structure is supposed to be stationary, “for centuries,” then it is necessary to provide for the possibility of cleaning the cesspool. Despite the fact that many sewage disposal machines have the ability to extend the hose, not all segments are intact, and the design itself is bulky and quite heavy. Laying a pipe across the entire site can result not only in the unpleasant need to clean the yard, but also in dented beds and flower beds.
For temporary buildings, it is better to choose a place near the fence. After filling the cesspool, the soil may still settle for some time and it is better if no one walks on it at first.
And, of course, it is desirable that the garden toilet is located on the windward side of the dominant winds in the warm season. If you use a septic tank, then this rule can be neglected.
From the point of deployment to the internal structure
The simplest construction method is a small, lightweight house over a cesspool. Ventilation and disposal in this case are absent and left to the will of natural phenomena. Today, such toilets are not often found in the country. Such a restroom is not only far from modern ideas about comfort, but is also harmful to the environment. In some regions, uninsulated cesspools are simply prohibited.
It is much more useful for your site to arrange a full-fledged sewer system that can be pumped out and cleaned. This will also open up more ample opportunities selection of the building itself and arrangement of the premises. Above a stationary pit, you can install both a foundation and a structure made of almost any material that will last for decades.
Today, so-called septic tanks are gaining increasing popularity. These are closed-cycle sewerage systems. They can be very different in design and principle of operation, but their main advantage is the ability not only to neutralize the smell and harmful qualities of waste, but also to process them into useful fertilizers. Depending on the complexity and size of the septic tank, this may simply be the most regular toilet at the dacha, and maybe a drain processing station autonomous sewerage from all over the house.
Oddly enough, but interior interior The “office for reflection” has not undergone any special changes. The inside of the country toilet is finished with inexpensive, practical and easy-to-care materials. Most often this is wooden and plastic lining or sheet panels. The most significant breakthrough in this delicate topic can be called the appearance of ready-made toilet seats made of ceramics and sanitary ware. They not only boast original design solutions(from a simplified version of the usual toilet, to a “stump” made of glazed clay), but they also significantly simplify the work on the internal improvement of a toilet in the country.
And, the most difficult thing is the walls and exterior
At first glance, it would seem, what’s so complicated about this? The structure is simple, without special requirements for loads, without special expectations in the field of architectural delights. But... at the same time, every owner wants it to be:
fast
inexpensive
durable
easy to clean
Beautiful
Agree, choosing building options that would combine all these qualities is not so easy. What can you use to build an inexpensive and beautiful country toilet?
The most common material for this structure is wood. Today there are a lot of options for wooden toilets.
Plank Toilet Design
This can be a familiar structure made of planed boards with a small figured window and pitched roof. To increase the strength and “windproofness” of such a toilet, as well as to simplify the construction itself, you can buy already tongue-and-groove boards. For construction, a floorboard 20 mm thick is suitable. high grade and small (or maybe even immeasurable) length. Such material is sold everywhere for almost nothing.
Blockhouse structures are also assembled quite quickly. From the outside, such a toilet will look like a small log house. The inside can be decorated with any lining and even insulated. Such toilets can have either a single-pitched or gable roof. They are covered with flexible or wooden tiles or remnants of the same material that covered all other buildings on the site.
If you have a budget and a well-thought-out cesspool cleaning project, you can simply order a ready-made log house. Most companies offer several options, from the simplest to real “fairytale houses”.
Plastic booths deserve special attention. They are rarely distinguished by high decorative value and originality. But they are extremely easy to install, and they look neat. Moreover, plastic is affordable price and record durability.
The most difficult project to build a garden toilet is made of stone and other masonry materials. For this facility, most often they use non-new building material, which remains after the dismantling of other buildings. Then unsightly walls can be lined with “wild” stone and facing bricks. Or just carefully plaster and paint.

Everybody knows popular expression, which says that acquaintance with the theater begins with the hanger. We won’t be mistaken if we say about a dacha that it starts with the toilet. You can judge the owner by its appearance and structure. The “hands-on” owner made this building beautiful and neat. There are no drafts or unpleasant smell.
It will be useful for beginners in country life to learn how to build an inexpensive and comfortable outdoor toilet with their own hands.
In this article we will talk about the most common types of closet structures, their structure and consider the possibility of combining them with other country houses.
Based on the method of waste disposal, these structures are divided into three types:
- Powder closets;
- Toilets with a cesspool (septic tank);
- Water closets.
First view outdoor toilet easy to set up and operate. Its main part is a seat (stool), under which a removable container is installed. After each visit, a peat mixture is poured into it with a scoop, which absorbs liquid and unpleasant odors.

A toilet seat with a sealed lid and a bucket of peat – that’s all you need to set up an outdoor latrine
A significant drawback of this design is the small capacity of the bucket. For those who rarely visit the dacha, a powder closet is optimal. If you plan to spend weekends on your property or your family has more than three people, you will have to empty the container often.
An improved version of the powder closet - peat dry closet offered on the market today. It consists of a plastic case, inside of which one or two containers are placed. A tank with a peat mixture and a dispenser is installed on top.

1, 2 – containers for the solid fraction; 3 – funnel for liquid; 4 – funnel for solid fraction; 5 – tank with peat dispenser; 6 – ventilation tube; 7 – drainage tube
To eliminate unpleasant odors, the structure is equipped with an exhaust pipe leading to the roof of the cabin. The containers in this toilet need to be emptied no more than once a week. This is achieved by separating the liquid and solid fractions of waste.
When using the dry closet, the liquid enters a funnel located in the front part of the body and is discharged through a tube into the ground or plastic container located on the street. Dense fractions of sewage accumulate in the internal container.
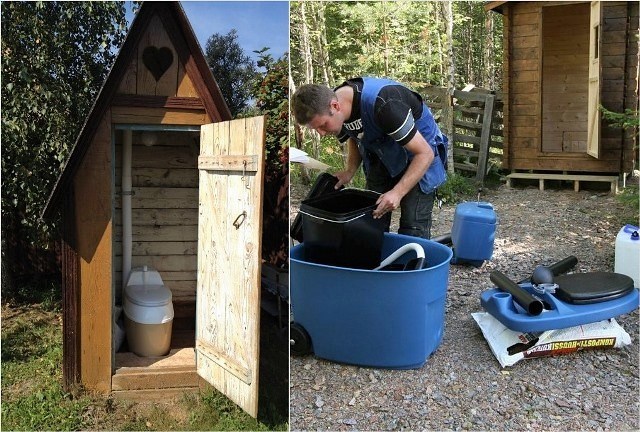
The dry closet is in the “combat position” and in the process of installation. In the first case, the cramped cabin is striking, so we do not advise you to save on its space at the expense of comfort.
Despite the benefits peat toilet in front of the classic powder closet (converting waste into fertilizer, good ventilation and an extended period of use), many summer residents choose the option with a cesspool (septic tank). Its installation is cheaper than purchasing an “advanced” dry closet, and the cleaning frequency is 1-2 times a year.
At the same time, you should remember two serious problems that a cesspool can present to its owners if constructed incorrectly:
- Soil contamination by pathogenic bacteria;
- Unpleasant smell.
It's not enough to just dig big hole in the ground and place a toilet booth above it. The container with sewage must be reliably isolated from the ground. A concrete tank treated with waterproofing impregnation is best suited for this purpose.
The second condition is entering into a cesspool special bacteria. They quickly decompose sewage, disinfect it and eliminate odor. Dry bacteria concentrates for septic tanks and cesspools can be purchased today at any hardware supermarket.
The design of the backlash closet (air toilet) cannot be called too complicated. Its main part is a concrete pit with a hole. A booth is installed on it. To eliminate unpleasant odors, there is a exhaust pipe. Its lower end is in a hole, and its upper end rises above the roof. Due to the difference in height, draft is generated. Air from the cabin is sucked into the pit and released into the atmosphere through a pipe.

Backlash closet design diagram
Another popular toilet option for a summer house is a water closet. Its main part is the familiar toilet with cistern. It contains a water lock, which prevents the smell from escaping from the pit into the cabin. Unfortunately, it is impossible to use such a system without heating, since winter time The water in the toilet and cistern freezes. That's why this design designed for the warm season.

Drawing of an outdoor water closet
With the onset of warm days, the container on the roof of the booth is filled with water. The outlet channel is connected to through a tee equipped with a vertical ventilation pipe.
Options for outdoor toilet stalls
You can build a toilet stall from different materials. Most often, the basis of the design is wooden frame, sheathed with OSB, tongue-and-groove boards, plywood or siding.

A toilet covered with planed boards looks neat and cozy
Moving away from the use of a frame and cladding, the house can be folded from, thereby creating a picturesque imitation of a log house.

For lovers natural wood You can also recommend using a blockhouse for cladding. It is cheaper than a massive log and is easily mounted on a frame. Toilet walls lined with wooden clapboard"herringbone"

Many dacha owners are not satisfied with the rustic appearance of the “birdhouse” toilet. Striving for originality, they erect luxurious log mansions on the plots for “solitary reflection.”

Bricks and blocks as materials for constructing latrines are still very popular. Whatever one may say, the capital structure will last for decades. Neither dampness, nor wind, nor sun will harm it.

If you don't have it at hand facing bricks, then the walls can be built from the remains of red and silicate. High quality plaster will hide uneven masonry.

The cabin, built from assorted bricks, is awaiting plastering.
Translucent polycarbonate can be used to cover the cabin from a metal profile. This material looks very aesthetically pleasing and is not afraid of moisture.

Sheet corrugated sheets - practical and durable material for a toilet cubicle. It can be placed on either a wooden or steel frame. The only condition is internal lining walls with insulation. Without this addition, there will be a hot “oven” in the summer and a freezer in the winter.

Cabin interior decoration plastic lining– concise and hygienic
To category unusual materials, used for the construction of latrines include straw blocks. A cabin built from them is warm and cozy. Anyone who wants to amaze the imagination of neighbors and guests does not go to a construction site to buy materials. Having collected a certain amount empty bottles, he builds a toilet out of them “to everyone’s surprise.”

In addition to rectangular and rounded structures, “huts” of different sizes are very popular.

There are two rational grains in this decision:
- The slopes of a steep roof replace the walls;
- The unusual appearance of the building adorns the landscape.
Very often the toilet becomes part of the utility unit. This solution allows you to place several rooms in one building. As a result, savings are achieved during construction (common walls) and the comfort of use increases (a warm toilet is always at hand).

Solid combination latrine with shower, lined with siding and covered with a hipped bitumen roof

Option for a brick toilet interconnected with a shower stall

Aesthetically, not a very successful combination in one outbuilding (toilet-shower) log house and plastic slate roofs

Some owners combine two toilets in the building: “for gentlemen and ladies.”
How to build a simple toilet for your dacha yourself?
Having decided on a waste disposal system (powder closet, cesspool, septic tank), you can begin construction.
Minimum internal dimensions of the cabin– width 1 meter, depth 1.4 meters and height 2.0 meters.
The basis of the structure, step-by-step construction which we will consider is chosen wooden frame from antiseptic bursa. It can be placed on a block foundation or on a shallow concrete “ribbon”. A thick sheet of plywood or OSB board with a rectangular hole cut in it.

Having assembled the base, level it vertical racks frame and strapping bars.

Having made the frame, it is sheathed with plywood using a jigsaw and a screwdriver.

The next step is installation of the roof rafters. They are made from dry timber with a cross-section of 5x10 cm, cutting it into the upper chord of the walls. In the upper part, the bars are connected to a horizontal ridge board.

Having completed this stage, the rafters are sheathed with plywood. This best base For bitumen shingles, which will fall on the roof.

Having finished with the roof, they begin to assemble the “podium” frame. A powder closet storage tank will be installed in it and a hole will be made for a seat with a lid.

The toilet door is assembled from a tongue and groove board, fastened with transverse strips for greater rigidity.

After lining the doorway with timber, the door leaf is attached to it using hinges. The final operation is painting the toilet booth outside and inside.

In conclusion, let’s say that we have considered the option of building a summer outdoor toilet. For the winter season, the walls from the inside need to be insulated with polystyrene foam (minply) and sheathed with any sheet material(plywood, OSB, board, plastic).
If you decide to install light in the booth, then at the same time you can minimal costs increase comfort of use. Install an electric fan heater. In just a few minutes it will warm the air to above-zero temperatures.
You shouldn’t deny yourself comfort even at the dacha. There are a huge number of country toilet projects that every person can implement. But first you need to decide on a drawing and, according to it, build the future structure.
A huge amount of materials and all kinds of designs for country toilets leads to the fact that people are simply lost against the backdrop of all this diversity. That is why the theoretical part is so important. Based on the data in this article, you can choose the optimal project for your dacha.
Typical designs of country toilets
Basically, to create a country toilet project, the following types of structures are used:
- toilet house with cesspool,
- dry closet,
- powder-closet.
Each of these designs has its own advantages. That is why it is so important to decide on the type before starting construction.
Country toilet with cesspool
The project must include a foundation pit. You also need to take care of its arrangement. For this it can be used plastic barrel or brickwork reinforced with reinforcement.
In the project you must provide required quantity bricks and cement, also do not forget about reinforcement. The walls you create are subsequently covered with plaster. It is the pit that determines the character of the above-ground building. Usually it's small wooden house, created from scrap materials. It can be in the form of a hut, a miniature house, or even a tower.
According to this country toilet project, all waste will accumulate in a pit. For further cleaning you will need a vacuum cleaner. The main disadvantage of the project is bad smell. That is why it is very important to provide for ventilation at the planning stage.
Ventilation can be either natural or forced. In the first case, two holes are made in the structure at the bottom and at the top. Their purpose is extremely simple - to create air disturbances. This way, the unpleasant odor will not linger inside for long.

Forced ventilation is a simple fan that blows out all the unpleasant odors from the toilet. When installing it, you need to think about the compensation hole through which air will penetrate inside. Its diameter must be no less than the diameter of the fan. All this is written down in the project.
Important ! Don't forget about the cesspool. It also needs air circulation. For this purpose, a ventilation pipe is installed.
Powder closet
When creating this project country house a cesspool is not provided. All waste is collected in a reservoir under the toilet seat. It is best to include two containers in the design different sizes. In the smaller one you need to make several different-sized holes and insert it into a larger container, on the side of which there will be round exit. A drainage hose is connected to it.
The liquid goes into the ground through the hose or drainage system. The main role in this country toilet project is played by the container for the filler. Peat is most often used as a mixture. The filler helps control unpleasant odors. Once the tank is full, it should be taken to the compost heap.
When you make a drawing, it is important to take into account the ease of removing the container. There are two possible options solutions to this problem. In the first of them, the reservoir is removed when the seat is raised. In the second, a small door is cut out at the back of the building. It allows you to remove the filled container without much difficulty.
Dry toilet
You don't even need to build anything here. In fact, you are buying finished project country toilet. All you need to do is install the product in convenient location. In this case, you can purchase either a finished structure or a whole cabin.
Advice ! Finished design Easy to install even at home. All you need to do is take care of the drainage.
Shower and toilet under one roof
Nowadays, designs for a country toilet combined with a shower are very popular. This is especially beneficial from a financial point of view. In addition, such a project allows you to significantly save free space on the site.

In the project, a toilet and shower will have one common wall. The result is savings building materials. In this case, the bathroom can operate both on the basis of a tank with a mixture, and on the basis of a cesspool.
How to create a drawing
The main task of the drawing when creating a country toilet project is to detail the design. The paper clearly indicates the size, shape and type of building. At the same time, there are a number of standards that must be observed.

Firstly, the distance from a country toilet to a water supply point cannot be less than 30 meters. This must be specified in the project. Secondly, a residential or commercial building should not be located closer than 15 meters. Of course, there are exceptions in the form of the same septic tank with biological system cleaning.
Dimensions are of particular importance in the drawing. You are free to ask them yourself. But there are certain standards that make it possible to create a beautiful and easy-to-use building with a high guarantee.

The height of the future dacha building should not exceed two and a half meters. In this case, the minimum indicator is at the level of 2 meters. The length of the building is from 1.2 to 1.8 m. The width is in the range from 1 to 1.2 m.

Many novice builders do not attach enough importance to the parameters of the cesspool. It is unacceptable. After all, it also needs to be included in the drawings. Estimated depth 1.5-2 m, diameter from 2 to 2.5 m. If groundwater lie close to the surface, then the pit will have to be abandoned.
Projects of superstructures for country toilets
When choosing a suitable country toilet project special meaning has a selection of materials. It is he who largely sets the parameters of the future building. There are several typical options, which will be discussed further.
Brick toilet
Advantages of this material can be listed endlessly. It is resistant to atmospheric influences, retains heat and cool equally well, and is environmentally friendly. Moreover, it allows you to give the structure any shape.
The basis of this project is the foundation. Without it, creating a country toilet out of brick is simply impossible. Separately, it is necessary to mention the quality of the masonry. This is the real art of laying bricks that will last forever. The top of the building is covered with a roof, a material for which in most cases slate is used.

In the picture you see an example of a related project. One design combines a toilet and a shower. This is not only practical, but also allows you to save a lot on the cost of building materials.
Wooden toilet
The project of a wooden country toilet is a classic. Its construction takes a minimum of time, but in order for the structure to serve you faithfully, it is necessary to strictly follow the planned plan during the work process.
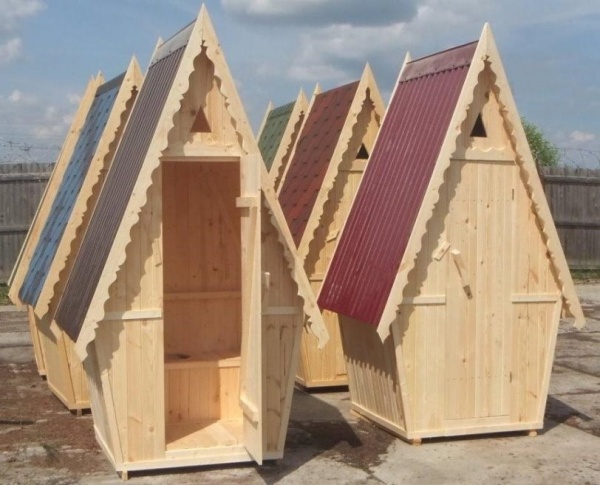
The picture shows one of the most popular options among summer residents - a teremok. As you can see, he has a small internal space and small dimensions. This allows you to install it anywhere. It is also worth noting the aesthetic appearance.
Metal toilet
This project option will appeal to those who want to save time and money. During construction, you can use sheets of metal left over from the construction of the house. The only thing you need to take care of is interior lining. Of course, you can do without it, but in winter it will be very problematic to stay in such a structure.

The main advantage of the project is that there is no need for any knowledge. Almost anyone can build such a country toilet. This is the most cost-effective option you can imagine. The only thing you need to pay attention to is the toilet seat. It is best made of wood to make it comfortable to sit on.
Types of wooden cabins
Exactly wooden cabins are most popular among summer residents. This is explained quite simply. The timber is inexpensive, but provides good thermal insulation and has a pleasant appearance. During construction, the following projects are most often used:

Results
As you can see, there are many different designs for country toilets. During construction, you choose the material, type of construction and internal organization. Any of the above options has its own disadvantages and advantages. Therefore, it is very important to weigh all the pros and cons of each project and make a choice in favor of the optimal one.
Are you hesitant to build a full-fledged bathroom in your dacha, but have decided to limit yourself to amenities in the yard? Agree, it would be great if this building was convenient to use and looked decent, and not only did it not rain on your head during your visit? But on the way to realizing your plan, you need a drawing, but you don’t know how to execute it correctly?
We will show you how to make a comfortable restroom out of an ordinary rural toilet. To do this, it is worth building not “by eye”, but according to a pre-developed project. In this article we have selected the most simple solutions, providing them detailed diagrams and drawings. We also looked at popular types of closets for dachas, their features and types of materials used for construction.
In fact, you don’t have to make a drawing of a country toilet yourself; you can use ready-made solutions given in our article. Decide on key features toilet, such as the materials used and the presence of a cesspool, and then choose the toilet model that you like. To help the novice designer, we brought detailed video to create a drawing.
Country toilet- not like that simple design, as many novice builders tend to think. There are a number of features that are important to consider when developing a project and drawing drawings.
Toilet installation rules:
- Dimensions. Consider the dimensions interior space restroom. The minimum allowable area is 1 x 1 m. If you save money and make the booth smaller, it will be inconvenient to use. Also Special attention worth paying attention to the choice.
- Height. There is also a height limitation. It is not advisable to build a toilet less than 2 m in height. You will soon get tired of entering it bent over.
- Roof slope. When installing pitched roof the rear wall is designed slightly lower than the front. This is done to form the slope of the roof and drain rainwater behind the building.
- Lighting. If you do not plan to install electric lighting, ensure that daylight into your toilet even with closed door. If you don't want to bother with windows, cut at least a small hole in the top of the door.
- Ventilation. The country toilet is a poorly ventilated building. To fix this, a ventilation pipe is run along the back wall.
- Shadow. To keep your country toilet from being stuffy in the summer, place it in a shady place.
- Place on site. Another tip for choosing a construction site: avoid the proximity of a septic tank or cesspool to water intake sources, wells, and boreholes. This is done for sanitary and hygienic reasons.
Image gallery
No. 2 - drawing of a “birdhouse” with a cutting table
More complex architectural form- country toilet-birdhouse. This option is most common. The drawings show that the side walls are in the shape of rectangular trapezoids, and the rear and front parts are rectangular.

Unlike the “hut”, such a restroom is much more comfortable and spacious. More material will be required than for the previous version
To prevent the wood from becoming moist and deteriorating from constant contact with the ground, it is recommended to make the toilet slightly elevated.
Special runners for the base are installed, about 12-15 cm high. The drawing shows that the back wall is shorter than the front. The height of the latrine is 2.08 m at the rear and 2.78 m at the front.
Thus, with a building length of 1.72 m, the roof slope will be about 22 degrees. The width of the “birdhouse” built according to this drawing will be 1.45 m.
Design solution with insulation.