Having decided to install a greenhouse or greenhouse on the site, the summer resident needs to choose the type and size of the structure, as well as decide on the material. The cost and durability of the structure will depend on these points. One of the most economical options is a greenhouse or greenhouse from plastic pipes with your own hands. Today our site will tell you about all the features of construction similar designs in the country.

Plastic pipes as a material for a greenhouse - what are the advantages?
IN modern construction plastic pipes are used quite widely. The main advantages of the material are durability and low cost. Plastic pipes are easy to work with, flexible and durable. The light weight of the material makes working with it especially comfortable and allows you to involve even a child in helping.
Due to such attractive characteristics of plastic pipes, craftsmen developed a method for using them in the construction of greenhouses and greenhouses. Today there are several types of similar structures that any summer resident can build with his own hands.

Greenhouses made of plastic pipes have the following advantages:
Resistance to precipitation. Plastic construction does not rust like metal and does not break down like wood.
Easy to assemble. A greenhouse of this type can easily be disassembled when not needed and then put back together.
A light weight. Design without special effort can be moved to a new location.
Durability. If you follow all the recommendations when creating a greenhouse, it can last up to 50 years.
Fire resistance. Plastic pipes are considered a fire-resistant material.
Wear resistance. The self-made frame tolerates well external influences, without changing its properties for many years.
Strength. Although the material is light in weight, it does not break or bend under gusts of wind.
Minimal care. During operation, plastic pipes do not need to be treated with any protective agents.
Availability. PP or PVC pipes with necessary characteristics can be purchased at any hardware store at an affordable price.
Nice appearance.
 Greenhouses made of plastic pipes look very attractive
 Types of greenhouses made of plastic pipes with photos
Summer residents appreciated the flexibility of plastic pipes. The material is easy to bend, cut and fasten. In addition, pipes of various lengths and thicknesses are always available for sale. All this allows you to build a greenhouse or greenhouse of any configuration on the site.
Arched design
This is the most common form of greenhouses in summer cottages in our country. This project is easy to implement, looks great and is easy to maintain. Due to the minimal number of fasteners, the structure can be easily disassembled.
 Installation of an arched structure made of PVC pipes
 Single-slope and double-slope greenhouse
Lean greenhouses and greenhouses are often attached to the house (on the south side), which saves space on the site and creates comfortable conditions for irrigation. Buildings for plants with gable roofs always built separately from the building. Rectangular structures are complicated by a large number of fasteners.
 Single slope greenhouse design
 Tent and dome
Such greenhouse projects made from PVC pipes are much more difficult to implement with your own hands. You will need certain skills to carry out correct calculations and construction complex structures. But these vegetable houses look amazingly beautiful.
 Greenhouse geodome made of plastic pipes
 Depending on the purpose of the structure, they use various materials for covering:
Film- for using the building for growing seedlings.
Cellular polycarbonate
- for year-round operation of the greenhouse.
Choosing the type of structure must begin with determining its purpose. Depending on the crops grown, covering material is selected and the size of the structure is calculated. Small greenhouses are usually erected in small areas, keeping in mind that they additionally cast a shadow. Read more about the selection and construction of greenhouses and greenhouses made of plastic pipes various options can be found using the video.
 Film greenhouse made of PVC pipes for growing seedlings
 Choosing a location for a greenhouse
To securely fasten a structure made of plastic pipes, it is necessary to ensure solid foundation. Use a wooden box, a foundation made of concrete, blocks or bricks. For lightweight film construction, reinforcement bars without a base are often used.
You should not place the structure in the garden where it will be shaded by tall plants.
The place should not be low-lying or, on the contrary, elevated.
Two suitable orientation options: north-south, east-west.
It is important to consider the direction of the winds in order to retain more heat in a greenhouse made of PVC pipes.

Having decided on the place where you will assemble the greenhouse from plastic pipes with your own hands, proceed to preparation required area. The ground must be leveled as much as possible without compacting it. Next, make clear markings, maintaining the correct angles.
Important!

Arched model of a greenhouse made of plastic pipes with photo
The construction of an arched model of a greenhouse is not particularly difficult. This is the most popular form of construction, so we will talk about it in more detail. It is very important to make all the calculations correctly to make it reliable and convenient. Windows and doors in the greenhouse are located at the ends. The photo below shows a diagram of such a structure.
 Do-it-yourself arched model of a greenhouse made of plastic pipes
 For those who do not have the desire or ability to carry out calculations and create a greenhouse diagram, there is a simpler option. A large number of specialized stores (including on the Internet) offer to buy ready-made frames from plastic pipes of arched and other models. All such sets are included corresponding to the scheme PVC pipes with markings and more necessary than fastening. All that remains to be done is to assemble the structure in a suitable place.
Assembling the frame of an arched greenhouse
For the base, a concrete foundation is poured or bricks, stones or beams are used. The last option is used most actively. Suitable bars with a cross section of 10 mm. Using staples, they are connected together in the form of a box. Required condition is the treatment of the material with an antiseptic composition.
Step-by-step instructions for laying a timber foundation:
1. Marking using pegs and ropes.
2. Checking the correct angles: cords stretched diagonally must be equal in length.
3. Digging trenches with the expectation of deepening half the width of the beam.
4. Pouring sand and laying roofing felt at the bottom of the trench.
5. Burying the beams halfway.

The size of the greenhouse depends entirely on the number of vegetables that will be grown in it, as well as the area of the plot. Standard height structures - 2 m. Before starting assembly, make sure that everything is in stock necessary elements designs:
PVC or PP pipes + fastening element;
clips for securing film or polycarbonate;
screws, tees, adapters;
reinforcement bars.
The reinforcement bars are buried around the perimeter of the long side of the greenhouse. Immersion depth - 40 cm; the same amount remains on the surface. It is very important to place the rods in pairs strictly opposite each other. The maximum distance is 90 cm, but it is better not to take a step more than 60 cm. The smaller the gap between the arcs, the more stable and durable the greenhouse will be.

After installing all the metal rods, you can proceed to fastening the pipes. The two ends of one pipe are pulled onto two opposite rods. The structure is secured with one or two horizontal pipes running along the top along the structure. The ends of the plastic pipes are attached to the beams with metal brackets.
Covering a greenhouse with film and polycarbonate with your own hands
When film is used to cover a greenhouse made of PVC pipes, the structure in this form can be used for 1-3 years (depending on the quality). The material cannot withstand further use. Polycarbonate as a cover for a greenhouse will last much longer, but will also cost several times more. Fastening both materials has its own characteristics.
Film shelter
In order to cover arcs made of plastic pipes, no special skills are required. Every summer resident can do this with his own hands, following the recommendations. The material is placed on top and secured using special clamps.
 Film greenhouse made of PVC pipes
 In the future, if necessary, it will be possible to easily eliminate sagging using the same clamps. The edges of the film are sprinkled with earth or clamped with boards or bricks. If you use dense agrofibre instead of ordinary polyethylene, the service life increases.
Polycarbonate coating
Polycarbonate is a more durable cover for a greenhouse made of plastic frame. Its advantages over film are obvious:
Resistance to temperature changes;
high insulating properties;
combustion resistance;
protection from excess ultraviolet radiation.
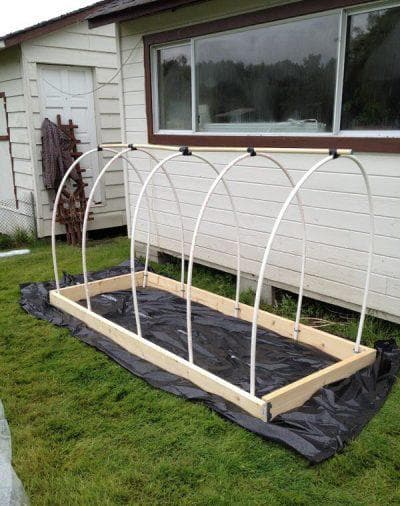
Because today I want to offer you a great idea for creating a greenhouse from PVC pipes with your own hands. This simplest design, struck me right in the heart with its simplicity and accessibility. The materials to make such a greenhouse require a mere trifle, but the benefits from it are incredible. Let's take a look and judge for yourself.
So, in order to make a greenhouse from PVC pipes with your own hands, You will need materials such as:
- PVC pipes in the amount of six pieces, with a diameter of 1.3 centimeters and a length of about 3 meters;
- two boards with proportions 5/15/240 centimeters;
- one board with proportions 5/15/180 centimeters (it will be cut in half);
- one wooden block measuring 5/5/240 centimeters;
- four metal corners, those that are attached with screws;
- ten, or better yet twenty pipe clamps, always with screws;
- galvanized screws and nails;
- hammer;
- screwdriver or special construction stapler who has what;
- covering material, in our case it is a thick transparent film;
- thick plastic film black for backing.
Now we need to choose a place for our greenhouse. By the way, using black film, you can kill two birds with one stone. First of all, the greenhouse will be protected from weeds. Secondly, after the greenhouse is removed, a magnificent, clean bed, since all the weeds will die under this very black film.
The process of making a greenhouse from PVC pipes with your own hands
1. To begin with, let’s cut our single board 5/15/180 centimeters exactly in half and get the end fences of our future garden bed.
3. We mark the box for the pipes. Two pipes should be located at the edges, and the remaining three at equal intervals.
4. We install the pipes into the box. By themselves, PVC pipes are quite strong and our goal is to carefully bend them into an arc, insert them into a box and fasten them to it using half a clamp. For greater reliability, you can fasten the pipe with two clamp halves - one slightly lower, the other slightly higher.

5. Initially we had six pipes, but we only used five. So, the sixth pipe will play the role of the top crossbar, which should be secured with plastic clips.

6. The top pipe will be slightly longer than the greenhouse, so it must first be adjusted to size. The remaining scraps can be used as film clips. To do this, you simply need to saw through them on one side. By the way, if you have an old dense hose, then it is better to make such clamps from it.

7. Now let’s make the greenhouse presentable and start by tucking the edges of the black film neatly under the bed.

8. Take transparent film and cut it to the size of our greenhouse. It is fastened with a stapler, but so that the metal staples do not tear the film and it serves us as long as possible, we lay a thin tape of plastic or ordinary material on top of the film.
9. Wood block, attach to the end of the film using the same stapler. This technique is necessary to simplify the procedure for opening a greenhouse in case of watering or ventilation.
A homemade greenhouse made from PVC pipes is a profitable alternative to ready-made store buildings, because it is no less functional and practical, but much more economical. However, in order to make a strong and durable greenhouse, you need to understand a lot of subtleties of the process: what material to use, how to correctly draw up a drawing, how to assemble the frame, in what sequence to build the structure, what to cover the “skeleton” with? Learn how to make a greenhouse from plastic pipes with your own hands, and feel free to get down to business!
Plastic pipes as a frame
PVC pipes are gaining more and more popularity and are gradually replacing leadership positions market metal fittings Therefore, PVC is often chosen to make both a summer greenhouse from film and a year-round greenhouse from polycarbonate. What is the secret of such demand and how not to make a mistake in choosing pipes in order to experience all the advantages of the material?
Functional and affordable variation of a PVC home greenhouse
What pipes are suitable for a greenhouse?
When deciding which pipes to choose for a greenhouse, you should focus on two factors: type and size. As for the first, two types of products are used to assemble a greenhouse:
- rigid - for single-pitched and double-pitched structures with straight edges;
- flexible - for arched and other rounded structures.

Rigid pipes are used to assemble greenhouses in the form of “houses”
The dimensions of PVC pipes must be selected to match the planned dimensions of the finished greenhouse, but it is important to take into account several recommendations from experts.
- Firstly, the wall thickness should not be less than 3 mm.
- Secondly, the shorter the segments, the more connections will have to be made to fasten them into a single structure, which will negatively affect the strength of the latter.
- Third, inner diameter products must be at least 13 mm.

Flexible products – the best choice For arched greenhouses
Material advantages
PVC pipes have a number of operational advantages:
- Resistance to corrosion processes – PVC does not oxidize under the combined influence of moisture and air, therefore it does not rust when exposed to water for a long time open air.
- Light weight - the pipes do not cause any hassle in transportation, and the already assembled greenhouse frame can be easily transported from place to place on the site.
- Pliability – PVC is easy to bend and cut, so the material can be given almost any shape, even without special equipment.
- Affordable price– polymer is cheaper than metal or wooden crafts, therefore, assembling a greenhouse with your own hands from PVC pipes does not involve high costs.
- Strength – the polyvinyl chloride frame can withstand strong mechanical loads and gusts of wind.
- Fire resistance - PVC ignites only with prolonged direct contact with open source fire and stops burning immediately after the source of fire is eliminated, which eliminates subsequent melting and smoldering of the material.
- Durability – the service life of products can reach 50 years.
- Ease of use - making a greenhouse frame from PVC pipes does not require any complex technology, A finished design does not require finishing painting or protective treatment.

The PVC greenhouse structure is strong, flexible and durable
Drawings and assembly features
In order to successfully build a polyethylene or polycarbonate greenhouse from PVC pipes yourself, it is important to carefully think through and work out each stage of installation: draw up drawings, calculate dimensions, prepare necessary materials, understand the sequence and subtleties of assembling structural elements.

Greenhouse on warm bed
Calculations and drawing
The first step in building a greenhouse is drawing up a drawing of the homestead structure. It will be difficult for a non-professional to cope with this task with his own hands, so it is better to focus on already developed diagrams - use them as a basis for calculating the size of the greenhouse specifically for your site.
The simplest version of a greenhouse is an arched structure made of flexible pipes 2 m high, 6 m long and 4 m wide. The drawing must include the location of the doorway and vents for ventilation. The length of the structure is variable - depends on the area of the site and the scale of cultivation garden crops. To calculate the size and number of PVC pipes for such a greenhouse, use the formula L = 2πR, where:
- L – length of one arc;
- R – radius of the greenhouse circumference;
- π is a constant value equal to 3.14.

Simple scheme
Considering that the planned width of the greenhouse is 4 m and the height is 2 m, the diameter of the regular circle will be 4 m and the radius will be 2 m. It follows that L = 2 * 3.14 * 2000 mm = 12566 mm
You have received the length of the entire circumference of the greenhouse, but to calculate the length of the arc you only need half of it: 12566/2=6283 mm
Since one arc consists of two pipes, to calculate the length of one product, the indicator should be divided again: 6283/2 = 3141 mm.
Thus, the recommended length of one pipe for an arched greenhouse is 3.2 m. The step between the PVC planks should be about 100 cm. That is, if you are planning to build a greenhouse 6 m long, then for its frame you will need six pairs of pipes 3, each long. 2 m each.

Approximate drawing of an arched greenhouse made of flexible pipes
The second option for building a greenhouse with your own hands is a gable one made of rigid plastic pipes. To avoid mistakes during construction, it is recommended to build a structure of standard dimensions:
- width – 4 m,
- length – 6 m,
- height – 2.5 m,
- the slope angle is 25-30 degrees.

A more complicated version - a gable structure
For the walls of such a greenhouse you will need six pairs of pipes 1.5 m long and five pairs 1 m long, for the roof - six pairs of 2 m long, for the ridge - five products 1 m long.
In addition, you will need material for the already mentioned doors and windows, as well as stiffeners. You can select the length of the pipes for door and window openings arbitrarily - according to your preferences and the overall dimensions of the greenhouse, and the length of the products for the stiffeners should correspond to the pitch between the main frame strips.
Preparatory work
When the dimensions have been decided, you need to stock up on working materials and tools. To build a greenhouse with your own hands you will need:
- PVC pipes;
- metal rods for the base;
- wooden boards 50x100 mm;
- crosses and tees;
- cellular polycarbonate;
- polyethylene film;
- hinges for doors and windows;
- welding machine for PVC;
- a set of screws, thermal washers and nails;
- hacksaw;
- screwdriver;
- steel staples;
- plastic clamps;
- hammer;
- stationery knife;
- furniture stapler and clamps;
- roulette and level.

Wooden foundation for a light greenhouse
At the same stage, you should decide on the location of the greenhouse. Keep in mind that for active development, most plants need access to sunlight, so it is important to choose an area of the site that will not be obscured by trees and outbuildings. The second fundamental point is the possibility of unhindered supply of a hose for watering plants.
Now you need to prepare the base. For an ordinary home greenhouse, it is not necessary to pour a foundation - you can get by wooden frame. Before installation, level and mark the working area, and then assemble the frame to its dimensions - tightly connect the boards together with self-tapping screws. Then you can go in two ways:
- the first is to dig a shallow trench around the perimeter, lay a frame in it and cover it with earth;
- the second is to install the frame on the corner bricks.

Metal rods will give the overall structure additional rigidity
To further secure the frame, drive one 50 cm long metal rod into its corners. The rods need to be deepened so that their protruding part matches the height wooden base. Next, drive similar rods 70 cm long close to the boards along the entire perimeter of the greenhouse in increments of 100 cm - they should protrude 40 cm above the base. On parallel sides, the support rods must be installed strictly opposite each other.
Rigid pipe frame
Assembling a rigid greenhouse frame from a polyvinyl chloride pipe involves five main steps:
- Place one 1.5 m long pipe on each support rod and secure them to the boards with steel brackets at the base.
- Place crosses on the tops of all PVC posts.
- Using the side holes of the crosspieces, connect all vertical racks horizontal jumper pipes 1 m long.
- Assemble the roof ridge: using crosses, connect five pipes 1 m long.
- Build the roof: alternately insert plastic pipes for the slope into the upper holes of the crosses of the already installed vertical posts; connect all the components with a common ridge.

The simplest frame greenhouse with fastenings with tees and crosses
Flexible pipe base
A do-it-yourself flexible greenhouse frame made of PVC pipes should be assembled according to the following diagram:
- Using crosses, connect two pipes 3.2 m long into four single arcs. Connect two more pairs with tees - these will be the end arcs.
- Place the arcs on the metal rods one by one: put on the first part of the plastic arc, secure it to wooden board metal bracket, bend the arc and secure its second end to a parallel rod on the opposite side of the base and secure it with the bracket in the same way.

Assembly principle

Ready-made “skeleton” of an arched greenhouse
The order of final assembly of the structure
After installing the frame, proceed to the final stages of assembling the structure - installing stiffeners and arranging door and window openings. First, strengthen the frame: cut five pairs of PVC pipes no more than 1 m long and weld them between the vertical posts. Next, install horizontal stiffeners at both ends of the structure - weld them between the outer posts at a height of 1.5 m.
The door and window are installed on end sides ah frame. The openings for them are easiest to make from polyvinyl chloride:
- Prepare six pipe sections: four – 1.5 m each, two – 1 m each.
- Place the long pieces onto the previously driven metal rods on both ends and secure them to the base with staples.
- Attach the tops of the vertical pipes to the previously installed horizontal stiffeners.
- At the front end of the greenhouse, at the level of the protruding base board, weld a short piece of plastic pipe between the long posts - this way you will get rectangular hole for the future door to the greenhouse.
- At the rear end, at a convenient height, mount a perpendicular short pipe section on vertical posts - this way you will get a window opening.

Door with window
After this, you need to prepare unique boxes for the door and window: already knowing the dimensions of the openings, build two rectangles of the required size according to their shape - they should fit into the previously prepared holes without difficulty. On last stage When arranging the greenhouse, they will need to be hung on butterfly loops on vertical PVC racks.
Pipe greenhouse covering material
To build a full-fledged greenhouse with your own hands, its frame must be covered with a protective plastic film or polycarbonate. It is rational to use the first covering material for seasonal greenhouses, the second - for year-round ones. Find out how to correctly “finish” a frame with both materials.

Polyethylene is the most popular material for covering home greenhouses
How to attach film to frame
To cover a greenhouse made of plastic pipes, it is recommended to use reinforced or multilayer film with increased wear resistance and tightness. Work should be carried out at a temperature of at least 16 degrees, otherwise sagging of the polyethylene cannot be avoided. Finish the frame using the following technology:
- Cover the frame with film and distribute it so that there is an equal amount on all sides.
- Using planks, press the film onto wooden frame and nail it in place. First, fix the covering on one side, then pull the material tightly, straighten it and secure it on the remaining edges. Nail the film not from the corners to the center, but vice versa - from the center to the corners.
- Additionally, secure the film to plastic pipes using special clips or office clips.
- Using a furniture stapler or clamps, cover the previously prepared door and window frames with polyethylene and hang the latter on the frame, securing them with self-tapping screws on the hinges.

It is best to fix the film with wooden planks
How to assemble a greenhouse from pipes and polycarbonate
To build a strong and durable greenhouse from plastic pipes and polycarbonate with your own hands, it is important to consider a number of rules for working with polymer sheets:
- Before installation, keep the material in a dry room for a day.
- Take accurate measurements for the working panels: measure each frame opening individually and lay out the sheets. You need to cut the material stationery knife.
- After cutting the panels, their ends must be covered with punched tape and end profiles, which should come complete with the material.
- The sheets should be laid with a protective film facing outwards - it cannot be removed until the installation of the polycarbonate is complete.
- Start installation from the roof: lay the first sheet, align it strictly vertically and carefully fix it with self-tapping screws and thermal washers to the frame with a pitch of 40-45 mm.
- Place the second sheet end-to-end with the first sheet and connect them with the component strips. Attach the second panel to the plastic pipes.
- Using a similar pattern, install all the polycarbonate panels butt-to-butt. At the corners, secure them additionally corner profiles. The most bottom sheets must be fixed to a wooden frame.
- Finally, screw the polycarbonate panels to the door and window units and secure the latter to the hinges.

Polycarbonate fastening

Inside view
Video: greenhouse in one weekend
These videos clearly demonstrate the process of building greenhouses from plastic pipes. Craftsmen willingly share their experience and proudly show off their creations, created in a few days.
Video: Quick assembly of a greenhouse from plastic pipes
Video: Home greenhouse DIY PVC
As you can see, building a greenhouse from PVC pipes with your own hands is an event accessible to everyone. Take care of your working tools and quality materials, carefully consider the project and adhere to the verified instructions at all stages of assembly. The reward for these efforts will be a practical, durable and functional greenhouse that will last for many years.
Almost every summer cottage the owners set up a greenhouse or greenhouse, and most prefer to do it with their own hands. Previously we used different natural materials– wood, metal, glass, and today plastic is increasingly being introduced into the yards of private owners. A greenhouse made of plastic pipes is modern, simple, convenient, durable and cheap. Moreover, it is assembled as if from a Lego constructor: with your own hands and practically without tools.
A greenhouse made of plastic pipes is becoming increasingly popular because it has a number of undeniable advantages. It’s easy to make, the assembly itself will only take a few hours, you don’t need to be a professional, just decide on the dimensions, make a drawing, buy and bring the necessary materials. Since plastic pipes are lightweight, they do not require a large pipe for transportation, loading and unloading, or assembling a greenhouse. physical strength. Therefore, you do not need to involve many people to work.
Any structures made from PVC (polyvinyl chloride) or HDPE (low-density polyethylene) pipes are easy to assemble and dismantle, which can be very convenient in the country. Greenhouses are often made seasonal use, covered with plastic film: the owners use them all year round, after use they remove the film, disassemble the frame, put it away for the winter, and put it back together in the spring. By assembling the structure with his own hands, the summer resident wants not only to save money, but also to implement own desires, plastic elements are best suited for this.
Perhaps the most important advantage of plastic pipes compared to other materials used is the absence of their interaction with water, earth, air - PVC and HDPE do not rust, do not mold, do not rot, and do not emit any harmful substances into the air or land. This explains the durability of the material - an important quality in itself. And environmental friendliness in agriculture, of course, welcome.
What types of greenhouses are there from PVC pipes?
Greenhouses are most often made:
- arched;
- gable;
- single-pitched.
For arched greenhouses made from PVC pipes with your own hands, a box is knocked down from boards or wooden beams. The pipes are placed on metal, or less often wooden, pins (pegs), which are securely fixed in the ground; there should be a 30-40 cm pin on top that fits freely into the pipe . If such a greenhouse (greenhouse) is covered with plastic film, then the ends are usually covered with plywood, wood board or plastic, in which doors and vents are made for ventilation. If the arched structure is covered with polycarbonate, then the end sides are made from it.
Single-slope and gable greenhouses are covered with both film and polycarbonate. Such a heavy, fragile and expensive material as glass is being used less and less for greenhouses and greenhouses in our summer cottages, which is not surprising.
Pipe structures are usually installed on a foundation or rigid base to add rigidity and stability due to the lightness of the material.
Video “Installing a greenhouse made of plastic pipes”
Step-by-step process of assembling a greenhouse from plastic pipes with your own hands at your summer cottage
How to build a greenhouse from flexible pipes
Arched greenhouses and greenhouses are usually made with your own hands from flexible pipes with a diameter of at least 20 mm. In order to build such a greenhouse, you need to take:
- metal pins with a diameter of 10-12 mm and a length of 50-75 cm;
- plastic pipe with walls 3 mm thick;
- plastic clamps for connection;
- aluminum fasteners to attach the arches to the wooden frame;
- polyethylene film for covering;
- boards that will help secure the film.
The amount of materials must be accurately calculated according to the drawing, which will inevitably have to be made if we want to assemble the structure with our own hands. You will also have to purchase wooden beams for door frames, vents, hinges for hanging opening sashes, nails, locks, and screws. In the most convenient place for the greenhouse, you need to mark its position, hammer it along the line of the long walls with a sledgehammer metal rods into the ground, leaving 30-40 cm outside.
Now you need to put the pipe on opposite pins and attach it to the wooden frame with metal brackets. All arches are made this way, and the more often they are located, the more stable the entire structure will be. If the frame is made under polycarbonate, then the step is commensurate with the size of the sheet; polycarbonate will make the greenhouse (greenhouse) heavier, more stable and simply tougher. And if the covering is supposed to be made of film, then the more often the step, the more stable the greenhouse, the less the polyethylene will leak, and, therefore, the longer it will be used.
Now we need to assemble the end walls, insert doorways, vents, and additional pieces of wood to stiffen the frame. After this, the top screed of the arched structure is installed. It passes along the highest points of all arches and is attached to them with polymer clamps.
The finished frame is covered with film, placing it in such a way that pieces of the same length remain at the ends. They secure it with planks, press the film with them and nail them to a wooden frame on one long side. Moreover, you need to start from the middle, and not from the corners. After securing the film on one side, straighten it evenly and do the same on the other long side: nail the boards, starting from the middle and moving towards the corners.
At the ends, the film is folded and nailed down. Doors and windows pre-covered with film are hung. If the ends are also film, then the film under the doors and windows is cut out so that enough remains to be fixed to the beam. This is a simple construction diagram inexpensive greenhouse(or greenhouse) with your own hands, using plastic pipes. Based on it, you can create something individual, more aesthetic, artsy, or suitable specifically for a specific area.
Some people do not use planks to secure polyethylene; instead, they use a furniture stapler. Others add ribs at the ends for rigidity, and many make the ends from an opaque but rigid material. That’s the beauty of building something with your own hands - you can give free rein to your imagination and choose the most acceptable one from the many options. Flexible plastic pipes in this case are the most suitable material.
Using rigid pipes
Rigid plastic pipes are usually used for the construction of lean-to, wall and gable greenhouses. Using fittings, you can assemble a frame without gluing, this is convenient for greenhouses used temporarily. Rigid pipes are connected with polymer tees or couplings, covered with plastic film or polycarbonate - all options are good. The only thing that cannot be done when using plastic pipes is glazing. It is not practical to use glass in a frame made of PVC or HDPE pipes.
Video “Description of the assembly of a greenhouse and PVC pipes”
Having your own greenhouse in your garden is always profitable and convenient. It's still cold outside, but you have organic vegetables in the refrigerator that can't compare with products bought in the supermarket. Today you can build a greenhouse from any material, but if you need to build a structure quickly and easily, then you should use the option from PVC pipes.
Which pipes are suitable
Before moving on to the description Supplies, it is necessary to highlight some advantages of a greenhouse made of PVC pipes:
- ease of installation, dismantling or moving to another location;
- low cost of materials for constructing the structure;
- creating the conditions necessary for growing numerous crops;
- high strength, lightness and environmental safety.
With all the advantages, it should be noted that a greenhouse made of PVC pipes is being built temporarily. It will be possible to grow vegetables there only for one season. After this time, you will have to at least replace the top coating. At choosing PVC pipes it is necessary to calculate the required number.
To build a small greenhouse, you need to buy PVC pipes of the following length:
- 190 cm (4 pieces);
- 68 cm (10 pieces);
- creation of hinges 10 cm (10 pcs.);
- 350 cm (2 pcs.);
- 558 cm (4 pcs.);
- 170 cm (2 pcs.);
- 360 cm (2 pcs.);
- 90 cm (4 pcs.).
In the video - a greenhouse made of PVC pipes with your own hands:
When choosing a material for covering the frame, you can pay attention to polyethylene, polycarbonate or reinforced film. Polycarbonate remains the most durable of all. But not everyone can afford it because of the high cost.
But you can see what it looks like in the photo in the article.
What material for a greenhouse is the best and most suitable is described in great detail in this
Information from the article will help you understand what a spunbond greenhouse looks like and how to make it yourself:
And here budget option remains polyethylene or reinforced film. If you change the top cover of the greenhouse every 2 years, then you should use polyethylene. It is inexpensive and can withstand light wind loads.
Manufacturers and prices for pipes
Today there is a wide range of PVC pipes used for greenhouse installations. The following manufacturers remain the most popular:

Installation of greenhouses
With wooden box base
An arched building made of PVC pipes can be mounted not only on the ground, but also on a pre-made wooden box. Thus, it is possible to create more favorable conditions for growing crops, accurately monitor their condition, soil composition and temperature conditions.
From a wooden box
All installation work are carried out according to the following plan:
- To complete the foundation, it is necessary to prepare the site for installation and mark it.
- Drive metal rods along the edges of the future box. They will be the basis for PVC installation battens.
- A distance of 70 cm must be maintained between the pins. Drive the pegs so that their length above ground level is at least 10 mm.
- Check all diagonals, all angles must be right. Otherwise the greenhouse will not be sustainable.
- Using the prepared boards, you can begin to create the box. Its height can reach 30 cm.
- Next, proceed to assembling the sheathing from PVC pipes. To make ends you can use wooden beams. Just don’t forget to leave room for doors and windows. Cover the assembled frame with film. Tuck its edges under the box and secure with staples. IN last resort you need to install doors and vents for air circulation. But you can see in the photo what the new generation greenhouses look like
A box for such structures can only have soil at its base, which is poured to a certain level. But there is also the option of installing the box on a cushion made of expanded clay and sand. This will improve the microclimate inside the greenhouse. Such a structure will be warmer, and it will be much easier to assess the condition of the soil.
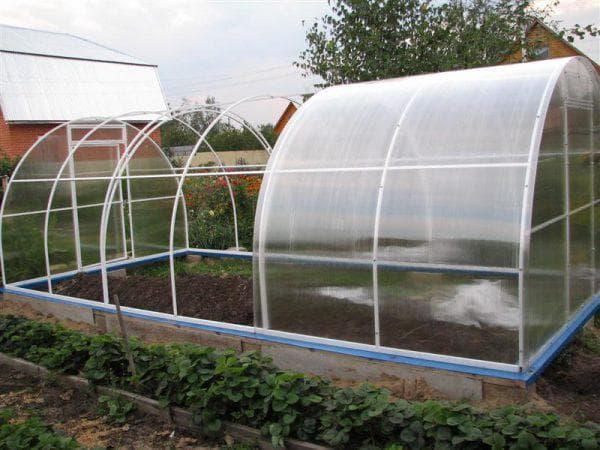
Polycarbonate coated
You can get a more durable building from PVC pipes if the frame is sheathed with polycarbonate. Such a structure is durable, reliable, and it is also much easier to maintain the conditions necessary for the full growth of plants. There is absolutely no need to build a powerful frame for polycarbonate sheets. So prepare metal pipes you won't have to. PVC structures perfectly withstand all loads if the assembly conditions have not been violated.
Installation work is reduced to compliance with the following plan:
- The first step is to prepare the area for installing the greenhouse. There, carefully level the soil.
- The greenhouse is assembled in the end parts. First, cut out 3 sheets with dimensions of 2x2.1 m. For these purposes, you need to use sharp knife. But the material must lie on a hard and level surface.
- Assemble a frame from PVC pipes on the ground. In this case, it is necessary to take into account the fact that there should be a window and doors that will open upward. This is what a greenhouse looks like
- Remove the protective film from the polycarbonate sheets and place it on a prepared horizontally mounted frame with the outer side up.
- Polycarbonate level. The first sheet should be laid so that the doorway and window are covered. When the sheet is installed level, it can be fixed to the sheathing of PVC pipes using self-tapping screws. After fixing, cut off the unnecessary parts of the polycarbonate along an arc using a construction knife.
- Now you can start fixing the second sheet. It should either butt to the first. Also make sure that there are no gaps between the materials. Complete the second end of the building in the same way.
- You can start creating doors and windows. Using a knife and a ruler, draw and cut in the polycarbonate sheets in the center of the door frame so that there is an overlap when closing. Cut out the windows in the same way. In order for them to close well, it is necessary to make protrusions for the hinges. It is not surprising, but any doors and windows can be made from scrap materials, but this is described in great detail in this article.
- Now you can proceed to assembling the frame. Make a wooden box around the perimeter from boards. Now mark all its longest sides and drive metal rods near them. They are necessary for the sheathing posts.
- Install PVC arcs on these guides, secure them to the ends with a longitudinal tie.
- Using building level, check the position of the sheathing. Now you can fix the greenhouse. To do this, drive special pegs into the corners of the sheathing towards the base. Thus, the structure will not change its position during use or strong wind.
- The installation is completed by attaching polycarbonate sheets. It is necessary to measure the arc and cut the material with a margin of 10 cm. External side should be directed upwards. It is worth leaving a margin of 5 cm above the ends. All unnecessary parts of the material must be removed after fastening.
- Fixation of polycarbonate sheets is carried out using press washers. The protective film can be removed from the material only after the installation work is completed.
- All joints formed between the sheets must be sealed. Neutral is perfect for these purposes. silicone sealant. Install handles on doors and windows. You may also be interested in learning more about what they are and in what part of the garden it should be planted.
The video shows the installation of a greenhouse made of PVC pipes: