Having received a plot of land, many discover a ditch or even a small ravine on it, which is long and difficult to fill; it is easier to build bridges for landscaping the dacha with your own hands.
What is the best material to make a bridge from?
When it comes to materials for a bridge over a ditch, almost all owners begin to remember where the boards and timber are located, but at the same time someone begins to think about trusses from a corner or channel. Without any doubt, metal welded bridges for dachas are much stronger and more durable than wooden ones, but it is better to use them near water stainless steel, which is not cheap. Regular iron will rust even if painted regularly.
In addition, a corner or channel is more appropriate in technical structures, but not in decorative ones, and it is quite difficult to assemble structures from them with your own hands.
If metal seems like the best addition to your landscape design, choose forged products, which will not only allow you to install a beautiful bridge with openwork railings, but also create a composition with a similar gazebo. As supports, many are trying to install concrete “bulls” - supports in the middle of the bridge span, or metal piles. However, such a decision is justified only if the site is cut across by a deep and, most importantly, wide ravine.
It will be enough to span a span across a stream or a small ditch without intermediate supports, with a maximum of two abutments at the ends. That is why, to make a bridge with your own hands, a few long beams with a section of 15x15, and with a short span, 10x10, are enough. In fact, even an ordinary log with a longitudinal cut can serve as an excellent and durable foundation for a bridge.
If you are a supporter of solidity, you can use natural stone. Moreover, the straight and humpbacked spans spanning rivers and gorges look very picturesque. But when choosing this option, prepare yourself in advance for multi-day and rather complex construction. By the way, just when working with stone, or more precisely, with concrete, which will be needed for pouring the base, you will also need metal very useful, but not a channel, of course, but only an angle and steel reinforcement. If you prefer lightweight structures, you can get by with just boards, which, when placed on edge, are in no way inferior in strength to timber.
Which bridge design should you choose?
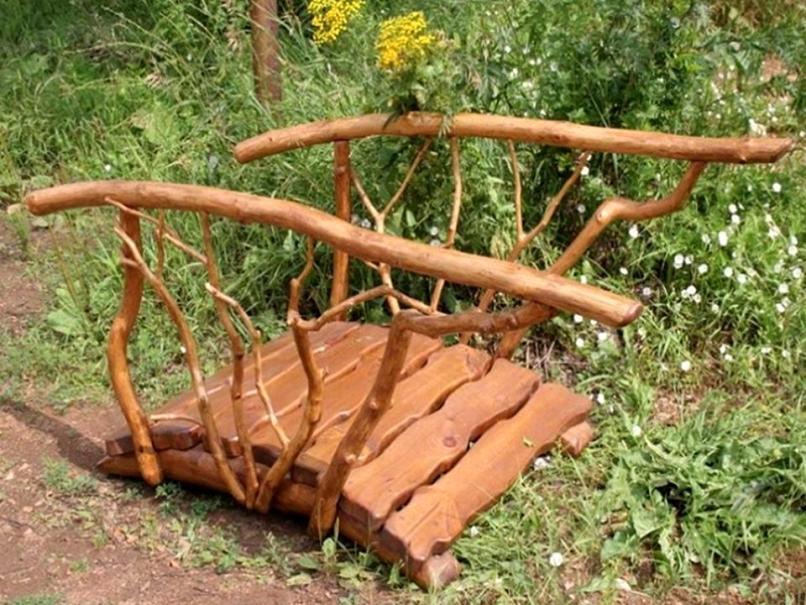
IN rural areas to overcome narrow obstacles, which, however, cannot be simply stepped over, 2-3 logs, tied or stapled, are often used. In such cases, as a railing, either a perch is placed on posts dug on both sides of a ditch or stream, or a stretched rope is tied. Such decorative bridge It looks organically against a pastoral background, and therefore can be used to decorate the landscape of your site.
A log with a longitudinal cut can be laid across a stream, ditch or small pond, across which it is laid as a flooring wooden planks. The above options are the simplest, except for large flat stones placed at a short distance from each other across the stream bed. However, boulders as a replacement for a bridge are not always appropriate, in particular, they are unsuitable for walking, respectable and elderly people, and are also unsafe for children.
Therefore, large stones are best used as supports on which, for example, granite or basalt slabs with a rough surface will be laid. If the stream is shallow enough and there is no risk of falling from the resulting decorative bridge, you can do without railings.
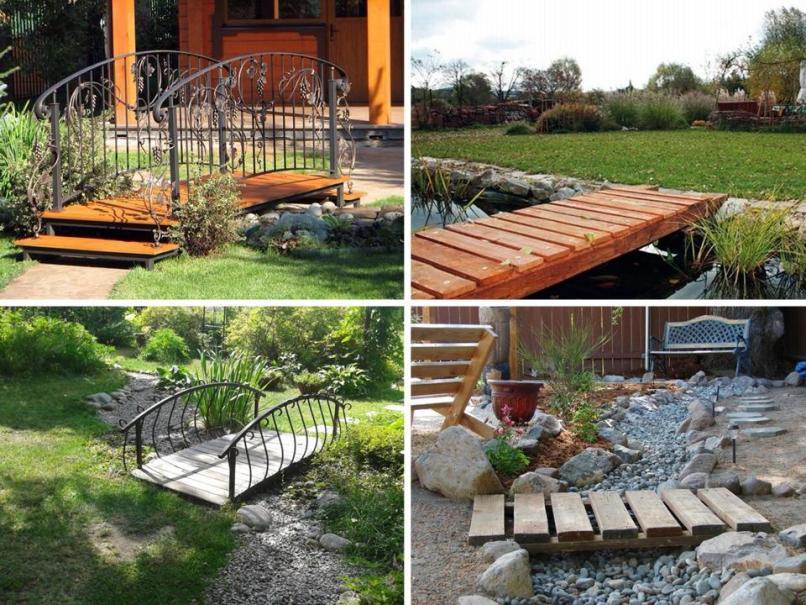
More complex, but no less beautiful design can be knocked together from timber and regular boards, or assembled and welded from metal. The easiest option to implement is a straight platform with railings on one side. A humpbacked bridge for a dacha looks much more impressive, but not everyone can make it with their own hands. But an intermediate scheme for constructing a span is quite accessible, when several wide steps lead to the main deck from both ends (over a narrow stream you will get an almost humpbacked bridge). This type will tower over the area and provide an excellent vantage point.
Choosing a place for the bridge
It would seem that this question does not require clarification: there is a stream and a deck that can be thrown across the riverbed - everything is simple. However, if there is neither a water hazard nor a ravine on the site, then the decorative bridge at your dacha will no longer become a decoration of the garden? Of course, such a structure in the middle of a lawn will look ridiculous; the span should be thrown, if not over a ditch, then at least over a flower bed.
Let's look at several options for what to do when you want to add a bridge to your landscape design, but there is nothing to throw it over. Actually, there is already one solution - a transition over the flower bed. In this case, a humpback bridge or a stepped structure is suitable, or, as an option, a straight span with ramps at both ends.
If you don’t have a stream on your site, you can create one with your own hands by laying out an artificial riverbed from different-sized stones, very similar to the real one (if you don’t take into account such a trifle as the lack of water). To create the illusion of a stream, tint sand and small crushed stones blue and azure and place them between the cobblestones. Another option for installing a bridge is a small island in the center of a pond or even a swimming pool. If the area of the man-made reservoir is large, the size of the island can be made such that it can accommodate a table and a couple of benches.
Bridge construction work on a garden plot
To make the flooring you will need a frame, and you can make it yourself from wood in two ways: by installing the boards on edge or by laying them flat. The first option will require less lumber, but the span will most likely be straight, since bending the board along the plane is a long and difficult task. The maximum that can be done is to give it a slight bend by cutting off part of the edge along an arc. It is much easier to build wooden humpbacked bridges for a summer house from planks placed flat, so let’s go exactly this way, considering various possibilities assemblies.
To fly through a narrow ditch, two boards with overall dimensions 3x18x200 centimeters. They are connected to each other by thinner crossbars, nailed to the bottom at the ends, as substrates. However, you can connect the foundation logs with two beams; at the same time they will serve as “supports” for the bridge. If the flooring needs to be thrown over a long distance, under load-bearing boards, along the outer edge of the frame, it is advisable to fill beams of the appropriate length, with a cross-section of at least 10x10, and only then attach the cross members.
Next, we begin to form the ledges. To do this, we lay shorter boards of the same 3-centimeter thickness directly along the load-bearing joists of the frame at an equal distance from the ends. Thus, if your frame is 3 meters long and you want the steps to be 40 centimeters wide, the next board should be 0.8 meters shorter than the base. If you want higher steps, use 10x10 timber instead of the boards that form them (including load-bearing ones), this will only make the bridge stronger and more durable. True, it will be more difficult to put together such a frame, and, most likely, you will have to use metal plates from the inside of the frame to reliably connect the beams.
Now you can start laying the flooring. To do this, you need narrower boards, 10 centimeters (commensurate with the cross-section of the beam), with a thickness of at least 2 centimeters and a length exceeding or equal to the width of the base frame. You will need quite a lot of them, so it is logical that you need to stock up on all the materials before you get ready to build a bridge over a ditch or ravine in your country house. First, we fill the boards onto the ends of the ledges, starting from the very bottom, that is, from the frame if it was assembled from timber. If the steps are made of boards, then we immediately begin installing the flooring. The crossbars can be nailed closely or at small intervals.
Assembling balusters and handrails for the bridge
So, the span is ready, and completely made with your own hands, and if it is installed in the garden as a decorative element, then you can leave it that way. But when used for its intended purpose, that is, to overcome a stream or ditch, it is advisable to make a railing. This is what we will do now. The handrail posts themselves, or, in other words, wooden balusters, you can buy ready-made, carved ones, or adapt thin bars. If the cross-section of the posts at the bottom is square, all that remains is to screw them with long screws to the base so that the upper ends are at the same level.
If the cross-section is round, it is better to carefully cut off the plane on one side and secure it with screws. If necessary, cut down part of the baluster from below. All that remains is to install the handrails, for which we take 2 bars and, having measured the spaces between the balusters on them, drill shallow holes in the appropriate places. Then we place them on posts and secure them to the side or top with screws. It is better to install the finished bridge not on the ground, but on pre-cast ones. concrete platforms.
A decorative bridge in a garden is a special design that is good not so much for its functionality as for its ability to decorate the surrounding landscape and make the overall landscape picture complete. Therefore, when planning to build bridges in the garden with your own hands, you need to consider all sorts of principles for placing structures, their types, and then create your own original, stylish, unlike other options.
Of course, during construction architectural forms small type look great in a garden or park natural materials- stone and wood. They harmoniously combine with surrounding plants, flower beds, wooden buildings, dry streams made of stone, pebbles and sand. But buildings made of metal and concrete look no less attractive.
A small bridge over a stream, made of artificial stone and decorated with wrought iron railings, looks quite natural surrounded by greenery
When classifying structures according to the material they are made of, there are several types.
Wooden bridges
They are great for suburban area with already installed buildings and wooden decor - a bathhouse, gazebos, tables, benches, a well. To make the wood last longer, choose one of the most valuable species - larch, cedar or oak. Special antiseptics, impregnations and varnishes increase the service life and give the wood the desired shade.

Wooden bridges are traditionally decorated with carvings: the balusters are given an original shape, a pattern is cut out on the supporting beams, and the railings are covered with ornaments.
Stone bridges
Beautiful, noble and almost eternal buildings. When installing a garden bridge with your own hands, do not forget about the weight of natural stone. For installation of structures made of sandstone, marble or granite, you may need construction equipment, so sometimes they use a lighter analogue - fake diamond.

When building a structure made of stone - natural and artificial - you should select elements that are similar in shape and color and harmonize with the surrounding objects
Metal bridges
Exquisitely beautiful forged structures, especially surrounded by flowers and greenery. They demand special attention and timely processing, since the metal is susceptible to corrosion.

A forged bridge will cost less if you order only a metal base and make the wooden elements (flooring, railing parts) yourself
Concrete bridges
They look monumental, last a long time and, with appropriate decoration, can decorate a garden with a large number of stones or plants. Finishing with colored tiles, stone chips or acrylic paints will advantageously hide gray concrete.

It's hard to guess that this original bridge is made of architectural concrete: its surface is stylized as stone and painted with acrylic paints
Combining several materials will make the garden bridge unique and will help add a little personality. Metal and wood, stone and wood go well together.
Examples of successful accommodation options
The main purpose of bridges is to cross a body of water, but often they are installed on the territory of a personal plot for a completely different purpose - to enrich and diversify the design.

The wooden bridge is part of the garden composition. Stylistically it combines with garden gazebo, built from the same material
The following objects are good places for installing decorative structures:
- small lakes, artificially created ponds, streams;
- natural ditches and ravines;
- dry streams;
- flower beds and separately decorated flower beds;
- paths and trails.
The traditional placement of a building over a body of water is carried out in compliance with certain rules. A crossing over a stream or pond is installed in the narrowest place, since a small structure is much stronger and looks more decorative. Country bridges for a garden with a dry stream are characterized by such qualities as compactness, miniature, and grace. The material for their manufacture must be combined with the surrounding coating: they are, as it were, a continuation of the paths.

A miniature bridge of the simplest design, spanning a dry stream, beneficially enlivens a monotonous composition of stones, greenery and flowers.

This bridge is an example of how organically they can combine various materials: paving slabs, a natural stone, wood, facing mosaic tiles
When installing small architectural forms, including bridges, it is necessary to take into account the style chosen for the garden. Let's assume that wooden structures, simple and slightly rough, are ideal for a country-style garden plot.
Choosing the shape and design of the structure
Before drawing up a sketch, it is worth considering everything existing forms and their options, and then make a choice. You can conduct the following experiment: take a photograph of the proposed installation location of a decorative bridge for the garden, print the photo big size and try it on various designs, cut out of paper. It will be clear what shape the design will fit perfectly into the overall picture.
According to their configuration, bridges can be divided into several types:
- Straight - they are optimal for self-production;
- Zigzag are guests from the East, where breaking the straight line is protection from evil spirits;
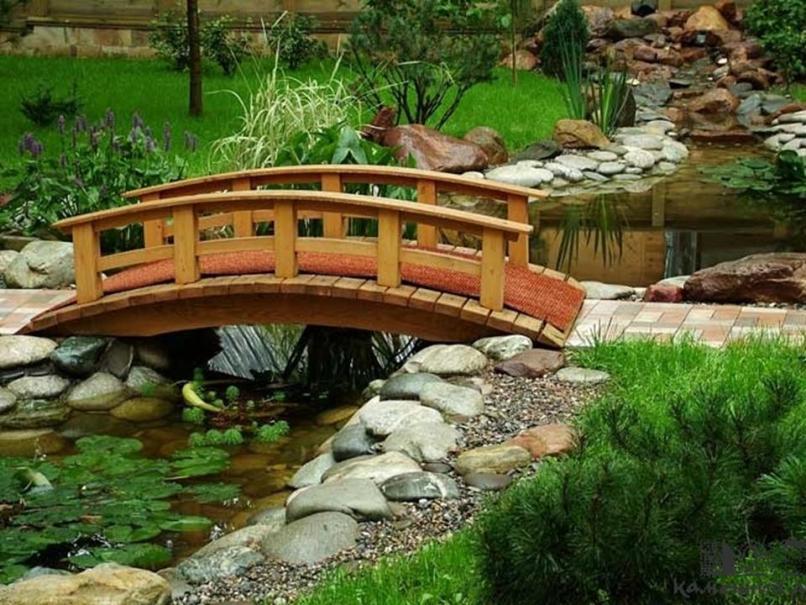
- Arched - look artistic and suitable for any style;
- Step-by-step - ideal for dry streams and shallow ponds;
- Stepped - resemble two staircases with wide steps, united by a common platform;
- Hanging – complex designs, requiring compliance with safety regulations.
Here is a photo selection of each option:

When building straight bridges from any material, it is necessary to consider a drain for rainwater; V in this case these are the spaces between the flooring boards

The ideal material for the construction of a zigzag bridge is wood - both the piles and the deck are made of wooden elements, treated with impregnation and antiseptic

The “humpbacked” shape of the arched structure is achieved different ways. One of the most common is giving load-bearing beams a certain curved shape

Large flat stones are best suited for creating a step bridge. The distance between them should be comfortable for stepping

The stepped structure can become a kind of observation point: from the upper platform it is convenient to view the surrounding landscape and admire the sunset

If you decide to choose a suspension bridge, then it is better to choose a small structure firmly fixed to piles driven into the ground
Master class: making a wooden bridge
The easiest way to decorate a garden area is to create a composition from a pond and a wooden garden bridge, both of which can be made with your own hands. Let's focus on the construction of a crossover structure made of wood.
To install the simplest structure, you will not need a concrete foundation or piles driven into the ground, but if the bridge connects the high banks of a stream, then additional reinforcement will be required.

When installing a wooden bridge across a pond, you should carefully strengthen the parts of the banks that serve as supports. Natural stone and concrete are used for strengthening

By installation method garden bridges are divided into several types: I – on concrete supports; II – on concrete supports and piles; III – on stilts
The basis of the bridge is two slightly curved beams with a section size of 0.2 m x 0.35 m and a length of 2 m. They can be prepared from straight blanks, using a jigsaw and chisel to remove excess wood. A flooring made of boards (3.5 cm) is attached to the beams, evenly distributed along the length of the beams.

By drawing up a drawing of the bridge indicating the required dimensions, you can make your work much easier. The length of the structure depends on the size of the object over which it will be located
Between the boards it is necessary to leave gaps 1-2 cm wide. All parts are dried before installation and treated on all sides with impregnations and antiseptics.

When drawing up a drawing, you need to take into account every little detail, for example, consider fixing the joints of balusters with beams or railings with balusters
The design of the railings may be different. The simplest one is curved arcs, fixed on several balusters. The railings are decorated with bamboo inserts, thick hemp rope or carvings.

Decorated railings are a way to diversify simple design bridge. It was worth adding rounded elements on the racks - and the bridge acquired a more decorative look
A simple decorative garden bridge, without decorations or frills, can complement a park area stylized as a wild forest.

A few untreated boards, a railing made of crooked poles on one side - and we get an original stylized bridge, as if thrown together hastily
The video shows an example of landscape design, where almost all the structures were made by the hands of the owners of country estates.
It's nice to create beauty garden plot. Where else, if not at the dacha, can you show your design aspirations? One of the great opportunities to add personality to your garden is to create a decorative bridge with your own hands. Its task may be to connect the two banks of a reservoir or divide the site into zones. In any case, before choosing the style and type of bridge, you need to decide on its purpose and get acquainted with interesting options.
It is important to correctly place the bridge on the plot
We hope that you have already chosen for yourself suitable option, and now you need to decide where you plan to place the man-made bridge on your summer cottage. Many people believe that a decorative walkway is only possible over a large area, and they are mistaken.
It is enough to choose the right design, material and location - and such a decorative structure will harmoniously fit into the landscape of even a small area.
It is common for walkways to connect the banks of a stream or pond, but landscape design experts offer other options for their placement:
- dry (stone) streams;
- flower beds;
- ditches and holes;
- paths leading to arches and gazebos;
- ravines.

An important condition for creating country decoration is a combination of it appearance with other garden elements, durability and safety for owners. Of course, if there is a stream or pond on the site, it makes sense to build a bridge definitely over the stream. A similar design is especially appropriate in a Japanese-style rock garden. According to Eastern philosophy, it is the “humpbacked” bridge that allows you to feel the greatness of the deity.

When creating a landscape in landscape style the building should be placed in the narrowest part of the reservoir. This solution allows you to divide the reservoir into parts of different sizes or to delimit the area between the garden and the recreation area.

In a regular type landscape, you should adhere to the corresponding rule of symmetry and plan to place the building in the center of the site. In this case, it will perform functional role and act as a mini observation deck. For a country-style site, a good-quality wooden bridge without decoration or frills, with wide and durable railings, is suitable.

Choosing a place for decorative design, don't forget about proportions. There should be a certain distance between the surrounding elements and your creation. Being located in close proximity to country houses or large trees, it will get lost.
Let's evaluate garden bridges by shape and purpose
Choose the appropriate form garden decoration follows, based on harmony with the surrounding landscape, on one’s own preferences and focusing on possible options execution. The following types of bridges can be identified by their shape:

In the simplest case, you can use a very small bridge in the form of a craft to decorate the area. Moreover, its design can be relatively large, and the product can be used by storks, frogs and other animals, with the exception of humans. Choosing a place for a small craft in the country is much easier. 
While you are carried away by the charm of designer products, you should not forget about their direct purpose: to overcome obstacles in the form of a stream or ditch. In this case, an inexpensive and reliable design with minimum requirements for external design, which, of course, can be done with your own hands.
Material for creating bridges
The choice of product material largely depends on its type, features of the design you like, surrounding landscape elements and budget. To create it with your own hands on personal plot fit: 


Regardless of the chosen material and design, a bridge will be appropriate if its design fits perfectly into the surrounding space. At the same time, than smaller area plot, the more simple the shape and color, you need to arrange a walkway.
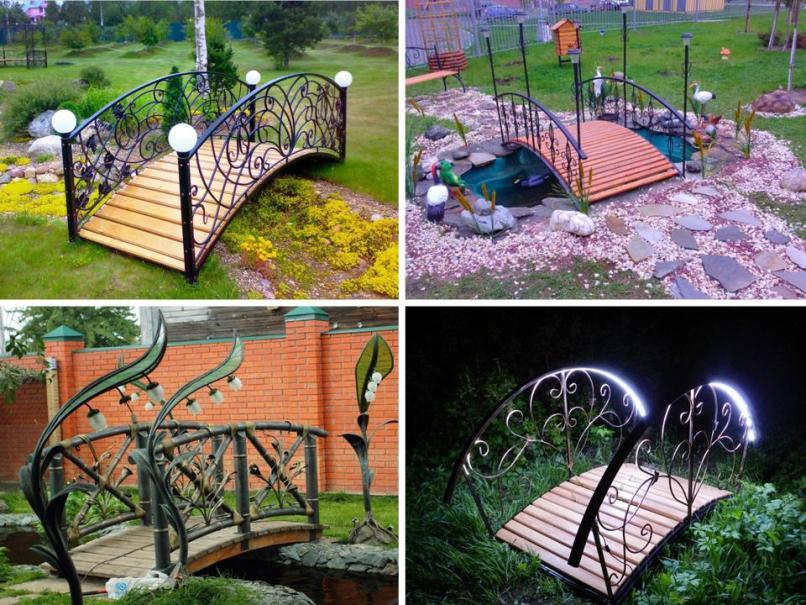
Quite often, next to structures are located climbing plants, and lighting elements, which provide mesmerizing illumination in the evening. This design will support the romantic direction in landscape design Your allotment.
A wonderful series of designer walkways
Probably one of the most enjoyable stages in acquiring your own bridge at the dacha is getting to know someone already existing options. We will comment on some interesting models with the hope that one of them will win your heart. In any case, it is very useful to study photos of successfully implemented projects.

This bridge is made for flowers that, in a friendly group, cross the stream. The load-bearing elements are steel, and the flooring is made of halves of logs. On the wood there is a sheet of waterproofing, soil and flowers. The bottom of the structure is lined with a sheet of metal.
When it rains, wood becomes slippery. A simple solution is a strip of carpet. Its color is coordinated with the surrounding elements. It is better to attach the material to the base with self-tapping screws.

Don't be afraid of bold colors! The fencing of the building is wonderfully combined with bright flower buds. The decking boards do not need to be fitted tightly and the gaps can be covered with slats that will resist slipping during rain.

The bridge can be asymmetrical in color, design, and material. Another great trick for a designer!
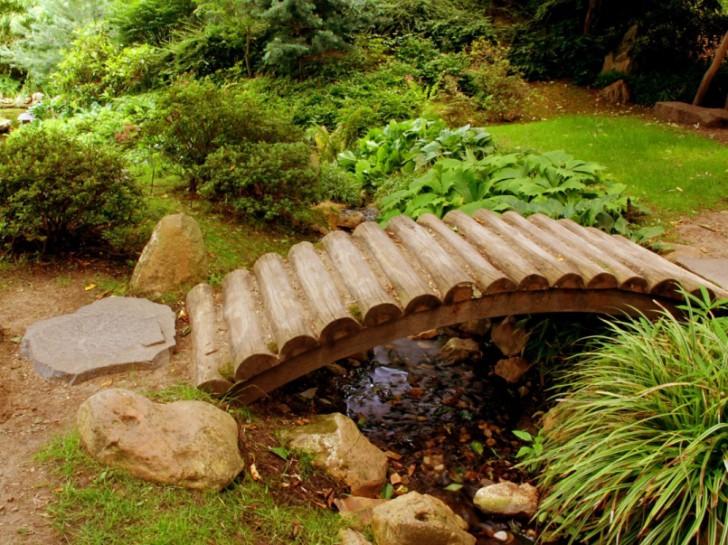
Ordinary halves of logs - and what a beauty! In this case, the design fits perfectly into the landscape.
This example suggests that you should be bolder when choosing material for your own handmade work. The result was a completely inexpensive and original product.

There is another hint hidden in this example: the combination of materials for crafts can be very different. Take a close look at what you have and try to match your own design with the environment.
You can make a metal bridge yourself
The metal bridge attracts with its openwork and light shapes, as well as its reliability and durability. Having studied the models presented above in the photo, you may think that it is unrealistic to do something like this yourself. However, blanks come to the rescue forged elements, which are present in abundance, for example, in the LEROY MERLIN construction supermarket.
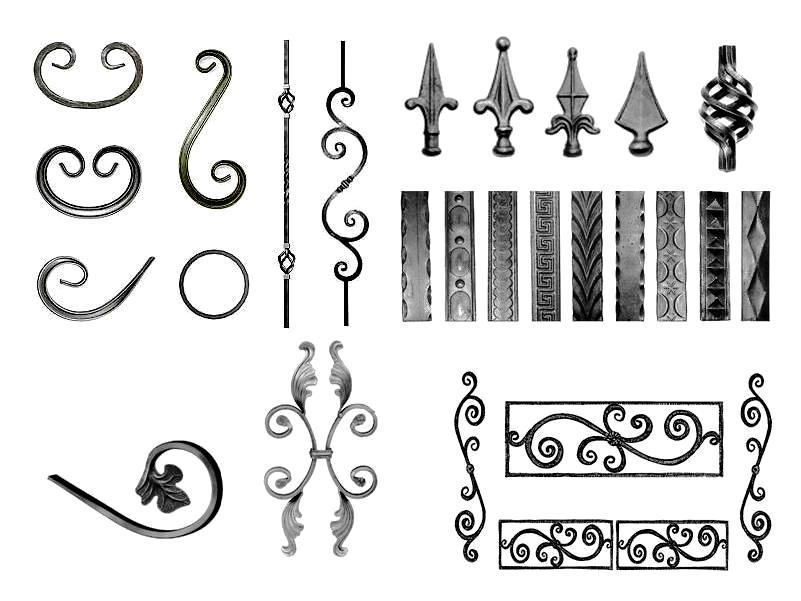 We have specially selected for you several easy-to-repeat designs. They all have a minimum number of elements that need to be bent. So, having welding machine and with some experience in welding, you can make a charming metal bridge with your own hands.

Of course, if possible, it is better to contact familiar plumbers and use their pipe bender to shape the longitudinal elements. In this case, the railing can be made from a strip of metal, which can be easily bent “in place” without special tool. In the end, the base of the building can be made in the form of step-welded pipes rectangular section and close them on the sides with wooden overlays.
The metal structure should be thoroughly cleaned of rust and the welded joints should be cleaned. Next, the surface of the product is degreased with white spirit, covered with metal primer and two layers of weather-resistant paint. Every year the product must be inspected and the damaged coating restored.
Assembling a wooden bridge with your own hands
The easiest way to make a bridge for summer cottage made of wood. Oak construction will last the longest. A compromise option for price is larch. For crafts that are hidden in a barn for the winter, pine is also good. The use of decking will provide a reliable, durable and non-slip flooring.

The design of a homemade wooden bridge is clearly visible in the above photo. A 25 mm thick board can be used as longitudinal supports for decorative crafts that cannot be stepped on by humans. At the same time, its width should be sufficient to cut out elements in the form of an arc. If there are no boards of the required width, they can be joined at the place where the railing balusters are installed.
The base of the product, which is used infrequently, can be made from 4 longitudinal boards with a thickness of only 30 mm, located at a distance of no more than 50 cm from each other. At the same time, every linear meter Cross members should be installed to prevent the bridge from swinging to the sides when walking.

It is better to mount a pedestrian bridge 3 m long on longitudinal elements with a cross-section of 50x150 mm or 100x100 mm. The cross-section of the longitudinal beams should be maximum in the middle of the structure and can be proportionally reduced as they approach their edges. The easiest way to assemble the base of the building is to use self-tapping screws. The fastening of the pedestrian bridge elements is reinforced by the use of galvanized corners. If the bridge length is more than 6 m, intermediate supports are installed.
Decorative flooring can be made from boards 25 mm thick. If the distance between the joists is no more than 50 cm, a 30 mm board is suitable for a pedestrian bridge with a minimum load. A permanent bridge is covered with boards 40-50 mm thick. The narrowest pedestrian bridge must have a width of at least 0.6 m.
 It is most convenient to use ready-made balusters for stairs, the range of which is widely available in the trade. In decorative crafts they are attached to the base with wood screws, and in “human” bridges the balusters are mounted using furniture bolts with nuts and washers, two sets per fastening unit. A convenient railing height is 0.7-1 m.
Curved railings are not easy to provide and are best done as separate straight elements between the balusters. A simple solution is a flat-laid board that can be easily bent “in place.”

A separate issue is the supports for the building. Their execution is determined, on the one hand, by the design, load and dimensions of the bridge, and, on the other, by the composition and mobility of the soil. In the simplest version, when placing the structure over a “dry stream”, a cushion of crushed stone will be sufficient.
On soft ground, four large sunken stones can be used. To prevent the supports from slipping, they should be attached to the stones using dowel-nails; one element per support is sufficient. In some cases, the structure may rest on the curbs of the paths leading to it.
The most reliable option is reinforced concrete shoes of sufficient area, buried 0.5 m into the ground. It is advisable to provide waterproofing pads made of rolled material between the supports and beams of a wooden bridge.
The wooden structure must be impregnated protective materials and is painted. Only use weather-resistant paints and varnishes. The coating must be monitored annually and, if necessary, restored.
Garden bridge made of stone and concrete by craftsmen
Here is a modern reproduction of an ancient Roman arched stone bridge. A team of several people worked on its construction for about a month, and it took up to
15 tons of stone.

You can make decorative bridges in the garden, which are not so much a functional structure as a product that can decorate the landscape. Initially, you need to decide what materials will be used as the base, and also think about the principle of placement of the structure. Only this algorithm will allow you to create stylish and quite original options.
Selection of materials
Decorative bridges are, of course, best made from natural materials by type of wood or stone. They will fit harmoniously into the surrounding exterior, where there are flower beds, wooden buildings, sand and pebbles. However, as practice shows, products made of metal and concrete look much more attractive.
Making a wooden bridge

If you want to cope with decorating your garden plot in a short time and without much effort, then it is best to create a composition from a garden wooden bridge and a pond, and these objects can be made by you yourself. You should focus on building a wooden structure, but if you decide to do it yourself, you should prepare tools and materials, and also familiarize yourself with the technology in advance. When decorative wooden bridges are built, there is no need to construct concrete base or piles that are driven into the soil. However, if the bridge is located in such a way that it has to connect the banks of a stream, then it will be important to supplement this design strengthening.
Making the base

The basis of the structure is two curved beams, the size of each of which should be 0.2 x 0.35 meters. The length of these elements must be equivalent to two meters. They should be prepared from straight pieces using a chisel and jigsaw, the excess wood should be removed. The beam is fixed to the flooring based on boards; their size should be 3.5 centimeters. These elements are evenly distributed along the length of the beams.
Work methodology

When decorative bridges are made, a gap of 2 centimeters should be provided between the boards. Before installation, parts are dried on all sides and then treated with antiseptics and impregnations. The railings can be carved; the simplest design will be curved arcs that are fixed on several balusters. These elements can be decorated with bamboo inserts, rope or thick hemp.
Manufacturing of reinforced concrete bridge

If you need a decorative bridge, you can create it from metal. Carrying out similar works will turn out to be somewhat more difficult than manipulations that involve wood. This is due to the fact that the production of blanks will take a lot of time; structural elements must be prepared in molds. The latter should be created from boards and the outlines should follow the contours of the future part, the lines do not have to be straight. For reinforcement, metal rods should be used that are placed inside the mold.
Filling should be done with a concrete solution, and the width of the layer should be 10 centimeters or more. In order for the solution to completely harden, it will take 48 hours, after which you can remove the workpieces and assemble them in the planned place into a single whole.
Facing

A decorative bridge should be beautiful, so after installation work it can be decorated using paving stones, artificial stone, clinker bricks or mosaics. A path that is made using the same will look great facing material, which was used to finish the main building on the territory. It is important to remember that such a structure will expand and contract as temperatures change, so the supports for the product must be driven in on one side.
If you are interested in bridges and decorative bridges, then it is important to decide not only what material the product will be made of, but also what design it will have and where it will be located. Even if there is no stream or pond on the site, the bridge will decorate any landscape. If there is no fountain or stream, and artificial pond, then you can install a bridge, which will be a good solution for decoration. It is important to be guided traditional rules placement of such structures over reservoirs, if the latter occur. It is necessary to install the structure in the narrowest place. This will solve two problems. The first advantage is expressed in the possibility of using a smaller structure. The second problem that you can solve is the savings on materials, time and effort when smaller structures are made.
Quite often, owners of suburban areas install bridges in the garden with their own hands. How to do it yourself similar design, was described above. If you have already decided on the technology and methodology for carrying out the work, then it is important to also think about where such a product would look most appropriate. If not, then the bridge can be placed over a ditch or natural ravine. Another good decision- this is the construction of a structure near a flower bed or a spectacular flower garden. If you want to make the most of original solution, then the bridge can be erected over. It is only important to think about whether the structure will naturally fit into the overall landscape. Among other things, it is important to consider safety, because people should not trip over such a structure.

An alternative option for making a wooden bridge
You can easily make a garden decorative bridge in the garden with your own hands. The construction process should begin with the formation of a support platform and fixation of the slopes to the shore. For this, stones of different fractions and crushed stone are used. On support platform there should be wide beams that will form the basis of the bridge. In those places where the elements will come into contact with each other, you should carry out waterproofing works. In order to prevent the base from moving, the beams must be fixed using metal profile. On next stage You can lay the flooring from boards; the master must take care of installing the pressure bars. The flooring is fixed with nails or screws. However, it is important to exclude their protrusion above the surface of the wood. On final stage you can start building the railings. The most suitable height for them, if the bridge is functional, is considered to be in the range from 70 to 100 centimeters. You can choose other bridge sizes and that will depend on your height.
The decorative bridge and its design can be made and produced on your own. Parts should be painted and processed protective composition. If the width of the reservoir is more than 6 meters, then a solid foundation should be prepared for the bridge, which is made from intermediate supports.
Decorate own plot- an indescribably pleasant experience. It is here that people create their own place for both physical and mental relaxation. Bizarrely arranged flower beds, various decorative elements– everything lifts the mood and encourages further creativity. It’s especially nice to decorate the area yourself. Bridges at the dacha are one of excellent opportunities add personality to your own garden.
Types of bridges

The functional purpose of bridges, and even more so bridges, has changed dramatically. Now they are not always an ordinary connecting element of two banks. Their main purpose was decorative decoration, division different zones Location on. Therefore, before choosing the type and style of the bridge, you should carefully analyze what exactly the small wooden structure will symbolize, which zones it will connect: this directly determines how exactly the bridge should be positioned.
- The style of the planned bridge largely depends on where it begins and ends. The rock garden calls for simplicity and sophistication, as required by Japanese culture.
- Lush gardens require intricately decorated structures.
- Bridges located over streams or artificial reservoirs require a gazebo on one of the banks - this way a certain completeness of part of the garden is achieved.
If you plan to build bridges for your dacha with your own hands, then wood will be the most optimal building material. Wooden structures fit perfectly into any style on any site. In addition, deteriorated parts of a wooden bridge are easier to replace than components of a concrete or metal bridge. The latter often have to be redone entirely or put up with the resulting deformations.
Tools and necessary materials
- Boards, plane, set of screwdrivers, saw and hammer, sandpaper.
- Drill with a set of drills, a file, fastening materials - nails, screws.
- Varnish, paint brush, protractor, ruler and pencil for marking.
Construction stages

Every building needs a foundation. For bridges, they can be two boards, with a width and height of at least 6 and 12 cm. The length of the base depends on the length of the future bridge: it should be half a meter longer to secure the bridge in the right place.
A straight bridge has practically no decorative value, so bridges for a summer house should be rounded. This can be achieved in different ways: create several steps that will rise from one end of the bridge to the middle and descend to the other end. Or, using skillfully turned boards, create the most rounded base possible by attaching additional guide boards to the base, forming a nice semicircle.

Before you start working with wood, you need to pre-process it: process the boards with a plane and sand them with sandpaper to achieve the effect of smooth wood. Then think about protecting wooden building materials: process them by special means, preventing the tree from rotting or being damaged by a bug.
Installation of the future bridge is carried out on a flat surface. The steps of the bridge are attached to two load-bearing boards laid parallel, forming a strong base. Boards of small width look neat and beautiful, but you will have to struggle with them.
If you plan to make a stepped bridge, you need to nail small risers to the base, which will form the base of the steps. Narrow boards are attached to the top, forming the outer, visible canvas of the bridge for the dacha.
After designing the appearance of the bridge, you need to make supports. They are located parallel to the steps, at the edges of the bridge, fastening and lifting it at the same time.
To arrange the railings, you can purchase balusters, or you can use ordinary boards with a small thickness, sanded and treated with an antiseptic protective agent.
The railing is often a straight line. If you need to get a curved line, you need to calculate the height of the outer balusters, organize the joint of the railing parts and mount the structure using fasteners.
The finished bridge requires careful processing using paint and varnish products. Such actions will not only strengthen the protective layer of the building, but will also give the tree a pleasant shade.