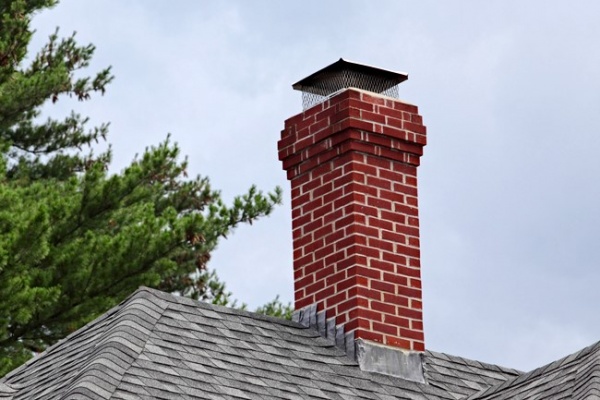
A chimney is a mandatory attribute of any stove, thanks to which the resulting combustion products are removed from the heating system. The chimney is most often made from metal pipe. It creates a draft, with the help of which all gases escape along with smoke.
Chimney requirements
You can install a metal chimney for a stove with your own hands, the main thing is to do it correctly, otherwise, due to incorrect calculations, the load on the heating system will increase, the room will become smoky, etc.
Main characteristics of any chimney:
- form;
- material;
- size.
The first thing you should pay attention to when buying a chimney pipe is its shape. Experts recommend using cylindrical pipes; they are better than others for removing waste gases and smoke.

Many owners of fireplaces and stoves are wondering how to clean a chimney? And this is not accidental, because a decrease in draft can lead to failure of the chimney and fire. Let's look into this issue.
Important! The chimney for the stove should have as few corners, sharp transitions and obstacles as possible. Otherwise, a lot of soot and ash will settle on the walls of the pipe.

The material from which the chimney is made is no less important. If we are talking about an environment with increased acidity, then it is best to use stainless steel pipes with molybdenum. Stove chimney You can also lay it out of brick, but the most popular material is alloy steel. We previously wrote about and advised you to bookmark the article.
The size of the chimney directly depends on the size heating structure(furnaces). To correctly determine the height of a structure, you need to seek help from building code documents. Errors in calculations lead to a decrease in draft and the appearance of traces of soot in the room. In order not to make a mistake with the diameter and length of the pipes, you can use a suitable finished project with dimensions from the Internet.
Basic requirements for metal chimneys:
- Pipes must be well insulated.
- Before installing the chimney you need to do correct calculations and prepare a project.
Compliance with these rules will allow the chimney to function without such consequences as smoke in the room, soot deposition, carbon monoxide inflow, etc.

Installation rules
- If the chimney pipe rises more than one and a half meters above the roof, then it must be additionally secured with brackets or braces.
- The height of the metal pipe from the furnace to the head must be at least 5 m.
- To remove condensate, special plugs are installed in the chimney.
- In some heating devices, the temperature of the exhaust gases is very high, so the ceiling surface must be additionally insulated. The craftsmen also recommend using special parts during installation, for example, an insulated passage through the ceiling.
- The chimney must extend at least half a meter beyond the roof.
- When installing a chimney pipe, it is unacceptable to “narrow” its diameter.
- Horizontal sections of metal pipe should not be more than 100 cm in length.
- If the pipeline is laid near structures made of flammable materials, then it should heat them by no more than 50 degrees Celsius.
- The chimney must be located at a safe distance from the electrical wiring, gas pipeline and highly flammable building materials.
Read more about it on our portal.

Tools and materials
You can install a metal chimney for a stove yourself; for this you need to prepare following materials and tools:
- metal elbow;
- connecting elbow;
- metal pipe;
- sealant (We recommend reading the material about);
- spark arrester;
- thermal insulation;
- brackets or other fastening elements;
- anti-spill canopy;
- tee with condensate drainage, etc.
Note: There are two types of tee for collecting condensate and cleaning the chimney: 90 and 45 degrees. It is usually sold with a special plug. It can be blind or with a condensate drain.

Device parts metal chimney- elbow, tee, plugs, etc.
Installation stages
Stove chimney, and in in this case we will talk about installing a pipe for a potbelly stove standard sizes, mounted as follows:
- The first piece of metal pipe is fixed in the chimney opening in the stove using sealant.

- The knee is built up, moving up to ceiling or windows.
Important! The pipe must be secured to the wall with brackets every two meters.

- Having reached the ceiling, a hole of the required size is cut and the thermal insulation is removed. The size of the passage must be at least 70 mm larger than the diameter of the pipe.

- The pipe is brought out through the passage glass and fixed at the attachment point with the external chimney.

Advice! The joints of elbows, pipes and tees are additionally secured with clamps. After completion of the work, they are additionally sealed.
- Next, attach a tee to drain condensate.
Advice! If the chimney will be discharged through a window, then a pass-through glass is installed in the glass hole.
- The external chimney is covered with bitumen and provides adequate thermal insulation.

- A spark arrestor is attached to the surface of the pipe, popularly called a “mushroom”. It protects the chimney not only from flying sparks, but also from precipitation and small debris.
- At the end of the work, an umbrella is installed on the chimney.

- Places of pipes that may be susceptible to corrosion are treated with heat-resistant paint.
- After all installation work After installing a metal chimney, a test firing of the furnace is carried out. Check the tightness of the structure and the heating level.
Important! When testing a stove with a newly installed metal pipe chimney, a burning smell or light smoke may appear. This is due to crystallization of the sealant composition and evaporation of oil from the surface of the pipes.

Efficient operation of the chimney for wood stove and other types of heating devices depends not only on the correct installation and calculations. The chimney needs constant maintenance. It is necessary to regularly monitor the condition of the pipes for burnouts, rust, corrosion, and clean them. During operation of the furnace, traces of soot and soot remain on the inner surface of the pipes, which make the cross-sectional diameter of the pipeline narrower. In addition to natural combustion products, traces of plastic waste may settle there. Sometimes the chimney becomes clogged due to the appearance of wasp's nest etc. Masters recommend carrying out cleaning work at least two or three times during the heating season.

For cleaning you can use:
- aspen firewood - burning aspen quickly removes soot;
- flexible thick cable for hard-to-reach places;
- burning together with special fuel chemical compositions and etc.
Video: DIY metal chimney installation
You can install a metal chimney for a stove with your own hands. To avoid unpleasant consequences, you need to strictly follow the instructions and not be creative.
Fire is an accessible source of heat used everywhere. However, lighting fires in buildings poses some challenges. Even if suitable conditions are created and its spread is prevented, it is necessary to organize constant smoke removal and corresponding draft. This is what chimneys are used for.
Purpose and features of the chimney
A chimney is a practical and simple device that allows all the smoke to escape. It is used for both open and closed fire sources. Constructed in the form of a pipe or shaft, the chimney provides good ventilation, drawing in smoke from the fire. Although this slightly reduces heating efficiency, this approach provides fresh air in a heated room.
However, the design of the chimney is not so simple. It must comply with all requirements and standards, including:
- Constant air exhaust
- Sufficient path capacity
- Minimum number of horizontal track sections
- Resistant to condensation
- Resistance to extremely high temperatures
And other features that should be taken into account when installing such structures. This will ensure its optimal specifications and will protect against possible problems when lighting a stove or fireplace.
The optimal design of the smoke channel implies cylindrical shape. This will not only eliminate unnecessary aerodynamic problems, but will also reduce the rate of soot accumulation on the internal walls.
Peculiarities various types chimneys are also different. For solid fuel boilers, often regular one will do a pipe that is sufficiently insulated and properly routed outside. However, when creating a chimney for a fireplace or stove, it is necessary to thoroughly calculate the design, ensuring good draft and other nuances. This important points, providing all the functionality of this element of the furnaces.
Design selection
The design may vary depending on the type and features. Currently there are three types similar products, distinguished by the materials used:
- brick
- steel
- ceramic
Their differences are significant, and the installation is radically different. Also, the design may vary depending on the layout of the house, the location of the pipe outlet and its additional features.
When planning and selecting materials, it is worth considering the following points:
- Smoke temperature and outgoing heat
- Presence of condensation
- The rate of soot accumulation and the possibility of its removal
- Aggressive impact on the structure
- Optimal pipe outlet location
And other nuances. This will ensure high efficiency of the boiler or furnace, and will also reduce the risk of fire spreading or destruction of the exhaust pipe. Optimal choice is always brick version, because it retains heat, withstands high temperatures, is slightly susceptible to condensation and is resistant to various types fuel. Although the construction similar design has its own difficulties, it is a long-term and reliable option.
Interesting ! It is worth noting that brickwork can be the outer contour for other types of chimney. It will allow for heat exchange along the entire length of the pipe, without increasing the risk of ignition of surrounding materials.
Concerning ceramic options, they are best used for gas and liquid fuel boilers. Ceramics are neutral towards aggressive substances, and their temperature limits are very high. At the same time, ceramics are resistant to corrosion, durable and strong. However, its installation must be done professionally, because it is a very fragile material.
An equally popular option is a steel chimney. It is suitable for those rooms where it is difficult to organize a full-fledged brickwork for smoke removal. At the same time, the cost of this option is low, the weight is moderate, and installation is quite simple. However, steel options must be provided with additional thermal insulation or a double circuit to reduce the risk of ignition of surrounding materials.
Important ! Steel options with thin layer metals are not suitable for solid fuel boilers. High temperatures are dangerous for them, because the steel can soon burn out.
Chimneys in houses often have a complex structure, which can be seen in the figure. There are elements for air intake, insulating parts for the transition between floors, brackets for fixation and much more. All this is worth taking into account, because the reliability of the chimney reduces its danger to the building.
Important ! Installation metal structure carried out from top to bottom.
Choosing a chimney and determining its design are important points that should be determined before installation. Each material has its own characteristics during construction, which determine the technical characteristics and reliability of the structure. Neglecting this will lead to the risk of ignition or low efficiency in the operation of the chimney.
Brick chimney
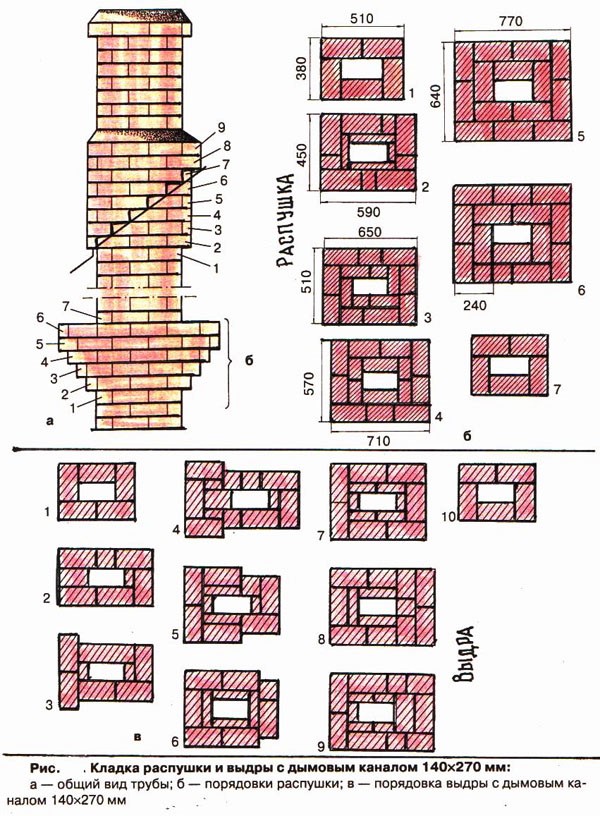
The brick version of this design is the most common and optimal for many buildings. It is easy to build, but there are some design details that need to be taken into account. It's not just a straight line brick pipe, but a circuit consisting of several constituent elements. Among them:
- Kiln neck
- Smoke damper
- Fluff
- Otter
- Pipe head
The first two elements connect the furnace to the pipe and allow you to regulate the draft with which the air comes out. Next, after several rows, there is a fluff - an expansion that is necessary to protect the walls from overheating. Often installed in front of the interfloor ceiling.
Next comes the otter, which protects the building from precipitation that can enter through the cracks near the base of the pipe. After this, the structure is completed at the end where the head is installed. A cap or other elements are fixed on it to protect the chimney from precipitation and wind.
Advice ! Installing a deflector on the tip increases the efficiency of the design, improving traction.
The design is more clearly shown in the image. This takes into account the nuances of chimney construction, as well as the location of all its elements. While some may find elements like otter or fluff unnecessary, this is a proven design that provides the most performance and longevity of the elements. Advantage brickwork is that they are difficult to add to a ceramic or steel chimney.
The construction itself consists of the following steps:
- Preparation of drawings
- Foundation preparation
- Step-by-step laying of the chimney
- Output to the roof, installation of the hood
- Structural insulation
The first stage is to prepare accurate drawings for the further construction of the structure. It is necessary to take into account the exact height, approximate thickness of the seam, calculate the weight and location constituent elements designs.
Advice ! When designing, it is worth considering the width of the channel. This determines maximum efficiency chimney.
After these stages, the actual laying of the chimney begins. It consists of creating a foundation, connecting the future pipe and the place where the fire will be lit, as well as the further construction of all components of the structure. If the masonry itself is relatively simple, then it is worth taking into account the features of fluff and otter. Their creation can be seen in the following image:
Advice ! It is worth making the seams as thin as possible to reduce heat loss and improve the efficiency of the structure.
Next, an outlet is created to the roof, where the head and cap are installed. Subsequently, all seams are insulated, as are weak parts of the structure. Isolation is required in weak points, where fire can significantly heat the brick, causing damage or condensation.
Important ! The head should be located high enough. If it is significantly lower top level roofs, draft may be minimal.
These are the main steps that should be taken into account when building a brick chimney. Although the design is simple, you should not neglect the help of professionals. For a large building correct conclusion chimney, creating a foundation and crossing partitions between floors - important stages, which determine the efficiency of the chimney.
Chimney in the bathhouse
For the bath the best option is a metal chimney. A sauna stove rarely reaches extremely high temperatures, and the atmosphere in the sauna is ensured only by good insulation of the room. But here it is better to take stainless steel, because the humidity in the building will be high, which will significantly affect the durability of the metal.
The presented options show the available chimney outlets from the bathhouse. It is worth considering that they all have thermal insulation on the external area. This is necessary to reduce heat loss and reduce metal damage.
Chimney design for sauna stove not so complicated, here you only need to take into account important nuance— condensate. It will constantly accumulate due to high temperatures and humidity. This is undesirable, because it will reduce the life of the chimney.
- Single-circuit pipe connecting the stove and chimney.
- Adapter.
- Double-circuit pipe.
- Condensate drain.
- Umbrella.
Initially, it is necessary to assemble these components. It is carried out using clamps and adapters that allow you to connect the various components of the chimney. You will also need a 45 degree bend to allow the pipe to be moved to the side. It is recommended to vent it not through the roof, but through the wall, which will protect the structure from condensation.
Advice ! Assembly can be carried out both preliminary and during the installation of components on the building.
Chimney for solid fuel boiler
The chimney for the boiler differs slightly from other options. It does not require such diligent insulation, but it does need a fairly reliable chimney outlet that can withstand exposure to elevated temperatures. Indeed, often the heat from such boilers can burn thin steel, which is often used for budget options chimney.
The construction of such a chimney is similar to the options for a bathhouse. It is necessary to create a connection to the boiler, and then lead it out through the wall. Here it is necessary to take into account that the smoke from such boilers is often abundant, so it is worth taking care of good draft.
When constructing, it is worth considering the following points:
- Thickness of material used
- Thermal insulation of the chimney
- Good traction
- Easy pipe cleaning
Based on this it will be reliable design, capable of completely eliminating all smoke from the boiler without creating a risk of fire in the building.
And for a better understanding of the chimney design, you should watch this video. The process of installing a similar structure for a heating and cooking stove is described here:
In order for your home to function properly, it is important to consider all the details during construction. The installation of a metal chimney can be done by specialists, but such services are not cheap, but all the rules and nuances will be observed. But it’s really possible to do it yourself. We'll tell you how to do all the work correctly.
The main condition for accurate installation is to know how the air jets are distributed when the temperature in the house rises. If installation steel pipes incorrect, then smoke will occur, carbon monoxide will fall into the room or backdraft will occur.
Any novice builder can make a homemade chimney. You just need to be well prepared: study the properties of steel, its advantages and disadvantages, and the rules for installing the structure. All work must be carried out with increased attention, since any little thing can cause smoke in the room, which will lead to very harmful consequences.
How to choose a pipe
Today chimneys are presented complex design, therefore, before installation, it is important to carefully select the material in order to subsequently install it correctly.
The result of the chimney will depend on:
What volume of fuel is consumed;
boiler efficiency;
efficiency;
safety;
type of stove being installed.
What are the advantages of steel chimneys:
1. Inside the pipe smooth surface, so soot and soot will not accumulate (which cannot be said about brick system chimney).
2. They are installed in a steam room or in your own home.
3. There is no need to install reinforced concrete columns or build a foundation.
4. Installation of the structure will not be hindered by weather conditions.
5. A small amount of condensation will form if installation and insulation were carried out correctly (often this applies to the chimney that is installed on the stove in the bathhouse).
6. Has high resistance to escaping gases.
7. Good strength.
8. Long service life.
9. Budget price (steel is much cheaper than brick).
10. All requirements for fire safety.
Before choosing a chimney, you need to understand what requirements it must meet:
The size of the chimney must be such that combustion products are removed;
each stove has its own separate chimney;
select a cross-section on the chimney pipe that is smaller than the area of the smoke outlet pipe;
the steel from which the pipe is made is of high quality, protected from corrosion, the walls are no thinner than 5 mm;
a pocket is made in the chimney, with its help the chimney channel is cleared of soot;
this channel contains more than 3 turns, pipe diameter equal to angle rounding corners;
The height of the pipe should be the same as the height of the ventilation.
How to properly install a chimney made of steel pipes with your own hands
Before installing a steel pipe, you need to familiarize yourself with some rules for such work.
If the equipment is gas, then the pipe is mounted vertically. The pipe is assembled from the bottom to the top. If the product goes from the boiler to the chimney, then it is short and has no bends. The pipe must be less than 5 m long. To create normal draft, you need to correlate its diameter to its height. Where the chimney pipe is horizontal, it should be located as far as possible from gas pipes and electrical wiring, the length of which is no more than one meter. Only one heating device connects to one chimney channel.
Let's look at the installation of a chimney step by step
 The pipe is brought outside only through a wall or roof. In the case where a pipe passes through a wall, an opening is cut under it, the area of which will be slightly larger than the cross-section of the pipe. This is necessary in order to insert a sleeve into the wall, which prevents the destruction of the stone due to overheating. Use brackets to secure a long chimney; this must be done both from the outside and from the inside. This will protect it from deflections due to winds and precipitation.
The chimney will pass through the ceiling and roof, so they are thermally insulated. This must be done, if only because the lower part of the pipe is adjacent to the boiler, and the heating is very strong.
How to Twist and Tilt
The speed at which smoke passes through the chimney and the retention of heat in the house will depend on how correctly the turns are made. Steel pipes are much easier to install than brick ones.
You will need to make three different angles:
The angle is 75 degrees, we cut it evenly, this is necessary to connect parts whose angle is 150 degrees (pieces of pipe are joined diagonally);
when cutting an angle of 60 degrees, you can make a joint with an angle of 120 degrees;
if the pipe is cut at an angle of 45 degrees, then make a right angle turn.
Let's collect all the information together and put it together in brief instructions:
1. The chimney is mounted to the roof from the stove or boiler.
2. We assemble all the links with each other sequentially.
3. For fire safety, insert the pipes into each other; the depth should be at least half the diameter of the pipe. This way moisture will not get inside.
4. You need to make a pocket near the base of the pipe so that you can clean it.
5. We fix all joints with clamps.
6. After one and a half meters each time, fix the pipe with brackets.
7. To protect the coating from overheating, insert pieces of galvanized steel.
As you can see, installing a chimney pipe is not so difficult. The main thing is to take into account all the rules before starting work, choose a pipe and prepare everything necessary details and tools. It is important to comply with those rules that directly relate to fire safety.
There are no posts on this topic.
1 General rules for the design and assembly of chimneys
The design and installation of chimneys must be carried out in accordance with current regulations:
SNiP 41-01-2003; VDPO (RULES FOR WORK, REPAIR OF OVEN AND SMOKE CHANNELS); SP 7.13130.2009.
The purpose of the chimney is to remove combustion products and provide normal draft to maintain combustion. The draft level depends on the height of the smoke channel and the diameter of the chimney.
When installing the chimney, you must observe following rules:
- The height of the chimney from the heating device to the head must be at least 5 m.
- The elevation of the chimney above the ridge/parapet is determined according to the diagram (Fig. 1).
- The elevation of the chimney above closely spaced roofs of neighboring buildings must be at least 1.5 meters.
- If the chimney rises 1.5 meters or more above the roof, it must be additionally secured with braces (Fig. 2).
- In the chimney design, it is recommended to provide plugs with a condensate drain to remove condensate and/or inspection to allow cleaning and maintenance of the smoke channel

- If the roof is made of flammable materials, a spark arrester made of mesh with a cell no larger than 5 x 5 mm should be installed in the chimney.
- When designing and assembling a chimney, it is not allowed to narrow the diameter of the chimney, but it is allowed to widen it. (For example, to assemble a chimney heating stove with a chimney outlet diameter of 115 mm, you cannot use a chimney with a cross section of 110 mm, but you can use a 120 mm chimney using an adapter from 115 mm to 120 mm).
- The length of the horizontal section of the chimney should not be more than 1 meter.
- The joints of the chimney elements should not coincide with the places of ceiling and roof passages, or passages in the wall.
- Bends and tees must be installed so that they do not bear the load from the weight of the chimney elements installed above them.
2 Chimney design and calculation of mounting elements
CHIMNEY DIAMETER. The diameter of the chimney must be equal to or greater than the diameter of the outlet of the heating device. To transition from one diameter to another, use the “Adapter” element of the corresponding diameter.
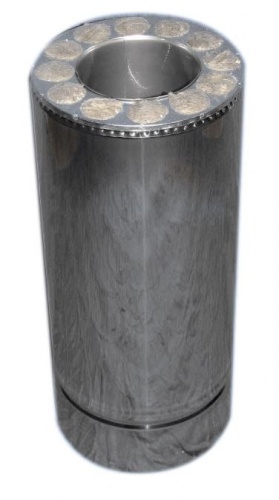
SELECTION OF PIPES TYPE. The use of a regular pipe or an insulated pipe depends on the location of the chimney. Conventional pipes are used only in heated rooms. Insulated pipes can be used in heated and unheated rooms, and outside. The choice between a regular and insulated pipe in heated rooms is made by the consumer, comparing cost, fire safety and comfort during operation. To switch from a regular chimney pipe to an insulated pipe, use the “Transition from non-insulated to insulated” pipe.

SUPPORTING PLATFORM. The choice of chimney design with or without the use of a “Cantilever Bracket” support platform is determined by the design of the heating device and the location of the chimney.
Without a support platform, it is only possible to use a flat vertical chimney resting directly on the heating device. Figure No. 3.
In all other cases, you must use support platform"Cantilever bracket". Figures 4, 5, 6. The location of the supporting element “Cantilever bracket” should be at least 5 meters along the height of the chimney.


TURNING THE CHIMNEY. To change the direction of the chimney, use a “bend or outlet insulated at 45 or 90 degrees”

CONDENSATE COLLECTION AND CHIMNEY CLEANING. To collect condensate from the chimney and clean the chimney, use a “Tee or tee insulated at 45 or 90 degrees” together with the element “Plug with condensate drain” or “Blind plug”.

PASSAGE THROUGH THE CEILING. If the chimney passes through the ceiling, it is necessary to use the “Insulated passage through the ceiling” element. Which should be 70 mm greater than the thickness of the ceiling.
IMPORTANT
- Some heat-generating devices (furnaces, boilers) may have an increased temperature of the exhaust gases. This will require additional insulation of building structures and individual design of the ceiling pass-through node to ensure fire safety. During the operation of the chimney, it is necessary to control the temperature on the outer surface of the “Insulated passage through the ceiling” element and, if necessary, replenish the insulation layer as it shrinks.
- The surface of the chimney heats up during operation. If the chimney passes near building structures made of flammable materials, it should not heat them above 50°C (clause 4.39.8 of GOST R 53321-2009).
PASSAGE THROUGH THE ROOF. If the chimney passes through the roof, then it is necessary to use the element “Passage through the roof” or the element “Rubber seal for the roof”, straight or angular. When installing a chimney through the roof, it is necessary to comply with the current regulations. building codes and fire safety regulations.
 COMPLETION OF THE CHIMNEY.
To complete the chimney, use standard elements“Umbrella” or “Insulated umbrella”.
COMPLETION OF THE CHIMNEY.
To complete the chimney, use standard elements“Umbrella” or “Insulated umbrella”.
IMPORTANT
- For gas-fired heating systems, the chimney must remain open!
FIXING THE CHIMNEY. The fastening must exclude the possibility of deflection and any displacement of the chimney from the wind or its own weight. To do this, use the “Wall Fastening” element, which is installed at the rate of: 1 fastening for every 2 meters of the chimney.
To count required quantity elements, draw a chimney diagram taking into account all the above rules and recommendations. The number of straight sections of bends and tees is determined by the layout of the chimney and its design. Typical schemes chimney assemblies are shown in Figures 3 to 6.
3 Chimney assembly
- Installation of the chimney starts from the bottom, from the heating or heating device upwards. To be able to regulate the draft, install a damper element in the chimney.
- It is recommended to assemble the chimney elements “by condensate” so that condensate and tar deposits do not escape outside.
- All joints of pipes and other elements (bends, tees, etc.) must be sealed with heat-resistant mastic-sealant, carefully connected to each other to the full depth of the landing socket and fastened with a “Clamp” element in EACH connection.
- After installation, a test fire should be carried out, during which it is necessary to check the tightness of the joints and make sure that adjacent structures made of combustible materials are not affected high temperature and do not heat up.
When using the chimney for the first time, an odor and light smoke may appear as a result of the evaporation of oil residues from the metal surface and the crystallization of sealing materials.
When heating the chimney from of stainless steel, including double-walled, tarnished colors may appear on its surface, which is not a defect. The chimney needs maintenance. The chimney should be cleaned regularly, at least 2 times per heating season.
The removal of combustion products from simple iron stoves used for heating cottages, garages and residential premises has some peculiarities. We will discuss them in this publication, and at the same time consider how to properly make a chimney for a potbelly stove in various ways.
Features of operation of potbelly stoves
To assemble an efficient and fireproof chimney duct for a metal stove, the following nuances must be taken into account:
- The efficiency of the stove is extremely low - no more than 50%. Accordingly, half of the heat generated by burning wood is lost through the chimney.
- The walls of the flue heat up considerably - up to a maximum of 400 ° C, average temperature– about 200 °C.
- From contact with cold street air Condensation forms inside. Its quantity depends on the temperature difference between the exhaust gases and the environment.
- Soot settles on the channel walls. The more condensate is released, the faster the soot layer grows.
- With periodic firing, an ice plug gradually freezes in the area of the head, blocking the passage and reducing the force of natural draft. With each subsequent ignition, the stove works worse and begins to smoke into the room.
Examples of incorrect stove chimneys - burnt-out galvanization and a pipe clogged with soot
Note. When using conventional single-wall pipes, condensation forms not only inside, but also on external walls chimney
Abundant moisture condensation is promoted by operating a solid fuel heater in smoldering mode. Closer to the head, the pipe warms up weakly, which is why the water released from the air does not have time to evaporate. The problem is aggravated by humidity and poor quality of fuel burned in garages and country stoves which produce a lot of soot.
The correct chimney pipe for a potbelly stove minimizes the following problems:
- reduction in the amount of condensate and soot is achieved due to external insulation a section running along the street and unheated rooms;
- thermal insulation also prevents the upper part of the flue from freezing;
- chimney installation in wooden house involves protecting structures from fire;
- The efficiency of the stove can be increased and the temperature of the pipe reduced by organizing heat removal in various ways.

These measures are taken as a whole. Removing heat from the iron chimney increases the efficiency of the furnace and reduces heating of the exhaust channel, and the insulation resists moisture condensation and soot deposition.
Materials used
Since we are considering potbelly stoves made of metal, the removal of combustion products should be organized using insulated steel pipes. Brick chimneys are of little use for such stoves - due to the roughness of the walls, soot accumulates quite quickly, and the masonry is destroyed by freezing condensate.
- the section of the flue connected to the potbelly stove indoors is made of a stainless pipe with a wall thickness of at least 0.8 mm;
- passage through walls and ceilings, the street part is made of insulated sandwich pipes;
- It is allowed to make a chimney with your own hands from black thin-walled pipes with subsequent insulation.

When using thin-walled pipes (3-4 mm) of ferrous metal, sections of the flue will have to be hermetically welded. For insulation, buy basalt fiber in the form of plates with the following parameters:
- density – not less than 80 kg/m³;
- maximum operating temperature – 600 °C;
- thickness – at least 40 mm.

An ordinary iron pipe must be insulated
Calculation and selection of materials for a potbelly stove chimney is carried out as follows:

To lay it in a dacha through a wall or ceiling made of flammable materials, you need to make passage units - fireproof cuttings. You will need galvanized steel 0.8-1 mm thick and fire-resistant insulation - stone wool.
Methods for laying chimney pipes
There are 2 classic version installation of chimneys used for potbelly stoves:
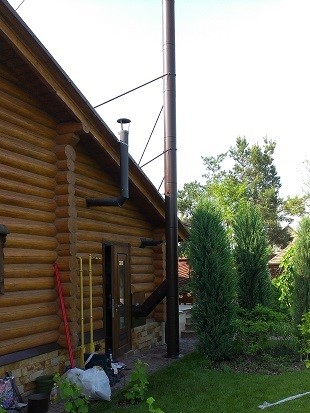
- Exiting the horizontal section from the stove to the street and connecting to a vertical channel attached to the wall of the building.
- The vertical flue rises directly from the furnace, crossing attic floor and roofing.

As can be seen in the diagrams, the second option is obviously more difficult to implement. In both cases the pipe crosses building structure – outer wall or ceiling, equipped with a tee and a condensate collector. But the second method involves crossing and sealing roofing. The wall chimney does not affect the roof.
Important point. Option No. 1 is safer for laying a stove chimney in a wooden house. If soot accumulates on the pipe walls and ignites, the temperature of the flue will rise to 1000 °C, which threatens smoldering and fire of the wood. In such a situation, the outdoor chimney will char the wall outside, while the internal one can start a fire.

Preference is given to a simpler and cheaper option, depending on the type of heated building:
- in a habitable private house, punching a hole into the attic is impractical and expensive - it is better to take the gas duct directly to the street;
- chimney the stove will inevitably pass through the upper rooms, so method No. 1 is preferable;
- chimney for a potbelly stove in a garage with flat roof laid in any way - through the roof or wall;
- Option No. 2 is convenient to install in all types of buildings during the construction phase.
When choosing suitable option Consider the need to clean the chimney from soot and drain condensate. For example, the wall of the building is located close to the neighboring area - then there will be too little space left to service the smoke duct.
Before preparing materials, make a drawing of the chimney and indicate the dimensions of all sections - this will make it easier to select pipes of the required length. Do not forget about fasteners - brackets and clamps, and also buy sealing agents for joints - oven sealant and asbestos cord.
Reference. Oven sealants include black sealants designed for a maximum temperature of 1500 °C. Red compounds with the smell of vinegar are intended for cars and will not be used for joining gas pipes.
How to properly make attached chimneys for potbelly stoves:

Important. The chimney pipe going into the wall or ceiling must be insulated with non-flammable basalt insulation. The best option– use a sandwich.

Laying the internal chimney through the ceiling is done in a similar way. The difference is that the condensate collector is located indoors, and the passage through the roof is sealed using a special chimney lining (master flush).
The specific operation of potbelly stoves with low efficiency makes it possible to reduce the total height of the pipe installed above the flat roof to 3.5-4 m one-story garage. There is no wind support zone, since there is no ridge or slopes, and heating of the exhaust gases to a high temperature creates sufficient natural draft. How this is implemented in the garage, look at the video:
In conclusion - how to increase the efficiency of the furnace
A chimney made wisely can increase the efficiency of any potbelly stove. There are several ways to remove the heat from hot combustion products and reduce the heating of the pipe:
- the simplest one is to organize airflow open area single wall pipe fan;
- turn horizontal section the gas duct is inclined and laid along the entire room;
- weld an air heat exchanger, connect a turbine to it and install it on the chimney;
- make a samovar-type water heater and install radiator heating.
The latter method allows you to solve the main problem of such stoves - heating the adjacent room. It is important here to ensure constant movement of water through the heat exchanger using circulation pump, otherwise the coolant may boil.

Design engineer with more than 8 years of experience in construction.
Graduated from Eastern Ukrainian National University them. Vladimir Dal with a degree in Electronics Industry Equipment in 2011.
Related posts:
