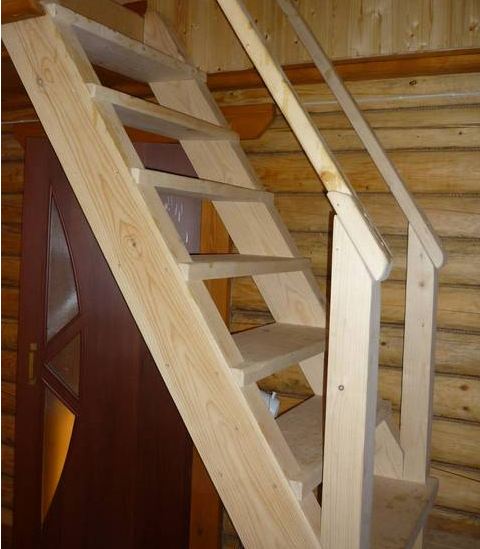
Let's consider such a simple and unpretentious thing that is found in every home like an attached wooden staircase. Many people make it themselves, and almost everyone has encountered a situation where it failed.
Most makeshift stairs are unsafe. It’s good if the crossbar comes off and your foot slips onto the next one below. But in many cases, falling from a height can cause serious injury. To prevent this from happening, let's look at how to properly make a ladder with your own hands from wood.
What are the parts of the stairs called?
To make it easier to cover the topic, we will present the generally accepted terms that denote its details.
There are only two of them:
- the rungs on which we step or grab with our hands are called steps;
- the long bars to which the steps are attached are bowstrings.
Attention. It is more correct to climb the stairs holding your hands not on the steps, but on the bowstrings. Although a ladder is used by one person, many fire escapes have the same design. When in an emergency situation several people move up the stairs one after another, the one who holds on to the bowstrings does not risk falling, because his hands will be crushed by the one above.
Why are most stairs done wrong?

Almost every wooden staircase is constructed as follows:
- Find bars and slats or even poles of a suitable cross-section.
- Cut the material to size.
- Everything is knocked together with nails.
The worst option is shown in the photo above; usually everything looks more beautiful. This is a dangerous and wrong approach. The nail holding the step in place can break down from time and corrosion, or be forced through the wood, causing the joint to fail.
Fastening with several nails or using screws or through bolts with nuts does not save the situation. Also, if the section is chosen incorrectly, or the material is defective, then the step or string, especially on a long staircase, may break.
Requirements for stairs

Wooden stairs used in production must comply with regulations.
Here are the names of several of them:
- SNiP 12 – 03 – 2001: Occupational safety in construction.
- POT RM-012-2000: Rules for labor protection when working at height.
- GOST 24258 – 88: Specifications for scaffolding means.
Let’s not invent anything new; we will apply them to our home construction. Our wooden extension ladder, drawings and materials for it, and assembly method will fully comply with them. Let's list the main requirements.
Material requirements
- Steps and strings of stairs must support a weight of at least 120 kg.
- Elements of stairs are made from pine, as a last resort, the steps can be made of hardwood (birch, beech, ash, oak).
- Fiber inclination of more than 7% is not allowed.
- The wood must not have any defects violating its strength characteristics - cracks, knots sawn along the axis, curls, resin pockets. Bowstrings should not have core tubes.

- The staircase elements are made from whole pieces tree. As an exception, manufacturing from planks glued along the entire length is allowed. At the same time, the laminated veneer lumber should not be inferior in strength to solid wood, and should not have delaminations and swelling at the joints.

- External surfaces must be sanded and not have any irregularities or burrs.
Design requirements

- Wooden stairs are not made longer than 5 meters.
- On the upper outer edge of the steps rectangular section a chamfer of at least 2 mm must be removed.
- The strings must be tied before the first and after the last step, as well as every 2 meters in length, with steel ties with a diameter of at least 2 mm on nuts and washers.
- The minimum cross-section of steps is 2x4 centimeters.
- The step pitch is no more than 0.35 meters.
- The steps and strings are assembled into a tenon. It is allowed to connect with metal fasteners, with the steps deepening into the grooves selected in the staircase array. When assembling into a tenon, glue that is resistant to moisture is used.


Safety requirements
- There should be no protruding wood or metal elements, all parts are buried flush.
- If the ladder rests on the ground, then a frame with metal spikes is installed at the bottom of the strings to prevent slipping. For the same purpose, for working on hard surfaces (concrete, parquet, ceramic tile) rubber shoes or pads are installed at the bottom.
- When supporting the upper part of the ladder on pipes or similar parts, metal hooks are installed at the top to ensure reliable fixation and prevent tipping.

If you meet all these requirements, then your ladder will be reliable - but be sure to also carry out a test (we will talk about the method below). But if you have the desire and ability, you can additionally carry out a design calculation.
Calculation of staircase strength

We will try to make our calculation instructions understandable even to people without technical education who are not familiar with the basics of strength of materials and theoretical mechanics. We present the terms, but this is so that it is clear to specialists (or so that they do not swear). Simply, take your measurements for calculation. We perform the following steps.
Preparing the initial data
- We determine what our wooden extension ladder will look like with our own hands; it is not necessary to make drawings; sketches (sketches or, as engineers call them, “kroki”), which will have all the dimensions, are enough. We get a section of steps of 3.5x5 cm, length 50 cm. Section of strings 4x9 cm, length 240 cm.

- For pine at a humidity of 15% (average value in normal conditions operation) the tensile strength is assumed to be 100.8 kgf/cm2 (10.08 MPa). If other breeds will be used, this value can be found in reference books or on the Internet.
- The modulus of elasticity of pine wood is 100,000 kg/cm2.
- We accept the load that we will apply during testing and that is required by the standards (the average person is much lighter) - 120 kg.
Calculating the steps

- We calculate the gross moment of resistance; for this we multiply the width of the section of the step by the square of its height and divide by six: 3.5x5 2 /6 = 14.58 cm 3.
- We calculate the maximum bending moment. To do this, divide the static load (weight) by eight and multiply the resulting number by the difference between the double length of the step (50 cm) and the subtracted length of the section on which the load is applied (this section is equal to the width of a person’s sole 10 cm): x(2x50-10)=1350 kg x cm
- We determine the design bending stress by dividing the maximum bending moment by the gross moment of resistance: 1350/14.58=92.59 kgf/cm2.
The resulting value is 92.59 kgf/cm2, less than the tensile strength of pine wood 100.8 kgf/cm2, which means the step will withstand.
Calculating the bowstrings
For bowstrings, the load is applied pointwise, at the place where the step is attached, and we also take only half the weight of 60 kg (two strings).
- We calculate the gross moment of resistance: 4 * 9 2 /6 = 54 cm3.
- We calculate the maximum bending moment: = 3600 kgf x cm.
- We determine the design bending stress: 36000/54 = 66.67 kgf/cm2.
It also turned out to be less than 100.8 kgf/cm2, which means our bowstrings will not break. It is also advisable to additionally calculate the deflection; for steps it is insignificant in any case, but for bowstrings it is important.
- To do this, we calculate the moment of inertia cross section. It is equal to the width of the section multiplied by the cube of the height and divided by 12: 4x9 3 /12 = 243 cm4.
- According to SNiP, it should be greater than that determined by the formula: . In this formula: P - applied load (60 kg), L - length (240 cm), E - elastic modulus - 100,000 kg/cm2. We consider = 108 cm4.
243 cm4 is twice as large as 108 cm4, which means the deflection of our bowstrings complies with SNiP.
Making a staircase

Once we have determined the requirements for a safe ladder, determined its dimensions and even calculated it, we can begin manufacturing. We will need a minimum set of materials, the price for which is also low.
- Beam for steps and strings.
- Wire for ties or, better yet, long studs with ready-made threads.
- Nuts and washers.
- Rubber shoes, pieces of rubber or finished parts for binding the lower part with spikes. If hooks are needed on top, then so are they.
- Screws.
- Glue for assembly.
- Drying oil and paint.
You can also get by with a minimal set of tools, especially if we already have timber the required section, but it’s more convenient if it’s nearby a circular saw And planer. We need:
- Equipment for marking - pencil, ruler, tape measure, square.
- Hacksaws for wood and metal.
- Plane.
- Mallet or rubber mallet.
- Chisels and chisels, or better yet milling machine for wood.
- Drill.
- Spanners.
- Dies with a collar.
- Sandpaper.
- Brushes for applying glue, drying oil and paint.
Let us describe the manufacture of a wooden ladder with our own hands according to the operations:
- We process the workpieces to the required section.
- Using a plane or machine we make their surface smooth.
- We mark the required length of the bars, and if our staircase narrows slightly at the top, take into account that the steps will be of different lengths.

- We cut the material to size.
- We mark holes (if assembled into a tenon) or niches (if assembled with notching) for the steps in the strings. At the same time, if we are going to install the steps into a tenon, then there are two options - cutting them into the bowstring over the entire cross-sectional area (easier and faster) or making a slightly smaller tenon (more labor-intensive).
- If we plan to embed steps into a tenon not with the entire cross-sectional area, then we prepare tenons for them. This is the most labor-intensive and time-consuming process. It is necessary to remove material from the step bars strictly in accordance with the shape of the holes on the strings; the process becomes more complicated if the staircase has a variable width (tapers at the top). The easiest way to do the job is to use ready-made holes on the bowstrings as templates. Be especially careful with this operation; the tenon must fit into the hole without play.
- We join the steps with strings. If we make a cut into a groove, then we install them in the grooves and fasten them with screws or nails. For reliability, we use two fasteners for each joint. Additionally, you can coat the joint with glue. If we assemble it into a tenon, then we immediately install the steps into one string (with glue, in addition you can also use a nail or screw, the main thing is that it does not split the material). Do not place blades, fabric or other material for a tight fit. If the tenon fits in with a gap, then we redo it. When the steps are glued into one string, we join them to the second string in the same way.
- After joining the steps with the strings, we drill holes for the ties, and their diameter should match the diameter of the wire or pins. Having drilled them out, with a drill of diameter equal size washers, on external sides string, select a hole to recess the washer and nut. Its depth is equal to the sum of the thickness of the latter.
- Cut the pins or wire to size for the ties. Using a die, cut a thread on the wire from both ends, turning it into a hairpin.
- To prevent corrosion, we paint or varnish the studs. This must be done in advance, because this part of them will be hidden in solid wood. At the same time, we do not touch the thread.
- We install the ties in place. We place a washer under each nut. We tighten, controlling the force, so as not to push through the wood and not to create excess pressure on the steps (the main task of the ties is to prevent spontaneous spreading of the bowstrings).
- Using a hacksaw, remove the protruding parts of the studs. We carry out the same operation with the ends of the steps. Additionally (not metal, of course) the joints can be processed with a plane.
- We install rubber shoes or pads, spikes and, if necessary, hooks. We fasten them with screws.
- We finally finish the surfaces with a plane and sandpaper(if you can use a grinder), you can use a scraper.
- We cover the surfaces with varnish or paint; the wood can simply be varnished.
Our ladder is ready, but in order to be sure of its reliability, you need to test it.
Video in this article:
Ladder test

In production, this operation is carried out with each staircase after production and every six months (it’s not a bad idea to do this at home), especially since the operation is not complicated.
- The ladder is installed at an angle of 75 degrees (plus or minus five), this is its working position.
- In the middle of one of the steps of the middle part, a static load of 120 kg is applied (a load is hung). Moreover, it should be suspended through a rigid pad covering 10 centimeters of the width of the step (simulating the load from the foot).
- Inspect the stairs.
If there is no loss of strength and no damage is visible, the ladder is considered to have passed the test.
Advice. In production, the test results are recorded in a special journal. It indicates the test date, inventory number, unit affiliation and the date of the next test. The record is certified by signature responsible person. Please take this into account if you are responsible for the safety of your subordinates at work.
I hope in our article we have given a comprehensive answer to the question - how to make a wooden ladder with your own hands? A staircase made in accordance with our recommendations will be truly reliable and safe. Enjoy working on it.
Today, most private houses are built on two or more floors. On this basis, the question arises about the need to move around the house, or rather, build a staircase. For such a structure you can use various materials both traditional and exclusive. But many owners country houses in order to save money, they are interested in how to build a staircase with their own hands.
Types of wooden stairs
The first thing to consider when developing a project drawing is this is the size of the staircase landing. Also, when choosing a design, you need to take into account the cost of materials, the ease of use of the structure (during descent and ascent), especially if it is installed for daily use. It is also necessary to pay attention to the aesthetics of this structure, since it must fit into the style and interior of the rooms. Wooden stairs are divided into two types - marching and spiral. In order to choose for yourself which one is better to install, you need to understand the pros and cons of each of them.
 Screw designs have quite complex shape, but their main advantage is that they take up minimal space, which is especially important in small house. It should be noted that such stairs are installed quite rarely when compared with marching ones. This is due to the fact that they are difficult to install and operate. Especially if you are lifting large equipment.
Nevertheless, such designs have many fans. Spiral staircases can become a real elegant element of the interior. Plus it's compact.
When installing screw structures, you need to carry out exact calculations, since making a small mistake during installation can lead to many injuries in the future.
Marching structures
Such buildings differ more high stability and strength than screw ones. But screw designs take up a lot less space, than marching ones, they are installed less often.
Mostly in private houses, structures with one or two flights are installed. But in principle there could be more. They also have a lot variety of options designs.
To save space marching structures installed on two flights, and the second part can be rotated to the first from 90 to 180 degrees. When planning, the main goal is to create comfortable conditions use of such a design.
Sometimes, for convenience, curved marching stairs. Smooth turning is ensured by installing corner steps. Such steps can also be installed on two-flight structures instead of a platform between them.
Single-flight wooden
 Single-flight design- the most popular option among owners of private houses and not only. The staircase can be located either in the middle of the room or near the wall.
The area under the single-flight structure is also put to good use. For example, if you install a partition and put a small door, you will get a functional utility room for storing things and tools.
It should also be noted that the advantage is the greater strength of such structures, since they have additional support in the form of walls.
Rotary step design
A single-flight staircase with rotating lower steps is usually installed to highlight the interior or due to the specific layout of the room. For example, if there is a window installed on the wall near the future staircase and you don’t want to cover it with a two-flight structure.
At the right approach not only to the design, but also to the interior of the room, turning steps will give the room elegance. At the same time, their functionality is not lost at all.
Two-flight simple
A staircase that has two flights and a turning platform between them, is often used when there is a need to install such a structure above front door, thereby significantly saving space. Moreover, it is very compact, and a closet for storing things under it can also be made.
Wood is rightfully considered the most popular material for building such structures. Before you start installing a wooden staircase, you need to think through some possible nuances. First of all, you need to decide on the type of structure.
 Eg, spiral staircase takes up much less space. But the downside is the complexity of producing and installing such a staircase. Moreover, it is very inconvenient to move along such stairs, since they are quite narrow and it is difficult for a “large” person to climb and descend along them. And there can be no talk about transferring any equipment at all.
One of the most popular types of stairs in private households is the flight of stairs. Making a wooden staircase with your own hands is not difficult. They are very comfortable and spacious. Structures of this type come with one or two spans, but there is no fundamental difference in the construction technique.
There are also a few things to consider:
- How much space in the house is the owner willing to allocate for installation.
- What is the distance between floors?
- What kind of load does it have to withstand every day?
- What elements will the structure have, its height, width, length, etc.
After determining the shape and type of structure, it is necessary to prepare all materials for work. In order not to overpay for extra purchased material, you need to carefully consider the design and make an accurate drawing.

Don't forget about the clearance above the stairs. When a person of average height walks along it, he should not bend down or hit his head on the ceiling.
Having measured all design parameters and made drawings, you can proceed to the purchase and preparation of all necessary materials. For such structures, you can use wood of different species. Craftsmen generally recommend using oak, beech or larch. But these types of wood are very expensive. More economical option - coniferous trees. Moreover, they also have sufficient strength for such work and are easy to process.
When purchasing basic material, you must pay attention to its quality. There should be no rotten parts, fallen knots, cracks or various deformations. The wood must also be well dried. Knots on the tree are allowed, but not in large quantities. Such a tree is considered second-class. Furniture cannot be made from it and it is better to recycle it.
For installation you need:

In addition to the materials, you must first prepare the necessary tools:
- Measuring tools (tape tape, corner, construction ruler).
- Drill for making holes (you can use a battery-powered one).
- Hacksaw for wood and metal. Alternatively, you can use an electric saw and jigsaw.
- A set of screwdrivers or a screwdriver with different attachments.
- Chisel and hammer.
- Sandpaper.
- Plane.
A previously made drawing should always be near the construction site in order to be checked and not make mistakes.
The next step is to install a wooden staircase with your own hands. Step-by-step instruction necessary for correct and consistent assembly. When the drawing is in hand and all the materials and tools are ready, then work on assembling the structure can begin.
The following steps must be followed:

At this stage the assembly is complete. All that remains is to cover everything with a layer of varnish or paint. Before painting, you can apply a ball of antiseptic to protect against pests. If you want to make a staircase in wooden house, then this can also be done easily. The main thing is to follow the correctly prepared drawing, select quality materials And necessary tools. Next, put in a little effort - and a chic, comfortable and necessary element of the interior is at the disposal of its owner. A staircase will decorate your home and make life easier.
Detailed and simple diagram for standard stairs to the second floor.
Are you planning to build a private house on two floors or more? We recommend that you immediately plan what the staircase will be like. And we will help with this - in this material described in detail about the types for cottages, dachas and private houses, design requirements. Also, with the help of diagrams and drawings, we will use an example to explain how a staircase is calculated and built. The design is quite simple - it cannot be compared with a roof, so even an owner with only minimal construction skills can make it. We will tell you how to make sure that instead of a wooden ladder you don’t get a stepladder. By studying the drawings and diagrams, you can make a high-quality design.
Kinds
In private homes, two types have been used for centuries, which we will briefly consider:
- Marching. This option is the simplest to implement, and the design is reliable. If a beginner gets down to business, then a marching wooden staircase will be great solution. The design can also be divided into single-flight and double-flight. Despite the differences between these types, their manufacturing complexity is the same.
- Screw. The work is for professionals, as it requires careful measurements and calculations. One miscalculation can ruin the entire structure, so only a master can do it with his own hands. The main advantage of this design is its compactness, because the design occupies a minimum amount of space in the house. Often, a spiral wooden staircase is the center of the interior composition. The only negative is the rather steep climb, which has a negative impact on safety.
Of course, we will dismantle the staircase, although we recommend that you familiarize yourself with screw options. It’s easier to do the marching version with your own hands, for which there are drawings.  Another disadvantage of a spiral staircase is that it will be inconvenient to carry large objects from one floor to another.
Preparation of materials and work features
Before you think about building it yourself, you need to draw up or take ready-made drawings, as well as prepare tools and materials for the staircase connecting the second floor to the first.
Let's start with the materials for building the structure on the second floor:
- screws;
- thick boards, which will later turn into steps;
- bars - the cross-section must be at least 40 millimeters.
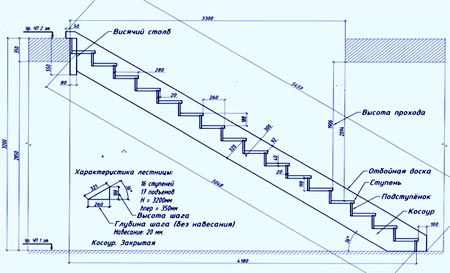
It is impossible to complete the work without a drawing; the image below shows in detail what needs to be measured so that the dimensions of the future structure can ultimately be calculated.
It is also worth considering the following dimensions when planning a structure for the second floor from the first:
- angle of inclination of the stairs;
- width;
- height of the entire structure;
- number of steps.
If you have skills in working with a 3D editor, then you can do detailed diagram. For example, the project will demonstrate whether a ladder can be made into a stepladder. It is also recommended to study the drawings.
Blueprints
 The simplest drawing a flight of stairs to the second floor, which the owner can make with his own hands. The drawing shows a rather large structure, but sometimes such a staircase leads to the second floor.
 Knowing the distance between floors, you can calculate the number of steps. For example, the height from floor to floor is 290 centimeters, the steps are chosen to be 20 cm each. After some simple calculations, the result is 14.5 steps. It is necessary to round to 14 or 15. In the first case, the height of each step should be 20.71 cm, and in the second - 19.33 cm.
The example uses integers - the height of the stairs to the second floor is 260 cm, each step is 20 cm long, resulting in 13 of them. As for the dimensions flight of stairs, then its width should not be less than 70 centimeters. The slope can be anything to the greater side. In the example discussed in this article, the flight of stairs is 1 meter wide.
It is also worth considering the platforms that will be below and above. The dimensions must correspond to the dimensions of the flight of stairs. Ideal shape will be a rectangle or square.  These are the most simple circuits for the manufacture of a wooden staircase to the second floor. The main thing is to choose a comfortable angle of inclination so that you don’t end up with a stepladder.
The most reliable option is a straight ladder. The U-shaped option is suitable for private houses with a large area. A beginner is unlikely to master the L-shaped design.
Choosing an installation method
The design of the future staircase may include:
- Bowstrings. This word refers to beams that support structures on both sides.
- Stringers. The second option is beams that hold the steps of the stairs from below.
Installation
When the steps, platforms and beams are ready, you can proceed to installing the stairs yourself. The example considers the option with stringers. It is necessary to make notes in advance for the location of their installation. On the floor of the first floor, stringers are installed on a support beam. Where the staircase meets the second floor, support members are placed in gaps in the floor beam. In some cases, metal supports are used to serve the same purpose. The stringers are fastened using anchor bolts.
During the installation process, you should always have at hand building level, you can also determine the position by the body kit, so that in the end you don’t end up with a stepladder. Elements wooden structure must be installed perfectly level. The tread panels need to be secured on top of the stringers; this is most conveniently done with self-tapping screws. 
Are the steps ready? This means you can begin installing balusters on the floor. At the top and bottom of the structure, support posts are mounted that limit the handrails. They are also decorative and supporting elements. 
Now installation:
- Finished balusters must be covered with handrails (railings), which are mounted on support posts. If the structure is large, then additional support in the middle of the stairs will not hurt.
- Sometimes 3-4 racks are required. In this case, you should not waste energy on balusters, since even boards will be a more rational solution.
- After the build is complete wooden surface needs to be sanded thoroughly. You can do this with your own hands or using a power tool.
- Further preparations are underway Before painting: all debris and dust are removed, it must dry completely. If necessary, putty is applied after sanding. Of course, this job requires wood coatings.
- When preparatory work completed, you can paint the wood elements. A primer is applied, and then 1-2 layers of paint. After drying, it is necessary to coat the structure with varnish. As an alternative, you can use stain.
In the end it turns out comfortable staircase, with which you can comfortably and safely climb to the second floor. If the angle is calculated correctly, then there will be no stepladder.
Sooner or later, they think about the issue of expanding the space and organizing the second floor in the building, be it or completing the construction of a full-fledged additional tier. In this case, you will definitely need steps leading to top floor, will help to install this necessary item efficiently and safely.
Details and names of elements of a wooden staircase to the second floor of the house
Become the choice of many. It is not surprising, because they are aesthetically attractive appearance and are favorable in terms of pricing policy.
What are the advantages
Such designs have a number of advantages that open up ample opportunities to owners of private houses.

What are the disadvantages
It is worth considering the shortcomings of the material, which can be encountered due to negligence and insufficient preparation.

These are the most popular negative sides wood products. Nevertheless, knowing them, you can warn yourself and receive only benefits from the implementation of your plans.
How to draw a diagram of a staircase for your home yourself
If you want to draw a diagram with your own hands, you should know some features that you should definitely pay attention to. You need to have on hand:
- Roulette;
- A felt-tip pen or chalk, which will be used to make marks on the surface of the wall or floor;
- Pen or pencil;
- Paper;
- Ruler;
- Compass.
These accessories will be quite enough to make the necessary drawings for a wooden staircase in the house.
Step-by-step steps for drawing a drawing
When you get your hands on it and a person begins to draw drawings of wooden stairs to the second floor on a sheet of paper, you should proceed step by step:
Carrying out the steps step by step, adhering to the order, making a drawing of a wooden staircase will not be difficult.
What to pay attention to
When taking measurements, be sure to pay attention to the following factors:
Taking into account these details, there is a possibility of drawing up the most accurate drawing of the staircase leading to the upper floor.
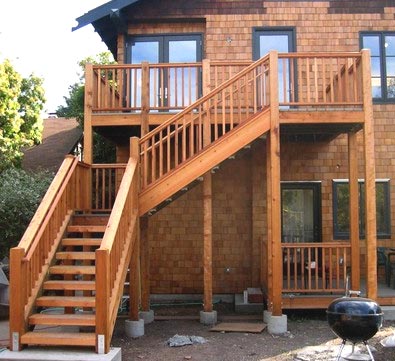
Wooden outdoor stairs
Of course, to climb to the top tier of the building you can use ladders, fixed to the base of the house. But this is unsafe and inconvenient. Therefore, if the entrance to the second floor level is planned to be organized not inside the space, but outside, then you should choose the design that best suits your preferences street stairs made of wood.
In this case, you need to adhere to some rules, since being in an open space, a wooden staircase is very susceptible to influences natural factors. That is why:
Advantages
Those who have decided to place a wooden staircase outdoors can note a number of advantages:

IN in this case Small errors are allowed, because the fact that the staircase is a little wider or longer plays a role in the house, and not outside it. Therefore, it is, of course, worth taking measurements, but in some indicators there is no need. For example, for the street there is no need to measure the space from the step to the ceiling, which must be done in the house.
This is not a complete list of advantages; each home owner will note his own. However, along with positive aspects There are also negative sides.
 Project of a street staircase to the second floor
 Flaws
- Exposure to natural factors;
- A wooden staircase outdoors requires careful maintenance.
Knowing the pros and cons, each home owner will be able to independently determine for himself whether to rely on installing stairs on the street or not.
If a private house has more than one floor, you cannot do without a staircase. But besides the fact that it must connect the floors, the staircase must also fit into the interior. Therefore, when choosing a design, you need to pay attention not only to the dimensions and how much space it takes up in the room, but also to take into account the style. Then a hand-made staircase to the second floor will not only be a functional item, but also an interior decoration. The work is difficult and responsible, but you can do it.
Types of stairs to the second floor in a private house
All these structures can be made of metal, wood, concrete, glass, marble and others decorative stones, and often use combinations of these materials. But most often, the staircase to the second floor is made from wood, a little less often - from metal or combinations of metal and wood.
In addition, there are two types of degrees - open and closed. In open stairs there is only a horizontal part - the step itself, in closed ones - there is also a vertical part - the riser.

Design standards
When designing a staircase, it is important to make it comfortable and safe. There are very specific numbers and recommendations that relate to the parameters of the steps and the general angle of elevation:

The number of steps is determined by simply dividing the height of the planned staircase by the selected riser height. For example, the height of the room is 285 cm. It was decided to make the elevation angle 40°. From the table we see that the height of the riser is 19 cm. Divide 285 cm / 19 cm = 15 steps. If the number turns out to be even, we slightly adjust the size accordingly to get an odd number.
If one of the steps turns out to be several centimeters smaller, this height is “taken away” from the first step. All others, including the last one, should be the same.
When choosing the size of the steps, comfort can be checked. If the double height of the riser is added to the selected step width, the result should be from 60 ms to 64 cm. The second test option is that the sum of the lengths of the tread and riser is optimally equal to 45 cm, but deviations of 2 cm in both directions are acceptable.

All these parameters must be taken into account when designing a house. If the house has already been built, you have to proceed from what is there and adjust the dimensions to the existing dimensions.
Spiral staircase
As already mentioned, a spiral staircase in a private house takes up the least amount of space. But it has a serious drawback: it is uncomfortable to walk on, and it is almost impossible to lift anything bulky to the second floor. So they are not very popular, although they look good and fit well into any interior.
Calculation features
When designing a spiral staircase, it must be taken into account that in some positions there are other steps above your head. Therefore, it will not be possible to make small risers.
The next feature is that the steps are all unequal in width - narrower on one side, wider on the other. The narrow part is attached to the central support (post), the wide part is attached to the walls or balusters. The standard for the width of the tread is measured in the middle part, and the wide part should not be more than 40 cm.
The span width is from 50 cm to 100 cm. The entire structure is doubled - a square with a side of 100 cm to 200 cm is required.
Prefabricated column design
This type of spiral staircase is the easiest to make: a pipe is placed on which wooden elements- steps, intermediate cylinders, etc.

If we look in more detail, then except metal pipe(in this case with a diameter of 40 mm), steps and balusters (available in any design) there are turned wooden cylinders (segments) that set the distance from one step to another.

On the other hand, the distance between the steps is maintained using cuts on the balusters. The steps are attached to these grooves (with glue + fasteners).

Do-it-yourself installation of a staircase to the second floor begins with the installation of a pillar. A hole equal to the diameter of the pillar is made in the floor of the first floor and the ceiling of the second. We insert the pipe into the hole, put on the enlarged washer, and tighten the nut. Further assembly is simple: the corresponding elements are mounted on the rod, and in parallel with the installation of the step, a baluster is placed and secured. The dimensions of the steps for this spiral staircase with the given parameters are in the drawing.

The steps are cut from laminated boards or furniture board. You can use solid wood, but of furniture quality, that is, without any defects and dried, with a humidity of no more than 8-12%. Although laminated wood is considered more reliable: it will definitely not be damaged and will not crack when dried.
Assembly example similar design look in the video. It has a prefabricated pole, but you can also use a solid one, although assembling the steps will be inconvenient - you will have to climb the stairs every time.
The design of a metal spiral staircase is presented in the following video fragment. For those who are familiar with welding, this option will be easier.
Spiral staircase to the second floor: photos of interesting options
With or without railings - the choice is yours. In the photo on the right, a wooden spiral staircase on a bent stringer is a difficult element to execute. Forged twisted staircases are a classic of the genre.
Marching staircase to the second floor
Marching stairs are the most popular. Firstly, they are convenient to use, and secondly, the technology for their construction has long been proven. There are few specific features of the calculation. It is important to decide on the number of marches. One section should have from 3 to 15 steps. The most convenient ones have 11-13 pieces. If according to calculations it turns out that there should be more steps, they are divided into several sections, between which platforms are made. The dimensions of the platforms are multiples of the step length (600-630 mm). Then the ascent and descent will not cause inconvenience.
Kinds
Stairs with landings take up quite a lot of space. If there is not enough space, turns are added. The most common option is to place the staircase at the corners of two adjacent walls. Also, to save space, you can make winder (turning) steps instead of a platform. Just one point: the section with winder steps is the most dangerous. If the family has small children or elderly people, it is better to make a playground.

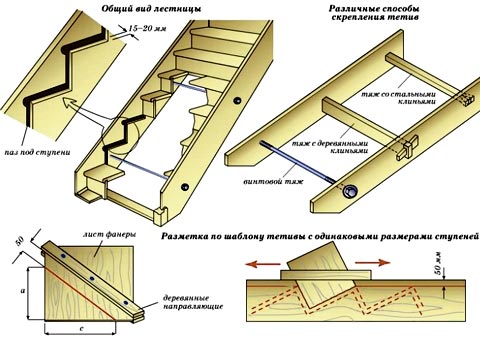
As we have said before, flight stairs are made on stringers (beams with a sawtooth edge) and on terives (just an inclined beam). Attaching steps to string beams requires more time and skill. Usually, a “seat” is cut out for each step - a groove is selected in the board. For additional reliability, bars are also nailed from below or corners are installed. The option with corners is reliable, but quite controversial from an aesthetic point of view. If the entire staircase is made of wood, metal parts are very “cutting” to the eye. Carefully processed bars look much more organic. However, if the boards for the steps are thick enough and the string is wide enough, you can do without additional fasteners. In this case, it is important that the steps do not bend, otherwise they may jump out of the grooves.

Assembling steps on stringers is simpler: you have two or three supports to which parts cut to size are attached. The main task is to correctly mark and cut the stringers.

This is a staircase on stringers - one of the fragments of the assembly
Installation of a flight of stairs with step-by-step photos
Stringers are made from wide board 75-80 mm thick and 350-400 mm wide. If there is no solid dry board, you can use glued ones. How to calculate the stringer is described in the form, but you can assemble the staircase to the second floor not only as a free-standing one.
An example of assembling a staircase on stringers against a wall is below. First we fasten support pillars, on which they will rely winder steps. We attach the upper stringers to these pillars.

Then we install the lower ones. We attach the stringer near the wall on top decorative board— it’s easier to clean and dirt is less visible than on the wall.

We attach the lower stringers - one to the post, the second to the finishing board
Intermediate stringers are installed in last resort. This makes it easier to connect all the elements.

The installation of steps begins. After they are cut, sanded and painted, everything is simple: put them in place, drill a hole for the screw, then tighten it.

The next step is attaching the balusters. In this case they are made of stainless pipe with wooden inserts. A hole is drilled under each baluster into which a tube is inserted and fixed with a pin or any other available method.


Photos of interesting marching stairs to the 2nd floor
Metal and glass - interesting combination Interesting idea, and at the end there is a pantry