Is it possible to make high-quality wooden windows with your own hands? - It turns out that if you have the tools, skill and a detailed plan, it is possible, and in this article we will tell you how.
This material is specifically about handicraft production at home, about industrial production We talk about eurowindows in this article: .
Plastic windows are in great demand among consumers, but wooden windows and doors are a budget and more environmentally friendly option. Since it is not difficult to make a wooden window yourself, many people install them in their dachas. The main thing is to understand how the window structure works. In order for the product to turn out to be of high quality, you need to follow the production technology, wood processing rules and assembly methods. And step-by-step instructions with a detailed description will help with this.
Drawings and work plan
Each construction and installation work consists of 3 stages: preparation, creation and completion of the work process. To assemble the window, select the most suitable raw materials and prepare carpentry tool. Do-it-yourself wooden windows are made using a diagram. The detailed drawing indicates general dimensions frames and the size of each individual part.
Calculate the exact cost of wooden windows from the manufacturer in
(Only for residents of Moscow and the Moscow region), send a request to calculate the cost:
Wooden windows are quite common in most residential buildings. This is explained, first of all, by the availability of materials used in the process of their manufacture. If the window opening has a non-standard shape, then the easiest way is to build the window yourself, and the master will choose its shape, number of sashes and fittings. We’ll talk about the features of making wooden windows further.
Wooden windows - features and advantages
In order to understand the features of wooden windows, we suggest considering their main advantages:
1. Aesthetic appeal of appearance.
The structure of the wood from which it is made is clearly visible on a wooden window. In addition, wooden windows fit perfectly into any type of exterior or interior. Most often, furniture made of wood and wooden doors, which harmonize well with windows made of wood. At the same time, wooden windows have high functionality and sophistication.
Windows made of plastic have an unpresentable appearance compared to wooden structures. Wood brings warmth and comfort to the room.
2. The ability to breathe.
Only wood has this function. It is the tree that is responsible for regulating a healthy indoor microclimate. Since wooden surfaces are capable of absorbing moisture when there is excess, and giving it away when there is not enough. The house, with installed wooden windows, has a comfortable and healthy atmosphere.
Windows made of plastic or other materials are prone to condensation forming on the windowsill or other nearby surfaces.
Due to the fact that wood breathes, there is a gradual circulation of air in the room. Even if you do not open the windows for ventilation for a long time, the air will be renewed through the micropores located in the wood. After a long absence from home, the air in the room will be fresh and renewed.
3. High durability.
Despite the fact that wood is a rather vulnerable material, especially to moisture or fire, thanks to the presence of modern compounds and impregnations, the quality characteristics of the wood used in the window manufacturing process are improving. Modern dyes and impregnations on a moisture-resistant basis ensure long-term operation of wooden window structures. In addition, in the process of using wooden windows, their original appearance is preserved. For example, plastic windows will require replacement after ten years of use; wooden windows do not lose their presentable appearance even after twenty years of use.
4. High level of strength.
The tree and its quality are assessed immediately during the purchase of materials. The strength of plastic windows cannot be assessed, since the metal profile is installed inside the structure. In addition, the option self-made wooden window allows you to choose a tree of such quality that will suit the owner of the window both in material and in operational terms. It is better to give preference to three-layer laminated timber with a minimum thickness of 70 mm. It is the application glue beam will ensure the stability of the window against external irritants and prevent its deformation.
5. Low level thermal conductivity.
This property is explained by the use of glue bars in the manufacture of windows. In addition, thermal conductivity depends on following the technological aspects of window installation.
6. Environmental friendliness and safety for human health.
This condition is the most important when choosing wooden windows. After all, wood is a natural material that does not emit any substances harmful to humans.
7. Ease of repairing wooden windows.
This advantage allows you to reduce the cost of repairing or restoring a wooden window. These types of windows are easy to maintain and repair.
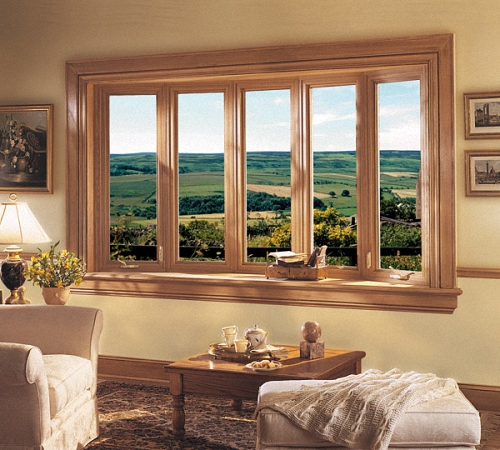
Wooden windows photo:
Installing a high-quality wooden window opens up such opportunities for its owner as:
- complete absence of drafts;
- high level of thermal insulation;
- good sound insulation;
- highly attractive appearance;
- choice of individual design;
- duration of operation.
Wooden windows technologies and varieties
In relation to design features wooden windows are:
- Russians;
- German;
- Finnish;
- aluminum-wood.

The first option is characterized by the presence of one separate wooden part. It consists of one box and two doors, each of them glazed. For the manufacture of the wooden part, solid pine is used, not wooden beam. Minimum thickness the sashes are 4 cm. The main disadvantage of such windows is their susceptibility to deformation. In addition, it is not possible to achieve complete adhesion of the sash to the window. Moisture that is outside the room gets onto the surface of the window sill. Double wooden windows are equipped with non-adjustable hinges and handles, so there is no ventilation mode in them.
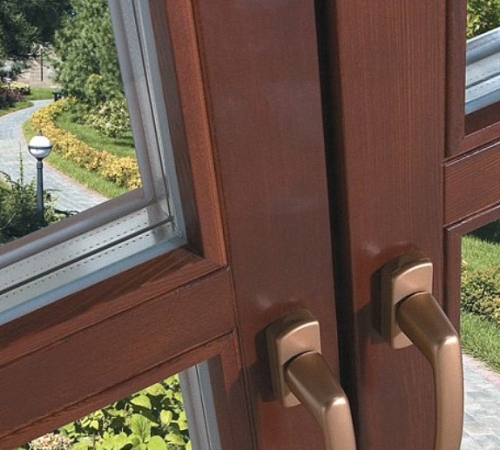
German windows are also called European windows. Since the fittings that are installed on them are of European origin. Such a window allows you to adjust the height and angle of the sash, it is possible to ventilate the window, and there are locking mechanisms.
A Eurowindow includes a window frame and a sash. The sash has a double-chamber double-glazed window, which perfectly prevents heat loss. To open the window, it only takes a little effort. In addition, the maintenance of such windows is quite easy, and for their production, laminated veneer lumber is used, the thickness of which allows you to make a multi-circuit seal that completely protects the room from drafts.

Such windows are characterized by warmth, reliability and durability. The service life of Euro-windows exceeds sixty years. This is due to the presence of glued three-layer timber, which is not prone to drying out or deformation.
There is an option to cover a wooden window with aluminum. This window is more long term operation and does not require constant painting.
Aluminum-wood windows require the manufacture of the supporting part of the windows from aluminum. The tree is covered with aluminum outside. Thus, the structural strength is improved due to the presence of aluminum, and the wooden surface creates an attractive appearance and warmth of the window. This type of window is practically not widespread due to high cost aluminum and the complexity of the work.
Finnish windows are distinguished by the presence of a wide frame and two sashes, which have a sequential opening type. One simple glass is installed on the outer sash, and a single-chamber double-glazed unit is installed on the inner sash. Both wood and aluminum are used to make the outer sash. The two doors are connected using a sequential opening mechanism. For the manufacture of window boxes and sashes are used solid wood, not laminated timber. The window has an attractive appearance, although compared to German windows, it is inferior in quality characteristics.
In addition, wooden windows are:
- blind - they do not have sashes, the window does not have a ventilation function, the price of such windows is much lower, since they are quite simple to manufacture; before installing such a window, you should consider the features of ventilating the room and caring for the external part window design;
- turning and tilt-and-turn - these types of windows have sashes that open into the interior of the room; they are quite popular due to their optimal cost and availability of ventilation;
- double-leaf mullion windows made of wood - with the help of an impost, several sashes are connected into a single integral window structure, this option is distinguished by reliability, ease of use and durability;

- bobbin double doors - the opening principle is the same as the previous version, only the first door has a rotary folding handle, and the second - without a handle, opening the second door is possible only if the first one is closed.
In addition, Swedish wooden windows stand out. They represent a combination of German Euro-windows with a Russian version of the window. This window has an outer frame with single glass and an inner frame with single glazing. This ensures a high level of sound and heat insulation.
Carved wooden windows are characterized by the presence different rose patterns that make them more attractive.
How to make a wooden window - main steps
Before you make a wooden window yourself, you should take care of preparing all the tools necessary for this in the form of:
- glass cutter;
- screwdriver;
- jigsaw or router;
- drills;
- hammer;
- chisels;
- square;
- roulette;
- rulers;
- planer
- glued laminated timber, pine or oak for the box;
- wood glue;
- glazing beads;
- self-tapping screws;
- dowels;
- sealant.
We suggest you study step by step instructions self-production of wooden windows:
1. Construction of the box.
Depending on the size of wooden windows, they are:
- large;
- average;
- small.
Before starting work, you should select the material for the window. The most optimal and inexpensive option- pine. Since this type of wood contains a large number of resin, then it is the most resistant to moisture and other external influences.
More expensive, but quality option- oak. Although for beginners it is better to choose pine, so as not to accidentally spoil the expensive material. The boards must be properly dried and free of knots, cracks, and deformations. Please note that the box is the main one load-bearing structure, which bears the entire load.
It is possible to use glue beams, which have higher strength characteristics and a long service life.
To build a frame, there are enough boards, 15x5 cm in size. A groove hole should be made in the workpiece, which will have the letter G and a depth of 1.5 cm. All parts are connected using wood glue, and then a wooden rod with a minimum length of 30 mm . It is the rod that is the element that acts as a retainer for all components of the box.
Next, the box is installed in a pre-prepared window opening. This procedure includes drilling holes in the wall, installing dowels in them, and fixing the box with self-tapping screws. Used to seal joints and seal cracks. polyurethane foam.
2. Construction of a window frame.
How to make a wooden window with your own hands drawings:
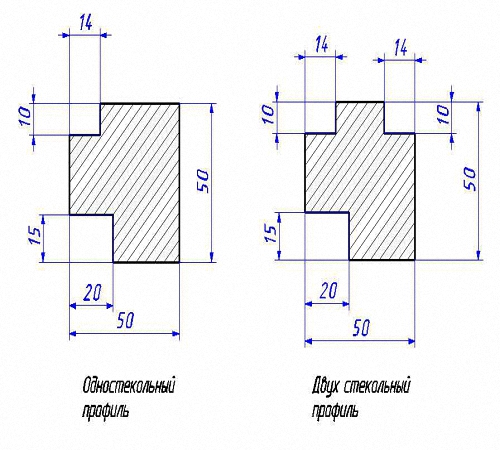
To create a frame, you need a beam measuring 70x50 mm. Although it is possible to adjust the thickness of the beam, depending on the size and strength of the window. The profile shape is determined by the thickness and amount of glass that will be installed in the window.
If you plan to install a single glass profile, then it is enough to construct two rectangular groove holes, otherwise more holes will be required.
To make a profile of a certain shape, you will need an electric planer or milling cutter. If the glass thickness is 5 mm, then a glazing bead 1 cm thick will be required.
When all the parts are prepared, the frame is assembled. To do this, you need to cut the board at an angle of 45 degrees. Using the prepared profile, a tongue-and-groove connection is provided, for more high level screws are additionally used for fixation. Please note that all caps should be sunk into the wood to improve the attractive appearance of the window and to avoid corrosion.
3. Installation of glass.
To ensure that condensation does not accumulate in the window and there are no cold bridges, you should correctly measure the length and height of the glass that needs to be installed in it. The minimum error when taking measurements is 1 mm.
It is better to use a diamond screw to cut glass, and fine-grained sandpaper to polish the edges.
In addition, you should follow all safety measures, namely, wear gloves made of thick fabric so as not to injure your hands from shrapnel and wear a mask that will protect your eyes from dust or small fragments.
A ruler with a small margin is placed on the glass. A line is drawn along it using a glass cutter. Next, the glass is placed on the edge of the table and broken off. The prepared blank is installed in the window; if it does not need correction, then the edges of the glass are lubricated with sealants and laid again. Next, the glass is fixed using glazing beads, onto the surface of which small nails are driven. If the width of the glazing beads is large, then it is better to use self-tapping screws to fasten them.

4. When studying the question of how to make a wooden window with your own hands, you should mention final assembly the entire structure. If the window has big size and is divided into two parts, then first the vertical beam is assembled and installed, then the sash is fixed with hinged hinges. Handles and other fittings are installed.
The installation work is completed by installing the finished window into the window frame, fixing it with screws that first pass through the surface of the frame and then through the wall. Polyurethane foam is used to seal all cracks, and after it dries, the walls are plastered. The installation of the ebb and window sill completes the work.
How to make a wooden window video:
To install new window frames, many people are accustomed to doing the same thing as everyone else - calling craftsmen who dismantle old windows and install new ones, most often made of plastic or aluminum. True, their significant drawback is quite high price and the need to use special equipment.
That is why many people ask the question: “How to make a window frame their with your hands? And what you need to do?".
Materials and tools for making a window frame
So, when choosing required material choose boards with a section of 5 by 15 cm or timber 5 by 5 cm.
You will also need:
- wood glue;
- window angles (metal);
- glass.
You will also need a drawing and some carpentry tools:
- saw;
- hammer;
- chisels.
After purchasing and preparing, we can get to work.
How to make a wooden window frame from bars with your own hands
To make it, it will be enough to have 4 strips, which will need to be connected into a rectangle. It is important not to forget to set the angle to 90°. To obtain the required profile, the frame is assembled from several similar rectangles with different widths.
Also, do not forget about accurate measurements, otherwise the weight may turn out to be skewed. In this extraordinary way it can even be made with a shaped profile.
This method is suitable for both fixed and multi-leaf windows, where there can be from one to three rows of glass.
If there is only one glass, then 8 plywood strips will be enough for you, which you will connect into 2 rectangles. And in order to secure the glass sheets, your second layer should be slightly smaller than the first.
When all the parts are ready, we fasten them with self-tapping screws.
Tools and materials you will need:

As you can see, anyone who knows at least a little how to work with a tool and has the desire to do something with their own hands can make a window frame with their own hands.
Down with laziness and forward to new achievements!
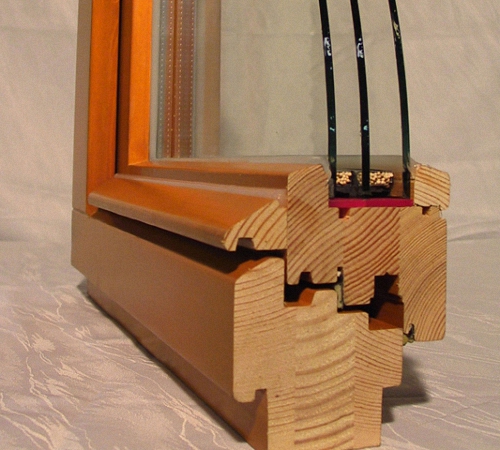
The first association that arises when you mention Euro-windows is single-chamber or double-chamber PVC structures white. These are the windows that are installed in most apartments and private houses, replacing outdated frame structures. Alternative plastic windows, inferior to wooden ones in terms of environmental friendliness, but superior in performance characteristics - Euro-windows made of wood. Their parameters are impressive, their appearance is up to par, and they are environmentally friendly. Unlike a plastic one, a wooden window frame with a proud “euro” prefix can be made independently. Making wooden windows with your own hands is a common thing for many FORUMHOUSE users.
DIY Eurowindow
Eurowindow - what is it and how is it done?
Eurowindow is a structure consisting of a frame, double-glazed windows and perimeter fittings controlled by a handle.
Perimeter fittings are a prefabricated harness made up of several parts mounted along the entire perimeter of the profile. It provides locking of the sash at several points, using one handle, which allows you to achieve the tightest possible fit and eliminates blowing. Thanks to this fittings, a window with an opening sash can operate in two modes – tilt and turn. In the rotary mode, the window opens only by turning; in the combined mode, the window sash opens and tilts.
The fundamental design difference between the “euro” and regular windows- This is one frame in which several double-glazed windows can stand. Home of technical characteristics“Euro” – complete tightness achieved through various seals. Thermal conductivity will depend on the number of air chambers, and on the type of glass in the double-glazed window, and on the correct installation of the window. Therefore, the material from which the profile is made does not play a role; what is important is the functionality of the structure and its characteristics.
Eurowindows: do-it-yourself made of wood
The process of manufacturing a wooden euro-window will require certain financial investments - the cost of wood, components, equipment. Window double glazed windows It’s also easier to order from professionals, although some craftsmen manage to assemble this unit themselves. But also considering the impressive cost finished product, which is an elite and therefore quite expensive product, the savings will be substantial. If we are talking about building a new house or completely glazing an old one, the difference can be tens of thousands.

Do-it-yourself windows: step-by-step instructions
Windows are constantly exposed to external influences and temperature differences between indoors and outdoors, which inevitably leads to changes in the geometry of the structure when it comes to wood. To minimize possible warping, frames and sashes are not made from solid timber, but from glued. You can purchase a ready-made one if there are reliable suppliers, or you can glue it yourself. In the second case, a workpiece of at least three lamellas is assembled, so that the fibers are directed in opposite directions. If possible, choose radial sawn wood; tangential sawn wood “leads” more. For gluing, special, moisture-resistant compounds should be used.
The section of the beam is chosen based on the number of double-glazed windows - for a window with one chamber, a 6 x 4 cm beam is usually used. In production conditions, grooves are selected in the frame not only for the double-glazed window and external seals, but also for internal ones. One of the former manufacturers of wooden European windows shared his drawings, by simplifying which you can get high-quality structures that are almost as good as ready-made ones. In order to do this, the drawings are quite suitable.


Considering that not everyone has professional equipment, and its purchase will negate all savings and is justified only for the purpose of manufacturing windows for sale, home craftsmen choose grooves for double-glazed windows, external sealing and fittings.
For these purposes, use a router, a circular saw, hand tool for finishing. The participants of our portal are equipped with all the necessary equipment and Ravildon decided to make a window together with his brother (nickname Halvasenshi) for his house.
Ravildon FORUMHOUSE Member
We had hand tools, machines and other devices. We welded a table, attached a hand router to it, bought a microtenon cutter and a movable carriage, and decided to dial the profile in length and thickness. A purchased profile costs from 1,600 rubles for six meters, so we will trim the finished beam, glue it, and then increase its thickness.
Here's a pepelats they made: I had guides with carriages lying around, welded the frame, attached it to a movable table manual circular saw, the simplest impostnik turned out to be. The grooves are rectangular, so you can do without shaped cutters. The cutting depth is adjusted by a movable stop, the height by a set of plates and rectangular pipes. I cut the groove in five passes, changing the linings, and finished it with a file.
The brothers trained on waste, and the results were recorded in a journal so that in the future they could choose the most successful option. Once we got the hang of it, we started making the frames themselves.

Another of our forum members used ready-made laminated veneer lumber. The photos show this whole big process in detail.
cyan__ FORUMHOUSE Member
The purchased timber was passed through a thicknesser and a trimmer, on a circular saw with a homemade device (high rip fence with guides and 0.5 mm rulers) made tenons and a profile, glued them together, selected the fitting grooves with a router, hung the fittings - checked how they worked, removed them, sanded them for painting. There are no special tricks, but you either need to have experience in carpentry, or first make several throwaway frames - practice.
Since the double-glazed window is planned to be double-chamber, the total cross-section of the timber turned out to be 80 x 78 mm.

If equipment and experience allow, the frame elements are cut obliquely, at an angle of 45⁰; they can be joined without a bevel, which, although less decorative, is technically easier. The parts are assembled using a tongue-and-groove joint, with the vertical parts being lugs and the horizontal parts being tenons. It is easier to make a single joint, but a double joint is stronger and more durable, since the gluing area increases; a triple tenon is even stronger. When there is only one tenon, it is worth additionally strengthening the frame with a corner, since the double-glazed window significantly makes the structure heavier.

Our portal member cyan__ tells how to make a wooden window using a three-tenon joint.
cyan__ FORUMHOUSE Member
I made three tenons for myself and put them on PU D4 glue, on another glue and one tenon under the double-glazed window, I would probably put a corner. As a test, you can glue one corner and test it for strength and deformation, loading it along the hypotenuse with a mass of one and a half glass units. Then it will become clear whether additional reinforcement is needed.
Templates from the corner
Halva Sr. assembled a box of two lamellas to make it easier to select quarters and grooves for seals circular saw. Dried timber required thickness, neither solid nor glued, were not on sale at that time, I had to make do with material with a smaller cross-section. But the timber we found was dry, already jointed on all sides. The frames were glued onto a smooth fugue due to the lack of a comb of suitable width. To be on the safe side, the structure was reinforced with self-tapping screws - diagonally, from the edge to the center (the fastener heads will later be hidden by a quarter). After the final blowing with pneumatics, the finished frames were given to the eldest son for finishing - for putty

Windows made industrially are no better than so-called do-it-yourself windows - the photo confirms this.
The grooves for fittings in the sashes are selected based on its type and dimensions. To make his work easier, Halva the Elder did metal templates, according to which I chose all the necessary grooves, here step by step description this stage of work:

Halvasenior FORUMHOUSE Member
Before cutting the tenon and groove, I prepared the grooves for the locks - I made a template from a bent steel angle. The holes are 8 mm in diameter, the screw hole is 10 mm in diameter. First, mark the centers, then drill 8 holes - depth 26 mm. I set the stop and used a hand router to combine the holes into a groove, dimensions: depth 28 mm, width 8 mm. I did without length limiters - the boundaries of the groove can be felt to the touch.

A cut or rounded corner is covered with a thicker layer paint and varnish materials, than sharp, therefore, more resistant to all external influences. Forum member Sukhov76, who made wooden windows for himself, advises his own method.
Sukhov76 FORUMHOUSE Member
Instead of chamfering at 45⁰, it is better to round the corner by a radius of 3 mm - it looks more aesthetically pleasing and fits well under paint. Paints and varnishes are “afraid” of sharp edges, according to the law of surface tension, on sharp surfaces the paint layer is thinner, and according to the law of meanness, it is the edges that are the most vulnerable in operation, and the coating wears off faster, but on a radius the layer is even and is more difficult to damage.
The assembled window frames and sashes are sanded and treated with special impregnations, and then varnished or painted. In order for each subsequent layer to apply well and last a long time, all compositions used must be on the same base, water, etc. The glass in the frame is secured with glazing beads.
It’s not enough to make a window with your own hands - the video on our portal will teach you how to paint it correctly to protect the surface for many years!
For the second floor of his house, cyan__ also made wooden windows himself, using the technology already given. After the blanks were cut, grooves and tenon joints were selected, holes for fittings and frames were assembled, the final part remained - finishing and installing glass.
cyan__ FORUMHOUSE Member
Primed and painted the outer white side. Then, by sanding, I removed paint drips on the masking tape in a couple of places - the inner, translucent one. The stain is not paint; on the white side, if anything happens, it can be easily wiped off with a wet rag. I installed the glass on spacers and nailed the glazing beads - a copper nail every ten centimeters looks good. I sealed it with neutral (this is important) silicone; acidic silicone can destroy the sealant of the bag. I turned it over onto a sheet of foam rubber and sealed the reverse side, mounted the fittings, mounting plates and inserted it into the opening. The final stage I adjusted the sash and inserted seals into the grooves.

Making a wooden window with your own hands is an opportunity not only to save money, but also to express yourself. For many years, a beautiful, environmentally friendly design will remind you not of the money spent, but of your own skill.
Everything related to the technical parameters and features of Euro-windows, as well as step by step instructions, diagrams, installation details and product characteristics different manufacturers are discussed in the section. Details of the manufacture of the wooden windows mentioned in the article are laid out step by step in the topic “”. After studying the article about, you will learn how to obtain high-quality and durable timber for future frames. Our article will tell you how to properly install a window with your own hands, and the video will teach you how to properly install windows and hidden roller shutters. How without dismantling old frame replace wooden windows with your own hands - video about new technology answers this question.
Carpentry work on the manufacture of windows is considered to be one of the most difficult; considerable skill and understanding of window design is required. Do not delude yourself and think that a wooden window can be made on your knees with a couple of simple carpentry tools. In the process of making a window out of wood with your own hands, a carpenter has to spend a lot of time and effort preparing the material and making additional hanging elements, from glazing beads to awnings and fittings. Therefore, wooden windows simply cannot be cheap and at the same time high quality if they were made by hand.
How to make a wooden window
In addition, you will need equipment for cutting grooves, cutting chamfers and internal transitions, otherwise it will simply not be possible to make a high-quality wooden window. To build a window you will need:
- A circular saw;
- Wood milling machine and manual;
- Grooving and slotting machine;
- Hand drill, tape measure, set of carpentry clamps.
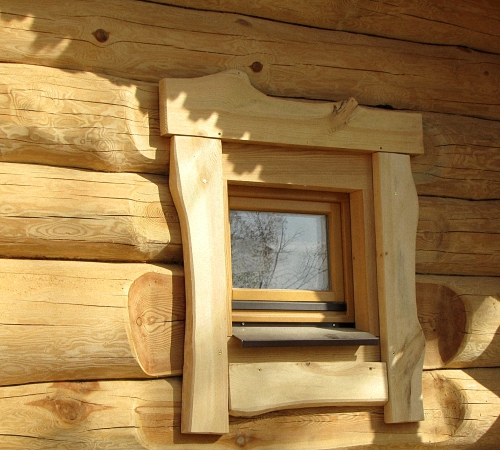
The window can be completely blind, for example, if you plan to glaze in a barn, garage or utility room. For residential premises, as a rule, a ventilation system is used using a window and an opening flap. General form The window device is shown in the photo. If you have the tools, equipment and prepared material, you can make the main part of the window frame in a day, if you have a clear idea of how to make a wooden window with your own hands and drawings for making the main parts.
For your information! In order to make a window with an opening sash, you must first prepare a set of awnings and two window locks.
It is clear that before making a window out of wood, it is necessary to take the dimensions of the window opening and the box into which it will be inserted. window unit. IN in this case a window will be made with an opening sash measuring 130x110 cm.

What is the best material to make a window from?
In order to make a wooden window quickly and efficiently, first of all you need to select quality material. Forget about oak, larch, Karelian pine, all kinds of options for making a window frame from laminated veneer lumber. In order to make a wooden window soundly the first time, you need to buy a well-dried pine blank without knots, without fiber defects and traces of damage to the wood by microflora or bark beetles.
To make a wooden window frame we will need:
- Three blanks, 115 cm long and 40x140 mm in cross-section, for vertical window posts;
- Two blanks 140 cm and cross section 40x140 mm for horizontal crossbars;
- Two blanks of 50 cm and two blanks of 110 cm, with a cross-section of 40x50 mm, for the manufacture of an opening sash.
For your information! All workpieces must have ideal geometry, without “propeller” or cracks.
If wooden blanks have been stored outdoors for a long time, before starting work, let the material sit and gain its original moisture content. Wood planks and the timber cannot be dried in the sun, in drafts or in a warm, dry room. It is clear that processing wooden blanks protective compounds you need to do it in advance, then put the material in line and dry it thoroughly. If possible, for the first experiment it is better to make a supply of blanks, since often due to errors it is necessary to redo or restore connections or entire elements of the wooden window frame.

The procedure for making a wooden window
If you have at your disposal necessary equipment, then cutting the material for a wooden frame on a window is quite easy to do in 2-3 hours; you will need a circular saw and a groove cutting machine.
The operating procedure is as follows:
- Quarters are stretched on vertical and horizontal blanks;
- Wooden beams are end-faced and cut to size for assembly;
- At the ends of the workpieces, an undercut is made gusset into the frame;
- A recess is cut out on the central cross member and the left pillar to accommodate the opening sash.
All that remains is to assemble the wooden window frame, make a window, install awnings and fittings. In order to install the awnings and make locks, you will need to spend at least 4 hours. About the same amount it took to make the main part of the frame.

We make a wooden window frame
The first operation of carpenters involved in the manufacture of wooden windows is called cutting quarters. In plain language, this means making rectangular cuts at the ends of the workpieces, which, after assembling the frame, will be used to install glass. The dimensions of the groove are 10x12 mm.

On the side vertical racks sampling must be done at the corners of the wide side of the beam facing inward of the frame. On the central vertical post, quarters are selected along all four edges of the beam.

This can be done using a circular saw, a hand router, or any end mill. If the wood is very dry, then before cutting the corner grooves, it is necessary to remove a small chamfer from the edges. This will avoid chipping.
After milling the quarters, it is necessary to trim the vertical posts and horizontal crossbars to size. That is, the vertical posts are cut to a landing size of 104 cm. The design height of the window is 110 cm. The thickness of the horizontal crossbars of a wooden window is 40 mm. In order to ensure that the vertical post is inserted into the upper corner horizontal beam, you need to make a 10 mm sample in it, the rest of the body is 30 mm. The same sample must be made for bottom corner and horizontal beam.
The vertical post must be installed in the upper and lower recesses on the crossbars. This means that the size of the rack is 1100-2x30 = 1040 mm or 104 cm. In a similar way, you need to trim the second side and B-pillar wooden window.

Let's make side cuts in the horizontal beams of the window for the sidewalls.

Everything is more or less clear with the side posts; all that remains is to choose a place for the grooves in the upper and lower crossbars for installing the central post, onto which the opening sash of the wooden window will be locked.
For the opening sash, we selected four wooden blocks, two 110 cm and two 50 cm. At the ends of the upper and lower horizontal beams, we already made 40 mm cuts. We set aside the width of the future sash from the edge - 45 cm.

On every cross beam make two cuts hand hacksaw to a depth of 10 mm and cut a groove 40 mm wide.

We assemble a wooden window frame using self-tapping screws.

We make an opening sash and install it on the frame
Unlike the frame, the wooden frame of the sash will be assembled using tongue-and-groove joints. This connection option will provide high rigidity frames and guarantees the absence of deformation and sagging of the sash. If you try to make it with self-tapping screws or even with corners, the sash will still deform and break the glass.
First you need to cut out the grooves in the horizontal sections with a milling cutter. Best suited for these purposes end mill or a groove cutting machine, but if they are not available, the grooves can be made manually with an ordinary chisel and mallet.

Tenons 40 mm long are cut out on the vertical posts of the sash. Before making the tenons, it is necessary to make a selection of quarters under the glass, as was done earlier for a large box.

We assemble the frame on tenons, having previously coated the joints with wood glue. After an hour and a half, the assembled sash frame is doweled and sanded along the plane of contact of the sash with the main wooden frame of the window.

The size of the sash frame is 50x1100 mm. In order for the sash to close into the window opening, it is necessary to cut a sample around the perimeter of the frame to a size of 1040 mm.

The frame of the wooden window sash is almost ready, now it easily fits into the main frame. All that remains is to make the awnings and install the locks. Small window hinges can be used as canopies, but their installation is quite time-consuming and requires careful cutting of secret grooves for the canopies. In addition, the strength of a conventional canopy for a heavy sash is not enough, and making three hinges will be unsightly. Therefore, barrels with pin fastenings are used as canopies.

You can install the barrel in a couple of minutes, but only if you have the appropriate device for drilling holes in the frame and sash. The problem with installing a keg is how to do it perfectly. precision drilling in a wooden beam frame at an angle of 45 o, drill diameter 6.8 mm, thread on the barrel - M8. There is no point in trying to do this by eye; it is better to spend an extra hour but achieve a high-quality result.
In order to make the device, you will need an oak block with a cross section of 40x40 mm. We cut off one edge of the wooden block along its entire length. The block is displayed on drilling machine and drills exactly diagonally.

WITH reverse side a quarter of 6x12 mm is selected along the edge of the bar. This is necessary so that the device fits tightly and rigidly on the edge of the sash and frame of the wooden window.
Before drilling the sash and frame, you need to make markings for installing the barrel. To do this, we put a mark on the frame for installing a canopy, step back up the rack by 13 mm and transfer it to the side of the sash along which the drilling for the mating part of the barrel will be done.

After drilling the holes, all that remains is to screw the screws of the barrel into the frame and into the sash, after which you can hang the sash on the installed canopies.


We cut in the handles and do the finishing
All that remains is to make the handles and finish the wooden window. For convenience, it is best to use balcony handles with hidden locks made of domestic steel; aluminum ones will not work; they last for 2-3 months, no more.
We fix the sash to the frame using clamps. On the front part we mark points for the output of the lock handles. From the points we transfer the line to the end plane of the sash. To install the lock, you need to mill the grooves. It will be most convenient to cut the groove using hand router with an 8 mm drill. The depth of milling the groove is 28 millimeters, you can’t drill less - the lock won’t fit, and more - too, it can pierce right through the wooden beam.

At the second stage, you need to mill out a shelf to hide the mounting flange of the lock. Next, you need to drill holes for installing handles and secure the “ears” of the handles to the wooden plane of the sash.

To install the mating part of the lock, you need to obtain an entry point for the lock tongue on the frame. To do this, simply turn with a little force to make a dent on the surface of the central pillar. We cut a groove along this dent and install a metal lock plate.

Conclusion
Before assembling the window, it is necessary to thoroughly sand the entire surface of the frame and sash, especially the ends and places where the quarters are removed. After sanding we process wooden surface impregnation, varnishing and installing glass. After the varnish or oil-paraffin impregnation has dried, we sew up the glass with glazing beads and install locks and strips, and the wooden window is almost ready.