Restoration antique furniture interesting and creative process, but who needs it and why. In this article we will deal with this issue and visually restore an antique chest of drawers.
In fact, there is no shortage of furniture in stores now; on the contrary, there can be a lot. Furniture market in modern world replete with a large assortment and variety, and the prices are very affordable. Allow yourself to buy new chest of drawers Almost any family can.
The main point of restoration is that on an old grandmother’s chest of drawers, for example, you can reflect your individuality, reveal your Creative skills and harmoniously complement the interior of the room with decorative elements or paintings. After all, the exact same painted product that you want to see and that will fit perfectly into the interior of your home cannot be found in the store. But it is quite possible to do it yourself, even without special skills or any creative talent, you can repair old furniture, following simple instructions.
There are two other benefits to restoring antique furniture. Previously, it was all wooden and of high quality, but now we mainly buy from chipboard panels. That's why sometimes it's old wooden furniture will last longer than a recently purchased new one. And the last advantage of repairing such products is still cost-effectiveness. Sometimes it’s enough to repaint it or reupholster it with new fabric and it’s like new without extra costs.
So, let's figure out how to restore an old wooden chest of drawers with the least amount of money and painting the tabletop. 
Materials and tools used in the work:
1. Knife, spatula medium and small;
2. Fine-grained and coarse-grained sandpaper;
3. Grinding machine;
4. Wood putty;
5. Solvent No. 646;
6. Brushes different sizes and a pencil;
7. Varnish on water based transparent and solvent varnish.
The first step is cleaning the chest of drawers
First, before work, you need to remove all the fittings from it, these could be handles on drawers and decorative elements. They can be damaged during the restoration process and they themselves will constantly interfere with your work.
Next, you should clean the chest of drawers from the old varnish. For this we need Sander with coarse and fine grain sandpaper. If the tabletop was covered with a thick layer of varnish, then sandpaper alone will not do. In our case, we cleaned the countertop using a knife and spatula. 
There are several ways to remove old varnish:
1. Scrape off with a knife or spatula.
2. Soak with solvent and remove with a cloth in several stages.
3. Use construction hair dryer with a special nozzle.
The third option is, of course, the most effective and fastest, but not everyone has such a device. Therefore, we successfully scraped off the varnish with a knife and spatula. And the second option is the longest and most painstaking, but wooden table top most likely it will remain intact and not scratched.
After removing the old varnish, you should sand the entire surface well. If the boxes had a thin layer of varnish and was almost undamaged, then you can simply sand it with a coarse-grained sanding paper. But still, ideally, for a uniform color, after applying varnish, especially light ones, it is better to remove all old varnish.
After we are convinced that the sanded surface is smooth, we can proceed to the next stage.
The second stage is preparation for painting and leveling the surface
Use a wide brush to brush off dust from the entire surface and wipe with a cloth soaked in solvent No. 646. On a degreased surface, varnish or putty will last longer and stronger.
It must be remembered that the newly applied varnish very noticeably reveals all surface imperfections, even the most insignificant ones; one speck of dust will be visible under the varnish as an unsightly pimple.
After degreasing the surface, take wood putty and a small spatula. The main thing when choosing putty is to match its color to the color of the sanded surface. And we begin to smoothly cover up the cracks, scratches, gouges and chips. We are waiting for the putty areas to dry completely.
In deep places, the putty may “fail” after drying, so you may have to putty again. After final drying, sand and degrease again. The surface should be perfectly flat and smooth. 
Now that we have achieved a uniform and even color, smooth surface, you can start decorating and painting the chest of drawers, let's move on to the third stage.
The third stage - applying varnish and design
So, we coat the surface of the tabletop with varnish in one layer using a brush. 
After the first layer has dried, the pile will rise on the wood; it needs to be sanded so that the design can be easily applied. The design will not be displayed on a varnish surface that has not been sanded. Using a pencil, we draw the necessary design; for us it was a flower. 
If something happens, the pencil can be easily erased from the varnish surface with a regular eraser. After applying the drawing, you can start painting with paints. In the technique of drawing with shading, it is necessary to use water-based paint.
We buy a regular color for water-based paint Brown color. First we draw the outline of the petals, then the centers and shade them with a napkin. It’s not at all difficult to draw such a flower, even without drawing skills. 
Very important point
– coating of the design with varnish. The main thing is to choose the right varnish. It should be transparent and water-based. Solvent-based or acetone-based varnish cannot be used., such a varnish will immediately dissolve the entire drawing. It is better to cover with a roller, not a brush, in the direction of petal growth and only in one direction. That is, do not move it back and forth with a roller, otherwise the entire design will be smeared and lose its appearance.
It is advisable to cover the design with transparent varnish in two or, better yet, three layers. On last time You can safely apply the varnish as you wish, the design will no longer be blurred. 
All that remains is to varnish the drawers and side walls. If you do not plan to make a drawing on them, then you can apply the varnish with a roller or brush, but be sure to apply the second layer after the first has completely dried. And also do not forget that after the first layer, pile will rise on the wood, which needs to be sanded with fine-grained sandpaper.
The dresser handles can be painted with the same solvent-based varnish and screwed back to the drawers. That's all, all that remains is to remove the nasty smell and let the varnish dry completely. 
The chest of drawers is given new life, it will fit perfectly into the interior of any room and will last for many more years. You can use completely different drawing and decoration techniques; there are many interesting options, the only thing you need to do is adhere to the rules that you read earlier, otherwise you can simply ruin the drawing.
A chest of drawers is a piece of furniture that evokes many memories in a person. It stores a variety of things, including memorable ones, from souvenirs to cosmetics. But in the modern world, people are trying to get rid of old, boring pieces of furniture. Almost no one is engaged in its restoration; more often, unwanted things are simply thrown away. However, there are those who prefer not to say goodbye to their favorite furniture. They strive to restore it themselves.
Things can be repainted, but the material for this task must be chosen carefully. For example, it’s a good idea to cover inexpensive furniture with any paint. If you want a matte finish, you need to use an oil-based enamel. To get a shiny surface you should buy varnish paint. The best option It will be water based acrylic paint. Aerosol cans are also considered suitable material for restoring an old chest of drawers at home. The paint goes on smoothly, without streaks or gaps. If you need  paint garden furniture, it's best to use paint and varnish materials, which are not susceptible to corrosion. Painting the chest of drawers can be done with various brushes or rollers.
The process of painting an old chest of drawers: stages of work
If you decide to start restoring old furniture, you need to stock up on the necessary materials for this. This instruction Suitable for wood or chipboard products.
- Before you start work, you need to wash and degrease the chest of drawers. The remaining paint can be sanded with sandpaper or a sanding machine.
- It is necessary to coat the furniture with a primer before painting and seal it problem areas using putty. After the primer has dried, degrease the surface of the chest of drawers with alcohol.
- Next you need to apply acrylic primer. This product perfectly eliminates cracks and scratches.
- After preparing the furniture, you can start painting it. Ideally, paint should be applied in 2 layers. The chest of drawers must be allowed to dry after painting for approximately a 7-day period.
By performing these steps one by one, you can give a second life to your chest of drawers. Restoration is a reasonable solution that allows you to save your family budget and postpone the purchase of new furniture. You need to choose high-quality materials, since the result and appearance of your interior will depend on this.
Do-it-yourself restoration of an old chest of drawers
 An old chest of drawers is a piece of furniture that inspires its owner Nice memories from past. In some cases, the owners do not want to part with their favorite item, but want to return it to its original appearance. Over time, interior design trends change, but it all depends on your taste. You can make a stylish upgrade out of an old, shabby chest of drawers without special costs. Anyone can update furniture with their own hands; it is not necessary to have construction skills. Restoring a chest of drawers at home is possible for anyone. The main key to success will be your desire and inspiration. You can change the color of an outdated dresser using acrylic paints. To completely transform the furniture, you need to completely replace all the fittings in it. In addition to painting, the old interior can be updated using color film. And with the help of paints you can create a unique design on it. If you want to get a chest of drawers white, you will need to use acrylic paint, having previously sanded the surface of the furniture. You can also turn it into a makeup table by attaching a mirror to the dresser.
How to paint a lacquered chest of drawers
IN Soviet times lacquered furniture enjoyed enormous popularity. It was considered a piece of furniture that demonstrated the wealth of its owners. IN  In our time, such furniture has lost its former glory. Of course, some people prefer a lacquered chest of drawers. But if you're tired of it, you should buy it necessary materials and begin its restoration.
Stage of painting a lacquered chest of drawers

There should be no difficulties in restoring a lacquered chest of drawers. With a competent approach to this procedure, you can update old thing beyond recognition, spending a minimal amount of money on it.
READ ALSO: HOW TO MAKE HANDLES FOR DOORS OR FURNITURE YOURSELF. TOP 17
1. Floral print
2. Add fabric to the sides of the drawers
Read detailed instructions.

3. Decorate drawers with wallpaper
You might also be interested - 45 Ways to Update Your Closet with Wallpaper.

4. Use lace
Read detailed instructions.

5. Apply paint to the lacquered chest of drawers
30+ Ways to Use Leftover Paint Wisely.

6. Memorable dates on the chest of drawers
Read detailed instructions.

7. Or your favorite songs
Read detailed instructions.

8. Or favorite cities (streets)
Read detailed instructions.

9. Caravan from a chest of drawers
Read detailed instructions.

10. Use cabinet drawer handles for filing cabinets.
Read detailed instructions.

11. Striped accent
Read detailed instructions.

12. Use painted toys as pens
Read detailed instructions. You might also be interested - How to make handles for doors or furniture yourself. TOP 17.

13. Or their halves

14. Blue milk
Read detailed instructions.

15. Paint the chest of drawers in a metallic color.
Read detailed instructions.

16. Bold Ombre Style
Read detailed instructions. You might also be interested - 33 Examples of walls with ombre effect + Master class.

17. Use a stencil to create an original design
Read detailed instructions.

18. Another option using stencils
Read detailed instructions.

19. Add a Geometric Pattern to the Top of the Dresser
Read detailed instructions.

20. Use wood strips to line drawers
Read detailed instructions.

21. Replace drawers with baskets

22. Cover the boxes with maps of different countries of the world
Read detailed instructions.

23. Or both

24. Ombre dresser style
Read detailed instructions.

25. Ombre...
Read detailed instructions.

26. Another ombre option...

27. Use magnetic paint
Read detailed instructions.

28. Use different shades of nail polish
Read detailed instructions.

29. Strictly and tastefully
Read detailed instructions.

30. Run colorful stripes along the entire chest of drawers
Read detailed instructions.

31. Sunny accent
You might also be interested - how to make a simple cabinet out of plywood.

32. Cover the chest of drawers with newspapers. Why not?

33. Scallops

34. Charming patterns on drawers
Read detailed instructions.

35. Update your dresser with gift wrap
Read detailed instructions.

36. Use old rope instead of handles
Read detailed instructions.

37. Funny mustachioed chests of drawers


38. Optical illusion
Read detailed instructions.

39. Bright circles on the chest of drawers

40. Or triangles

41. Use nails with heads
Read detailed instructions.

42. Cross stitch effect
Read detailed instructions.

43. Ombre...

44. For lovers of sailing
Read detailed instructions.

45. Stylized chest of drawers
Read detailed instructions.

46. Cover the chest of drawers with fabric
Read detailed instructions.

47. Cover with foil
Read detailed instructions.

48. Don't be afraid to use bright colors

49. Ombre...

50. That time when doodles look organic

51. Add brass brackets and handles
Read detailed instructions.

52. Create a Colorful Texture on Drawers
Read detailed instructions.

53. Marine chest of drawers

54. Let's experiment...

55. Use house numbers as handles
Read detailed instructions.

56. Add miniature wheels
Read detailed instructions.

57. Let's experiment...

58. Add vinyl letters
Read detailed instructions.

59. Bright and colorful chest of drawers
Read detailed instructions.

60. Bright geometric patterns

61. Create fancy shapes
Read detailed instructions.

62. Get rid of drawers

63. Another option for geometric patterns

64. Colorful chests of drawers
Read detailed instructions.

65. Leopard notes
Read detailed instructions.

66. Don’t forget about the decor of the inside surfaces of the drawers

67. Color contrast

68. Mix prints

69. Let's experiment...

70. Use colored pencils as lining
Read detailed instructions.

71. Sea shades

72. Use leather instead of ordinary pens
Read detailed instructions.

73. Landscape dresser

74. Mirror chest of drawers
Read detailed instructions.

75. For UK fans
Read detailed instructions.

76. Family photo
Read detailed instructions.

77. Contrast stripes

78. New legs for an old chest of drawers
Read detailed instructions.

Despite the fact that Soviet-era furniture is quite reliable and strong, it is not considered beautiful, much less competing with modern furniture. In addition, by this time it was pretty worn out and required repairs. Even in such conditions, the owners feel sorry to part with her. To buy a new, modern one, you need a lot of money, since furniture has always been not cheap, and it is not cheap now. IN in this case there is one Alternative option leaving old furniture and not buying new is to try to update the furniture with your own hands, giving it an attractive and modern appearance. Cabinet furniture can be remade quite easily, especially since all the materials necessary for this are available. In any case, purchasing materials for remaking furniture will be much cheaper than buying new furniture. One of the easy and accessible techniques is changing the color and replacing the fittings. There won’t be any special problems with the fittings, but changing the appearance is much more complicated. There are several options, but the two most common are painting and gluing special film or wallpaper.

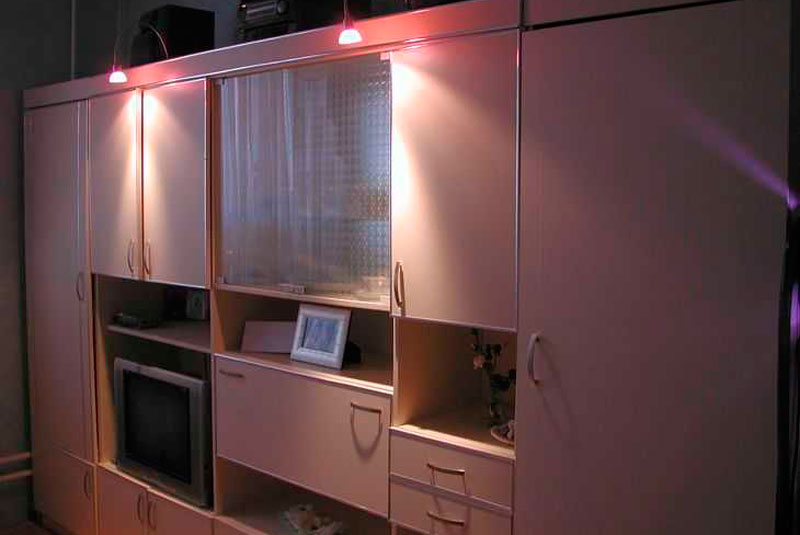
The most affordable and simplest option is to cover old furniture with self-adhesive film. On sale you can find film for every taste, both colored and monotonous, in various colors, shades and textures. Many people prefer wood-effect film, but there are other options that meet the spirit of modernity. This approach can really turn an old wall into furniture that will have an attractive and modern appearance. It’s not difficult at all, it’s enough to do your work slowly and carefully, which will allow you to get interesting result worthy of attention. To verify this, just look at 2 photos. The first photo shows an outdated Soviet wall made of chipboard, and the second photo shows the same wall, but after updating.

The wall received a new appearance thanks to the use of compacted furniture self-adhesive film, cream color with a matte surface. Where there was an open part of the wall, there were glass doors covered with a translucent matte film. For the edging, a furniture layout was used, chrome-colored, and also self-adhesive.
The work consists of the following stages:
- The old wall is disassembled, everything that is not needed is removed, including the fittings.
- All surfaces are cleaned of dirt and degreased. To do this, use a soft rag and detergent. After this, the product is washed off warm water with vinegar and finally wipe the surfaces with a dry, clean cloth.
- Fragments of the required size are cut out of the film, with a margin of up to 1 cm. After pasting, the excess film is cut off with a stationery knife.
- Before pasting, the surface is irrigated with water from a spray bottle. Wet surface will allow you to accurately position the film, since it can be moved, or even peeled off if it was not possible to glue it properly the first time.
- Before pasting, it is removed from the film protective film, after which it is laid on the surface. Having correctly positioned the film fragment, begin to smooth it with a soft cloth in the direction from the middle to the edges. The main thing is that there are no air bubbles left under the film. In this regard, all work is performed slowly and very carefully.
- When bubbles form, they are pierced with a thin needle and the air is expelled from them. This operation is also carried out using a rag, moving from the edges to the puncture point. After this, this place is thoroughly rubbed with a rag.
- After the film is glued, a thin cotton fabric is taken and placed on top of the film, after which an iron is used average temperature heating The fabric is ironed together with the film.
- Finally, the trim (edging) is glued and the fittings (handles) are installed.
- This technology is applied to every part being glued. Glass is glued in the same way, only from the inside. After complete assembly it will turn out completely new furniture wall. In this way, you can breathe a second life into items such as bedside tables, chests of drawers, cabinets and kitchen furniture.
After the wall was successfully pasted over, it was also updated old wardrobe and installed on the right. The result is that the entire wall is filled with updated furniture. Using the same technology you can update the old one kitchen furniture– apply self-adhesive film and replace the handles.
There is a second option for upgrading furniture, which is less expensive and, what’s most interesting, does not require disassembling anything. In this option, only furniture doors are covered, not with film, but with non-woven wallpaper. For gluing, PVA glue is used. To prevent the edges of the wallpaper from lifting, they are cut into blanks, the size of which is 5 mm smaller size door Judging by the photo below, the result is not bad at all.

The advantage of such a finish is that the finish can be replaced with new wallpaper at any time.
As a rule, a surface covered with wallpaper lasts for five years. A similar technology was used for finishing kitchen set. To make the surface washable, the wallpaper is covered with two layers of PVA glue. The most important thing here is to do everything carefully so that no smudges form, since you will have to work with a brush.
As an option, the wallpaper can be opened with varnish, but before that it is better to experiment on not the desired wallpaper. It is important to determine what the reaction of the wallpaper to the varnish will be. When choosing a varnish, you need to know that acrylic and cellulose provide a transparent surface, while polyurethane will turn yellow after a certain time. Polyurethane varnish It is practically unaffected by solvents and, if it needs to be removed, you will have to resort to mechanical action. Typically, coarse sandpaper is used for this or an electric drill with an attachment is used.
How to update a chest of drawers
An old chest of drawers can sit in the attic for several years and lose only its appearance. Typically old varnish coating cracks, but otherwise he can be envied modern furniture. It does not dry out and remains as reliable and strong as it was before. In this case, the chest of drawers undergoes a more complex renovation, using painting and decoration, using polyurethane molding and wallpaper.
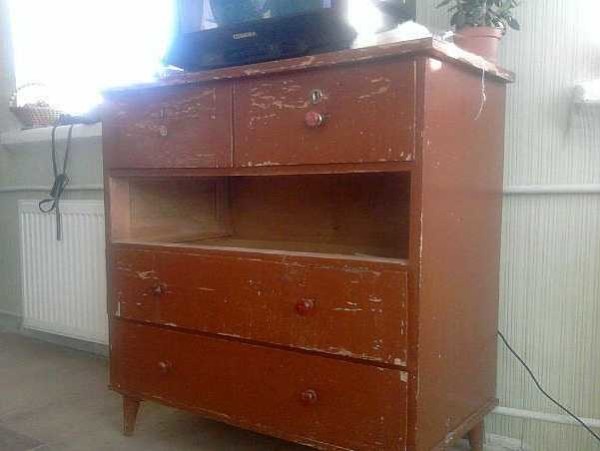
Stage No. 1. All fittings are removed from the chest of drawers, after which the old covering is removed. As a rule, the old varnish coating is removed mechanically, using sandpaper (coarse) for this. All sinks, cracks and chips are sealed with putty and wait until it dries. After complete drying, the surface is sanded with fine sandpaper. The result is what is shown in the photo below.

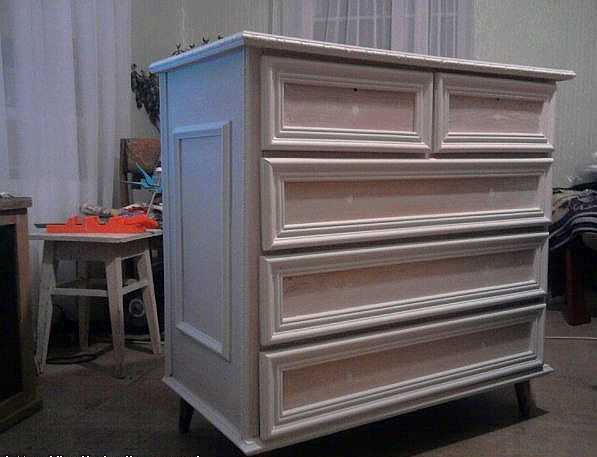
Stage No. 2. Installation of polyurethane moldings. The main task is to choose the right moldings so that they are neither small nor large. Basically, products are selected up to 5 cm wide and very narrow if you look at them in profile.
The purchased moldings are very carefully and accurately cut into pieces of the required length, and the corners are cut at an angle of 45 degrees. At the same time, you need to make sure that the drawing matches. The molding is attached using PVA glue. Alternatively, you can use self-tapping screws for reliability. At the same time, before screwing them in, recesses are made for them. All recesses are filled with putty very carefully, otherwise there may be problems when the putty dries.

Stage No. 3. All surfaces for gluing are treated with a primer. As a primer, it is possible to use PVA glue diluted with water in a ratio of 1:2. After the primer has completely dried, begin painting. As a rule, 2 layers of water-based acrylic paint are applied. The color is coffee with milk, although the color in the photo does not match the one indicated due to poor color rendering.

Stage No. 4. Decoration is carried out on the basis of wallpaper made using silk-screen printing technology. Sections of wallpaper are cut precisely according to the dimensions of the inner part, bordered by the molding. The wallpaper is glued using PVA glue. After complete drying, the entire chest of drawers is coated with water-based varnish in 2 layers.
Stage No. 5. Finally, screwed to the chest of drawers modern legs in the form of wheels for furniture and handles are installed.

If you carefully study the technology, everything is much simpler than it might seem. Although, all stages require a certain accuracy, otherwise appearance there will be problems. In the same style you can update wardrobe. The result is not a bad set for a room or bedroom. It may not be entirely modern, but it is original and stylish, and most importantly, very cheap.
If old furniture has a varnish coating, it is very difficult to get rid of it. If there are no obvious flaws, it is better to use a primer for complex surfaces and only then start painting. This approach will minimize the effort to update old furniture.
Updating an old bedside table
The photo below shows the process of updating an old polished bedside table. First of all, the polish was removed, after which the surfaces were filled and sanded. After that, it was painted with acrylic paint in two layers. Finally, the paper from the gift bag was pasted onto the door, making it possible to get an original design. After this, the entire bedside table is covered with two layers of semi-gloss acrylic varnish.

All stages are not particularly difficult if you have the slightest skills. All processes correspond to the sequence of actions described during the restoration of the chest of drawers. The result exceeds all expectations.
 This old nightstand is due for an update.
 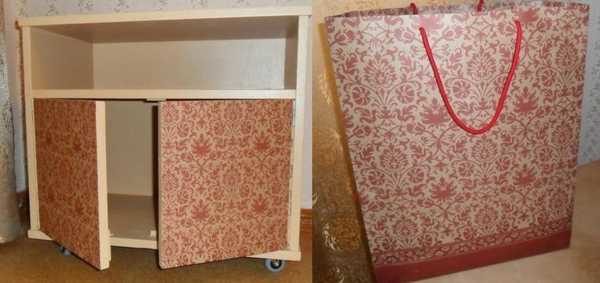 This bag will serve as an excellent decor for doors.
 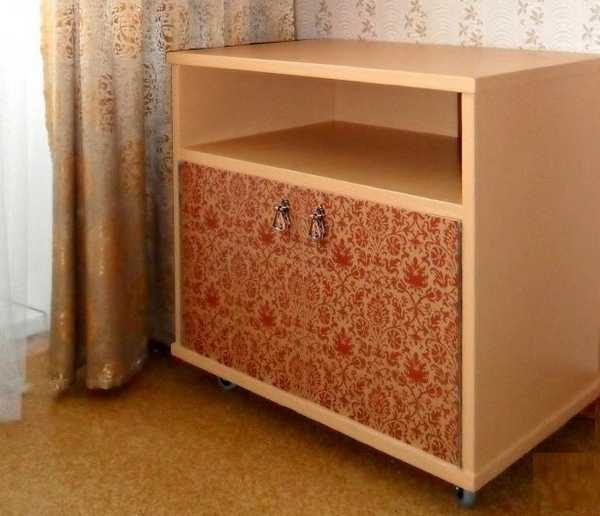 The result of updating an old bedside table.
 Remaking furniture with your own hands is simple and accessible to everyone, if desired. Unfortunately, without desire nothing will happen. Below in the photo, you can see a bedside table that was redone using a very simple method: the bedside table was simply covered with embossed wallpaper and varnished twice.
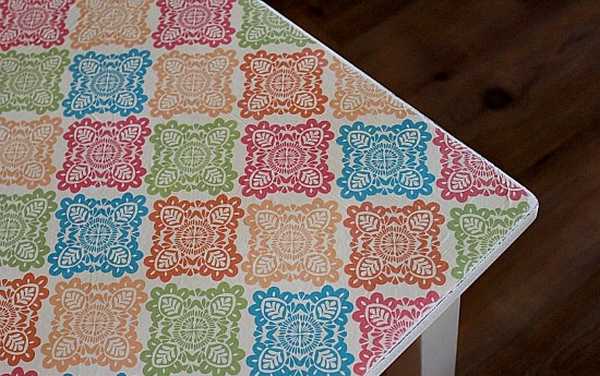
How to remake a table
By adopting such technology, it is enough to simply transform an ordinary coffee table into the subject modern interior. They simply take it and cover it with wrapping paper. This is thick paper that sticks without problems and does not become limp under the influence of varnish.
First you need to work on the legs and edges of the tabletop. They need to be painted light color so that they fit better with the new style. After this, you can begin further work.
Before pasting, you should cut out a piece of paper slightly larger than the size of the tabletop. PVA glue is used for gluing. The surface is well rolled with a roller to avoid air bubbles. The result should be a perfectly smooth surface.
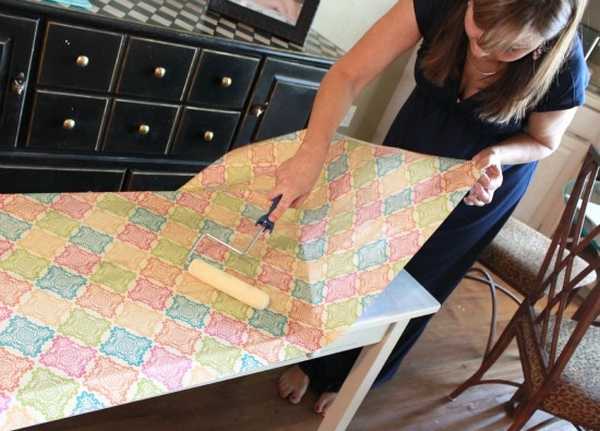
After this, remove excess material by running a fine-grit sandpaper along the edge of the tabletop, pressing the paper against the tabletop. This method allows you to remove excess material very smoothly, which is more like a professional action.

Finally, the surface is covered with two layers of varnish. At the same time, the layers should be thin. Each layer is applied perpendicular to the previous one.
Furniture remodeling: photo ideas
Today there is a chest of drawers in almost every home.
with your own hands
In addition to the fact that this is a very beautiful piece of furniture, it is also very functional. After all, you can store so many things in it! Progenitor modern chest of drawers there was an old Russian chest. It was just slightly modified and transformed. In ancient times, only representatives of a noble family could afford a chest of drawers.
After all, it was quite expensive back then. And now it is an indispensable attribute of any room in the house.
- Sander;
- screwdriver and jigsaw;
- hacksaw, spatula, hammer;
- ruler, pencil;
- MDF board;
- putty, paint, PVA glue.
Return to contents
Stages of work

When everything you need is prepared, you can get to work.
Remove all the drawers from the chest of drawers and unscrew the old handles. On next stage To restore a chest of drawers, you need to remove the old varnish and paint. To do this you will need sandpaper or a sanding machine.
Return to contents
Finishing and its options

Coloring

Return to contents

The next step will be to transfer all the pictures to the chest of drawers. Apply glue to each picture individually and cover the entire surface of the chest with them. The side walls of the cabinet should be decorated not only with pictures, but also beautiful frame on topic with them.

paintings and everything is ready.
At the end of the work, the chest of drawers should be varnished.
This way, you will protect the pictures and extend the life of the cabinet.
Return to contents
Unusual solution


Do-it-yourself restoration of an old chest of drawers
Today there is a chest of drawers in almost every home. In addition to the fact that this is a very beautiful piece of furniture, it is also very functional. After all, you can store so many things in it! The ancestor of the modern chest of drawers was an ancient Russian chest. It was just slightly modified and transformed. In ancient times, only representatives of a noble family could afford a chest of drawers. After all, it was quite expensive back then. And now it is an indispensable attribute of any room in the house.
Although most often they place a closet in the bedroom - because this is where bedding and other things are stored. If you attach a mirror to the chest of drawers, it can become an excellent alternative to a modern dressing table.
What you need to restore a chest of drawers
 In Italy, it is customary before the New Year to change all the furniture in the house, starting life with a clean slate. But in Russia it is not customary to throw away old furniture, especially if it was inherited from relatives and has retained its outwardly attractive appearance. However, over time, even the most durable and reliable furniture can fail and lose its attractiveness. So you have to buy a new one.
As an alternative option, you can consider restoring furniture yourself. This is especially applicable to old grandmother’s chests of drawers, which are as strong and reliable as the Soviet system. And for this you only need your imagination. The result will be a completely new designer piece of furniture in your home.
First you need to prepare all the necessary materials and tools:
- Sander;
- screwdriver and jigsaw;
- hacksaw, spatula, hammer;
- ruler, pencil;
- roller and several different brushes;
- MDF board;
- putty, paint, PVA glue.
Stages of work

When everything you need is prepared, you can get to work. Remove all the drawers from the chest of drawers and unscrew the old handles. The next step in restoring the chest of drawers is to remove the old varnish and paint. To do this you will need sandpaper or a sanding machine.
After the cabinet is cleared of paint, you need to check the reliability of all furniture fastenings. If there are loose areas or loosely screwed legs, then they should be disassembled and re-twisted, after first going over the joints with furniture glue.
Carefully check for chips, scratches and cracks on the surface of the furniture. If they are present, then you need to get rid of them. To do this, you will need a high-quality wood putty. It is applied thin layer to fill all the holes and chips in the cabinet. Leave the cabinet to dry. After a few hours, you need to level the surface using fine sandpaper.
The final stage of restoring a chest of drawers with your own hands will be priming and drying. After that you can start inventing exterior design hand-restored furniture.
Finishing and its options

Restoration of the chest of drawers proceed to its climax. You can paint the furniture in a color that matches your decor or make it a bright accent in the room. But here you need to have a subtle sense of taste so as not to make it too pretentious.
From MDF boards cut out using a jigsaw decorative overlays on the boxes. Carefully sand all corners and side cuts. Apply PVA glue and firmly attach the drawer covers. Now all that remains is to paint the cabinet and varnish it.
By the way, if you use not the usual one, but craquelure varnish, then you will get the effect of aged furniture at home. And you will do everything yourself, without resorting to the services of designers.

Now all you have to do is attach beautiful handles to the drawers and that’s it, the restoration of the chest of drawers is completed brilliantly.
DIY chest of drawers for children's rooms

For a children's room you should choose bright color paints and beautiful decorative stickers that will decorate the surface. After the painted cabinet has dried, assemble the stickers into an unusual collage. It could be many fairy-tale heroes or scenes from your child’s favorite cartoons. The most convenient way is to stick it all on film.
The next step will be to transfer all the pictures to the chest of drawers. Apply glue to each picture individually and cover the entire surface of the chest with them.
His Highness the Chest of Drawers: Part 2 - Ten Easy Ways to Upgrade
The side walls of the cabinet should be decorated not only with pictures, but also with a beautiful frame in the theme of them.
So, you will get a finished image. To do this you will need four slats, which will need to be cut into required sizes and paint. After this, it is enough to glue the slats around the perimeter of the resulting

paintings and everything is ready.
At the end of the work, the chest of drawers should be varnished. This way, you will protect the pictures and extend the life of the cabinet.
Unusual solution

What do you think of the idea of a DIY Chinese chest of drawers? This is quite unusual and very original. So, restore the chest of drawers according to the previous option and you can move on to finishing.
To get started, you will need several slats and a stencil with hieroglyphs. Just first clarify what these symbols mean so as not to get into trouble. By the way, you can get by with simple pieces of wallpaper with hieroglyphs that can be pasted on the closet and proceed to further steps:
- Paint your chest of drawers a subtle color bed color, which will organically fit into your interior.
- Now mark the width of your overlay pieces.
- After this, cut a piece of paper that will

det serve as the basis for your hieroglyphs and apply the hieroglyphs themselves on it.
Transforming an old chest of drawers with your own hands does not require any special skills or knowledge, and high costs not necessary here. But new item furniture in your home will pleasantly surprise guests and family members. And such a cabinet will become a real decoration of any room interior.
http://mebelza.ru
How to restore an old chest of drawers?

Probably, in every house there is furniture that is older than the total age of all family members. If you have such a family heirloom in your home, then don’t rush to get rid of it, because an old thing can be turned into a unique design object in a few hours. Let's try to figure out how to restore worn-out furniture, using a chest of drawers as an example.
How to update an old chest of drawers?
If you don’t know how to decorate an old chest of drawers, the universal decoupage technique will come to your rescue. Decoupage is the decoration of an object using multi-colored paper cutouts combined with paint, gold leaves, etc. This time-tested technique will allow you to update the decor of an old chest of drawers quickly, cheaply and without much effort.
Before decoupage, you need to check whether your chest of drawers needs deep restoration. This restoration of an old chest of drawers consists of removing the previous coating and filling in chips and cracks, followed by treatment with primer. If all of the above has already been done, or the chest of drawers does not need deep restoration, we move on to the most interesting part - the decor. And here we can safely let our imagination fly: colored wrappers, favorite postcards, magazine clippings, decorative sheets precious metals, in a word, whatever your heart desires can be used in decoupage.
Restoring a chest of drawers with your own hands is a very exciting activity.
Decoupage of an old chest of drawers - step-by-step instructions
For decoupage we will need:
- paper (in our case we used smooth, fibrous fabric, in the Art Nouveau style);
- ruler, pencil, scissors;
- PVA glue, or any other white glue;
- water;
- brush.

