Regardless of the design option for your site, garden arch will be one of the main elements of its decoration. Despite the fact that this kind of structure is designed to support climbing plants and emphasize their beauty, the arch itself is an excellent tool landscape design. Light, openwork structures that rise above the surrounding environment cannot fail to attract attention. Let's discuss how to build a garden arch with your own hands.
Garden arch - worthy decoration any gardenBusiness card of your site
To decorate the arch garden plot, it is important to choose the location for its installation wisely. A similar design can be used to designate a separate area of the yard. For example, install an arch for climbing plants over the path between the utility area and the general area of the site, as in the photo.
The arch at the entrance to the courtyard looks interesting, welcoming everyone. This type of design must be made with high quality and worthy design, as it will act as the calling card of the entire courtyard. Forged construction may be quite appropriate for such a case.
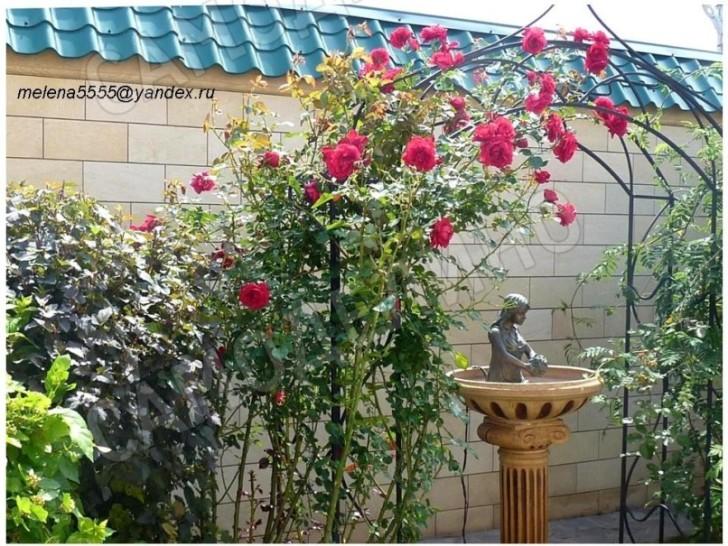
 An elegant metal arch supports roses above the fountain sculpture
 Somewhere in the depths of the garden there may be an arch, the main purpose of which will be to support climbing roses or grapes. It can be made from reinforcement or wood.
Designers propose to make a kind of enfilade of several flower arches standing behind each other. When the climbing plants completely entwine the frame, you will get a tunnel leading to a gazebo in the garden or to a waterfall with a lake. They can be used as supports for grapes, climbing roses, other colors.
There is one more point that is important to pay attention to - the accuracy of the design. It can be assumed that the plants will hide asymmetrical support elements, protruding or uneven parts of the reinforcement from prying eyes. However, in winter period And in early spring, when the plants have not yet woken up, the arch will stand without shelter. It is worth thinking about how the quality of the design will affect the appearance of the yard.

 This arch separates the vegetable garden and the general area of the site
 Types of arches
It is easy to assume that such supports are most often metal, including forged or wooden. Practice shows that in fact, garden supports can be made from a wide variety of materials. Let's look at the most current options.
Lightweight heavy metal structures
Steel reinforcement is used quite often when creating arches. The steel supports are quite strong - they can withstand the significant weight of plants with flowers or grapes, as well as gusts of wind. At the same time, welded structures have an impressive appearance - they do not clutter up the space, and from the outside they appear openwork and light.
 A mesh arch filled with soil: very interesting!
 Metal arches can be made in various options. The simplest method is an arc made of a metal rod, the ends of which are fixed in the ground or attached to separate supports. Such an arch is unstable and difficult to make accurately. A slightly more complicated version looks more effective similar product: two arcs of the same type that are connected to each other. As a connector, pieces of rod welded to reinforcement arcs or wire can be used.
The most complex option, but also quite aesthetic - forged structures. However, it will not be possible to make such a support with your own hands if you do not have experience and tools. It is best to order such work from a professional.

 The forged arch is spectacular even in winter time
 Metal structures have one significant drawback - they begin to rust over time. To avoid corrosion, it is necessary to use a frame with a special coating or paint the arch, but this will have to be done annually.
The accessible charm of warm wood
Wood is also a popular material for creating an arch. It is from this that it is easiest to create a structure yourself. The main obstacle when working with wood is the difficulty in creating an arched top. Due to this wooden supports do U-shaped, or in the form of a triangle.
The simplest version of a wooden arch is two supports, between which a crossbar is fixed. More complex options are a combination of two or more simple designs.
The tree has a well-known drawback: it is susceptible to rotting. You can combat this feature by covering the boards with stain and painting them different colors, coated with varnish. There are also special antiseptic compounds that prevent rotting.

 A wooden arch divides the area into zones
 Convenient and modern plastic pipes
Today, garden arches made from plastic pipes which are used for plumbing. This durable material– it is not subject to rotting or corrosion. Craftsmen make such structures on their own, especially if they have experience working with plastic.
An arch is made according to the same principle as from metal. It’s quite easy to bend the plastic in the right place, and a special one is used to connect the parts. welding machine. The finished products are relatively durable and also successfully perform their functions. You can purchase ready-made plastic structures.
Flight of fancy and other materials
Creative people have learned to use the most different materials for creating garden arches. Sometimes you can see brick supports, arches formed from powerful roots, lamp posts, sculptural compositions, tree trunks entwined with roses. Arches are also popular today unusual shape– round, domed, twisted. All this can be done with your own hands if you show imagination and put in a little effort.
Master class on making a wooden arch

 DIY wooden arch
 The garden arch that you see in the photo is a connecting element of the overall structure with a pergola and trellis. The entire structure divides the yard into common and utility zones. The arch itself also serves as a support for the climbing roses. 
 To build the wooden arch I used the following materials:
- timber with a section of 60X40mm;
-shanks for shovels with a diameter of 40mm;
-wood screws 4.2x76mm (black, rare pitch);
- impregnation for wood “Pinotex”;
- yacht varnish;
- galvanized box with a section of 60X60mm;
-cement and sand.

 View of the arch from reverse side
 The design has following parameters: height 2m, width 2m, depth 0.8m. All parts were coated with impregnation and two layers of varnish before assembly. Four seasons of the arch's life have shown that the arch has to be varnished once every two years. Sometimes it is necessary to sand the darkened wood and re-coat it with Pinotex before varnishing. Then the entire structure always looks like new.
To install the supports, I dug four holes 0.4 m deep. At the ends of the 4 beams that will be in concrete, I put pieces of galvanized profile 60x60mm (I bought one fence post) and secured them with self-tapping screws. Since the timber is thinner, we had to fill the gap with a 10mm thick strip of plywood. It is easier to use special galvanized thrust bearings, but it was not possible to acquire them quickly. I set four beams vertically and in height using a level, temporarily fastened them with slats and screws, and concreted them.
 This is what a support in the ground looks like
 After the solution hardened, I connected the top of the supports first with transverse and then longitudinal beams. I wanted to provide a higher passage, so I added one more longitudinal beam on each side of the arch. All connections were made with self-tapping screws. In order not to load the screwdriver too often, the beam closest to the screw was pre-drilled with a diameter of 4 mm.

 Installation of longitudinal beam
 I attached two more to the “roof” of the arch (four in total) cross beams. Then he tied them together with several crossbars. This way the design looks more interesting, and the long beams will not “sink” from moisture.

 Arch top design
 All that remains is to cut and secure the ladder of shovels on the side walls of the trellis. Of course, you first need to mark with a ruler and pencil. I was diligent enough to treat all the ends of the parts with impregnation before installing them. But the places where the parts are joined do not “lose their face” over time, and the wood does not deteriorate.
 Sidewall design
 To cut the cuttings at the same angle, I first drew a template on a board and was guided by it when cutting. For these purposes, you can use a miter box.
 Fastening the cross members
 The result was a fairly rigid structure and no drawings were required. In any case, the roses like it.
DIY metal arch
 DIY rebar arch
 We propose to build a support consisting of two pieces of reinforcement bent in the shape of an arc. We will connect both lines of arcs with rigid wire. Introducing step by step instructions construction structures:
- First you should think about what the dimensions of the finished support should be. From practice, for an arch 200 cm high you will need 2 rods about 6 meters long. In this case, the width of the structure is assumed to be approximately 1.8 meters. The step between the arcs will be 30-50cm. To fasten them together you will need pieces of wire of the same size.
- To bend the rods correctly, you need to prepare a template. The drawing is drawn directly on the ground using a peg and cord. The twine is tied to a peg, the required length is measured and an arc is drawn.
- Next, the already bent pieces of the frame should be connected to each other with pieces of wire or reinforcement. They can be welded in a simple way in the form of a ladder, or make them intersect, forming rhombuses or other shapes. First, they are welded along the edges of the frame (at the edges of the arcs and in the center), then the remaining space is filled with segments.
- Mark the place where the support will be installed. At those points where the “legs” of the structure should be, holes are dug. Pipes are inserted into them, the diameter of which will allow the ends of the arcs to be placed inside. The pipes are then filled with concrete. After the solution has hardened, you can install the arch.
If the structure will spend the winter on the site, it is welded to the pipes. If the arch must be removable, its lower parts are fixed in the pipes using wedges. After installation is completed, the arch is coated with paint.

 Green color arches camouflage the structure among plants
 As you can see, almost all the garden arches that are presented in our article can be made independently. We talked about the principles of working with metal, but you can make an arch from plastic pipes, or build it from stone or brick.
For decoration personal plot used a lot variety of options plantings - from flower beds and lawns to intricate green sculptures. The advantages and beauty of all such compositions are embodied by arches entwined with flowers and greenery. This is both a flower garden and garden figure, and even small architectural form, under the arches of which you can arrange a place to relax. A wide range of garden arches for climbing plants are presented by modern manufacturers, but building one with your own hands is not at all difficult. In this case, the design will be original, completely individual and will cost much less.
An arch entwined with plants is a very noticeable element of garden design. Therefore, it cannot be used separately, but must harmoniously complement the existing landscape style. In addition, this very useful design carries not only a decorative, but also a functional load:
- provides reliable support for climbing plants, preventing them from growing chaotically;
- significantly influences the architecture of the site and very noticeably supports a particular direction of the existing design;
- successfully performs zoning of the site, can be used instead of a gate;
- Effectively replaces lamp posts, swing supports or other posts.
The functions of a garden arch for climbing plants largely depend on its location. There may be several installation options:
- at the entrance to the site or its separate zone;
- in the form of a tunnel along the path;
- anywhere in accordance with the general style.
By installing a garden arch for climbing plants in cozy corner and by equipping a bench under it, you can get an excellent shaded place for relaxation. Moreover, the purpose of such a structure will depend on the size - with a larger area, it is quite capable of replacing a gazebo for picnics or tea drinking in the fresh air.
The dimensions of the arch should be correlated with the area of the site. A bulky structure will physically, and especially visually, reduce the area. In such cases, it is recommended to install a trellis, which occupies less space and can perform the same functions as a traditionally shaped arch.
Installation Features
The great advantage of a garden arch is the simplicity of its design. As a rule, it is installed without pouring a foundation and consists of two vertical racks with an arched or even overlap. The result is a durable structure that reliably supports climbing or climbing plants.

The construction of the arch is not associated with any particular difficulties, but has some features:
- the form should provide for the possibility of weaving plants;
- the height cannot be less than 2 m, so that a person of any height can walk freely;
- the minimum width should be 1.2 m, regardless of whether a passage is required under it - such a distance between supports is necessary for the normal growth of climbing plants and to avoid the effect of neglect;
- the design must be aesthetically pleasing even without plants, so as not to spoil the landscape during the cold season;
- In terms of its style, the garden arch should correspond to the overall color of the site.

Many types of arches do not require a foundation and can be installed directly into the ground. If it is necessary to arrange the foundation, you can use an existing concrete or other platform as such, or build a new one. The process of preparing the site for installation depends on the selected type and material of the future structure.
Types of arches
Garden arched structures are divided according to the following characteristics:
- manufacturing material - metal, wood, stone, plastic or combination;
- location and shape - free-standing, arched tunnels, trellises, pergolas, gazebos, and other complex structures.
Choosing the type of arch for the base flower arrangement, it should be taken into account that its reliability depends on the material of manufacture, appearance, compatibility with the overall landscape design style and functionality.
Arches made of metal, especially with forged elements, are very durable and beautiful, but during frosts they can lead to the death of plants climbing on them. Wooden arches are in perfect harmony with almost any style, since they combine most naturally with the natural landscape, but their service life is more limited than that of metal ones. Sudden temperature changes, high humidity, and various pests have a detrimental effect on the tree.

The most popular are plastic arches, characterized by ease and ease of installation. But they are not very reliable, since they quickly crumble under the influence of frost and scorching rays of the sun. Although such structures are often collapsible and can be removed for the winter.

Arches can also be made in the form of permanent structures made of stone or brick. Such structures are the strongest and most durable, but their style must be carefully thought out, and installation requires a significant investment of time, effort and money.
Installation of different arches
The technology for constructing a garden arch for climbing plants depends on the complexity of the design and the selected material. Easiest to install wooden structure, especially if you have some woodworking skills.
Wooden
The most common U-shaped wooden structure is constructed from timber with a thickness of at least 4 cm. The work is carried out in the following sequence:


You can also first assemble the arch, and then dig this structure into the ground.
Metal
A metal garden arch is usually made from reinforcement with a cross-section of 6–10 mm (thinner rods for crossbars, thicker rods for supports) or small diameter pipes. The forged arch looks especially rich.
 The installation diagram for a structure made of reinforcement is the simplest:
- The reinforcing bars are given an arched shape using a pipe bender.
- The blanks are dug in to a depth of 0.5 m. If an arch of several arcs is installed, they are spaced at intervals of 30 cm.
- The cross members can be straight or as round as the main rods.
- All structural elements can be connected in several ways - using welding, clamps or soft wire and connecting rings bent from thin reinforcing bars using a pipe bender.
- For corrosion protection finished design primed and then painted.
 This garden arch turns out to be light and versatile. It can be installed anywhere and in almost all landscape styles, since the thin rods will be completely hidden by climbing plants, which will make the base itself completely invisible.
When using pipes instead of reinforcement, they should be concreted to ensure sufficient stability. Regardless of the type chosen metal profile, this design requires periodic maintenance. It involves touching up areas with peeling paint to prevent corrosion.
Plastic
The construction of an arch from plastic pipes is carried out according to the same principle as the construction of a metal or wooden structure, but it requires less effort. This material is easy to process and light in weight. To connect the elements, tees and a special soldering iron or burner are used.
In addition, a plastic garden arch does not require regular maintenance. Unlike wood and metal, plastic is not afraid of moisture, so it does not rot or corrode, and therefore does not require periodic touch-ups.

Stone
The capital arch made of stone is strong, durable and making the right choice The material looks very attractive. It does not require additional finishing and special care. But you can build it yourself only if you have the skills of a mason, otherwise the structure may turn out to be ugly and short-lived. Moreover, it is different high cost, only suitable for large plots and special landscape styles. Therefore, stone arches are not popular for arranging private households.

When constructing garden arches, all of the above materials can be combined with each other. Their combination can be very diverse, the main thing is that metal, wood, stone and even plastic favorably emphasize the beauty of each other and the surrounding landscape, and also create suitable conditions for plant growth.
Plants for the arch
To create an arched composition, use different types climbing plants, the choice of which is determined by the ultimate goal:
- to get a flowering or greening arch as quickly as possible, you should plant climbing annuals - bindweed, decorative beans, kobeya and the like;

- for an arch that will not need to be renewed for several seasons, climbing perennials - wild grapes, roses, honeysuckle, clematis - are more suitable.
To obtain optimal results, it is recommended to use combined landscaping. The basis of such plantings are perennials, and annuals are planted next to them. As a result, the arch will be covered with seasonal greenery and flowers within a few weeks, and then they will be replaced by climbing plants. perennials, which will remain for next year.
Plant care
As the plants grow, they must be evenly attached to the frame, creating an arch-shaped vault. Or you can choose species, such as ivy or wild grapes, that will wrap around the structure on their own.

Climbing flowering plants need proper care, regular watering and fertilizing. Many of them, particularly roses, need to be covered for the winter. If there is no opportunity or desire to care for arched plantings, it is recommended to choose unpretentious flowers - morning glory, honeysuckle, kobeya. They differ bright flowering And strong aroma, which will make the arch as attractive as possible.
Creating a garden arch does not require much effort and can be made from those materials that are easiest to install. But the finished composition will become a colorful decoration of the site, created according to your own plan from your favorite flowers or greenery.
Video instructions for building an arch
There are many ways to decorate your suburban areas. Some people prefer to plant areas with flower beds with perennial plants, others like garden figurines and figurines, while others spare no time and money to create landscape design. But there is a decoration that everyone will like. This decoration is a garden arch, which gives any area a corner of romance and a certain sophistication.
As a rule, climbing plants with dense greenery are used for arches.
For some, flower arches are associated with a solemn ceremony, but this does not mean that this design cannot be present in country or garden areas. A garden arch, curled with lush greenery or flowers, can be used not only as a decoration for the area, but as a way of somehow zoning the area. For example, a garden arch can be a kind of entrance if you use it to highlight some area of the garden. If you install a garden arch in front of the entrance to the garden plot, it will turn into a decorative gate.

Also some landscape designers An arch for climbing perennial plants is often used to create a separate recreation area. You can install a bench or small table inside the structure. Sometimes garden arches, entwined with charming flowers, are installed along the path or garden path, thanks to which the path turns into a beautiful flower tunnel.

Modern arches are made from a variety of materials, the most common being wood, plastic and metal. Metal structures look very beautiful if they are created using forged elements. Also, garden arches made of wood fit well into various landscape styles, becoming a coordinated complement to natural beauties.
Plastic arches are very popular due to their lightweight design. Arches can be made of brick, stone or even concrete.

Metal garden arches
When choosing a garden arch, remember that the material from which it will be made will determine its appearance and reliability. For example, metal garden arches are the most reliable because they are not afraid of precipitation and temperature changes. But in winter metal structure may damage some types of perennial flowering plants.

Wooden garden arches
The tree does not tolerate sudden changes in temperature, and is also vulnerable to pests. It is necessary to install a wooden arch only in a temperate climate zone. It is best to choose structures made from hard wood - larch, cedar, oak. Before planting a wooden arch with climbing plants, it must be treated with antiseptic agents.

Plastic garden arches
Garden arches made of plastic also do not tolerate climatic conditions with high precipitation and sudden temperature changes. But plastic structures are made in a prefabricated version, so in winter the garden arch can be removed indoors and the plants can be covered with a canopy.

Garden arches for plants do not have to be a stereotypical shape. Currently on sale you can find garden arches with rectangular ceilings or gable roof. If you dream of decorating your garden original decor, you will probably like pergola arches or round arches, created from standard arches.

Choosing plants for a garden arch
To decorate a garden arch, you can use absolutely any climbing plants. It all depends on the desired result. If you want your arch to “bloom” quickly, plant annual climbing plants. Bindweed, beans, nasturtium, kobeya cope well with this task, “ squirting cucumber" If you dream of a garden arch that will delight you for several seasons, choose perennials such as honeysuckle, wild grapes, clematis and charming roses.

Garden arch design
There is nothing complicated in the design of a garden arch. After installing a garden arch, two plants that belong to the same species are attached to the arch frame on the sides. As they grow, you will need to bend their tops so that they form a vault that will repeat the shape of a garden arch. In this case, the main thing is not to miss the moment. If you bend the top too early, its side branches will grow upward, becoming the central shoot. If you bend it too late, the hardened branches will not be able to wrap around the arch.

But some plants have almost no need for such “direction”. To decorate a garden arch with grapes or ivy, just plant the plants at the edge of the garden arch, and the plant will wrap around this structure on its own.

If you want to decorate a flowering arch using clematis or roses, then as the plants grow they will need to be tied up. Also remember that beautifully flowering plants need proper care. For example, it is recommended to insulate roses in winter, and clematis require regular fertilization.

TO unpretentious plants To decorate a garden arch, you can include morning glory, kobeya and honeysuckle. They will decorate the garden arch bright colors and fill your garden with a pleasant aroma.

Garden arches can be decorated in different ways. Of course, the arch looks attractive if it is entwined with dense vegetation and flowers; you can also decorate only the arch’s arch and side parts.
An arch of climbing flowers is bright decoration for any garden. To decorate the arch, you can choose your favorite plants, turning your site into a prototype of the Gardens of Eden.

Growing climbing flowers is impossible without providing them with reliable support. Any supports are used in this capacity: pillars, fences, stretched threads, etc. However, the most spectacular spectacle can be obtained by forming a tandem of climbing plants with special architectural elements. One of the most popular such structures is the arch - an arched structure on two supports. Despite the highest decorative qualities, its design is very simple, so an arch for flowers in the country can be made with your own hands. Let's consider 3 options for its manufacture from different materials.
Simple model arches with a height of 2130 mm and a width of 1830 mm are created from two reinforcing sections bent into arcs, connected to each other by metal rings. The arch for flowers is made by hand without the use of welding; thin wire is used to connect the parts.
The metal arch looks like a light, weightless structure entwined with greenery and flowers
The distance between the arched arcuate sections is 31-32 cm. To hold them in place, they are dug into the ground at least 40-45 cm. A distance of 15 cm is maintained between the connecting cross-ring rings (d = 30 cm).

Schematic illustration metal arch
List of materials for making a metal arch:
- fittings (rod) d=10 mm, length 6 m - 2 pcs.;
- fittings (rod) d=6 mm, length 0.94 m - 9 pcs.;
- soft wire;
- primer, enamel for painting;
- pins for the template - reinforcement d=10 mm, length 0.25 m - 10 pcs.;
- rope L=0.9 m.
Step-by-step manufacturing scheme:
1. First of all, you will need to bend pieces of reinforcement d = 10 mm to obtain an arched opening. To do this, you can use a simple template of 0.25 m long pins driven into the ground along the calculated contour of the arch.

Cut the reinforcement into pins using a hacksaw
The outline is drawn directly on the ground as follows: a rod is driven into the ground, a rope L = 0.9 m is tied to it and, taking the free end in the hand, a semicircle is drawn with paint or chalk. Then, starting from the top point of the semicircle, the pins are driven into the ground.

Drawing a semicircle using a rod, string and paint
The resulting template is very easy to use. In order to give the arch an arched shape, the reinforcement d = 10 mm is bent around the driven pins. The bend will be smoother if a strong, but flexible material. A strip of siding, a chipboard strip, etc. will do.

Reinforcement bending - labor-intensive process, which is easier to cope with together with an assistant
2. In this arch model, metal rings are used to connect the reinforcement sections. They are made from reinforcement d=6 mm thinner than the main sections.
From a bundle of reinforcement, 9 pieces of 94 cm are cut and rings are formed from them using a pipe bender. If you do not have this tool, the design of the arch can be simplified and instead of rings, connect the arched sections with straight rods. This arch will look simpler original version, but it will also be quite functional.

Forming rings from reinforcement using a pipe bender
3. The bent main sections of the arch are installed in the ground, deepening the reinforcement by 40-45 cm.

4. At a distance of 61 cm from the bottom of the arch soft wire tie metal rings, keeping a distance of 15-20 cm between them. They will allow you to connect the arched sections together and fix the shape of the arch.

Attaching rings to metal sections of the arch
5. To protect the arch from corrosion, all metal parts of the product are coated with a primer and then a layer oil paint.
Option #2. Wooden arch made of timber
Traditional wooden arch from timber - the simplest and inexpensive construction, fitting into the design of any garden. This garden arch for flowers, 2.2 m high, consists of two vertical frames, two inclined and one horizontal parts.

An easy-to-make wooden arch will help divide the garden space into functional areas
Materials required for construction:
- timber 40x50 mm, length 2 m – 4 pcs.;
- timber 40x50 mm, length 0.35 m – 4 pcs.;
- timber 40x50 mm, length 0.65 m – 2 pcs.;
- wooden planks 35x20 mm, length 0.65 m – 24 pcs.;
- wooden planks 35x20 mm, length 2 m – 2 pcs.;
- metal corner, length 0.25 m – 4 pcs.;
- screws or nails;
- primer, paint.
Wooden arch construction plan:
1. Make two vertical frames. Each frame consists of two vertical supports of 2 m each, two crossbars of 0.65 m each and one strip in the middle, 2 m long.

2. Assemble the side of the arch. Planks 35x20 mm long, 0.65 m, are stuffed onto the frame in increments of 0.2 m. The edges of the planks are cut at 45°, and any irregularities are sanded. sandpaper or a sander.
3. Attached to vertical posts metal corners. Subsequently, when installed in the ground, they will play the role of a foundation and will be able to hold the structure in a given position.
4. Cut out the bars for the top of the arch. Inclined bars 0.35 cm long - 4 pcs., upper horizontal bars 0.65 m long - 2 pcs. They are fastened together with self-tapping screws.
5. The upper part of the arch is connected to the sidewalls.

The arch is completely assembled on the ground, and then lifted and installed vertically on permanent place
6. Dig holes at the site where the arch supports are installed. Metal corners are fixed in the ground, setting the arch level. To make the wooden structure last longer, you can place stones under the supports.

7. On wooden surfaces a primer is applied, then a layer of varnish or paint.

A layer of varnish protects the wood from corrosion and increases decorative properties arches
Option #3. Arch with gabion base
A wooden arch, the sides and rounded top of which are formed from galvanized mesh, will be a convenient support for climbing flowers. Another unexpected detail of this design is the foundation of two massive gabions. They firmly hold the arch supports, eliminating the need to fill concrete foundation or dig posts into the ground.

Unusual arched design - a combination of beams, mesh and gabions
Materials used:
- beam 65x45 mm, length 1800 mm (4 pcs.) – vertical supports;
- beam 65x45 mm, length 800 mm (2 pcs.) – transverse beams;
- timber 21x10 mm, length 1380 mm (8 pcs.) – slats for creating grooves;
- galvanized mesh sheets, width 500 mm, length 1800 mm (2 pcs.) - for the sides and top of the arch;
- metal grid double torsion – for the manufacture of gabions;
- galvanized wire;
- screws.
Stages of gabion arch production:
1. Two gabions measuring 100x50x50 cm are made from meshes. Each gabion consists of three boxes: two for the base (the wooden supports of the arch will be installed in them), one for unifying, smaller in size. The gabion parts are connected with durable galvanized wire.

The gabion box is made of durable mesh, ideally from a special, so-called “gabion” mesh.
2. On each cross beam, a router is used to make through slots 4 mm wide and 500 mm long. The trellis mesh will be inserted into this groove in the future.

Cutting a through groove along the crossbar beam
3. Vertical posts are fixed on the sides cross beams using screws.

Screw connection of crossbars and vertical pillars of the arch
4. Triangular brackets are attached to the posts and crossbars to add rigidity to the structure.

Attaching the bracket to the crossbar and support increases the strength of the structure
5. On the vertical supports, the groove for fastening the mesh is formed by two wooden slats. They are fixed screw connection above and below the support beams.

Two slats are fixed along each support at a short distance from each other (3-4 mm). This allows you to create a groove for attaching the mesh to the side parts of the supports
6. The mesh is inserted into the grooves formed by the rails in the support posts and pulled out through a slot in the horizontal cross member.

The mesh is installed in grooves on the crossbar and side supports
7. Install the arch support posts into the gabion boxes.
8. Gabions are filled with stones: basalt, granite, limestone, glass blocks and so on. At the same time, they strive to fix the support posts as tightly as possible so that they cannot move during operation.

9. To obtain a rounded top of the arch, the mesh sheets are bent towards each other and tied in the middle with steel wire.

When the arch is ready, it doesn’t matter whether it is metal or wooden, climbing flowers are planted near it. Therefore, do not worry about minor defects in the construction! Massive lashes of climbing roses, clematis, annual morning glory or sweet pea will hide all design errors that are often made in the process of independent production.