For starters, for the amateur self-made furniture, you should learn how to create a stool, since it is the easiest. And then it’s time to study the issue of creating a table.
Table designs vary, however, the simple version is very similar to the process of creating a stool.

A simple table for use in the country or during a picnic can be assembled in just a few hours. To do this you will need a hacksaw, hammer or drill.

However, a table based on a similar approach can be made for a living space. Because it can ideally replace the current extra-large option purchased from a retail outlet or furniture store.

The process of creating a table yourself is interesting on the other hand, because with its help the author has freedom of creative expression. It can be presented as a noticeable element of the interior of the room.
Creators of handmade amateur furniture are called carpenters for a reason. The usual definitions like: sofa holders or bedside tables, or maybe cabinets, do not apply to them.

Having gained experience in this area, over time it will be possible to create exclusive types of tables with advanced characteristics.

Now let's consider the issue of creating wood-based tables yourself.

Wood is clean and affordable, and is not as difficult to process as other materials. It conveys the maximum energy of the aesthetic filling of the style of the living room.

Due to its properties, it is lenient towards the mistakes of beginners in the field of independent furniture creation. However, thinner versions of the tables will require an advanced level of craftsmanship.

To begin with, having learned to work with wooden things, then it will be easier to use glass, plastic or even metal as a material.

Selection of tools and work space
To study independent creation tables or other wooden elements furniture, it is necessary to use only non-residential premises.

This is due to the specifics of working with wood. It leads to the formation large quantity dust, shavings and other waste.

And the process of tinting or creating protection for a material based on stain can create dangerous emissions into the air. Actually, nitro varnishes can also be dangerous.

Because of this, for a personal carpentry workshop you will have to take care of ventilation of the room. Experts advise creating artificial ventilation premises.

Many people use a garage for this, however, production waste can pollute or damage the car, so this is not the best option.


Carpentry tools include modern and traditional types
For the most part, to begin with, you can limit yourself to a simple carpentry tool, however, later you may need modern versions in the form of:

- A rotating version of the miter box, which helps to create cuts based on two planes, adhering to the required size.

- This tool will open all your beneficial features, first of all, with bow saw. This pair is considered universal; it can be useful for many jobs.

- Manual version of universal electric jigsaw, featuring a tilting shoe that helps create cuts based on required angle in relation to the vertical plane.

- Disk version grinder. It will help beginners complete wood surface treatment in about 5-15 minutes. Experienced carpenter together with the skin, it can do the same job in about an hour.
And there is also a regular grinding machine draw machine and for grooves with recessed places, characterized by a protruding version of the working part.


Such tools are distinguished by their price and narrow specialization of work; experienced craftsmen recommend renting them for a short period.

The best specialists, using various grinding machines, can even create the effect artificial aging wood, however, is very hard work, as for beginners.

Which tree is best?
To create a wooden table, any wood that is moderately resistant to decay is suitable, however, you should refrain from soft versions like: poplar, willow, ailanthus wood, aspen and alder.

Of the domestic types of wood, it is best to use:

- soft options in the form of pine, fir, cedar, horse chestnut, plane tree, juniper or spruce.

- solid in the form of ideal oak, beech, maple, walnut or ash, larch, suitable for many works, as well as fruit species represented by apple, plum, pear, apricot and quince. And also elm and rowan should be included here.


- enough hard species based on acacia, yew, stone birch, dogwood and boxwood.

Conclusion
I would like to decorate a table and probably all types of furniture created with my own hands with an artistic version of painting, and not with ordinary stripes.

However, over time, the design may deteriorate; to prevent this from happening, it is necessary to rub the paint into the depths of the wood before the varnishing process. This can be done using the technique of glazing. We are talking about layer-by-layer rubbing of the paints used.

Photos of tables with your own hands


Even if furniture production is far from your area of expertise, make country table with your own hands to gather with family and friends on warm summer evenings is a completely feasible task.
Its main advantage, as opposed to a purchased one, is its undoubted savings. It is not necessary to make a table from scratch: simply by assembling purchased parts, you will save 30-50% of the cost. If you manage to use materials left over from construction or renovation, the costs will be limited to the purchase of fittings.
To choose a design, you need to decide where the product will be used.
By using cheap, substandard boards for your country or kitchen table, you will get benefits that are not available for mass production. Sounds dubious? But this is true: the knots that cause boards to be rejected have interesting decorative properties. If you manage to highlight them successfully, you will become the author of a completely unique design product that would be a shame to leave in the garden in the rain.

Making a country table with your own hands to gather with family and friends on warm summer evenings is quite a feasible task.
To choose a design, you need to decide where the product will be used: on a grassy lawn under a tree, to complement a gazebo, to stand in a workshop or in a house.
The simplest country table can be assembled in a few hours with a minimum of materials, but it will not last long. To get a product that will be truly pleasant to use, you need to carefully prepare the boards and perform all technical operations at each stage with high quality.

Its main advantage, as opposed to a purchased one, is its undoubted savings.
If you find a large stump in the forest, it can be easy to make garden table. All you need to do is remove the bark from the stump, make an even cut along the top, sand it, treat it with an antiseptic and varnish it. It is enough to nail or screw the finished stump to the “leg” furniture board- and you're done.
Tabletops made from boards fastened at the bottom with transverse slats look good. If you prefer glued table top, you can do it yourself, but it will require a lot of effort.

If you manage to highlight them successfully, you will become the author of a completely unique design product that would be a shame to leave in the garden in the rain.
It is difficult for a novice master to fasten the legs securely, so try to choose a design, correctly assessing your skills and taking into account the cost of labor and time. The easiest way to make cross-shaped and L-shaped legs. To attach straight legs, you need to carefully connect the parts.
One of the most cozy options for garden - collapsible table with benches, which can be installed in a gazebo or on the veranda. It’s not difficult to do, the main thing is to choose quality materials and properly prepare them for work.

The simplest country table can be assembled in a few hours with a minimum of materials, but it will not last long.
How to choose a tree?
For garden or kitchen table will do wood of many species, both soft (pine, spruce, cedar, fir) and hard (oak, birch, ash, walnut, maple, apple, pear, acacia, etc.) The exception is too soft wood species (poplar, alder, aspen, willow).
One of the main parameters of the suitability of wood for making furniture is resistance to rotting: the species listed above meet this requirement.
If you do not plan to do furniture work on a regular basis or are just starting to practice, give preference to the most common types of wood - pine and birch.

Tabletops made from boards fastened at the bottom with transverse slats look good.
It is possible to use different types of wood for the table top, frame and legs. At the assembly stage you will need dowels: they are usually made of acacia or boxwood. Birch wood has an inexpressive pattern and can be significantly warped due to spilled liquid - it is better not to use it as a tabletop material, but due to the hardness of this species, it can be used to make legs.
It is better to make the tabletop from oak or pine. If you know how to brush wood, the surface of your kitchen table can become a real work of art. Wood can be brushed soft species: wood is burned gas burner, and soft fibers are removed with a wire brush. It is better to carry out work in the yard due to the large amount of dust. If you managed to burn the wood evenly, you will be pleased with the result. Brush can be tinted with stains, stains, artistic paint diluted with water acrylic paint. Of course, brushing the wood is not necessary: it is only a finishing option.

If you prefer a glued tabletop, you can make it yourself, but it will require a lot of effort.
Selection of paints and adhesives
Before installation begins, the boards must be protected from rotting. The tree must be impregnated with water-polymer emulsion (WPE): treatment is carried out twice with an interval of 3-5 days. This is enough for the product to last a long time.
Some models will require glue. Along with special carpentry adhesives (BF-2, etc.), you can use construction PVA: it is applied to both surfaces to be glued, dried until tack-free, then the parts are connected and kept under pressure for up to three days.

It is difficult for a novice master to fasten the legs securely, so try to choose a design, correctly assessing your skills and taking into account the cost of labor and time.
Choice paint and varnish materials determined by where the product is planned to be used: in the yard or indoors. For garden table which is inevitably exposed to precipitation, alkyd, alkyd-urethane, nitrocellulose varnishes and oil paints are suitable. For a kitchen table, as for any furniture that is constantly located indoors, it is better to use acrylic paints and varnishes: they are more environmentally friendly and do not have strong odor. Varnishes marked with the “blue angel” sign are recommended for children's furniture and toys.
If you decide to cover the wood with stain, paint or simply tinted varnish, this must be done before assembly. Material compatibility must be taken into account. The varnish is tinted with a paint of a suitable composition: if the varnish is alkyd, the paint should be oil-based; if you use acrylic varnish, it can only be tinted with acrylic paint. First, a small amount of varnish is thoroughly mixed in a separate container with paint, and then the resulting mixture is added to a larger volume of varnish.

One of the most comfortable options for the garden is a collapsible table with benches, which can be installed in a gazebo or on the veranda.
What tools are needed
To work you will need:
- hacksaw,
- circular saw or jigsaw;
- drill;
- screwdriver;
- hammer (if you decide to use nails).

Many species of wood are suitable for a garden or kitchen table.
IN this list only the most necessary tools, but to make the work more comfortable and the finished product to look aesthetically pleasing, it is advisable to buy or rent a rotary miter box, an eccentric sander and milling machine.
The rotating miter box makes it possible to make cuts at exactly the right angle. An eccentric sander will allow you to prepare parts simply, quickly and efficiently: you will sand the boards in an hour, instead of doing it all day by hand with sandpaper. For high-quality processing A belt sander is useful for the ends, and a milling machine allows you to select wood for the required grooves and process the edges.

If you do not plan to do furniture work permanently or are just starting to practice.
Homemade table from pallets
A spectacular table in a rustic style can be constructed from pallets ( wooden pallets). If you are the happy owner of such a container, especially a double-deck pallet, just disassemble it: there is no problem purchasing boards!
Do you think that buying new boards is always better? You probably haven’t worked with wood before: you can’t use raw wood (the product will become deformed after a few months), and dry boards are much more expensive. To dry green wood planks, they are stacked in a well-ventilated area: this necessary process will set your project back by 4-6 months! The already mentioned rejected boards, also dry, can be a good option for the kitchen table.

It is possible to use different types of wood for the table top, frame and legs.
Let's return to the pallets: they are disassembled. Now you have at your disposal strong boards with different patterns and color, it is possible that they are from trees of different species. These features should not be considered as disadvantages: they will give the product a zest: you just need to create from them interesting composition, alternating boards of a similar shade.
From the side parts of the pallet you will get excellent frame, and the remaining strips will be used to assemble the tabletop.

It is better to carry out work in the yard due to the large amount of dust.
To make the legs, you will need a beam at least 5 cm thick. All parts must be prepared: sand strictly along the grain with sandpaper, first coarse (No120-150), then finer grain (No400-600), carefully removing dust.
Some boards can be painted with acrylic or oil paint. Fans of the loft style can use stencils in the form of numbers or simple graphic symbols. We stain boards with a beautiful natural pattern or simply varnish them. After staining or first layer acrylic varnish soft fibers rise; They need to be sanded with medium-grit sandpaper and a new coat of varnish applied.

A spectacular table in a rustic style can be constructed from pallets (wooden pallets).
If a non-aqueous varnish is used, it is enough to apply 2-3 layers, and if acrylic, the number of layers can reach up to ten.
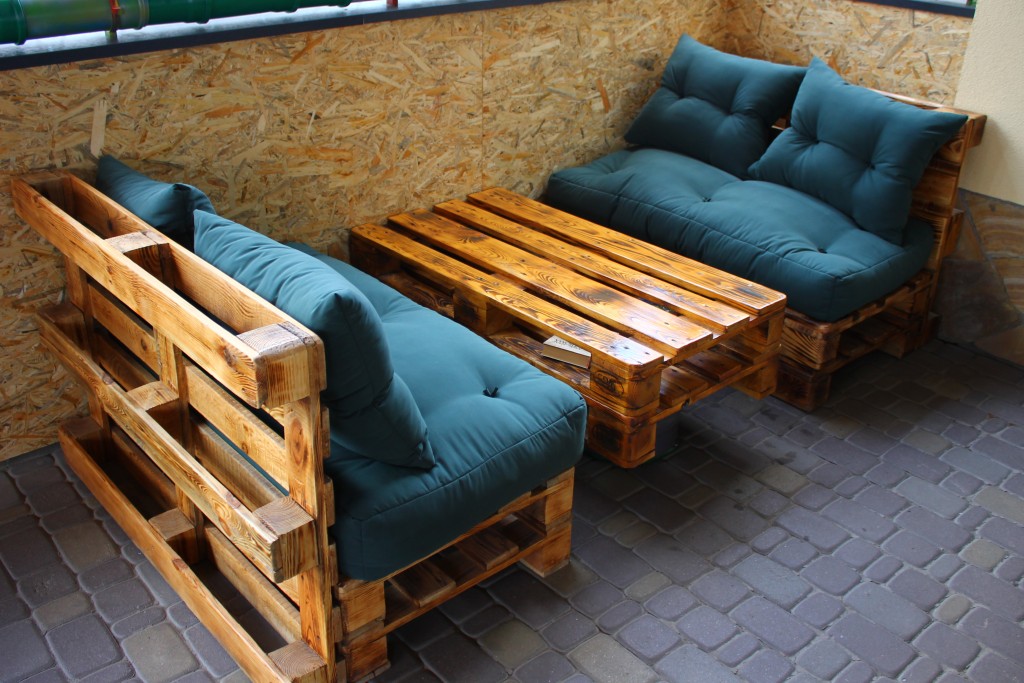
Rejected boards, also dry, can be a good option for a kitchen table.
We fasten the tabletop boards with strips, which we place at the joints of the boards. Using a drill, screwdriver and self-tapping screws, we fasten the boards to the planks (we use two self-tapping screws at the joints, and one on solid boards). The use of a drill is necessary so that when screwing in the screws the wood does not crack. We assemble the frame from the prepared pallet sides. Using a drill of a diameter suitable for self-tapping screws, we drill holes at the joints. We coat the joints with glue and fix them with self-tapping screws. We install the legs: simply screw the boards to the frame, screwing in the screws diagonally. To strengthen the structure, we make jumpers at the bottom in a similar way.

To make the legs, you will need a beam at least 5 cm thick.
Wooden table with glued top
For a glued tabletop, you need to select boards of the same width. If the table is intended for a workshop and its appearance doesn't have of great importance, you can use old floorboards: there are already grooves there. To make the grooves yourself, you will need a milling machine.
A flat surface is required to assemble the tabletop. We simply coat the sides with glue, join the boards together without gaps and tighten the resulting structure with clamps. Depending on the glue used, the tabletop should dry from 1 to 3 days. If everything is done correctly, you will get a tabletop with a completely flat surface without cracks. All that remains is to work on the ends - first trim them with a jigsaw and then sand them. If you do not have a belt sander, this must be done manually - with sandpaper, first coarse, then medium-grit.

After varnishing the parts, you can proceed to installation, which consists of several stages.
If you don’t want to bother with glue and clamps, you can use ready-made furniture board from a hardware store. Then the tabletop remains to be covered with transparent or tinted varnish.
For good result you need to apply 5-7 (for acrylic varnish up to 10) layers. After every third layer work surface The countertops should be sanded with fine-grained sandpaper, carefully removing dust with a damp cloth. At the varnishing stage, it is important not to rush: each layer of varnish must dry thoroughly.
All that remains is to make the legs of a garden or kitchen table: let’s focus on the option with L-shaped legs. You will need boards with a thickness of at least 22-25 mm.

For a glued tabletop, you need to select boards of the same width.
L-shaped legs consist of two parts connected at an angle of 90. It is necessary to make a sample on the boards to be joined, coat the joint with wood glue, and then install self-tapping screws.
When the glue has dried, we coat the legs with varnish and, after drying, simply attach them to the tabletop with self-tapping screws.

There are several options for connecting the legs to the tabletop.
Table with straight legs
To make straight legs, just saw thick timber into pieces of equal length. There are several options for connecting such legs to the tabletop.
To ensure that straight legs are installed securely, you can use a dowel connection at home. You can make them yourself from acacia wood or buy ready-made ones. To assemble dowel joints you need quick-drying wood glue (BF-2).

To make straight legs, just cut a thick beam into pieces of equal length.
Table with X-shaped legs
Sequence of work.
- On inner side We fasten the tabletops with self-tapping screws, two strips on each side.
- To make the table look good, the edges of the planks must first be cut at an angle of 52.
- We attach paired planks so that the legs fit, making overlaps of 2-3 mm on each side.
- Place the boards on a flat surface, crossing them at the desired angle. We measure the distance between the ends of the boards: it should correspond to the width of the table.
- We outline the intersection with chalk: here you need to select half the thickness of the boards so that after assembly they lie in the same plane.
- We coat the recesses with glue and place the parts under the press for 1-3 days. For greater reliability, the connection can be strengthened with self-tapping screws.
- We varnish the legs.
- All that remains is to attach them to the tabletop, placing them in the grooves formed by the slats - and the table for your garden with your own hands is ready.

X-shaped legs are made from beams or boards with a thickness of at least 50 mm.
Table with benches
The optimal solution for a gazebo is dinner table with benches attached to it. It is better to make this design collapsible so that it can be stored indoors for the winter.
The table will require thick boards (from 32 mm), which need to be cut into pieces according to the drawing. In this version, two benches are attached to the table. When all the parts are cut, they need to be sanded, paying special attention to the ends. We varnish each board separately.

The optimal solution for a gazebo is a dining table with benches attached to it.
To connect the parts of the structure, we will prepare studs (length 160 mm), nuts and washers - 24 pcs. For other connections we use screws or nails of suitable length. Using a drill, you need to prepare all the holes for fastenings.
According to the drawing, we assemble the tabletop and the upper parts of the benches. We cut off the transverse slats along the edges, the angle should be 45. This is convenient to do with the help of a rotary miter box.
We make and fasten all the legs with self-tapping screws. We fasten the parts cut at an angle.

We varnish each board separately.
We tighten the product with studs and bolts. The holes for the studs must be pre-drilled with a drill. When installing the stud, you need to put washers on both sides and tighten the nuts using a wrench.

We tighten the product with studs and bolts.
We fasten the seat boards with gaps of 5 mm. When the seats are connected to the sawed-off supports, we attach them to the assembled base with 160 cm boards: you will need 4 boards.
Install the remaining studs and enjoy the result.

Using a drill, you need to prepare all the holes for fastenings.
VIDEO: Do-it-yourself wooden table for a gazebo
50 photo ideas: how to make this table with your own hands


This type of useful furniture such as DIY wooden table It's not just a way to save money or show off your carpentry skills to others. First of all, such a homemade item is an opportunity to make a thing that is ideally suited for the tasks assigned to it in terms of size, configuration, material and strength. And, if everything is done according to the instructions and recommendations of the craftsmen, then making a new table will not be much more difficult than assembling a ready-made one brought in a box from the store.
How to make a wooden table with your own hands
Before disassembling specific items and recommendations for how to make a wooden table with your own hands, you should decide whether you need to get exactly wooden product and what exactly its design will be. This texture is ideal for, because the naturalness and environmental friendliness of wood fits perfectly with the dacha concept.
But even in city apartments, especially in those whose design is in Provence, rustic, and Scandinavian styles, small wooden tables that look like they have been deliberately aged fit perfectly. Yes, and loft or others modern varieties they cannot do without a wooden texture, however, it is more likely that the main material there may be wooden pallets. This type of furniture is more likely to be referred to as furniture, since its assembly resembles the assembly of a construction set. If you want exactly this coffee table, then keep in mind that the pallets must first be dried well (so that they do not change their shape, they do not “sag” after one season of use), all the boards must be brought to an absolutely even shape using a power tool, and only then painted. Therefore, think about whether you can spend the same efforts on making even a small DIY wooden table, video with a master class for which you will find on the Internet, but it will be durable furniture that will probably not go out of fashion for a long time and will serve its owner faithfully.
DIY wooden garden table
In most cases, we need advice on creating exactly DIY garden table made of wood. There are a huge number of tasks for this piece of furniture; we can safely say that there are never enough tables in a dacha. Therefore, both lunch and kitchen table, and a picnic table, round, for a gazebo or folding, with which you can sit on the terrace or on the river bank while fishing. And for each option there are individual tips for creating.

However, there is also general recommendations that you can keep in mind when creating DIY wooden table, photo which you see in our article today. This applies to the selection of wood, for example. It is believed that a countertop, especially one that sits outdoors, should be a hardwood such as oak or walnut, but today with the availability of many quality protective equipment and varnishes, you can very well use pine boards, which are much cheaper in price and, with correct processing, they will serve you for a very long time. If you want to practice cutting complex elements or creating carvings, then choose soft woods such as linden, but be prepared for scratches or dents if used too hard.

The second important general point in creation is the choice of a suitable configuration for it. You may want to pay attention to finished projects DIY wooden table, drawings which are included, including in our article. They already have dimensions indicated, but this should be treated only as a recommendation. After all, what are good independent work– you have the right to make your own decision on size and shape. It is according to the number of members of your family that you can choose the width and length of the tabletop, and the shape is selected according to the height or parameters of the terrace, gazebo, inside which the furniture will stand. The standards are considered to be a height of 75-85 centimeters and a rectangular tabletop of 120x70 centimeters.

Based on all of the above, the first stage can be called creating a drawing on which you will not only mark all the necessary dimensions, but also make an approximate cutting of the parts that you will need for assembly. You can use the illustrations as an example DIY wooden table, drawings, photos which you see above. The diagrams indicate the sequence of actions that must be followed to make the product stable. In general, the stability of the legs and the evenness of the surface of the tabletop are two mandatory conditions similar For evenness, you must comply exact dimensions length of the legs and trim their lower surfaces well. Ready product You can even check with a level whether it will stand in the correct plane. But regarding sustainability there is various ways. For some, this is achieved with the help of a different number of legs, that is, not the classic four in all corners of the rectangle, but three or just one, strictly in the center. If there are four legs, then they are additionally equipped with stiffening ribs, supports and jumpers between each other. By the way, it is very convenient to place your feet on such supports while eating; this can be called another pleasant bonus.
DIY wooden tables and chairs
Set DIY wooden table and chairs done, will become excellent option for filling summer terrace where you can have lunch and dinner at fresh air. Even if there is a canopy or roof over the set, timely care and processing of the wood before starting work is still very important. The boards should not have any unevenness, knots, or holes; they should be completely dry, so that later you do not get deformation during use, because there will be plenty of humidity in the surrounding space. Also good decision will make the tabletop and the top of chairs or benches not continuous, but with gaps between the boards, which will allow rainwater to drain from the surface without stagnating.

You can see one option in the photo. For this, boards are taken; they should not be too thick, since on such surfaces the deformation of the surface may be stronger, but not thin, so that fairly heavy pots or other utensils can be placed on the surface. If you cannot afford to make the entire product using hard, valuable wood, you can combine it by making the tabletop itself durable and resistant to damage. The model we offer you is made on four points of support, so it is perfect for a stationary table that is fixed in one place. Used for fastening metal pipes, which are deepened into the ground and, if necessary, concreted.

First, the boards are knocked together, using special self-tapping screws, since ordinary metal nails can lead to damage to the material. The assembly takes place on two boards, which are located below; everything else needs to be screwed onto them. After this, the surface must be processed using manual or electric planer Of course, if you use an electric one, it will save you significantly more time. The boards that will create the frame of the table top, as well as the timber for the legs, are cleaned in the same way. Final sanding with sandpaper is carried out after the product has been assembled. You can trim the edge using a router either on a ready-made, assembled tabletop or on boards; you just need to mark the boundaries if you want to repeat the rounded shape, as in our example.


In another example, step by step production which you see above, the tabletop is literally assembled using scraps of boards that were previously used in renovation or construction. In this case, it is very important that their thickness be the same, because they will be assembled at the ends. Interesting visual effect ensures assembly technology, because the boards are literally strung together metal pins and additionally glued. Then the legs are nailed to the surface, made at an angle of 45 degrees.

DIY wooden gazebo table
If we single out the models that are the most complex and require special attention, then among them wooden gazebo table. With your own hands it is not so difficult to make, but it is very important to correctly calculate its dimensions and fit it into the existing space of the gazebo as efficiently as possible. When we, after all, care more about its functionality than about any decorative properties. In the case of a gazebo, a place that attracts special attention from guests, you need to take care of the visual decoration of the tabletop. Both carving and interesting design using saw cuts.

As for the shape, you need to be guided by the shape of the building itself, inside which the furniture will stand. That is, in a rounded gazebo, square or round table top Not only will it look ugly, but the space will also be used extremely irrationally. That is, most often they use a simple rule - in a round gazebo they put a round table, in a hexagonal one - a hexagonal one, in a spacious and wide rectangular one - a rectangular one.
DIY round table made of wood

Because round gazebo- the most popular variety, we can say that exactly round table do it yourself from wood and is the #1 model that DIYers want to make. The particular difficulty that distinguishes this particular shape is cutting out the shape; you must not spoil the material and try to ensure that you get a perfect circle.

For those who doubt their abilities and the levelness of their hands, we can recommend a compromise option - buy a round ready-made tabletop and make furniture based on it. For a round top, it would be important to use a tripod system, which is shown in the photo above. First, a base is created, three boards are connected to each other, and legs are nailed to them. The last stage The tabletop is secured to the self-tapping screw in the center.
You should start working, of course, after a specific model of a given item has been selected. If there are no carpentry skills as such, then there is no point in aiming for a whole work of art. But even the simplest option in terms of production can look quite decent and even more beautiful because it will be made on its own.
A list of required tools or how to make a wooden table with your own hands using what is in every pantry
Having examined and gone through many drawings of wooden tables with your own hands, you can come to the conclusion that you will need the entire set of carpentry tools. Indeed, for comfortable and fast work you will need to acquire the following:
1. Jigsaw.
2. .
3. Sander.
4. Screwdriver.
5. A set of drills of various diameters.
6. Brushes.
7. Sandpaper with zero granularity parameter.
8. Materials for processing (stains, varnishes or paints).
9. Materials for eliminating defects (wood putty and similar).
10. Carpenter's vice and glue.


The list is quite large and you can think about whether it’s easier to buy a ready-made piece of furniture than to rack your brains over how to make a wooden table with your own hands with a minimum of available tools. But there are no hopeless situations, so let’s get creative and find new ways to achieve the goal.
- The jigsaw is being replaced regular saw(however, there will be an order of magnitude more work to eliminate irregularities).
- There is no need for a router if the tabletop is made from a single sheet rather than individual segments.
- For the same reason, you can remove wood glue along with a vice from the list.
- You can cross out the grinder, but it’s worth clarifying that it’s almost impossible to manually polish the surface to the required state. Therefore, we choose more a budget option- a grinding attachment for a screwdriver.
- It is unlikely that you will be able to do without a screwdriver, but this tool is available in almost every home.
Other parts and materials, even if they are not in the house, are not so expensive to purchase.
Assembling a table made of wood with your own hands according to the drawings of a simple and waste-free design
To assemble a table with your own hands from wood according to this drawing, you do not need to be a trained specialist. The design is simple and understandable, the main thing is to do everything carefully and slowly. This option is also attractive because it can be made in two types: both a coffee table and a dining table. The only condition is that when making the latter you will need support stands (they can be easily purchased at a hardware store).
Wooden table drawing of a wooden table diagram No. 1
So, the instructions on how to make a wooden table with your own hands are as follows (see diagram No. 1):
1. The canvas is prepared (sanding, stripping, treatment with antiseptics, sealing microcracks, etc.).
2. Transfer the separation lines from the drawing to the canvas.
3. If you move from the left edge of a horizontally laid sheet to the right, then the markup will look like this:
40 mm – line (this cut will serve as a support bar).
250 mm – curved line (this cut will act as legs, in the case of coffee table, and if the dining option is chosen - as a support stand for high legs).
900 mm – curved line (the largest segment, of course, will be used as a tabletop in the future).
250 mm is the last straight line (divides the remainder into the leg and the support bar).
4. The elements that will be supporting (legs and slats) must be shortened by 30 mm on the sides. This is done so that their edges are not visible from under the tabletop.
5. Having placed the leg with an arc downwards, we see that it rests on sharp edges. In this case, we will not get the stability of the product. Therefore, we measure 30 mm from the top of the corner and make a horizontal cut on both sides.
6. Attach the bar to the top of the legs with self-tapping screws. The step between them is 150 mm.
7. We retreat 250 mm from the edge of the tabletop and place the legs in this place. Self-tapping screws (4 pcs) will be screwed into the tabletop through the plank, so make sure that they do not get into the cross fasteners.
Our article on how to make one for your dacha with your own hands will be useful.
The fully assembled product is painted or varnished. To obtain high-quality mirror image smooth surface not enough sanding pure wood. After coating with the same varnish, one way or another, small fibers will “stand on end.” Therefore, after each applied layer it is necessary to sand the surface with fine sandpaper. And the applied layers must be at least three. The end result is a beautiful piece of furniture without breaking the bank.