Propane gas cylinders have a limited service life; over time, quite a significant portion of them are discarded. At the same time, the home craftsman has a workpiece that can be used for a variety of tasks. For example, you can learn how to properly make a barbecue out of a gas cylinder.
You can, of course, hand over a fairly significant part of the metal at recycling points and receive a certain amount, but in the hands of a skilled craftsman, the used unit finds another use.
Design features of a gas cylinder
In 1953, the design of cylinders for individual gasification of apartments and houses was approved. Subsequently, devices were developed that were installed not outside, but inside the building.
Gas cylinders for individual use according to GOST 15860-84:
1 – shoe; 2 – lower bottom (lower sphere); 3 – reinforcement belt; 4 – upper bottom (upper sphere); 5 – place for the cylinder passport; 6 – collar (protective casing); 7 – valve; 8 – restrictive neck ring for cylinders without a shell and with a valve; 9 – shell; 10 – neck ring for cylinders with a shell and valve; 11 – shut-off valve; 12 safety cap
For design, craftsmen need the basic dimensions; they can be found in the attached Table 1. Using the data, you can independently work out the type and parameters of the product that you intend to make yourself.
Table 1: Dimensions of cylinders for storing and transporting propane
| Cylinder sizes, mm | Cylinder nominal capacity, l | |||||
| 2,5 | 5,0 | 12,0 | 27,0 | 50,0 | 80,0 | |
| D | 200±2.5 | 222±+3.0 | 222±+3.0 | 299±3.0 | 299±3.0 | 299±3.0 |
| D₁ | 200±3.5 | 200±3.5 | 200±3.5 | 270±4.0 | 299±4.0 | 299±4.0 |
| D₂ | 155±5.0 | 155±5.0 | 155±5.0 | 222±5.0 | – | – |
| D₃ | 160±3.5 | 160±3.5 | 160±3.5 | 230±4.0 | – | – |
| S | 2.0±0.3 | 2.0±0.3 | 2.0±0.3 | 3,0+0,3 | 3,0+0,3 | 3,0+0,3 |
| H | 225±2.0 | 285±2.0 | 470±2.5 | 575±3.0 | 960±3.5 | 1400±4.0 |
| H₁ | 136±2.0 | 197±2.5 | 384±2.5 | 474±3.0 | 830±3.5 | 1275±4.0 |
| Mass of liquefied gas in a cylinder, kg | 2.8±0.10 | 4.0±0.12 | 6.0±0.15 | 14.5±0.10 | 22.0±0.15 | 31.5±0.20 |
From the presented data it is clear that the wall thickness of large-volume containers is quite solid, it is 3 mm. For devices that burn solid fuel, such walls will last quite a long time.
Construction of a barbecue from a cylinder
Before starting work, you need to develop a drawing of the future product. The design provides:
- a rotating cover; part of the shell will be used for its manufacture;
- To open and close the lid during operation, you will need a handle. To prevent burns, a wooden handle is placed on the outside;
- hinges will be needed to rotate the lid when opening and closing. It is not advisable to use rivets; they can melt, since the internal temperature during the combustion process can rise above 700...800 ⁰C;
- The edges of the cut shell need to be reinforced with a corner. It will additionally seal the joint between the parts;
- to remove combustion products, it is necessary to weld a pipe with an elbow;
- the entire device must be placed on legs, the height of which will help to operate the grill without bending over when preparing food;
- It is advisable to place a shelf for solid fuel under the cylinder itself;
- In order for firewood or coal to burn normally, you need to organize an air flow. To do this, it is enough to cut transverse grooves. A more advanced option is also possible using pipelines for forced submission air.

Sketch drawing of the future barbecue
During the manufacturing process, additions or some changes may be made to the project. Their goal is to optimize the design of the installation.
 Basic cuts of the workpiece before starting welding work
The most common are cylinders with a volume of 50 liters. They are easier to get. They are sold at gas stations where propane is filled. There are always containers there that are unsuitable for further use.

Creative design of a garden grill made from a balloon
Some masters create quite interesting designs. They provide for the installation of auxiliary shelves for the installation of dishes, semi-finished products and ready-made dishes.
Can be found homemade designs, where rain shelters are installed. Then cooking can be done even in bad weather.
The presence of a closing chamber turns the grill into a barbecue made from a gas cylinder. Here food is prepared in a confined space. From the burning coals, the heat flux of radiation is directed to the inner cylindrical surface, and then reflected from it and onto the food being prepared. A barbecue is being created in which it is convenient to prepare oriental dishes.
Attention! You can hear the opinion that inside such barbecues, the heating of the product occurs unevenly. In fact, the presence of reflective surfaces made of thick metal allows you to maintain a high temperature throughout the entire volume. Thermal radiation spreads in all directions and is then reflected onto the products placed on the grill.
A possible continuation could be a small-sized smokehouse for hot smoking meat and fish products.

Drawing of a smokehouse made of two gas cylinders

Real performance of the smokehouse
What do you need to prepare for work?
To begin work, you need to prepare tools, as well as auxiliary consumables.
✹ Tools to get the job done:
- angle grinder (angle grinder, grinder) with a set of cutting and cleaning discs;
- welding machine with electrodes. Practice has proven that modern inverter devices can weld at DC in thin-walled products;
- roulette and others measuring instruments will help mark out the workpieces;
- lathe will allow you to grind out the hinges and handle. You can also buy necessary equipment;
- electric drill with metal drills;
- an electric screwdriver allows you to quickly assemble individual parts into units and an entire structure;
- Pull-type riveters are used to create permanent connections;
- a pencil and scriber, as well as chalk, will help mark out the workpieces;
- protective devices: welder's mask, apron, gloves, goggles or mask for plumbing work, respirator.
✹ Materials for work:
- cylinder for 50 liters of gas mixture;
- rolled angles, profile pipes;
- metal rod with a diameter of 8…16 mm;
- hardware: self-tapping screws, screws and bolts with nuts;
- fire-resistant paint, liquid for washing off dirt and grease;
- a handle from a shovel or other garden tool.
Safety precautions when cutting a gas cylinder
You cannot start cutting the workpiece right away. A flammable gas remains inside, along with gasoline (gas in the form of a liquid). If you start any machining: drilling or cutting, a spark may occur that will cause an explosion. It is necessary to remove any remaining flammable substances from inside the container.

It can be quite difficult to unscrew the valve. Behind long years During operation, quite strong bonds are formed between the elements, and diffusion of one metal into another is often observed. You need to do this.
- Secure the cylinder against possible rotation around its axis. Here they use belts or thick wire.
- A gas key (No. 2) is installed on the valve.
- It can be extended by a pipe by about 1 m.
- Select a position so that the resulting lever has a stroke of at least 40...50 cm.
- Press the lever sharply to create a shock load.
In most cases, this approach is effective. To make it easier to tear off the valve, you can tap the neck with a hammer.

The balloon is filled with water. It will squeeze out all existing flammable substances. Now you can cut gas cylinder.
Attention! It is advisable to carry out all procedures away from residential areas. Stands out quite bad smell.
Step-by-step instructions for making a barbecue with your own hands
After all the preparatory operations have been completed, the manufacture of the barbecue from the cylinder begins. Below are detailed step-by-step instructions.
 | To make it more convenient to work with a cylindrical object in the future, it is necessary to use shoes to fix the wheels. |
 | After all measurements it is necessary to make markings. Many people use a pencil or chalk. But such lines are inconvenient to use; they get erased. It is most convenient to use paper masking tape. It is pasted according to the diagrams and drawings. In the future you will have to cut along the edge, then it will be more convenient to carry out any cleaning. |
 | A longitudinal line is drawn along the ruler. Then masking tape is applied. |
 | Before cutting the surface, the hinges are welded. A groove is cut at the installation site. The rest of the part has not yet been cut through. A gap of about 2 mm is needed between the hinges and the surface of the shell. Use regular matches. They are placed under the hinges. |
 | The area under the hinges themselves is cleaned. Then they are fixed for subsequent welding. |
 | After welding the hinges, the cover is cut out. |
 | The preliminary work has been completed, the hinges have been lubricated. The lid opens freely. |
 | The skewers will be fixed in the grooves. They are cut to a depth of 15 mm. This way the emphasis will be quite strong. The groove width of 4 mm will allow you to easily place the skewer when frying kebab. |
 | You need to make holes on the back of the case. The sharp parts of the skewers will penetrate them. Marking is carried out using an automatic center punch. |
 | First, holes with a diameter of 4.5 mm are drilled. Then they are drilled out to 9 mm. |
 | Holes are needed at the bottom through which air will flow to the solid fuel, which will be burned in the barbecue. Marking is carried out, and then drilling is carried out in two stages. |
 | Profile pipes are welded inside. They provide rigidity when installing skewers. When heated, the sheet part of the grill may move. Therefore, amplifiers from profile pipe will help maintain the strength of the entire structure. |
 | After preparing the body, you need to check how conveniently the skewers will fit inside it. Experienced kebabs give advice: “A gap of about 1 cm is required between meat pieces between skewers located next to each other.” Therefore, you can install the kebab sticks quite tightly. |
 | The legs will raise the body higher. However, there will be no need to weld the support if you use ready product, which can be found at scrap metal collection sites. A ready-made support from sewing machine. It is cast from gray cast iron, so the barbecue body must be welded through intermediate steel corners. |
 | Rolled isosceles angles with a side of 40 mm are screwed to the frame. The holes were pre-drilled, then the M8 thread was cut. |
 | The corners are welded to the body. The bed and corners will ensure the rigidity of the entire structure. |
 | The lid will become very hot. When cooling, the geometry of the lid may be damaged. Rods from reinforcement are welded inside. Such a cross member will not allow the radius of the generatrix to change. |
 | A tire is made from a strip 30 mm wide and 4 mm thick. This will keep the lid strong. At the same time, the tire will not allow hot air to escape outside. Such a seal will perform a dual function. |
 | One end of the shank is secured with a hand vise. It is welded along the generatrix. When welding, each new section is additionally fixed. The result is a prestressed structure. |
 | Once the work on the door is complete, the result is a rather elegant product. The joint between the body and the lid will be covered. |
 | Supports for the future handle are made from a sheet of metal 2 mm thick. The handle is made from the handle of a shovel. It is pre-drilled and polished. The supports are welded to the lid. |
 | To prevent gasoline residues and other harmful inclusions from remaining inside, coal is placed inside the housing. Burning is carried out for 3…5 hours. The lid is kept in the closed position. Therefore, the entire surface of the former cylinder is simultaneously burned. |
 | The ash is removed, then the outside surface is treated with flap grinding wheels. White spirit helps degrease the surface. All that remains is to paint with heat-resistant paints. |
 | The painted grill looks quite respectable. When asked the question of how much a barbecue made from a gas cylinder costs, it is advisable to look at hardware stores. Sometimes you can meet there similar products. The price tag is quite high. |
 | The best test for such equipment is cooking food in it. After aging in the marinade, the meat is threaded onto skewers. On smoldering coals skilled craftsmen will prepare a delicious dish. |
Video: do-it-yourself grill from a gas cylinder.
Making a homemade smokehouse
A ready-made grill is used to smoke meat. However, specialists produce more complex design universal use.
For smoking you need to have not one, but two or more chambers.
- The first chamber contains the product to be smoked.
- In the second chamber (there may be more than two) a smoldering fire is lit.
- First, they light the wood chips, and then cover the air supply.
- As a result, the wood chips begin to smolder.
- The smoke moves through the pipe into the food chamber.
- The product is fumigated with smoke and acquires the appropriate appearance and color.
There are hot and cold smoking.
- When hot smoking, the distance between the fire source and the product is minimal. The treatment is carried out with smoke, the temperature of which is not less than 50...60 ⁰С. To obtain high-quality smoked meat, about 3...4 hours of processing are required. As a result, you can store the finished product in a cool place for up to 5...7 days.
- Cold smoking is carried out with smoke whose temperature is no more than 20…25 ⁰С. The result is a smoked product that can be stored in a cool place for up to 14...17 days.
How to make a smokehouse at home?
The following project involves the manufacture of several working devices:
- Brazier for frying kebabs, sausages and other products on the fire.
- Oven for cooking food.
- The stove can be used to produce smoke.
- The grill will be used in this case for smoking semi-finished meat products.
 | To make the slab, you need to prepare the corners for the front wall. They are sawn from rolled angle 50·50 mm. |
 | Next, the corners on the front wall are welded. |
 | The finished wall looks like this: |
 | The doors are welded. One is used to supply firewood, the other is used as a blower. Ash resulting from burning wood or coal is removed through it. |
 | The remaining walls are cut from metal 6 mm thick. Dimensions are indicated in the attached sketches. |
 | The oven assembly is assembled by welding. |
 | The walls are welded using internal corners. They are used to obtain an angle of 90⁰. First, the walls are chamfered, then a thicker layer of weld is obtained. |
 | A panel is installed on top. It has rings in which you can place utensils for cooking. |
 | Cast iron grates are mounted inside. They separate the space of the firebox and the blower. Typically, the grate bars are removable. |
 | To install the barbecue, special legs are used. A special stand is made from strip metal radial type. The forming element of the cylinder will be placed in it. |
 | By welding the legs together they create a ready-made support for the grill. |
 | The barbecue is being assembled. Place the cylinder in place. The structure can be disassembled if necessary. |
 | The cover is reinforced using segments. They will not allow the lid to change geometry when heating and cooling. |
 | A pipe system is welded on the left side. It will be used for hanging skewers. |
 | Chimneys are mounted on the wall. |
 | Intermediate pipes are needed between the chambers. Through them, smoke can be transported from the oven to the smoking chamber. It is necessary to provide modes for switching the movement of flue gas. |
 | It is specially installed to switch the movement of smoke through the pipes. There is a special control handle. At different positions inside the pipe, the smoke will be directed into the pipe or into the chamber. |
 | A special blower is installed in the grill. It uses a perforated pipe. |
 | Along the way, you need a pipe square. Additionally, a pipe is used, which is led into the chamber. |
 | By screwing together pipe sections, an assembly product is obtained. |
 | It is not difficult to place it in place. A hole is first made at the bottom to accommodate a pipe with a diameter of 27 mm. |
 | Now air will flow inside and support combustion. |
 | The finished installation is located under a canopy. The underframe is mounted at the bottom of the stand. You can place dishes and semi-finished products on it. |
Video: do-it-yourself smokehouse from a gas cylinder.
User manual
Ready smokehouse works in several modes.
Cooking on the stove
- The chimney opens to the “open” mode. Now all the smoke will freely exit through the main chimney.
- Firewood or coal is placed in the fuel chamber. Dishes are placed on top. If necessary, remove excess circles, then the flame and hot gases will be in direct contact with the bottom of the pan.
- The vent opens.
- The wood is set on fire. Cooking begins.
- After the wood burns out, coals remain in the firebox. They are still for a long time will continue to smolder, heating pots and pans placed above.
- chimney can be covered. Then the main energy of burning wood will be spent on heating the stove and dishes.
- When the coals burn out completely, the combustion products are removed outside through the ash pit.
The ash can be used in the garden.
Smoking meat using the oven as a smoke generator, and the barbecue for the main process of saturation with smoke
- Wood chips are prepared (alder, apple, peach, apricot).
- Coal (firewood) is placed inside.
- The embedded solid fuel is burned inside the furnace.
- After reaching the smoldering mode, chips and sawdust are poured inside.
- The semi-finished meat product is being prepared. It is soaked “wet” in a special marinade. Preparation using the “dry” salting method is possible.
- The semi-finished product is placed inside the chamber (smokehouse).
- The air vent hole, which is necessary to maintain fuel combustion in the barbecue, is closed.
- The smoke from the generator is transported inside the smoking chamber.
- The semi-finished product is in the smoke coming from the generator.
- Partial cooling of the smoke is observed. Its temperature can be 35...50 ⁰С. That's why hot smoking occurs. Its duration should be at least 3...5 hours.
- If the smoldering stops, the smoke supply is turned off. The coals are re-ignited. After reaching the smoldering mode, wood shavings are poured in. Some masters recommend moistening them. Then the smoking time may increase.
After smoking is completed, the product is removed from the chamber. It is advisable to wrap it in paper, then the smoke molecules from the surface will move inside the meat pieces.
Frying shish kebab and sausages
For frying, you can use regular firewood or charcoal. When choosing firewood, it is advisable to use the following types wood: oak, birch, apple, peach, apricot, plum.
- Firewood is placed in the chamber. The air vent hole in the grill opens.
- Solid fuel can be ignited using paper. It is much faster to light it using lighter fluid.
- It is necessary to allow the light fractions of the fuel to burn out. Frying begins after the coals reach smoldering mode. At this time, a light gray coating forms on the surface.
- Shish kebab pieces are strung on skewers. If you are preparing lean meat, it is advisable to place small pieces of fat between them. Internal fat (beef or lamb) is best.
- On average, up to 150...180 g of prepared meat is threaded onto one skewer.
- The skewers are placed in grooves on the front wall. The points of the skewers extend into the holes on the back wall.
- You must have a water sprayer. During frying, fat drips from the sticks. When it hits the surface of the coals, it ignites. Open fire will burn the food being cooked. Open fire reduces the quality of the finished product.
- You need to spray water from a spray bottle onto the existing fire.
- During frying, you need to turn the product over.
- The finished kebab is removed from the grill and served on the table.
- If it cools down, you can reheat it by returning it to the grill.
Sausages for frying are strung on wooden skewers, then they will not burst and spread.
To fry sausages, you need to add about half as much coal as when preparing meat shish kebab.
- The temperature is maintained at 250…280 ⁰С.
- They are laid out on a wire rack. The distance between individual fragments is up to 2…3 cm.
- Fry on each side for 3...5 minutes.
- You need to constantly turn the semi-finished product.
- Thick sausages take up to 15 minutes to cook. For thin ones – 10…12 min.
- Turn the finished sausages over with long tongs, then the risk of burns is low.
Today on the Internet you can find a lot original ideas regarding how and what to make a grill from. This article will talk about how to make a barbecue from a gas cylinder with your own hands. It seems that this is unrealistic, but there were craftsmen who developed an entire technology. We will provide you detailed description, photographs and videos for clarity. Moreover, you will be able to make sure that you are quite capable of implementing such an idea.
Types of barbecue from cylinders
There are several types of barbecue that you can make yourself:
- regular without lid;
- smokehouse;
- smoker;
- B-B-Q.
Each of these types has its own distinctive features. For example, a barbecue means a conventional design in which part of the cylinder is cut off, hinges are attached to install the door, and a mesh for coals is placed inside. Everything is very simple and primitive.
As for the smokehouse, things are a little different. Such a grill must be completely sealed and equipped with a firebox. To make a smokehouse, a strip of metal and part of the bottom are cut off. Additionally, the structure is equipped with a pipe (chimney).
Well, another type of barbecue has a name like a smoker. In another way, people call it a steam locomotive. It has a barbecue, grill, barbecue and. Manufacturing usually requires several gas cylinders. Once completed, the design truly resembles a steam locomotive.
Necessary tools for manufacturing
To make a barbecue from a gas cylinder you will need to assemble special tool and materials. So, during the work process the following is necessary:
- welding machine;
- grinder with cutting wheel;
- clamps;
- metal pipe;
- electric drill;
- sheet of metal about 4 mm thick;
- aluminum rivets;
- hinges for mounting the cover;
- 50 liter cylinder.
Important! Using such a container to make a barbecue is dangerous. To prevent an accident, make sure that all gas has been released before cutting it.
Removing gas from a cylinder is quite simple. To do this, you need to place the cylinder upside down and completely twist the valve. Given that the gas is heavier than air, the gas will escape quickly. To check, you can use soap by lathering the neck of the bottle. If bubbles appear, it means gas is still escaping. To make sure the container is completely empty, fill it with water.
In this video, you can clearly see how to make a barbecue from a gas cylinder:
Instructions for making a barbecue
So, the process of making a barbecue grill from used cylinders with your own hands consists of several successive steps, which we will tell you about later. Be sure to watch the prepared videos, since theory is one thing, but seeing it in practice is another.
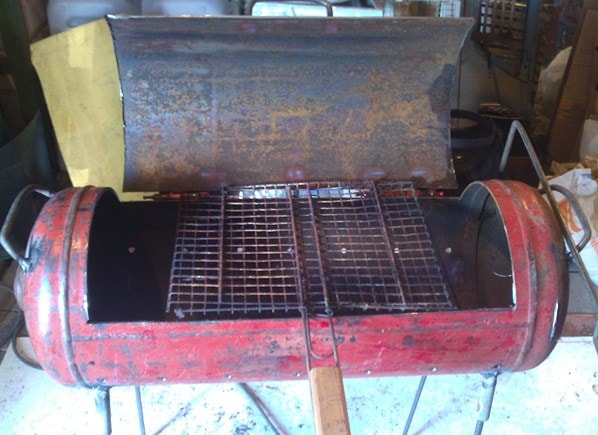
So, first of all, take a standard 50 liter cylinder. Do not cut off the side walls, that is, the top and bottom of the cylinder. Otherwise, the wind will not fan the coals to fry the meat. To cut the required part in the cylinder, find the seam. Using a grinder and a metal cutting wheel, make the cut.

After cutting along the seams, you will find the base rings, which are necessary for joining the bottom and body of the gas cylinder. They shouldn't be cut off. These will serve as a shelf for the lid. So, it turns out that you cut the balloon so that you have two parts. One of them will serve as a lid.
On next stage loops need to be secured. They can be secured by welding, having previously secured them with aluminum rivets. As a result, the gas cylinder will again take on its shape, only part of it will be attached to the canopies. In this way, a barbecue is formed from a cylinder.
The next step is to secure the handles, which allow you to easily open the barbecue lid. For this purpose, it is recommended to use metal handles that can withstand high temperatures.

Important! To be influenced high temperatures the gas cylinder did not lead, weld a metal corner 32x32 mm along the perimeter of the edges of the hole. Clamps are useful for this. Clamping the product with them, weld the corner to the cylinder by welding. This corner will also serve as a support for the skewers.
A similar procedure should be carried out on the hinge side. Only the corner is welded to the inside of the gas cylinder. In the next step, it's time to work on the legs. The legs can be round or square pipe, or the same metal corner that was welded to strengthen the gas cylinder. The legs are welded so that they are the same length. Pay attention to the fact that it is important to decide what type of barbecue you want to make: portable or stationary. Based on this, it is decided what kind of legs there will be. For example, for a portable one, you can attach small wheels or weld metal “nickels”, which will prevent the barbecue from “drowning” into the ground. As for the stationary one, the base can be filled with concrete and the legs can be concreted.

Advice! When welding the hinges to the cylinder body and its lid, make sure that everything is done exactly. It will be quite difficult to fix. Therefore, here you will need outside help, to hold the hinged lid and mark where and how to cook.
When all the main elements are welded, all that remains is to put the lid on the hinges. It is important to weld the limiters for the lid here. Otherwise, the lid will fall inside the barbecue from the gas cylinder. Afterwards, it is imperative to test the stability of a homemade barbecue from a gas cylinder. Open the lid and release it. If the barbecue doesn't fall over, it's done well. If it falls, the legs must be additionally secured with a corner or the angle of the legs must be increased.

To ensure the necessary draft during fuel combustion, holes must be drilled throughout the body. Ash and water will also spill out through them. In fact, at this stage we can consider that the gas cylinder barbecue is ready.
It is extremely important to perform high-quality final works on cleaning. Sand all welding areas. Make sure that there are no sagging in the inside of the cylinder, which during the heating process will peel off and smoke onto the meat.

Additionally, a barbecue made from a gas cylinder can be equipped with a pipe, which will significantly increase traction. To make the barbecue easy to move, small wheels can be welded onto the legs. As practice shows, for ease of use of a barbecue from a gas cylinder, it is necessary to divide the product into two parts. In one, protrusions are made for installing gratings, and in the second, slots for skewers are made. There are no special restrictions. You can watch the video and photos in this article and get an original idea for yourself.
What is the best way to paint a barbecue?
A barbecue made from a gas cylinder can be painted with two types of paint:
- Powder thermal paint. This method is difficult to implement at home, as it requires burning the barbecue at high temperature.
- Heat-resistant silicone enamel. This paint can withstand temperatures up to 600°C.

Another painting method is also known - oxidation. This is enough labor-intensive process for home craftsmen, but quite realistic. The product is treated with 5% sulfuric acid. After this, boil in a highly concentrated solution of laundry soap for two hours in a sodium hydroxide solution. This barbecue will serve you for many years. Corrosion will not attack it throughout its entire operation.
Advice! Regardless of the type of paint you choose, be sure to clean the barbecue of all kinds of dirt. Additionally, you will need to degrease the surface.
Conclusion
So, we have looked at all the features of making a barbecue. This is a troublesome task, but the result will not leave you indifferent. It will be especially pleasant when you cook your first kebab or fry vegetables. Such food is known to be very nutritious. For this reason, do not deprive yourself of this benefit. With a little effort, you can do everything yourself. Complete the video and evaluate your abilities. We hope that this material will help you in this matter. In the comments to this article, you can share your own experience with our homemade readers who, just like you, want to do everything themselves, saving money.
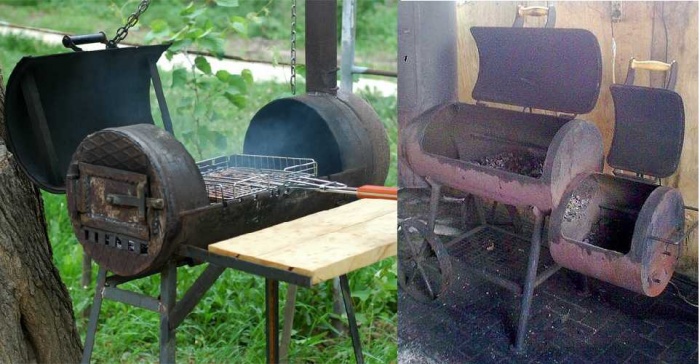
Few people imagine outdoor recreation without well-fried shish kebab or grilled vegetables. The key to successful preparation of products is convenient device, for example, a barbecue made from a gas cylinder with your own hands. At correct operation it can last for more than one year.
The design can be easily made to suit your needs using high-quality auxiliary materials and tools. For different situations, either a folding version of the barbecue made from a gas cylinder, the photo of which is presented on this page, or stationary design, where a grill-smokehouse made from a gas cylinder is securely fixed in the courtyard of a country house.
Varieties
A brazier is usually called a brazier, with the help of which dishes are cooked over hot coals from wooden logs. It is customary to classify into the following groups:
- portable design, due to its small dimensions and maximum disassembly, it is easily transported to the place of operation;
- portable devices do not have a clear structural connection to a specific location, can be moved nearby, and can be disassembled into several component elements;
- stationary installations, structurally built into a foundation or other base and cannot be moved.
Stationary structures are manufactured using brickwork, and for the rest, sheet iron or leftovers are used metal containers. Owners of old unnecessary cylinders are luckier, because a barbecue made from a gas cylinder, made with your own hands as in the video, already has shapes that are as close as possible to the required dimensions.
The cost of a completed cylinder is about $10-15, which is significantly cheaper than buying a ready-made industrial product for barbecue or shish kebab. At the same time, the walls in the gas cylinder are much thicker, which will ensure long-term operation.
Necessary materials
To make a barbecue you will need a gas cylinder with a capacity of about 50 liters. A larger one will be difficult to move, and those with a smaller volume do not have such convenient operational properties, but also look much more aesthetically pleasing and attractive.

The walls of the container are approximately 3 mm thick, which allows for easy processing using an angular grinder(Bulgarians).
You will need to stock up on the following kit:
- drill and set of drills;
- grinder with several discs for working on metal;
- hand saw for metal;
- portable welding machine and electrodes with a diameter of 2-3 mm;
- corner 40x40 mm or close to this profile with a length of about 6-7 m;
- door canopies 2-3 pcs.;
- straps 10 mm in diameter if it is intended to form a barbecue grill.
Preparatory work
It is advisable to take the cylinder without through rusty areas, so that corrosion processes do not destroy the product. Before cutting down the faucet, you will need to release the pressure by opening the faucet and turning the container over. Checking the complete release of gas is done using a soap solution, which can be applied to the outgoing hole. If there are no signs of bubbles, then the gas has completely escaped.
It is necessary to cut down the crane hand tools to prevent overheating and sparking. You can additionally secure the process by watering the cut with water.
After cutting off the tap, water is poured into the opened hole to wash out the residues. gas condensate. If you don’t wash the container well, the smoker grill made from a gas cylinder will have an unpleasant odor inside for a long time.
Residues of water should be disposed of as far as possible from the residential area, as they are poisonous and emit a characteristic odor for a long time. Only after the hapah has been completely eliminated can you start making a barbecue from a gas cylinder with your own hands - drawings, photos, videos later in the article.

Using chalk, markings are made on the outside to cut out a segment that will serve as a lid. Stepping back from the bottom and top by 3-5 cm, make marks on both sides perpendicular to the axis along the circumference of the container. We connect these two chalk rings with two axial lines located at the maximum distance from each other. A rectangle has formed inside, which needs to be carefully cut out with a grinder.

It is necessary to leave intact a couple of inner rings on which the future lid will rest.
Making legs
After measuring the height, we saw off the legs. They can be welded into a single frame, which is the future basis for the structure, or made into separate detachable elements. In the first case you will need construction corner 40x40 mm, and for the second option you will need four equal pieces of pipe 40-45 mm. Another option is to weld the frame with your own hands to bottom side barbecue grill from a gas cylinder, and removable legs are bolted to the frame.
.jpg)
The design includes a lid secured with door hinges. For them, holes are pre-drilled through which steel rivets are placed.
.jpg)
Aluminum rivets may not withstand the load when exposed to high temperatures.
The handle is fastened with bolts, and its working part must have wood insulation to prevent burns during use. It is advisable to choose its material with maximum heat-resistant characteristics.
The side hole can be welded with a patch or installed on it exhaust pipe to increase draft through such a chimney.
The lid can swing back greatly and overhang the structure. To prevent this from happening, you will need to weld a limiter in the form of a small corner or pipe.
Assembly of all elements
Frequent high temperatures can deform the structure of the cylinder container. This can be avoided by tightening the grill around the perimeter by welding a metal corner. An auxiliary shelf for skewers, racks, containers with meat or other household needs can be easily mounted to such a structural element.

To connect the remaining parts, clamps are used, which will secure the structure in the required position. After assembly, you can drill holes in the bottom to provide better ventilation and remove moisture, ash and small debris.
Painting the barbecue with heat-resistant paint will help ensure durability. This coating prevents corrosion processes on the outside.
Before use, it is necessary to heat the container several times with wood for 1-2 hours to get rid of the harmful odor.
Decoration
The barbecue can also be used as a smokehouse; to do this, only install a container for sawdust on the side opposite the pipe. However, in this case it is necessary to ensure maximum tightness of the structure.
The difference between a barbecue grill and a barbecue grill is that the first design option requires installed grid for meat, and in the second case, slots are made at the edges of the container for skewers.

To make a barbecue grill, a spit is installed, on which meat preparations will subsequently be placed. It is mounted along the cylinder axis.
Stationary barbecues are designed in the form of stylized funny designs, for example, an old steam locomotive. In this case, the pipe acts not only as decoration, but also performs the functional duties of the hood.
Today, among summer residents and owners country houses A popular topic is the creation of all kinds of barbecues, smokehouses, barbecues, ovens, etc. People began to relax more with their families on weekends, going to the dacha to barbecue, what could be better? fresh air and deliciously cooked kebab))
But in order to cook everything thoroughly and efficiently, you need a barbecue grill, smokehouse, for example, the author made this miracle from old gas cylinders. At first, the master simply made a barbecue grill from a cylinder, then he wanted to improve his creation and he added another small 25 liter cylinder as a smokehouse firebox, and a large cylinder serves as a smoking chamber. The compartments communicate with each other, the small one is located at a lower level to form draft and the smoke independently passes into the smoking compartment.
A small cylinder can also be used as a barbecue or barbecue, only one grate can fit there, and there are 2 times fewer skewers, but in combination with a large cylinder you can increase the barbecue productivity per hour)))
So, let's look at what is needed to create a smokehouse-barbecue-barbecue?
Materials
1. gas cylinder 25 l
2. fittings
3. metal pipe 50 mm
4. sheet metal 2-3 mm (for damper)
5. loops 2 pcs.
6. pen holders
7. pipe 50 mm long 1.5 m
8. lid opening limiter (fittings)
Tools
1. grinder (angle grinder)
2. welding machine
3. drill
4. hammer
5. file
6. ruler
7. marker
8. pliers
Step-by-step instructions for making a smokehouse-barbecue with your own hands.
As mentioned above, the author already had a basic grill made from a gas cylinder (By the way, the site has previous material on how to make a grill and correctly cut a gas cylinder) But the master decided to improve his design and increase its functionality, and as a result, productivity , adding another small compartment to the existing barbecue.
As source material An old 25 liter gas cylinder was taken (see how to cut a gas cylinder on the website). The cylinder was cut in compliance with all safety regulations.

Then, in the end part, using a grinder, sawed out technological hole in the shape of an ellipse, two cylinders will communicate through it.


After which the master proceeds to making the lid of a small cylinder, namely, he makes markings with a marker and makes a cut with a grinder along the intended contour, but there is no need to cut everything out at once. We make one cut and immediately weld the hinges and only then cut out the entire lid.

The hinges are welded on.

Another technological hole in the shape of a triangle is made at the opposite end of the small cylinder; it will serve as a blower and regulate the air flow into the combustion chamber.

On a large cylinder, a hole is also made in the end part for installing a chimney pipe.

Pipe diameter 50 mm length 1.5 m.


This is exactly what happens.

Holders for the handle are welded onto the small cylinder, and the wooden handle made from a shovel handle.

A limiter made of reinforcement is also welded for a certain opening angle of the grill lid.

A damper is installed; it is slightly larger in size than the hole itself and serves to regulate the air supply and draft accordingly.


After the firewood burns, we turn the damper to minimum to maintain smoldering in the combustion chamber.

It is advisable to use alder firewood; they produce very aromatic smoked meats) The author smoked chicken wings and sausages and smoked them for an hour.

Periodically you should open the lid of the smoking chamber and check the condition of the product.

The chimney copes with excellent draft.
You can make a barbecue yourself from a gas cylinder in a few hours. The advantages of this design are obvious - relatively small dimensions, convenience, and the ability to be decorated in any style. After watching videos of famous masters on this topic, you can be amazed. What types of barbecues can they come up with - they look like a submarine, and a steam locomotive, and crocodiles. It can be used as a smokehouse or barbecue, which expands the functionality of the design.
The desire to smoke fish or chicken immediately arises. Buying a barbecue is not a problem, and the simplest one costs about 500 rubles. But how long will such a grill made of thin stainless steel last? It is unknown, since the material from which such barbecues are made does not inspire confidence. And it will be useful only if you are planning to relax in nature and there is simply no room for a full-fledged barbecue during transportation.
The basis of the design is a gas cylinder, its volume is 50 liters. The height is 1.2 m, and this is enough for the heat to last for a long time. And you can easily fit a couple of large barbecue grates (relevant for cooking large amounts of meat). There should be no external damage to the cylinder, otherwise small pockets of corrosion under the influence of high temperature and open fire will turn into holes. Not immediately, but after several years of active use, this fate awaits the metal. And if you decide to cover the finished grill with a layer of heat-resistant paint, the defects will come out. The holes can be welded, but appearance this will ruin it. For work you will need tools and materials:
- electric drill;
- Bulgarian;
- pipe wrench;
- chisel and hammer;
- screwdrivers;
- metal pipe;
- hinges for doors;
- metal corner.
A frame from an old school desk or a stand from a sewing machine can be used as legs for a barbecue. You can also use homemade ones from angle or professional pipes or fittings. If the grill is installed on permanent place, then you can lay out a brick stand. Just make sure that you can easily pick out the ash from below.
Types of barbecues
The simplest option is an open grill from a gas cylinder; it is very easy to make it yourself, since it does not have a lid, smoker or barbecue capabilities. But more complex designs can be made:
If you have imagination, you can make it from reinforcement and metal rods curly legs, handles, limiters. There are a lot of options for making barbecues, even your eyes widen when you see the designs. Provide a place in the yard to install a barbecue - away from gas pipes and electrical wiring. There should be no containers with paint, fuel, or wooden buildings nearby.
Preparatory stage
Always follow safety rules. The downside of a propane tank is that the gas vapor stays in it for quite a long time. Even if there is no gas in the cylinder for a long time, it can explode from the slightest spark. Therefore, the first step is washing. First, open the valve and bleed off any gas that might remain in the cylinder. Then turn it over and get rid of the condensation.
Carefully cut off the valve of the gas cylinder and water it from time to time cold water. Then connect the hose and fill the container with water, shaking it sometimes to help the gas evaporate better. The cylinder should stand with water for at least a day, only after that you need to empty it (do this away from residential buildings and not on the ground). That's it, the container is ready for work.
If you are making an open grill or barbecue, then you don’t need any drawings, the design is quite simple. And in general, there are no special requirements; it all depends on your preferences in what proportions to cut the cylinder. But it’s worth reading the recommendations:

The simplest option is to cut the container into two parts, weld legs to each, and you will get two good open barbecue. But the functionality is limited and the appearance is not very attractive. And in any case, you need to install it on legs to make cooking convenient. An alternative is to weld two pipes across to place the structure on the ground. But squatting near the fryer is uncomfortable, especially if you need to cook a lot of food. Therefore, it is better to make a full-fledged barbecue with your own hands, with a smokehouse function and all the possible little things that are useful during operation. Before you start manufacturing, look at the photos of the designs and choose the most attractive option for yourself.
Making a barbecue from a propane cylinder: drawings with dimensions
Most convenient option- is to take advantage gas burner, but not everyone has it at home. But the grinder is much easier to find. You need to outline the boundaries along which the lid is cut:

To work, you will need several disks, since the thickness of the walls of propane cylinders is large, and the temperature is rather high. To save material, you need to cut not completely, leaving small areas. Subsequently, using a chisel, you cut through these remains of the container wall.
Estimate in advance how tall your structure will be. They mentioned that a sewing machine base would be suitable as a decorative stand. But if there is none, make legs from pipes, attaching them to the bottom of the base of the grill. Initially attach the legs using bolts (the threads should be outward). If necessary, cut off the excess bolts and finally weld the legs to the base. You weld metal strips to the legs from below to prevent dirt from getting into the pipes.
If you do not plan to use the grill on the ground, then it is better to do adjustable legs. To do this, weld nuts to each one so that their planes coincide and are parallel to the base on which installation is planned. The bolts will act as a regulator; tighten them until they stop. Then, depending on the base, unscrew it several turns, achieving a stable position of the structure. A similar adjustment is provided for washing machines, bathrooms, refrigerators and other household appliances.
Use a drill to make holes for the hinges, secure them with rivets and weld them. 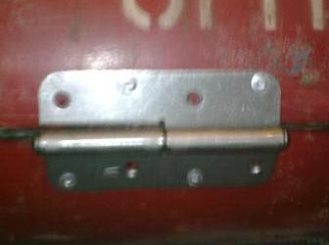 If you place it only on rivets, the lid will sooner or later fall off under the influence of high temperatures.
  It is possible without hinges - a removable cover installed on top of the base. But you will have to provide 4 bars that will prevent it from falling through. Make holes in the top of the lid and install one or two handles. They must be made of heat-resistant materials. The simplest option is a metal rod. You bend it and weld it on the back sides of the grill so that two people can move the structure if necessary.
A piece of pipe or corner is suitable as a limiter. It will not allow the lid to spill over into reverse side and fill up the entire structure with skewers and meat. For fixation, you can use 1-2 pieces of chain. When assembling, first secure all structural elements with clamps. Thanks to this, there will be no gaps, the appearance will be attractive, even despite its simplicity.  You can make a barbecue from a gas cylinder with your own hands in 3-4 hours, if you have everything necessary materials and tools. Here's a video from step by step instructions and all sizes:
Additional Design Attributes
When using the barbecue for its intended purpose, deformations may occur due to heating. Weld small metal corners from the inside of the base along the entire roaster.  These ridges will help ensure that the skewers or rack sit well on the broiler. To make your homemade barbecue more stable, weld pieces of angle iron or pipes to the legs. You can make several crossbars if desired.
Holes must be made in the bottom and sides, which are necessary to create draft and drain liquid after washing or rain. From the part of the container where the valve was located, you can weld a piece of pipe to remove smoke. But this is only relevant if the grill is used with the lid closed. If cooking without a lid, this is not necessary. For convenience, make holes for skewers in the base of the grill. They will be useful when cooking, since skewers with meat or vegetables will not turn over under their own weight. Since making a barbecue from a gas cylinder is quite simple, you should not neglect such useful little things.
To improve the appearance, you can paint the entire structure.  Exists a large number of paints that can withstand temperatures up to 800 degrees. This important condition, because regular paints when heated, they will simply burst into flames, and even poison the food if it is already on the fryer. Before painting, apply a coat of primer (it should also be heat-resistant). Red, black, silver - this is the color range available for heat-resistant paints. But this is quite enough. Making a barbecue from a cylinder is not difficult, but deciding what type of structure to choose is important point. Perfect option- this is the manufacture of a smokehouse and a barbecue in one design. Here's a couple for you good ideas in the photo, they enlarge when clicked:
How to do all this, watch the video:
If desired, you can make a stationary roaster by welding small tables on the sides and front.  Since the temperature is high, it is better to make them from metal corner. Such tables will be convenient when stringing meat or vegetables - you can place pots on them. And if the feast is expected to be long, then you can not put out the coals and place a kettle and pots of food nearby so that they stay hot longer.