Answer
As a child, I had some old book with all sorts of wonderful crafts (a camera out of a box, a telephone out of cans, it seems) and there was something like this raft. True not from plastic bottles, of course, and their beach balls. There was no plastic as such then (at the time of the book’s release)
Answer
The book was called “One Hundred Conceits of Two Friends”!
Answer
Lena, next time invite Dmitry to film the process if there is no one among your own to hire 😀
Answer
After reading the article I remembered summer holidays in the village. My friends, whom I only saw during the holidays, surprised me every time with their skills and abilities to do something unusual. Either they would build a dugout, or a house on a tree or from turf, and all sorts of floating devices were the most favorite topic. They were built from plastic bottles and wood, and the hippest ones were those that had a camera from tractor wheel. Bottle rafts were the most unreliable. At first we swam on such rafts, then the bottles floated on us, as the bags were constantly untied =)
Answer
The craving for “sea travel” is probably inherent in everyone)) And this raft also has such a serious environmental background. This is how young people should be encouraged to clean up natural recreational areas! What else could you come up with that would be so intricate for the rest of the (non-aquatic) garbage? 🙂
Answer
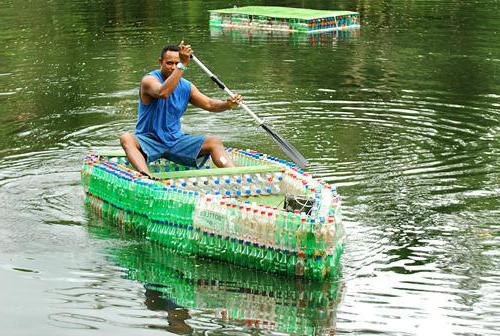
I saw such a raft in action among fishermen.
Answer
Anyone can make such an unusual raft from plastic bottles. For this you need the following materials:
- 10 bottles of 5 liters,
- 84 bottles and 2 liter volume,
- 4 identical small boards,
- nails,
- bags – 4 pcs.,
- waterproof tape,
- oars.
How to make a raft from plastic bottles
If you are going to build a quality raft, you will need a lot of time. For example, I did it in two and a half hours. It all depends on you and your skill. It’s better to build such a raft together, it’s much more convenient and faster.
To begin, take 5 five-liter bottles and glue them together, side by side, in a row, with waterproof tape. Please note that the tape must be waterproof, otherwise your raft will quickly fall apart. You need to glue by wrapping each bottle - this is important. Perform the same operation with the remaining 5 liter bottles.
Thus, you have 2 rows of glued bottles. The next task is to glue these rows together so that you get a small raft. You need to glue the bottles together as tightly as possible, don’t skimp on tape.
Now let's start with 2 liter bottles.
We take 7 bottles and, just like five-liter bottles, glue them together in one row. You need to make 12 such rows.
After this, we take a bag and place three rows of bottles in it, on top of each other. We fill the rest of the bags in the same way. The result was 4 bags of empty bottles. Carefully wrap each bag tightly with tape.
Of course, we can’t do without oars. If you have them, that’s good, and if not, then I think you can easily make them, but I’ll still tell you how: For this we take two wide boards- two pieces, about a meter long, and we cut each one so that we get two blades. That's it, the oars are ready.
Let's continue, take 4 identical small boards and nail them to each other so that we get a square. For each outside square, attach a bag with our plastic bottles. It is best to attach using ropes and tape.
We place our glued empty five-liter containers in the middle of the square. We securely attach them to the boards. The entire surface of the raft should be at the same level. If desired, the raft can be covered with waterproof fabric.
The raft is ready.
Such a raft can support 2-3 people. And on my own similar design very reliable and durable. The main thing is that all bottles are straight and with tightly closed lids. It is best to tear off the labels from the bottles.
Careful storage of the raft is important. After use, you should not leave it in water, as it will quickly deteriorate. This simple design will allow you to relax, go fishing or just ride. With a little effort, materials and time, you will get a great raft. It's interesting, it's economical, it's fun.
The raft is compact, easy to build, and can be made from any available materials. For example, you can build a raft from plastic bottles. All you need:
- Rope
- Bottles
- Waterproof tape
But you can’t go anywhere without preparation. Bottles need to be checked for cracks and holes. Tear off the labels, wash, close tightly with lids so that air cannot escape.
These are the battleships with vertically positioned bottles that transport people to Malaysia.

Or you can place the bottles horizontally and it will turn out pretty good.

Dimensions are limited only by imagination and the number of passengers. 
And I spent time with the child and saved on travel.
 Just 800 bottles, a couple of boards and a romantic vacation on the water is ready.
And on such a “yacht” a resident of Crimea went on a journey to Odessa.

But Odessa residents, on the contrary, are in a hurry to leave their hometown.

On such a rocket, the guys from Pskov conquered the water festival.

A knife, ingenuity, time, and not even a raft, the whole boat is ready to sail.

You have the materials, you have the desire, you have the crew, so why waste time on trifles? Whistle everyone on the yards. 
Patience, tape and labor, if they don’t grind everything, at least they will help you swim.

Complete the sides and you can open the transport line. 
DIY raft: 10 drawings of the best models
Anyone can come up with their own model of a raft, making it with their own hands. There are many materials for their construction, but they are usually made from:
- wood;
- logs;
- plastic bottles and canisters;
- barrel;
- polystyrene foam;
- cameras;
Each raft is special to the designer. You don’t have to invent raft models, but take drawings from the Internet, you can only add your own details. Top ten drawings best models included both relatively simple and complex raft models.
To build you will need: an ax, a knife.

Without fish, reeds are like wood. All you need: reeds, a couple of sticks and a rope or its substitute.

Why is it not simple? Boards, bottles and forward to boarding.

Four barrels, a dismantled local pier, a rope - the raft is ready. Goodbye Earth.

You'll have to put in a lot of effort, but what a result!

Professional rescue rafts from the Ministry of Emergency Situations.

Such a raft can support up to 5 people, of medium capacity. Well, a couple of boxes of 40 degree fuel.

All people over 30 have heard of Tom Sawyer. This is the same raft.

The sailing raft "Yukaghir" is not a fairy tale?

A raft built on chambers. The Black Pearl would be jealous of such a “destroyer.”

DIY canister raft 8 photos
A high-quality and difficult-to-sink raft, can be made from canisters. Of course, the more there are, the better, but 40 canisters are enough to keep two people afloat. To build it you will need 50x160 cm boards, cans, rope or tape, and enthusiasm.
To strengthen the structure, you can use metal packaging tape and several boards measuring 30x155 cm, which are attached to the finished frame. It is advisable to cover the boards with paint or glue to prevent deformation.

Floating cottage.

Budget, relatively quick option. I dismantled the neighbor's fence, took a rope with canisters and go for it.

This raft requires 28 canisters. At least cross the sea.

Another a budget option, the main thing is that the canisters are intact, and then, you see, it won’t drown.

A combined version of canisters with bottles, which were combined into blocks. The only thing missing is a sun canopy. 
This amount is definitely enough for one person. The main thing is to do everything carefully and not touch the canisters. 
A combined option, not budget, but worth it. Complete the chairs and canopy, and the excursions can begin. 
DIY log raft 9 photos
The oldest, but reliable material to build a raft - logs. It is not always possible to find even boards, but there are always logs, the only problem is their extraction. Despite the fact that they are heavy, they stick to the water like plastic, very well. For the most simple models All you need is logs, rope or its substitute.
Correct raft bundle.

Nobody bothered too much here. It floats and is fine.

Norwegian raft. The guys are trying very hard, it’s a massive job, it’s worth it.

A single raft for fishing, with normal currents you can get anywhere on the water.

The process of making a raft from logs with your own hands.

The guys from the USA spare no effort; such a “raft” can fit a truck or half a hundred people. In general, how will it go?

Hunting version of a single-seater raft.

This option is suitable even for romantic dates.

Floating house. For people tired of the city bustle.

12 photos - a raft made of wood, made by yourself
The main material for building a raft is wood. Without it, it would be impossible to launch a single raft. A wooden raft made by yourself can be combined with other materials: tubes, bottles, polystyrene foam, etc. It is better to choose wood without rotten parts or traces of termites. If there is an opportunity for additional protection can be coated with paint.
Model of an advanced raft from the middle of the last century.

Similar rafts were also used for military purposes. A couple of boxes of ammunition and 2-3 people will fit without any problems.

A simple version of a single-person raft. The main thing is to firmly nail and tie the materials together.

Bamboo raft from Thailand. Very light, maneuverable and durable.

Bamboo doesn't grow here, but craftsmen enough.

Swimming through Siberian rivers is not a question.

The guys from Bryansk are preparing for the water festival.

Our domestic battleship. It wouldn’t be a shame to go around the world with this.

A good compact model that can accommodate two adults.

You won't be able to sail far on this, but you can swim close to the shore.

Island rafts are popular among tourists.

DIY foam raft 9 ideas + photos
When choosing a material for building a raft, you can pay attention to polystyrene foam. It is lightweight, durable, inexpensive, and most importantly, accessible to anyone. The amount of materials for building a foam raft with your own hands is limited only by imagination and time.
One of the simplest models. The foam blocks are held together with wood. It can be done without cross boards, but the raft will be unstable.

Practical implementation by the Finns. You can barbecue on it, sleep, or fish. You can take 3-6 people on board.

And this guy decided to go to the social network while sailing, why is unknown, but the main thing is that his raft did not sink.

Why not a canoe? Only made of polystyrene foam.

Here the guys decided not to waste time on trifles. Build a raft, so build it safely.

But a sailboat worth all the money. I found time to both build and sail.

With such a battleship, at least for Far North. The main thing is not to fall into the water.

They prepare thoroughly, no, one might even say epically.

Sometimes just crazy ideas are born in your head. One of these could be going down the river on a homemade raft. There is no need to immediately discard such thoughts, because they can develop into a wonderful adventure that you can then remember for the rest of your life. In general, it is worth seriously thinking about such an idea. But for such a trip you will need at least some kind of swimming device. There is one solution - a raft. Many people ask the question: “How to make a raft with your own hands?” Thanks to it, you can easily and quickly go down the water. How to make a raft, from what materials - the answers to these and other questions are in this article.
What is a raft?
Surely everyone in childhood knew how to make a raft out of paper. It was possible to transport pebbles and figurines on it, organize competitions: who would swim first, and so on. But now you can go on a trip along the river yourself, making your childhood dream come true.
A raft is a simple floating device, thanks to which you can quickly get to the other side or go downstream. It can be used for various purposes: for survival, entertainment, participation in amateur competitions, in some environmental campaigns. The range of applications for the raft is quite large. What is its advantage over a boat? The fact is that it is very simple to make, and you get no less pleasure. The raft is lightweight, making it easier to transport or carry. So, how to make a raft with your own hands?
A little about materials
How to make a raft when there are no materials? And you don’t need a lot of things to create. You need to think: what material is very light, cheap and widespread at the same time? Plastic bottles fit all parameters perfectly. They can even be found on the banks of the same river. Vacationers leave behind a lot of garbage that would be useful for such a task.
To give even more buoyancy, you can use foam. It is also light and cheap. Surely everyone has boxes from under the TV or refrigerator, in which pieces of foam plastic are lying around.

Wood is an excellent material for a raft. In the old days, when there were no plastic bottles, such a swimming device was made only from it. But nowadays it is not necessary to make a raft only from wood if you have plastic containers. The characteristics of this wonderful material will be useful for the “deck” of the raft itself.
How to make a raft from plastic bottles?
There's really nothing complicated here. But before you make a raft, you need to decide how many people will float on it. This is an important question. It is best to go alone, as it is easier to make a raft for one person than for two. The smaller the craft, the stronger and more reliable it will be. Less chance of falling apart.

Let's get started
There are quite a few options on how to make a raft from bottles. Therefore, everyone has the right to modify their design in the way that is convenient for them. The first step is to prepare the materials. For us these are plastic bottles. You need to carefully inspect them for holes. They must be intact, otherwise water will simply accumulate in them. Each plastic bottle must be tightly screwed on with a cap and filled with air. This means that it should not be flattened. The more air in the container, the more buoyant the raft itself will be. When everything is ready, you can begin work on creating a swimming device.
Create a raft
One unit during construction will be a block of bottles. It's very easy to make. For this you will need four bottles. When you connect them together, you get a square. That's exactly what we need. The construction of such blocks will turn out to be very strong and reliable. The most important thing is to be able to quick repairs. If something happens to the block, it can be easily removed and replaced with a new one. Therefore, such a lightweight circuit is very easy to maintain and operate.
You need to fasten the bottles into a block using waterproof tape. For greater safety, it is best to secure yourself with a rope. The main thing is to twist them tightly so that it is rigid, otherwise the block will fall apart again.

Now all you need to do is just make blocks. How many are needed depends on the size of the raft and its carrying capacity. But the extra ones won't go to waste. Once a sufficient number of blocks have been made, you can begin to form sections. It's already next stage in dividing the raft. One section consists of several blocks. It is formed according to the width of the swimming device. If it is four blocks wide, then one section will combine them. This division will also make it easier to connect all the elements together and replace damaged bottles.
In this way, the blocks are combined into sections, which are then fastened together into a raft.
How to make a raft deck?
What is located on top can be called the deck. This is an important part where a person will be located with all his equipment. The base consists of two large wooden beams, suitable for the length of the raft. Then cross boards are attached on top. They can be installed every forty to fifty centimeters. Then you will need to attach a part of the bottles to these crossbars using ropes and tape. For greater convenience, it is best to lay a sheet of chipboard or plywood so that it covers the entire area of the raft. Thus, we have a flat surface on which to sit comfortably. To prevent everything from getting wet, it is best to cover this leaf with a thick tarpaulin. It would also be good to build yourself something like a hut so as not to get baked in the sun.
How to make a raft from bottles with your own hands
For active rest on the water it is not necessary to use professional watercraft. Imagination, ingenuity and some tips that can be found in our article will help you build a raft from plastic bottles. The process of creating an alternative swimming device not only gives a lot of positive emotions, but also helps to take care of the environment by reducing the amount of non-recycled plastic.
What is a raft?
A raft is a simple floating structure consisting of logs, planks or reeds tied together (Figure 1). It can be considered the oldest means of swimming. With the help of a raft you can move to the other side of the river or go downstream. A huge advantage of such a craft is its ease of manufacture and transportation.
Figure 1. The most common raft options
What materials can be used to assemble a raft?
Nowadays, it is not at all necessary to build watercraft from wood (Figure 2). For help to modern man come modern materials, which are always in walking distance, and do not require large financial investments. For example, plastic bottles. The swimming structure made from them will be quite strong and light, so it can not only support the weight of an adult, but is also very easy to carry. For additional buoyancy, plastic containers can be combined with foam.
 Figure 2. There are many options available today when choosing materials for a raft.
 Building a raft with your own hands will be interesting for children and adults, and will help to have fun, both during the creation process and after.
Preparation of plastic bottles and other materials
To build your floating craft you will need plastic bottles. Depending on the displacement, they may be needed different quantities. Also, for work you will need waterproof tape, and for some structures you will also need tarpaulin bags, rope and boards (Figure 3).
In order to use the maximum volume of bottles, you must first prepare them.
Remove all labels from plastic containers, wash and place open bottles in the freezer for a while. Afterwards, take them out and immediately screw on the lids. When warm, the air inside the bottles will gradually heat up and expand. This technique will increase the air pressure inside the container and make it more rigid and dense.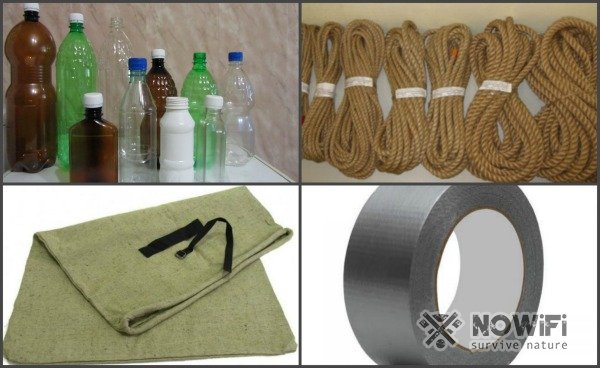 Figure 3. Basic materials for making a raft from plastic bottles
 If you care appearance your “vessel”, try to select bottles of the same color and size.
DIY bottle raft: step-by-step instructions
First you need to decide how many people your watercraft should accommodate. This determines the size of the vessel, its maneuverability, as well as the amount of materials and time spent on work (Figure 4).
Remember that a one-person raft is not only easier to make, but it will also be stronger, more stable and safer.
On the Internet you can find many options for building boats from plastic containers. Choose one of them, or come up with your own, based on the information you find and your own experience. However, for all options, several of the same rules apply, which will make the job easier and help make your raft as buoyant as possible.
 Figure 4. Raft size depends solely on your needs and material availability
 Carefully check all containers for holes or cracks. The container must be intact, otherwise it will leak water.
Each bottle must be tightly screwed on with a lid to prevent air from escaping. Do not use flattened containers. It is harder to connect it with others, and it has less buoyancy.
The easiest way is to divide the construction of a swimming craft into blocks. Each block consists of four bottles, forming a square, held together with waterproof tape. This design marking is very convenient and reliable. From blocks, like a puzzle, you can assemble a shape of any size, and if something happens, such “squares” can be easily replaced if they are damaged.
If desired, the blocks can be tied not only with tape, but also with rope. The main thing is that the bottles are twisted together as tightly as possible, without wobbling, otherwise the structure will simply fall apart.
The next step in construction is dividing the future raft into sections. They should consist of several blocks, and their number should be determined by the capacity and size of the future floating vehicle (Figure 5). This division will help achieve a more accurate assembly and make it easier to replace containers that have become unusable.
Using a rope, you can make loops-handles for convenient transportation of the watercraft.
 Figure 5. Example of a raft with 2 and 8 sections
 For maximum stability and strength of the vessel, you can make a deck from wooden planks. It will support the weight of an adult along with his equipment. Take two long slats or boards and tie them along the length of the structure. Next, you can attach either transverse strips to them, or lay a sheet of plywood on top. To prevent the deck from getting wet from splashes, it is advisable to cover it with tarpaulin or thick oilcloth.
If you are planning a long trip, install a small shelter from the sun for yourself.
Options for placing plastic bottles
Below we present the most popular options for building a raft from plastic bottles.
Option 1: horizontal arrangement of bottles
This method of arranging bottles is the simplest and is suitable for creating a small raft similar to inflatable mattress(Figure 6). Accordingly, it is better not to take risks by testing such a structure for strength, for example, by rafting down the river. This type of boat is more suitable for relaxing on the seaside or for entertaining children.
To create such a raft you will need about a hundred plastic containers, depending on the desired size, and electrical tape or waterproof tape.
 Figure 6. Horizontal arrangement of bottles
 Connect the bottles together in the manner described above (dividing the entire area into blocks).
Make sure that all bottles are tied with their necks facing the same direction.
You can make sides or a “pillow” by connecting not four, but six bottles into blocks, and placing them along the edges of the vessel.
After you connect all the bottles to each other, arranging each row so that the necks of the bottles are connected to the bottoms of the next row, it would be useful to additionally wrap the sides of the raft with electrical tape to avoid damage from snags or sharp stones.
Remember that without additional reinforcement wooden planks or a sheet of plywood, such a raft will not be very reliable and can quickly become unusable.
Option 2: Vertical arrangement
For this method of construction initial stages identical to the previous one.
 Figure 7. Even such a floating craft can be built from vertically placed bottles
 You need to prepare blocks of four bottles. When required quantity blocks will be ready, start assembling the sections, but now place the bottles with their necks down. It is more convenient to fasten such a structure in rows rather than square sections. The vertical arrangement of the bottles allows for more solid foundation for a deck that will not sag as much under the weight of a person due to the smaller contact area (Figure 7). You can put not plywood on the bottoms of the bottles, but, for example, a piece of linoleum or a wicker mat.
In order to make the sides of such a raft, you may need a rope or wire that will be used to secure the towering bottles. This option is suitable for long swims, ensuring the safety of passengers and their belongings.
Option 3: design from large containers
We consider large containers to be 20-liter bottles or plastic canisters. Due to their size, it will take a little more than an hour to fasten such containers and build a floating craft (Figure 8).
 Figure 8. An example of constructing a raft from plastic barrels
 To build, in addition to bottles, you will need boards, wire, nails and a sheet of plywood.
From the boards you need to assemble a simple frame similar to the type of sheathing. Plastic containers close tightly and screw to the frame using wire. Fix a sheet of plywood on top and, if desired, cover it with tarpaulin or oilcloth. Such a raft will be very stable, and even bulky, but it will be able to accommodate a large company.
Option 4: a raft of very small bottles
Half-liter bottles can also be used to build a floating craft. In order to reduce the amount of painstaking work, you can fill plastic containers polypropylene bags instead of tying bottles (Figure 9).
 Figure 9. Raft made of small plastic bottles
 You will need up to a dozen of these bags. Having tied them tightly, tie them together, or tie them to wooden frame(same as in the previous version of the raft). It is better to tie bags not with tape, but with thin wire or polypropylene twine.
Some tips:
The raft frame can be assembled not only from wooden slats, but also from strong branches. This method is suitable if you are relaxing in nature, away from the city. You can fasten the branches together using twine, tape or wire.
To steer the raft you will need oars. They are also easy to make from scrap materials. Take a long, strong stick, having previously cleared it of twigs and interfering twigs, and insert it into the neck of a flattened two- or five liter bottle. Secure them together with tape or string. Make the required number of oars, and feel free to go swimming.
 Figure 10. The end result of imagination and creativity when making a raft from plastic bottles
 If you are connecting the structure with wire, handle and hide the sharp ends so as not to accidentally get hurt while swimming.
Fantasize, invent own design design, taking into account exactly what you need from the watercraft (Figure 10). The cheapness of materials and their widespread availability allows you to experiment to achieve the desired result. If you are going on a long voyage, then you should take care of the availability of protection from the sun and bad weather, as well as build special fastenings or a place to store things.
A distinctive feature of your vessel can be a small sail or flag. Make it colorful, or write the name of your little boat on it.
After use plastic raft it is necessary to remove it from the water and dry it well in the sun, otherwise the materials may become unusable. If you plan to store homemade design Until next season, hide it in a dry place where there will be no sudden temperature changes. By observing these storage conditions, the homemade raft can be used for several years.
Video of the process of making a raft from bottles