There must be no person who would not want to save money on achieving results. That is why lovers of gardening and gardening skillfully invest their resources in equipment, whether they make it themselves or buy it in a specialized store. Such equipment is often a greenhouse or greenhouse. How to build structures that will help out in unfavorable climates?
Do-it-yourself greenhouse and greenhouse, photo
The topic of this article is DIY greenhouse and hotbed. Photos and expert advice will help you build on your summer cottage structure for growing vegetables, herbs and berries.
How to make a greenhouse with your own hands?

Unlike greenhouses, the main structure of a greenhouse is the arcs. It is because of them that the frame can have different shapes: arched, triangular and house-shaped. The material for pipes of future arcs is different types fittings – metal and fiberglass. Also used polypropylene pipes. If they are made from window frames, then glass is usually used as a covering.

Most likely, every summer resident will choose an arched greenhouse; it is best used. The most a simple greenhouse you can imagine bent polypropylene pipes stretched by the simplest plastic film. You can secure the film with ordinary bricks. Optimal distance There will be half a meter between the arcs. The base may be made of wood or may be absent altogether. For greater rigidity, it is necessary to fasten all the arcs with a horizontal beam.

If you need a greenhouse for growing seedlings or herbs, then you should pay attention to wooden structure. The greenhouse itself is not tall and triangular in shape. Its advantage is excellent strength and stability.
Greenhouse - where to start?
If your greenhouse no longer has enough space to grow plants, then you should think about building a greenhouse. If the construction of a “greenhouse” structure did not pose any special problems, then to create a “greenhouse” one will need to make an effort to obtain a durable, sustainable results. What is the algorithm of actions for building a greenhouse with your own hands?

The easiest greenhouse to make is an arched one. Among its advantages:
- Penetration sun rays , which means – good growth plants and a bountiful harvest.
- Minimum manufacturing materials. The main raw materials for the construction of a greenhouse are PVC pipes, timber for the base and for the door frame, brackets for fastening, and dense polyethylene film.
- Small size. The construction of the structure does not require a large area.

Where does the construction of a greenhouse or greenhouse begin?
Stage 1. First you need to select and prepare the area where the greenhouse will stand. It is advisable to compact it.
Stage 2. Next comes the base, consisting of boards knocked down around the perimeter and disinfected with an antiseptic. In each of the corners of the knocked down structure, reinforcement must be inserted (into the ground). The same reinforcement must now be placed around the perimeter of the base at a distance of no more than 50 cm. The reinforcement must be dug into the ground by half or less. The length of the reinforcement is at least a meter.
Stage 3. Cut PVC pipes must be inserted onto the fittings at identical opposite ends of the pipe. Fix the pipes metal loops using a screwdriver.
Stage 4. The next step is to collect door structure, which will also strengthen the work previously done. You will need timber of this size: one 130 cm, two 170 cm, two 60 cm and two 140 cm. From 170 cm and 130 cm it is constructed doorway. Next, at a height of 140 cm, 60 cm beams are driven in. The remaining beams are nailed to the latter, from below.

The result should be a structure with one main frame and two on the sides. It must be said that the dimensions are taken on the basis that the parameters of the greenhouse will be 3 by 6 meters. The finished frame should be strengthened by connecting with wooden foundation, bars. Last step- covering the structure with a thick polyethylene film, which can be secured with an ordinary long block or using a bracket.
So, we hope that our topic is a greenhouse and a greenhouse with your own hands, photo– will help you build high-quality, reliable design which will allow you to grow a rich harvest.

See also video:
- The protective layer on which the inscriptions are applied must be located with outside greenhouse
- To get the maximum robust construction be sure (!) to pay attention to the location of the polycarbonate “honeycombs” - they should only go vertically, in inclined structures- parallel to the slope.
- When creating arches, keep in mind that polycarbonate sheets bend only in one direction - lengthwise, that is, along the line of the stiffeners.
- The joints of the sheets should be at the center of the frame post; the sheets are connected only in this way.
- This type of plastic is cut construction knife, jigsaw, grinder. You can also use a hacksaw or a circular saw.
- To firmly connect the sheets to each other, special plastic profiles. Manufacturers do not recommend overlapping polycarbonate. In practice, when making a polycarbonate greenhouse with your own hands, it is not always possible to cut and fit the sheets perfectly. Some craftsmen generally manage to do without connecting profiles, placing polycarbonate overlapping. The most important thing is that the joint must be in the center of the rack, and not sag in the air. Moreover, even with ideal installation, snow pressure can force the sheet out of the profile. In the case of overlap, this does not happen.
- It is not advisable to use a powerful drill for screwing in self-tapping screws - it will overtighten the fasteners and often slip off during operation. It is better to work with a regular screwdriver. Polycarbonate is drilled at low speeds with little effort. Next, turn off the tool, insert the screws and continue working.
- The distance between the screws to be screwed in is 25-70 cm. It all depends on the type of frame and the expected snow and wind load.
- When assembling polycarbonate structures, rivets are sometimes used instead of self-tapping screws. However, dismantling the greenhouse or replacing a damaged sheet in this case will be more difficult.
- When the temperature changes, plastic can change size. When making butt joints, a small space of a couple of millimeters in size is necessarily left between the sheets - a technological gap. Otherwise, cracks will form at the junction. For the same reason, the size of the holes for fasteners is made a little larger. To prevent the plastic from cracking, do not tighten them all the way.
- To compensate for expansion and protect against cold bridges, it is recommended to use special thermal washers for polycarbonate (screws are purchased separately). It is allowed to use EPDM roofing screws, equipped with a gasket or standard for metal with a rubber thermal washer, in which the threads have a small pitch.
A greenhouse for summer residents is the simplest and most unpretentious design for growing seedlings, as well as early vegetables and greenery. Currently garden shops sell inexpensive snowdrop greenhouses that are easily and quickly installed on personal plot. Making such a greenhouse with your own hands is not at all difficult. There are the simplest designs that do not require large financial investments and labor costs.
Description of the snowdrop greenhouse design: design, advantages and disadvantages
The snowdrop greenhouse is the simplest design, which consists of a certain number of plastic (or metal) arcs and covering material (polyethylene film or agrofibre). Since greenhouses are much smaller in size than greenhouses, the requirements for them are not so stringent.
The small snowdrop greenhouse is easy to assemble and also easy to dismantle. It will only take a few hours to install it. It does not take up much space on the site and therefore can be placed anywhere in the garden. For such a greenhouse you can do wooden base, but you can do without it. In this case, plastic or metal arcs are simply buried in the ground. The spunbond is attached to the arches with special latches, clips or other convenient methods.
Basically, the snowdrop greenhouse is made of spunbond (agrofibre), since it has a large number of advantages compared to polyethylene. Arcs made of plastic pipes are much lighter than metal ones, bend easily and do not rust.
Advantages and disadvantages of a snowdrop greenhouse made of plastic pipes and agrofibre
| pros | Minuses |
| Easy to install and dismantle | Not stable in strong gusty winds |
| Low cost of materials | During heavy rainfall and hail, the structure may bend |
| Agrofibre resistance to wind and hail | Not suitable for use in severe frosts |
| Protects plants from ultraviolet rays, transmits soft diffused light and prevents them from drying out | Small area and height of the structure for growing plants |
| Does not allow water to pass through and preserves plants in slight frost (-5°C) | If used carelessly, agrofibre can be damaged by sharp objects. |
| Durability of the design | |
| Easy to care for (easily machine washable) | |
| Agrofibre is a durable and hygroscopic covering material | |
| Suitable for use in middle lane Russia, the Urals and Siberia |
Examples of designs in the photo
 Small greenhouse “snowdrop” made of agrofibre
  Greenhouse made of plastic pipes
  Greenhouse on a wooden base made of spunbond
  Small polycarbonate greenhouse
  Small greenhouse square shape polycarbonate
  Triangular wooden greenhouse
  Greenhouse "snowdrop" made of plastic pipes under plastic film
  Polycarbonate greenhouse
Preparation for construction: drawings and design diagrams
To build a snowdrop greenhouse, you do not need special complex drawings or diagrams. It will be enough to draw by hand simple diagram greenhouse indicating the number of arcs and the size of agrofibre.
The greenhouse is 4 meters long, 1 or 1.2 meters wide.
Construction of a snowdrop greenhouse will not cause much difficulty, since you will need to buy the required number of plastic pipes and a roll of spunbond.
When purchasing covering material, it is necessary to accurately calculate the width of the material, since agrofibre can be made in widths from 1.6 to 3.5 meters. A narrow canvas can be used in a ground-based greenhouse as mulch.
To build a small greenhouse with a length of 4 to 6 meters, you can simply sew on sewing machine two strips of spunbond.
If you plan to plant seedlings early in the ground, then it is best to use dense spunbond with a density of 60 units. Standard snowdrop greenhouses are covered with agrofibre with a density of 42 units.
Calculation of the required amount of material and tools for building a greenhouse
We will build a small greenhouse 4 meters long. To create it we will need:
- PVC plastic pipes - 5 pieces (diameter 20 mm). Pipes are sold in lengths of 3 meters. HDPE pipes can be used.
- Agricultural material - a piece 6–7 meters long (if the width is 1.6, then the footage is multiplied by 2).
- If we make a greenhouse with a base, then we will need wooden boards - 2 pieces 4 meters long and 2 pieces 1 or 1.2 meters long. The width of the greenhouse will depend on its height; the higher the structure, the smaller its width will be. If there are strong winds in the region, then it is best not to build a high greenhouse.
- If we put arcs on the reinforcement, we will need 10 rods about 40–50 cm long.
Tools:
- Hammer, nails;
- Screwdriver, self-tapping screws;
- Construction level, corner;
- Bayonet shovel.
Step-by-step instructions with photos for building and installing an arched greenhouse “snowdrop”
- First we need to knock down the base for the greenhouse. To do this, we take wooden boards and knock them into a rectangle. We check the evenness of the structure with a corner or building level.
- We install the base on the ground in the place where the greenhouse will be built. On the sides with the outer or inside at a distance of 1 meter from each other, we drive the reinforcement to a depth of approximately 20–30 cm. The rods should be located opposite each other.
- Bend plastic pipes and insert them into metal rods. For greater strength, plastic pipes can be secured to the base with self-tapping screws and metal plates.
- You can also nail it for greater strength. wooden blocks at the corners of the base and in the places where the arches are attached.
- If we need to make the greenhouse more stable and reliable, then we simply nail vertical wooden boards to the board base (at the short ends). We attach them to the edge vertical board, in which we pre-drill holes with a diameter slightly larger than a plastic pipe.
- During the assembly of the greenhouses, we thread each pipe into these holes. The greenhouse structure will be more durable.
- If you make special folds in the agricultural material every meter and stitch them, then the arcs can be simply inserted into them and then there will be no need to secure them to the structure with special latches or clips.
- For further use greenhouse, you may need ordinary clips for plastic pipes, which will secure the agricultural material raised to the required height.
How to make a snowdrop greenhouse for cucumbers, peppers and eggplants
A triangular-shaped greenhouse is perfect for growing cucumbers.
- First, we make a wooden base the same as for an arched greenhouse. In the middle we nail the posts every meter.
- Then, on each side of the base, we nail two inclined boards. We get a triangular-shaped structure.
- We nail a long beam or attach a pipe to the top of the greenhouse.
- We attach agrofibre to the sides of the greenhouse. We also attach spunbond to the sides, but only in a different way. Cutting off required quantity strips, measuring the length by the width of the material with a margin. We nail small wooden slats to the agrofibre on both sides, which will serve as a certain “anchor” for the material. We cover the greenhouse with it and nail it on top so that it sticks better to the structure.
- Thanks to wooden slats agrofibre will not rise in strong winds, it will not need to be fixed at the base, and it will also be convenient to use the greenhouse on both sides.
- If desired, agrofibre can be replaced with cheaper polyethylene film.
- After the cucumbers begin to curl, the agrofibre can be removed and high posts can be nailed to the side parts. Between them we will just need to pull a rope along which the cucumbers will curl upward.
How to use a greenhouse
- The snowdrop greenhouse made of plastic pipes is easy to assemble, so at the end of the season you can simply assemble it like an accordion and put it in the pantry.
- If the greenhouse has a wooden base, it will need to be treated regularly antiseptics, to avoid the appearance of fungus and mold.
- Agrofibre is a lightweight but durable material that can be easily washed in an automatic machine.
- If you want to use biological fuel as additional heating for a greenhouse, its base will have to be buried about 15–20 centimeters into the ground. We insulate the side walls with foam plastic, and inner space we fill the greenhouse organic fertilizer: manure, as well as dry leaves, hay or straw.
- Place the prepared soil mixture on top of the layers.
Biofuel types:
- Horse manure is considered the best organic fuel, since within 7 days after installing a greenhouse, the temperature inside it will rise to +25–30°C and will remain for about two and a half months. Thanks to this, seedlings for early vegetables can be grown in such a greenhouse.
- Cow and pig manure are slightly worse than horse manure, as they produce less heat. The temperature in the greenhouse does not rise above +20°C and lasts only 1 month.
- Goat, sheep and rabbit manure have similar characteristics to horse manure and produce the same amount of heat.
Since biofuel settles over time, when laying it it is necessary to make a sufficiently high layer.
Video: how to make a snowdrop greenhouse with your own hands
Light and simple design The snowdrop greenhouse is perfect for growing seedlings, early vegetables and herbs. It does not take up much space and can be built in just a few hours if you have all the materials and tools. After the season ends, such a greenhouse can be removed to make room for growing other late crops. Thus, with a minimum of effort and a little imagination, you can build an excellent collapsible greenhouse on your site.
A greenhouse is a necessary building for all owners summer cottages, since this design allows not only to grow strong seedlings, but also to obtain early harvest vegetable crops. In addition, it is possible to grow high-maintenance plants in it, since such a building allows them to be protected from frost and pests.
It’s not difficult to build a greenhouse with your own hands, since it is much smaller than a greenhouse, and its design is simple, so you don’t have to buy special ones for construction. Construction Materials, but use those that are already on the farm. In this article we will look at the technology of building a greenhouse with our own hands, and also consider the main materials that can be used for this purpose.
DIY greenhouse
Before building a greenhouse, you should decide how it differs from a regular greenhouse. Based on this, you can not only choose suitable option designs, but also choose inexpensive ones, but enough durable materials for construction.
A greenhouse differs from a greenhouse in the following features:
- A greenhouse is a temporary structure in which only seedlings and early vegetables and vegetables can be grown. fruit crops, whereas the greenhouse can be used year-round;
- Heating equipment is not installed in greenhouses, but support optimal temperature carried out by the sun or with the help of compost and manure that are in the soil;
- Greenhouses are usually low, so they are only suitable for growing low-growing crops, while in a greenhouse you can grow shrubs and even trees.
It should also be taken into account that greenhouses differ from greenhouses in that they can be stationary or portable, and for their construction you can use almost any available materials.
Note: As a rule, arcs that are covered with film are used as a frame for such structures, but such a structure can also be erected from scrap materials.
There are a lot of options for building greenhouses from scrap materials (Figure 1). For example, for this purpose you can use old window frames. They can be mounted horizontally on wooden box, or install vertically, creating a triangular-shaped structure. A simple model can be made from ordinary old barrel, covering its upper part with the cropped plastic canister or film.
 Figure 1. Design options from scrap materials
 As a small portable greenhouse, you can use ordinary wooden or plastic boxes: All you have to do is cover the top with thick plastic wrap.
Selecting material for assembling a greenhouse or greenhouse
Despite the fact that such a building can be made from scrap materials, it is better to use more durable and reliable materials, especially if you want the created structure to last for several years.
Next, we will look at the main materials that can be used to build the frame and as the outer covering of the building. Using this information, you can independently choose the most suitable option.
Polycarbonate
This material is considered one of the most modern and is widely used for the construction of greenhouses. The technical and operational characteristics of polycarbonate fully justify its cost. The fact is that sheets of such material are much more expensive than conventional film, but the finished structure will be highly durable and will last for many years, and thanks to the transparency of polycarbonate, enough light will get inside. Besides, this material makes the building airtight, so the plants inside will develop more evenly (Figure 2).
Note: If you plan to use polycarbonate as a covering, it is better to use 4 mm thick sheets. They are quite durable, but at the same time lightweight and suitable for installation on any frame.
 Figure 2. Polycarbonate structures
 The size of the sheets can be any: polycarbonate can be easily cut into pieces of the required area, depending on the characteristics of the frame. However, it should be taken into account that to fasten the material you need to use special screws and thermal washers, which will not only ensure reliable fastening, but also prevent cracking of the sheets.
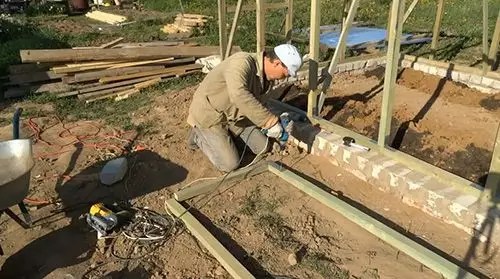
Profile pipe
Recently, profile pipes have become actively used for the construction of greenhouse frames. This is explained by the fact that this material can be freely cut into any parts and create a structure of any shape and size.
To build a frame from profile pipe you will need a tape measure to remove necessary measurements, level and plumb line, as well as metal scissors and a screwdriver for cutting and fastening parts.
The construction of a frame from a profile pipe is carried out as follows:
- Using self-tapping screws, a guide profile is attached to the foundation.
- The top beam should be positioned so that all side sections are distributed evenly. In this case, the beam must be securely fastened and not move.
- The side beams are attached to the central one, adhering to a step of one third or fourth of the length of the polycarbonate sheet.
The structural elements can be fastened with self-tapping screws, but if you are going to use the structure long time, to increase their strength it is better to weld them.
Polypropylene or PVC pipes
If you need to quickly build a closed bed, or you do not have the opportunity to buy and cut the profile correctly, you can always use polypropylene or PVC pipes as a frame material.
The advantage of using such pipes is that they can be shaped into almost any shape with minimal physical effort. In addition, such material is relatively inexpensive, and if you have recently had work done at your dacha construction works, pipe remains can also be used for construction (Figure 3).
Note: The flexibility of the pipes and the ease of their installation make it possible to create not only stationary, but also portable models, since finished design can be easily dismantled and reassembled in the new season.
The technology for constructing a frame made of plastic pipes looks like this:
- They dig in the prepared area metal pins, keeping to the square future design and arc layouts. In this case, each such pin should protrude approximately 30 cm above the ground surface.
- A pipe is put on the protruding edge of the pin and bent to give the desired shape.
- The second end of the pipe is put on a pin located at the opposite end of the future building.
- After this, you need to fix the arcs together, attaching them to the central pipe, the length of which should correspond to the length of the entire building. If you do not have pipes of a suitable length, you can use two pieces of material, but they must be securely fastened together.
 Figure 3. Assembling a frame from plastic pipes
 The final stage of construction will be covering with dense polyethylene film or polycarbonate sheets. The instructions above show the technology for constructing the simplest arched model, but if you wish, you can build a triangular-shaped structure.
Greenhouse made from window frames
A small but functional greenhouse can be built from old window frames. However, it should be borne in mind that such a design will not have the tightness of a model made of film or corrugated sheets, but is quite suitable for growing a small amount of seedlings, early vegetable crops and herbs.
Despite the minor disadvantages of window frame designs, they also have several important advantages. Firstly, you save significantly on construction, since you do not have to buy any materials to construct the building. Secondly, the technology for constructing such a room is quite simple, and even beginners can cope with this task (Figure 4).
Note: If old window frames have glass, they can be left as a covering. If the frames are empty, after installation they can be covered with film.
To build a model from window frames, you must first build a foundation. To do this, you can simply mount a frame from wooden planks or bars. The optimal size is timber with a cross section of 50x50 mm or boards with a thickness of 40 mm. The frame frame is formed by racks, upper and lower harnesses made from boards same size. In this case, the step between the trims must exactly correspond to the size of the window frame.
If you plan to build a triangular-shaped structure, you should additionally install central pillar from timber, the length of which must correspond to the length of the closed bed. Such gable design will prevent the building from collapsing under the weight of snow.
 Figure 4. Drawings of window frame structures
 The window frames themselves are attached to the supports using ordinary nails or screws. To increase the strength of the structure, the frames are fastened at four corners, not only outside, but also inside. The resulting cracks are sealed with polyurethane foam.
Film
Despite the fact that film is considered an obsolete material for covering greenhouses, it is still popular due to its low cost and ease of installation. In addition, film models do not need a foundation, and the light weight of the film does not carry a serious load on the frame.
It should be taken into account that film buildings do not have long term operation. Even with careful handling and no serious negative impacts precipitation, such a building will last for best case scenario one or two seasons. However, such structures are often used for growing seedlings and early greens. Can be used as a frame wooden beams, to which the film is attached using nails or screws. In addition, you can build a simple arched model by installing supports made of thick wire or plastic pipes, onto which you can then simply stretch the film.
DIY greenhouse drawings and projects
If you do not have the skills to construct drawings, but have a desire to acquire your own greenhouse, you can always use ready-made drawings and projects similar designs.
 Figure 5. Finished drawings of various types of models
 Figure 5 below shows several simple options small structures closed ground, which you can easily build with your own hands.
How to assemble a greenhouse yourself using video
Many summer residents abandon the idea of building a greenhouse with their own hands, fearing that the structure will not be strong and airtight enough, and the plants inside will die. To master the necessary practical skills for constructing such structures, we recommend that you watch the video, which shows in detail all stages of construction.
It is no secret that for any summer resident it is a source of pride, and sometimes even self-affirmation. Real masters of dacha business build winter oases with a variety of flowers and plants. Many of them are created according to individual sketches.. Be patient and have pencils to draw a drawing of the greenhouse you like for yourself. We will tell you what you can use to build something that will be the envy of your neighbors, what materials are best suited for these purposes, how you can use PVC and other seemingly unnecessary elements to build the best warm house for flowers and vegetables.
Read in the article
Types of greenhouses and greenhouses with photos of DIY projects
The most popular greenhouse configurations are arched or gable. When choosing this or that configuration, the specifics of the plants that you plan to grow there play an important role. Arched structures are more suitable for low-growing plants: peppers, tomatoes, eggplants. But gable, on the contrary, grapes and so on.
For flowers, you can choose a more interesting design. Their advantage is that plants can be hung on flowerpots, then the shape and configuration of the greenhouse can be absolutely any.

The first and most important way a greenhouse differs from a greenhouse is the lack of heating in winter period. The greenhouse design is purely seasonal. However, in southern regions, Where all year round The temperature is above zero, greenhouses are used constantly.

If the weather permits and you have a passion for design, you can create a greenhouse like this for flowers and small plants non-standard design. You can use scrap materials, plastic pipes and bottles, anything that is lying idle.


There are also ready-made samples that can be bought at any large supermarket for gardeners.

Review of the best projects for building mini-greenhouses with your own hands
An interesting solution for gardeners is offered by the Eco-plast company. The mini-greenhouses of this company are equipped with a system forced ventilation. They are very good to post on. Greenhouses under the Sun Tunnel brand will ensure maximum seed germination with the first rays of the spring sun


You can repeat a similar idea with pallets yourself. It is enough to provide the plants with decent air, organize compartments for planting seeds, and create draft using an ordinary penny fan.
For your information! In such a ventilated, on the one hand, but sufficiently heated, on the other, compartment, the plants not only become active and begin to grow, but are also maximally protected from pests due to the tight fit of the protective cover to the tray.
Very often, an economical mini-greenhouse is installed against the walls. Firstly, it saves material consumption, and secondly, it simplifies the procedure.


Advantages of winter greenhouses:
- Foundation. The advantage of winter greenhouses is its capital foundation. Most often with the possibility of heating. Typically, stronger and more massive materials are used, which in itself makes the structure more stable and durable.
- Space. Winter greenhouses, most often they are installed for a reason, but for the purpose of making a profit. That is why, in order to recoup the costs of heating and maintenance, most farmers do not save on space.

- Division into zones. Possibility of individual selection of planting sites depending on frost resistance. Some crops require more heat, and therefore heating, and some require less.
Review of the best projects for DIY greenhouse heating
There are a variety of heating options. However, if you really want to harvest, then simply heating the air will not be enough.
Advice! The main condition for a high yield in winter is to provide the plants with warm soil.
Heating options:

In what places are greenhouses and greenhouses installed?
Choice right place for a greenhouse – almost 50% success. Before you start planning the site, decide for yourself:
- Whether the greenhouse will be seasonal or not;
- Is there enough light in your area?
- At what level are they located? groundwater. Being too close will ruin all your efforts. Root system plants will simply die from the abundance of moisture.
- Is there wind on the site;
Advice! The site must be leveled if the soil is loose and the greenhouse can “slip” or sag. It is better to compact the soil.

What materials are used to make a greenhouse or greenhouse with your own hands?
What to look for when choosing material for a greenhouse or greenhouse:
- good throughput Sveta;
- resistance to deformation, for example to winds;
- ease of installation and assembly;
- durability.
What materials is the frame made of?
Modern construction technologies allow you to use different materials for arranging the frame: from traditional wood, to modern polypropylene. However, if you decide to use wood, remember that this is a rather difficult material to maintain. Over time, it can dry out, rot, and sag.
Advice! When installing a greenhouse with wooden frame, it must be installed on concrete base to prevent contact with the ground.


How to build a stationary wooden greenhouse from timber with your own hands
How to build a polycarbonate greenhouse yourself wooden base We'll tell you how to do it yourself in simple step-by-step instructions.
| Illustration | Description of action |
 | We make markings for the width of the shelter. We begin assembling the frame from the corners, using reinforcing elements. |
 | We fix the corners on. |
 | In addition to the base. We begin assembling the frame for the roof base. We also use corners here. |
 | We reinforce the frame with transverse guides. |
 | We begin assembling the doors. We use regular corners, hinges and fittings. |
 | For gable greenhouse The process of covering with corrugated sheets, as a rule, begins with the roof. To do this, we mark the polypropylene in advance. |
 | We do the same with the sidewalls. The main thing is to reduce the number of “cold bridges” by laying the layers slightly overlapping. |
How to make a dismountable seasonal wooden greenhouse with your own hands
This is a relatively small structure, which is very simple to build.