Updated:
 2016-08-25
Making a tandoor with your own hands is not as difficult as many may think. You should approach the work responsibly and carefully, study the video instructions first, and rely on competent recommendations. This is exactly what we will do today. We hope that with our help you will be able to build a magnificent tandoor.
A tandoor oven is an analogue of a Russian oven in Asia. This stove allows you to cook a variety of dishes, has a special firebox, and makes it possible to minimum cost prepare fuel maximum amount food.
Let's point out some key features, which tandoor has:
- A classic tandoor is built using clay mixed with sheep's wool. This is required to retain heat inside the vessel as efficiently as possible;
- Building an Asian stove requires a certain level of skill. It will be extremely difficult to build it without experience;
- At the top of the tandoor there is a narrowed hole into which food and fuel are placed;
- There is a blower at the bottom, which creates draft;
- From the outside, an Asian stove looks simple, but during construction there are a lot of nuances and features, non-compliance with which leads to a failed construction result;
- Tandoor is mainly associated with the preparation of flatbreads. But in fact, an Asian oven allows you to cook bread, entrees, meat, vegetables and much more.
Kinds
 When planning to build a tandoor with your own hands, you should take into account that there are several varieties of it. Each type has its own nuances and design features.
We invite you to get acquainted with each Asian stove so that you can decide for yourself which scheme is closer and more attractive to you from the point of view of possible independent construction.
Although there are many more varieties of tandoors than we will present today, we will consider the most popular and in demand:
- Made of ceramics;
- Horizontal;
- Electric;
- Gas;
- Vertical.
Let's study the features of these types of Asian stoves.
Made of ceramics
 This classic version tandoor, which is ideal for preparing delicious, aromatic dishes. Distinctive feature The advantage of a ceramic tandoor lies in its durability.
Why are ceramics better than metal or concrete structures? To begin with, the metal emits an unpleasant aroma, which is transferred to the food. Concrete is not the best choice from a hygiene point of view, since traces of sand and cement may remain on the finished products in the oven.
If you look at the photo, you can quite confidently say that ceramic stoves not only contribute to excellent cooking, but also look interesting and original. The price of construction depends on the materials used.
Horizontal
This type of tandoor will weigh about 80 kilograms. Mostly such ovens are created for cooking food on a baking sheet.
The stove stands on a base up to a meter high, and the firebox is presented in the form of a hemisphere installed horizontally. First, a base of bricks or stones is placed under the stove, and then formwork is made on both sides. It is placed on a base and filled with a mixture of concrete and clay. Then it executes natural drying tandoor, which lasts about 10 days.
When building such a furnace, the most important point is to gradually increase the firing temperature. After firing, the stove must cool, and then it is polished, the resulting cracks are covered with clay and fired again. Only upon completion of the second firing is the tandoor considered ready for use.
Horizontal types of Asian ovens are often found in restaurants today, since the design is quite compact and allows you to add real dishes cooked on an Asian oven to the menu.
Electric
 An electric tandoor is an electric oven, only slightly different from conventional ones.
The most modern versions are equipped heating elements, remote controls remote control. Such ovens are designed for preparing a wide variety of dishes.
But there is one drawback that covers all the delights of an electric tandoor - the lack of aromas and tastes that are typical when cooking food on open fire, coals. Because of this, an electric tandoor can only conditionally be called that.
Gas
It appeared around 2002. The gas tandoor was developed by the Uzbeks. Its peculiarity is that it is perfectly used in restaurants and cafes.
A gas oven is a metal cube with a clay jug inside. Food is placed in it for cooking.
The peculiarity is that such a tandoor is suitable for home use in a house or apartment. The main requirement is to ensure effective ventilation. You won't have to build anything.
Vertical
There are several types of vertical Asian stoves. If we take into account the simplest ones, then this is a hole in the ground, which is lined with bricks coated with clay. It is important to build a special pipe through which air will flow to the firewood while the tandoor lid is closed.
Such designs are not very difficult to implement, which is why many people at their dachas choose just this version of the Asian stove to cook for their family and friends.
Do it yourself
The presented tandoor with your own hands will consist of solid brick, clay, sand, cement and grate.
And how to make a tandoor without experience or skills? To get started, we recommend that you study the instructions in detail, watch the video and consult with specialists. In fact, the construction is not difficult. You just need to decide to take this step.
Let's start talking about how to make a tandoor with your own hands.
- Decide on the dimensions. There is a ready-made scheme, or you can focus on your requirements and wishes. Typically, such Asian ovens are made with a diameter of about a meter and a height of about 1.2 meters. The upper part should be narrowed, about 50 centimeters in diameter.
- To build a stove with these dimensions it should take you 16 rows of bricks. The lower part is created from 8 rows, and another 8 are used to narrow the structure.
- The interior of the oven must be coated with a clay solution. The choice of high-quality clay is important here so that it ensures the preservation of heat.
- The lower part of the tandoor must be laid in the ground. Make a recess for the stove so that after pouring the foundation there is approximately 60 cm left to the surface.
- Pour the foundation for the Asian tandoor oven and let it dry.
- The first circle of brickwork - the outline - is laid on top of the foundation. Then the entire surface is covered with bricks, leaving only a rectangular opening to create a ash pit no more than 20 cm wide.
- Next, up to 9 rows are laid along the contour.
- Starting from the 9th row, there is a shift of 30 mm, so that in the end the upper part of the oven has a hole diameter of about 50 cm.
- The tandoor is coated with clay inside and outside.
- It is dried for about 3 weeks and the lower part is filled with soil. All that remains is to heat the stove with brushwood and that’s it.
Making a tandoor oven yourself is not difficult if you approach this issue correctly. But the result is a variety of dishes with great aroma and taste.
Dacha - most often used as a place to relax. A tandoor would be an excellent addition. With its help, you will be able to please your friends or relatives with exquisite and tasty dishes cooked over a fire. The main advantage of the tandoor is that food is hung in a vertical position. Thus, the fat that is formed during the cooking process flows evenly over the surface and does not immediately fall onto the coals. We’ll talk further about the features of making a tandoor at the dacha.
Do-it-yourself small tandoor for a summer house
In the tandoor you can prepare various dishes in the form of flatbreads, samsa, kebab, fish, etc. At the same time, dough products are fixed directly on the walls of this device. This bread has a special, refined taste.
We bring to your attention several options for making a tandoor. Traditionally, this oven has round shape. It can be both aboveground and underground. In some eastern homes, the tandoor is located directly inside the kitchen, most often in the center. Thus, this stove is not only a place for cooking, but also, to some extent, a heating device.

It is possible to manufacture a small portable tandoor, in which case wheels are additionally installed in it. During production stationary option oven, it should be located on soil made of sand or stone. In this case, the soil should not be wet in any case.
Before you build a tandoor with your own hands, you should prepare drawings. To make a tandoor, use stone blocks, ceramic clay bricks or white bricks with fire-resistant characteristics. Initially, you should arrange the base, since the tandoor has an impressive weight, the base in the form of a foundation should be quite strong. Fuel will be placed inside the base, so care should be taken to make it from fire-resistant materials.
It is possible to make a tandoor directly on the ground. In this case, it is enough to arrange a small round depression. At its bottom you need to make a sand cushion and start laying a brick well.
The bricks are connected to each other using a special mortar. It is possible to use a ready-made oven mixture. It contains plasticizers, red clay and red sand. There are two masonry methods - horizontal and vertical. The first option differs in that the finished tandoor retains the accumulated heat longer. The second option is more economical and requires fewer bricks for its manufacture. There should be a hole in the bottom of the stove through which combustion products will be discharged. Initially, we recommend laying out the oven without using any mortar.

If you need to cut bricks, use a grinder with special disk for ceramic products. After completing the ordering, brick laying is carried out on the previously prepared mortar. The process of constructing a round oven is quite lengthy and requires experience in working with similar materials. All bricks must be tightly connected to each other.
In order to form the correct round shape, you will need a brick template. During the laying process, periodically use a level to measure the evenness of the tandoor. Eastern ovens tapered slightly at the top; for these purposes, craftsmen used templates according to which the masonry was carried out.
After masonry is completed, the inside of the furnace is freed from mortar, dust and dirt. Use clay to fill the external joints between the bricks. The inside of the oven is also coated with clay, previously soaked and combined with other components in the form of finely chopped grass. Additionally, ceramics, mosaics, tiles or natural stone will help decorate the stove.

Do-it-yourself tandoor in the countryside, photos and unusual manufacturing ideas
To make a brick tandoor, you must have some experience working with bricks, as well as special tools. To simplify this process, we offer the option of making a tandoor from ordinary wooden barrel.
In the process of work, in addition to the barrel, you will need the presence of clay, as well as skills in working with this material. The inside of the barrel is coated with a solution of refined oil. In order for the mail to absorb the oil well, leave it for 12 hours. To prepare the solution you will need clay, sheep wool, with the help of which reinforcement and sand with fire-resistant characteristics are performed.

The consistency of the solution should be thick; it will help coat the inside of the barrel. To smooth the solution, use special tools in the form of trowels. To dry the barrel, use incandescent lamps. Next comes the process of removing the hoops and disassembling the barrel. Thus, it is possible to obtain a tandoor clay oven. In this case, the product must be fired a second time.
DIY tandoor video:
To make another unusual tandoor, you will need plastic barrel. Initially fill it with water and wait for it to increase in size. The outer part of the barrel should be treated with a solution based on fireclay clay. Thus, the contour of the furnace is formed. Next, the product is dried for seven days. After this, the water drains from the barrel and it decreases in size. It is at this moment that the barrel is removed from the oven.
This stove allows you to install special stands on it for a cauldron, in which you can cook a variety of foods. To install skewers under the kebab, you will need to make metal fasteners. Additional decoration of the stove is done using tiles, ceramics, paint and other decorative elements.

Do-it-yourself tandoor: step-by-step instructions - options and manufacturing features
There are several types of tandoor ovens. The first of them is stationary. This structure is distinguished by a hemispherical design with a volume of one cubic meter. The side wall of the oven has an opening, the diameter of which is about 60 cm. The technology for making a traditional Uzbek tandoor with your own hands is particularly complex and takes a long time to complete.
A simpler option is to make a tandoor with your own hands from brick. Firewood, coal or brushwood are most often used to fire a tandoor. The inner part of the walls is wiped, the fumes are removed from it, and traditional dough cakes are placed on it. Used to remove cakes special devices in the form of hooks. Fuel is loaded through the same opening as the food.
The second option is to make a portable tandoor. For these purposes, fireclay clay is most often used. The thickness of the walls of such a furnace reaches seven centimeters. Among the advantages of this material note high level heat resistance, high thermal output and thermal capacity. Thus, dishes can be prepared in a short period of time, with little fuel consumption. The shape of the stove most often resembles a barrel, the sides of which are equipped with handles with which it is transported from place to place. To improve the strength of the structure, it is tightened using vertical and horizontal strips of metal.

Among additional elements We note the details of such a tandoor in the form:
- grates, grill meshes or baking trays;
- hooks for pulling out food;
- skewers, additional attachments;
- utensils for preparing combined dishes.
The lid is equipped with a device on which the skewers are fixed in a vertical position. The lower part of the furnace is equipped with a blower. It is used to light the stove and clean the ash pan. Clay portable ovens must be protected from the harmful effects of moisture and frost.
Another option for the traditional tandoor oven is the electric oven. By external characteristics he looks like a normal one kitchen stove. In its lower part there is an element in the form of a heating element, which performs the function of heating the oven and cooking food. However, an electric oven is not able to generate the same heat as coal or firewood; as a result, the food turns out over-dried, devoid of natural moisture.
The main advantage electric oven tandoor is that they can be used in any place with access to electricity. They differ original design and good performance characteristics.

How to make a tandoor at the dacha with your own hands
It is difficult to make a portable version of the tandoor; it is better to buy a ready-made oven in a specialized store. But, if you decide to make a stationary tandoor, then use the recommendations below.
We offer the option of making a tandoor at the dacha with your own hands from brick. For these purposes, it is necessary to use a special brick with fire-resistant characteristics. In addition, you will need previously developed drawings, a template made of wood and mortar for masonry.
To prepare the solution, fireclay clay, water and ordinary salt are used. Possible use case ready-made composition, which also contains plasticizers that improve the resistance of the frozen solution to temperature changes and moisture.

The masonry is done in three bricks, then the structure is coated with kaolin clay. The drying time of the solution is about 25 days. After this, the stove is heated daily with a small amount of firewood. After the solution has completely dried, the product can be fired. The tandoor oven can have various shapes, starting from an oval and ending with a jug or a straight pipe. Among the advantages of making a tandoor with your own hands, we note:
- quick cooking;
- small amounts of fuel used for cooking;
- opportunity self-made ovens;
- the ability to prepare dishes of various compositions with unsurpassed taste.

Particular attention should be paid to the process of lighting the tandoor. If the weather outside is hot, the stove is completely filled with wood. IN winter time years, small chips are first laid, which gradually heat the walls of the furnace. Next, the firewood is laid. Use of wood from fruit trees will saturate your dishes with an unsurpassed aroma; coniferous trees emit resin - we do not recommend using them in cooking. The best option- birch, acacia, oak.
Please note that use coal not suitable for cooking. During its combustion, toxic substances are released in the form of coke oven gases. Fuel is added in such a way that it occupies no more than half the volume of the furnace. The oven is melted and warmed up for an hour, only after that the cooking process begins.
It is not recommended to install the oven in indoors, since there is a possible risk of fire of objects located near the stove. Stationary models are characterized by a high fire height, reaching 100 cm. Therefore, when working with them, maintain the maximum safe distance. Do not allow water to come into contact with hot areas of the oven, as there is a risk of cracks. The oven can sometimes reach 450 degrees, so keep children away from it. When working with tandoor, wear gloves with heat-resistant characteristics. Before transporting the oven from place to place, wait until it has cooled completely.

Additional accessories for the stove can be made independently or purchased in specialized stores. These can be all kinds of spatulas, potholders, skewers, grates.
If you decide to purchase a tandoor, we recommend choosing models that have additional glazing. They are practical to use, as they are easy to clean from grease and soot. A high-quality Uzbek tandoor with your own hands will become not only a place for cooking over a fire, but also a decoration for the exterior of the dacha, so the process of its manufacture should be taken with particular seriousness.
Do-it-yourself tandoor at the dacha video:
What is tandoor? Surely, you are familiar with this word, and many are even lucky enough to see it or try delicacies prepared in the tandoor. In the Middle East, there is a tandoor in almost every home. In the absence of gas in the Caucasus in ancient times, it could replace a gas stove.
A tandoor is a roasting pan that has an interesting jug-shaped shape. The main purpose of the tandoor is cooking. Despite its popularity in eastern countries, recently brick and clay ovens are in demand in Europe. There are two types of tandoors: stationary and portable. The second option is more compact and convenient. At any time you can move the product, give it to a neighbor for the weekend, and so on.
 Portable tandoor
  Compact tandoor
 Despite the fact that the first ovens in the East were built from clay, today they are being replaced by the more practical brick. Therefore, our material today will be devoted to how you can build a brick tandoor with your own hands.
Tandoor: historical background
If you believe the legend, which is passed down from generation to generation, the first clay oven was invented by a shepherd, whose name was Tandoor. One day he saw that at night all the flowers closed their buds, and insects were hiding inside. In this simple way they protected themselves from the cold wind. The young man made a magnificent bud out of clay, only bigger. In it he prepared himself a simple dinner and lit a fire. Food from the bud turned out to be incredibly tasty and nutritious. She also stayed hot for a long time.
Subsequently, the young man became rich. He made buds from clay and sold them to everyone. In honor of the talented young shepherd, these ovens began to be called tandoors. Tandoor himself became a respected person. In fact, he was a kind of analogue of the Greek Prometheus. Only he gave people not fire, but delicious food and the opportunity to cook it at home.
According to another legend, the tandoor is attributed truly sacred significance. There is an opinion that masonry clay ovens was widespread back in the 10th century among the Sart tribe. They lived on the territory of modern Uzbekistan and worshiped fire. For the Sarts, the tandoor was the home of beautiful peris (analogous to fairies in Europe). Several centuries later, it acquired a different, now practical, meaning. By the way, the Mongols, who conquered the Sarts and took away all the inventions, were able to see in a clay structure an excellent method of cooking.
How many secrets does the tandoor keep?
Nobody counted the number of secrets, but the fact remains: the production of a simple stove in the East is covered with many legends. For example, if you make this stove without the proper level of skill, it will burst from high temperature. They say that clay for production is always carefully sifted, like flour for dough. However, there is still no official confirmation of this.
The wool of some animals can also be added to the clay. For example, goats or sheep. After prolonged firing, it burns out and pores appear in the vessel. Also during construction, ordinary barrels made of wood or plastic are used. They hold their shape remarkably well. At the end of construction, the barrel is removed.
Of course, knowing these secrets is not enough to build a full-fledged tandoor with your own hands from brick or clay. But the fact remains: building with brick is much simpler and more affordable.
 Brick tandoor
 However, this fact does not deprive the tandoor of its amazing qualities. Do not think that the ancient nomads always built such ovens from clay. They regularly moved from one place to another, building a stove from scrap materials. One food still turned out incredibly tasty. Tandoors are found everywhere in Armenia and Kazakhstan, Azerbaijan and Turkmenistan, Mongolia and Tajikistan, and Japan. Historians still do not know the exact answer which of the two structures is older: the Russian stove or the tandoor.
By the way, the word itself is of Turkic origin, and in each country it is called differently. For Armenians it is tonir, for Tajiks it is tanur, for Georgians it is simply tone.
Step-by-step guide to building a brick tandoor
There are three varieties homemade stove: pit, portable and ground. Now we will consider the option of building a ground tandoor from fireclay bricks. This is due to the fact that a pit tandoor is usually used to heat rooms, while a portable one is a type of barbecue.
You will agree with the statement that any serious project must begin with comprehensive training. On the one hand, there is nothing difficult in building a brick tandoor, and anyone will tell you this professional builder. But on the other hand, you need to be properly prepared to create a durable and comfortable object.
Master class on making tandoor
The preparation process begins with the collection necessary materials. There are several options for brick tandoor, but in our case, the “gentleman’s” set looks like this:
- Sand and gravel mixture – 150 kg.
- Mesh with cells of 5 cm - 2 square meters. meters.
- Cement M400/500 – 6-7 kg.
- Asbestos fiber – 6 kg.
- Fireclay bricks - from 50 to 70 pieces.
- Fireproof paint – 1000 ml.
- Fiberglass reinforcement – 6 mm section, minimum 15 meters.
- Steel wire – 3 mm section, 15 meters.
- Fireproof mixture, without which no masonry is possible - 20 kg.
As soon as it is collected necessary set tools, take care of the most necessary tools. Most likely, you already have them at your dacha, and if not, you can always buy more:
- Plastering rule.
- Convenient container for mixing concrete or.
- Grinder and diamond wheels.
- Spatula and paint brush.
Your tandoor oven will be located outside. Therefore, she must have reliable foundation and stable design. It is bad if the soil contains a lot of clay. In this case, you definitely cannot do without a reinforced foundation. On heavy soils, the so-called columnar foundation. But if the soil is light enough, it is enough to simply cast a monolithic slab.
 Preparing the base of the tandoor
 The masonry is designed in such a way that the oven area will be approximately 100 by 100 centimeters. As you understand, this is not the most compact design, so the slab must be at least 10 centimeters thick. Approximately 15 centimeters of soil is removed around the perimeter. At the corners of the future slab, recesses of 75-90 cm with a diameter of 12-15 cm are made. When the holes are drilled, reinforcement will be required.
You can’t do without fiberglass reinforcement. The structure must be filled with concrete.
To ensure the concrete has a good consistency, use sand, cement and gravel in a ratio of 3:1:1. The size of the gravel fraction should not exceed 1 cm. The result should be a solution with the consistency of thick sour cream. When pouring mortar, always focus on the foundation pit. The formwork will help you maintain the correct orientation and help avoid discrepancies in levels. The formwork is laid on the bottom, height 5 cm. The bottom is covered with sand, but the height of the layer should not be greater than the height of the formwork. Next, you need to pour water on the sand so that cavities do not appear, and begin laying the formwork for monolithic slab. Many users ask: why is there sand in the foundation at all? IN in this case, it performs the function of a damper cushion.
Do-it-yourself formwork for a brick tandoor is always made from roofing boards. The optimal width is 15 centimeters. The boards are buried 10 centimeters into the ground, only 5 cm rises above the ground. You need to put a reinforcing mesh on the sand. Before pouring concrete, everything is leveled again using a level.
Wait until the concrete hardens. This will take about 72 hours. If possible, we recommend increasing the waiting time to seven days. Only after this do you pick up the drawings and start laying the foundation.
 The finished arch is attached to cement
 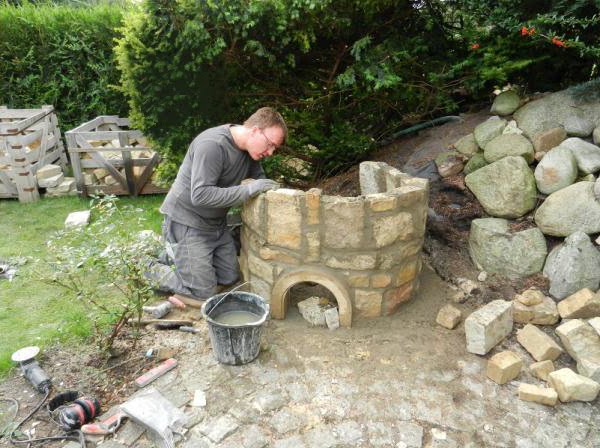 laying on cement in a circle of stones
  We draw out the walls
 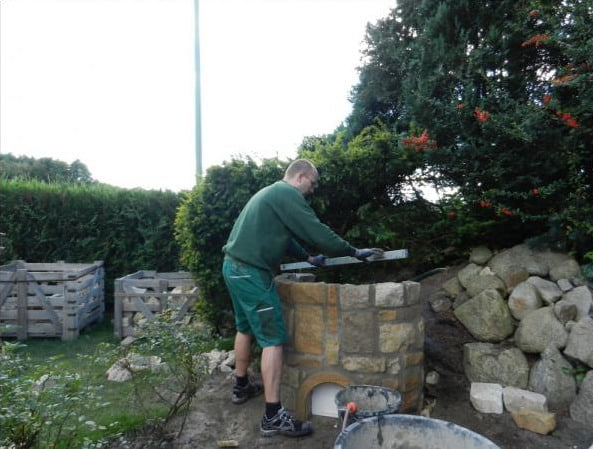 Level check
  Preparing the mold for the inside of the tandoor
  Filling the internal form
  Preparing clay for the inside of the tandoor
 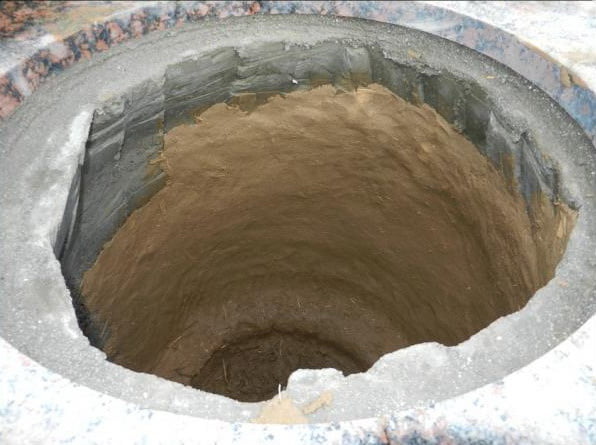 Smearing interior walls clay
  Decorative cover for tandoor
  Decorative blower
  View inside the finished tandoor
  Final drying of the tandoor
 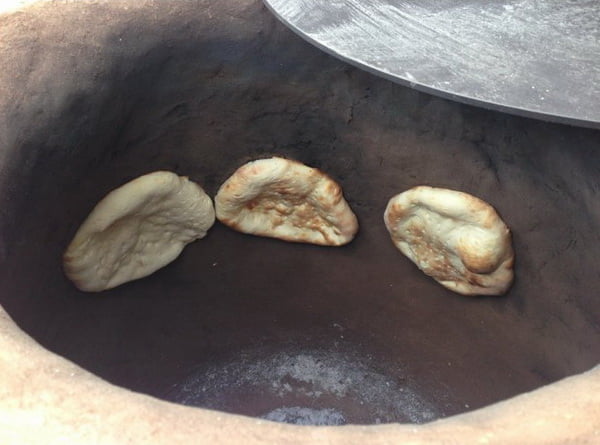 Making bread
 How to form the base of a tandoor?
Since you and I have to build a tandoor from brick, brick will be used as the base. But not simple, but fireclay. This is due to the fact that the temperature inside the tandoor will be incredibly high, and ordinary red blocks are not designed for such a load. But fireclay brick has excellent fire-resistant qualities. It almost does not absorb moisture and can easily withstand the weight of the tandoor.
Another undoubted advantage of tandoor is its resistance to sudden temperature changes. Therefore, it is simply ideal for construction outdoor stove. No cracks on frosty or hot sunny days!
The base is always made in the shape of a circle. Outline the pattern with chalk, the diameter of which should be 75 cm. All bricks are laid out in the given order. At the end of the procedure, unnecessary corners are ground down to form an ideal base. Don't forget to put roofing felt on concrete base. It will guarantee good sound insulation.
After this, mix the refractory mixture and apply it to the roofing material with a spatula. Consider the fact that the brick base must exactly match the selected height of the tandoor, and the size of the neck should be a third of the base. To assemble the rule, use a pole (height up to 100 cm, base length - 30 cm, step between given guides - 25 cm). The pattern is made of plywood; the bed slats are ideal (meaning the part on which you usually place the mattress).
We build walls
Wall masonry has its own characteristics. All bricks are laid vertically. Therefore, you will need to stock up on enough solution to provide all structural elements with enough reliable fastening. Make sure that the edges of the bricks are placed as close to each other as possible. Use steel wire to tie together the first row of bricks. After fastening, the ends of the wire need to be tightly twisted and hidden in some kind of seam. In the second and third rows the procedure is repeated. When the main structure is built, plastering can begin. Use baking mixture, but remember that the thickness should be at least one centimeter.
 We insulate the walls of our oven
 Wait for the plaster to dry. It is advisable to cover the tandoor with film for comprehensive protection structures from rain, exposure sun rays. Strong heat can be detrimental to an as yet unfinished tandoor. When the structure hardens, the surface is covered with acrylic. It is recommended to use the so-called whitewash. Armed with a broom, clean the inside of the tandoor from the dirt and build-up that has formed there.
 Almost completed tandoor, only the lid remains
 Terms of use
We just figured out how to make a tandoor out of brick. Only one question remains unresolved: how to use such a stove? You need to be especially careful when igniting for the first time. Raise the temperature smoothly and gradually. Use 2/3 of all firewood, take only dry logs. Products should be loaded inside only after the firewood has completely burned out, that is, an hour after ignition. The coals are evenly distributed along the bottom. One dressing is enough for two dishes, the second will take about 2 times longer to cook. It’s easy to check the oven’s readiness. To do this, move the stick along the wall with inside. If the soot quickly disappeared and the wall became clean, the tandoor is ready for use.
Time to take stock
A do-it-yourself tandoor made from special brick is, first of all, just a wonderful oven for preparing delicious, nutritious dishes. Your own tandoor will definitely delight you with evenly roasted meat. You don't need to twist the skewers and turn the steaks - everything happens on its own. You already know how to build a tandoor, which means you will always have incredibly tasty and very healthy bread in your home.
Accounts for public utilities are constantly growing. But if you cook in a tandoor at least sometimes, you can significantly save on electricity and gas consumption. The installation is extremely easy to operate and will not cause problems even for a beginner dealing with a brick oven for the first time.
DIY brick tandoor video
The tandoor is made in the form of a container, hollow inside. A hole is made on the top surface for storing food and firewood. A blower is installed below, providing traction in the device. To enhance thermal insulation, an additional shell is made of brick, and sand or clay is poured between the body and the brick fence.
When wood burns, the tandoor becomes hot, and the temperature in it can rise to 400 degrees. The oven retains heat well, so the heat lasts up to 4 hours, during which it is allowed to cook dishes continuously. Food cooks quickly because the heat spreads not from the outside, but from inside the vessel. The device prepares aromatic dishes, evenly fried meat, fluffy bread and other uniquely delicious products.
Advantages and disadvantages
The original country stove for cooking is simple to construct and easy to operate. But, despite these significant advantages, it also has several important disadvantages that are worth paying attention to before you start building.
Advantages
- Fuel economy.
- Maintaining optimal temperature.
- No difficulties in use and maintenance.
To heat a tandoor you need much less wood or coal than for a barbecue or barbecue. With one load of firewood you can cook about five servings of shish kebab, when you can’t even get two in the grill. Shish kebab is cooked much faster and easier in a tandoor; you just need to hang the skewers inside and close the lid.
The meat will cook on its own; there is no need to constantly turn it. Good tandoors with fairly thick walls cook food much faster than thin-walled ones, due to greater heat accumulation and longer retention of heat inside.
Flaws
- No chimney.
- When operating, it is necessary to constantly use special gloves that resist burns.
- After igniting the wood, a coating of soot appears on the inner surface.
- Heavy, thick-walled tandoors are difficult to transport.
- Food and fuel are placed in the same hole.
If you want to use the stove indoors, you can make a portable tandoor on wheels, which is lighter and more compact. To get rid of soot, it is enough to clean the walls with a hard brush and rinse with water.
Making a real clay tandoor
Ancient technology involves making an Uzbek stove using modeling. The tandoor is made from special kaolin clay, which differs from ordinary clay in good thermal insulation properties. During operation, the device may crack; to avoid such unpleasant consequences, camel or sheep wool is added to the clay.
Asian masters in the construction of real tandoors do not share secrets that allow them to achieve better results. Therefore, you have to make a stove without knowing the exact composition of the mixture. How to make a tandoor from clay with your own hands is described in the following paragraphs.
Scheme
This scheme classic tandoor made of clay, reinforced brickwork quite simple to build.
The finished tandoor will measure 900x900 cm. The width of the upper opening is 350 cm.
Materials and their quantities
Tandoor is made from kaolin clay mixed with wool. The wool pieces should be approximately 15mm wide. The amount of clay used depends on the final consistency of the mixture and the presence of other components in the composition. Ready mix should be viscous and thick. To make the body, clay and fireclay sand are mixed in proportions 1:2. The mixture is filled with water and left for several days.
The walls are made of refractory bricks. The presented scheme requires approximately 1000 bricks. Sand is poured between the brickwork and the furnace body to better thermal insulation. It will require about 30 kg.
Tools
To build a tandoor with your own hands, you need the following tools:
- Shovel.
- Bulgarian.
- Construction level.
- Putty knife.
- Fittings.
- Container for solution.
- Wire for fixing brickwork.
Different schemes may require additional tools. For the presented diagram, the above elements are sufficient.
Step-by-step instructions for sculpting
- Kaolin clay is mixed with wool or fibers.

Mixing clay and wool
- The finished mixture is left to stand for a week to achieve the required condition.
- Flat “sheets” are molded from the mixture; their thickness should be at least 5 cm.

Clay sheets
- The body of a tandoor oven is made from sheets, laying them out in a round container.

Construction of a tandoor from clay

View from above

Don't forget to make a blower
- It is recommended to lubricate the inside of the oven with vegetable oil.
- Leave the structure to dry for 24 hours.
- Lubricate the cracks that appear with clay milk and leave to dry further.

Lubricate the cracks
- Next, we strengthen the tandoor with brick walls, using the same kaolin as a solution.
- Sand is poured evenly between the bricks and the body.

- The next step will be making the lid. It can be made from wood:

- After all the manipulations, you can proceed to drying the oven. Drying finished Uzbek stove must last at least two weeks. Once the first drying is completed, the oven is heated with paper or shavings. After burning the fuel, the tandoor should cool completely and be heated again the next day.

Ready tandoor
Typical manufacturing errors
- Incorrect preparation of the mixture. Any deviations can cause cracks to appear. It is important to maintain proportions when preparing the batch.
- Insufficient firing. Causes the device to transmit heat to the outside.
- Incorrect drying. Drying the oven should be done in a warm place with little humidity.
Clay tandoor from a wooden barrel
It is much easier to make an Uzbek tandoor with a wooden barrel base with your own hands. There is no need to make flat sheets of clay to create a body or burn them for a long time to give them a ceramic state. It is worth noting that the tandoor is made with a foundation for reliable installation. The disadvantage of this option is the impossibility of moving it.
The article on our website portal provides a description for a tandoor made from a 120-liter barrel. The diameter of such a barrel is 526 cm and the height is 170 cm. The following diagram represents detailed description tandoor devices with foundation. Using the picture you can understand how to make an Uzbek tandoor with your own hands:
Materials and their quantities
To build a higher-quality and long-lasting tandoor, it is best to use kaolin clay mixed with wool or fibers. Kaolin is better at preventing cracks from appearing. The mixture also needs to be made from clay with an admixture of fireclay powder in a ratio of 1:2. The material from which the barrel is made is not important, all the same Oak barrel or cherry, the wood used does not matter. The following materials are also required for construction:
- Thermal filler, for example sand.
- Bricks.
- Lattice.
- Fittings.
- Water.
It is equally important to make the right mixture; the durability of the oven and its performance depend on the composition of the clay for the tandoor. If you want to strengthen the device, you can build a foundation of brick and the same clay mixture. To improve the thermal capacity of the furnace, sand is poured between the base and the brick shell.
It is better to use good, ceramic brick. Such a stove saves fuel much better due to the fact that it retains heat inside many times longer. It is not necessary to make a tandoor with a brick shell; the oven can be made simply from clay, but in terms of its qualities it will lag somewhat behind the most improved version.
Tools
To make an Uzbek tandoor from a barrel, you need the same tools as for simple tandoor made of clay with minor differences:
- Bulgarian,
- Putty knife,
- Master OK,
- Drill,
- Cutting.
Manufacturing instructions


Finished structure with brick finishing
When the tandoor is ready, you should not use it immediately; first, the structure must be thoroughly dried. The tandoor oven must dry for at least a month, and if the bottom of the barrel was not removed during construction, then drying is extended to one and a half months.
Errors
- Poor mixing of the clay mixture, which causes the tandoor to crack or even spread.
- Excessive thermal insulation of walls.
- Fixing bricks on a poor-quality mixture. It is best to use the same kaolin clay.
The tandoor, like any other stove, is a flammable device that can harm human health. For best performance and your own safety, it is important to follow the operating instructions.
- Place the structure on open area to avoid fires in nearby objects.
- If you need to move the oven, attach wheels to it.
- Be sure to check that there is no fire or hot coals in the device before leaving it unattended.
- The base of the tandoor must be heat-resistant.
- When heating, you should not use coniferous firewood because it releases carcinogenic resins.
- When using the oven, be sure to use heat-resistant gloves and oven mitts.
Conclusion
Using simple steps, an exotic Uzbek stove can be made that can cook delicious dishes. Food from the tandoor will give you a unique feeling of oriental sophistication. In this convenient and interesting barbecue substitute, you can cook not only meat or fish - the tandoor is famous for its aromatic flatbreads.
The dough is placed directly on the inner surface of the oven base and thus baked. Making a real tandoor from clay with your own hands is not only pleasant, but also very useful, because you can treat yourself and your loved ones to special dishes while relaxing in nature.
Tandoor is eastern variety oven made in the form of a volumetric jug. It allows you to replace a large and bulky grill with summer cottage. They cook here different types, dishes ranging from kebabs to flatbreads with herbs.
A tandoor for a summer residence is an indispensable attribute, which is used as decoration and cooking. Modern technologies They offer a huge number of models of this oven. They differ in their appearance and size.

How to make a tandoor oven with your own hands? How to choose the right material and manufacturing technology for this structure? The answers to all these questions are rearranged in our detailed guide.


Selection of consumables
Before choosing tandoor designs, it is recommended to decide on the consumables from which the stove structure will be built. These include:
- chess brick. It is used for the construction of walls. The thickness of each element should reach about 10 cm wide. For the initial claque you will need from 400 to 1500 pieces. ceramic product;
- construction composition. Here you will need sifted river sand, clay. This masonry mixture has high fire resistance to high temperatures;
- the foundation must be made of concrete and additional reinforcement;
- the blower must be made of metal pipe diameter from 50 to 100 mm;
- wooden boards for making rough cornice. This design will allow you to correctly lay out the initial masonry.

The process of making tandoor at home
Making the right tandoor for a summer house takes too much time. On average, it takes from 1 to 2 months to build. The construction process includes several main stages. These include:
Foundation. Here it is important to make a high-quality support base that will allow you to use this design as intended.


In addition, a solid foundation helps to withstand rare temperature changes. It is erected in a pre-prepared pit. Deepenings are made at the bottom metal structure into which concrete will be poured.

Making a template. This measure will allow you to maintain the same radius during the laying of brick elements. The distance between each arch should be 28 cm.

Laying process. When the foundation is completely dry, begin laying bricks. The initial level is fixed to a thick layer construction staff. Each stone is leveled using wooden template. It is carefully moved after each laid stone element.

Next, proceed to the second row. It is performed using the same technology. This continues until the 4th row of the structure. Upper layer laid at a slight angle. The result is a barrel-shaped structure with a spacious middle and a thin neck.

Kiln firing. External side coated thin layer clay composition. The consistency of the material should resemble plasticine. After this, a small amount of salt is placed in it. It will prevent cracks from appearing during the firing process.

Before applying protective layer the structure is moistened abundantly with water. Now they start firing. Solid wood is used here hardwood. They burn more and produce a minimal amount of ash.

The container is filled 2/3 of the height of the stone product. When the wood begins to burn actively, it is left until completely burned out. During the smoldering process, the coals are covered with a metal lid and left to cool on their own. The photo of the tandoor shows an illustration of the working process.

Additional accessories
When the oven is fully completed, you can make additional paraphernalia that will facilitate the cooking process. These include:
- Multi-level grid - barbecue. It is used for cooking fish, mushrooms or meat sausages;
- Barbecue attachment. It is a metal structure, on the sides of which there are additional notches. During the process of frying meat, the skewer is fixed in these cuts. This will prevent overheating metal elements during the heating process;
- Nozzle for lavash. She attaches the dough piece to the side. It is a mesh product that is fixed with long hooks.

Photo of brick tandoor


