Laminate is a rather impressive coating, the use of which can make the interior of a room more solid and attractive. Floors lined with such material will look attractive, but, of course, only if correct installation slats. Further in the article we will look at how to lay laminate flooring along or across a room, what technology to use to assemble such a covering and how to carry out the preparatory work.
What factors does the installation method depend on?
Laminate flooring can be installed in rooms either lengthwise or crosswise. The choice of direction for laying such boards will depend on the following factors:
- size and configuration of the room;
- number and location of light sources;
- type of subfloor.
The reader can see what laminate flooring looks like when laid along or across a room in the photos presented on the page. As you can see, depending on various factors, the most attractive appearance of such a coating can be achieved using both installation methods.
How lamellas are most often placed
In most cases, the direction of the laminate boards is chosen based on the light source. In residential premises, this is, of course, usually a window. When laying the slats perpendicular to the light source, all the joints between them become visible. Accordingly, the coating itself does not look very neat and impressive. The laminate should be laid parallel to the rays of sunlight falling into the room.
In every room in modern apartments Most often, only one window is provided. Accordingly, choosing the location of the lamellas will not be too difficult. But in corner apartments windows can be located on adjacent walls. Very often there are two or more of them in equipped rooms in private houses. In such rooms, when laying, you should focus on the window from which the most sunlight comes in (the largest, facing the south, etc.).

Of course, both in apartments and in private houses there are also rooms without windows. In this case, you need to focus on the brightest source artificial lighting. Laminate boards in such rooms should be installed parallel to the rays emitted by them.
Things to know
The material may fit slightly differently narrow corridors with ceiling lamps. Focus on the light source in in this case for obvious reasons it won't work. In such rooms, slats are usually laid simply in the direction of the busiest movement of apartment residents. Using this installation method in this case allows you to extend the service life of the coating. When laid along the main movement, the joints of the boards will subsequently wear out much more slowly.

Selecting the installation direction depending on the size and configuration of the room
How is the laminate laid - along or across the room? The answer to this question also depends on the layout of this particular room. The slats of this material are mounted, in fact, usually parallel to the rays of light from the main source. However, sometimes designers and builders break this rule. For example, in very narrow rooms with one window on a short wall, slats can be mounted at an angle of 90 degrees to the falling sun rays. Of course, the coating itself in this case will not look so neat, but noticeable joints will visually expand the room and make it more voluminous.
Sometimes rooms in apartments can have a complex configuration, that is, in plan they can be, for example, the letter “G” or “P”. In such rooms, it is recommended to lay laminate flooring in a diagonal manner. With such installation, the service life of the coating may be slightly reduced. However, the use of this technology will make the interior of a room with a non-standard layout more solid and attractive.

How to lay laminate flooring - along or across the room, depending on the type of subfloor
Boards of this material are placed on a concrete screed standard technology, focusing most often on the light source. Another thing is wooden floors. It is recommended to lay the laminate on such a coating perpendicular to the lower plank floorboards. When using this technology, the service life of the coating is extended. If the floorboards of the subfloor are located parallel to the rays of light from the main source, the apartment owners will most likely have to give up the opportunity to install a more effective coating in order to make it more durable.
Selection of material according to technical characteristics
How to lay laminate flooring - along or across the room correctly, we'll talk about this a little lower. First, let's figure out how to choose this flooring.
When purchasing slats, among other things, of course, you should pay attention to their type. In respect of technical characteristics This coverage may vary:
- according to the degree of wear resistance;
- according to the degree of resistance to moisture;
- by the type of fastening of the lamellas to each other.
There are only four wear resistance classes of laminate:
- 21, 22, 23 - can be used in residential premises with not too high traffic (in bedrooms, offices, living rooms);
- 31-33 - intended for installation in rooms with heavy traffic load (corridors, kitchens, halls);
- 34 - especially durable laminate used for finishing floors in hospitals, conference rooms, etc.;
- 42, 43 - super durable material, made to order.
According to the degree of moisture resistance, lamellas can be classified into conventional and intended for installation in wet rooms. In changing rooms and rooms of saunas and baths, for example, class 34 laminate is usually installed. In addition to increased strength, such boards are also moisture resistant.

Special types of coating
Among other things, for installation in damp rooms a special waterproof laminate. Such boards are equipped with a specially designed lock that ensures the tightness of the joints. Also, this type of laminate is capable of long time withstand even direct contact with water.
Laminate flooring can be laid along or across the room, regardless of its type. The principles discussed above for choosing an installation scheme in specific rooms are valid for all types of this material.
Methods for connecting boards
Regular, non-waterproof laminate planks can be equipped with two types of locks: Lock and Click. The first type of connection is characterized by extreme simplicity of design. In essence, this is a regular tongue/groove lock. It is recommended to purchase such a laminate only if you intend to hire a specialist to install it. Installing boards with a Lock lock is quite complex and time-consuming.
If you plan to do the installation yourself, it is better to purchase lamellas with a Click type connection. If there is such a lock, one of the boards during installation is simply brought under the other at an angle of 45 degrees. Next, the master presses on this bar, trying to give it a horizontal position.

Preparatory work
We found out how to lay laminate flooring along or across the room. But how to properly prepare a room for such a coating?
Laminate flooring purchased in a store must be left in the apartment for at least 48 hours before installation. This will allow the material to “adapt” to the microclimate of this particular room and change its geometry accordingly.
The subfloor before laying the laminate should:
- thoroughly clean from dirt and dust;
- align in such a way as to get rid of depressions and bumps and ensure that the difference in heights around the perimeter of the room does not exceed 5 mm.
The answer to the question of how to lay laminate flooring along or across a room correctly when using planks with Click locks is, in principle, not too complicated. However, before installing such a covering, the floor itself must be covered with a substrate at least 5 mm thick.
Lumps and holes should first be eliminated to avoid that the laid laminate will soon begin to “creep”. If there are such defects in the subfloor, the joints between the lamellas of the coating will subsequently expand greatly. As a result, the floor will look unaesthetic and will also begin to creak a lot.
Coating assembly technique
When installing such finishing, the same technology is used, regardless of how it is decided to lay the laminate - along or across the room. So how to properly assemble such a coating?
They usually start laying slats in rooms from the corner farthest from the door. The first board is mounted at a distance of approximately 1-1.5 cm from the planes of adjacent walls. In the future, such a temperature gap is maintained along the entire perimeter of the room. If such a gap is not left between the walls and the covering, with fluctuations in air temperature and humidity it may subsequently become deformed. To ensure an even gap, it is advisable to install special wedges between the wall and the boards during installation.
In exactly the same way as the first lamella, all other boards are laid along the wall. The second row of planks is mounted offset from the joints of the first. Accordingly, the first board in it is cut to the required length. You can cut the planks with a regular wood hacksaw.

When laying laminate along or across the room, as already mentioned, the boards are connected to each other at an angle of 45 degrees. Press down on the slats of the second row until you hear a click. It is not recommended to use too much effort. Otherwise, you can simply break the lock or even the board itself.
Using the technology described above, the planks are installed until the entire area of the room is filled with them. After completing the assembly of the coating, the wedges are removed from the temperature gaps and these gaps are covered with plinths.
How the laminate should be laid (along or across the room) can be seen in all the details in the photo above. This procedure, as you can see, is actually not complicated. In order for the finished coating to look neat, the main thing is to carefully prepare the subfloor. The slats themselves with the Click lock are easy to install and most likely even a beginner can handle their installation.
Laying laminate flooring can be turned from a mundane task into a work of art. To do this, you will have to choose an original pattern according to which the planks will be located. But in most cases, it is necessary to choose such an option for the location of the laminate joint lines in order to visually expand or, conversely, reduce the room. The light falling from the window helps to achieve this. What is the best way to lay laminate flooring in relation to the window? This article, as well as the choice of laminate for the room, will be discussed in the article.
Preparatory work
The successful installation of laminate flooring largely depends on how the preparatory work is carried out. They include preparation of the base, tools and calculation of the required material. These three steps are the ones that take the most time. Each of them will be described in detail below.
What should be the basis

Laminate flooring can only be laid on a flat floor or other surface. In this case, an error of more than 2 mm per linear meter. In this case, it will not be possible to implement the required contour. That is why the following requirements are imposed on the foundation:
- level consistency;
- strength;
- minimum humidity.
Substrate preparation will depend on which laminate installation method was chosen. In a room where there is wooden floor may require minimal intervention. To determine this, you need to carefully inspect the floor for imperfections. It is important to identify creaks and deflections that occur when walking. It is advisable to evaluate the condition of the joists and support beams on which the plane is supported. If several need to be replaced, then you might want to consider keeping the wood floor. In cases where extensive intervention is required, it is better to carry out complete dismantling. The reason is that the affected tree will deteriorate further.

Damaged joists are removed and eliminated. If mold or mildew has appeared under the floor, it must be thoroughly cleaned and the affected areas treated with an antiseptic. It is important to determine what caused the mold to appear. All paths for moisture penetration must be blocked, since it will certainly condense or leak out again. The shingles, which hold together when walked, are strengthened. It's better to walk the surface scraping machine so that it becomes perfectly even. To bring the floor to the required level, linings are made from blocks of wood. After sanding, the wood is coated with an antiseptic compound.
Advice! The easiest way to check the difference in the floor plane is with a laser level. The best one is one that can project a beam with an angle of 360°. The main points are selected and a tape measure is taken from the beam to the floor plane. The difference in values will indicate a difference.
Concrete foundations sometimes require longer preparation. The floor must be carefully inspected for damage. It is also important to identify hidden flaws. To do this, you can gently tap it with a hammer. If there is a dull sound in some places, then over time they may peel off, which will bring unpleasant consequences with it. All potholes are sealed with tile adhesive or another similar solution. After this, you can proceed to identifying surface level differences in the manner described above.

If the difference in floor level is no more than three centimeters, then it can be compensated using a self-leveling mixture. Before starting work, it is necessary to remove dust and dirt from the floor surface and treat it with a deeply penetrating primer. If it is quickly absorbed, then the procedure can be repeated twice. After the primer has completely dried, the dry composition of the mixture is acquired. It is diluted with water in the proportions specified by the manufacturer and filled to the marked line. The next step is to remove any air bubbles from the solution. If this is not done, they can weaken the strength of the entire plane. For the procedure, you will need a needle roller, which must be passed over the thickness of the poured solution several times.

Advice! At greater difference floor level may require pouring a full screed.
Instead of pouring the screed, you can apply leveling using plywood or OSB sheets. Before starting work, the floor surface is cleared of debris and treated with a primer. All potholes are sealed with glue. The next step is styling waterproofing film. It should protect the wood from swelling and mold. The film must be laid with an overlap of 10 cm between the individual sheets, the joints are taped. The film is also laid overlapping on the wall. The next step is to adjust and lay the logs. They are attached to the concrete base using anchor bolts. In this case, the bolt heads must be recessed into wooden beams so that it is possible to lay the flooring.

All logs must be leveled. After adjustment, sheets of plywood or OSB are laid on them. In this case, the material must be selected so that it does not contain harmful impurities that may be released during operation. The bedding sheets are laid with staggered seams to ensure they are intertwined. The heads of the screws should not protrude beyond the sheet, so they must be recessed. A gap of 5 mm must be left from the walls to the sheets. This gap serves as a thermal seal that compensates for expansion with changes in temperature and humidity.
Note! Plywood can also be used to level a wooden floor.
Calculation work

After preparatory work Before laying the laminate, it is necessary to carry out calculations that will be the key to rational use of the budget. It is necessary to determine the area that will be covered with laminate. If it is only one room, then it is enough to multiply the width by the length. In the case of several rooms, you will need to calculate the area of each and the numbers are summed up. After this, you need to accurately determine the type and size of the laminate that will be used for installation. It is important to know the size of one laminate plank. This will allow you to calculate its area. The next step is to calculate the number of strips required. To do this, the total area of the premises is divided by the area of one plank. Next, the total number of planks is divided by that contained in one package.
After determining the total number of packages, you need to make a reserve of 10%. It will help out if the laminate planks are damaged or something goes wrong. After purchasing laminate flooring, it cannot be installed immediately. It is important that the laminate is acclimatized. This usually takes one day, but it may take more. During this time, it acquires the temperature and humidity of the room in which it will be installed.
Tool

Everyone lays laminate flooring using their own tools; if this is a one-time procedure, then there is no need to purchase expensive power tools and you can get by with the following units:
- mallet;
- styling hook;
- roulette;
- fine-tooth hacksaw;
- spacer pegs;
- marking tool.

If installation will be carried out constantly, then you can additionally acquire miter saw. It will allow you to cut the laminate at a precisely specified angle and with minimal damage to the surface.
Laying methods

When purchasing a laminate, it is important to choose the right class. Those that start with 2 are intended for rooms with a small load, so for passage rooms such as hallways and corridors it is better to take class 33; for the bedroom and guest room you can stop at class 31. Everything will depend on the price. The next step is to choose the direction of laying the laminate relative to the window and correctly implement the project.
Choosing a direction
The choice of direction for laying the laminate is determined by several factors:
- number of windows;
- location of windows;
- room parameters;
- laminate design.
If laying laminate flooring is being done for the first time, then it is better to choose the method of laying perpendicular to the window. The advantage of this type of laminate installation is that the light from the window falls on the slats parallel to the seams of the laminate. This allows you to hide their presence. Thanks to this approach, the laminate floor appears monolithic. This also allows you to hide some flaws that may be made when laying the laminate. At the same time, the laminate boards look monolithic, which creates a certain charm. If the laminate is embossed, then this incidence of light will further emphasize the texture of the laminate board. However, it is better not to use this installation method for low-class laminate. The reason is that it wears out at the joints, which will ruin its appearance.
Note! When choosing this method of laying laminate flooring, you should pay attention to the configuration of the room. If the window is on a larger wall and on a smaller one, then this approach will lengthen the room even more.
The next option for laying the laminate in relation to the window would be a parallel arrangement of the slats. The reason for its choice may be the location of the window in the room, as discussed above. This installation method is also chosen in narrow rooms where light comes from next room. This method of laying laminate allows you to highlight the texture of the planks in a special way. This creates a feeling of an uneven surface. This option for arranging laminate boards is also suitable for laying mixed lamellas. Some may be glossy, while others may be matte.

Advice! For walk-through rooms in the best possible way Laying the laminate will be laid according to the direction of movement. In this way, it will be possible to achieve a long service life due to minimal abrasion of the laminate planks at the seams.
If the windows are arranged in a mixed manner, then you can lay the laminate diagonally. At the same time, the room acquires elusive lines. The gaze goes along the laminate not up or down, but to the corner of the room. To further accentuate the corner, a table or fireplace is placed in it. The angle of laying laminate in this way is within 40-60 degrees. Diagonal laying of laminate flooring is considered the most uneconomical, since a lot of waste remains from the laminate planks.
Installation process

The installation process requires due attention and skill, which is acquired as the work progresses. It is better to start from the far corner of the room and move towards the exit. Most often, laminate flooring is laid from left to right. The prepared surface is covered with a lining. If the laminate is laid on a concrete floor, then additional waterproofing in the form of a film is required, which is laid according to the pattern as described above. The lining can be made of foamed polyethylene or cork. An overlap is made between its individual sheets, and the joints are taped. The tenon of the first laminate strip is cut off to make it easier to place parallel to the wall.

A gap of 5 mm is made between the wall and the plank. To make it easier to store, plastic pegs are used. The first row is completely assembled and placed in its designated place. If it becomes obvious that the last plank will need to be cut by more than half, then it makes sense not to start with the whole part, but to divide the size of the final plank in half and lay the short one. The size of the first laminate strip in the second row should be selected in such a way as to ensure interlocking seams. After laying each plank, it must be tapped rubber mallet using a metal bracket. To get around pipes and other protrusions, you will need to make a hole with a jigsaw. A video about the installation technology can be viewed below.
Summary
As you can see, the choice of direction for laying the laminate is determined by many factors. According to the designer's idea, the styling pattern may contradict generally accepted rules. This is required to achieve a certain effect or to match the arrangement of furniture, which will compensate for the dimensions of the room.
Laminate is a very popular floor covering with good performance qualities such as wear resistance, practicality, strength. The material is quite simple to install, which, with care and precision, can be handled even by an unprofessionally untrained person. At huge selection color solutions, patterns and surface textures, laminate is affordable.
However, in order to beautifully lay laminate flooring in a room, you need to know some nuances, which include the direction of laying the material.
Choosing a laminate
The choice of texture, pattern and color of laminate is a matter of taste, and there is no arguing about tastes. Moreover, designers have long ceased to consider the statement that the floor covering should be darker than the walls as an unshakable truth.

When renovating a room, you should pay attention to the option in which a laminate of one type is used in finishing the walls and floor. color range, but of a different shade. This solution visually enlarges the room.

Important! One of the main criteria when choosing a laminate is whether the material belongs to a certain class. The class determines, first of all, the wear resistance of the coating. Our stores offer laminate of 31, 32 and 33 classes, and material of 34 class has also appeared on sale. All of these classes correspond to the “commercial laminate” category. At the same time, sellers state that laminate of a lower class (classes 22 and 23, this is “household” laminate) is not in demand and therefore is not on sale. It is often added that even class 23 laminate has a short service life.


In fact, it is simply more profitable for both manufacturers and sellers to promote commercial laminate as more expensive. Six years of guaranteed operation of class 23 laminate in any room of the apartment is not enough?! Class 23 coating has two types of connections: adhesive and locking, so you can choose. It's just hard to find it on sale.
Requirements for the base for laying laminate flooring
Before starting work, you need to check the condition of the surface of the base on which the laminate will be laid. The requirements for the foundation come down to three points:
- Be even.
- Be durable.
- Be dry.
When checking with a rack, the permissible height difference is 2 mm. Usually used for measurements building level, the length of which is 2 m.
Laminate flooring is laid on concrete or wooden floors or plywood. OSB boards can be used as the base.

Before installation, an inspection of the wooden floor is carried out. Creaks must be eliminated by fixing the floorboards to the joists in these places. Replacement of boards and joists is carried out if necessary. Wooden floors can be sanded to ensure a smooth surface.

The cracks are sealed with wood putty. Plywood is often used to level a wooden floor. To create a reliable base, sheets of plywood are laid so that four seams do not meet at one point. To do this, the sheets are cut with different configurations. When laying, there should be a distance of about 10 mm between the plywood sheets.

Checking the level of the screed is carried out using a construction or laser level, and inspect the screed for cracks and concrete sagging. Sagging is smoothed out by grinding or knocked down. Deep cracks are opened and sealed with mortar. If there are significant fluctuations in height (within 20 mm), use is used to level the screed. The mixture is poured over the surface concrete screed, level, then roll with a needle roller to remove air bubbles from the mixture.


After the self-leveling floor has dried, the surface is primed. It's better to use a primer deep penetration. For waterproofing, when laying laminate flooring on a screed, it is necessary to use polyethylene film.
On old linoleum You can lay laminate if the surviving coating is firmly laid on a flat base, has no serious (through) damage, and there are no swellings on the surface of the linoleum. In other cases, the old linoleum needs to be removed.

Preparatory work. Styling tools
The material in packages is brought into the room in which installation will take place. Within 2 days it must adapt to temperature and humidity. Packages are opened immediately before starting work.
Important! Covering must be purchased for the entire room. Remember that the shade will vary in different batches of the same laminate model. Or this model may end up on sale.
For diagonal laying, it will be enough to provide a margin of 10% to total area rooms, for direct - 7%. The area of the room is determined and divided by the footage of laminate in one package. The resulting number of packages is rounded up to the nearest whole number.
Before starting installation, draw a plan of the room (to scale, indicating the dimensions of the panels you purchased). The plan will help you rationally cut the material and avoid unnecessary costs and mistakes.


For installation we will prepare:

A mallet and a block for tamping the panels are needed to install the covering with a Lock-lock.
Choosing the direction of installation
There are several options. Laying diagonally and herringbone will require much more time, and the material consumption will be greater. Diagonal laying visually enlarges the room. It is believed that this method of installation reveals all the beauty of the floor covering.


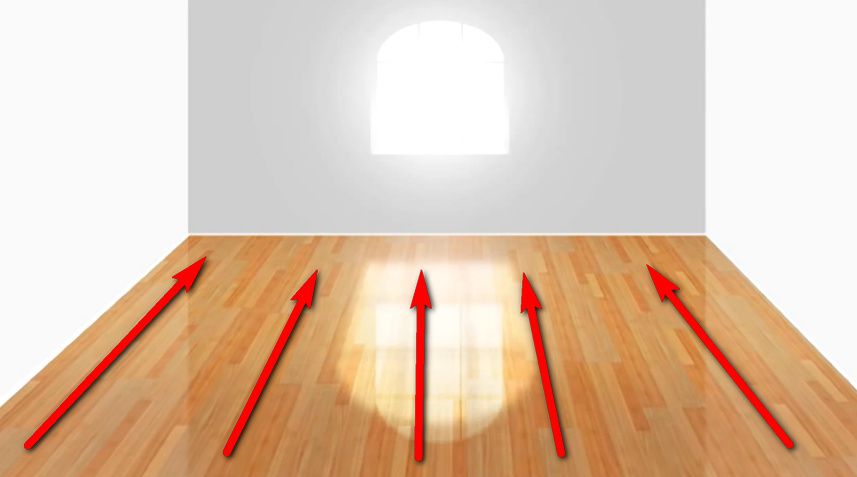
Important! Traditionally, laminate flooring is installed so that the light shines along the long side of the panel (perpendicular to the window). In this case interpanel seams will be almost invisible.


Laminate flooring is laid parallel to the window in narrow spaces. This method helps to visually expand narrow room.

If the base is an old wooden floor, the direction of laying the floorboards must be taken into account. In order to reduce possible deflection of the structure, the coating on the wooden floor is laid perpendicular to the floorboards.
If the old wooden floor is leveled with plywood sheets, it is better to install traditional way- perpendicular to the wall with the window.
Procedure for laying laminate flooring
First, the substrate is laid. Exist different types substrates. Their properties depend on the material from which they are made. They also differ in price:

Despite the fact that some manufacturers claim the ability of the substrate to level out unevenness in the laminate base, this is a serious exaggeration. The purpose of the substrate is to create an additional sound-, hydro- and heat-insulating layer under the material. The underlay can compensate for minimal differences in height, but cannot level the floor with serious differences in height.
Important! The rolled substrate is rolled out so that the strips lie end to end. These joints are glued together with tape. This is done so that the substrate does not move during the installation of the coating.

Laying laminate
The work begins with installing restrictive wedges around the perimeter of the room. They are needed in order to maintain a gap for the expansion joint. Installation begins from the far left corner of the room and proceeds towards the window. The panels of the first row are laid so that the ridge faces the wall. Connect end sides panels. The last panel in the row is cut to size and laid.
Advice! Lay the covering in a checkerboard pattern or offset the next row by one third of the panel (the seams in adjacent rows should not match). In the first case, the row begins alternately with a whole or half of the panel. When laying a panel offset by a third, the first row starts with a whole panel, the next - with a panel 2/3 of the length, the third - with a panel of 1/3 of the length, then everything is repeated. This way the floor will have a neater appearance and the strength of the structure will be greater.

The second row of panels is assembled and joined to the first. Panels with a Lock connection need to be hammered with a mallet. The blow is applied to the block pressed against the panel to ensure that the ridge fits tightly into the groove.

Panels with a Click connection are applied to those already laid at an angle of 45°, lowered and click into place with a characteristic sound. The cover with a Click-lock can be disassembled and reassembled 3-4 times.

Usually you can't fit a whole number of panels in a room. Therefore often the last row have to disband. It may turn out that the dimensions of the room will dictate the width of the last row of 50-70 mm. Panels of the first and last rows of different widths will look very ugly. That's why you need a room plan. In this case, it is worth trimming the panels in both rows. More work, but appearance the floor will be much better. Don't worry if the cut is not perfectly straight - it will still be hidden by the baseboard.
After completing the installation of the covering, the wedges must be pulled out. Then you can begin installation.

As a conclusion
If the room does not have any special features (the room is very narrow, the window is offset from the center), the long sides of the panels are usually laid along the flow of light perpendicular to the window. In this case, the seams between the panels will not be so noticeable. In addition, this method of installation visually increases the length of the room.
Diagonal laying is used to visually increase the width of the room. For the same purpose, you can use laying the laminate parallel to the window.
Different directions of laminated panels when covering the floor allow you to achieve different visual effects. You can visually expand a narrow room or divide it into zones. In what way and how correctly to lay the laminate to obtain the desired effect: diagonally, lengthwise or crosswise?
Laminate design diagram.
How to lay laminate flooring: choosing a laying pattern
An important component of quality finishing premises is design. Or rather, the creation of a simple drawing on which it is necessary to indicate the dimensions of the future environment and the direction of laying the laminated floor covering. The main factor in choosing the laminate installation method is the direction of the daylight source.
Laminate flooring can be laid in different ways:
- perpendicular to the source of daylight;
- parallel to the light source;
- diagonally.

Laminate installation options.
In general, laminate flooring involves a large number of different installation methods. However, it is better for a beginner to start mastering these skills at in a simple way- direct.
The most common type is installation perpendicular to the light source, due to the fact that you can get a perfectly smooth coating. Laminate flooring can be laid in a parallel manner in narrow spaces for their visual expansion. Diagonal laying is suitable for non-standard rooms. This arrangement can be a way to divide the space into zones. But laminate laid diagonally will look beautiful in spacious rooms that are not cluttered with furniture. It is also more characteristic labor-intensive process styling and high consumption material.
Direct method of laying laminate: along or across?
Installation of laminate along or across refers to direct method styling But how to choose the best option?
Installing laminate along the light line is the most common. With this installation, laminated panels are mounted parallel to the long wall of the room. So, window lighting will do invisible joints panels because there is no shadow cast. The flooring looks perfectly smooth, like one continuous panel. This option is well suited for rooms with a window located along a short wall. However, in a corner room with windows on adjacent walls, this effect cannot be achieved.
Related article: Condensation on the loggia and balcony

Sequence of direct laying of laminate.
Installing lamellas across the line of light or along a short wall of the room is less welcomed by professionals, but this method also has its advantages.
Having laid the laminate flooring long walls, you can achieve a visual expansion of the room.
But such installation in a very narrow room, for example, a corridor, will be more labor-intensive due to large quantity pruning.
From all of the above we can conclude:
- if there is only one window in the room, then lay the laminate perpendicular to the window to visually hide the joints;
- If there are two windows in the room, located on adjacent walls, lay the laminate perpendicular to the window that gives more light.
Choosing a laminate and planning its installation
When purchasing laminate flooring, pay attention to how it is assembled. It is advisable to choose a coating not with glue system connections, but with a locking one, since the adhesive installation method is already outdated, and the locking connection will provide an even and smooth coating without gaps during quick installation.
You should purchase laminated flooring with a reserve, having previously calculated the area of the room. The packaging indicates the size of the laminate it contains.

Laminate classes.
The amount of laminate flooring you choose will depend on the laminate placement you choose. For direction along and across it is necessary to purchase 5-7% more material, for diagonal - by 15%.
It is necessary to make a diagram of the future laying of the laminate, since the lamellas need to be shifted during installation. Most laminate manufacturers do not recommend using fragments shorter than 30 cm. The width of the panels can very rarely be a multiple of the size of the room. Therefore, the last row is often made from planks sawn lengthwise. According to the technology, it is not recommended to make the last bar narrower than 5 cm. And if according to the scheme it turns out to be less than 5 cm, then it is necessary to make the first row narrower by sawing off a small part from it.
Related article: How to choose the right door?
To obtain a floor covering from lamellas laid in a checkerboard pattern or brick order, they will need pruning. You can alternate them either symmetrically or without adhering to any sequence. A symmetrical installation method allows you to get a specific pattern. With an asymmetrical laying pattern, the lamellas are shifted in an arbitrary order due to the installation of trim from the previous row to the next. This scheme is the most economical.
Stages of laying laminate diagonally, lengthwise or crosswise

Tools for laying laminate flooring.
Regardless of which method of laying the laminate you choose - diagonal, lengthwise or crosswise, the technology for its installation is the same.
To install laminate flooring you will need the following tools:
- measuring instruments - tape measure, ruler;
- pencil;
- jigsaw;
- hand saw;
- mounting crowbar;
- tamping block;
- hammer;
- spacer wedges.
The work of laying laminated panels consists of the following steps:

Installation diagram of the substrate under the laminate.
- Preparing the base. While the purchased laminate set adapts to the temperature and humidity conditions of the room, you can start preparing the base. The laminated coating is laid on a flat surface, which can be obtained using a self-leveling or “dry” screed. If the base is wooden, it needs to be treated grinder. On concrete base After leveling, a polyethylene waterproofing film is laid, and then a special substrate for the laminated coating. It performs shock-absorbing and sound-proofing functions.
- After this, proceed to laying the first row of laminate flooring. The lamellas are connected according to the “ridge into groove” principle. The ridges on the lamellas of the first row must be sawed off. When laying the slats, leave a small gap of 7-10 mm from the wall by inserting wedges. This will allow the laminated coating to freely contract and expand during changes in temperature and humidity conditions.
- Having assembled the first row of laminate, proceed to the second. The second row starts with half of the lamella, and then whole elements are laid. This will ensure that the lamellas are laid in a staggered order. If a fragment of the lamella remains from the first row, you can use it as a starting element of the second row, provided that its length is at least 30 cm.
- After assembling the second row, it must be inserted with ridges into the grooves of the first row. You cannot do this job without an assistant. Place a tamping block on the end of the second row and lightly tap it with a hammer, moving the block along the row to slam the mechanism shut.
- The third row of laminate again starts with a whole lamella.
- When laying laminate diagonally, it is better to start installation not from the corner of the room, but from the longest diagonal or from the doorway. This way you can install the slats in two directions and make it easier in the doorway.
Probably one of the most frequently asked questions after purchasing is “how to install it?” What’s most interesting is that the answer will always sound different, because it all depends on the area of the room and the layout. So, for example, when installing a floor on a loggia or balcony, you need to take into account some technological subtleties, and in the living room and similar spacious rooms - others.
The entrance to the room can be perpendicular, parallel or diagonal laying. Most wise choice will be one in which (from the window) natural lighting will be directed along the butt seams. Thanks to this you will achieve excellent visual effect– the structure is continuous, seamless, i.e. the joints are not visible. If you want to illusorily expand the space, then it is better to choose diagonal installation, relative to the entrance. You get original, nice floors. However this method considered more expensive.

To summarize, it should be said that the choice of laminate flooring direction depends on external features premises.
What is laminate?
This is a multi-level “sandwich”, the layers of which are connected to each other using cold or hot pressing:
Also read materials:
- The top layer is a laminated (resin) film that protects the panel from various external (physical) influences;
- The second layer is decorative. This is either furniture foil or paper that is subjected to special treatment, gives the laminate an attractive texture and color;
- The main layer is wood chip or fibreboard high density(i.e. chipboard or fibreboard). She takes on the main load;
- Unrefined or resin-impregnated thick paper or plastic. Protects the board from moisture and helps maintain its shape.
It is noteworthy that laminate may vary in characteristics. It all depends on what materials were taken for its production.

The standard sizes of laminated boards are as follows:
- length: from 100 to 140 centimeters;
- width: about 20 centimeters;
- thickness: from 6 to 11 millimeters.
Some types of laminate have tongue and groove joints. Due to this, the boards are easy to dock with each other.
Buy laminate? How to make the right choice
Often on sale there are products made in the form of planks with a tongue-and-groove lock or a smooth edge. Naturally, the first option will be somewhat easier to install.
Typical plank layouts:
- Board length from 1.1 to 1.5 meters;
- The width of the board is from 0.2 to 0.4 meters.
Depending on the intended purpose of the coating and its type, manufacturers determine the service life of the laminate within five to fifteen years. That is why it is so convenient and beneficial for temporary finishing.
Products with lock type connections are usually installed using a glueless method. Boards with smooth edges are mounted exclusively with glue, and it is better to hire a professional for this job.

- Affordable price. Compared to expensive parquet, laminate, with its high decorative qualities, is available to a wider range of consumers;
- Strength. The material can withstand fairly high loads;
- Ease of installation. This is especially true for materials with a locking type of connection;
- Easy to care for. The coating can be quickly cleaned of many contaminants using conventional means;
- Heat resistance. Laminate has protective properties against exposure to elevated temperatures due to special treatment;
- Possibility of repeated use. The coating is easy to dismantle, which allows you to replace the damaged area or re-install it.
Disadvantages of laminate:
- Impossibility of local reconstruction. If damaged small area on the board, it will have to be replaced entirely;
- Decorative processing is not possible. Laminate cannot be scraped or varnished;
- Do not tolerate heavy moisture. Chipboard serves as the basis of the material, and as you know, chipboard is deformed when exposed to abundant moisture.
Procedure for laying laminate flooring yourself
Before you start, make sure you have all the necessary tools:
- Fine-toothed hacksaw;
- Hammer;
- Jigsaw.
Next you need to check the underlying foundation. All cracks and depressions must be repaired, unevenness must be eliminated so that the horizontal plane is perfectly smooth, and dirt and dust must be removed. Typically the base is plywood laid on joists or concrete. Use padding if necessary. It will provide sound insulation, insulate the floor and cushion the coating. The substrate is laid in strips. The joints are secured with adhesive tape. There is no need to glue it.

Installation procedure:
- Place a whole, solid panel in the corner of the room, directed along the sunlight falling from a window or other source natural light. Remember, the distance from the walls should be at least one and a half centimeters on the corner sides. This gap is necessary so that a safety margin remains when the laminate expands, so that it does not deform. Next, next to the corner lamella, the installation of the first row continues. Use whole fragments;
- The second row starts with only half of the panel. You can cut the board in half with a jigsaw. The main thing is to cut strictly at 90 degrees. Installation is carried out “staggered”. There is no need to cross stitch the seams. The boards are joined using a system of locks - the locks are inserted into the grooves, the boards are carefully ensured that the lock fits completely into the groove. Use the skirting boards after installation is complete. Use them to mask the gaps between the wall and the laminate.
Loggia or balcony under laminate
To finish areas that are in more contact with open space than others, you have to use frost- and water-resistant laminate.
Loggias and balconies can be sheathed with such material both on the floor and on the walls, and even the ceiling. The main thing is to create an optimal microclimate, trying to reduce the frequency of temperature changes and humidity levels. Please note that the decorative glaze may peel off from the base or become cracked if the reading on the thermometer drops below five degrees above zero. Necessary conditions can be achieved by glazing the loggia double glazing. In this case, the operation of laminated panels will become possible. It will be useful for the final stage.