First of all, you must follow the manufacturer's instructions, which clearly describe which side to lay the windbreak on. If there is no such instruction, there are a number of general recommendations, applicable for windproof films:
- the wind protection spreads towards the insulation with the “fleecy” side, unless otherwise specified in the instructions;
- if both sides are the same, the film is attached with the manufacturer’s logo on the outside;
- wind protection without markings and distinctive qualities of one of the sides can be installed in any convenient way.
Manufacturers often roll rolls in such a way that the wind protection can be laid as simply as possible - as the roll unwinds.
Windproof films different types, are stacked differently:
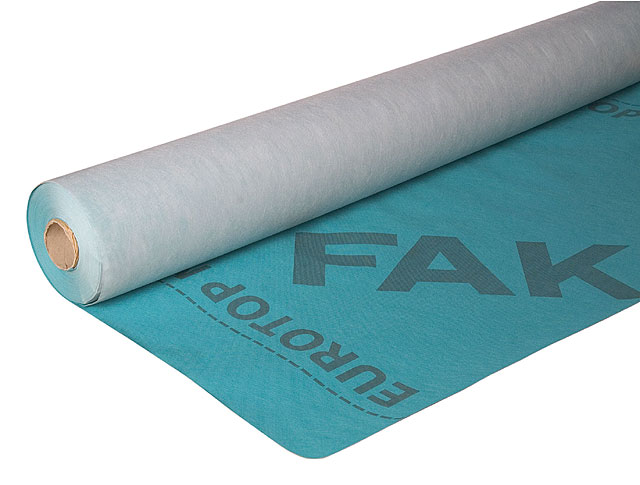
- Simple wind protection. These are perforated single-layer films that can be placed on either side of the insulation, as they have double-sided vapor permeability.
- Wind and moisture protection. These are two-layer films that are laid with the moisture-repellent side facing out. This side is smooth, often with manufacturer’s markings or painted in a different (non-white) color.
- Superdiffusion membranes. This material has a multilayer structure with high water resistance and vapor permeability. It is necessary to lay the membrane with outside insulation and only the marked side out.
Laying windbreaks on the floor
On internal floors The film is spread over the insulation with the markings facing outward and the plain side inward.
And in order to protect the wooden floor from cold wind blowing from the uncovered base of the columnar foundation, the film is laid on the subfloor without gaps close to the insulation. In this case, it is laid with the inscriptions down.

How to lay a windbreak on a roof
Single-layer windproof films are laid under the roof on either side. But two-layer ones - only with the smooth side up.
Some films and membranes are UV resistant due to a special coating. The manufacturer must indicate this parameter. This windbreak is attached to the rafters with the colored (protective) side up.

How to install windbreaks on walls
On the walls, wind protection is placed on the outside directly on the insulation (with the markings or the colored side facing out). It is necessary to provide a ventilation gap between the film and external finishing. In order for the windbreak to provide a sufficient level of protection from moisture, it must be mounted horizontally from bottom to top with an overlap of at least 10 cm. Inside, a vapor barrier is laid on the walls - this is very important
Vapor barrier is the general name for a whole package of methods for protecting thermal insulation or building materials from the appearance of steam inside them and the release of condensate. This type of insulation allows you to withstand absolutely any temperature conditions, and therefore vapor barrier is considered an important link in preserving heat inside a building during the winter season. A well-designed vapor barrier prevents destruction insulation materials and thus contributes to the durability of the entire structure. So, vapor barrier - how to install it correctly.
Vapor barrier materials
Vapor barrier, as a method of preserving heat, is needed to ensure that the moist steam created in the room does not cause the appearance of fungus, mold, does not have a destructive effect on the ceiling structures, roof, walls, floor and freely penetrates outside. There are many materials that provide stable vapor barrier: film, penofol, membranes and others. Let's take a closer look at each of them.
Still the most common material is film. It must be tensioned well during installation, and also remember to make gaps for ventilation.

Membranes represent a modern construction material, which can be used not only as a vapor barrier, but also for waterproofing premises. There are several types of membranes: single-sided and double-sided, single-layer and multi-layer. Double-sided membranes are perhaps the most economical option, they are often used for roof vapor barrier. 
Another type that needs to be mentioned is reflective vapor barrier. Often such insulators are used in baths and saunas. Penofol is one of the materials in this group, which is foamed polyethylene. Can also be used as a lightweight thermal insulator. The next common reflective vapor barrier is foil on kraft paper. It can be used in almost any room, even at elevated temperatures. 
Which side should the vapor barrier be laid against the insulation?
This is probably the most frequently asked question - which side to lay the vapor barrier against the insulation, so it was highlighted as a separate item.
The vapor barrier film has a two-layer structure. One side is smooth, the other has a rough surface to retain drops of condensation and its subsequent evaporation. This film is laid with the smooth side outward (adjacent to the insulation), and the rough side into the room.
Reflective (foil) vapor barrier is created not only to protect the insulation, walls or roof, but also to return heat to the room thanks to the reflective surface. Therefore, to perform this function, it must be placed with the reflective side in the room.
An air-permeable vapor barrier membrane protects walls and roofs from moisture, but at the same time allows the structure to “breathe”. The membrane can be either double-sided, with the same characteristics on both sides, so it can be laid on either side, or one-sided, in this case, manufacturers indicate the reverse side on the surface of the material. When purchasing, you must read the installation rules.

How to properly install a vapor barrier
Once we have decided which side to lay the vapor barrier against the insulation, we can proceed directly to work. Let's describe the process using film as an example:
- First we lay thermal insulation and sound insulation, after which we can lay the film;
- the film should not be sagging, so stretch it well during installation;
- The film is secured with double-sided adhesive tape or tape. You can also use nails with a wide head for fastening, driven in increments of 30 cm or furniture stapler, which can make your work much easier. You can also use wooden slats, which are screwed with the same frequency of 30 cm;
- The sheets of material must be laid with an overlap (10–15 cm), while specifically for the film (as it does not allow air to pass through), do not forget to make gaps for ventilation from time to time, about 5 cm wide.
Now you can find others, more modern options. For example, membranes with an adhesive side provided. You just need to delete protective layer and stick it on.

We have reviewed general rules How to properly install a vapor barrier, now let's describe the nuances for the roof and floor.
Roof vapor barrier
Protecting the walls of your home from moisture and steam is only half the battle. After all, the main part of the evaporation flows tends upward, and condensation cannot be avoided after heavy snow and rain, and it is the roof of the house that takes the first blow.
Among other things, poor roof vapor barrier leads to a decrease in indoor temperatures, unpleasant smell and dampness in the house, fungus, rust and other troubles. To protect your home from problems, you need a vapor barrier and it is very important to do it correctly.
Experts recommend using for roofing membrane materials, which allow air to pass through, but do not allow moisture to pass through, thereby removing excess moisture from the roof insulation. Double-sided membranes can work on both the internal and external surfaces of the roof.
The sequence of laying the material is very important, you can see it in the photo below.

Floor vapor barrier
Floor vapor barrier plays an equally important role. Wet cleaning, showering, cooking and even normal breathing can affect the release of condensation. And the main flow of it settles on the floor.
If you are just building a house and not renovating, there will be less hassle. The first thing you need to do is treat all the wooden floor elements special composition against rotting, insects and fungus. If you are making repairs, you must remove the old coating and thermal insulation. Check for sagging or rotten boards, if necessary, replace them completely or partially, and then also treat them with protective agents.
All previously listed materials can be used for vapor barrier of the floor. For the film, you should also make gaps for ventilation; other materials do not require this.
The most popular material is isospan. It should be noted that there is a difference between the ground floor floor and the interfloor ceiling. On the ground floor, waterproofing must be laid on the subfloor, followed by insulation and vapor barrier. On the second and subsequent floors we replace the waterproofing with a vapor barrier layer. You can see all this in the photo below. 
Let's briefly describe the process for interfloor covering. We lay a vapor barrier on the load-bearing frame of the floor; the sheets should overlap with a width of about 15 cm. We fasten using any of the previously described methods, but most often it is recommended to use a special duct tape. Next, the insulation is laid, after which another layer of vapor barrier is laid overlapping in the same way.
Vapor barrier along with waterproofing for the home is a necessary thing. Protecting walls, roofs and floors leads to the preservation of the material, its original appearance and properties, protects against the appearance of fungus, mold, drying out and rust, and also ensures the home optimal temperature. And that’s all, we hope that this article was useful to you.
Ensuring a reliable level of vapor barrier in the house is the key to maintaining a stable level of air humidity in relation to the temperature outside. Vapor barrier, unlike insulation, does not easily maintain temperature, but protects the room from exposure to steam and condensation. Many people, when they start installing insulation and vapor barriers, wonder which side to lay the vapor barrier so that it works properly.
The question of which side to lay thermal insulation correctly is very important when preparing work. To understand which side you need to lay the vapor barrier film on the surface, evaluate the entire process of laying the walls, including the installation of insulation. And only then will it be clear which side, where, what needs to be put.
General description of the vapor barrier process
 Prepare the base so that it is dry and clean by first coating it with primer. Metal surface should be cleaned of fat. A vapor barrier must be installed on the roof immediately.
On the floor and walls lay the insulation first, then waterproofing, and only then - vapor barrier material, while the film should not be stretched too tightly and should not hang down.
Vapor barrier has the following advantages:
- moisture evaporates faster;
- regulation of the room microclimate along with insulation;
- protection against fungi and mold;
- increasing the service life of building materials.
Installation of vapor barrier materials is carried out in accordance with certain rules. To protect the insulation, vapor barrier material must be placed on inside the room between the thermal insulation layer and internal lining. Also correct styling vapor barrier depends on what material you use.
So, the principle of vapor barrier operation is as follows:

To install a vapor barrier, regardless of the material used, materials such as:
- wooden laths;
- metallic profile;
- construction stapler;
- self-tapping screws;
- metal scissors;
- double-sided tape;
- regular or construction tape.
Classification of vapor barrier materials
The material used for vapor barrier must be durable, have low thermal conductivity and be fire resistant. Universal material for this purpose no, materials such as are used for vapor barrier:

Vapor barrier technology
The algorithm for installing a vapor barrier looks like this:

How to properly install vapor barrier on the ceiling
 The ceiling, roof, floor and walls are subject to vapor barrier. Let's start by describing the process of laying vapor barrier materials on the ceiling.
The ceiling needs a vapor barrier due to protection from negative impact water vapor that is formed due to high humidity in room. Household needs such as washing, bathing, cleaning, cooking and much more contribute to an increase in indoor humidity.
Released as a result of these processes warm air goes upstairs and wants to go outside, but bumps into the ceiling. A vapor barrier will increase the service life of roofing materials; it will also minimize the likelihood of mold and mildew in the attic. In addition, the ceiling will become more fire resistant.
To install a vapor barrier on the ceiling, you need roll material attach to the rough ceiling surface and press metal profile or lathing. When you start rolling out the rolls, stripes will appear, butt them together with an overlap of 10–15 cm. To seal the joints, use special self-adhesive tapes.
How to perform a vapor barrier on the floor, roof and walls
 It is necessary to isolate the floor from steam, first of all, on the first floors above basements, as well as in baths and saunas. The material is laid after installing the insulation and waterproofing material. Film needed don't pull too hard, but also not to allow it to sag. Then secure it with an overlap with double-sided tape or special staples.
Please note that the vapor barrier must be laid in two layers, with the bottom and outside insulation, as well as on top of it.
For vapor barrier in large rooms need to use liquid rubber from bitumen. It is applied manually or using a compressor. When it dries, an elastic film of rubber appears in its place, impervious to moisture.
And as a vapor barrier for roofing, it is best to use double-sided diffuse membrane. It should be installed from the inside and outside; the membrane must be placed on the heat-insulating material itself without gaps. Bitumen can also be used, which is laid in rolls on top of the roof and secured with counter battens.
Equipping walls with vapor barriers is largely similar. The material must be attached to the wall along its perimeter with a stapler, and each panel must overlap the other by 15 cm; they must be glued together with construction tape. Thin slats are laid on top.
Sheet material is mounted on a frame made of metal or wood. The barrier is secured with self-tapping screws, and the joints are sealed with adhesive tape. On the outside, thermal insulation works before installing the insulation, creating together with it subsequently three-layer protection system.
So, as you can see, installing a vapor barrier is not as difficult as it might initially seem. Thanks to it, you will protect your premises from moisture and extend the life of building materials.
One of the main criteria comfortable life There is an optimal temperature level in the house, as well as a suitable humidity level. Provide good performance Properly installed layers of heat, moisture and vapor barrier will help. Moreover, correctly laid layers not only improve the microclimate in the house, but also protect the floors from exposure various factors, including humidity. How to properly install a vapor barrier on the floor?


Each house has its own specific microclimate inside. Here a person prepares food, takes a shower or bath, works out wet cleaning. Thanks to all these processes, enough a large number of a couple who is trying to find a way out beyond the walls of the rooms. It has a fairly strong effect on all elements of the structure, and drops of moisture settle on the surface of the walls, ceiling, and inside the floor pie. The resulting condensate, willy-nilly, begins to penetrate into the structure of the materials used to build the house - it is absorbed into the wood, penetrates into the insulating layer, reducing the performance characteristics of the materials, destroying them.

In rooms located on the first floors directly above the ground or basement, the floors also experience increased exposure to humidity. Here, moisture also affects the materials from below. And the vapor barrier is installed precisely in order to reduce the level of impact on the floors, while this type the material does not interfere with air circulation at all - its flows can easily go outside, the rooms will “breathe”.
On a note! Vapor barrier is especially necessary when building houses made of wood. However, it will not be superfluous when constructing concrete structures, since it will reduce the level of humidity in the building.

Prices for vapor barrier film “Izospan”
vapor barrier film isospan
What is the difference between hydro- and vapor barrier
Vapor barrier is a thin film that is installed inside the floor pie. However, quite often it is confused with waterproofing, but this is completely different materials. So, the waterproofing layer is designed to prevent moisture from entering the room from outside. If water does reach the insulation, its characteristics will deteriorate significantly - it will no longer retain heat. This will be especially felt in winter period when the water inside the insulating layer turns into ice crystals. The floor will become colder, and in general it will no longer be so comfortable to be in the room. To prevent this from happening, it is necessary to lay a layer of waterproofing. In general, it does not allow precipitation to pass through it, groundwater and is laid outside the floor pie.

The vapor barrier is installed inside the floor pie. And it will protect the materials included in the structure of the base, no longer from moisture from the outside, but from condensation coming from inside the room, which is formed due to breathing, cooking and other processes accompanied by the release of steam and moisture.

The main difference between these two types of materials is their structure. Waterproofing coatings They do not allow moisture to pass through, but are quite capable of allowing evaporation to pass through. But vapor barriers retain both moisture and steam, thereby protecting the insulation. Thus, the vapor barrier does not have a membrane structure as such.

On a note! Not all types of waterproofing materials are vapor permeable.
Types of vapor barrier materials
Several basic types of materials can be used to create a vapor barrier layer. This is a polyethylene or polypropylene film, the so-called diffuse membrane or liquid rubber. Previously, only roofing felt, roofing felt and other similar materials were used.

Polyethylene film is the cheapest and simplest material used to create a vapor barrier layer. It is quite thin, and therefore during installation it is important to be careful not to tear it. The film may or may not have fine perforations.
On a note! There is an opinion that film with perforation is used for waterproofing, and without it - for vapor barrier. This is due to the presence of small holes in the material.

Vapor barrier film "Yutafol N 110"
However, in any case, no matter what the film is, when using it you will have to create a ventilation gap. And since it will have to be done anyway, many do not think about the presence of perforation and simply buy the material that costs less.
Now there is another subtype of films made of polyethylene - it has a reflective layer coated with aluminum. This material has higher vapor barrier properties and is usually used in rooms where there are high levels of humidity and air temperature.

Polypropylene film is characterized by high quality and strength. It is easy to install and can serve long years. Polypropylene film is made not only from polypropylene - it also has an additional cellulose-viscose layer that can absorb quite a lot of moisture and retain it. At the same time, as the humidity level decreases, the layer dries out and is again ready to absorb it.

When laying this type of film, it is worth remembering that the anti-condensation absorbent layer should be turned away from the insulation. And between the vapor barrier layer itself and the insulating material, a small gap is left for ventilation.
Diffuse membranes are perhaps the most expensive vapor barrier option. They are considered to be of the highest quality, are called “breathable” and are capable of not only protecting building materials from excess moisture, but also regulating the humidity level. Membranes are divided into single- and double-sided, and the materials are mounted in different ways - if when laying one-sided option membrane, it is important to observe which side it will be turned to the insulation, then the double-sided one can be laid in any way you like.
Such membranes are characterized by significant vapor permeability. They are made from a special non-woven artificial material and can have several layers. There is no need to leave a gap for ventilation during installation.
On a note! Among the membranes there are those that are called “intelligent”. They combine several properties at once - they are able to work as a vapor barrier layer, provide waterproofing and are also thermal insulation material. This type of membrane is able to regulate the level of steam depending on the levels of indicators such as temperature environment and indoor humidity.
Liquid rubber when creating a pie wooden floor It is used extremely rarely for vapor barrier; it is more suitable for concrete bases. However, it is still a common enough option to talk about. This rubber is a polymer-bitumen composition prepared on the basis of water. It is applied very simply - sprayed over the base, moreover, it forms a seamless and durable coating- a kind of rubber carpet. When the polymerization process is completed, the material will not be able to pass through any substances.

Liquid rubber can be applied automatically and used to process spacious structures, or manually - this option is suitable for small rooms.
Brands of materials for creating vapor barriers
There is a wide variety of different brands of vapor barrier materials on the materials market. They have a lot of differences and may differ in price, quality and other factors.
Table. Brands of materials.
| Brand | Information | Manufacturer | Price |
|---|---|---|---|
| Tyvek | Well protects against steam and moisture | Denmark | 5500 rub./50 sq. m. |
| Izospan | Protects from moisture, wind, steam | Russia | 13 rubles/sq.m. |
| Brane | Russia | 1100 rub./70 sq. m. |
|
| Domizol | Excellent protection against steam, moisture, wind | Russia | 13 rubles/sq.m. |
| Polyethylene | It breaks, but protects well from steam | Russia | No more than 10 rubles/sq.m. |

Izospan is especially popular. There are several subtypes of it, and for floors it is recommended to purchase Izospan V. It is a two-layer version of the membrane. On one side it is smooth, and on the other it is slightly rough. The rough side holds capillary moisture well, absorbing it.
Installation features
The floor pie is made of several layers, including logs, a layer of waterproofing material, a subfloor, a layer of insulation, a vapor barrier layer, a layer soundproofing material and finishing coating. Before installing a vapor barrier, it is necessary to prepare the surface. If the structure is being built from scratch, then there will be no problems with installing this layer. The subfloor boards are simply treated with antiseptic preparations, leveled, and a vapor barrier material is laid on top of them. It is also recommended to cover protective compounds and lags.

If the house has already been built, it is carried out major renovation, then first it is important to remove the old flooring and other previously used materials. Next, it is important to check the strength of the logs and the rough foundation - if they sag or rot, they will have to be dismantled and replaced with new ones. All the trash in front further work removed, the smallest specks are removed using a vacuum cleaner.
The vapor barrier layer must be laid on a flat base without protruding nails. Otherwise it may be damaged. Immediately before installation, it is important to determine which side the vapor barrier material will be mounted. As for ordinary polyethylene film, there is no need to determine the side. If Izospan is used, then it is important to look at its color on both sides. It is laid with the light side facing the insulation. If the material has pile, then this side is mounted towards the room - the pile will absorb excess moisture.

Laying vapor barrier "Izospan"
On a note! To work with vapor barriers, a material such as tape is useful. It is used to connect the joints of individual coating strips. This is necessary to improve the tightness of the vapor barrier layer. In this case, individual strips of material are laid with an overlap of 15-20 cm on each other.
Installing a vapor barrier does not require special knowledge. The material is rolled out over the surface of the prepared floor and secured to it using small nails, construction stapler. However, the easiest way is to use special adhesive tape.
Hard to reach or have unusual shape It is best to additionally treat the areas with a bitumen-based coating agent. The reason for these actions is that in such places it will be quite problematic to lay and properly fasten vapor barrier material.

The process of laying "Izospan"
The insulation itself will be laid directly on top of the vapor barrier if the material is used to protect it from moisture not only from the inside, but also from the outside. Foam plastic, mineral wool or expanded polystyrene can be used as an insulating layer. It should fit very tightly wooden joists so that cold bridges do not form.
Another layer of vapor barrier is mounted on top of the insulation layer. It will no longer allow moisture coming from inside the room to reach the insulation and be absorbed into it.
On a note! Foil film perfectly reflects infrared radiation. Therefore, it is laid with the shiny side facing the room.
How to lay a vapor barrier
The vapor barrier must be installed in compliance with the technology, although in general this process is quite simple and understandable to everyone.
Step 1. Windproof material is spread over the subfloor.

Step 2. The film is laid so that its edges overlap the wooden logs.

Step 3. The material is fixed using a construction stapler along the joists.

Step 4. After this, insulation boards are laid on the laid material. They must cover all the space between the joists.
Step 5. Adhesive tape is glued along the perimeter of the wall in its lower part before installing the vapor barrier layer.

Step 6. A vapor barrier layer is laid. Pieces required sizes laid across the joists with a slight overlap on the walls. The film is laid so that it sags a little in the middle.

Step 7 The film is fixed using a construction stapler on the joists.

Step 8 The edge of the vapor barrier film, placed on the wall, is glued to it using the adhesive tape installed earlier.

Step 9 The junction of the next layer of film is sealed using adhesive tape, which is glued along the edge of the previously laid layer.

Step 10 A new piece of material is laid so that there is an overlap at the location of the adhesive tape. The rest of it is again fixed to the joists using a construction stapler.
Floor installation
Prices for liquid rubber for waterproofing
liquid rubber for waterproofing
Video - Installing vapor barrier
Video - Vapor barrier films for floors "Ondutis"
Vapor barrier is a layer in the floor cake that should not be neglected, much less replaced waterproofing material. It is thanks to vapor barrier that it will be possible to create a microclimate favorable for life in the house.
Vapor barrier is the most important part of the insulation, which occupies a key place in its durability and reliability. The absence of such a layer will lead to the accumulation of moisture and slow destruction of the material, especially during the cold period, when significant temperature changes are observed. In this regard, many people are interested in how and which side to lay the vapor barrier to the insulation.
This material must be installed because it will protect against temperature differences
general information
A few decades ago, glassine was used exclusively as a vapor barrier. It was cut into even strips and then glued to the insulation. And only recently have more modernized materials appeared on the market, which are created on the basis polyethylene film and can be used in the most extreme conditions with high humidity.
Modern options are characterized by the following advantages:
- high resistance to temperature changes and ultraviolet radiation;
- maximum strength;
- multifunctionality.
However, when installing such materials, additional difficulties arise that force beginners to figure out which side to lay the vapor barrier against the insulation. There are no particular difficulties in laying the vapor barrier layer, but nevertheless, questions about choosing the right side are increasingly appearing on various forums.
In this video you will learn how to properly install a vapor barrier:
Purpose of vapor barrier
Which side to the insulation is laid the vapor barrier layer is one of the most current issues that people encounter when constructing private premises or renovating old homes. But before you start looking for answers, you should understand what such a layer is intended for and what its importance is.
As you know, water is best guide heat, because it is not without reason that it is used as a coolant in heating and cooling systems. And if the thermal insulation of a room is not protected from moisture, this will cause serious deformation processes, the formation of mold, fungi and other problems.
The most serious troubles appear during the cold season, because if in the summer, with above-zero temperatures and good ventilation, any steam quickly escapes, then in the winter it will begin to rise, penetrating into the insulation. Exposure to negative temperatures will cause the upper part of the insulation in the roofing “pie” to begin to freeze, creating additional conditions for internal wetting.
Such phenomena will reduce the effectiveness of the insulation and negatively affect its structure, which, in turn, will entail the development of corrosion processes and the appearance of fungus. If not accepted radical measures, then moisture will begin to seep into the room, damaging the finishing elements. To prevent such a course of events, it is necessary to install high-quality vapor barrier.
And in order to understand which side the vapor barrier is laid to the insulation, it is important to study it design features. On both sides of the insulating layer there are different films, which are intended for opposite tasks. A vapor barrier is installed in the lower part, preventing the penetration of steam, and in the upper part, a vapor-permeable membrane is installed that can allow accumulated condensate to pass out.
A logical question arises: where does the steam come from if a vapor barrier is attached to the bottom of the insulation? Unfortunately, even the highest quality films are not able to provide 100% protection against condensation penetration, so certain amounts of moisture still penetrate into this layer.
Types of materials
When figuring out which side to lay the vapor barrier on, you need to learn about the main types of such materials. After all, people often wonder why a layer has the same or completely different sides. Conditionally existing varieties are divided into groups: A, B, C, D.
 Vapor barriers are divided into 4 groups and each of them has its own specifics
 Representatives of the first group are intended to remove condensate from the other side. They cannot be used as a vapor barrier, as they are characterized by high throughput and solve the opposite problem - they release steam outside, but do not allow rainwater to enter the room. Such thermal insulation is indispensable for roofing structures with an inclination angle of 35° or more. The fact is that on such a roof drops will easily roll down and evaporate.
Group B vapor barrier is a classic double-sided layer that has a durable structure and absorbs any moisture. During the day, the accumulated condensation comes out and disappears.
Because of this feature, such hydro-vapor barrier is always laid with the smooth side facing the insulation, and the rough side facing outwards. This option is suitable only for rooms with roof insulation, since in the absence of insulation its strength is significantly reduced.
 Before purchasing a vapor barrier, you need to know the features of each group.
 Membranes from group C are intended for maximum protection of insulation from water vapor. Their structure consists of 2 heavy-duty layers, which differ from the previous ones in increased density. Often this vapor barrier is used in non-insulated roofs to protect wooden elements and gain protective functions insulation. Unlike the previous type, the material is laid with the rough side in the lower (inner) part of the thermal insulation.
There is another type - polypropylene isopar group D. It is a modernized material consisting of especially durable polypropylene fabric with a laminate coating on one side. In addition to the main task of insulation attic floor, such insulation is capable of protecting the roof structure from leaks, and in conditions of maximum humidity.
The effect of changing sides on vapor permeability
Depending on the installation method, the listed types may also differ from each other. In this regard, the following vapor barrier groups are distinguished:
- For single-sided installation. Such material must be nailed on a specific side.
- For double-sided installation. In most cases, both sides of vapor barrier membranes are the same. Their main advantage is maximum density and the possibility of laying on any side.
It should be noted that in the recent past, membranes with the properties of modern vapor barriers were used in astronautics. After that, they began to be modernized in every possible way and used for wide everyday tasks. And if once upon a time the installation of such material was not considered challenging task, then now various sites and forums are literally overflowing with discussions about performing such a task.
 Double-sided installation is more practical
 Today, there is a strong opinion that if the vapor barrier is attached to the roof with the “wrong” side, then the service life of the insulation and the roof as a whole will be noticeably reduced. However, according to experts, such masonry can only negatively affect durability interior decoration, since the rough side has the same properties as the smooth side. In terms of vapor permeability, the layers practically do not differ from each other. But as for the quality of retention of condensate droplets, the situation here is different.
Pitfalls and myths
Many people mistakenly think that if there is a good vapor barrier layer, condensation will not appear in the room at all or will quickly come out. However, this is an erroneous statement, because any moisture that rises upward in the form of steam eventually becomes condensation.
There is also such a thing as a “temperature limit”, at which all moisture turns into a drop-like state. In most cases, this happens at a temperature of +15°C and a humidity of 65%. If the latter indicator rises to 80%, then condensation can occur at +17°C.
Steam formation occurs when there is a difference in partial pressure. Any steam that appears inside the house tends to go outside, where there is a lower temperature. But on its way it encounters a barrier - a vapor barrier layer.
If the room air is heated to a certain level, all the moisture in the air will turn into condensation and precipitate. With this phenomenon, the difference between a roof structure protected by insulation and an unprotected one is clearly visible. If the vapor barrier layer is located on the insulation, then it will warm up many times faster than without it.
In the absence of a vapor barrier, water vapor will begin to make its way directly to the roofing “pie”, where it will meet the cold front. Because of this, steam is converted into condensate, and when negative temperatures- into the icy edge. But all these processes take place inside roofing structure, which negatively affects its functionality and durability.
And if in winter the ice formed does not pose any threat, then with the first rays of the sun it will begin to melt en masse, creating huge smudges on the slopes of the room.
True, if the roof is equipped correctly, then the occurrence of condensation will be practically excluded. And in this case, even incorrect placement of vapor barrier layers will not in any way affect the security of the roofing “pie”.
Features of anti-condensation film
Many manufacturers of vapor barrier materials focus on Special attention such a moment as the “anti-condensation side” of the film. It differs from the other part of the material in a special fleecy layer that can absorb a significant part of the moisture and retain it until it evaporates completely. Due to this specific feature The insulation and film practically do not get wet, which has a positive effect on the durability of the finishing part of the roof.
Because of this, experts advise placing the rough side inside the home or attic, and the smooth side directly to the insulation. But in practice, things may look different. After all, if condensation appears inside the roof structure, then even a reliable fleecy surface is not able to completely retain it. The anti-condensation side of the vapor barrier layer and a similar film are significantly different from each other.
However, at the stage of constructing the roof, it is better to follow the instructions from the manufacturer and place both the film and the anti-condensation side. But if the moisture-proof layer, heat and wind insulation have already been installed, there is a suspicion that some things were missed during installation important points, there is no point in hoping that the “right” side or the most quality material from the leading brand Axton will hide these shortcomings.
Experienced craftsmen often claim that it doesn’t matter which side the vapor barrier is placed on. After all, as already mentioned, any droplets, moisture and condensation are serious enemies of the roofing “pie”, and with proper installation of insulation they simply should not exist. Otherwise, even the lining and wall decoration will begin to deform, swell and fall off. Moreover, sometimes the consequences can be irreparable.
Such troubles occur only when there are serious shortcomings at the construction stage. And if the vapor barrier is located between the drywall and mineral wool, then do this complex design no point at all. The drywall itself is able to absorb condensation, so steam will not have the opportunity to penetrate to the internal vapor barrier. In this situation, you can get by with ordinary glassine.
Installing a vapor barrier indoors is a rather painstaking and responsible process. But, unfortunately, many roofers pay great attention to those points that, in fact, do not play a role important role for effective protection against condensation. And the side of the masonry material is one of them. To prevent the development of putrefactive processes, the formation of fungus or deformation of the finish, it is enough to properly arrange the roof and follow the basic rules for maintaining this structure. In this case, it will serve for a long time and with high quality.