When designing any residential building, architects pay special attention to the roof, since it performs not one, but several functions at once, depending on its design features. It must be said that not all future homeowners are satisfied with an ordinary gable roof, although it can be called the most reliable, since it has only two pitched planes and one joint between them. Many people are more attracted to complex designs, which add special attractiveness and originality to the building. Other, more practical homeowners prefer attic structures, which can simultaneously serve as a roof and a second floor.
The basis of any roof is the individual rafter system, having its own design features. It will be much easier to choose the right roof frame if you figure out which ones in advance. types and diagrams of rafter systems used in construction practice. After receiving such information, it will become more clear how difficult such structures are to install. This is especially important to know if you plan to build the roof frame yourself.
Main functional tasks of rafter systems
When arranging pitched roof structures, the rafter system serves as a frame for covering and for holding materials “ roofing pie" With proper installation frame structure the necessary conditions will be created for the correct and non-insulated types of roofs that protect the walls and inner space houses from various atmospheric influences.

The roof structure is also always the final architectural element of the exterior design of a building, supporting its stylistic direction with its appearance. However, the design features of rafter systems must first of all meet the strength and reliability requirements that the roof must meet, and only then the aesthetic criteria.
The frame of the rafter system forms the configuration and angle of inclination of the roof. These parameters largely depend on natural factors, characteristic of a particular region, as well as the desires and capabilities of the homeowner:
- Precipitation in different periods of the year.
- The direction and average speed of the wind in the area where the building will be erected.
- Plans for the use of space under the roof - arranging residential or non-residential premises, or using it only as an air gap for thermal insulation of the rooms below.
- Type of planned roofing material.
- Financial capabilities of the homeowner.
Atmospheric precipitation and the strength of wind currents place a very sensitive load on the roof structure. For example, in regions with heavy snowfall, you should not choose a rafter system with a small slope angle, since snow masses will linger on their surface, which can lead to deformation of the frame or roofing or to leaks.
If the area where the construction will take place is famous for its winds, then it is better to choose a structure with a slight slope of the slope so that sudden gusts that occur do not tear off individual elements of the roof and roofing.
Main elements of roof structure
Parts and components of rafter systems
Depending on the chosen type of rafter system, the structural elements used can vary significantly, however, there are parts that are present in both simple and complex systems roofs

The main elements of a pitched roof rafter system include:
- Rafter legs that form the roof slopes.
- - wooden beam, fixed to the walls of the house and used to fix the lower part on it rafter legs.
- A ridge is the junction of the frames of two slopes. It is usually the highest horizontal line of the roof and serves as the support to which the rafters are anchored. The ridge can be formed by rafters fastened together at a certain angle or fixed on a ridge board (purlin).
- Sheathing is slats or beams mounted on rafters at a certain pitch and serving as the basis for laying the selected roofing material.
- Supporting elements, which include beams, purlins, racks, struts, ties and other parts, serve to increase the rigidity of the rafter legs, support the ridge, and connect individual parts into an overall structure.
In addition to the mentioned design details, it may also include other elements, the functions of which are aimed at strengthening the system and optimally distributing roof loads on the walls of the building.
The rafter system is divided into several categories depending on different features of its design.
Attic space
Before moving on to considering different types of roofs, it is worth understanding what an attic space can be, since many owners successfully use it as utility and full-fledged residential premises.

design pitched roofs can be divided into non-attic and attic. The first option is called that way because the space under the roof has small height and is used only as an air layer insulating the top of the building. Such systems usually include or have several slopes, but located at a very slight angle.
An attic structure that has a sufficiently high ridge height can be used in different ways, be insulated and not insulated. Such options include an attic or gable option. If you choose a roof with a high ridge, then mandatory it is necessary to take into account wind loads in the region where the house is built.
Slope slope
To determine optimal inclination roof slopes of a future residential building, first of all you need to take a closer look at the already built low-rise neighboring houses. If they have been standing for more than one year and can withstand wind loads, then their design can safely be taken as a basis. In the same case, when the owners set a goal to create an exclusive original project, unlike the neighboring buildings, it is necessary to familiarize themselves with the design and operational features of various rafter systems and make the appropriate calculations.

It should be borne in mind that the change in tangents and normal values wind forces - the steeper the angle of inclination, the greater the importance of normal forces and the less tangential forces. If the roof is flat, then the structure is more affected by the tangential wind load, since the lifting force increases on the leeward side and decreases on the windward side.

Winter snow load should also be taken into account when designing the roof. Usually this factor is considered in conjunction with the wind load, since on the windward side the snow load will be much lower than on the leeward slope. In addition, there are places on the slopes where snow will certainly accumulate, putting a large load on this area, so it should be reinforced with additional rafters.
The slope of roof slopes can vary from 10 to 60 degrees, and it should be chosen not only taking into account the consolidated external load, but also depending on the roofing that is planned to be used. This factor is taken into account because roofing materials differ in their weight; to secure them, a different number of elements of the rafter system is required, which means that the load on the walls of the house will also vary, and how large it will be also depends on the angle of the roof. The characteristics of each coating in terms of resistance to moisture penetration are also important - many roofing materials in any case require one or another slope to ensure free descent storm water or melting snow. In addition, when choosing a roof slope, you need to think in advance about how the process of cleaning and repair work on the roof will be carried out.
When planning a particular angle of the roof slopes, you need to know that the fewer joints between the sheets of roofing, and the more airtight they are, the less you can make the slope of the slope, of course, if it is not intended to be arranged in attic space residential or commercial premises.
If a material consisting of small elements is used to cover the roof, for example, ceramic tiles, then the slope of the slopes must be made steep enough so that water never lingers on the surface.
Considering the weight of the roofing material, you need to know that the heavier the covering, the larger the angle of the slopes should be, since in this case the load will be correctly distributed over the rafter system and load-bearing walls.
Can be used to cover the roof following materials: or profile sheet, galvanized steel, corrugated asbestos concrete and bitumen-fiber sheets, cement and ceramic tiles, roofing felt, soft roofing and other roofing materials. The illustration below shows the permissible slope angles for various types roofing coverings.

Basic designs of rafter systems
First of all, it is worth considering basic types rafter systems relative to the location of the walls of the house, which are used in all roof structures. Basic options They are divided into layered, hanging, and also combined, that is, including elements of both the first and second types of systems in their design.
fastenings for rafters
Layered system
In buildings where internal load-bearing walls are provided, a layered rafter system is often installed. It is much easier to install than a hanging one, since the internal load-bearing walls provide reliable support for its elements, and in addition, this structure will require less materials.

For rafters in this system, the defining reference point is the ridge board, on which they are fixed. The non-thrust type of layered system can be arranged in three options:
- In the first option, the upper side of the rafters is fixed on a ridge support, called a sliding one, and their lower side is fixed by cutting to the mauerlat. Additionally, the rafters in the lower part are fixed to the wall using wire or staples.

- In the second case, the rafters in the upper part are cut at a certain angle and connected to each other using special metal plates.

The lower edge of the rafter legs is attached to the Mauerlat with movable fasteners.

- In the third option, the rafters are rigidly fastened in the upper part with bars or treated boards located horizontally, parallel to each other on both sides of the rafters connected at an angle, and between them the ridge run.

In the lower part, to secure the rafters, just as in the previous case, they are used sliding fastenings.
It is necessary to explain why sliding fasteners are often used to secure rafters to the mauerlat. The fact is that they are able to relieve load-bearing walls from excessive stress, since the rafters are not rigidly fixed, and when the structure shrinks, they are able to move without deforming the overall structure roofing system.
This type of fastening is used only in layered systems, which also distinguishes them from the hanging version.
However, in some cases, for layered rafters, a spacer system is used, in which the lower end of the rafters is rigidly fixed to the Mauerlat, and to relieve the load from the walls, tie-downs and struts are built into the structure. This option is called complex, as it includes elements of a layered and hanging system.
The roof is a complex and important architectural element of any building. Its construction should be approached with special attention, it must be remembered that installation of the rafter system requires considerable experience in performing similar works And special tool. Those who are holding carpentry and measuring tools for the first time in their hands should not undertake the creation of a roof - the results of the activity can be very negative.
There are two types of roofs depending on the number and placement of rafter support points, but each developer can, at his own discretion, slightly change the specific design of the rafter system. This takes into account the operating conditions of the building, the purpose of the attic space, the climatic zone of the location, and the technical parameters of lumber and roofing coverings. Of course, the type of rafter system is influenced personal experience and preferences of developers.
Before you start making rafters, you should decide on their type, method of fastening and linear dimensions. Only in this case can you be sure of the strength and safety of the structure.
How do various factors influence the parameters of rafters?
| Physical factor | Brief description of the effect on rafter parameters |
|---|---|
| The rafters must withstand snow and wind loads. During calculations, you need to take the actual maximum values of snow cover from the tables of building codes and take into account the strength and wind rose. The data allows you to find out the total load on the roof slope depending on its area and angle of inclination. Next, you can determine the size of the rafters, their number and pitch. In this case, a safety factor must be included. The fact is that lumber does not have stable and identical values strength, too many unforeseen factors affect these indicators. In most cases, 50×150 mm or 50×200 mm boards are used to make rafter legs. |
| Gable roofs can be layered or hanging. For hanging roofs you need to make rafters from stronger boards. In this case, the method of fixing the elements to the Mauerlat is taken into account. If a notch is made, then the width of the boards should increase by the amount of the notch. The fact is that the cut in this place automatically reduces the width of the material that takes the load. If you make a cross cut 60 mm long on a 200 mm thick board, then only the remaining width of 140 mm is taken into account. Accordingly, if, when calculating the loads, rafters from 200 mm boards are selected, but during fastening unintended cuts of 60 mm are made, then the width of the blanks for the rafters increases to 260 mm. This remark is made for those who like to abuse various notches and cuts for the persistent areas of the ends of the rafters. Currently there are many special devices, allowing you to firmly fix the rafter in the desired position without filing. |
| For residential buildings, rafters must have a safety margin of at least 1.4 of the design values. For non-residential buildings the coefficient is reduced to 1.2. Conclusion - the size of the rafter boards on houses is larger than on garages and other extensions. |
| Residential attic spaces (attics) must have an insulated roof. The width of the rafters must correspond to the thickness of the insulating layer. At the same time, you need to adjust the pitch between the rafter legs depending on the standard width of the insulation. If in a given climate zone optimal thickness roof insulation is 200mm, then it is recommended to choose the same width for the rafters. Various extensions of narrow rafter legs during roof insulation are not considered the right solution. |


This knowledge will help you make the right decisions both during the manufacture of rafters and during their fixation directly on site. Mistakes in the construction of a rafter system are too expensive; you should not be overly self-confident.
What influences the choicesizes andwaysfasteningsrafters
Very important point. The task of any fixation is to ensure the stability of the connection node, while it can be stationary or have one or more degrees of freedom. This cannot be achieved without knowledge of the loads affecting the rafter legs. Loads can be permanent and temporary, dynamic and static, unidirectional and multidirectional.
- Constant vertical forces. They arise due to the impact of roofing and roof insulation materials. Due to the fact that the rafter legs are located at an angle to the vertical force, they are subject to bending and expansion loads. The magnitude of the forces is determined after constructing the diagram; based on the specific bending and expansion forces, the thickness and width of the boards for the rafters is selected. The fastenings must prevent the rafter system from spreading.
- Variable vertical forces. Appear in winter, the magnitude depends on the depth of the snow cover.
- Lifting wind forces. As a result of gusts of wind, lifting forces are applied to the roof. The dimensions of the rafter legs are not affected; the forces are taken into account only when choosing the type of fixation; it must provide for and support such loads.
- Lateral forces. The value depends on the windage of the roof. As a result of gusts of wind, lateral forces act on the rafter system. They increase bending and tearing loads. This feature also needs to be taken into account during the manufacture and installation of rafter legs.

There are options for rigid fastenings of roof trusses; for this, metal plates, corners, screws and nails are used.

Sometimes it is necessary to use floating rafter connections to compensate for changes in size wooden houses. For floating connections, special fasteners and bolts are used. The second allows the rafter legs at the top to rotate slightly.

Another example of a loose rafter connection is a sliding one. It is used on wooden log houses and makes it possible to compensate for the natural shrinkage of the house.

What elements are used to increase the stability and load-bearing capacity of rafters
As a result the right choice rafter system and methods of fixing its elements, the structure must be stable, compensate for natural fluctuations in linear parameters and withstand various loads that arise during operation. To fulfill the conditions during fixation of rafters, they can be used additional elements fixation.
Runs
Most often they are mounted in the ridge part of the system; the upper ends of the rafter legs rest on them. To increase stability, cuts may be provided. The top connection is rigid or floating with bolts. On large roofs, purlins can be installed in the middle of the rafters or in other places with critical loads.

VertikAlinen racks
They are installed to strengthen rafters; through the use of racks, elements can be made from thinner lumber. The upper end of the vertical racks rests against the rafters, and the lower end against the beam or ceiling beams.

CornerOpores
Resists bending and expansion forces, universal use. Corner stops can be placed in any places of the rafter leg that cause concerns about strength. Due to such stops, the resistance of rafters to bending and tearing forces significantly increases.

Puffs(crossbars)
The purpose is to keep the rafter legs from spreading; they are used on hanging rafter systems. Most often they are placed in the upper part of the truss; for manufacturing, you can use boards approximately 20–25 mm thick. The fact is that they work in tension, lumber holds such forces well. The boards do not work well under compression, quickly sag and lose their original strength.

Knucklehellish
They are used in the upper ridge part of the rafters; due to the use of puffs, the strength of the joint connection is increased. Pulls can be made of wood, plywood, OSB or metal.


Lugs(stops)
They have many specific names. They are ordinary pieces of boards 30–40 cm long and 40–50 mm thick, fixed at the bottom of the rafters. They rest against the mauerlat and prevent the structure from slipping. The use of bosses allows for a rigid connection of elements without sawing down the rafters. We talked about the problems that arise in connection with sawing in this article above.

Prices for various types of timber
Options for connecting the ridge assembly of rafter legs
The ridge is one of the main and most loaded elements of the rafter system. The unit has several connection options; you should choose a specific one depending on the general parameters of the roof.

For long slopes ridge beam It is better not to use it, but instead to install two parallel purlins and tightening bolts. This design is easier to make, more stable and safe.
For a suspended roof, you should choose the most reliable methods of connecting rafter legs; these systems have a minimum number of additional stops.
Prices for various types of fasteners for rafters
Rafter fasteners
Step by stepWithThand of mouthAnew rafters
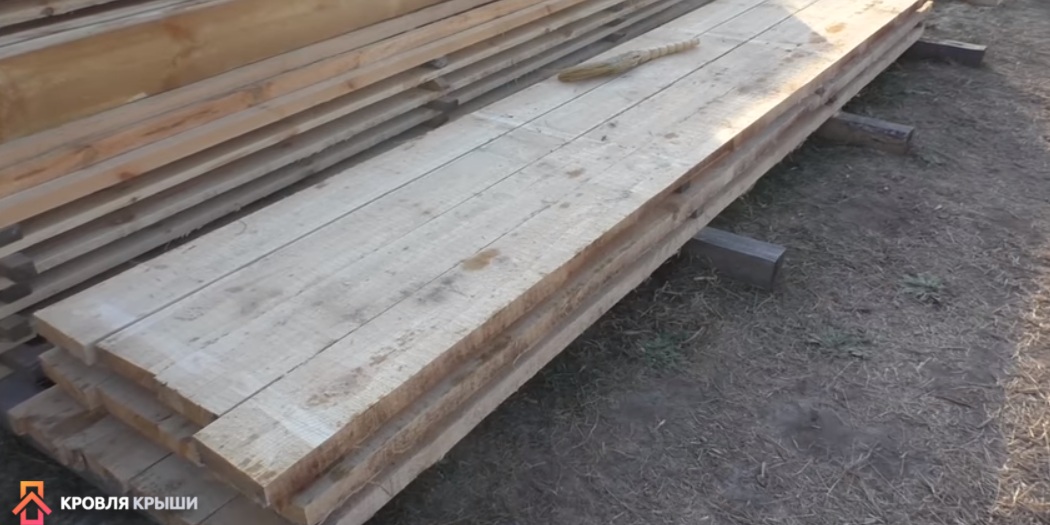
For the rafter legs, 50×200 mm coniferous boards and first-grade lumber are used. The boards cannot have traces of rot or fungus, significant defects or deep cracks. The use of low-quality lumber for the manufacture of rafter systems is strictly prohibited.
To increase the protection of roof elements from rotting, it is recommended to use fire protection.

Rafter blanks should be impregnated at least twice, and the material should be dry and clean. Processing is done on a level area in dry and clear weather.

You can impregnate with a roller, brush or pneumatic remote control. It is not recommended to use household hand sprayers - they are too time-consuming and difficult. The boards can be raised to the top after the impregnation has completely dried.


Our gable roof has a ridge girder; the vertical supports rest against a beam located on the load-bearing wall in the middle of the building.
Practical advice. If the house is quite high and the boards are heavy, then it is recommended for protection window openings make a basic device to prevent damage. To do this, two boards are knocked together in the form of a square; the length and width are selected taking into account the parameters of the opening. The device is installed on the window sill, and the rafter boards do not damage the foam blocks during lifting.

Prices for fire-bioprotective impregnations
Preparatory operations
The production of rafters begins with preparatory operations.
Step 1. Raise rafter boards into the attic. For convenience, place them evenly along the length of the building, place one end on the mauerlat, and the other on the girder. First you need to install the outer rafters on both sides of the roof of the house, stretch a thread between them and install and align all the remaining ones along it.
Step 2. Check the position of the ridge run again. It should be located exactly in the middle of the roof. Its displacement by 1–2 centimeters will not affect the strength of the roof as a whole, but will somewhat complicate the manufacture of rafters and the laying of roofing materials. Besides, experienced builder may notice a discrepancy in the sizes of the slopes and, accordingly, the asymmetry of the roof. It is recommended to ensure that the ridge run is located along the line of symmetry, unless this is associated with great difficulties. The final decision is made by the foreman on site and depends on the magnitude of the displacement and the amount of work to correct the error.

How to align a run?
- Attach a sheathing board to the mauerlat; it is lighter and easier to lift and fix. The second end should lie on the purlin. The board is nailed to the mauerlat with an ordinary smooth nail or screwed with a self-tapping screw.
- Climb to the top of the purlin and use a tape measure to check the distance from the edge of the purlin to the mauerlats installed on opposite walls. Work very carefully, it is advisable to use insurance. Unfortunately, in practice, few people follow safety rules, but in vain. Falls from height can cause very serious injuries.
- Center the purlin and secure the board. To increase rigidity, fix the same board on the other side of the purlin.

Now everything is ready, you can begin to manufacture and install the rafters.
Installationrafter legs
If you work alone, then you need to screw a piece of lath to the purlin at the place where the first rafter is fixed. The rafter board will be temporarily fixed to it to prevent it from sliding down.

And at this time, you can carry out work on the manufacture and preparation for connecting the upper part of the rafters.
Step 1. Lift and place the rafter board in place, using a clamp, clamp it to the previously attached batten.

Step 2. Draw lines to cut out the stop pad. This is done in two stages. First, draw a horizontal line. To do this, press the rail, square or other flat object tightly against the horizontal surface of the purlin.

Second, draw a vertical line. Now the ruler or square should be pressed against the side surface of the purlin.

Important. The width of the ruler should be no more than 2–3 cm, there is no need to make deep cuts and significantly reduce the width of the rafter leg, it loses its maximum design strength.
Make the same markings at the bottom of the rafters. Only now the ruler needs to be pressed against the surfaces of the Mauerlat.
Step 3. Remove the board and carefully cut out the seats. You can work with a hacksaw or an electric circular hand saw.

Practical advice. If the cuts are made with an electric circular saw, then it is better to cut in two steps. First cut to the mark, then turn the board over and cut again to the mark. Use a hammer to knock out the cut piece, and remove the remaining protrusion with a chisel or chisel. There is no need to go beyond the line with the saw and try to cut off the lip in one go. This method increases the cut by 3–5 cm, depending on the diameter of the disk, which significantly reduces the load-bearing performance of the rafters.
Step 4. Place the prepared rafter in place and check that it is made correctly. Perform the same operations with the second leg of the truss.


Step 5. Place the rafters with emphasis on the mauerlat and purlin, tighten them with a clamp at the top. Find the middle of the purlin and transfer the line to the rafters, use a level or a construction square (only when the plane of the purlin is strictly horizontal).


Step 6. Saw two rafters along a vertical line at the same time. The boards must be tightly clamped with a clamp. Pay maximum attention; the saw blade should be perpendicular to the plane rafters If you saw it obliquely, the ridge joint will not fit tightly, and this reduces the stability of the rafter system and is considered an obvious construction defect.

If there is a lack of practical experience in performing such work, the first leg may have a gap in the ridge part; if it is within 1–2 mm, then there is nothing to worry about. If it is more than 4 millimeters, then the element needs to be corrected. Look at which planes of the thrust pads do not allow the top cut to fit tightly. Approximately indicate the size of the additional cut. Remove the rafters and remove any interfering protrusions. Check the connection again, if gaps remain, repeat the operation. As practice shows, experience appears on the second or third rafter and no further corrections need to be made.
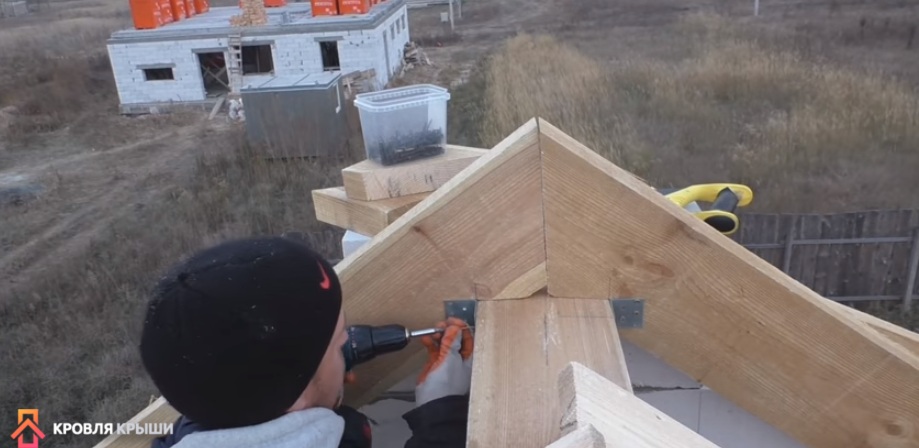
Step 8 Securely fasten the rafter legs in the correct places. To do this, it is recommended to use metal plates and corners; working with them is simple and easy; their strength fully meets the requirements for the rafter system.

For each pair of rafters you will need one large reshaped plate to connect the ridge assembly, two 50x50mm corners for fixing to the purlin and two 60x80mm corners for screwing to the Mauerlat. The thickness of the metal is at least two millimeters.


In the same way, install the outer rafters on the other side of the house, stretch the threads between them. One at the top and bottom and one in the middle. To prevent them from interfering during the manufacture of rafters, make a gap of about one centimeter between the thread and the plane.
Real professionals never make one rafter in the attic of a house. This algorithm of work significantly increases construction time, complicates the process itself and makes it unsafe. Working with electric tools on unsuitable sites is very dangerous; injuries from them are severe and often cause disability.

If the house is built with high quality and strictly adheres to the dimensions and rules, then the rafter legs are made according to one template on the ground. The finished elements are assembled on the roof. This technology increases labor productivity by 3–5 times, while at the same time improving the quality of the rafter system, it is more reliable and durable. Of course, the salaries of builders also increase proportionally. They work from the mine and receive money not for the time spent in the attic, but for the assembled roof.
Prices for popular models of screwdrivers
Screwdrivers
Video - Manufacturing and installation of rafters on a gable roof
Sometimes ceilings become the central elements of design, but besides this, in any case they also carry a practical load.
The rafter system is Basic structure pitched roofs. It consists of rafter legs, which are placed at an angle, as well as vertical posts. Absolutely any materials are used: wood, metal, concrete and others.
This photo clearly illustrates how each pair of beams connects to the horizontal beam. The load is distributed evenly, and the resulting structure is very reliable.

Design by renowned company Searl Lamaster Howe Architects, Chicago, Illinois, USA
Exposed ceiling beams are an excellent interior solution. It is this design of the ceiling in a house with a pitched roof, shown in the photograph, that makes the image more harmonious and complete. Don’t forget about this simple, very accessible, but no less spectacular design technique.

Gorgeous living room, designed by Anat Shmariahu, Cupertino, California, USA
The following photo gives us an idea of how original a veranda ceiling can be. Here the beams are placed perpendicular to each other, and this is very unusual architectural solution. This increases the height of the ceiling, creating something like a coffered structure.

Stunning porch with decorative ceiling beams, designed by the Frederick + Frederick design team, Beaufort, South Carolina, USA
The rafters extend beyond the outer wall to form eaves for water drainage. This is a very original solution to the problem of draining water from the roof.

Chic example of a home design with beamed eaves, John Lum Architecture, San Francisco, California, USA
The ends of the roof beams, which are in this case painted in White color, are called rafter tails. The blue rafters at the ends of the gables are outriggers.

Very unusual and stylish rafter design, designed by RW Anderson Homes, Seattle, Washington, USA
Also presented here original way roof design with protruding beams. They have no practical significance, but are simply elements of exterior decor.

Extraordinarily cozy summer house with decorative rafter beams, project SRM Architecture and Interiors, Portland, Oregon, USA
Exposed ceiling beams give the room the inexpressible charm of a rural house, while simultaneously fulfilling its main function - maintaining the roof. In our hectic times, country style is becoming very popular. His images put you in a romantic mood and have a calming effect. And the ceiling plays an important role here.

Textured and reliable design ceiling beams give a feeling of unity with nature, design by Nurit Geffen-Batim Studio, Ra'anana, Israel
Arranged this way decorative beams create the illusion of a conical ceiling. You immediately feel a feeling of flight and lightness.

This design evokes images of places of worship, the vision of the design team at Aarcon Construction and Remodeling, Tomball, Texas, USA.
Rafters come in different levels, depending on the design of the house. The main thing here is to take care of the quality of the material and fasteners: the structure must be stable.

A home that delights in its simplicity, designed by Gaulhofer Windows, Duncan, Canada
Using ceiling beams, you can adjust the geometry and volume of rooms. If installed along the width of the ceiling, the room will visually expand. And in order to lengthen the room, the elements of the ceiling structure are laid perpendicular to each other. If the ceilings are too high, you can place the beams low under roofing covering. This will immediately add coziness to the design.
Ceiling beams will be appropriate in any interior, so don’t be afraid to experiment! Decorative wooden rafters will bring a feeling of warmth to the room, and metal structures will create the atmosphere of an industrial loft. In any case, a room with an open ceiling structure will look unique.
Semicircular roof with a pediment on the side appearance arches, gives the country house a certain individuality that distinguishes it from neighboring buildings with primitive gable or hipped roofs. The main load-bearing elements in such a semicircular roof are arched rafters, the choice of which, production technology and their installation will be discussed below in the article.
What are arched rafters
An ordinary roofing rafter is a flat wooden beam with a cross-section of 120x40 mm or 150x50 mm. When creating a rafter system for pitched roof, all the bars are located at the same angle of inclination and are in the same plane.
An arched rafter is the same load-bearing element as a regular one straight rafter, only having the shape of an arc. Unlike straight rafters, arched beams, based on the material of manufacture, are divided into wooden, metal and reinforced concrete. According to the manufacturing method, arched rafters are conventionally divided into solid, prefabricated and glued, the production of which is possible only from wood.
Where and how are arched rafters used?
In private suburban construction- this is the creation of rafter systems for semicircular roofs of one-story and two-story cottages, as well as for the construction of suburban area canopy for parking personal vehicles.
Arched roof
In the field of industry and agriculture, arched rafters are used for the construction of hangars, warehouses, terminals, railway stations, and sheds for the construction of covered parking lots, bus stations, gas stations and even water parks.
With such a wide application, of course, the arc radius, material and design of arched rafters can differ significantly.
Industrial production of arched rafters
On an industrial scale, arched rafters are made mainly of metal and much less often of reinforced concrete. Metal arched rafters are called trusses and, as a rule, are transported and installed on load-bearing walls or columns assembled in one piece. Depending on the expected load, metal trusses are made from the following assortment of rolled metal: channel, triangle, hollow square, pipe and reinforcement.
 Metal arched rafters
  Canopy using metal arched rafters
 Reinforced concrete arched trusses, in most cases, are manufactured immediately at their future location, that is, reinforced monolithic trusses and crossbars are poured into pre-prepared formwork in the form of an arch. Such construction cannot be called typical, since such architectural projects are developed quite rarely, and it comes directly to construction even less often.
 Reinforced concrete arched rafters
 Arched wooden rafters
For suburban private construction, arched rafters and trusses made of wood are used. According to the manufacturing method, they are divided into the following types:
- From solid wood, arch-shaped beams are made by cutting wood. Because of large quantity waste, these arched beams are made up to 6-7 m long.
- Glued rafters - obtained by gluing thin edged boards 8-10 mm thick. The manufacturing process is similar to the production of laminated veneer lumber, the only difference is that at the time of gluing and drying the future rafter is deliberately given a selected bending radius.
- Composite arched rafters are manufactured both by small woodworking enterprises and directly by the team of builders who install the roof. Composite arched beams in their design consist of beams 100-150 cm long sewn together with metal pins.
 Solid wood arched rafters
  Laminated arched rafters
  Composite arched rafters
 Making arched rafters with your own hands
The production of rafters for the installation of an arched roof always begins with calculations. There are 2 options here: the “hard” and “easy” path.
The hard way to calculate the length and bending radius of rafters
This option involves developing a scheme of the following type:
 Scheme for calculating arched rafters
 The method of calculation and calculation is as follows:
- Take graph paper and decide on what scale the drawing will be made;
- Next, using a tape measure, you need to measure the span covered by the arched roof from one load-bearing wall to the other;
- Load-bearing walls and the distance between them are transferred to drawing paper;
- Next, using a compass, a regular circle is inscribed between the load-bearing walls;
- After this, an equilateral hexagon is inscribed into the circle;
- The angles of the hexagon themselves determine the dimensions of future arched rafters;
- This calculation is completed by transferring from graph paper to nature, that is, it is necessary to manufacture the first arched rafter according to the drawing, which will subsequently be used as a template for the manufacture of the entire set of beams.
Easy way to calculate
There are a number of different 2d and 3d programs, as well as calculators that will help you calculate the number, length and arc radius of rafters for an arched roof. For example, in calculation calculator you just need to load the initial data, such as the width of the covered span between the load-bearing walls and the maximum height of the arch from ceiling. The latest data is important, since the task is not always to make a roof in the form of half a regular circle. It is often necessary to calculate an arc with a smaller radius, which is more problematic manually on graph paper.
Installation of roofing from arched rafters
Having completed the calculations, we begin to assemble the first arched rafter. To make it, blanks of 140x40 mm timber are cut, for example, 130 cm long. Next, on a flat surface, an arc is laid out from the blanks - the profile of the future rafter. After this, the same number of blanks are made, which are placed on top of the first “layer” of bars and the attachment points between them are marked. In most cases, the ends of the bars in layers 1 and 2 end at a certain angle. On next stage both “layers” of bars are sewn together with pins.
A stud is a metal round rod with a diameter of 8-12 mm with a thread cut at both ends for a nut of the corresponding diameter. To improve fastening, lock nuts are used or a clamping spacer is placed under a regular nut. Depending on the total span and length of the rafter, it is assembled from two or three layers of bars described above.
 Installation of arched rafters
 Having prepared the first rafter, using it as a template, the rest of the set of beams is made, taking into account that there should be a pitch of 90-120 cm between the rafters in the roofing system. When the entire set of arched beams is prepared, they are lifted up and the assembly of the roof begins. The lower ends of the arched rafters are attached to the mauerlat - a massive beam fixed along two load-bearing walls to the ceiling, using pins released from it.
The connection of the upper ends of the arched rafters is made either with a ridge - a longitudinal massive beam mounted on racks, or without a ridge - that is, each pair of rafters is sewn together at the highest point of the roof. If the second option is chosen, then the entire length of the roof arch is divided into equal 3 parts and, at the resulting two points, support beams extended along the entire roof are mounted, which are installed similarly to a ridge, on racks.
 Roof installation
 After installing the entire set of arched beams, a sheathing of edged boards is filled transversely with them. The pitch between the sheathing is selected depending on the roofing material. That is, the dimensions of the tiles. If you plan to sheathe the roof with bitumen (flexible) tiles, then instead of lathing, the entire rafter system is sheathed with OSB sheets or moisture-resistant plywood. With this design, the distance between the rafters in the system should not exceed 100 cm. Otherwise, the sheathing is filled, OSB is mounted on top of it, and bitumen shingles are installed on top.
Prices for arched rafters and the cost of installing an arched roof
The price of arched rafters depends on the material from which they are planned to be made, as well as on the length and complexity of the arches. For example, when ordering arched rafters, you may find the following nonsense: the price of metal trusses may be the same as the cost of wooden arched rafters. It would seem that rolled metal is more expensive than wood, but the complexity of manufacturing arched beams plays a role here.
The rafters serve as the basis for the entire roofing structure, and their installation is one of the most important tasks when building a house. The frame of the future roof can be made and installed independently, observing technological features roofs of different configurations. We will present the basic rules for the development, calculation and selection of a rafter system, and also describe the step-by-step process of installing the “skeleton” of the roof.
Rafter system: rules for calculation and development
The rafter system is a supporting structure capable of resisting gusts of wind, taking on all external loads and evenly distributing them to the internal supports of the house.

When calculating the truss structure, the following factors are taken into account:
- Roof angle:
- 2.5-10% - flat roof;
- more than 10% - pitched roof.
- Roof loads:
- constant - the total weight of all elements of the “roofing pie”;
- temporary - wind pressure, the weight of snow, the weight of people carrying out repair work on the roof;
- force majeure, for example, seismic.

The amount of snow loads is calculated based on the climate characteristics of the region using the formula: S=Sg*m, Where Sg- weight of snow per 1 m2, m-calculation coefficient (depending on the slope of the roof). The determination of wind load is based on the following indicators: type of terrain, regional wind load standards, building height.
Coefficients, necessary standards and calculation formulas are contained in engineering and construction reference books
When developing a rafter system, it is necessary to calculate the parameters of all components of the structure.
Elements of the truss structure
The rafter system includes many components that perform a specific function:


Materials for making rafters
Rafters are most often made from trees coniferous species(spruce, larch or pine). For roofing, well-dried wood with a humidity level of up to 25% is used.

A wooden structure has one significant drawback - over time, the rafters can become deformed, so metal elements are added to the supporting system.
On the one hand, metal adds rigidity rafter structure, but on the other hand, it reduces the service life of wooden parts. Condensation settles on metal platforms and supports, which leads to rotting and damage to the wood.

Advice. When installing a rafter system made of metal and wood, care must be taken to ensure that the materials do not come into contact with each other. You can use moisture-proofing agents or apply film insulation
In industrial construction, metal rafters made of rolled steel (I-beams, T-beams, angles, channels, etc.) are used. This design is more compact than wood, but retains heat less well and therefore requires additional thermal insulation.

Choosing a rafter system: hanging and suspended structures
There are two types of rafter structures: hanging (spacer) and layered. The choice of system is determined by the type of roof, floor material and natural conditions of the region.
Hanging rafters rest solely on the external walls of the house, intermediate supports are not used. Rafter legs hanging type perform compression and bending work. The design creates a horizontal bursting force that is transmitted to the walls. Using wooden and metal ties you can reduce this load. The ties are mounted at the base of the rafters.

A hanging rafter system is often used to create an attic or in situations where roof spans are 8-12 m and additional supports are not provided.
Layered rafters mounted in houses with an intermediate columnar support or additional load-bearing wall. The lower edges of the rafters are fixed to external walls, and their middle parts are on the inner pier or supporting pillar.

Installation of a single roofing system over several spans should include spacers and layers roof trusses. In places with intermediate supports, layered rafters are installed, and where there are none, hanging rafters are installed.
Features of arranging rafters on different roofs
Gable roof
A gable roof, according to building codes, has an inclination angle of up to 90°. The choice of inclination is largely determined weather conditions terrain. In areas where heavy rainfall prevails, it is better to install steep slopes, and in areas where strong winds prevail, flat roofs are installed in order to minimize the pressure on the structure.

Common option gable roof- design with an inclination angle of 35-45°. Experts call such parameters the “golden mean” of consumption of building materials and load distribution along the perimeter of the building. However, in this case attic space It will be cold and it will not be possible to arrange a living room here.
For a gable roof, a layered and hanging rafter system is used.
Hip roof
All roof slopes have the same area and the same angle of inclination. There is no ridge girder here, and the rafters are connected at one point, so the installation of such a structure is quite complicated.

It is advisable to install a hip roof if two conditions are met:
- the base of the building is square in shape;
- in the center of the building there is bearing support or a wall on which it will be possible to fix a stand supporting the junction of the rafter legs.
Create hip roof It is possible without a rack, but the structure must be strengthened with additional modules - racks and puffs.
Hip roof
Traditional design hip roof assumes the presence of slanted rafters (diagonal) directed towards the corners of the building. The slope angle of such a roof does not exceed 40°. Diagonal runs are usually made with reinforcement, since they account for a significant part of the load. Such elements are made from double boards and durable timber.

The joining points of the elements must be supported by a stand, which increases the reliability of the structure. The support is located at a distance of ¼ of the length large rafters from the ridge. Shortened rafters are installed in place of the gable roof gables.
The rafter structure of a hipped roof can include very long diagonal elements (more than 7 m). In this case, it is necessary to install under the rafters vertical stand, which will rest on the floor beam. You can use a truss as a support - the beam is located in the corner of the roof and fixed to adjacent walls. The truss truss is reinforced with struts.
broken roof
Sloping roofs are usually created to accommodate a larger attic. The installation of rafters with this roofing option can be divided into three stages:

- Installation of a U-shaped structure - supports for purlins that hold the rafter legs. The base of the structure is floor beams.
- At least 3 purlins are installed: two elements run through the corners of the U-shaped frame, and one (ridge purlin) is mounted in the center of the attic floor.
- Installation of rafter legs.
Gable roof: do-it-yourself rafter installation
Calculation of inclination angle and loads
Of course, you can calculate a gable roof yourself, but it’s still better to entrust it to professionals in order to eliminate errors and be confident in the reliability of the structure.
When choosing the angle of inclination, it is necessary to take into account that:
- an angle of 5-15° is not suitable for all roofing materials, so first choose the type of coating, and then calculate the rafter system;
- at an angle of inclination over 45°, material costs for the purchase of components of the “roofing cake” increase.
Load limits from snow exposure range from 80 to 320 kg/m2. The design coefficient for roofs with a slope angle of less than 25° is 1, for roofs with a slope from 25° to 60° - 0.7. This means that if there are 140 kg of snow cover per 1 m2, then the load on a roof with a slope at an angle of 40° will be: 140 * 0.7 = 98 kg/m2.

To calculate the wind load, the aerodynamic influence coefficient and wind pressure fluctuations are taken. The value of the constant load is determined by summing the weight of all components of the “roofing cake” per m2 (on average 40-50 kg/m2).
Based on the results obtained, we find out the total load on the roof and determine the number of rafter legs, their size and cross-section.
Installation of Mauerlat and rafters
Do-it-yourself installation of rafters begins with the installation of a Mauerlat, which is fixed anchor bolts to the longitudinal walls.

Further construction of the structure is carried out in the following sequence:

Installation of rafters: video

Methods for connecting rafter structure elements: video