It is no secret that the dacha uses furniture that has served its time in the apartment. The table is no exception. However, in dacha conditions, the furniture that served well at home cannot always fulfill its purpose. This is about modern tables, made mainly from laminated chipboard. Such tables are not suitable for a gazebo, veranda, garden, and in a house with high humidity in the off-season, their service life is limited. In such conditions, a wooden table is needed, but a wooden table is not a cheap pleasure. The solution to the problem is to make a table with your own hands. This is quite easy to do. In addition, this will allow you to save significantly, including on delivery.
The simplest table design
The simplest table design is shown in the photo below. At the same time, this design is the least expensive both in terms of materials and manufacturing effort.

Fig.1.
Optimal overall dimensions of the table
One of the advantages of making a garden table with your own hands is that the table can be made of any size. Thus, the table can be easily adjusted to the dimensions of the gazebo, veranda or kitchen.
To make it easier to navigate the sizes, I will give a size chart, which is most often used in the production of tables. The size chart is based on the size of the countertop.
- 60x90 cm. A table with this size is optimal for 3 people. At such a table it is convenient to have lunch, drink tea, etc. Thanks to its size, it will fit well into any small space.
- 80x120 cm. 4 - 6 people can comfortably sit at this table. Typically, a table of this size is appropriate to place in a large kitchen or on the veranda.
- More than 120 cm. Tables with these sizes are good for feasts. In dacha conditions and limited space country house Basically, such a table is installed in a gazebo or under a canopy in the open air.
Naturally, when making a table with your own hands, you can make the size arbitrary, however, in order to be comfortable at the table, you should adhere to the recommendations given above.
Manufacturing procedure and table drawing
The table drawing is shown in the figure below.

Fig.2.
Table legs are made from wooden block with a cross section of 40x40 mm and a length of 70 cm. If you want to decorate the table, you can use balusters as legs. They are carved and will make the table design more interesting.
The support for the tabletop can be made from a board with a cross-section of 25x150 mm, sawing it lengthwise into two halves. For support you need 2 boards 650 mm long and 2 boards 1050 mm long.
With the countertop everything is much more interesting. The table top can be made different ways. The easiest option is to purchase a furniture panel of the required size. It can be purchased at online building materials hypermarkets.

Fig.3.
If you take this path, you should remember that furniture board is made by gluing small sections of boards, and if it is constantly exposed to precipitation, it will quickly become unusable. Therefore, a table with a top made of furniture board must be varnished or painted to protect against moisture.
Another option is a plank countertop. Boards can be used in any size. For example, with a section of 25x100 mm. It's simple and cheap option countertops. This option does not have the disadvantages that are inherent in furniture panels.

Fig.4.
However, without special equipment it is unlikely that it will be possible to fit the boards tightly. Therefore, the tabletop will have gaps between the boards. It looks good for garden table. But not very practical.
You can get rid of the gap mentioned above by using an unusual, tongue-and-groove board. It will cost a little more, but you will get a smooth, even tabletop.

Fig.5.
Euro floor boards can be used as tongue and groove boards. They are easier to find in the store. It’s just important not to forget to stitch them from the wrong side.
Table assembly
Once all the elements of the table are ready, you can begin assembling the table. The table is assembled in a certain order.
First, assemble the support for the tabletop and attach the legs to it. This is the most difficult moment in assembling the table. As described earlier, the tabletop support consists of 4 boards. They need to be connected to each other. There are several ways to do this.
The photo below shows how to assemble a tabletop support and secure the leg to it using a special tie.

Fig.6.
This method is an ideal solution, except for this fact. It may not be easy to purchase a special screed.
Another way is to tighten the entire structure using a wooden block.

Fig.7.
When using this method, you need to pay attention to the fact that the block must be sawed off at an angle of strictly 45 degrees. Otherwise, the table will not be rectangular.
In my opinion, the simplest and most affordable option for assembling the legs and supports for the tabletop is to use a metal general construction corner measuring 50x50 mm. You can buy it in any store, and it has the correct geometric shape.
The last step in assembling the table is installing the tabletop. Depending on the type of tabletop, it can be secured in various ways. The furniture panel can be attached with corners or with glue. Separate boards using screws and glue.

Fig.8.
As you can already understand, making a table for a summer house or at home with your own hands is quite simple. It is important to approach the issue creatively. This table can be decorated with any paint and varnish coatings. A wooden table made by yourself will delight you every day and will last for many years.
Wooden tables and design ideas

Fig.9.

Fig. 10.

Fig. 11.

Fig. 12.
If you dream of having a good time on your personal plot, then you just need a large table that can accommodate a group of your friends and family. Moreover, you can do it with your own hands, spending very little time on it. In some cases you may need a helper, sometimes an extra pair of hands won't hurt.
This article provides detailed step-by-step instructions for making a wooden table for a summer house.
To give you a choice, we offer you four project options at once country table- two ordinary picnic tables, a table with benches, which are a single structural unit, and, finally, a round table. You should think through all the details in advance and choose the type and size of table that would suit your needs and the style of your garden plot.
Folding picnic tables - mobility comes first
Folding tables are very convenient, and most importantly practical and simple. They don't take up much space. At any moment, such a table can be neatly folded into the garage, and, if necessary, again moved outside. The mobility of furniture is especially appreciated in small areas.

How to make a garden wooden table with your own hands
A dacha is the place where a craftsman, a carpenter, a carpenter, a gardener, in general, a master, awakens in a person. Buy furniture for suburban area- it’s a simple matter, but not everyone can make a wooden table for their dacha with their own hands. You must immediately be prepared for what to do garden table you will do it yourself for a few days. But the tips listed below will help you make a good-quality table yourself.
Today we will construct a fairly simple country table with our own hands in provencal style. Such tables not only look great, but also have quite reliable design. It's worth paying attention to the boards. They must be even, since the appearance of our country table will directly depend on this.

When designing a table for a summer house, it is necessary to prepare lumber in three dimensions:
- Supporting frame - section 38 x 90 mm.
- Tabletop - section 38 X 140 mm.
- Supporting strips - section 19 X 64 mm.
- Drawing
Before starting work, the most important thing is to find it on the Internet, or make your own drawings of a table for a summer house with your own hands. An accurate schematic designation will allow you to select lumber that will be most suitable in cross-section to the dimensions indicated on the diagram. It doesn’t matter if the dimensions don’t exactly match each other, because you can always make an adjustment using an electric planer.

- Preparation of material
When deciding how to make a garden wooden table, approach the issue responsibly, since the life of the furniture will depend on this:
- purchase of blanks. Professionals advise purchasing lumber from coniferous trees that has been well dried beforehand. Its main advantages are:
- price;
- simplicity and ease of manual processing;
- beautiful structure;
- furniture glue;
- 4 X 65 mm screws;
- 3 mm drill;
- drill;
- tape measure, pencil, sandpaper.
- Further actions
We will need:
- two upper transverse beams, dimensions 38 X 90 X 978 mm;
- four legs for a country table with your own hands, size 38 X 90 X 695 mm;
- two bowstrings - 38 X 90 X 921 mm;
- one longitudinal lower and one upper beam - 38 X 90 X 1575 mm and 38 X 90 X 1473 mm, respectively;
- two pieces of braces 38 X 90 X 772 mm;
- blanks for the tabletop - seven pieces, measuring 38 x 90 x 2337 mm;
- six support strips - 19 X 64 X 432 mm.
Advice: start work on a flat surface. It is extremely necessary to observe the joining angles of the parts. The blanks, which will later become the legs of our country table, should be cut on both sides at an angle of 10°. The cuts must be parallel. But the bowstring blanks, which are similarly cut at the same angle, should be cut one towards the other.
Stage 2. The legs of our country table should be attached to the cross beams and this entire structure should be fastened with screws. There are two screws for each connection.

We screw the string diagonally to the leg with inside, in the same way fastening the structure with two screws.
The lower beam must be used to connect both strings to each other. As mentioned above, using screws.

Next, holes are first made in the upper longitudinal and transverse beams for a fastener called a dowel, after which we again diagonally connect the blanks of our country wooden table with existing screws.

Tip: when connecting all the elements, use glue for additional strength. Remove excess immediately.
We place the braces on the screws.

Tip: blanks intended for braces should first be cut at an angle of 45 degrees
We fasten the blanks for the table top with screws to the cross beams with our own hands.


How to make a rectangular table for a garden
After developing a work plan and approving the drawings of the garden table, purchase all the materials needed for this project. Choose wood designed for outdoor use - pine, cedar, redwood or pressure-treated wood. When purchasing, check each board: they must be completely smooth and without any visible defects. Do not skimp on the quality of lumber, because your structure will have to withstand all weather adversity.

There are several important points that you must take into account if you want the result to be of a high professional standard. We must not forget about the accuracy of measurement and the use of professional tools when cutting boards and bars and drilling holes. To increase the reliability of the structure, you can additionally use waterproof glue to fasten the parts. Round open edges using a router or sandpaper.
Attention! Dimensions are converted from the inch system and may not correspond to the metric measurement system. Choose lumber that is as close in size as possible. Or just customize it yourself.
Tools required to implement the project:
- hacksaw, jigsaw;
- milling cutter;
- drill and drill bits;
- chalk cord, tape measure, spirit level, pencil;
- safety glasses and gloves.
Time:
- From one day to a week depending on the chosen project. If you have power tools at your disposal, you can finish the job even faster - in just a few hours.

Adviсe:
- A router will help smooth the edges of wooden blocks and boards.
- Before screwing in screws and self-tapping screws, drill into wooden elements design guide holes.
- The heads of the screws that are screwed in should not protrude above the wooden surface, and for this, the entrance parts of the holes must be countersunk.
- Do not use cracked or warped lumber.
- Do not use excessive force when tightening the screws, otherwise the wood may crack.
DIY picnic table. Step-by-step instruction
Materials:
- A - Legs: 5x10 cm bars, 106 cm long (2 pcs.), 43 cm long (2 pcs.) and 56 cm long (2 pcs.);
- B - Frame: bars 5x10 cm, length 87 cm (2 pcs.);
- C - Tabletop: boards 5×15 cm, length 180 cm (6 pcs.);
- D - Tabletop base: boards 5x15 cm, length 87 cm (2 pcs.), bars 5x10 cm, length 62 cm (2 pcs.).
The first stage of the project is making the table legs. Saw off the bars of the required size. To speed up the process, you can use a circular saw. Smooth the edges of the bars and cut lines sandpaper.
Connect the bars to form an X-shaped structure and fasten them with 60 mm self-tapping screws, not forgetting to pre-drill the guide holes. Lubricate the joints with glue. Make sure there are no cracks or gaps.
Fasten each pair of legs with a horizontal block, using 60 mm self-tapping screws for this purpose. Cut off the ends of the bars as shown in the figure.
Place the boards intended for making the tabletop on a flat surface. We advise you to place pieces of 6 mm plywood between them, this will create uniform gaps. Place the assembled table sides on the tabletop and secure them by screwing in self-tapping screws at an angle of 90 mm. Before fixing, make sure the legs and table top are perpendicular using a spirit level.
Post on bottom side tabletops, cut pieces of 5x15 cm boards and secure them with 60 mm screws.
Saw off the ends of the bars, which will serve as supports reinforcing the structure, at an angle of 45º. Place the supports in their place and secure with 90 mm self-tapping screws screwed in at an angle.
And finally, last but not least: check that the heads of the screws do not protrude above the wooden surface, and fill all cracks and holes with wood putty.
Tip: To protect wooden surfaces from the damaging effects of atmospheric moisture, cover them with several layers of exterior paint or stain.
Table with benches. Instructions with drawings
Materials:
- A - Legs: bars 5x10 cm, length 95 cm (4 pcs.);
- B - Crossbars: bars 5×10 cm, length 160 cm (2 pcs.);
- C - Fastening the tabletop: 5×10 cm bars, 75 cm long (5 pcs.);
- D - Inclined supports: bars 5x10 cm, length 84 cm (2 pcs.);
- E - Tabletop: boards 5x10 cm, length 180 cm (14 pcs.).
You should start by making the legs. Since the legs of this table will be inclined, the ends of the 100 cm long bars should be cut at an angle of 30º. Connect the elements with 90 mm bolts.
Make sure the surface you are working on is fairly level. The mounted sides of the table must be identical, only in this case can you hope for an excellent final result.
When the sides of the table are ready, you can start making wooden table top. We recommend that you knock it together on the ground (floor), and then attach it to the legs using self-tapping screws.
Tip: Don't forget to make sure the side walls of the table are vertical using a spirit level, otherwise the end result of your work is unlikely to satisfy you.
Rigidly fix the entire structure using inclined supports. Their ends should first be cut at an angle of 26º.
Now all that remains is to build the benches. Saw off the boards of the required size, place them on both sides of the table and, having previously drilled several guide holes at a distance of at least 1 cm from the edges, secure them with self-tapping screws.
Tip: To ensure that the seat boards are evenly distributed, place nails or pieces of plywood between them before attaching them. Thanks to this little trick, all the gaps will be the same.
At the end of the work, pay attention to small but very important touches. Fill all cracks and holes with wood putty. After the putty has dried, sand the wood surfaces with medium-grit sandpaper.
Tip: Be sure to apply several coats of paint or stain to protect wood surfaces from exposure to water and sunlight.
Round table. We do it at the dacha on our own
Materials:
- A - Base: 5×10 cm block 102.5 cm long (1 piece) and 47 cm long (2 pieces), 2.5×10 cm block 9 cm long (4 pieces);
- B - Stands: bars 10×10 cm, length 60 cm (4 pcs.);
- C - Tabletop base: 5x10 cm bars 82.5 cm long (1 pc.) and 52.5 cm long (2 pcs.), 2.5x10 cm bars 47.5 cm long (4 pcs.) and 60 cm long (2 pcs.) ;
- D - Tabletop: boards 2.5×15 cm, length 195 cm (9 pcs.).
The first stage of the project is to create the table base. To connect its constituent elements, use waterproof glue and self-tapping screws. Make sure that the corners formed by the bars being connected are straight. To protect the assembled table base from rotting under the influence of rainwater, place it on small stands made from scrap 2.5x10 cm boards.
Now you need to attach four posts made from square bars to the base. Before fixing, make sure they are vertical using a spirit level. The height of the legs may differ from what we propose; in this case, you should, first of all, be guided by your own needs.
The most difficult stage of the project is making the countertop. Place the boards on a flat surface and mark the center of the square. Secure one end of a 60 cm strip at this point. Rotate the other end of the staff to mark the outline of the circle. A jigsaw with a sharp blade will allow you to make circular cuts at a high professional level.
After cutting the boards of the future tabletop, we recommend that you fasten them together with waterproof glue and additionally secure them with several clamps. Attach the bars that serve as the base of the tabletop, as shown in the picture (yellow elements should be made from 5x10 cm bars, green ones from 2.5x10 cm bars).
Tip: To attach the bars to the tabletop, use waterproof glue and galvanized screws (30 mm self-tapping screws for fastening 2.5x10 cm bars and 50 mm for fastening 5x10 cm bars).
After the glue has dried, you should attach the legs to the base of the tabletop using 90 mm self-tapping screws, having previously drilled pilot holes. Use a spirit level to check the perpendicularity of the legs and tabletop.
To ensure that the result of your work corresponds to a high professional level, make sure that the heads of the screws are recessed deep enough. Cover all cracks and holes with wood putty, and after it dries, sand the surface with sandpaper.
Tip: Apply several coats of exterior paint or stain to protect the table from moisture damage. To ensure that the base stands are also untouched by water, place the table on a concrete surface and seal them tightly.
Now you know how to make a picnic table yourself. You just have to put in a little effort, which will subsequently be rewarded with enthusiastic exclamations from friends and pleasant summer evenings spent with your family at a large table.
To do dinner table with your own hands, you will need a little skill and a lot of time and patience. If carpentry skills are well developed, and you have a full set of tools at home (from a circular saw to a milling machine), then such work will be completely simple. In this case, you can choose an option for making a table that corresponds not only to your skills, but also to your financial capabilities.
Choice of materials and size of the future table
The dining table is the center of the kitchen or dining room, even if it is located under the wall. Its size should be selected depending on the size of the room and the number of people who often dine together. The comfortable area for one person at the table is 60 cm. In total, for a family of 4 people, a tabletop measuring 80x60 cm will be sufficient. But sometimes you have to receive guests, so it is better to increase the size of the table to the maximum suitable for the dimensions of the room.
This way it will take up minimal space, but if necessary effective area doubles. At the same time, it is better not to make the table attached to one wall, because sometimes you may need to move it to another room.
What is the best way to make a dining table?
Solid oak is an ideal material for a kitchen table. Strong, durable and wear-resistant material will last for generations with proper care. Pine is much softer and easier to process, so it is better suited for beginning builders. If you take a ready-made furniture board, you won’t have to adjust and fasten the boards yourself, but such a tabletop will cost more.
It is advisable to choose strong wood for the legs - they must withstand the weight of the tabletop with numerous dishes and plates. In addition, a table is often used instead of a stepladder - this also needs to be taken into account when choosing wood. Natural wood can be treated with stain, varnished or painted in any color. Or experiment with a combination different types coatings and even change the style annually.

If maximum savings are required, you can buy a laminated chipboard, fortunately there is a choice decorative coatings extremely wide - under natural wood, plastic, plain and colored. If you order a sheet of the required dimensions, assembly will take a minimum of time. But you need to choose only products with a durable top coating and insulate the edge of the tabletop well, otherwise the surface will begin to “swell” when moisture gets in.
How to make a simple dining table
For those who have decided to start making furniture with their own hands for the first time, a simple rectangular table with a countertop made of laminated chipboard. It will require:
- Buy a sheet laminated chipboard needed sizes.
- Buy 4 legs - these can be ready-made balusters or beams with a square section of at least 5x5 cm, which will have to be adjusted in height and sanded with sandpaper. In addition, you can find metal chrome legs that will give the table a modern and stylish look. The included fasteners make assembling the table as easy as possible.
- If the legs are wooden, the frame is first assembled from facing boards - for a stronger fixation. The crossbars are attached to the legs on the sides using self-tapping screws. metal corners from the inside.
- The legs are attached to the tabletop 10 cm from the edge. Wooden - on corners, metal - using ready-made fasteners. The frame is also fixed to the tabletop from the inside with corners - one on each side.
- The wood is treated with stain or painted with a preliminary primer - depending on the chosen style.
- Slice chipboard sheet closes furniture edge. It is very convenient to use a rigid U-shaped PVC edging. Apply liberally to its inner side silicone sealant(to prevent moisture from entering) and simply snaps onto the edge. The ends are closed with plugs, and excess sealant is removed.
- If the table top is round or curved, you can take a flexible profile - it is attached to the sealant, the edges are cut off after the glue has set. The flexible edging allows the edge to be made with only one seam, which significantly improves the appearance.
- For greater reliability, you can use T-profile, but for it you will have to mill the groove clearly in the center of the entire edge - and not everyone has a manual milling machine. But such an edging with wide antennae perfectly hides uneven cut edges if they are full of chips and cracks. A regular edge cannot hide such defects.


The advantage of a chipboard table is its maximum simplicity and cost-effectiveness. To assemble it you will need a minimum of tools:
- screwdriver or screwdriver;
- sharp knife for cutting edges;
- sandpaper for sanding wooden legs;
- brush for applying coating to wooden parts.
Folding table-book - for all occasions
In order not to think about seating guests on the floor in the best Japanese traditions, a folding dining table is ideal for a small apartment. How to make a book-table with a rotating mechanism?

No more complicated than a regular rectangular table, only a little more expensive:


In addition, you can make an extendable table. In this case, the frame is made “half”. One part is screwed to the bottom table top in the usual way, and the second one is made wider so that it can overlap the first one. Full extension telescopic guides are fixed on the outside of the narrow part of the frame and on the inside of the wide part. But such a design is still less reliable than a rigidly fixed frame.

How to make a table original?
If you want to make the table special and have the opportunity to realize your idea, why not try it? For example, make it glowing or decorate it with tiles.
Glowing table - how to amaze guests
For such a table, wood with defects is specially selected - chips, cracks and holes from knots. First, the boards are adjusted to size and glued together. For better fixation, they can be attached to wooden dowels:


If you need to fill out through holes, boards covered with wax paper are placed under them. You can use regular baking parchment. To prevent the resin from overflowing over the edge, you can stick tape on it so that it rises a centimeter above the surface. To make smooth edges on a chipped board, formwork is made, which is also covered with paper and filled with epoxy.

After the first layer has dried, the tabletop is sprayed and sanded “wet” with fine sandpaper, dried and a second coat of paint is applied. This continues until the perfect shine is obtained. In addition, the wood will be protected from moisture, which is very important for a kitchen table.

Table with ceramic tiles - practical and durable
The base for ceramic tiles can be anything - an old countertop, a sheet of metal or OSB board. The choice of decor is also unlimited, although mosaic looks better. To simplify the work, you can buy a ready-made mosaic on a grid - you don’t have to assemble it yourself, and the thickness is minimal, which is quite important for table decor.

Apply tile adhesive to the countertop using a notched trowel. A pattern is laid from the corners along the outer perimeter of the tabletop, gradually filling the entire surface.

After the glue has completely dried, grout is applied and as soon as it dries, the excess is wiped off with a damp sponge. If you add sunflower oil to the water, the grout in the joints is leveled and does not cling to the sponge.
To protect the edge of the tabletop, it is sealed masking tape, which is removed after the grout has dried. If the edge requires processing, it can be painted in a contrasting color, which will give the table even more originality, or it can be completely covered with the same tiles.
The mosaic laid out only in the center of the table looks original. In this case, a jigsaw is used to select wood to the height of the tile and a mosaic is laid in the resulting recess.

Even if it was not possible to maintain the same depth, the height of the tiles can be adjusted by increasing or decreasing the layer of glue. The main thing is that the countertop is level, so each row of tiles is checked with a level.
There is no need to buy expensive materials if you can use something that no one else needs. How to make an original and beautiful dining table for a summer house from old pallets can be seen in the video:
Just like in a bedroom without a bed, and in almost any other room, be it a living room, kitchen or even a hallway, you cannot do without a table. Actually, it won’t be superfluous in the bedroom either. It’s better to have several of them at once - for different purposes. So that there is somewhere to put a night lamp, where to lay out notes and books, install a laptop, or even just have a snack or even do something more piquant.

It’s not difficult to buy a “desk”, there is a wide choice now, but making it yourself is a matter of special sophistication. Such a homemade item of apartment “wardrobe” will be valued much more highly by both the owner and guests, and it will be more pleasant to use.

This is not an easy task, but it is also not difficult, requiring, however, a certain aesthetic taste and carpentry skills. But don’t be scared and retreat right away. It is quite possible to cope with this task, the main thing is to imagine what you want.

Advantages and disadvantages
A homemade product has both its advantages and disadvantages. Among the advantages:
- Variability. You can do what you really need with your own hands. In all aspects. This includes complete freedom in choosing shape, material, texture, size, and design.
- Saving. Buying furniture in stores will cost significantly more. In fact, for the same or even worse quality you will sometimes have to pay many times more money.
- Uniqueness. What you do with your own hands, no one else can do. This will allow you to create a stylish and original, and most importantly, unique interior almost anywhere - in the country, in an apartment, in your own home.
- Improving skills. Working on a table is an opportunity to practice your metalworking and carpentry skills and learn a whole range of new things. These skills will also be useful when repairing ready-made store-bought products in the future.

Having better understood the design of tables, it will be possible to take a more professional approach to the selection of such products in retail outlets, or even even discover a source of additional income. And in general, you can always help your loved ones and friends fix something, bring a fresh idea to the design.

However, making tables yourself is fraught with certain difficulties. Among them:
- Time-consuming. Be prepared to spend one or more days, or even a week for a large item. The maximum, as the masters admit, is 10 days spent on a large table. In fact, you can spend your entire vacation toiling with the material and achieving very meager results. Therefore, it is better to be psychologically prepared for difficulties during the first experience.

- Injury hazard. Working, especially with wood, is fraught with splinters. When working with old material (beams, fence boards), you need to remain extremely careful. But in some cases, even work gloves may not save you from small cuts. Too delicate hands should not do such things.

- Manufacturing defects. A house is still not a workshop, and some calculations can be difficult to make - hence the roughness and unevenness in a seemingly finished product, verified to the smallest detail. It’s fine if the table is made for a summer house, but in a standardized room the result can become the subject of offensive jokes and just look out of place. For the manufacture of an improvised “bureau” or other more complex than regular table, designs still require skills and certain experience. There would be time to work it out.

- Need a tool. If you don’t have it, everything is simple – you’ll have to buy it and master it. Time is already money, but there are also additional costs at the first stage. However, in the long term, such an approach will lead to savings - the next table will be made for next to nothing, especially if there are supplies of material at the dacha.

- Not suitable for all styles. Be careful when experimenting with homemade products in modern interiors, for example, high-tech, where metal and technological materials rule the roost. Working with them is difficult, and wooden crafts can disrupt the harmony of the room.

A little advice. If you decide to make a table, and this is your first experience, try to find a good adviser who will psychologically and with the help of his skills support the endeavor. You can take the first steps together, and then set off on a free “flight”.
Assembly Features
There are many types of tables. The most common are desk, computer, toilet (with or without a mirror). Desktops vary depending on whether they are designed for a laptop or made for a desktop computer. In the latter case, you will need a special space for the system unit - it can be installed both under your feet and at eye level.


Each option has its own advantages that affect the design of the table. In the first case, the system unit will not get in the way, but it will not be very convenient to connect USB ports to it from behind. When designing, you should leave a significant open space behind the table, and do not place it near the wall. If the system unit is located on top, the bureau should be as stable as possible, and the table top should be made of durable, reliable material.

If there is a goal to design a desktop for a schoolchild, including a collapsible structure, it is reasonable to build into it drawers for notebooks, textbooks and CDs. An alternative is a separate shelf above the structure. The drawers can be either retractable or an open shelf. Backlighting is also relevant.

Tables can also be corner or transformable; height-adjustable, collapsible, on wheels.
All these are not frills, but practical design elements. Among the more complex options, popular ones include, for example, river tables with beautiful, often transparent material, built into the middle part. Their production will take more time and require higher metalworking skills, but will allow you not only to improve your working “skills”, but also to make a real interior artifact. Each type of table has its own assembly features and specifics. Let's look at some of the most popular, simple and available options creating a table that does not require the heights of technical training, but allows you to create high-quality and interesting products that do not look awkward or poor even in a modest interior.

Tools
But before you start carpentry, you need to decide what and with what you plan to work. You need to get down to business in full “instrumental” readiness. Don’t be afraid, you won’t need anything rare or particularly complicated - just the usual working arsenal, which a real man always has at hand. So, let's list the main things. You can’t do without the “classics of the genre” - nails, screws, a screwdriver, a plane, a hammer, glue (instant glue will come in handy), a knife. In some cases, you can use a saw (in nature). Don't forget about work gloves and disinfectants. Be sure to have iodine and cotton swabs with you, unless, of course, the goal is to make a table and not get sick with tetanus.

The fact is that wood, when sanded (with sandpaper or another device), can turn out to be very “unfriendly” and simply become a pile. When working with metal, you also need metalworking tools. And in any case, it is better to acquire eye protection - a special work mask. For subsequent processing of the material and its cleaning, a brush and disinfectants, including against insects, especially when using old wood. You can also clean the table with sandpaper.

And, of course, you need varnish or paint for final processing. You may have to treat the tabletop with varnish several times (after the first one, the lint will simply stand up), which means it is better to buy it with a reserve.
Popular materials
One tool is obviously not enough. There is something, but nothing to work on yet. The main thing is, of course, the material. Theoretically, a table can be made from anything, but there are some subtleties. The most popular is wood, but it must be dry! If it is not dry, dry it; This will take time, but it is better not to rush anywhere for the sake of the quality of the product.

A table made of dry wood, logs, timber is a wonderful and reliable element of the interior. Beautiful, functional and inexpensive. With this option, you can save a lot if you have inexpensive bars or logs on hand - stored, for example, in the country. In stores, good wooden tables are definitely not among the cheapest.

Wood is in trend now. This is the main eco-material. You can’t do without it in interiors tailored to a natural style. In fact, it is wood in one form or another that is used in all classical interior styles, right up to colonial or modern.

You can also make a bureau from chipboard. The material is composite and quite affordable. But it has a lot of disadvantages. Chipboard is afraid of moisture - no longer an option for the kitchen. It doesn’t hold nails and screws well – adding extra complications to the job. And in general, it is not very environmentally safe - it is better not to keep too many chipboard products in the apartment. However, such a table can be placed, for example, in a house or on the veranda at the dacha - as an inexpensive, temporary option - for the season, for receiving guests. Inexpensive, simple and moderately aesthetically pleasing, and most importantly – functional.

Let us clarify that laminated chipboard is also available on sale - also wood and shavings, only laminated in a special way - with a polymer film at high temperatures, or even with a special varnish that provides increased water resistance. Laminated chipboard is more expensive, but such boards are practically devoid of all the disadvantages of chipboard.

However, using plywood will be no less practical. There are many types of it - there are also moisture resistant ones. This means the range of applications is wider. In Russia, this material is gaining popularity and is also being exported en masse, which indirectly speaks of its quality. Plywood is quite easy to process and not too expensive. The downsides are its facelessness, dull texture and the accompanying feeling of unnaturalness. In addition, when working with plywood, you must be very careful preparatory stage. You can’t do without a sketch or drawing. You can use it as already ready-made projects, so do it yourself.

The easiest way is to make a table from a furniture panel, say ash. This is a little more expensive, but at the same time it will ensure the reliability of the main part of the table - the tabletop. Less hassle with polishing, but at the same time somewhat less naturalness and texture.

An extreme alternative is to use natural wood: stumps (they, by the way, can be used on their own, but this is designer chic) or saw cuts. With them everything is exactly the opposite. You will have to sand it and varnish it yourself several times, but in the end you will get a completely unique unique product that all lovers of “natural” design will be able to appreciate, if, of course, after the get-togethers they leave without a few splinters in various places.

Often, glass or special optical glue, plexiglass adhesive, which replaces it, is used in table decoration. You can also buy just impact-resistant glass - although it will be more expensive. It's stylish, impressive and safe. This material is optimal for small oval coffee tables, but recently it has been increasingly used by designers in models with right angles.

We also add that the legs and base can be metal. You should not be afraid of the combination of wood and metal - with proper design it can be not only harmonious, but also very interesting. In modern interiors, lofts and high-tech, sometimes you can’t do without it. In addition, metal combines effectively with glass or its analogues.

Kitchen table
This is an absolutely necessary element of the interior. It should be convenient, comfortable and stable. The surface of the tabletop is often of no fundamental importance - it is usually covered with a tablecloth or oilcloth. At self-production It is important to pay attention to the lower parts of the structure so that you can sit at the table without any problems and always have the opportunity to comfortably place your legs.

You can make a good dining table with your own hands in just a few days. According to home “masters”, even very beautiful large models took them no more than 7-10 days. You can use any material - the easiest ones to work with are chipboard, plywood and wood. The main thing is that the beams and boards are smooth and well polished.

Carefully study their dimensions and, if necessary, bring them up to standard - it is hardly advisable to make a kitchen table more than 80 cm in height. The shape and size of the countertop will depend on the interior and the availability of free space in the kitchen.

The table, although the main element of the interior in such a room, should not take up all the space. Therefore, especially in small kitchens, it is practical to make it square - you can approach from all sides, but more than four people are still unlikely to fit behind it. In large dining rooms, on the contrary, it is better to stick to the classic rectangular format.

Oval or round table top it will also look interesting, especially if you choose beautiful curly legs for it - this, however, will require good carpentry skills.
When working on a standard wooden model Attach beams or boards using strips at the bottom under the tabletop. A practical option with plywood. It is better not to use chipboard - there is always high humidity in the kitchen, and something is accidentally spilled on a regular basis, and this material, as is known, does not withstand the influence of the water elements well.
An interesting idea would be to create sliding table. In this case, the fastenings must be flexible. But you can do it easier. Still, making an extendable table with your own hands in the format of one design is a non-trivial task.

Therefore, make two small rectangular products of the same dimensions. During the day, they can be moved to different parts of the kitchen or even apartment, and before eating together, they can be moved, thereby forming a large table. Very practical option for small kitchens. When making, pay attention to the lower parts - partitions and beams should not interfere with each other when connecting tables.

If the kitchen is very small, you can do folding table. Assemble the tabletop and attach a special bracket to the wall. Such a “bureau”, as a rule, has only two legs, which means they should be placed so that at least three people. Another option is to build a small cabinet for storing dishes and food instead of one of the legs. This is an ideal way to save space.

When designing a table with a sink, it is better to seek the help of a professional. It will not be difficult to make sketches and the main elements of the structure, but the main thing is that they do not interfere with the pipes being laid under it. So you can’t do without a locksmith and a plumber.

At the final stage, it is better to process any table. How to cover it and how to decorate it is a matter of taste. You can varnish and cover it with a tablecloth, or even decorate it with special tiles or even stone. The field for experiments is large.

Many will fit into the kitchen interior color palettes, including bright ones. Don’t be afraid to make the table red, yellow or green - it’s fashionable, pleasant and aesthetically pleasing, and will create a good mood when preparing, eating and communicating with family members and guests.

And one more tip on kitchen tables. If you want to design a product with drawer, make the design of the latter as reliable and airtight as possible so that moisture does not get in there. Assemble it from several boards or slats and securely fasten them with special glue or nails. When using plywood, it should ideally not be thicker than 20mm.

High-quality grinding and processing, including against insects, is important. Remember that the kitchen, as a place for storing food and preparing food, is a favorite environment not only for cockroaches, but also for various arboreal and moisture-loving species of insects, especially in hot climates.
For computer
A computer table should be compact and functional. It's always better to design it with reserve. There are two main concepts:
- Desk for a desktop computer. If the equipment is powerful, say, gaming, you will have to make the table long and wide enough. The monitor will take up a lot of space on it. Diagonal from 20 inches and ample opportunities Screen rotations imply user mobility at the table, which means there should always be a place to put your hands. A separate measurement should be made taking into account the size of the keyboard.

The table should also accommodate other devices - a mouse, joysticks, gamepads, or even a gaming role. The system unit will also take up part of the space. It can be installed at the bottom of the table - for this you will have to make special ceilings so as not to place the equipment on the floor. The table should not be closed - high-quality cooling is very important for a powerful computer, and open space will provide the necessary air circulation.


At the same time, the design of the table is not of fundamental importance - in any case it will be filled with equipment. The main thing is to use high-quality varnish and paint so that the surface is smooth, easy to wipe and does not accumulate a lot of dust, which is dangerous for equipment.
- For laptop. When measuring, keep in mind that it must fit both the computer itself and the hands of the person working or playing at it. Often a full-fledged keyboard is also connected separately to laptop computers, so it is better to use spare material. Leave room for the mouse too.

Let us add that the shape of a computer desk can be made to almost any shape. Previously, there was an opinion that it should be rectangular, but practical experience has shown that oval tables, in particular for laptops, are a very interesting solution. If you attach wheels to them, turning them into an analogue of a coffee table, you can easily move with your computer throughout the room - show videos to friends from convenient angles or, conversely, if necessary, quickly and efficiently immerse yourself in work or correspondence away from prying eyes.

However, a table with right angles has some specific advantages. It is easier to equip it with drawers and shelves for storing books and discs. Do not forget about the reliability of fastening these structures, since the weight of a music or game collection can reach 7-10 kg.

Night table
It is better to make the night table extremely compact. Size is not his strong point, the main thing is convenience of shape. First of all, adjust the dimensions of the materials to the height of the bed. It’s better to make it level with the level of the mattress, but it’s okay if it’s lower. A high bedside table is not too impractical, although it is seen as an example in some design schools. If aesthetic qualities are more important to you, it is reasonable to experiment in this direction. In this case, you can choose any shape - from oval to rectangular and square.


The design concept should be included in the composition of the bedroom interior. For classic styles The best material to choose is wood. Moreover, in the case of retro and historical styles The more authentic it is, the better. If you have skills in artistic carving, then in this case it’s time to use them. In modern interiors, a wooden product will also be relevant - the texture, if necessary, will be hidden under varnish, paint or tablecloth. The color scheme depends on the color of the room. The color should be in harmony with the bed, bed linen, and ideally with a floor and ceiling. Radical contrasts are inappropriate here.

Special attention When working on a nightstand, you need to pay attention to its stability. The leg can be made big. If there are several of them, they should turn out absolutely identical. Please note that they not only place an alarm clock or a coffee table book on the night table, but sometimes rest it with their hands - it should be able to withstand such loads without any problems. The table can also be equipped with several drawers, or, if the level of technical skill or specific material does not allow, with an open shelf.


Coffee table
In many houses and apartments, the habit of laying out newspapers and magazines on the coffee table has already become a thing of the past. They have been replaced by new means of communication - various gadgets - from iPhone to laptop. But they also need to be placed somewhere, even if you just put them on charge. Before making such an interior item, it is better to immediately determine its functionality.

The main thing is to understand one simple truth: no one works behind magazine “bureaus” - at best they work part-time, so they should be low, aesthetically pleasing and comfortable for a relaxed pastime. And it is aesthetics that comes first. Your guests will remember, first of all, the design and material of the table. Another point is functionality. It would be good if such a table had space under the tabletop where you could put something.

So, it is better to take chipboard or boards as materials. They should be assembled on dowels with extreme, maximum precision - so that the joints of the elements are not visible.
An additional cross member will make the table more stable and reliable. If the structure contains metal (legs), a welding machine will be required. A rectangular metal element can be placed in the base. Don't forget to reinforce the sides in the same way. A very common option is glass (or transparent glue). Such tables are often found in offices, waiting rooms and other “guest” facilities. However, as the experience of many designers shows, it fits well into home interiors.

When making it, it is important to pay attention to the wooden or metal base - it will be visible under the glass! Cross-shaped shapes work well. Don't forget that glass can also be used simply as an additional component. For example, cover part of a classic wooden table with it. It is advisable to equip the resulting already light interior object with wheels. Such a “mini-transport” will be especially relevant in a large living room, as well as in an apartment where there are always a lot of children (then, however, you should not experiment with glass again). This is good and useful item for fun and relaxation.

But the mobile table should be light. Massive - it is better not to equip it with this “bonus”, but to make it from durable, heavy dimensional boards. It will ground the interior and make it more collected.
There is also an option with a transforming table. It is practical, but not always aesthetic. However, if you make a double (in height) base, then it can even be used as a conditional easel. Let's add that coffee tables, as a rule, are still small and are usually designed for one, maximum, four people. The selection of sizes is purely individual. The only thing that matters is the height - it can be varied from 40 to 60-80 cm. Do not forget also that in some situations the product can also be used as a bookcase - for this you will need to make shelves and compartments that meet your needs.

In terms of color, contrast between the tabletop and legs is acceptable. The combination of metal and wood looks good. You can apply a drawing or make an unusual ornament on the surface, but it’s easier to just cover it with something - you won’t have to repaint the products every time your mood and taste change. And one more thing about the form. Magazine furniture can be either round or rectangular-square - a matter of taste. Round products are used somewhat more often because they are safer and more affordable.

King Arthur's knights, after all, also sat behind round table, therefore, in the living room, a place for receiving and gathering guests, each of whom often wants to show their individuality and initiative, it is better to do without places at the head of the table and other patriarchal delights, and it is safer for children - they will not hit again.

Garden furniture
A holiday in nature is a wonderful pastime, however, in order to really have a good rest and sit in company, you need high-quality and comfortable table. This type of furniture is very specific. On the one hand, it must withstand high humidity - if it is standing outdoors in the rain, on the other - it is very unpretentious in terms of aesthetic qualities and always gravitates towards naturalness. In nature, a glass table or an expensive metal product would be inappropriate.

So, before you start making such furniture, you need to decide important point: where it will stand and how mobile it should be. There are essentially two options:
- Fixed outdoor table. Usually such structures are placed near garden house or at a distance from it in comfortable places for rest - under an apple tree or other fruit tree. The main thing is that such an exterior item should be durable and reliable, standing on its “legs” as firmly as possible. In some cases, it is reasonable to even dig the legs into the ground. The surface can be any, but preferably wood.

The main thing is to remove lint and shavings from it, as they can lead to unpleasant and deep injuries or just splinters. Please note that the surface must be moisture resistant - the table will regularly get wet in the rain. In cases of heavy rainfall or simply a long absence from the dacha, it is better to cover it with something, say, oilcloth. This will not save you from high humidity, but will protect you from direct contact with water.

- Movable table in a country house. Typically it is more compact version. It can be used indoors, taken out onto the veranda or open air. When making it yourself, it is better to focus on using lightweight materials so that it can be transported.

Wheels are unlikely to help much (the landscape at the dacha is not always level), although they can also be attached, but this will make the structure less stable. A good bonus will be the ability to extend or assemble the table. For the winter season, such a table can be completely folded and stored in the attic so that it does not deteriorate.


What is the best material to make a garden table from? Pallets, boards, old logs, for example, from an already unnecessary or dilapidated fence, partitions from boxes, may be useful. old tire, whatever. It is better not to use glass and not to abuse metal. The latter tends to rust: this is not so terrible, but aesthetically it can ruin the entire natural harmony, unless, of course, there is a desire to create a post-apocalyptic ambience.

It is better to fasten boards for tabletops in the countryside from below using planks. There is another option with gluing - this is a more time-consuming technology; after processing, you will need to pull the boards together and keep them in this state for about a day. If the material is old, it is better to arrange it according to color, align it stylistically according to color.

Light - to light, dark - to dark, with interweaving color contrasts closer to the center. Don't strive for perfection with constant alignments - naturalness should not be symmetrical. The next step is to sand the surface. It is better to do this with sandpaper.

When working with legs, the main thing is to make them the same length - otherwise eating at such a table will not be pleasant. It is important that their surfaces are not beveled, but smooth. However, if you dig your legs into the ground and don’t have a saw at hand, you can always compensate for a couple of centimeters, but only as a last resort.

Then, after designing the structure, the tabletop needs to be varnished. After the first time, lint will probably stand up, so we process it twice. For reliability, an additional support-mount can be made in the lower part at the final stage. It will make the structure more stable and allow you to position your legs comfortably.

To continue the work, you can also attach benches to the table - making them part of a single structure. It is better to connect the bench with the table using special wooden planks using nails or long pins. For reliability, you will also need washers and nuts. The seats themselves are made according to a similar principle, only their height, naturally, is lower than the table, and the fastenings should be even more reliable - it is better to make cross-shaped ones.

The final stage is painting. Gray, brown, and natural tones look good. Bright colors look too eclectic, unless you have a modern country house design, and instead of trees there is artificial vegetation.

And a few more words about sizes. As a rule, country tables are long, but not too wide - this makes it easier and more convenient to approach them. Do not install them too close to bushes, especially thorny ones, gooseberries or cherries; approaching them will be painful.

The distance from the fruit trees must also be reasonable, otherwise Newton’s experiment can be repeated, but it will fail. The height of country tables, as a rule, is medium, since both adults and children usually sit at them. So, with built-in seats, it is better not to over-inflate the design.
How to organize lighting
This question is relevant both for small night tables and for work products on which a computer is installed. You can put a small floor lamp on the night “bureau”; it would be reasonable to extend the wire with the switch to the bed, so that every time you don’t reach for the table and drop the lamp in the dark. On the desktop it is also reasonable to use a table lamp, but since we are experimenting with homemade structures, other more interesting opportunities appear.

If you make a small “superstructure” over the table from several panels - plywood and chipboard, and securely attach them with nails, then under them you can install a regular light bulb, or better yet, an LED. It will be more effective to use two or three small point LEDs. They will provide high-quality and uniform lighting.

A child who studies at a table, and an adult while working, will be able to read at any time without any problems. To work at a computer (so that the light does not shade the screen), it will be possible to turn on only one point of lighting, which can reasonably be placed a little to the side - it will become a source of dim light.

Among modern design concepts, there are also options for lighting tables from below, through the structure of the tabletop, but you can cope with such a difficult task on your own “ terms of reference“It will be problematic without a qualified electrician, and the practical benefits of such structures leave much to be desired.

The choice of light temperature for almost any table design is purely individual and depends rather on the place of use. In classic small bedrooms, warm color combinations will be relevant.

On the contrary, cool shades will fit more harmoniously into the kitchen interior. A lot depends on the style. High-tech, for example, is often designed specifically for cool colors. Accents in classics, colonial style and some loft variations, on the contrary, are better placed on the warm segment.

Forms
The table can be made absolutely anything, completely carved, but the design has already developed several classic and practical shape ideas. Among them:
- Rectangular. These tables were popular in almost all historical eras. In Russia, boyars gathered behind them, they served as a place for peasants to eat in huts and the basis of tavern life.

IN Soviet time they were slightly replaced by other shapes - square, designed to minimize the living space as such. Nowadays, rectangular tables are no longer associated with the ideas of dominance and patriarchy, but have retained their immanent massiveness and hardness. More often used in large rooms. Suitable for a cottage, living room, spacious kitchen.

- Square. Products of this shape allow you to perfectly organize space. Their use is reasonable and economical. In addition, there is always the opportunity to move such tables. Often there are folding models that turn from square to rectangular.

Making such a product yourself is not easy. However, you can simply make two identical tables. Let us clarify that in terms of the homemade approach, it is square and rectangular tables that are suitable for “testing the pen” of novice craftsmen. And it’s easy to make, and the field for experimentation is wide.
- Rounded. A round or oval piece of furniture is suitable as a coffee table or night table. This perfect shape for apartments where families with children live, as it avoids unpleasant collisions with sharp corners. Technically, making them is more difficult, but the most unexpected objects can always come to the rescue, for example, car tires.

- Designer forms. The edges of tables do not have to be smooth. Sometimes they are made curved. Products can be rounded on one side, having right angles on the other. Triangular models are becoming increasingly common.

For example, in the kitchen a table that is rectangular in relation to the seating and rounded towards the sink and cabinets will look advantageous. Guests will be able to sit comfortably, and the hostess or host, while treating them, will not constantly bump into corners. Naturally, the production of such models will require higher technical skills. The main difficulty will be how to cut out the appropriate shape. This also imposes some restrictions on the materials used - beams, boards and logs are technically inapplicable in many such structures.

How to make from scrap materials
Sometimes it is difficult to restrain fantasy, then very interesting options improvised “offices” that can be used both outdoors and in modern high-tech interiors and not only - even at work. It is not difficult, for example, to make a table from a car wheel, or rather a tire. Attach chipboard to it on one side - slightly smaller than the radius, and on the other - legs. Can be decorated side surfaces and a lid of your choice.

If you pull the table with fibers or ropes, you will also get an ottoman - two in one. To create more effective fastenings, stock up liquid nails. The lid of such furniture can be made removable and subsequently stored in the “wheel” whatever your heart desires. With the right approach, such a hiding place will even become a mini-safe, where it will be possible to protect things at least from children, and not every unlucky thief who breaks into your home will guess such a little trick.

No one is stopping you from collecting useful design and old boxes: you’ll get a kind of interesting labyrinth table. However, you need to be very careful here - many craftsmen who posted their creations from boxes on the Internet ended up with something more reminiscent of an urn. To avoid this, do not leave too much free space in the center of the structure.

Another, perhaps even more extreme option is to design a table based on an old suitcase. Such Soviet colossuses are waiting for the hour of their disposal on many balconies of the country, and perhaps now their finest hour has come. Just don’t literally rely on exceptional Soviet quality - it’s better to strengthen the product with sheets of, say, plywood. You will also need legs and wheels.

Disinfect the product before starting work. At the final stage, it can be varnished, painted or covered with fabric. This option is suitable for colonial and various retro styles, and in general it will look at least original in any room. Old frames can also be used usefully when working on a table - the main thing is to strengthen them well. With adequate design, you can achieve all the benefits of the pop art style effect.

A table made of pallets in a loft style will decorate almost any interior of a modern living room. You can also make an interior object from pallets, from an old window sill or tabletop (with an antique effect), from ceramic tiles, professional pipes. A table made from a profile or water pipe is actually a fashionable idea. And in general, almost anything is suitable for creating creative furniture: from old chests and barrels to mirrors, rolls of wallpaper and batteries - the main thing is to trust your imagination, sense of style and technical skills in working with materials and tools.

Beautiful interior placement ideas
And finally, let's look at a few interesting examples homemade tables in various interiors. Let's start with the dacha. A large table made of varnished boards will fit well at a distance of several meters from the plantings. A light or dark brown color will harmonize perfectly with greenery. We divide the tabletop into five parts along the narrow part (according to the number of boards). By fastening them from below, we will maintain the effect of naturalness and naturalness.

The table will also be secured at the bottom by two floors, on which it will be convenient to place your feet. The benches are also attached to the table (consisting of three boards each). The advantageous design is emphasized by additional neat carvings on the sides. As a result, we have before us almost an example of the pre-revolutionary tsarist Russian style of the mid-19th century, or even modernism (depending on how you look at it).

It was in this setting that connoisseurs of rural idyll greeted guests at the beginning of the 20th century, organized creative meetings, exhibitions and even theatrical performances. This table does not look old-fashioned; it seems to continue the interior of a classic country house, where there is at least glass and metal.

Another example. River table for the living room. The easiest way to make a transformer with your own hands is to make an imitation of it, that is, do not use a plug-in structure in your work, but paint the product accordingly. In essence, this is a classic wooden table with a textured surface that will sit well next to a sofa or armchairs.

It is better to choose the color depending on the style of the room. Light wood will harmonize with light light colors and vice versa. The painted part (blue or its shades) should be in harmony with the chandelier or ceiling. Low vases with flowers or herbs will look beautiful on such a table. How simpler design such a table, the better - it can be used both as a coffee table and as a dining table.

The next idea is for the corner computer table, - also quite realistic for doing it yourself. We will make the corner parts rectangular, and the one protruding towards us will be of an arbitrary, but wide and comfortable shape, so that you can put your hands on it and place the keyboard. The materials we use are plywood or chipboard.

Ordinary wood will also work, as will old countertops, but working with the form in this case will be somewhat more difficult. If you still choose a “difficult” material, pay attention to varnishing and painting; it is better to pay special attention to these stages of work.

Colors we use homogeneous ones without overusing light shades. In our example, the table will be brown. However, to perfect the design idea, you should harmonize the color of the table with the color of the monitor, keyboard and system unit.

Among night tables, a two-level option would be practical and easy to manufacture. It’s easier to make it rectangular, but if your skills allow, it’s better to make it round. The lower overlap is placed at a level of 10-15 cm from the floor, the upper - at the height of the mattress.

For a bedroom decorated in dark colors, a soft dark texture is suitable. The table can even be painted black. It will thus become a focal point of color in the room, giving additional contrast to the bed and floor. Nice visual effect appears if you place a decanter of water and a glass on it.

AND last example– a compact small night bureau with two drawers. In this case, we will select dark colors. The wood will need to be well processed and varnished. The design of the drawers is as simple as possible.
The dining table is important element kitchen interior. The design and dimensions of the kitchen table should allow the entire family to be seated at it, but at the same time not interfere with free movement. Available for sale big choice kitchen tables of various shapes, from domestic and foreign manufacturers. But if you have a little skill carpentry, then perhaps it makes sense to make a table with your own hands, with own design, which fits perfectly into general interior kitchens.
In our article we will tell you: how to make kitchen tables different models what tools and materials to use for this. Also at the end of the article, you can see unusual models of kitchen tables.
Tools
Despite the variety of table models and production methods, the set of tools used for making tools, with minor exceptions, remains the same:
- Electric jigsaw.
- Hacksaw.
- Drill.
- Screwdriver.
- Set of drills.
- Screwdriver Set.
- Electric planer.
- Electric planer.
- Sander.
- A set of hexagons (in cases of using confirmations).
- Iron or heat gun (for edging the ends with tape).
- Yardstick.
- Pencil.
- Ruler.

Depending on the complexity of the table design, additional tools are included in the set.
Materials for production
The following materials can be used to make a kitchen table:
- Chipboard – Chipboard.
- LDSP – Laminated chipboard.
- Glued board.
- Regular edged board.
- Wooden beam.
Often in the production of kitchen tables, a combination of two or more of the above materials is used. 
Accessories
Kitchen table fittings include the following fastening and decorative elements:
- Furniture corners.
- Confirmations.
- Eccentric bolts.
- Hinges for folding tables.
- Rollers for sliding tables.
- Corner leg mounts.
- Legs-overlays for tables made of chipboard.
- Plastic profile for table top.
- Trimming adhesive tape.
- Decorative plugs.

Certain table models may include additional fittings not included in the list.
Table options and methods for making them
Simple kitchen table made of chipboard
Marking
On the purchased laminated chipboard sheets, mark the parts of the table:
- First of all, mark the tabletop, since it is the largest element of the table. The tabletop is made in the shape of a rectangle with rounded corners.
- In the second step, draw two side posts that will serve as the legs of the table. The stands are usually made in the shape of a chess rook, with a round cutout at the bottom. But you can show your imagination and make racks of a different shape, the main thing is to comply with two conditions: the racks must be stable and not crawl out from under the tabletop.
- Finally, mark the upper and lower crossbars that connect the racks to each other and increase the stability of the table and the strength of the table top. Please note that the lower crossbar is made 1.5-2 times wider than the upper one. The shape of the bottom crossbar can be either flat or wavy.
When making markings, take into account the fact that the table posts should be located 15-20 centimeters from the edge of the tabletop. 
Cutting out table pieces
- Place a sheet of chipboard on the table.
- Using a jigsaw, cut out the tabletop. When cutting, do not forget to place an unnecessary piece of plywood under the cut line, this will help avoid chipping on the back side cut.
- Cut out the rest of the table. Avoid sagging of the sheet, this can lead to the clamping of the jigsaw saw, as well as to the breakage of the cut part.
- Sand the edges of the cut parts with sandpaper or an oscillating sander.

Trimming the edges of parts with tape and profile
- Place the plastic profile on the edge of the tabletop.
- Having reached the corner bend, warm up the profile construction hairdryer and rotate the profile.
- For a more secure installation plastic profile on the countertop, you can additionally use universal glue.
At the second stage, you will need to trim the racks and crossbars of the table with a special tape:
- Clean the ends of the parts from dust and grease.
- Pressing the tape with a hot iron, glue it to the end of the part.
- Cut off the excess with a knife, matching the width of the tape with the width of the end. Smooth out any unevenness with sandpaper, being careful not to scratch the tape or the part.
- Apply tape to the ends of the remaining parts.

Please note that gluing the trim tape is only required in visible places on the table parts.
Table assembly
- Using confirmations, connect the floor racks with the upper and lower crossbars. The location of the top crossbar should allow it to support the tabletop and prevent it from sagging. The lower crossbar is attached above the round cutouts of the racks, 20-25 centimeters from the floor.
- Having made the base of the table, install the tabletop on it, securing it to the furniture corners from the inside.
- Install plastic pad feet on the bottom of the table posts.
- Close the heads of the confirmations with decorative plugs.
A simple kitchen table made of chipboard is ready! 
You can also watch how to make a table from chipboard in the video:
Kitchen table "book"
The “book” table consists of the following parts:
- The base is made of posts and crossbars.
- Narrow main table top.
- Pairs of movable legs-stands.
- Two opening side tables.
- Piano and regular hinges.
- Fastening elements.
A table of this design can be made from laminated chipboard, or from glued and edged timber. Also, metal parts are used to make the base.
Let's look at the process of making a table from laminated veneer lumber.

Manufacturing of tabletops and stands
In order to make a tabletop from bars glued together, you need to have at least two racks with clamps on which you will form the tabletops. Stands and tabletops for a table made of laminated veneer lumber are made in the following way:
- Take several bars with a cross-section of 50x30 millimeters and place them on racks with clamps. Place the bars in such a way that the annual rings on adjacent bars face in different directions, this will avoid bending of the part during subsequent use.
- Form a shield from the bars, slightly larger in size than the future tabletop.
- Coat the ends of the bars with PVA glue.
- Clamp the shield with clamps. Avoid squeezing too hard, otherwise the shield will bend.
- Leave the glued bars for a day for the glue to dry completely.
- After 24 hours, remove the shield from the clamps and treat the surface planer or using an electric planer.
- Cut the shield to the required size and finish the edges with a plane or hand router.
- Thus, you need to make two table posts, two crossbars, one narrow and two wide side tabletops.
 Bars clamped with clamps
 Making retractable legs
Retractable legs for the “book” table are made in the shape of frames, where the lower crossbar is located 15-20 centimeters from the floor. To make a frame, you will need four bars with a cross section of 50x25 millimeters. The connection of the bars can be made using long screws, tenons and glue or confirmats.
Assembling the book table
- Assemble the table base by connecting the posts and crossbars.
- Attach a narrow tabletop to the base.
- Attach retractable legs to the table posts using hinges.
- Attach to narrow tabletop side ones, attaching them to the piano canopies.
- Install the pad feet on the racks.
- Check the operation of all moving parts of the table by unfolding it completely.
 Table-book
 Varnishing the table
To highlight the beauty of the tree, cover ready table clear varnish, if desired, pre-treating its surface with stain. To achieve a polished effect, you will need to apply several layers of varnish. 
How to make a “book” table, watch the video:
Extendable kitchen table
The sliding table has the function of increasing the surface of the tabletop by installing additional elements. This type of table is popular in small apartments, where the area of the home does not allow installing an ordinary large table.
An extendable table is made from the following parts:
- Two main countertops.
- Additional collapsible table top.
- Bases with tray.
- Four legs.
- Corner mounts for legs.
- Rollers for table tops.
- Hooks for fixing tabletops.
- Spikes of clamps.
It is best to make an extendable table from a combination of chipboard and bars.
 Accessories for extendable table
 Manufacturing of countertops
- From a sheet of laminated chipboard, cut out two tabletops of the same size, which will form the main surface of the table.
- Cut out an additional tabletop. The width of the additional tabletop should not exceed a third of the total area of the table, otherwise the table will not be stable in the extended position.
- Apply edge tape to the edges of the tabletops.

Making the base of an extendable table
The base for the sliding table is made of four narrow crossbars connected to each other corner fastenings for legs and tray. To lighten the overall weight of the table, instead of laminated chipboard, you can use plywood 5 millimeters thick for the pallet. Also, instead of a pallet, manufacturers often use metal or wooden crossbars, which strengthen the structure and serve as storage for the middle tabletop.
Making table legs
The legs for the sliding table are made from four bars with a cross-section of approximately 50x50 millimeters, slightly beveled towards the bottom. A hole is made at the top of each leg for a mounting screw. The hole should be located on the inside. Don't forget to sand the legs with a plane and sandpaper.
Assembling an extendable table
- Install the sliding tabletops onto the base, attaching them to the roller mounts.
- Extend the tabletops and install a removable tabletop. To properly fix the additional tabletop on the base, install spikes on it, which will connect all parts of the table together.
- To prevent the tabletops from coming apart when the table is assembled, install locks in the form of hooks on them.
- Attach the legs to the base.
- Varnish or paint the tray and legs.

Instructions for assembling the sliding table are also in the video:
Folding wall table
If you have a very small kitchen and there is no way to install a regular kitchen table, then making a folding wall table can be a solution to the problem. Its advantage is that when folded it takes up only 15-20 centimeters of kitchen space, and when disassembled it can easily accommodate two or three people for lunch.
The folding table consists of three parts:
- Countertops.
- T-shaped wall mount.
- Triangular folding stand
You can make a table from plywood, bars, hinges and screws.
 Wall Table Parts
 Making a wall table
- Use a plywood jigsaw to cut out the tabletop.
- From bars with a cross-section of 100x20 millimeters, make a wall mount in the shape of the letter T. The upper mount bar should correspond to the width of the tabletop, and the lower one to the height of the triangular stand.
- Make a triangular stand that hinges to support the tabletop in the open position.
- Install the mount to the wall using dowel screws.
- Attach the table top to the top mounting bar. Use hinges or piano canopies to connect.
- Install the triangular stand.
- Check the operation of all parts of the table by disassembling and reassembling it several times.
- Cover the table with varnish or paint.
If you have a tabletop, but you don’t want to make parts for a folding table by hand, then purchase folding brackets from the store. Bracket models are specially designed for wall mounting and are very inexpensive, ranging from 170 to 700 rubles.
 Wall bracket for table
 You can see another version of the kitchen table in the video:
Design and shapes of kitchen tables
To help you choose a kitchen table, we present you with photographs of the original models:

- Rustic laminated wood kitchen table.

- A “tansformer” table on one leg of complex design.

- Extendable table with a pattern on the tabletops.
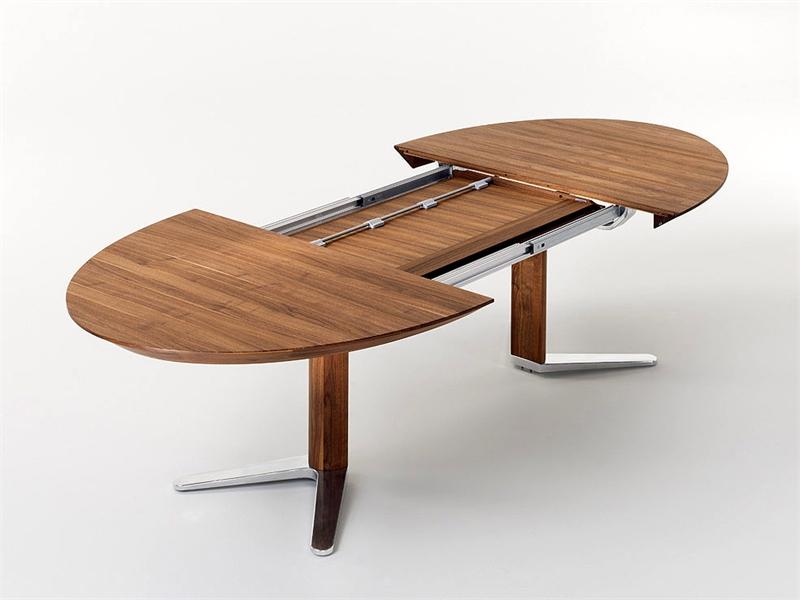
- Table made of laminated boards with rounded tops, in high-tech style.

- Round table with original legs.

- Massive kitchen table made of timber.

- Original table made of laminated veneer lumber.

- A beautiful board table with a very simple design.

- with internal electric lighting.
Now that you know everything about making tables, it won’t be difficult for you to make your own table for the kitchen!