Polyurethane foam is used everywhere, especially when installing windows. It's convenient and practical material however, it requires protection from sun rays and moisture. That is why the question often arises - how to cover the polyurethane foam on the outside of the window? Exists big choice materials that you need to try to understand.
Why does the foam need to be covered?
What if you need to finish the slopes from the inside?
For interior works the same technologies can be used, however, in addition to plastic and plaster, you can also use: it will hide the foam from the eyes, it can be painted or covered with wallpaper. The only disadvantage of the material is that it is susceptible to moisture, so it cannot be used outdoors. Drywall is easily attached using self-tapping screws or dowels, helps create a perfectly flat surface, and is inexpensive. After the panels are installed, they must be coated with a primer for better adhesion to the future finishing.

Installation of plasterboard slopes inside a building
Drywall lends itself well to any treatment, but first it is advisable to putty all the cracks and screw heads.
Please note that to install the panels you will need wood profile. If you have smooth walls, you don’t have to use the sheathing. It is enough to glue the panels with special glue. This greatly simplifies the installation task.
There are quite a lot of options for how to seal polyurethane foam on windows from the street. We have illustrated the most accessible and cheapest of them; using these tips, anyone without builder skills can close the foam on the windows.
Through plastic windows About 25% of the heat in the house is lost. Have you thought about this? It is impossible to refuse them, so you need to minimize losses. Gaps in plastic windows are an unacceptable luxury. Why do they appear and how to fix them? This is what we will talk about in this article.
If you do not have time to study the issue yourself, then you can always turn to the specialists of the Teplo Doma company for help. We repair and service windows and are ready to solve your problem. Contact a consultant.
Where do the cracks come from?
Why did a gap appear in the frame of a plastic window? Is it blowing from under the windowsill? Is the sash loose? It all depends on what kind of cracks we are talking about. If this applies specifically to plastic windows, then there are two most important and common reasons:
- Installation errors.
- Broken or incorrectly adjusted.
The first reason for the appearance of cracks is improper installation.
If the window was installed by unreliable craftsmen, then there is a high probability that the joints were pressed incorrectly, and then also insufficiently protected. As a result, thin layers of foam peeled away, deteriorated under the influence of UV, and the window began to blow. Or, for example, quite often installers do not blow out the space under the window sill. As a result, it blows from under it.
How to eliminate cracks in plastic windows if they appear between the frame and the slope. You can try to cover them with putty, but most likely they will appear again. The window was installed incorrectly and as a result it moves and cracks form. What to do? Contact the Teplo Doma company specialists right now. They will help.
The second reason is incorrect adjustment or the window requires repair.
Many people forget that cracks can form due to improper adjustment or, for example, worn out sealing gum. For example, the sash may become skewed, creating a gap through which it will leak. If the seal fails, then again, the sash will not be able to fit tightly to the frame, and a gap will form from which it will blow. You can read more about why it blows from the window. Help Wanted? Gaps in plastic windows, do you need to adjust the fittings? Call us.
How do you seal cracks in plastic windows?
Installation errors result in a large number of problems. To avoid them, you should initially contact experienced specialists.
Why did a gap appear between the frame and the slope?? Most likely, the foam layer was not adequately protected. What to do? To solve the problem.
- Remove the old foam layer.
- Clean the gap thoroughly.
- Blow out new foam.
- Wait until it dries.
- Trim off the excess.
- Caulk the joints.
- Paint it.
- Additionally, seal the cracks with acrylic frost-resistant sealant.
This is about the question of how to cover up the cracks in plastic windows from the outside. Of course, if you have no experience repair work, then it is better to seek help from specialists.


What sealant should I use to seal cracks in plastic windows? You can use acrylic, bitumen or polyurethane sealant. The main thing is not to use silicone sealant; under the influence of temperatures it can roll up and become unusable.
To get rid of cracks forever, you should equip your plastic windows external slopes made of plastic.
How to get rid of gaps between the frame and the sash? This will require correct timely adjustment, as well as replacement of the sealing rubber.
How to cover cracks in plastic windows inside? If the problem has already manifested itself, then the easiest way to fix it is with a sealant. There are special sealants for windows and doors. This is what you should use.
Window repair in Moscow
If your windows require repairs, then you can always turn to the Teplo Doma company for help. Our specialists will identify the problem and quickly solve it. You can also do everything yourself, but for this you will need certain knowledge, tools and materials. We already have all this. Contact a specialist and tell us about the problem you are experiencing.
As a rule, replacing any windows leads to the destruction of the adjacent section of the wall. The question arises: what should be done to make the window structure look beautiful and reliably protect from noise, wind and other troubles of the street? The answer is simple: in this case, repair work cannot be avoided. Exist various options sealing slopes, but to choose the right option, it is necessary to consider them in more detail.
About slopes
Sections of the wall adjacent to window block, are called slopes. They are internal and external. Strict requirements apply to internal areas.
The following functions are assigned to the slopes:
- giving the window structure an aesthetic and attractive appearance. Can you imagine quality window, which is docked with a broken wall;
- improvement of sound and thermal insulation. Window designs those that do not have high-quality slopes do not have sufficient tightness;
- protection of mounting elements and seams from impact environment. A high-quality slope not only protects fasteners from corrosion, but also reduces the likelihood of windows fogging and freezing.
Thus, slope repair is a list of works aimed not only at restoring damaged sections of the wall, but also at creating additional insulation.
Basically, one of the following repair options is selected:
For any repair of slopes, first of all, high-quality surface preparation is necessary.
Preparing the window opening
Restoration of slopes begins after their surface has been prepared. Preparation is performed in the following sequence:

In order not to destroy the restored slopes, the window sill is installed before the repair begins.
To protect against dirt and broken elements, the window and window sill are protected with paper or polyethylene. It also wouldn’t hurt to protect the window handle and battery under the windowsill.

The protective film on the window is removed only after all work is completed.
- The surfaces of the slopes are thoroughly cleaned. Large dangling fragments are attached to the mortar.

Plastering slopes
This option for repairing slopes is low cost. For sealing it is enough to have: finishing mixture, a set simple tools and water-based paint.
This option also has disadvantages:
- To obtain a very smooth surface, you need to put in a lot of effort and spend a lot of time. An experienced installer performs this work much faster;
- Cracks often appear after plastering. This may be due to a single-layer surface coating, when a thick layer slides down. In addition, cracks appear due to changes in humidity or poor quality of the mixture;
- low thermal insulation window designs;
- lack of adhesion to the plastic from which the window is made.
It is believed that plaster looks more aesthetically pleasing for internal slopes than plastic and drywall.
Plastering begins with the right choice and preparing the mixture. In this case, it is necessary to take into account the location of the slope.
- External slopes - located in special conditions: precipitation, wind, temperature fluctuations. It is recommended to use cement and heat-insulating mixtures with a water-repellent effect. This can be Knauf products or a regular mixture of cement and sand.
- Internal slopes must have an aesthetic appearance. To ensure a smooth surface, use gypsum mixtures. Very common starting and finishing putties company "Ceresit".
In any option, the drying time of the solution is taken into account, since further work decoration continues after it dries.
1. Do not dilute a large amount of solution. This is due to savings - the unused solution dries quickly.
2. The solution is applied in several layers. The next layer is laid after the previous one has dried.
The repair sequence is as follows:

Covering slopes with plastic
As noted earlier, plastic is in demand due to easy installation and low cost. Besides this, there are other advantages:
- The material goes well with the window profile. The slope and profile have the same expansion, so there is no tension between them;
- are saved performance up to 20 years;
- withstands temperature changes;
- There is protective layer, which does not burn or melt;
- easy care. Dust and dirt are removed with a damp cloth.
The following sequence is selected for work:

Sandwich paneling

When choosing this option, please note that minimum thickness panels 20 mm.
Without auxiliary profiles the slope is sewn up within a few hours. The order of plating is as follows:
- The panels are cut to fit the dimensions of the slope.
- “Liquid nails” are applied to the panel and it is pressed tightly against the surface of the slope.
- The gaps between the frame and the panels are sealed.
- WITH outside The corners are installed with glue.
Lining and sandwich panels cannot be repaired. As a rule, they change when damaged. In this case great importance has a choice of shade, as it differs in different batches of material.
Drywall installation
A sheet of drywall is construction material, in which gypsum is placed between layers of cardboard. An indispensable material for hiding various defects walls, so it is recommended for slopes.
Its advantages include:
- wide range of uses. Suitable for all types of windows;
- can be used to finish slopes of any size;
- low price;
- quick installation;
- environmental Safety;
- painted in different colors.
There are also disadvantages:
- low strength. Any mechanical impact leaves traces;
- destruction at high humidity;
- rapid wear, requiring additional painting;
- inconvenient installation. When cutting you must use protective equipment, since gypsum dust is harmful to health.
Important!
1. Drywall is the base that requires finishing.
2. It is better to choose a moisture-resistant version of the material that is not afraid of condensation on the windows.
There are several ways to cover slopes with plasterboard, but the simplest is considered to be the following installation using putty.
- The slope is measured from the wall to the frame. If the wall is uneven, then it is necessary to take measurements in several places.
- The measurements are transferred to the drywall. For convenience, a pattern is made.
- The future slope is cut out of the sheet. The material is cut with a knife or sawn.
- Putty is applied along the edges and in the center of the workpiece.
- The workpiece is pressed tightly against the slope, and a spacer is installed. It takes a day for good adhesion.
- Very often, aluminum corners are installed to align corners.
- The surface of the slope is puttied and, after drying, treated with sandpaper.
- The cladding is completed with two layers of painting. At the same time, the window profile and window sill are protected masking tape.
In general, everyone independently chooses the method of repairing slopes. If the technology of the work is not violated, then it will be beautiful and reliable.
Wooden windows are environmentally friendly structures; they create a comfortable indoor microclimate. For these qualities, many do not want to part with them. But over time, the tightness of the frame decreases and the window becomes a conductor of cold and drafts.
The problem can be solved different ways. How to seal a window for the winter and insulate the gaps between the frame, frame and slopes depends on how durable the repair should be and how much time and money you are willing to spend on it. Both the old methods of insulation that our grandmothers used and the modern ones produced using technological materials are effective to varying degrees.
Looking for the cause of cold windows
To ensure that insulation work is not in vain, it is necessary to correctly determine weakness windows that let in cold air. The reason may lie in different parts of the structure:
- Slopes (deteriorated or missing insulation);
- Window sill (cracks or bridges of cold may form in its lower part, which, at first glance, are invisible);
- Glass (blowing occurs at the junction of the glass and the frame; the putty that covers the joint deteriorates over several seasons and requires regular updating);
- Frame and sashes (shrinkage of wood, subsidence of sashes, movement of soil under the house - all these circumstances lead to the formation of gaps between the frame and the window frame).
If visual inspection It was not possible to identify the cause, you can use some tricks. For example, wet your hand with water and bring it to different parts window. An even more sensitive method is a lit candle or lighter. The flame reacts to any air vibrations, which will indicate places of heat loss.
A very old window requires an integrated approach. To achieve good thermal insulation, you need to eliminate all possible cold bridges. Structures in good condition need to be insulated around the perimeter of the frame and opening sashes using any available method.
How to seal cracks
The most common problem that owners of houses with wooden windows face is the appearance of gaps between parts of the structure. They are formed as a result of changes in the geometry of the window and window opening. In some cases, it is enough to adjust the position of the sashes by tightening the fastening hinges. But most often the cracks have to be sealed. You can use a lot of available and specialized materials for this purpose.
Paper
It is made from cellulose fibers good insulation. You can make it yourself from toilet paper or newspapers. To do this, you need to shred the paper and fill it with water. When the mass softens, you need to remove it and squeeze it well. To make the putty more durable, add the same amount of clay and twice as much crushed chalk to the cellulose.
 Sealing a window with paper is one of the most simple ways insulate the house for the winter
 The mixture should be used immediately for its intended purpose. You can put it inside the cracks in any way convenient tool, for example, with a knife or a strong ruler. It is advisable to seal the sealed cracks with masking tape, soapy paper or cloth.
In this way, you can insulate your windows throughout the winter. But removing the composition from the cracks and frame will not be easy, and there will be traces on the surface that can only be removed by painting.
cotton wool
This method of insulating wooden windows for the winter with cotton wool is perhaps the fastest and cheapest. You need to tear off pieces of cotton wool and place them tightly into the gaps in the window structure. It is recommended to use a screwdriver or knife to seal small cracks.
 Cotton wool is the cheapest, but also the most short-lived insulation
 The advantage of this method is that the cotton wool can be easily removed in the spring, without losing the appearance of the window. Insulation will be effective within one season, since the wool cakes and compacts over time and under the influence of moisture, so the cracks will have to be filled annually.
Foam rubber
Insulation of old wooden windows can be done using ordinary pieces of foam rubber or special foam rubber tape with an adhesive backing. Due to the many air chambers in the pores, this material provides good thermal insulation, but does not save you from street noise.
 Thermal insulation of windows using foam rubber
 Pieces of foam rubber can be hammered into the cracks between the frame and the frame or laid around the perimeter of the working sash and closed tightly. If necessary, the insulation is very easy to remove.
 Laying adhesive foam tape around the perimeter window frame
 To apply adhesive tape around the perimeter of the window, you will need to remove the frame from the box. If the gaps are large, then apply foam tape You can apply several layers until a tight fit is achieved. The sashes are insulated in the same way. The disadvantage of this method is that when removing the tape, traces of glue may remain on the frame or pieces of paint may come off.
Rubber compressor
An adhesive tape made of rubber or polyurethane can last for many years. And you can insulate a window with it very quickly. The only drawback is that you will need to spend money on purchasing the tape.
The insulation has the shape of a tube with a cavity inside - this ensures that its shape is maintained even if the sash is actively used. There is no need to seal the cracks - this is also a plus.
 Thermal insulation of windows Swedish technology– fast and reliable method insulation, but not cheap
 Similar materials are used to insulate wooden windows using Swedish technology. But before installing the tape, recesses are made around the perimeter of the frame and sashes, into which the insulation is then inserted.
How to reduce heat loss through glass
Even double glazed windows metal-plastic windows in winter it is always cold. The main heat loss occurs through this part of the structure. In the case of wooden windows, the situation is especially difficult - the glass is simply inserted into the groove and does not fit tightly.
Putty
This method of insulating windows partially solves the problem of glass fitting to the frame. But it lasts for 1-2 seasons. After which the procedure must be repeated.
 The putty ensures a tight fit of the glass to the frame
 For sealing, special window putty or plasticine is suitable.. These materials are equally flexible and adhere well to wood and glass. They are applied from the outside of the window to the joint between the glass and the frame. Before use, a small piece of material should be kneaded and the gap should be covered with an even layer, pressing slightly. The key disadvantage of the method is the destruction of the putty upon freezing and melting of the plasticine in the sun.
Sealant
The method of sealing a joint using silicone or acrylic sealant is more reliable and durable than the first. But at the same time more troublesome and expensive.
For work, it is recommended to purchase a transparent composition. The sealant is applied to seat glass, that is, in the groove. Therefore, the glass will have to be removed. The composition must be squeezed out in a uniform strip along the entire perimeter and immediately install the glass in place and once again pass the sealant along the seam.
 Sealing the joint between glass and frame using sealant
 Small feature, which should be remembered when choosing this method of insulation - the sealant hardens, so then it will not be possible to easily pull the glass out of the frame if necessary.
Film
Thermal reflective film, according to manufacturers, can reduce heat loss through glass by 30%. It glues directly to the glass.
 Thermal reflective film can be glued to glass
 In order to protect windows for the winter in this way, you need to clean the surface from dirt and degrease, then cut out a piece of film with a margin of 2 cm on each side. Tear off the bottom layer and apply it to the glass. Using smoothing movements, stick it over the entire area. If folds have formed, you can warm them up a little with a hairdryer and cut off the excess with a utility knife.
Insulation of window sill, drainage and slopes
If there are no cracks in the frame, and heat still escapes from the room, the problem may be the presence of cold bridges in the space under the window sill or inside the slopes. IN in this case repair and insulation of wooden windows will be required at the same time.
Polyurethane foam
Universal insulation for windows - polyurethane foam. It can be used for sealing cracks and installing slopes.
To prevent heat loss from under the window sill, it is necessary to clean out from the space under it old fallen plaster, crumbling foam, caked cotton wool or other type of insulation that has become unusable. Then install the foam can into the gun and blow insulation into the gap. It is important to remember that the composition expands several times. Excess foam can be easily cut off with a knife after drying.
 For sealing large gaps It is better to use polyurethane foam under the windowsill
 Foam is also blown into the seam between the frame and the wall and along the edges of the slope, then any insulation is laid and a slope made of plasterboard, plastic or sandwich board is installed. Temporarily it must be fixed to the wall with masking tape. All joints must be coated with sealant.
Polyethylene film
Insulation of windows wooden house can be produced by other methods. A new and not yet sufficiently proven method is to seal the window opening with completely transparent plastic film . The method is not entirely aesthetic, since gluing the film absolutely evenly is difficult. It can only be partially leveled with a hairdryer. But, judging by the reviews, the method allows you to reduce the heat loss of the window to the level of a blank wall, which is much more effective than sealing or sealing the cracks.
 Sealing a window opening with film significantly reduces heat loss, although it does not look entirely aesthetically pleasing.
 The film is fixed in different ways:
- Double-sided tape;
- Furniture stapler;
- Masking tape.
This type of cold protection is easy to install and dismantle. The same film can be used repeatedly.
Since there are different ways to insulate old wooden windows for the winter, it is best to use several at once to eliminate not only the obvious problems, but also those that may arise in cold weather.
Successful window installation is only part of the installation process, since the heat concentration inside the room and the optimal level of comfort directly depend on the quality of the structure’s sealing. In addition to practical indicators, the external design of the window opening will also noticeably change. The ability to properly seal windows after installation will not only eliminate the penetration of cold air from the street, but will also eliminate the formation of fungi, mold and unpleasant odor dampness.
Preparation for external sealing
It is necessary to seal the slopes both from the inside and from the outside in order to avoid the disastrous consequences of defects. When exposed to environmental factors, a layer of polyurethane foam will be destroyed and quickly lose its functionality. For this reason external works are given priority attention and only after their completion are they taken on interior decoration.
The finishing serves as protection for the polyurethane foam from destruction and an aesthetic appearance.
Before you begin installation, you need to decide on the materials that will become the basis of the slope. As external elements often use plastic panels or the plaster method. Similar materials are also used for interior work, where the choice expands significantly, including sandwich panels, wood or plasterboard.
 After installing the window unit, all cracks and gaps are carefully sealed with foam.
 Before sealing the window, all empty spaces must be carefully filled with foam.. After this they apply waterproofing materials and allow the structure to dry and settle. Before starting sealing work, bring installed structure in order and treat with antifungal drugs that are used during installation.
Covering windows with plaster
The plastering method is widespread among both experienced specialists and non-professional craftsmen. Popularity plaster finishing due to low cost Supplies And good quality compared to other methods. There is also a small disadvantage to this type of finishing, which is a large time investment. To get it for real good results, masters will have to sacrifice some time. However, labor costs will result in a successful completion.
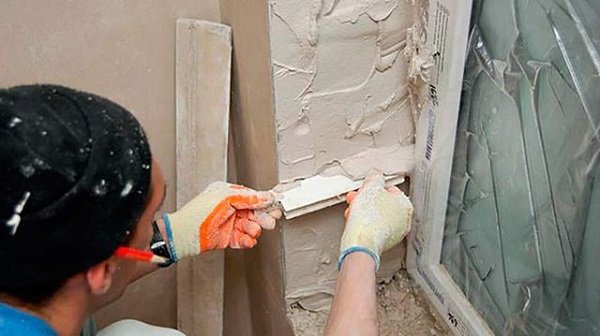
 Plastering of external slopes is carried out in 3 stages
 By average standards plastering work on external slopes will take from 2 to 3 days, since each of the applied layers of the mixture must dry well before applying the next one. The first and second layers must be made with a thermal insulation compound, which can be purchased in every specialized store. The layer is very important for maintaining heat in the house, which is especially important for regions with low temperatures. The third layer - the last - is applied using regular plaster mixture. As soon as the sealed slopes have dried, you can safely sand and paint the surface in the desired colors.
Seal with plastic
Finishing slopes using plastic materials will become excellent option to achieve quick results of decent quality. Universal plastic will help to cover small defects or errors made during installation of the structure. Plastic slopes can be freely purchased in almost every hardware store with wide choice color range. True, they will cost more than plaster.
 Plastic panels are installed quickly and easily
 To install such a panel, you first need to fit it by cutting it to fit required sizes and attach assembly adhesive, and fill the joints with silicone sealant. Easy installation does not require knowledge of specialized skills, and the panels themselves have a long service life and do not require special care.
We seal the internal slopes
The interior decoration of windows needs to be given great attention, since not only the level of comfort and reliable protection from the external environment, but also an aesthetic component. Try to carry out the work with great care so that the result is presentable. appearance.
Application of drywall
This material is one of the most affordable price options that meets environmental requirements. It does an excellent job of retaining heat indoors and looks attractive from the outside. The disadvantage will be difficulty in installation, since the formed joints will have to be sealed especially carefully. Installed drywall needs to be puttied and painted. When choosing this material as a finish, give preference to moisture-resistant types. Before fixing the sheets, it is advisable to make a layer of glass wool to increase the thermal insulation properties.
 Installing drywall is a labor-intensive and complex process.
 Sandwich panels for embedding
Sandwich panels consist of two sheets of PVC, the filling of which contains polyurethane foam with a high thermal insulation function. The material has an increased level of comfort with excellent heat retention. Installation of sandwich panels is carried out using profiles, under which isover is laid. The technology is in many ways reminiscent of installing plastic slopes and is simple to implement. The thickness of the structure is 10 mm, and the material itself has a long service life.
 Sandwich panels have high thermal insulation properties
 Plastic option
The demand for plastic sealing is explained by its harmonious design due to the ability to choose the same color and structure of materials similar color scheme window opening. The panel is easily placed on a special glue, but first the surface must be laid out with isover. Upon completion of the work, carefully seal the openings with silicone sealant.
Technology for sealing windows with plastic slopes
Because the plastic slopes are highly popular due to the simplicity and accessibility of execution, let’s take a closer look at the scope of work and the principle of installation of the structure.
 Interior decoration windows most often perform plastic panels
 First you need to remove the remaining foam from work surface, treat the openings with an antifungal agent and install a layer of waterproofing. Pay attention to the sealing of the window under the window sill: the free space must be carefully filled with foam to prevent future blowing.
 The space under the window sill is carefully sealed with foam
 The starting profile must be attached around the perimeter of the window frame, and along outside position the rail. This is an important installation part on which the profile fastenings for slopes are mounted.. This can be done with staples construction stapler. Be sure to check the thickness of the slats: if there are slight deviations, use a thin shim.
Next, the panels need to be placed between the prepared profiles. You need to start working on the upper side of the window frame, moving to the lower ones. First, the plastic is introduced into the starting profile and secured well, after which you can use a sealant.
 Silicone sealant used to seal joints
 Before you start fixing the second side of the plastic, a layer of mineral wool. This step will improve the sound and heat insulation function. Having successfully attached the slopes along the top of the window, you can install the side panels in a similar way. At the end of the work, the joints and the connection strip with the window sill are covered with a thin layer of liquid plastic, and the excess is carefully removed.
Even an inexperienced craftsman can seal windows after installation, since the methods are simple to perform and do not require high labor costs. Ready-made designs, made of plastic or with plaster, will delight you with their neat appearance and reliability. It is only important to follow the technology and stock up on knowledge on how to properly and efficiently seal a window.