Candles have accompanied people for many centuries. It is known that the very first of them, which are mentioned in historical documents, were used in China around 200 BC.
And in Europe they appeared after 400 AD. The first, so to speak, models were made from natural fats and wax, and later they began to use oil for the production of candles.
Paraffin was a real revolution in their production, but they began to use it only in 1830.
Initially, candles were needed only for lighting. However, now that we have electricity, we still keep them in the house: basically as decorative element, and sometimes for light, depending on the circumstances and mood.
Today we will tell readers of the Design Museum how to make original candlesticks with your own hands.
Candles in a jar with a wide neck

Preserving jars are a delicious option for this project. You can make many interesting candle holders out of them.
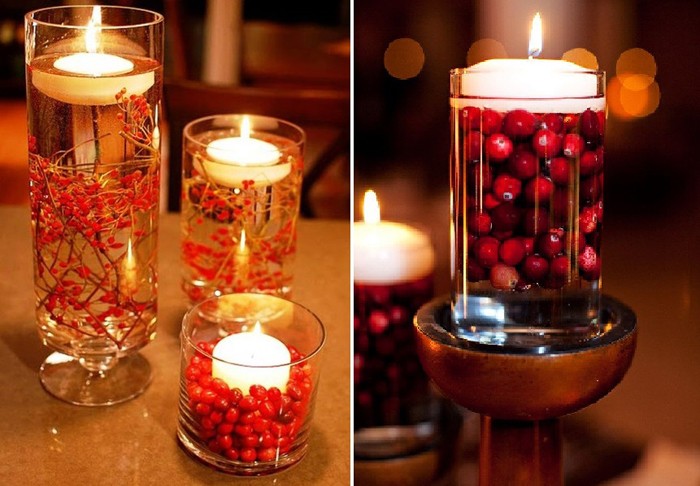
For example, these floating candles are kept in wonderful rustic style. They will look great on any table. You can also use them as a centerpiece for your wedding centerpiece.

You can do more interesting design, adding color to such a product using paint, as well as personalizing it, as shown in this example.
Cut out a heart from ribbon or something else, attach it to the jar and paint it without touching this shape. Then remove your “stencil” and you will have a beautiful candle holder. (Check out Heartloveweddings.)

This project is similar to the very first one shown here, but used regular small candles instead of floating ones. The jars are placed upside down, and the candles are attached to the lid. (Look at Simplykierste.)

Reusing old cans and fabric will allow you to create something elegant and beautiful. First, measure the container and decide how much lace you will need for the wrapper. Then apply glue to the edges of the material and wrap the jar. Place the candles inside. (Look on Flickr.)

You can also make lanterns using oil. Drill a hole in the center of the lid for the wick, pour some oil into the jar, and you have the perfect lantern for your yard. Just place it on your terrace and you will get a truly wonderful view!

This material may seem difficult to work with, but you still try to use it if you want to implement own design-project.
For example, try making stylish candle holders. It's much simpler than it might seem at first glance. You will need: cement powder, paper cups, coins, Vaseline, adhesive tape and disposable containers. (Look at Sayyes.)

There is an even easier way to create a unique candlestick made of concrete. For example, such a product can be intended for four candles at once. This is a simple block with holes.
To make it you need a form, concrete mixture and candles. Pour concrete into the mold and place candles on the right places. Wait for the solution to harden. And when the spark plugs burn out, you can remove them and replace them with new ones. (Look at Signepling).

There are many others interesting designs, which you can try to make. In principle, the shape depends only on your desire. Just figure out how to make it, or find ready-made molds (for example, for baking) with the right size for you. (Look at Nimidesign.)

The fact that concrete is not a very delicate material gives you the opportunity to make candle holders with a rougher design if necessary. At the same time, they can look very organic.
The lines don't have to be perfect! On the contrary: any irregularities and imperfections will make your product unique. (See this site for details.)

You can use a soda bottle as a casting mold. Start by cutting off the top. Add a small amount of water to the bottom, then a glass of concrete and mix.
Continue adding both the first and the second. Gently shake the pan to ensure it is level. Place the candle on top of the mixture and press it down.
Spread the concrete evenly around the candle. Allow it to dry overnight and then remove from the mold. (Look at Oncewed.)

This project will require milk cartons, duct tape, and concrete. Remove the top of the cardboard base and then cut it around one of the sides to form a lid.
Make four holes for the candles. Fill the mold with concrete and use masking tape to secure the cut part. Insert candles into the holes and let the concrete dry. (Look at Chezlarsson.)

You might like the look of the bottom of a plastic bottle, which can also be used for a mold. First, cut it off. The cut doesn't have to be perfect. Then fill in concrete mortar, shake a little and insert the candle on top. Let it dry and you can use it.

By painting the lamp, you will give it interesting view. The products shown in the photo were made using the technique we described above. At the same time, the lower part is painted in various metallic colors. You can simply dip the bottom into a container of paint, then wait for it to dry. (Check out Monsterscircus.)

These unusual looking candle holders have lids. That is, you will need two molds for one product. One will hold a candle, and the other can be used to cover it after use.
The form can be chosen the way you like: just find it and do it as we previously described. Do not deny yourself the pleasure of having a concrete candlestick! (See this site for details.)
Wooden lamps
If you prefer warm material with a variety of textures, try wood. And although wood can easily burn and from a safety point of view it is not entirely correct to place it next to an open fire, it will look elegant and become a favorite decoration in your home. The main thing is not to leave such a product unattended during use.
This option shows us a compact and sleek design. This is a large block of wood with three holes. And since the candles are placed inside a glass candle holder, there is no danger of the product catching fire. (See this site for details.)

This candle holder is essentially a simple piece of wood with five small holes for thin candles. (Check it out on Houzz.)

If you like natural look logs, then why not use large stumps to create unusual candlesticks in country style? These mini sculptures will make a great impression on your guests.

Do you recognize those tiny candles that grace our birthday cakes? But they can also look great on a table, on a fireplace, and in other places. Make cute little cubes, drill holes in them and you're done! (Look at Handkandhunt.)

Take advantage of what nature gives us and find a piece of wood that has an interesting shape. Clean it and make recesses in it for attaching candles. You will get a stunning decorative element that will give your home an unusual atmosphere. (Look on Etsy.)

Everything here is similar to the previous description, the only difference is that this piece of wood is thinner. This candlestick is also very simple to make. Take wooden blank and make a hole in it for the candle so that it fits the wide shape. This product can also serve as a table for romantic dinners. (Look at Brit.)

When it comes to wood, the finish doesn't have to be flawless. Each piece of wood is unique in itself, so no matter what you do to it, it will remain that way. To give your home a rustic look, try using scrap wood. (Check out Aamodestuffblog.)

We have shown you many options on how to make candlesticks from wood. They are similar to each other, but at the same time completely different. In this case, the log was cut in half vertically. This way it rests confidently on the table, while maintaining its natural appearance. (See this site for details.)

Candlesticks made from pipes

Try the design in industrial style, if you think it would be a good fit for your home. For example, use such a pleasant accent - a candlestick made of copper pipes. Try combining the pieces to create robust construction With good reason And interesting shape. (Look at Anmagritt.)

You can combine various materials and finishing. This candlestick, for example, is made from copper tubes, but has a base made from a piece of wood. Solid foundations With an ideal diameter, the candles hold tightly. (Look at Adailysomething.)

This candle stand is made of black metal parts. It showcases a symmetrical design with a solid foundation and simple form. This product will look amazing in the fireplace area or in the center of the dining table. (Look on Etsy.)

If you need something simpler, try this project - it will take you a minimum of time. This is a minimalist copper candle holder. All you need is a thin copper wire that you can bend the way you want. Experiment with a few samples until you find something you really like. (Look at Amerrymishapblog.)
Glasses and bottles

A glass - provided it is the right size - can be a wonderful lamp. But you might want to personalize it a little. You can, for example, use twisted sisal and wrap it around the base of a candle holder for a classy, rustic look. (See this site for details.)

Here's something you've probably never thought about. You can make a candle holder out of a beer bottle! Cut off the top part and carefully attach it to the bottom. This way you will have a wonderful base for a candle that you just need to put inside. (Look on Etsy.)

If you want to try something more flashy, you can use glitter. Take an empty glass that you like, apply some glue to the inside and sprinkle some glitter on it. Wait for everything to dry - and you're done! (Look at Houseofearnest.)

This wine bottle turned into a lamp-candlestick. To do something like this you will need to cut the bottom off. Then find a suitable stand, such as a wooden disk. Do not cover the neck so that there is a vent. (Look on Etsy.)

Use the power of reflection to obtain an intriguing item. Apply silver paint for this. In addition, if the glass has specific design, it will be even more beautiful. Choose a glass decorated with monograms or other designs. (Check out Ruffledblog.)

Look what interesting idea for the center of the table. Take empty glass bottles (they can be different sizes and shapes), as well as some paint and a brush to write the numbers. Then insert the candles into the neck. Choose them with a suitable diameter. You can also tie this candlestick with twine or cord.
Wrapper design

Do you want to do something wonderful for Christmas that will create a magical atmosphere around you when you watch TV in the evening? Why not make a “sweater” for the candle holder? You need yarn and crochet hooks. Choose a template you like and get started. (See this site for details.)

Touch rustic chic bring these unique handmade lamps into your home. You will need twigs, a can of spray paint and glue gun. First, paint the sticks, and then glue them to the cup one at a time. (Look at Freutcake.)

As you probably know, rice paper ribbons are incredible. universal item, with whom it is very interesting to work. You can decorate a lot of things with them, including candlesticks.
Choose prints you like and start creating. Be creative and come up with your own design. (See this site for details.)

The author of this project used a very simple yet chic way of decorating. This simple rope, wrapped around the base of the candle. If you decide to take the same step, take twine, paper tape and a glue gun. (Look at Mintedstrawberry.)

A candle holder in the form of a glass cylinder wrapped in bark will look truly charming. The idea is not only interesting, but also simple. All you need is a glass vase, thread, glue and birch bark. (Look on Etsy.)

If you want, you can try to make something fresher. For example, like this wonderful thing in the photo above. A candle in a glass holder with small fresh flowers tied with twine.
This original product captivates the eye and gives modern room a touch of tenderness. And besides, the flowers will smell nice!

And the last project in this chapter, which incorporates all your wishes. Glass jars and paper snowflakes around them. You can choose a theme directly for yourself and replace the snowflakes with what you like best. (Look at Michelemademe.)
Other design options

There are many more great ideas you can use, but they don't fit into any of the above categories. How do you like the deer antler candlestick?
A very unusual option. Do something similar yourself. For this you need: copper bushings and caps, horns and candles. (Look at Adailysomething.)

This candle stand has a sculptural design and is different from others not only in shape but also in color. The piece has bright violet accents and looks very elegant.
To create such an item, take tape and demarcate the areas that need to be painted, and then simply dip the candlestick in the paint. (Look at Kristimurphy.)

Try modeling your own candlestick using clay. To make this you will need a rolling pin, a candle cone, a pizza cutter, wine stopper or something similar and modeling clay. A very tempting project to tackle over the weekend. (Look at Oncewed.)

Screen-printed burlap reveals its true beauty when it gets dark. If you want to make an equally interesting piece of decor, prepare Consumables: cardboard or stencils, burlap, glass candlesticks, ribbons, acrylic paints, sequins and threads to match the burlap. (Look at Justcraftyenough.)

We need to come up with something fun for children's party? Here's an example: candle holders in the shape of dinosaurs. You can use other toys that your child likes for these purposes.
Just take something that can hold candles and glue it to the toy. (Look on Etsy.)

Basically, you can reuse any item that can hold a candle. Even fuses or something similar, like in this photo. Check out this unique and inspiring project! (Look at Pikkuvarpunen.)

And such candlesticks are even more unusual. These are old ladles, so they would look best in the kitchen, adding a bit of country charm to it.

If Halloween is approaching, check out this option. decorative design. Take a small pumpkin, make a hole in it and remove everything inside.
Grease the surface with glue and sprinkle with glitter. Wait until everything is dry and place candles inside. To make your job easier, take a drill. The hole should be slightly larger than the candle. (Look at Twigandthistle.)

Pepper and salt containers make great candle holders because they have little holes in the top. All you have to do is place the candle inside and make a handle out of wire. Then you can decorate the product and hang it on a branch in the garden, for example. (Look at Thehomelessfinch.)

It is also very easy to build an original candlestick from a tin can. In addition, prepare a can of spray paint, a nail and a hammer. First, fill the container with water and place it in the freezer.
Then use a template to punch holes in the base of the jar. Remove the ice and spray paint the product. (Look at Celebrations.)
Anticipating the holidays, we will tell you how to make candlesticks with your own hands on New Year.
You don't have to be a professional designer to decorate your apartment in an original way for the New Year. We all have old stuffed animals, photographs, candles and other things that can be easily used to create holiday decor.
Christmas decoration is a fun activity that you and your children will love. This work will lift your spirits and prepare the whole family for winter holidays. We will tell you how to prepare your home for the New Year and Christmas with homemade candlesticks.
How to make candlesticks
Have you decided to decorate your home for your favorite holiday? Simple and effective method- playing with light. A living flickering candle will create a mysterious atmosphere and give good mood. In the flame of a candle, all problems and worries gradually disappear, and even a small mess is not so noticeable.

To create a mysterious atmosphere, prepare a lot of candles. They're also easy to make yourself. Consider the lighting in the room in which you are going to celebrate next year.

First, let's check out the old stock. Is it possible to do something with them? Enhance the look of old candle holders with snowflake napkins, draping elegant embroidered fabric or thin glossy paper. You can wrap them with ribbons, lace or shiny tinsel, and cover them with rhinestones.

It's nice to watch the floating candles. You should have an old transparent vase or crystal salad bowl that has long gone out of fashion. You can decorate the edges with toys or small pine cones.
Now pour water into the salad bowl and place the candles in it. Add small spruce branches, rowan berries and petals to the water to make your creative composition the main decoration festive table. Candlesticks can be made from unnecessary things that are uselessly stored on our shelves. They are even edible. Don't believe me? Then move on to the next sections of the article.
Fragrant from fruits
In search of scrap materials for our device, we go to the kitchen. We will try to make original candlesticks from fruits. Prepare them immediately before the celebration. Candlesticks made from fruits will give a beautiful, unusual glow and subtle aroma.
Take bright apples, grapefruits or oranges. Fruits should be bright, with a pronounced round shape. Cut them in half and use a spoon to carefully remove all the pulp.

Using a marker or pen, draw a simple pattern, cut out any excess along the contours, using nail scissors. There should be a lot of “holes” to allow light to escape.

Place a candle in the center of each half. Can be done closed version, covering it on top with the second part.

Decorate the fruits with small fir branches, buds, and rhinestones. Use toothpicks to attach rowan berries and tiny toys.

From unnecessary cans
We use any jar for these purposes - from the smallest (for baby food) to a liter. The originality of future candlesticks will be emphasized unusual shape banks.

The most basic way to use a jar is to simply turn it over, throw a piece of fancy fabric on top and place a small candle on the bottom.

Consider creative candlesticks made from jars that will become a work of art. Let's try to dress up jars with the children. Let's take:
- colored markers;
- gouache;
- nail polish of different shades;
- PVA glue;
- brushes

If you are decorating the jars with markers or nail polish, no preparation is required. Take and draw different Christmas stories on them - snowflakes, fir trees, garlands, snowmen or just intricate abstract patterns.

When planning to decorate jars with gouache, prepare them for painting. Cover the container with glue and let it dry, then the paint will “stick” to the glass better. Draw outlines and color the shapes in bright shades.

Entrust painting to your child and do not try to correct his creativity. The result will definitely exceed your expectations! After the gouache has dried, cover it clear varnish. If you don't have it, use hairspray. It is used to prevent the paint from peeling off and contaminating your hands.

Other interesting technique painting is stained glass paint. It is designed for drawing on smooth surfaces. This good idea and for Christmas decorations.

First draw a pattern on the jar with a marker. Then outline the outline with black paint, then leave it to dry for half an hour. Fill the space with any bright colors and leave to dry again (dry for several hours).

We insert the candle into our jar - the pattern begins to flicker with colored lights. A wide-necked liter container can be filled halfway with water. The candle will float, and the light from the jar will shimmer and fill the room with warmth.

Do you want to celebrate New Year outside the city? Place your glowing decorations along paths, on windowsills and trees. Bright colored lights will create a wonderful mood.

How to make a candle house
You might have seen small “houses” for candles on store shelves, but they are completely devoid of originality. Let's learn how to make such decorations using simple master class. To do this, prepare:
- empty square milk or kefir packaging;
- glue;
- gouache;

Prepare the salt dough: mix a glass of flour and salt, pour in a tablespoon of any vegetable oil and enough water to knead the dough. The final consistency should be like clay. To make colored dough, add paint to the mixture.

Now let's start building the house. Wash the paper container thoroughly to remove any remaining milk drink, dry it and cut off the bottom. Cut out a few windows and leave a hole for the pipe.

Next we lubricate external wall at home with glue and begin to roll small sausages from the dough. Here you can involve your child - he will cope with the task. We do this with all the walls, not forgetting to leave the openings for the windows uncovered.

Now we roll out a rectangle to make the roof. We attach it to the walls with glue. Next up is the door and shutters. Near the house you can install any figurine - the Snow Maiden or Santa Claus. For large objects we use glue, for small ones we lightly moisten them with water.

Dry the resulting composition in the oven at a very low temperature. When the work has dried, it can be decorated with any paints. Cover the top of the house with varnish. Place a small candle inside it, and it will glow with a soft light, and real smoke will quietly come out of the chimney!

The “house” for the candle is ready
Is not mandatory set, you can improvise and use whatever you find in your Christmas decoration box.
- We make a candle stand using a metal lid or a narrow glass. In the first option, glue a button onto the lid to secure the candle. The glass itself will cope with the task, supporting it with its walls.
- Now let’s create a stand for the entire composition. You can use a piece for it old board or plywood. We coat it with glue on all sides and apply foil.

- To make the cones beautiful and elegant, cover them with an aerosol and let them dry. Preparing the branches Christmas decorations and other available decorative elements.

- In the middle of our board with foil we install a candle stand. We lay out pine cones, twigs, and toys around. When the resulting composition takes on an attractive appearance, we begin to glue the objects.
- Trim the branches to the required size so that they fit in the glass and do not obscure the candle.
- Lay out the branches on paper and coat them with glue.
- Cover it with it outer walls glasses in a circle. Do this quickly so that the glue does not have time to dry.
- Place a candle of the desired size in the glass.

Method No. 1
You need to take a glass, a candle, glue, scissors, paper, small branches of spruce, fir or thuja.


Do everything step by step - the craft is ready
We will send the material to you by e-mail
How long can you put off the creative desire to make a wonderful thing every year? New Year's candlestick with your own hands? It's not difficult at all, there are plenty various options, among which there will definitely be “the one”! The editors of the online magazine website recommend celebrating the coming 2019 with candles in special and unique candlesticks, because everyone can do this.
The use of candles for the New Year is an ancient tradition, the meaning of which has not been lost to this day. A burning candle is a symbol of a pure and strong soul, as well as rebirth and new life. Candles cleanse the energy of our home, so the subconscious desire to decorate the house at this time with different candles becomes understandable.

Glass candle holder
To make a candlestick with your own hands from a glass glass, you need very little time. But here there is a wide range of decorative possibilities:
- the glass is decorated with perforated paper;
- they paint on glass with stained glass paints;
- Beads, stones, glass beads are placed inside the glass;
- The glass is wrapped in openwork, guipure, and various laces.


Related article:
How to beautifully decorate an apartment for the New Year: colors and combinations of shades, planning compositions for decor, New Year's decoration style, decorating a small and spacious apartment - read in the publication.
A glass jar also makes a chic candlestick
If there are a few extra cans in the house, then they will make beautiful festive New Year's candlesticks that are made with your own hands. This is an undeniable decoration of the home, especially since it does not require large investments.


You can grate white soap, prepare coarse salt, glitter and PVA glue. Coat the jar with glue and sprinkle it thickly with a mixture of salt, soap shavings and glitter. The neck of the glass container will need to be beautifully wrapped with satin ribbon or jute.
Candlestick made from waste material: we use tin cans
People have already gotten the hang of using tin and aluminum cans for making molds, which are so necessary when working with cold porcelain, salt dough or polymer clay. And for New Year's decor we also need tin cans.


Another use of quilling
They draw using the quilling technique, and make various figures, and therefore it is high time to use this colorful and filigree technique for New Year decorations. For those who haven’t tried their hand at paper rolling yet, let’s give you a couple of tips:
- in work you need to reel paper strip onto a toothpick and glue the remaining tip of the paper with the resulting bulb with PVA glue;
- form a bulb from a bulb the required form in the form of a drop, an eye, a triangle, a rhombus.


Paper quilling strips are sold in craft stores and come in a variety of color combinations.
Related article:
: textiles and cutlery, tablecloths, napkins, chair covers, what dishes are needed to set the table for the New Year, lighting solution for New Year's table, we decorate the table with a runner and different compositions, the rules for table setting - read in the publication.
Plastic bottles for long candles
It is often easier to come up with decor for small candles, but for tall ones it is more difficult: due to their size, they are less stable. It’s good that there are always plastic bottles in homes - this is a simple material for making candlesticks for long candles with your own hands.


How to make floating candles: combining New Year and romance
Small round flat candles in an aluminum plate are created as if specifically so that our imagination does not doze off, but works effectively. Such candles are the most the best option to decorate a New Year's celebration in a romantic style.


Forest gifts for decoration
When someone has never tried to make a New Year's candlestick with their own hands, they immediately start looking detailed master class, but in fact, often special explanations are not so necessary. You need to learn to feel any material. You can try your hand at working with pine cones: natural material It’s such that it definitely can’t turn out ugly!


Beautiful cone candlesticks made of natural cones and... newspapers
First, prepare a mold for the candle from newspaper, cream and PVA glue. Lubricate the candle with cream (lightly), and apply pieces of newspaper in layers, gluing them onto PVA. Let each layer dry. We will try to make the bottom thicker at the base of the future cone. As soon as the papier-mâché dries, remove the candle and glue the scales from real cones to the newspaper base with hot glue, starting from the bottom. No need to worry, they are not difficult to separate from the pine cone with ordinary scissors. At the end of the work, we will smear the tips of the tongues of the cone with PVA glue and sprinkle them with glitter.
New Year's candlestick made of fir branches
To make a New Year's candlestick with your own hands from fir branches, in addition to pine needles, you will need a mold for the candle and the branches themselves. This could be an unused candy bowl or a beautiful vase, jar or glass.


Making your own New Year candlesticks from fruits: aroma throughout the house
Everyone, when inhaling the aroma of citrus fruits, has a strong feeling of an approaching holiday, so why not visualize it in a candlestick?

Can I use salt dough?
Elegant candlesticks are also made from salt dough: they take the shape of a house or are made on a plane.


First, the dough is rolled out to a thickness of 0.8-1 cm, then the shape of each wall is cut out on it according to the diagram or template. On each wall and roof, bricks, doors, and windows are cut by hand using available tools. They must leave space in the roof for smoke to escape, or make a separate chimney and then attach it to the roof. As soon as the components dry, they are assembled together and glued together with Titan glue or paste glue. You can first coat the joints with dough, thereby not disturbing the “laying” of the brick. The painting stage remains.
Making your own wooden candlestick
Working with wood first of all requires tools. Depending on what kind of product is to be made, they rely on a specific tool.


Do you want to decorate your home for the holidays or just create a cozy atmosphere in it? Then just decorate dinner table, shelves and consoles with candles. And to save on buying a lot of candlesticks, we recommend making them yourself. In this material you will learn 7 ideas for making candlesticks from easily accessible, improvised and even waste materials in just one evening.
Idea 1. Candlestick made from wooden saw cuts
A cut of wood is an almost ready-made candlestick, beautiful, environmentally friendly and versatile. It will be appropriate in or interior design all year round, including on New Year's holidays.
How to do it: You can make saw cuts yourself, but it’s faster and easier to buy ready-made ones, which are sold in many online stores and craft stores. “Ready” cuts are good because they do not have splits or cracks, they are properly dried and can already be sanded. You can choose saw cuts of different diameters, heights, different varieties wood and make a whole set of candlesticks. You can make a cell for a candle in a cut using a drill with a Forstner drill (about 150 rubles) or another drill that can make a blind round hole of the diameter you need (for example, it can be a “ballerina”, a wood crown, a spiral or feather drill etc.).
Idea 2. Candlestick made from a wooden block
And here is another idea for making a candlestick out of wood with your own hands, although this time from a block. However, you can replace the block with a dried log or board of a suitable size.


How to do it: To make a large wooden candlestick with your own hands you will need:
- Dry planed or unplaned wooden block(it’s better to be wider so that the candlestick is stable). In this master class, a 100x100 mm block was used.
- A drill and Forstner drill of a suitable diameter (for your candles) or any other drill that can be used to cut a blind round hole of a small depth of 0.5-1 cm or more. A drill with a diameter of 50mm was used here.
- Square.
- Roulette.
- Pencil.
- Hammer.
- Stain of the desired color, rags or brush.
- Latex gloves.

Step 1. First of all, you need to cut a piece of the required length from the block using a saw or jigsaw. In this project, the candlestick was made for decoration large table, so it is 90 cm long. Consider how many candles your candle holder will hold, and what spacing there will be between them. Then mark the cut line, cut the block and lightly sand its end sandpaper.
Step 2. Next, you need to draw markings on the block to place the candles. To do this, first decide on the length of the indents from the edges of the candlestick (this MK has 7 cm indents), then simply place the candles on the block at equal intervals, circle them and mark the center of each circle with a dot.

Step 3: Using a drill and Forstner bit, cut out the blinds round holes small depth. Don’t worry if the edges of the cells turn out rough, this is only a plus for our rustic style candlestick.


Step 4. Give the wood an aged and rustic look by tapping the ends of the candlestick with a hammer. You can make dents in just a few places or all of them. visible sides bar.

Step 5. Now you need to give the tree color, while maintaining the visibility of its design and beautiful texture. To do this, simply rub the stain with a soft rag into the surface of the product in one layer, and then let it dry.

This is what you should get.

Idea 3. Candlestick from a bottle
Glass bottles make not only elegant or vintage candlesticks, but also caps. Here are some ideas that you might like and are very easy to implement.


These candlesticks, made with your own hands from cut bottles, can be beautifully packaged and gifted to loved ones.
How to do it: There is nothing easier than making a candle holder from a bottle with your own hands as in the photo above, because to do this you just need to cut it and fill it with wax and a wick, or just put a small candle. Trim glass bottle possible in two ways.
- Method 1: Soak a thick cotton thread in alcohol (eg nail polish remover), then wrap it around the bottle. Light the thread with caution and immediately begin to rotate the bottle around its axis so that the fire spreads along the entire length of the thread. Now immerse the bottle in boiling water for 3 minutes, and then immediately transfer it to a container with cold water. Due to a sharp change in temperature, the glass will crack where the burning thread was tied. However, if the glass is too thick, for example, like a bottle of champagne, then the procedure will have to be repeated 2-3 times.
- Method 2: If you have a glass cutter or glass drill, you can use them. Wrap a hair tie around the bottle and then use a glass cutter to draw a line along its outline. Burn the cut line, immerse the bottle in boiling water for 3 minutes, and then quickly transfer it to cold water.

When the bottle splits, sand the sharp edge with first coarse and then fine grit sandpaper.

Now that the candlestick is almost ready, you can insert the wick into it, fixing it in a vertical position (for example, with Chinese chopsticks as shown in the photo) and finally fill it with pre-melted paraffin.


Idea 4. Candlestick made from a glass or tin can
Jars are another available material from which you can quickly and easily make a candlestick. In this selection of photos you can get ideas for decorating Christmas candlesticks.

In this video you can see a master class on how to make a New Year's candlestick with your own hands from a glass jar.
And here is an example of candlesticks that you can make with your own hands from a tin can.


You can see a detailed master class on making a candlestick from a tin can in the following video.
Idea 5. Candlestick made of plaster or concrete
Concrete or plaster poured into a container dries and takes the shape of the container. Thus, to make a candlestick with your own hands, you only need to find a suitable disposable container, for example, a plastic bottle or yogurt container.

These cute concrete candle holders were poured into yogurt cups.

Concrete candlestick made using a plastic bottle

This candle holder was made from plaster in the shape of a balloon.

Plaster candlesticks are made using disposable cups

You can learn the principle of working with mounting mixtures from the following master classes.
Idea 6. Lantern candlestick made of polymer clay
Polymer clay (plastic) is excellent for making figured or openwork candlesticks, in which the light from a candle decorates the walls with fancy patterns or scenes. If you need to make a themed candlestick, say, for Halloween or New Year, or you just have an original idea, then we recommend experimenting with this material. Next, we present a selection of photo ideas for lanterns and candlesticks made of polymer clay.


