Or walks on fresh air. The process of creation is a great way to take your mind off everyday problems and get a charge of positive energy. And then there are handmade crafts for the dacha and garden for a long time create good mood, decorate the house and the surrounding area.
Any business can be approached in different ways. Even an ordinary souvenir, with all its beauty and uniqueness, will simply gather dust on a shelf or bring real benefit. It depends on its functionality.
The same applies to decorative elements. suburban area. Figures and devices purchased or made independently can only decorate and complement the landscape, or they can perform quite practical functions.
 An old bathroom can be used as an element landscape design at the summer cottage
 With a certain amount of imagination, you can, on the contrary, turn ordinary and everyday elements of the site into unusual works of art. Then a simple barn, woodpile or barrel will become a source of pride for the owner and the object of attention of random passers-by and guests.

To find something worthy of attention that will complement the look of your yard, you don’t have to run to the construction hypermarket. Serial, mass-produced products are presented there that will surprise no one. Most of your neighbors have exactly these figurines and decorative items on their property. To create a truly unique piece of jewelry, you only need great desire and time. Even most of the details will be at hand. A wide variety of unexpected materials are suitable for this.
- Used plastic bottles.
Suitable bottles for water, milk, beer, technical liquids, different color, volume and texture. Other plastic recyclables will also come in handy. These can be cups, bowls, disposable food containers, buckets, bottle caps, plastic sheets, substrates - whatever you have at hand. Plastic - universal material. Durable, not afraid of water, high and low temperatures, if it is not subjected to mechanical stress, it is easy to operate. And the variety of recyclable materials and its abundance is simply a Klondike for those who love to create.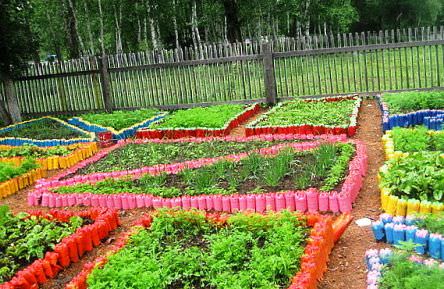 Usage plastic bottles as a fence for garden beds
 - Old car tires.
End of service life winter tires or you have punctured a wheel that cannot be repaired - do not rush to take it to a landfill. Better yet, find a few more wheels for his company. Craftsmen create real masterpieces from tires.
- Natural materials are also suitable for crafts.
We are talking about wood, logs, stones and other gifts of nature. By themselves they are insignificant, but when correct selection angle, couples, decorative processing you can create real works of art. Unusual crafts for a cottage made of stones
 - Plaster figures and decorative elements.
Most of the store products are made from this material. Inexpensive and easy to use, it can also become your faithful assistant in creating exclusive items. True, it will take some skills or just time and patience to master the basics of architectural and sculptural craft. - Second life of high technology.
The bright reflective surface of CDs makes them an excellent material for making various decorations. They can be used as mosaics for cladding walls and other surfaces. And you can create three-dimensional and 3D crafts from disks. They look quite futuristic, and also have security and repellent properties, and are effective against pests of garden crops. Peacock with a tail made of computer disks
 - Construction materials, including used ones.
If they can be used to build real houses, why aren't they suitable for making small decorations? For these purposes, remnants of plywood, polystyrene foam, MDF sheets and anything else that remains from the renovation and tolerates the street climate are quite suitable.
You can make a completely utilitarian thing from any material. The main thing is to understand at the very beginning what you want to do and why you need it. And the means to achieve the goal are all good.
Before you start working with your own hands, prepare fastening materials: glue, preferably several types, sharp scissors, a stationery knife with replaceable blades, wire, tape. And, of course, brushes, solvent and waterproof paints. How brighter colors- all the better. When everything is ready, you can start decorating.
Such a different flower bed
The flower bed is always in demand and relevant on the site. And there are a great many options for execution.
Tire flower bed

- Take old tire and install it in place of the future flower bed. Fill it with soil. Black rubber can be painted as desired. The remaining tread pattern will create its own pattern. If desired, you can additionally paint the tire.
- If needed large flower bed, then you can dig up its perimeter and protect it with tires installed vertically. They can be placed straight, at an angle, obliquely - depending on the problem that needs to be solved. And, of course, paint the resulting flowerbed.
Flowerbed made of plastic
- The simplest option is to make a low fence out of bottles turned upside down. To do this, you need to bury 1/3-1/2 bottles in the ground. The flowerbed will look more attractive if you make it a non-classical regular shape, and add curved, broken lines or even depict the outline of some animal. The color of the fence must be chosen to match the overall color scheme, then it will complement and emphasize the composition.
- You can make multi-level flower beds. To do this, fill up the already completed perimeter with soil and fence separate plot. It should turn out higher, creating a second stage.
- A more complex version of crafts made from bottles for the garden, but also more interesting - a flowerbed right in a bottle. Take a large container, place it horizontally, carefully cutting upper layer. And then add characteristic ears, draw a muzzle, and equip it with paws and a tail. Next, pour soil directly into the bottle and plant flowers. This is how unique pigs, cats, hedgehogs and other cute creatures appear on the site.
The video shows how to make a flower bed from ordinary bottles
Flower bed made of stones
Flower beds made of stones look very impressive in almost any landscape. It could be fake diamond or natural cobblestone, sandstone or pebbles - any option is a winner.

- Flowerbed without fasteners. To do this, you need to stack fairly large stones on top of each other, forming a low wall. And fill the inside of the resulting well with soil. The fence should not be made strictly vertical, but slightly tipped inward. Thus, the stones will lie under their own weight, additionally resting on the ground.
- Flowerbed using a solution. Here the stones need to be used as bricks, laying them on cement mortar. Also a nice solution. If you do not spare the solution, then it begins to play not only a functional, but also a decorative role.
Flower bed made of logs
 DIY log retaining wall
 - Small round chocks can be used to fence a flower bed. Install them vertically, specially select logs different heights. This will give the florist a cozy, rustic look.
- A flowerbed can be made directly in a log. To do this you need a fairly voluminous log. The larger its diameter, the better. Select the required length according to the length of your flower bed. We place it horizontally, and then there are two options. If you need a stationary flowerbed, then cut out a through rectangle in this log, fill it with soil and plant flowers. Over time they will reach the ground, and will receive nutrients also from there. And if you need mobile design, then it is necessary to cut off the bottom edge a little so that a plane is formed and the flower bed is stable. And then carefully cut out a fairly deep, but not through, rectangle from above, which is covered with earth.
Gnomes, mermaids, goblin and other garden inhabitants
Less utilitarian, but more attractive are garden figurines from various materials. They serve solely to decorate the site and complement the overall picture.
Wood crafts for the garden
 Wood and plywood crafts for the garden
 - Various logs, logs, and logs are suitable. If it is an unusual natural material, and with bizarre growths, chagas, mushrooms - even better. They are taken as a basis, and hair, facial details, arms and legs are made from scrap materials. Such goblins are usually found in pairs and placed on miniature benches. The result is not just one figure, but a whole composition.
- In addition to fairy-tale characters, animals are made from wood. These can be either miniature copies or more significant compositions. For example, a figurine of a horse or a giraffe.
- Decorations for flower beds in the form of mushrooms are made from logs. A very common figure is the old forest man from Russian fairy tales. In this case, both specially purchased logs and hemp remaining from cut down trees are used.
Crafts made from plaster

Here everything is limited by your imagination. You can create anything. Almost all store-bought garden figurines are made from this material, so if you have little imagination, you can go through shopping centers(or look at photos on the Internet to save time), choose your favorite sculptures or entire compositions, and then make them at home with your own hands, adding a signature touch.
Foam figures

Foam plastic in the country can be used along with other materials. However, if you take it into account unique properties- lightness and buoyancy, then you can create figures of a certain direction.
- Figures for placing on trees or bushes. Easy to cut, glue and paint. Thanks to this, a wide variety of birds can permanently settle in your garden. You can create a bright spot of color using foam products not only on the ground, where there are already enough emotions thanks to flowers, but also above. Vertical decoration of a site is usually more difficult to achieve.
- Figures for placement in and near water. Polystyrene foam floats perfectly, and therefore bright artificial flowers, birds, frogs and other living creatures will great solution. The main thing in this matter is to choose moisture-resistant paint.
Plywood decorations
Most often this flat figures, as they say, 2D format. Therefore, the main role here is played by the contour and artistic abilities of the master.
- Figures are made from plywood for and utility rooms. For example, a cat walking along the ledge or climbing out the window. Or a bird flying up to a ledge. And banal flowers, patterns and ornaments made of plywood will look fresh and elegant.
- Flat figures for placement in space. Silhouettes of summer residents weeding beds, or various birds and animals. A small illusion of volume can be created by overlaying plywood various parts. For example, you don’t have to draw the cat’s paws, but cut them out separately and attach them to the main figure. But still, such a craft will look good only from the frontal view.
The video shows examples of do-it-yourself plywood work
How many interesting and exciting things can be made from polyurethane foam and plastic bottles. Plastic bottles are an affordable and free material that can be found everywhere. You can make it out of it various crafts, and it is also very convenient for making frame shapes for crafts. You can also make interesting crafts from polyurethane foam, and it’s also very convenient. And if suddenly the figure accidentally breaks, it can be foamed, painted and again we have it like new
Today I want to show you two interesting master manufacturing class giraffe made of polyurethane foam. Both giraffes turned out very beautiful and interesting. The first giraffe is more like a real one, and the second giraffe is more like a fairy-tale character. Despite the fact that both giraffes are different, they turned out to be unique in their own way. The first master class on making a giraffe will be by Elena Sadovskaya. Also, you might be interested to see how Elena made a cobra from polyurethane foam for her garden, see.
To make a giraffe we will need:
* Wire.
* Corrugation.
* Metal-plastic tube.
* Polyurethane foam.
* Acrylic enamel.
* Acrylic lacquer.

Method for making a giraffe from foam:
First, we will make a frame for the giraffe. Elena’s giraffe turned out to be 2 m 15 cm tall, the figure is quite large and therefore the body and legs additionally need to be strengthened with a metal rod. We connect plastic bottles together, use a metal rod instead of a neck, and make legs. We insert the rod into the corrugation, and then into the plastic bottles (we form the body). We make cuts in the bottles and connect the rods inside with wire to make the figure more stable. Then we form the neck also from corrugation and wire. We make the length of the neck according to your wishes, as you intended.


Then, when our frame is ready, we use polyurethane foam to increase the required volume of the entire figure, except for the head... In order to save on foam, the volume can be increased with improvised materials. It can be anything: newspapers, bags, polyethylene, etc. True, Elena did not do this on this figure. Therefore, it took 4 cylinders to make giraffe foam. Well, we all learn from mistakes. Elena tried different foams, but she liked Titan foam the best, she can long time is in the gun and does not dry out. That is, you can work slowly and with better quality.


We make the giraffe's head separately. The basis is also an irreplaceable small plastic bottle. We also cut out the ears from the bottle, first foam them to the required volume, and only then apply them to the head. Giraffes have large eyes, so buttons won't work. Elena found a rubber ball at home (she bought it from a vending machine for her granddaughter). I cut it in half and it was just the right size. I drew eyes on the ball and covered them with nail polish several times.


We bring our heads to the right size, and then connect it to the neck corrugation.

We polish the neck and increase the required volume along the frame. Then, when the figure dries, we cut off all excess from it. Last layer foam - leveling (apply in small drops, twisting the gun as much as possible.) Tighten the hole for the foam harder and begin to fill the dimples, pressing a little with the gun. When the droplets are small, the foam does not increase much. And, of course, wet hands, when the foam sets, do not press down, but smooth out the figure.


When the giraffe dries well, we begin painting. Let's color it acrylic enamel. We cover acrylic varnish for outdoor work. That's it, the giraffe made from polyurethane foam and bottles is ready. We admire the work done.

In her work, Elena also uses acrylate-based aqualac for interior and exterior work, colorless. It looks white, but when it dries it becomes transparent and does not turn yellow. It's not stated on the tin, but it looks like a semi-matte finish. Not expensive for the price. He also takes regular colors in small plastic bottles; they mix well with acrylic, as with any other paint. I used colored ones before acrylic paints from art stores, but for foam figures it works high consumption, expensive. Also important point: when making figures from foam, you do not need to putty them; practice has shown that over time the figures begin to crack. Don’t look at how rough the figure is, it is smooth to the touch and neither dust nor dirt lingers on it.


Giraffe made of polyurethane foam and bottles

We will also look at another master class on making a giraffe, the author is Nadezhda Vilesova. Nadezhda told us a little about how to make this craft and shared the manufacturing process with us.
We create a frame from scrap materials; to make a giraffe, 2 five-liter cans were used for the frame. Then we insert four plastic tubes into the canisters, in the place where our legs will be. We secure everything with tape, and then apply the required volume using polyurethane foam.

When everything is well dry, create a mold, and then mix cement with gypsum 2:4. We put in a smaller portion of plaster. Mix well and begin to sculpt very quickly, as the plaster hardens quickly.


We wait for it to dry well and then paint the finished giraffe beautifully. Again we wait for it to dry and paint it with varnish.

Also using this MK you can make such a funny donkey from polyurethane foam.


Copyright © Attention!. Copying text and photographs can only be used with permission from the site administration and by indicating an active link to the site. 2019 All rights reserved.
Alena Turyeva
Plywood is one of the lightest and most convenient materials for creating crafts. It is so easy to work with that figures can be made from it quite quickly, and most importantly, it is interesting. I will present to you my work that I did for my group at plot. I chose two figures: giraffe and cow. These are not just animal figures! They functional: ring throw (horns and tail cows) and playing with a ball.
If you plan to install the figure without resting it on any support in the garden, you must also consider making pegs for its base. Their size depends on the dimensions of the figure itself. But, in any case, expect that the pegs should go at least 50 cm into the ground. I did the work with my good friends.
To create a figure we will be required:
Plywood 2 cm thick;
Drawing;
Simple pencil;
Fine-grained sandpaper;
Screwdriver and screws;
Gouache, paint for painting (enamel, brushes and clear varnish.
I was drawing cow and giraffe without stencil, if anyone is comfortable, you can do it with him. With a simple pencil I drew the silhouette and other details of the animal directly on plywood. The silhouette and circles were cut out with a jigsaw and passed sandpaper. Then the most interesting part - coloring) And at the end they were covered with colorless varnish.


I also decided for plot to plant Pinocchio. My friends helped me make Pinocchio.
You need logs, a hatchet, nails, screws, two bottle caps, fabric (a cap, plywood (for a key), yellow paint, brushes and clear varnish.
Such a miracle happened)


Thank you for your attention, I hope you liked my work. And also thanks to my friends! It's good to have such helpers)
Publications on the topic:
Quite recently, a couple of kind gnomes “settled” in my house. I made these fairy-tale little men to decorate the beds on our children's plot.
Summer is a small life full of unforgettable bright moments! Therefore, we did not remain indifferent to the colors of summer. And we decorated the site with the children.
Ladybug is a symbol of good luck and goodness. Agree that everyone loves her. In the old days it was believed that the ladybug was a messenger of God. If.
Photo report “Decorating the summer area” Every summer I want to surprise the children with something new and unusual. I want them to feel comfortable.
Goal: To introduce children to African animals: giraffe. Objectives: To consolidate skills in working with natural material, develop figurative and spatial.
Good day, dear colleagues and friends! I bring to your attention a summary of plasticineography "Giraffe" Cognitive development.
The long-awaited summer has arrived. Every summer in our sanatorium we work on arranging walking areas. On our site we decided.
Useful tips
Made from plastic bottles, stones, old tires and others at first glance unnecessary items, can be done a huge number of things.
DIY crafts can be used for home or garden decorations, and also to give as a gift to a loved one.
Kids will love it too participate in the production of colorful and original crafts, especially if these are crafts for themselves.
Children's crafts from plastic bottles

Whether it's summer or winter, cute toy animals will always delight children.
In this master class you can learn how to make penguin crafts using plastic bottles.

You will need:
Clean plastic bottles (any size)
Acrylic paints
Scissors.
Below is a diagram to follow to make penguins:

Kindergarten DIY crafts. Living stones.

It can get very creative and useful decor any garden or vegetable garden. You just need to find a few simple stones and, with the help of paint and imagination, get started.

It will be easier if you use smooth stones. But at the end of the day, it all depends on the design and pattern you are going to apply.
Here are a few simple examples- animals, bugs, fish.
Children will not only find it interesting to color, but also to play with such pebbles in the garden.
In addition, such painted stones can be used to decorate the interior and exterior.
You will need:
Pebble
Acrylic paints
Clear varnish
Simple pencil
1. Prepare the stone, wash it and let it dry.
2. Using a pencil, draw the desired design on the stone.
3. Start coloring with gouache.
* It’s good if the color of the stone matches your drawing. Drawings with a black outline turn out very well.

* When the paint dries, you need to coat the stone with colorless varnish, thereby the paint will not be erased.
You can make something more complicated, for example a snake and a turtle.


An even more complex option is the image of a rabbit.


Children's paper crafts. A whole paper platform.

This kind of craft is very easy to make.
You will need:
Colored paper
Scissors
Glue (glue stick)

You need to cut out strips, squares, etc. from colored paper. and make swings, slides, ladders, tables, paths and much more.

Everything is limited by your imagination - create what you want and build the site you dream about.
Crafts for the playground. Giraffe made from a tire and a log.

A very cute giraffe can be made for a playground or kindergarten.
You will need:
Old tire
2 logs (short and long)
Plastic bottle.
Eyes from old toy
Watering can (for tail)
1. Bury the tire halfway.
2. Make a muzzle from a short log and connect it in the shape of the letter L with a long log using nails. The body of the giraffe in the image is about 1 meter long, and the head is 25-30 cm.
3. Dig in a long log next to the tire (see picture).
4. Prepare a plastic bottle and use it to make ears for the giraffe. Next, attach these ears with glue or nails to the muzzle.

5. Animal eyes can be made from plastic bottle caps. Glue eyes from an old toy onto each lid (or you can draw them with a marker).
6. You will need the spout of a watering can to make a giraffe's tail.
7. All that remains is to paint the craft so that it looks like a giraffe.
Crafts for kindergarten. Zebra made of tires and logs.

Just like a giraffe, you can make a zebra, and the African savannah will be filled with another animal.
You will need:
1 tire
2 logs
Eyes from an old toy
Plastic bottle
1. First dig the tire in halfway.
2. Make a muzzle and neck from logs. The body of the craft in the image is about 70 cm long, and the head is 25-30 cm.
3. Dig in a log next to the tire.
4. Make ears from a plastic bottle and attach them to the face.

5. You can make eyes from plastic bottle caps or use parts from an old toy.
6. Make a tail from the spout of the watering can, and insert a brush made from an old tire inside.
7. The nose can be made using thick rubber.
8. All that remains is to color the craft.
Children's craft from a plastic bottle

Using plastic bottles you can make many beautiful and sometimes even useful crafts.
Take, for example, this outlet for every little thing. It’s not difficult to make, but it will be useful for a little fashionista who can store jewelry, brushes and pencils in it.
This craft can also be used as a flower vase.

1. Prepare a bottle and use stationery knife cut off the top part.
2. Using scissors, cut thin strips of the same width on the bottle (to the middle).
3. Now the strips need to be folded. Do this so that they are perpendicular to the bottle.


5. All that remains is to design the outlet.
Children's crafts from bottles

So many interesting crafts for home, garden and vegetable garden can be found in our articles.
Try cutting out a giraffe like this. The craft is not complicated. To cut this craft you will need:
3 mm plywood, preferably without defects, a wooden ruler (in measurements it is more accurate), copying, hard pencils, thin files for hand jigsaw, skins, needle files, jigsaw wrench, awl or hand drill with drill number 3. Cutting out a craft is not difficult, which means it will take little time to make it. When cutting, do not forget about the position of the jigsaw in your hand. Watch your posture. If you want the craft to look beautiful, take your time. After cutting, clean each part first with “Medium” sandpaper and then with “Fine” sandpaper; some parts should be cleaned with needle files. Assemble the craft according to the rule: part number 1 must be attached to another part number 1, part number 2 to 2 parts, and so on. First, assemble the craft, then if all the parts fit well into the required parts, glue them together. You need to glue it using PVA glue. To make the craft beautiful, you can coat it with spray paint of any color you want or coat it with Wood Varnish.

