Interior decoration home renovation has some differences from apartment renovation. The scope of work is more impressive, and the action plan must be thought out in advance. It is important to choose the right finishing materials and follow the work technology.
If you decide to decorate the interior in your own country house, it's worth getting acquainted with some tips professional builders and also see photos finished works. If you perform a harmonious combination of materials, interior decoration country house will give the room coziness. Photos of finishing country house inside the economy class will help solve the problem of choosing the style and materials for lining various surfaces.

Popular materials
Finishing wall coverings are installed after installation of communication networks, as well as after insulation of the surface. You should choose a specific material only taking into account the following characteristics:
- available budget;
- building type;
- purpose of the room.

Such factors should be taken into account before you start decorating the walls.
You can decorate the walls in a private house with several materials. There are many popular options, each of which has many advantages. Most often, the following is used to decorate the walls of a building:
- tree;
- PVC panels;
- wallpaper - you can save a lot of money on this material;
- ceramic tile;
- decorative plaster.
It is worth considering each material in more detail.
Tree
Quite often, summer residents completely cover their walls with clapboard. This material is relatively inexpensive and easy to install. When installing lining in a room, a special comfort is created. In addition to this type of wall decoration with wood, a block house or imitation timber is often used.

Many owners of private houses think that when cladding walls using wood, the interior will take on a monotonous look. However, this can be called a myth. There are many techniques that allow you to advantageously combine this material with other types of finishes. Sheathing can be carried out in different directions. In addition, the walls can be painted.

PVC panels
This option for wall decoration is ideal for economy class renovations. The costs of this solution are quite small. This coating is inexpensive and practical. It is quick to install and easy to clean. A large selection of colors allows you to find perfect option to create an original interior.

For example, such material can perfectly imitate wood. When covering various surfaces plastic panels many problems are solved at once. The costs are minimal. When choosing this material, the surface must be leveled. As a result, the interior takes on a noble appearance.

Wall decoration with PVC panels that imitate wooden board, can be combined with vintage style furniture. It is better to choose this material if finishing is necessary. summer cottage. This is due to the fact that the material is quite fragile. In addition, it does not provide the required level of thermal insulation.
Decorative plaster
High-quality but expensive material is used for interior decoration. Thanks to the use of decorative plaster, the surface of the walls is visually leveled. At the same time, small defects are hidden, and the wall can be painted in any shade. In addition, the resulting texture is quite unusual. Caring for walls lined with decorative plaster is quite simple. It can be used for rooms with high humidity.

Wallpaper
This type of wall decoration is traditional. It is in demand not only among owners of city apartments, but also among owners of cottages and dachas. Wallpaper can be chosen to suit every taste, which opens up ample opportunities for creating original design. However, after several years of operation, the wall cladding will have to be completely changed.
If the room is unheated, it is better not to glue wallpaper. They can deteriorate after just six months. This is due to temperature changes and dampness of the walls. As a result of such influences, bubbles appear on the wallpaper. Therefore, it is better to glue wallpaper in rooms with working heating.

It should also be remembered possible finishing walls with bamboo wallpaper. This material is quite unusual. It consists of thin pieces of bamboo that are placed on fabric base. This wallpaper is very easy to clean. In addition, they do not lose brightness and are resistant to mechanical damage. They are often used to decorate kitchens and hallways. Bamboo wallpaper differ at a high price and the complexity of installation.

Ceramic tile
It is more practical to decorate the kitchen backsplash and bathroom using ceramic tiles. You can highlight certain parts of the room, focusing attention on them using mosaics. If all the walls are completely covered with tiles, the room will look uncomfortable.
Ceiling materials
If attic room combined with a residential area, it must be reliably insulated, and the roof must be protected from leaks. This will create a cozy space.
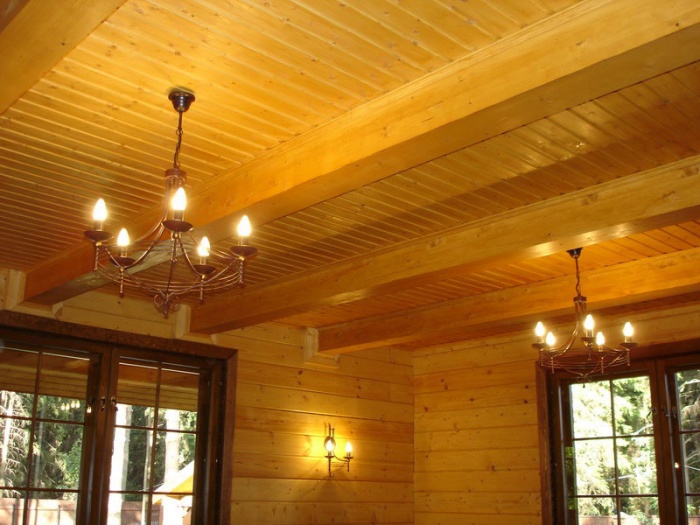
Tree
Both the walls and the ceiling can be finished with imitation timber, clapboard or block house. There are also quite interesting combinations. Meet various combinations. For example, you can decorate the ceiling with clapboard and the walls with a block house. In some interiors, the ceiling is decorated with wood and the walls with another material.
Drywall
This material is quite quick and easy to attach to various surfaces. When using drywall, the walls and ceiling can be perfectly aligned. It is possible to create multi-level steps and bends of different shapes. When choosing this material you can save a lot.
Stretch ceiling
When using a tension structure, ceiling repairs are performed almost instantly. Some companies begin work on finishing the ceiling in this way already 2 days after receiving the order.

The surface of the ceiling is perfectly smooth. Thanks to this solution, you can successfully hide communications. Stretch ceilings are becoming increasingly popular. An interesting option is one that combines suspended ceilings and plasterboard.
Choosing a floor covering
There are a lot of materials used for floor finishing. Among them, the most popular are wood, ceramic tiles, laminate, linoleum, and carpet. Each material requires special care. Features of operation different surfaces you need to find out before going to the hardware store. With this approach to choosing a coating, you can save a lot.

Wood
In a private home, such material can be used as flooring. They are ideal for floor surfaces. Wood is able to retain heat, has high aesthetic properties and is environmentally friendly. In case of budget finishing the choice falls on regular boards. At proper preparation and installation, they are able to preserve the “naturalness” of the interior and last for many decades.
A more expensive option is parquet boards. It is characterized by increased strength and visual appeal. However, even such material has to be processed protective compounds. This measure is mandatory. Many owners of country houses save on repairs by choosing wood.

Laminate
In private homes that are intended for all-season living, laminate flooring is often installed. It is produced in various color and texture options. For this reason, you can find for your home suitable option. Many owners of private buildings resort to installing this flooring.

Ceramic tile
This material is usually used for finishing floor surfaces in bathrooms and hallways. Quite often, tiles are also used for residential premises. On the market you can find a version of ceramic tiles made to look like wood. When choosing this finishing option, the floor is as durable as possible.

If you lay a heated floor system under such tiles, you will get a fairly practical coating. Outwardly it will resemble parquet board. In terms of strength and durability, such a floor is not inferior to high-quality wood.
Carpet
This coating is often used for finishing floors in heated houses where people constantly live. If you install carpet in unheated rooms, it will become damp and rot. Carpet attracts the attention of rodents.

Linoleum
This coating is inexpensive but practical. Today there are many options for such material, having a variety of visual finishes. However, a heating system cannot be installed under such a floor. Linoleum, which imitates parquet, will harmoniously fit into classic interior. If you choose linoleum, you can save a lot on floor repairs.

Decoration of various rooms
When choosing a material for a particular room, it is worth considering its purpose. There are several tips to consider when creating high-quality flooring:
- For rooms where humidity is high, you should choose moisture-resistant coatings. They should wash well.
- For residential premises, the construction market offers a large selection of materials. You can choose products for the living room, bedroom, nursery or hallway.
- Floor coverings should be selected in the same way - for rooms with high humidity - resistant to damage and moisture.

Such features must be taken into account when choosing coverings for the ceiling, walls and floors. If you choose the right materials for various coatings, you can save money on home renovations.
conclusions
The finishing of premises is carried out not only taking into account the purpose different rooms, but also cost various materials. Internal lining different surfaces is a rather labor-intensive and time-consuming process. Selection of finishing material country house must be carried out taking into account the characteristics and properties various types coverings.
Cozy atmosphere in country house– the key to a comfortable pastime away from the noisy city. In building favorable conditions for relax Not the least important role is played by the interior decoration of the walls of a country house, which can be done different ways.
However, not all owners can afford to purchase expensive materials in order to tidy up the dacha, which prompts them to look for more budget solutions.
Wall design options
Construction market replete with various offers, forcing the modern consumer to rack his brains over the choice of finishing material.
Some choose in the simplest and most accessible ways, which are suitable both for finishing an old country house and new houses, o which will be discussed below.
Painting
To implement this finishing option You can use different types of paints(see photo), among which the most common are water-based and acrylic materials.
The advantages of this finishing method:
- painting is a very simple procedure that does not require special skills or tools;
- the painted surface can be easily repainted in a different color if necessary;
- an endless selection of colors and shades;
- ease of cleaning and disinfection.
Now about the disadvantages:
- Before painting, the walls require careful preparation, since if there is a rough surface, the paint will lie in an uneven layer, which will lead to the formation of peeling over time;
- the painted surface needs systematic wet cleaning;
Drywall
Installation of drywall will not only allow perfectly align the walls indoors, but also lay thermal insulation material between the sheets and the main wall, if necessary.

Advantages of using drywall:
- quick and easy installation;
- the ability to construct structures of any complexity;
- drywall makes it easy to disguise wiring and various communications;
- Possibility of finishing with various finishing coatings.
Flaws:
- decreases effective area premises;
- low resistance to mechanical stress;
- the need for additional puttying of seams and joints after installation, as well as puttying of the material over the entire area;
- Drywall is susceptible to high humidity, which negatively affects the service life of the material.
You may be interested in information on how to level a wall with plasterboard. Read this one.
Textile
This finishing method often used in the old days, and now he has received a second birth. Both natural textiles and artificial materials are used to cover walls.

Textile fastened in various ways: pasted like regular wallpaper, stretched over previously constructed wooden frames, which are then installed on the wall, fixed to the wooden wall with a stapler.
Advantages of the method:
- there is no need to level the walls (except for those cases when fabric is glued instead of wallpaper);
- resistance to various mechanical damage - textiles simply stretch under load without being subject to ruptures or cracks;
- the room acquires a special chic thanks to the texture of the material;
- fabrics for wall decoration are made in a wide range, so there are many options to choose from, as well as the possibility of combining the material with curtains and bed linen.
Flaws:
- the fabric absorbs a large amount of dust, so the material must be vacuumed regularly;
- textiles quickly lose their appearance, get dirty and rubbed easily.
Wallpaper
A traditional option that provides the modern consumer wider range of possibilities, than in the old days.

Today you can buy not only paper wallpaper, but also vinyl, duplex, non-woven, textile and other types of materials.
Advantages of wallpapering:
- walls require less thorough preparation, unlike painting, which requires repairing even the smallest cracks and irregularities;
- large selection of different types of material;
- opportunity independent conduct finishing work with minimal skills.
Flaws:
- the need to replace wallpaper (except liquid wallpaper) after 5-7 years, as they quickly lose their appearance;
- susceptibility to mechanical damage;
- difficulties in removing dirt, even when it comes to washable wallpaper.
Wall panels
Wall panels are products intended for decorative finishing walls Can be made from various materials(chipboard, fibreboard, PVC, wood) and different shapes– in the form of plates, sheets and slats.

They are mounted like drywall on a frame, which in this case can be either steel or wood.
Advantages of panels:
- relatively simple installation;
- the possibility of equipping the wall with sound insulation, which is laid behind the panels;
- there is no need to level the walls before installation;
- the ability to dismantle the panels for use in another location.
The disadvantage of this finishing method is reducing the size of the room, since the sheathing on which the panels are installed takes up a lot of space.
How to choose the right material?

When choosing a material you need must be taken into account, what the walls to be finished are made of.
For finishing brick walls country house most suitable material – wet plaster, considering the fact that in winter the room will not be heated. Therefore, other materials (such as drywall or wallpaper) can quickly become unusable on a cold brick wall.
To finish walls made of aerated concrete, it is best to use both plaster and finishing frame materials(plasterboard, lining). One has only to take into account that for aerated concrete, due to its characteristics, best suited gypsum plaster. If the building is located in an area with a harsh climate, then a layer of thermal insulation will need to be laid under the drywall.
A distinctive property of foam concrete is gyroscopicity (the ability to absorb moisture), therefore for interior decoration of walls made of foam blocks it is better to use vapor-proof material.
Do you know how long it takes for primer to dry? detailed information In this article .
Frame house It is best to finish the inside using OSB boards - one of the best options. The plate increases the rigidity of the frame and improves moisture-protective and thermal insulation properties buildings. Both wallpaper and paint can be used as a finishing touch.
Walls made of laminated veneer lumber. Despite the fact that the walls are made of timber, as well as log house and the log house itself have a completely aesthetic appearance, some still resort to additional finishing. This is often due to the desire to insulate the building.
Here the same drywall or wall panels come to the rescue, allowing you to hide thermal insulation material under decorative cladding.
Walls made of rounded logs in wooden structure. In this case, for fans natural wood a suitable method coatings wooden walls clear varnish .
For those who are not impressed by this option, there are other methods of finishing the walls of a wooden house, among which the most common are:
- cladding PVC panels or slabs;
- siding finishing;
- installation wooden lining or house block.
However, it is worth noting that the last two options can hardly be called budget.
Decorating the inside of the house with wood with your own hands
One of original options finishing that allows you to give the walls the appearance of natural wood - use of special wood wallpaper, which are made from various types of wood.
According to the installation method, they are practically no different from regular wallpaper, requiring only the use of a special adhesive mass. But not everyone can afford such pleasure.
A more popular way to decorate a house with wood is to install a block house, this option will cost you little and has an aesthetic appearance.

Before installing it, you must keep the material indoors for 2 days. During this time, you can prepare the wall - if it is not level, you should level it with plaster. After this, they construct from the bars wooden frame for installation of a block house.
Installation of the block house is carried out from floor to ceiling, in the process material is attached to frame with self-tapping screws, screwing them into the base of the spike with which each separate element products. The boards of the block house are connected to each other using the tenon-to-groove principle.
Upon completion installation work the surface can be coated with clear varnish or varnish with stain.
Decorating the inside of a house with a block house: video tutorial.
The construction of any house is carried out in cycles, which have special names. Each of them includes a set of works, as a result of which one large task is completed. The house is built in four cycles: zero, above-ground, finishing and special. On the first, the foundation is erected, on the second - the box, on the third - finishing the house, internal and external, and the fourth includes work on conducting and connecting communications.
Procedure for carrying out internal work
The specificity of finishing the house inside is that Finishing work are carried out in parallel with special ones, and compliance with the sequence of individual labor operations is the key to saving money and delivering the project on time.
Need to say, that there is a problem of consistency between specialists are present not only in private housing construction, but also in large construction companies. Moreover, sometimes it is more pronounced in them, which is associated both with the peculiarities of logistics and with the employment of crews at other facilities.
Here is one example of such inconsistency when decorating the inside of a house.
 Plasterers work in the house. Before installing the beacons, they asked why the electrical wiring was not installed on the walls. They were told that the electrician team was delayed and they could start plastering. As a result, the electricians arrived when the painting work was already underway and they had to make grooves in the plaster layer, which, after installing the wiring in them, were sealed by the painters. Thus, the electricians did extra work using expensive power tools, and the painters wasted time sealing the grooves.
To prevent this from happening, all internal work must be clearly divided and sequenced performing them together with others.
Sequence of stages
Finishing can be represented in the form of three successive stages:
- rough;
- pre-finishing;
- finishing
 Since there are three types of surfaces in one room - ceiling, walls and floor - these stages can differ significantly from each other. Therefore, for most work, the top-down principle is acceptable.
Sometimes it may not work. So, the installation of windows is done first, as well as the installation plasterboard structures. But other “dry” operations - styling wooden floors, laminate, wall panels, suspended ceilings (except plasterboard) - at the end.
Special work throughout the finishing process is also carried out in stages. For example, installation of main pipelines is performed during rough finishing or before it, and external wiring - after finishing. Hidden internal wiring involves installing grooves at the construction stage, and installing pipes in them before finishing. Plumbing fixtures and fittings (sinks, toilets, bathtubs, faucets) are installed after finishing is completed.
The same principle is observed in electrical installation work. Wiring is installed before finishing, panels, socket boxes, distributors - after plastering works, but the sockets themselves, lighting fixtures, switches - after all finishing activities.
Considering the variety of design and decorative solutions used in interiors, each case is individual. But in any case, clear planning stages is very important and this must be done before starting finishing.
Types of home interior decoration
Firms and specialists occupied with interior decoration, the following complexes of work are distinguished:

Some major stages need to be discussed in more detail..
Plastering walls
 It is intended for leveling the surface of walls using lime, cement, cement-lime and gypsum mortars. The latter include various dry mixtures of gypsum, filler and inhibitor (so that the gypsum does not set immediately).
Plastering is carried out after installation of electrical wiring, but before installation of water supply, sewerage and heating systems. In winter conditions they often do the opposite, which is very inconvenient and affects the quality.
Plastering is carried out in three steps - spray, primer and covering. Each previous layer must acquire an initial strength before, than the next one will be applied to it. Covering is often done with a different composition: for example, if the spray and the soil consists of lime or cement mortar, then the covering may well be gypsum - it does not require labor-intensive grinding and serves as the best basis for subsequent putty.
Pouring floors
It can be done both before finishing and after plastering work. Since this work involves a high probability of contamination of the surrounding surfaces of the walls, it should not be done after the final finishing has been completed. If you decide to do this, care must be taken.
Filling before further finishing work is also convenient because it allows you to make it on the entire floor at one level and facilitate further labor operations, especially those where height marks are required, for example, tiling walls.
Working with drywall
 The general rule is that dry work is carried out after wet work. For the most part, this is true - after all, it dries out wet finishing can damage drywall, which can cause it to collapse or become a breeding ground for mold fungi.
Therefore, gypsum plaster ceilings are installed after plastering work. This is also more convenient because the profile fits much better on a flat surface, especially if you have brick walls.
An exception may be partitions made of this material if you are not entirely sure whether the screed will withstand the load. Having decided to erect partitions before installing floors, you should remember that their lower part must be protected from moisture. This can be done using a waterproofing device, which should end above the subfloor level.
The second way to avoid getting wet is to install the frame on the ceiling and the sheets above the screed. This may require additional time and material costs for installing the frame, but their volume is small.
Drywall can be an alternative to plaster in cases where the surface will not experience stress, that is, cabinets and other heavy objects will not be hung on it.
An electrical cable is installed between the installation of the frame and the gypsum board fasteners.
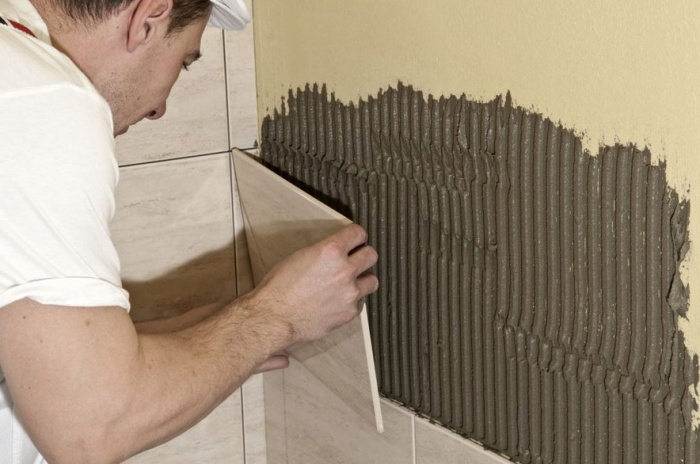
Tiling
 The optimal order here is the reverse - from bottom to top. That is, first the tiles are laid on the floor exactly below the level, and then on the walls. Unfortunately, this is not always feasible (more often than not, never), so the solution here is simple - wall cladding begins from the second row on a temporarily installed profile. The main thing is to determine where the level of the finished floor will be. With this approach, the floor and the first row of tiles on the wall can be tiled later.
Tiling work is carried out after leveling the wall. Covering may not be necessary, but the ground layer of plaster should not contain differences of more than 8 mm: the maximum permissible layer of tile adhesive is exactly this. On the surface of moisture-resistant plasterboard It’s easier to glue tiles, but the wall needs to be primed in any case. If you doubt the strength of the base, concrete contact soils can be used as a primer.
Electrical wiring is laid in any case before facing works, and also make holes for sockets before them, which are then duplicated on the tiles. This order will not create additional difficulties when installing glasses under sockets.
Slopes for windows
This service is often included in the window installation kit. Don't rush to use it, because you may become a hostage to someone else's work schedule. Slopes can be completely different, and the time when they can be installed depends on their type.
- Plastering is done simultaneously with plastering.
- Slopes made of gypsum board are installed after plastering work, but before puttying.
- Slopes made of PVC panels are installed after finishing.
Accordingly, combined types of this window element are made in stages: drywall before putty, and an overlay panel after finishing.
 The interior decoration of a private house has a number of features, the main of which are small volumes and great variety. If you decide to invite specialists for work, give preference to those who have related specialties; they will be able to navigate the work procedure themselves. Unlike apartment building, the finishing of which is carried out by large teams and is paid for specific work; in individual housing construction, payment for the final result dominates, and it is not profitable for the worker to do extra work. If you decide to do everything yourself, you will have to stock up on tools and take your time.
It should be remembered that all finishing work should begin no earlier than the roof of the house. It is better to work in the warm season, this will save you money on heating. Walls and ceilings must be dry. As examples, consider the complex interior works in the room and in the bathroom.
Room decoration
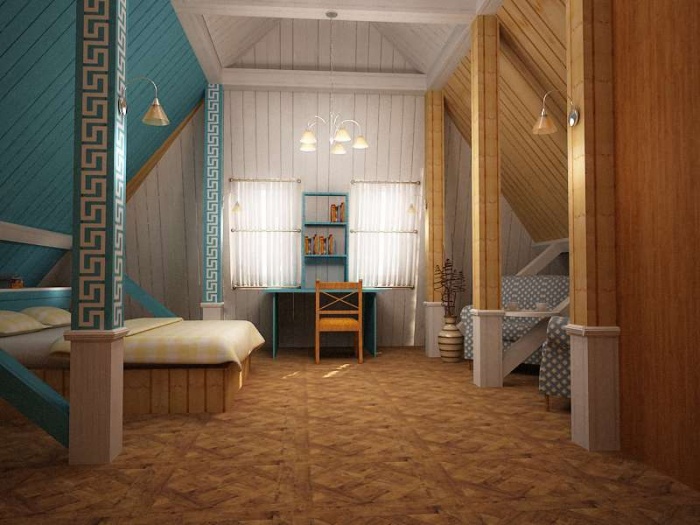
 Room with two windows, plaster slopes. The ceiling is two-level with halogen lamps. The walls are covered with wallpaper. Door with platband. There are two sconces on the wall. The floor is natural parquet board.
Initial data: External and internal walls - ceramic brick, partition - gypsum plasterboard. The ceiling is a reinforced concrete slab. Windows have been installed.
Operating procedure:

Bathroom
Initial data: outer wall made of aerated concrete, internal and partition - made of ceramic bricks. In interior wall there is a ventilation duct.
The result should be a combined bathroom with hidden communications, one socket for washing machine, forced ventilation in a suspended ceiling made of metal slats. Walls and floor - tiles.
Progress:

Here are the simplest cases of interior work. The order in which you will have to produce them depends on the design and technological solutions in your home.
The coziness and comfort of a country house depend not only on reliable walls and roofs, but also on high-quality finishing of the house as a whole. All work on the construction of a private house is divided into several stages, and the final stage is finishing the house inside and out. Finishing a private house combines several different types of work, requiring the master to have extensive knowledge and skills in the construction business. When finishing a private house with your own hands and not having extensive experience in this matter, you need to know the following - finishing a private house is divided into interior and exterior. Each of them uses its own finishing materials and construction technologies.
The importance of the appearance of a private home cannot be overestimated. The first impression of the house itself and its owners depends on how well the materials are selected and how well all the work is done. The exterior decoration of the house includes work on the facade and basement, and they are carried out after all work on the roof has been completed. Do exterior finishing building a private house with your own hands will not be difficult, the main thing is to know what and how to do.
Finishing the facade of a private house
Today the market can please you with a large selection of finishing materials for facades, ranging from various plasters to ventilated facades. The choice of this or that material depends purely on the personal preferences and financial capabilities of the owners of a private home.
Plaster

This method of finishing the facade of a house has been known for a long time and is still popular. The most widespread are cement-based plasters with various additives. With the development of technology, acrylic, silicone, insulated and various decorative plasters appeared. When choosing a particular plaster as a material for finishing the facade, you need to make sure that it is suitable for exterior work. Plastering the walls of a house allows you to create a smooth and uniform surface, which in addition will strengthen and insulate the walls of the house.
Plaster is applied to the prepared surface, which is cleaned of dust and impregnated with primer. deep penetration. To increase strength and durability, the plaster layer is reinforced with mesh.
Plasters are especially popular "bark beetle" And "under a fur coat". The first application technology is the same as for conventional plaster. But “under a fur coat” is done by spraying plaster mortar on the wall through a sieve with cells of a certain size.
Siding

Finishing a private house with siding appeared relatively recently. This one is simple and affordable way Facade cladding consists of installing vinyl or metal strips that are attached one on top of the other. Finishing the facades of private houses with siding allows you to create a ventilated facade with a vapor-permeable film; if necessary, you can insulate it. All siding installation work is quite simple and does not require special knowledge. The main thing is to do everything carefully and gradually.
Stone, tiles and porcelain tiles

Cladding with ceramic tiles, artificial or natural stone falls into the category of very expensive facades. The cost of materials and the complexity of the work do not contribute to the growing popularity of this type of facade finishing. More often you can see a combined stone-plaster or tile-plaster finish. Sometimes instead of plaster, ordinary paint or whitewash is used.
As already noted, finishing a facade with tiles or stone is a very complex matter and requires certain skills and abilities that have been honed over the years. A mistake can lead to the wall collapsing and having to do it all over again. Therefore, it is better to entrust this option for finishing the facade to professionals.
Decorative brick

This finishing material has been used for quite some time, but thanks to modern technologies in construction you can find facing bricks on the market various forms and shades. Carrying out masonry work facing bricks is not much different from laying ordinary bricks, but it is worth noting that facing bricks are more demanding in terms of precision and accuracy of the work performed. In addition to its impressive appearance, the advantages of facing bricks include the possibility of installing thermal insulation between the wall and the finish. For those who want to finish the facade with facing bricks, you will need a partner. Typically, the laying of facing bricks is carried out in parallel with the construction of walls. The connection between the facing brick and the wall is made using masonry mesh. If you have to clad an already built house with brick, then you need to slightly enlarge the base itself in order to create a reliable stop for the masonry. And only after that start laying facing bricks. If necessary, the space between the wall and the masonry can be additionally insulated, for example with expanded clay.
Ventilated facades

This option for facade finishing appeared relatively recently, but quickly gained popularity due to the ease of installation, the possibility of creating thermal insulation, ease of repair, the presence of wall ventilation and beautiful appearance. In addition, this finishing option is suitable for all types of wall surfaces. The design of such facades is a metal or wooden frame on which composite panels, porcelain stoneware, natural stone and much more are hung.
Finishing the facade of a private house: photo

Located at the bottom of the façade, the plinth protects it from contamination and mechanical damage. For this reason, it is customary to finish the plinth using the most reliable and durable materials, which in addition serve as protection against moisture. The materials used for finishing the basement are the same as for the rest of the facade, but the main selection criteria remain strength and waterproofness.
Facing the base begins with high-quality surface preparation and consists of the following work:
- elimination of various irregularities, chips and cracks by filling them with a repair composition;
- the repaired surface must be impregnated with a special deep penetration primer to increase adhesive and strengthening characteristics;
- before installation facing materials with their porous structure work surface should be treated with a water repellent.

Today the most popular finishing materials for the plinth are:
- clinker tiles;
- stone tiles;
- polymer tiles;
- resin-based tiles;
- fake diamond;
- slate;
- PVC panels;
- various plasters.
The main difference between the finishing work of the base and the facade is the increased attention to the waterproof and water-repellent characteristics of the base.
Interior decoration of a private house
The most labor-intensive and time-consuming stage of construction is the set of finishing works for interior spaces country house. In essence, the interior decoration of a private house is the embodiment of an interior design project in life. All interior finishing work begins after the subfloor has been created, electrical wiring has been installed, heating and plumbing have been installed. Finishing finishing works: plaster, putty, painting, wallpapering, laying tiles, flooring installation and so on are carried out completely and are final in the construction of a country house.
Decorating private houses: interior design photos

Ceiling decoration in a private house
It is most convenient to start finishing work from the ceiling. Because in any case, something will “blur” or fall somewhere, and then you will have to clean the surface or even redo it again. Carrying out all the work on finishing the ceiling in comparison with walls and floors is somewhat more difficult due to the inconvenience of applying finishing materials. But it all depends on dexterity and ability to use the tool. In all other respects, it is quite possible for a beginner to finish the ceiling on his own; the main thing is to know what and how to do.
The construction market offers a wide range of materials for ceiling finishing, and designers can always come up with something original. Today the most popular ceiling finishing options are suspended ceiling, suspended ceiling, wallpapering, as well as such time-tested methods as whitewash And painting. What exactly the ceiling will be depends on the overall interior design and the possibility of its implementation. You should start finishing the ceiling by leveling the surface with plaster, putty and, having soaked the surface with a primer, you can begin applying the finishing coat.

These finishing options have been known for a long time and are the easiest to implement. The work does not require special knowledge or skills, and you can handle it yourself. The main advantages of this ceiling finishing are simplicity, accessibility and very low cost of materials. Materials used for whitewashing quicklime, and for painting you can use a wide range of paints, ranging from ordinary alkyd to lime paint.
Wallpapering

Like painting or whitewashing, wallpapering the ceiling belongs to the category budget options finishing, but in comparison with them, this finishing option is much more complicated. Carrying out the work of wallpapering the ceiling will require certain dexterity and skills, and besides, you can’t do it without a partner. It should be noted that for this finishing option you should use special ceiling wallpaper or liquid wallpaper. Of course, you can find premium wallpaper on the market, the price of which is very high, but here it all depends on your wishes and budget. It is highly not recommended to use vinyl wallpapers and silkscreen printing.

The peculiarity of this finishing option is the creation of a structure that is attached to the ceiling and hides it, while allowing you to equip unique lighting using multiple lighting fixtures, and also makes it possible to create multi-level ceiling. The structure itself is only a base that needs to be puttied and then painted or wallpapered. Unfortunately, the main disadvantages of this finishing option are the reduction in the overall height of the room and some complexity in creating the structure itself, which requires excellent engineering and construction skills.
For suspended ceiling use metallic profile various shapes, sheets of drywall, special fasteners, screws and dowels. It is better to entrust the creation of a suspended ceiling project to a professional, as this requires specialized knowledge and experience.
Like a suspended ceiling, the design of a stretch ceiling allows you to hide the ceiling and provide a variety of lighting, but the structural elements of a stretch ceiling are already attached to the walls. Unique feature suspended ceilings is the possibility of using various materials with patterns and prints that allow you to create a unique ceiling surface. In addition, a suspended ceiling can be combined with a suspended ceiling, thereby creating a multi-level structure.
The design of a stretch ceiling is quite simple and consists of a profile with a snap mechanism to hold the stretched fabric, which is attached around the perimeter of the room. Installation of suspended ceilings requires certain skills to tension a fabric or PVC sheet, but to secure the profile you do not need any special skills.
Wall decoration in a private house
The next stage of work after finishing the ceiling is finishing the walls of a private house. As with ceilings, the choice and use of materials depends on the style of the room and the previously developed design project. Popular wall finishing options are wallpapering, ceramic tile cladding, artificial or natural stone, decorative plaster, sheathing with plasterboard sheets or simply painting walls.

Despite the fact that some finishing materials require good command of tools and experience in construction, the work is generally easier than when working with ceilings. Also, before you begin finishing the walls, their surface must be carefully leveled with plaster and putty. Today, to decorate the walls of a private house they use ceramic tiles, wallpaper, decorative plaster, various paints, sheets of drywall, lining, as well as many other materials on the market.

In fact, the same materials are used to decorate the ceiling and walls. The only exceptions for the ceiling are ceramic tiles, artificial and natural stone.
Finishing floors in a private house

The main work on arranging the floor was done at the stage of creating the foundation, but the floor is finally created during the interior finishing. It should be immediately noted that the finishing floor covering is laid at the very end, after all finishing is completed, so as not to accidentally damage it during all the work.
The choice of flooring depends on what the floor will be, concrete or wood. So, any floor coverings are suitable for concrete floors, ranging from ceramic floor tiles and ending parquet. But for wood there are certain restrictions on materials. To finish them you can use massive board , parquet, laminate, linoleum. Such limitations are associated with the design of the wooden floor and installation technology. floor coverings. Of course, you can even lay ceramic tiles on a wooden floor and install a “warm floor” system, but the reliability and durability of such a design will be in question.
Some features of interior decoration
It is worth noting that finishing the kitchen in a private house, bathtub and toilet requires the use of materials that are resistant to high humidity conditions. Therefore, to decorate the kitchen ceiling, various alkyd paints. The walls are finished with ceramic tiles, clapboard or simply painted. For the floor in such rooms, laying linoleum, tiles or stone is most suitable.
To decorate rooms such as the bedroom and living room, you can use any materials. The main thing is that they meet environmental requirements, since we spend more time in these rooms.
Decorating a corridor in a private house is a special case. It's all about the immediate proximity of the street. Therefore, when choosing what to use for finishing, you should give preference to moisture-resistant materials that are resistant to temperature changes. In addition, it will not be superfluous to take care of good thermal insulation.
The foundation, walls and roof of the house, the so-called box, are most often erected by one team. The future owner of the home acts as an investor and supplier. When moving on to decorating the house, he will have to take care of the proper organization process. After all, the order of execution individual species work is of great importance for the quality of construction.
Experienced foremen rightly claim that erecting the building frame is only a smaller part of building a house. Usually it is performed by one team, the leader of which independently determines the sequence of certain types of work. Organizing the supply of materials is within the power of a developer who does not have extensive construction experience. Moreover, due to the duration of each stage of the first phase of construction, there is always time to order in advance necessary materials.
When it comes time to decorate the house, the situation changes. At a construction site, several different teams often start working simultaneously. All of them must be provided with the scope of work and the necessary materials. But this turns out to be not so simple. The main difficulty is the need to meet deadlines for completing a particular stage. A delay in the work of a team of electricians or plumbers leads to the fact that finishers cannot begin work on their site. Because of this, conflicts arise and the completion date of the house is delayed.
Where to begin?
The finishing of the premises begins after the completion of general construction work. In the cold season, the main condition is the presence of windows and doors
The answer to this question depends on what time of year the work will be carried out. It must be taken into account that the above-zero temperature is necessary condition many technological processes finishing. When interior work begins in the summer, all stages can be completed before the onset of cold weather. If you start finishing the house in late autumn or winter, then the first priority is installing windows and external doors, as well as connecting heating.
Basic Steps
Some finishing works can be done independently, which will significantly reduce their cost.
Let's consider the order of the main stages of finishing a building using the example of a one-story brick house, where the foundation, external walls and partitions have already been completed, interfloor ceilings, roofing, chimneys and ventilation, base floors on the ground, terrace, external staircase structure, water supply and sewerage, external doors installed. Before the start of finishing work, the design of the interiors of the house must be ready, then the types of materials, their quantity and the location of the built-in equipment must be determined.
1 . FLOOR BASEDepending on its thickness, the base of the floor can be reinforced with mesh
The base for floors made of so-called lean concrete is usually poured with fine-grained concrete in a layer of 3-4 cm and rubbed. If the base is made of high quality and there are no unevennesses, you can use self-leveling mixtures.
Before starting work, walls and windows can be covered with plastic film
2. INTERNAL NETWORKS
At the same time, you can mount an antenna, power supply and alarm system, and also do wiring telephone network. It is better if the wiring is placed in corrugated hoses. This will ensure its safety and will allow you to change cables in the future, if necessary, without disturbing the surface of the walls. In adjacent rooms, another team can install water supply and sewerage pipes.
3. WATERPROOFING AND THERMAL INSULATION OF FLOORS ON GROUND
After the leveling layer of concrete has hardened, you can begin laying the waterproofing. It is made from a thick film or bitumen membrane on cold mastic. In order for the waterproofing layer to be dense, the base must be free of dust. Then a layer of thermal insulation is placed - slabs of mineral wool polystyrene foam or extruded polystyrene foam. They are laid in two layers with the joints offset.
4 . HEATING PIPES ROUTING
Simultaneously with the implementation of the second layer of thermal insulation, the pipes of the heating systems are installed. They are laid between polystyrene foam boards, thereby minimizing heat loss. It is especially important that the terminals for connecting radiators are located on required height. This is complicated by the absence of floors and window sills at the time of work, which can serve as a guide. To avoid complications, it is imperative to conduct a pressure test of the system before covering the pipes with floor grout.
5 . INTERNAL PLASTERINGAll unevenness of gypsum plaster is rubbed out. After drying, the surface is ready for finishing finishing material: paint, tiles, wallpaper
A few days before the end of installation heating pipes in one or more rooms you can start plastering the ceiling and then the walls. The slopes of windows and internal doors are plastered after installing carpentry and window sills. It is necessary to leave holes in the walls for gas supply pipes.
Leveling gypsum plaster is applied to the layer of cement-lime plaster. Additional processing surfaces before applying the finishing decorative covering is not required, since if the technology of use is followed, gypsum plaster provides both leveling and filling.
6. FLOOR SCREEDAfter the leveling layer of concrete has hardened start laying waterproofing - a thick film or bitumen membrane
Thermal insulation of the floor is usually covered with polyethylene film, which is used to concrete screed. The film is necessary to protect the insulation from absorbing water from the concrete. Depending on the expected thickness of the applied concrete layer, floor reinforcement can be performed metal mesh. Then beacons are attached to the film, and soundproofing tape is laid around the perimeter of the room. Large areas of the floor are divided by dilatation sutures. They are necessary to ensure that cracks do not appear on the floor due to such deformations.
Polyethylene film is laid over the thermal insulation layer, which reliably protects the insulation from moisture penetration
7. WINDOWS AND DOORSAfter attaching the windows to the wall with anchors the seams are sealed with polyurethane foam. Then the external and internal slopes are sealed, covering polyurethane foam from the damaging effects of ultraviolet radiation.
Before plastering work begins, windows and window sills made of PVC or wooden windows. This is best done at above-zero air temperatures. To avoid damaging the surface of windows and doors during subsequent finishing work, it is better to protect them with thick plastic film.
8 . DEVICE OF LEVEL FLOORS
After plastering the walls and ceilings, the next stage of finishing the house is covering the pressure screed thin layer self-leveling self-leveling mixture. It is applied only to dry screed, which dries for 5-6 weeks. This period must be maintained so that the base of the floor dries completely and gains strength. After drying (1-2 days), the self-leveling floor mixture is primed.
9 . INSULATION AND FINISHING OF FACADES
This work can begin even before installing the windows. It is best to choose one of the facade insulation systems, which includes all the necessary materials and products. A fiberglass reinforcing mesh is attached on top of the foam or mineral wool slabs, on top of which thin-layer plaster is laid.
10 . INSULATION OF THE ATTIC COVER
Installation of insulation of floor slabs can be carried out not only on the ceiling last floor, but also fit under it
If the attic will not be used, then a vapor barrier is laid on the ceiling of the last floor, then two layers of insulation (mineral wool boards or expanded polystyrene) with offset joints, and waterproofing on top of it. If you plan to use the attic as a useful attic space, above the insulation layer wooden joists arrange the floor from boards. At the same time, the roof and walls of the attic space are insulated.
eleven . TILING AND FIRST PAINTINGThe tiles are laid on a dry and leveled subfloor. by using adhesive compositions for interior work. Used for seams special compounds
At the same time, you can begin laying tiles in the kitchen, bathrooms, pantries, garage, or paint the walls and ceilings for the first time.
12 . INSTALLATION OF GA30- AND WATER SUPPLY PIPES
After the first painting, they begin to install water and gas supply pipes. Thanks to pre-arranged holes, installation takes place without dirt or dust.
13 . FLOORS
After the subfloor has dried, ceramic tiles or parquet can be laid on it. In the latter case, it is necessary to check the humidity of the base with a special device, which should not exceed 3% when installing wooden floors. If the humidity is higher, you need to dry the base using construction thermal fans.
14 . INTERIOR DOORS
Their turn is after laying the floors, but before the second painting. Earlier door frames installed already at the stage of construction of partitions. Now that adjustable boxes have appeared, they can be installed even after painting the walls.
15 . INSTALLATION OF DECOR AND SECOND PAINTINGMost often, modern homes are decorated with decorative cornices or ceiling moldings made of polystyrene foam, which are attached with special glue
The second painting of walls and ceilings begins after sanding and varnishing the floors, which are covered with film or cardboard, thus protecting them from contamination.
16 . INSTALLATION OF PLUMBING AND LIGHTING
Finally, the installation of plumbing fixtures is carried out, kitchen equipment, boiler, fans, etc. After checking the operation of all life support systems at home, you can begin preparing for the housewarming party.
17. WORK AROUND THE HOMEWhen paving natural stone slabs better to lay on concrete base. For the coating to last a long time, the base must be perfectly level.
When the construction of the house is completed, they begin to install local area, which includes creating a landscape, laying and paving paths, planting trees and bushes, installing lighting in the garden, as well as flower beds and ponds.
The colors of the facade of the house and the paving around it complement each other. To cover an open terrace, it is better to choose high-strength materials
The color of the joinery is selected in such a way that it harmonizes with the color scheme of the facade