I warn you! Everything here is not childish: design, welding, grinder, lathe, emery, high voltage, heat, programming... :D:D:D
General diagram (taken from the robot forum)
General components of the design:
- Auger - wood drill
- Sleeve - water pipe
- Motor with gearbox for rotating the auger 10-100 rpm
- Melt zone heater
- Die for forming the diameter of the thread - plug for the pipe
The raw materials are ABS granules and ground parts of plastic parts

I looked through a lot of photos and videos various designs. I liked this one (photo from the web):

My starter kit

1. Sleeve


The tip is sanded.

3. Nema23 stepper motor with 15:1 planetary gearbox

4. Heater in the form of a clamp, 50 mm wide, 220 volts 190 watts
5. Plug for a pipe from a hardware store
6. Thrust bearing 15x28x9 mm

Bearing centering bracket

7. PID controller with SSR relay and thermocouple 8. Stepper motor driver
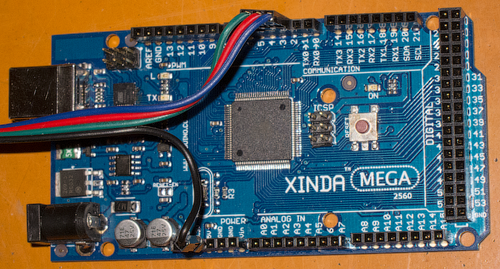
9. Arduino Mega 2560 from storage
10. 24 volt power supply
11. Set of drills for the die hole
12. The coupling connecting the drill to the stepper is made from a socket head. The square is bored to lathe up to 10 mm.
Some sizes:
- internal pipe diameter 21.6 mm
- pipe length 375 mm
- hole length for loading granules 70 mm
- drill diameter 20 mm
- diameter of the round part of the drill shank 12.7 mm
- length of the hexagonal part of the drill shank 34.5 mm
- buffer, between the end of the drill and the exit from the pipe 13 mm
- nozzle hole 2.6 mm
How to start a stepper? Need a driver running Arduino

Arduino is currently powered by USB for quickly uploading sketches.
Preliminary sketch for Arduino
#include AccelStepper.h>
stepper.setSpeed(1000000);
stepper.runSpeed();
The maximum speed should be 32 rpm. Need to do smooth start SD.
Test run (Reconnaissance in force).
Today 01/31/15 is a significant day. Launch of "self-propelled gun".
This is what my hyperboloid looks like.

One switch turns on the heater, the other turns on the stepper. The Arduino is in the package under the driver.
The granules (ABS Kumho 745 N) were dried in the oven for 40 minutes at a temperature of 65-85 degrees. The temperature was controlled with a pyrometer.

Preheated the heater to 230 degrees. I turned on power to the stepper and poured granules into the hopper. The speed was high and the temperature was low. The stepper began to actively skip steps and jerk the pipe. I had to reduce the speed, increase the temperature and thermally insulate the heater.
New sketch:
AccelStepper stepper(1, 2, 3, 4);
stepper.setMaxSpeed(10000000);
stepper.setSpeed(1000);
stepper.runSpeed();
I set the temperature to 264 degrees, but now I think that’s not enough. This temperature is where the thermocouple contacts the heater.

The stepper rotates very slowly, but the rod creeps out of the hole. I didn't measure the speed. Along with the rod, smoke rises from the hole with the well-known smell of ABS. The rod is lowered in rings to the floor. The process of bar loading is very uneven and the diameter varies on average from 2.5 to 2.9 mm. We conclude: to stabilize the diameter, it is necessary to eliminate twitching of the rod.
After completely clearing the hopper of granules, the rod continued to drag on for a long time and became slower. After slowing down completely, I turned off the heater. The cooling process is extremely slow. I had to remove the thermal insulation. Maybe you need to adapt a fan for this? When the temperature reached 100 degrees, the plastic began to harden, and the stepper began to skip steps. The auger no longer turned. The process is over.
As a result, the stepper driver got very hot. The stepper warmed up tolerably. Needs additional cooling.
Let's move on to the printing process (Mendel90).
Due to the unstable diameter of the rod, springs had to be installed on the extruder. The nozzle is 0.8 mm. This is the extreme nozzle diameter for standard design E3D-v5, you need to increase the nozzle temperature and reduce the speed so that there are no gaps between the threads. Printed with a layer of 0.2 mm. Sticks to the table very well. The layers are even, despite the floating diameter of the rod.
Manual welding tool- an extruder - today is no longer something unusual or supernatural. Thanks to modern technologies the opportunity arose to create such a tool with your own hands.
The extruder is designed to make permanent connections of various plastic products, which are carried out by feeding a molten mass of material into a heated bath formed by the edges of the samples being welded.
This tool is used for the production of containers, sheet products, and repairing damage to plastic structures, for example, soldering car bumpers made of plastic.
The extruder has no weak points, it has a long service life and is easy to operate. Enterprising people purchase semi-finished plastic products and use this tool to make unique designs. One of similar projects one can note “a bathhouse organized on water”. A pontoon was used as a base for it.
Do-it-yourself extruder for welding
This idea arose more than 60 years ago, so until today it has undergone many different changes and has become almost ideal. A huge number of mechanisms have appeared that differ in the technique of influence, but are almost uniform in terms of the resulting structures.
How is the base of the proposed part heated? Everything is quite simple: as a result of mechanical procedures, it produces thermal energy, promoting additional heating of the plastic. External thermal influences cannot be excluded. IN in this case the process depends largely on the original structure of the extruder.
Manual welding extruder: working principle
The extruder is not a difficult tool to operate; there are three versions:
- cold forming;
- hot extrusion;
- heat treatment.
Thermoforming is the most popular technology today. The procedure is carried out at high speed and under maximum pressure. To implement it, a screw extruder is used, the main design element of which is a specially shaped screw. The forming procedure in this case is performed at the outlet. The raw material, together with the additional elements used, is placed in a special chamber.
Factory equipment can be equipped with special devices on which the mixing and movement of raw materials depends.
Production
How to make your own manual welding extruder for joining polypropylene products? The assembly procedure for such a tool is not particularly difficult, as it might seem at first glance. Anyone can assemble it.
Making an extruder is a rather fascinating process that directly depends on the purpose and shape of the device.
How can a homemade extruder differ from a factory one:
- assembly of structural elements;
- number of working chambers;
- the presence of additional systems.
Remains unchanged cylindrical shape tool. Today it is considered the most technologically advanced, so it remains unchanged.
Technological differences
It is still necessary to illuminate a few sufficiently important points, in particular, this applies to the dry extrusion procedure, which directly depends on the thermal energy released by the apparatus itself, generated during operation. It also remains possible to involve steam in the process, for which an individual chamber is available. Steam is necessary to increase the wear resistance of equipment.
The technology is characterized by high speed of work; the procedure is carried out in only 30 seconds. A plastic welding machine can perform the following operations with raw materials in such a short period of time:
- grinding;
- dehydration;
- mixing;
- disinfection;
- stabilization;
- increase in volume.
For self-made For a manual extruder at home, you need to purchase a certain list of parts:
- auger of the required shape;
- electric motor;
- housing for the device;
- feed capacity;
- output capacity;
- vacuum chamber.
To do in living conditions welding tool plastic products with your own hands, it is enough to understand the procedure for creating an extruder, its working principle.
Extrusion is considered a common method for producing semi-finished or polymer goods. This process is created in Food Industry or in the production of animal feed. The polymer melt is pulled out using an extruder head into a molding head with a special profile.
How does the process work?
Most polymers can be extruded: thermoplastics, elastomers and other materials. Technology welding extruder has been used for many years. During processing with special equipment, there are several different characteristics: composition of raw materials, percentage of humidity and nature. Pressure and temperature may change during operation. Where can a welding extruder be used?
- Feed processing.
- Creation of plastic and polyethylene.
- Creating pipes.
- Food production.
Extruder design:

DIY extruder for 3D printer
A special feature of the hand-held 3D printer is that it works on the basis of filament-like plastic. different types, most often used ABS and PLA. The device of such an extruder consists of two blocks, the first is responsible for supplying the filament, the second is a nozzle with a heater that cools the device.
 How to make a homemade 3D printer extruder? First you need to choose a stepper motor or use motors from old scanners instead. To mount the motor, you will need a housing, a special roller and a hot end. The body can be made from different materials. A special roller is adjusted using a spring, because the thickness of the rod is rarely ideal. The material is connected to the feed mechanism, but the grip should not be too tight, otherwise pieces of plastic will start to break off.
You can buy a part called a hot end, but the price is quite high; it would be more profitable to download the drawings and make it yourself. The radiator is made of aluminum to remove heat from the hot end barrel. This helps eliminate premature heating of the material.
The most The best decision- This led radiator, cooling is applied using a fan. The hot-end barrel is created from a metal tube, which is created to connect the radiator and heater. The thin piece of tubing is a thermal barrier that handles the heat at the top of the extruder.
The heater in a 3D extruder is made from an aluminum plate with your own hands. First, a hole is drilled in it for hot end barrel mounts, then a hole is created for the bolt, resistor and thermistor. The plate is heated using a resistor, and the thermistor regulates the temperature. The nozzle is created from a blind nut with an oval end.
When choosing a nut, it is better to choose brass or copper; they are very easy to process. The bolt is secured in a vice, then the nut is screwed onto it, and so on. final stage- This is creating a hole in the center. This is how a homemade extruder for a 3D printer is created.
If you don’t quite understand how to make such a device for a 3D printer, then you should familiarize yourself with the videos and drawings to simplify your work.
DIY clay extruder
This equipment is designed for modeling. With the help of such manual extruders you can work with clay and plasticine. Main design for this extruder, it is considered plastic bottle transparent color. Before use, it must be washed and dried. You need to remove the plate from the cover using a needle or pin.
Next you need to create a hole from which the material will be squeezed out. The diameter must match the lines. Trim the edges of the hole and take a metal disk to which you attach the handle. Done, now you have a clay extruder. Everything is very easy and you don’t even need a drawing.
Conclusion
An extruder is considered very useful, because thanks to such a tool you can create many materials that used in vital areas. The 3D printer device makes the most quality parts, and it is very profitable to make it yourself, you can make a decent amount of money from this. When creating such a tool for a 3D printer, do not forget to familiarize yourself with the diagram.
In the practice of production activities of small enterprises involved in packaging various products, as well as when laying plastic pipes A tool is needed that can be used to reliably connect materials with a low melting point. The class of such materials is large - these are low-density polyethylene (HDPE), polyvinyl chloride (PVC), polypropylene, etc. A manual welding extruder can handle all this work.
Design and operating principle
A manual welding extruder is a thermomechanical device that sequentially carries out two processes - heating a low-melting plastic to a viscous state, and then squeezing the mass onto the surface in the joint area. There, HDPE, PVC and other low-melting plastics solidify, forming a strong weld.
For compactness and ease of use, the equipment in question is usually designed in the form of a pistol with a handle (in which the drive electric motor is mounted) and an upper nozzle for heating the working mixture. The welding extruder consists of the following components:
- Electric motor.
- Feeder.
- Extrusion chamber.
- Crushing screw device.
- Chambers for melting plastic.
- Thermal heater.
- Welding nozzle.
- Control systems.

To operate, the device is pre-filled with a filler rod made of the material that will be used for welding. The process goes as follows. On top panel In the extruder there is a receiving sleeve with a hole through which the filler rod is passed. The filling must be such that the free end of the rod falls into the area where it is captured by the auger. When the electric motor is turned on, two processes occur: heating the filler rod with a concentrated stream of hot air, and - after some time, which is determined by the device sensor - feeding the rod into the grinding zone.
There, a rotating auger crushes the plastic rod, turning it into a granular mass. The latter melts when heated, and, moving further, enters the melting zone. In this zone, the granulate is already mechanically and homogeneous. Under the influence of pressure from the screw, it passes into the welding zone, enters the welding nozzle and, in the process of pressing against the surface of the products being welded, is squeezed out into a uniform strip, the width of which depends on the configuration of the nozzle. Since the external temperature is much lower than that created by the thermal heater, the material of the filler rod instantly solidifies, forming a welding seam.

In less compact but more productive extruder models, the filler rod is heated using an external thermal heater, and air is supplied there from a small compressor. There may also be design differences in the method of heating the filler material: sometimes heating is carried out by ring heating elements coaxially placed in the thermal heater body.
The manual welding extruder control system performs the following functions:
- Pre-setting the heating temperature, which is determined by the melting temperature of the plastic (as is known, HDPE melts at 120...130ºС, PVC - at 150...220ºС, and polypropylene - at 170...190ºС).
- Turning on the thermal heater;
- Starting the drive of the auger grinder;
- “Cold start” blocking, when the screw can move still heterogeneous filler material;
- Switching off the thermal heater while the auger is still rotating, which eliminates the adhesion of granulate residues in the welding chamber.
Operating rules and selection of a manual welding extruder model
Before use, it is necessary to fulfill a number of conditions usual for plastic: clean the surface of the products to be joined from external contaminants and avoid working with wet material.
The success of the work also depends on the difference in the melting temperatures of the materials being joined, if they have different chemical composition. For example, HDPE with polypropylene can be welded using the method under consideration, since their melting temperature ranges completely or partially overlap. On the contrary, welding HDPE with PVC, and even more so with polypropylene, is problematic or completely impossible. In such cases, a welding extruder can only be used to join products made from the same materials.
The compactness of the manual welding extruder allows it efficient use even without stopping the operation of the connected devices. Particularly when welding polypropylene pipes It is not necessary to turn off the water supply through them.

A number of mandatory checks are carried out first (especially if the extruder has not been used before):
- Checking the straightness of the feed of the filler rod in the extruder sleeve: with high roughness of the forming rod, the rod can move not in a straight line, but along a helical line, which will worsen the operating conditions of the screw crushing device and lead to the formation of granulates that are not uniform in size.
- Control check of the effectiveness of the heating temperature of the rod to the state of its viscosity: material from different manufacturers may have a different melting point range.
- Checking the reliability of pressing the welding nozzle to the surfaces being joined, especially if they have a complex configuration. Many models of manual welding extruders are equipped with replaceable nozzles for this purpose.
- Checking the possibility of melting the materials being joined with heat from a thermal heater, without supplying a filler rod. It is carried out in the absence of accurate information about the material of the products connected in this way.

Choice suitable model manual extruder is produced by the following parameters:
- By productivity per unit of time;
- For the convenience of managing process parameters;
- According to the thickness of the welded products;
- By equipping the device with replacement devices
- According to the range of rod diameters.
It should be noted that most brands are designed to work with filler material from a specific manufacturer (often the same one that produces extruders).
Theoretically, it is possible to make a household welding extruder with your own hands. To do this, a screw drive is attached to a conventional industrial hair dryer (for example, for grinding feed), and both units are designed in a compact form. Instead of a screw, a more affordable plunger drive is sometimes installed, but this option is unreliable: it all depends on the homogeneity of the material of the original rod. The electric motor for the drive is selected as a commutator type, which better tolerates constant changes in torque values.
Welding extruder manufacturers
The most popular devices in this market segment are:
- From trademark Munsch (Germany). Consumer advantages - ease of fastening of all components (which increases maintainability), undemandingness in the size of the filler material, the presence of a separate heating function (useful when using the extruder outdoors in the cold season), a convenient set of replaceable nozzles, perfect system management and control. Plus - traditionally high German quality of manufacturing and assembly.
- From the Leister brand (Switzerland). The manufacturer produces a wide range of standard sizes of welding extruders: from small ones, with a productivity of up to 0.8...1.2 kg/h, to professional ones, designed for processing up to 6 kg/h. The devices are equipped modern system control and monitoring of the welding progress, ergonomic to use. The quality is also at high level. There is a special line.

- From the Dohle brand (Germany). The company is known as a manufacturer construction hair dryers, however in Lately actively positions itself as a manufacturer of manual welding extruders. Unlike the above brands, it uses purchased electric motors for drive. It produces the smallest extruder with a productivity of only 0.5 kg/h, which is equipped with a hose and a built-in mini-compressor.
- From the Stargun brand (Italy). With a small range of models, extruders from this company differ in drive power and are designed for use primarily in professional conditions. The highlight of the devices is the possibility of local illumination of the welding zone.
- Domestic extruders of the RSE type. They are equipped with a filler material supply drive and include most of the same options that have already been listed above.
Prices for extruders depend on their functionality and performance. On average, the cost of domestic devices ranges from 30,000 to 55,000 rubles, imported ones - from 50,000 rubles. and more.
I will have to make an extruder for plastic with my own hands for the following reasons. Firstly, I decided to make one, and I will need a lot of rather expensive rod for a 3D printer, which is much cheaper to produce myself using a plastic extruder than to buy a ready-made rod from ABS or PLA plastic for a 3D printer. Secondly, the plastic extruder is one of the components thermoplastic machine (TPA), which I have been dreaming of for a long time. So, again, I'm trying to kill two birds with one stone and save myself a lot of money.
 Let's figure out what a plastic extruder consists of and how to make one with your own hands minimal costs. A plastic extruder consists of a tube ending in a removable brass nozzle from which the molten plastic will come out. A so-called auger (a large screw like in a meat grinder) will rotate inside the tube. This auger will push the plastic granules along the tube. Starting somewhere slightly to the middle, the tube will be heated by a special heating element, due to which the plastic inside the tube will melt and reach the nozzle in a fairly fluid state.
The auger is an ordinary large-sized wood drill, purchased at a tool store for 340 rubles. I messed up a little with the diameter and took 22mm, which I later regretted greatly, because it turned out to be quite difficult to find a pipe with the same internal diameter. Therefore, my advice to you is to first find a pipe, then look for a suitable drill (auger) for it.
As can be seen in the very first photo, the tube is divided into two parts, connected by flanges. This is necessary in order to separate the particularly hot part of the tube from the rest of the mechanism. Later, a heat-resistant insulating gasket will be sandwiched between the flanges. In general, heat will still be transferred through the screw, but a collapsible tube will make the extruder more maintainable and will leave space for experimentation (remove one tube and screw on another).


I made the flanges on my own homemade machine CNC made from 5mm steel sheet. As you can see, my machine chews steel quite well, despite its still flimsy and unfinished Z axis. Two flanges, twisted with bolts, were clamped into the vice. We want all the holes to match!


To ensure the parallelism of the two pieces of pipe, I welded the flanges to the frame before sawing it. We twist two flanges together (in one of them I cut an M6 thread, in the other I simply through holes), and it is necessary to twist through washers, the thickness of which would then allow a hacksaw blade to fit between these flanges. By the way, do not forget to mark how the flanges should be attached. To do this, I sawed the mark at the end with a file. The flanges are connected correctly if the marks on them match.
 The next step was to make a slot in the short part of the pipe. Granulated plastic will flow into this slot through a special funnel and be pushed by a screw further along the pipe towards the nozzle. note that right part The loading slot approximately coincides with the beginning of the screw.
One of the most tedious stages of creating an extruder for plastic with your own hands is making a heating element for the longest part of the extruder - the one in which the plastic will melt. Here I also decided to save money and do a heating element independently from crushed refractory brick mixed with liquid glass and nichrome wire, pre-calculated for a given power.
The difficulty is that I don't have carbon dioxide for fast hardening liquid glass. So far I haven’t found where in our city you can refill a carbon dioxide cylinder. It would have been possible, of course, to play around with a carbon dioxide fire extinguisher, but somehow I didn’t want to waste such a responsible device over trifles.
I read a good recipe on the Internet where a little cement (1/5 or even less) is added to the refractory. Then the liquid glass reacts with the cement and hardens in literally a matter of minutes. In the spring I did a good job with fresh cement, but by autumn the cement had already sat and deteriorated, so the liquid glass did not want to harden properly.


By the way, the cover from my auger in which it was sold was very useful as a mold for filling the pipe with refractory. And if I had not forgotten about special measures for hardening liquid glass, then my heating element would have turned out simply perfect shape. In fact, I forgot to add cement there, so I had to remove this entire mold and manually coat the pipe with a fireproof mixture, and then wrap it all in regular paper to dry. By the way, calcining liquid glass at 150-160 degrees helps speed up the curing process.


Today I unwound this scroll and checked the result. Sticky paper can be easily removed by moistening it with a little water. Overall, it turned out well, but you will have to re-coat it here and there, filling up the holes. The fact is that in some places the refractory solution with liquid glass “floated”, lagging slightly behind the extruder pipe. This was easy to detect by pushing my extruder heater along the entire surface with my finger. Where the refractory did not fit tightly to the pipe, it crumbled and fell off.
 Of course, the technology for making heaters for extruders with your own hands from refractory bricks and liquid glass will need a little work. This baked ring is especially inspiring - it turned out just great! (It can be clearly seen in this photo right next to the mounting flange) But for now I’m not going to mass-produce heaters for extruders, so let’s put this question aside.
 So, we got a heater with a power of about 3 kW. Yes, you can melt aluminum in this, not like plastic. I wonder what kind of extruder performance can be achieved with such a heater?
 Now all that remains is to fit the engine and make a normal driver with synchronization for it. Stay tuned…