Gates that do not open with leaves, but slowly disappear from our eyes, “driving away” along the walls of the garage, are convenient because they do not interfere, are not bulky, and do not take up space. The owner of such a device does not need to think about where it will be placed when opening, when a garage is being built, there is no option “difficulties in winter due to snow.” When opening such an entrance, only the lower part of the gate door near the garage ceiling is visible. Overhead gates are very secure because they are essentially a single piece of wood or metal and are very difficult to break into. If you galvanize them, they will also be very resistant to corrosion. The door will reliably protect against thieves, keep heat inside the building and will become very convenient and easy to use, but buying it is very expensive. Much cheaper and more interesting to do Do-it-yourself lifting garage doors.
Important! Before making such gates, you need to understand that they also have disadvantages:
All you need is a rectangular opening for the entrance to the garage; an arch will not work, except for decorative purposes.
You must first open the gate, and then drive close to the garage (you need about one and a half meters of space). When the gate is open, the height of the garage decreases by 15-20 cm.
Overhead gates are very secure because they are essentially a single piece of wood or metal and are very difficult to break into.
A model with sections is a canvas made up of blocks of wood, plastic, or steel, about 1.5 m in size. When this door is lifted, the blocks are “pulled” upward and then returned back the same way. Inside wooden canvas will be filled with polyurethane foam, which will not let the cold into the garage in winter. The panels are connected by hinge-type hinges, the moving parts consist of steel or plastic (steel is better, they will last longer), and the guide skids are resistant to destruction and rust due to their composition.
Unfortunately, such a door is almost impossible to make yourself, and breaking it is quite simple. You can buy a ready-made prefabricated kit and install the door to get its main advantage - simplicity and ease for the owner.
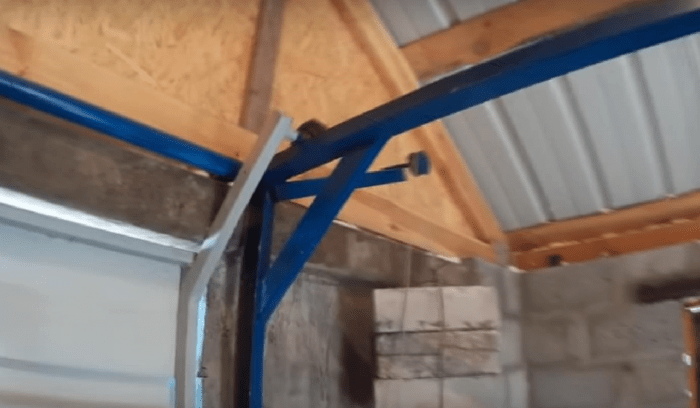
Lift-and-pivot doors - during movement, the doors “drive” under the roof using the action of hinges and levers. Such a door is very reliable and it is very difficult for an attacker to break it in order to rob a garage. They are also quiet during lifting, because they do not use “moving” elements: guides and rollers, and when using them, it is quite difficult to pinch your finger. This is an expensive choice, about 60 thousand rubles. for the object and 15 thousand for installation.
Important! Gates can also be without automation, manually operated or automatic with an electric drive. Naturally, the former are cheaper. The cost will be from 14 to 75 thousand rubles. From 7 to 15 thousand they pay for installation. You can buy the parts separately, but is it worth the hassle? It’s easier to purchase an installation kit so that you can assemble and install it later. Each type of door comes with detailed description step-by-step assembly.
 Lift-and-pivot doors - during movement, the doors “drive” under the roof using the action of hinges and levers
 This type of door includes a frame, a lifting leaf and a mechanism that opens the door. Steel or wooden frame mounted in the opening, profiles directly for the canvas must be placed in the box. It is made from wooden planks, sandwich panels, it should be covered with metal. Door made from whole piece wood, a very expensive pleasure, the choice is simpler - boards impregnated chemical composition, which will protect from the weather and covered with metal, painted in any color. You can cover the tree with pieces of pressed foam or other insulating material.
Before you start making gates, you need to study available methods rise.
- Method when using hinges and levers. The simple design promises reliability, but you need to very successfully install the guide profiles and carefully adjust the spring tension. The profiles should be placed parallel and evenly.
- Counterweight method. The cable is attached downwards at the corners of the frame, passed through a block, led to the winch pulley, and at its end there is a counterweight. Its mass will be commensurate with the weight of the gate. This option means that the frame and frame will be subject to considerable load; it is recommended to choose such a mechanism exclusively for huge gates. Next step: gate design. We measure the opening and draw a sketch (we look for drawings on the Internet).
Important You will need the following parts: a metal rod for the voltage regulator, diameter 8 mm; corner for rail section - 40 x 40 x 4 mm, for frame - 3.5x3.5x0.4 cm; wooden blocks with a section of 12 by 8 and ceiling 10 by 10; channel bracket 8 x 4.3 x 0.5 cm; metal pins; spring diameter 3 cm.
The box is assembled from wooden blocks, their ends are connected by steel plates or corners, and the bottom goes 2 cm deep into the floor, then we fix it into the opening with steel pins.
 This type of door includes a frame, a lifting leaf and a mechanism that opens the door.
 The frame is made like this: take a thick corner, its parameters are directly dependent on the panel fabric, with 25, take the 75th, with 50, the 100th corner. Next, we measure the garage and prepare the opening for attaching the frame, you need to make sure that its surfaces are smooth and even, if this is not the case, we take the grinder in our hands and work. Next, we look for a workspace for the welding process. We will have 2 channels lying on the welding site, their parameters are 20 cm smaller than the frame. We cut the corners to length at both ends, making sure that they fit tightly. We weld them together, make cuts and use four (five) electrodes, create a frame, but do not weld them very tightly. We apply it to the opening and control the density; if it is not there, then we adjust what happened and weld it again, then we clean the seams. We do the same with the second part of the frame, then do the same on the second wall, the frame should be made double - internal and external, install it.
A support for the channel bracket is made from the corner, a hole is made in one shelf to secure it to the racks, and 3 holes are made in the other to secure the spring bracket. We secure the bracket by drilling 3 holes in one of the shelves. Next, we make an adjustment plate from an iron strip and use it to connect the spring and bracket. We bend the last turns of the spring with hooks, attaching a tension regulator from a rod to the bottom. We create a hinge corner for the lower part from the corner, drill a hole of 8.5 mm and weld it to the frame, retreating from the lower edge to the central part of the hole. Thus, we prepare for the manufacture of a lever for lifting on a 12-cm hinge. Next, we weld to its end and attach a plate for the voltage regulator.
We will need two corners for the gate to move. We take two corners, butt them together and connect them along the edge so that the distance between the tops is at least 5 cm. We weld the rail to the plate with holes, leaving 8 cm between the lower edge of the cross member and the axis of the guide. Weld a piece of channel with an indentation of 12-15 to the second end of the rail cm. Next, we attach it to the ceiling beam. You can install additional protection devices if desired, as well as rubber edging and linings, they will make the structure more stable and will give stability to the structure.
 Garage Doors
 It is advised to pour concrete into a trench along the length of the stroke between the side posts, press the channel parallel to the ground, and when it hardens, weld both frames.
Installation of the canvas
We measure the diagonal, taking into account the dimensions, attach it by welding, all kinds of gaps are eliminated, we clean the seams and install the canvas. We attach the brackets and guides, their horizontal must be made ideal, then: we insulate the canvas, fasten a metal sheet, we clean the seams and degrease them. We adjust the springs and secure the internal fittings. The entire celebration of work and construction will take two to three days.
The option is complicated, but they are airtight and better protect the room. They can be electric or manual. The first option is convenient; just press a button or remote control and you’re done. But manual drive It breaks less often, and it’s easier to make a shield for it. Required Parts impossible to make at home. Parts cannot be purchased on the market; it is better to buy a factory kit.
The garage doorway should be measured and assessed whether a standard door leaf will fit, and also check that the side parts and the top and bottom of the opening are in the same plane. We add 50 cm to the height of the doorway (if the gate with a drive is 100 cm), this is the length of the garage required for the gate to rest on its ceiling.
 The option is complicated, but they are airtight and better protect the room
 Sectional doors consist of a door leaf, locks, a movement mechanism, a spring balancing mechanism and guide modules. Tires are attached to the edges of the opening, which are driven under the ceiling, and the gate moves along them. It is better to buy polymer sections; they are practically resistant to corrosion, do not create noise, and can withstand temperatures of -50 - +60.
Installation diagram
Create markings to secure the frame and constituent elements. Assemble the frame structure (not much different from a similar algorithm for up-and-over gates). Everything is standard: we install the frame, bolt the guides to the ceiling, but there is no need to drill holes or make other structures to hold it suspended. We assemble the canvas, starting from the bottom, and equip the panel elements with rollers. We protect the structure with casings. We check - if everything is done correctly, the canvas will not move on its own, hovering at the level at which it was installed.
It’s worth saying in conclusion - homemade sectional doors must be safe. The bet is your own car, or even your life. You should be extremely careful about the installation rules, adhere to safety precautions and pay a small amount to a specialist who will check the quality of the door installation after the owner’s efforts.
Do-it-yourself lifting gates
This option and type of gate will be optimal for self-production. This does not require much time or any specialized skills. Basically, to make a gate with your own hands, you will need:
- welding machine;
- metallic profile;
- rollers;
- The shield itself is for the gate.
Basics of work
First, you should finish any work inside the garage. The design feature means that dust getting into the guides or rollers can interfere with normal operation and malfunction. Again, the floor should be finished after installing the gate, since it (the frame) must go at least 2 cm deep. The walls and garage opening must be level so that the guides can be easily installed.
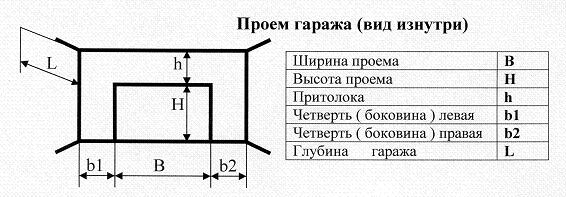
The next step will be to take measurements of the opening. This is how you can determine what height the guides are needed and what size the shield will be. In Fig. 1 is an example of what sizes you will need.
Frame making
The next action that should be taken is the manufacture of the frame, the base of the gate. Here are several options available for use:
- steel structure can be used;
- you can use wooden blocks.
The final choice is yours, but still, metal will be more reliable. As soon as the frame is welded, it should be tried on in the opening to eliminate various errors or miscalculations. If the frame is level, you have checked its position both horizontally and vertically, it should be secured at least with anchors. Your frame should look like this:

If you have gaps between the wall and the frame, the gaps should be blown out construction foam, and then secure the horizontal guides that should be under your ceiling.
After you install the frame, you should weld the brackets for the rollers to the guides and install the rollers themselves. The upper brackets with rollers should be installed a little further forward. This will ensure normal work– the gate will not cling.
The image below gives you a closer look at what your frame should look like from the outside.
Selecting and creating a gate shield
Since it will be located outdoors, the shield should be made most resistant to various climatic conditions. The shield is made from any available materials. It can be:
- wooden blocks covered with metal on the outside;
- you can use a solid sheet of metal;
- you can make a frame from several steel profiles, With minimum distances from each other, and then sheathed with pieces of metal.
Again, no one forbids you to use it as finishing material Let's say plastic. In this case, the appearance of your gate will be aesthetically pleasing. Moreover, the color of the plastic is offered in a wide range.
In the picture below, you can see ready-made options. In the first case, a solid metal sheet is used, in the second, a shield sheathed with metal is presented.

When making a shield, there are several little tricks that will be relevant for any owner.
Firstly, you can knock down your gate special materials which will help keep the room warm even in frosty weather. Such materials will be quite easy to find. And hitting the gates with them will not be difficult and will not take time.
Secondly, it's worth giving one more helpful advice. In order not to once again use the entire structure of the gate, and not to open it completely, you can make a gate in the shield through which the owner can enter. In the figure below you can see an example of such a solution.

Many people make windows in the gates. In this case, you also have two solutions. You can cut a hole in the canvas and seal it yourself with glass or plastic, or you can buy a ready-made gate window at a specialized store.
Having completed all the work, the finished shield should be placed on the runners and the functionality of the structure should be checked. Next, install (weld) the springs. They will ensure smooth opening/closing of the gate, and will also facilitate this process.
In the photo below you can see finished design how it should look outside and inside the garage.

Installation of additional parts
These include:
- handles for opening;
- latches for fixing the gate;
- locks and temples.
Handles should be made at the bottom of the canvas, both from the inside and from outside. This approach will allow you to easily close and open the gate without clinging to the edges with your fingers. And in the cold season this will be very problematic.
The latches should be installed with inside canvases. So, if you have made a gate, you can only open the gate from the inside. This will completely secure your garage. If the garage is attached to the house, and there is an entrance to the garage from the residential part, then the purchase and installation of latches and latches can also be called the optimal solution.
If the garage is a separate building, then it should be closed with special locks. Or, you can buy ordinary, hinged ones, having previously made bows on the canvas and on the vertical frame (on the side facing the street, outward).
In fact, this will be the final stage self-installation and creation overhead gates with your own hands. All you have to do is paint the frame and the shield in the desired color, or, as mentioned above, do the upholstery of the shield thermal insulation materials or soundproof.
But this is not all the work that can be done. Eat alternative options in the mechanism, as well as modification of existing gates.
In particular, you can install a counterweight system. To do this you will need a winch and cables. In this case, a smoother ride can be achieved, and it also opens up greater possibilities for modifications.
The basis for safe operation
In the process of working on the gate, having finished the basics and checking the functionality of the structure, it is worth taking care of safety. It is necessary to make stoppers that will not allow the canvas to leave the guides. This is very important point which can protect you from injury.
Gate automation
In most cases, overhead gates, which are created with your own hands, open and close manually. It's simple and reliable. But, on modern market We offer a wide range of various drives that can be installed on your gate. In this case, you can open or close the gate only by pressing the corresponding key.
Installing such a system will also be quite simple. The drive, along with the necessary components, is sold in any store specializing in the sale and installation of gates.
Again, you can make your gate open remotely. It's very simple. On almost all drives you can find a control panel, and in the instructions you will find sawing of the contacts. Connecting everything correctly will not be a problem - it will be difficult to give an example here, since different manufacturers use their own standards. But in any case, such information can be found in the instructions for the drive.
By installing the drive, you will receive a gate that is in no way inferior to the factory one, with the ability to open remotely, with all the advantages and features, but much cheaper. Final version appearance The DIY gate can be seen below.
By following this guide, you will surely be able to create your own gate easily and simply. And you can see the results of the work of other people who also set out to create lifting gates with their own hands in the video below.
Video - Do-it-yourself lifting gates, drawings and assembly features
We install overhead garage doors with our own hands
Up-and-over gates are the most convenient, reliable, practical, but quite expensive type of enclosing structure for a garage. IN open position they take a horizontal position and move forward a little, forming a small canopy over the entrance.
Their pros and cons, as well as self-installation, will be discussed in this article.
Advantages and disadvantages of this type of gate
The lift-and-swivel design has several clear advantages over other types garage doors:
- durable solid fabric provides reliable protection from unauthorized entry and burglary;
- characterized high stability to corrosion and other negative consequences environmental influences (subject to manufacturing technology and recommendations for the selection of materials);
- does not require space to open;
- when open, does not take up useful space;
- involves finishing with different facing materials, allows decoration with any inserts and panels;
- can be insulated with special polystyrene foam panels;
- can be opened manually or equipped with automatic system opening;
- Suitable for installation in single and double garages.

The disadvantages of up-and-over gates are mainly associated with some limitations and features of the design itself, which are expressed in the following:
- it can only be installed in rectangular openings;
- when open, reduces the height of the opening (approximately 20 cm).
- The one-piece door leaf makes it impossible to repair individual sections - in case of damage it is required complete replacement the entire element;
- the gates are equipped with a spring mechanism, which is designed for a certain mass of the structure, therefore, when performing thermal insulation, the weight of the insulation should be taken into account: if the mass of the insulated gate increases significantly, it is necessary to install counterweights;
- There may be gaps between the canvas and the frame, which can be eliminated using rubber seal, but such gates are recommended to be installed only in unheated garages.
Gate operating principle
The design of up-and-over (panel) gates is quite different simple device. It consists of frames, canvas and guides along which it rotates around its axis, moving from vertical to horizontal position and back.
The basis is a steel frame, which is fixed in the garage opening or behind it and is the leading part when the gate moves. For its manufacture, rectangular pipes are usually used.
When the gate is opened, a roller mechanism and lifting arms are activated, with the help of which the gate leaf moves along the guides and is then fixed under the garage ceiling. The lower part of the canvas rises up and forms a canopy over the garage opening. The compensation springs stretch when the gate is closed, but remain free when the gate is open.

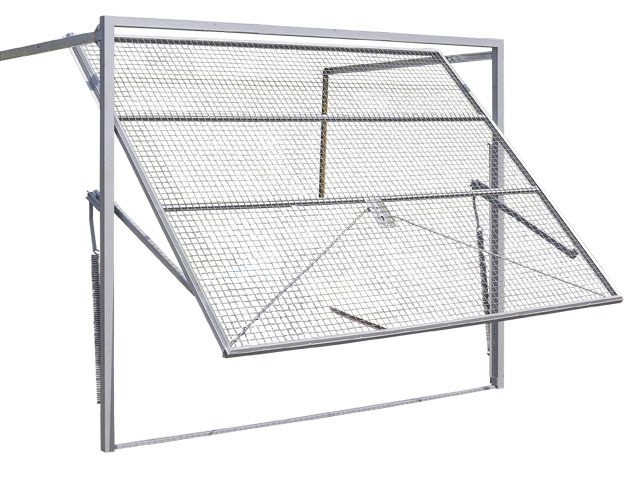
Gate in open position
The opening mechanism for this type of gate is of two types:
- Articulated lever- a simple, reliable and most popular mechanism that ensures simple movement of the shield and prevents it from blocking. Mandatory requirements: careful adjustment of spring tension and high precision installation of guides.
- On counterweights– this mechanism consists of a cable attached to bottom corners frame and passing through the block, as well as a counterweight mounted on the opposite edge of the winch. This mechanism is recommended for use for massive gates with a lot of weight.
Control of panel garage doors can be manual or using an electric drive (usually with a remote control).
Selection of materials
Materials for up-and-over garage doors should be selected depending on the mechanism and leaf used. For the most simple gate, which you can make with your own hands, you will need (all measurements are given in centimeters):
- wooden blocks: for a box with a section of 12x8, for a ceiling - 10x10;
- metal pins;
- corner: for frame - 3.5x3.5x0.4, for rails - 4x4x0.4 cm;
- channel bracket 8x4.3x0.5;
- spring with internal diameter 3 cm;
- metal rod with a cross-section of 0.8 (for the tension regulator);
- electric drive (if gate automation is provided);
- canvas.
As a canvas, you can use a board made of boards covered with metal, a solid canvas or a sandwich panel.
For self-made gates the best option is a board panel covered with galvanized iron and covered protective composition. For thermal insulation, you can use polystyrene foam, polystyrene foam or insulation in mats, and to improve the appearance, you can line the finished gate with wooden panels or plastic.

Self-assembled gates
Necessary tools for work
For self-installation up-and-over garage doors will require a traditional set of tools:
- level;
- hammer;
- pencil;
- drill;
- spanners;
- screwdrivers;
- drill;
- Bulgarian;
- welding machine.
The first step in installing a gate is designing it. For this it is necessary measure the opening and draw up a sketch yourself or select a ready-made drawing.
Drawing of up and over gates
After this, materials and tools are purchased and the direct work for gate manufacturing:
- A box is assembled from bars, which are fastened together with squares or metal plates.
- The box is fixed in the opening and secured with pins, the bottom is buried approximately 2 cm into the floor screed.
- The gate leaf is assembled: the frame is sheathed with a shield and covered with sheet metal.
- A mechanism support is made from a corner, two holes with a diameter of 1 cm are drilled in one shelf for fixing to the longitudinal posts, and three more are drilled in the other for fastening the spring bracket. To attach the channel bracket, used as a support for the spring, 3 holes are drilled in one of the shelves.
- The bracket and the spring are connected using an adjusting plate made from a strip of iron. The outer coils of the spring are used as hooks, and a tension regulator made of a rod is attached to the bottom. On one side a ring is formed, on the other a thread is cut.
- The hinge unit at the bottom is made from a corner with a hole (0.85 cm) and welded to the frame between the lower rib and the middle of the hole for the lifting mechanism lever at a distance of 12 cm.
- A plate with a hole for the tension regulator is welded to the end of the lever.
- Rails are made for the movement of the shield: 2 corners are made, and the edges of their shelves are welded in such a way that inner space between their tops was 5 cm.
- One end of such a rail is welded to a plate with holes. There should be a gap of 8 cm between the center line of the guide and the lower edge of the crossbar. The channel pieces are welded to the other edges of the rails at a distance of 14-15 cm. The channel is attached to the ceiling beam with a bolt.
After assembly is completed, the structure is painted to give it an aesthetic appearance, hard to reach places It is recommended to paint before assembly.

- It is recommended to use welding to assemble parts, which will reduce the need for fastening and drilling holes;
- the height of the gate opening should not be less than 2.2 meters, and the distance from the top of the opening to the ceiling should be 0.35-0.5 meters;
- if the rise is low, the drum should be located at the rear;
- there should be a groove in the lower profile of the canvas into which the seal is installed;
- the weight of the canvas is very important parameter, its optimal value is 100 kg;
- as a drive you can install a reversible self-locking winch (220 V, 350 W, traction force - 125 kg);
- To install automation, you can use a car alarm.
For ease of use, the canvas can be made with inserts made of translucent materials, which will increase the amount of light, and also be equipped with locking devices and security systems that protect against pinching or prevent break-ins.
Homemade up-and-over gates are the most economical opportunity to close a garage opening without limiting the functionality, ease of use and originality of their design.
On video - detailed story O self-production up-and-over garage doors:
Most experienced car enthusiasts prefer old swing or sash gate options, considering them the most secure and reliable due to the heavy weight and thickness of the metal. But, as practice shows, leaf systems have a worthy competitor, namely, folding garage doors. Popularity folding design such that today it accounts for approximately three-quarters of garage doors sold. It is worth understanding the reasons.
Advantages and disadvantages of overhead garage doors
To understand the difference in using lift-and-fold systems and the old swing structure, you need to try them out in practice at least a couple of times to knowledgeable person the difference is visible to the naked eye:
- The hinged door system allows you to avoid the formation of a “blind” zone when leaving the garage. Lift systems do not have doors that block the view, which is why dozens of cars crash in garage cooperatives every year;
- The absence of swing doors when opening the doors increases the space for maneuver in front of the gate; there is no need to park the car a couple of meters from the doorway in order to be able to open and close the garage.
For your information! Often, drivers decide to change regular gates to folding ones for only one reason: in a strong wind, there is a chance of getting hit by the gate on the car body at the time of departure.
Folding gates are cheaper to manufacture, they are more convenient to use, and the simple device allows you to build them yourself. But it is not possible to install such a system in every garage; at a minimum, you need free space in the ceiling above the entrance to the garage.
We build folding garage doors with our own hands
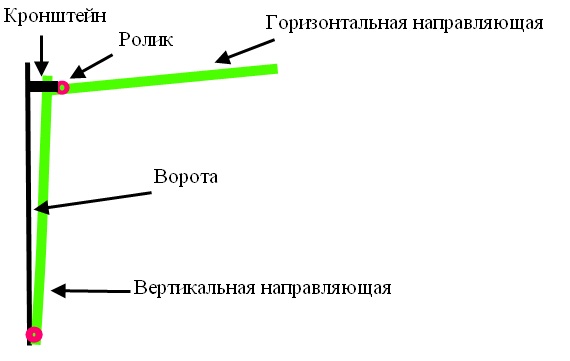
The structure and operating principle of the gate are clear from the diagram and drawing below:
- Structurally, the gate consists of two frames - the shield itself, or the panel covering the doorway, and the supporting one support frame with guide elements;
- When opened, the upper part of the hinged gate is tilted and moves on rollers or bearings along two guides until the panel is completely on two horizontal beams;
- The bottom edge of the panel rises up and is fixed in this position.
The plane of the folding gate makes a movement reminiscent of rolling around a conventional cylindrical surface of large radius. To make it easier to lift steel or wood panel folding gates, the design uses compensation springs or counterweights in the form of a load suspended on cables.
Important! Unlike swing systems, folding gates do not have external hinges that can be easily cut with a grinder. In this case, the panel covering the doorway is adjacent to the supporting frame from the inside, so it is much more difficult for attackers to pull out the garage door with a cable hooked to the tow bar of a pickup truck or tractor.
Manufacturing of hinged gate assemblies
The easiest way to make a hinged gate design is from a steel angle and channel. Initially, you will need to measure the dimensions of the doorway, cut it from the channel and weld the frame of the garage doorway.
At the top of the frame, two horizontal corners with a flange width of at least 40-50 mm are welded. The length of each corner is more than two meters, so perform welding work and the assembly of the entire structure must be “on the ground”, before installing the folding gate system in the doorway.
The angle of attachment of the corner to the frame must be adjusted according to construction level. After welding to the frame, each corner is strengthened with a temporary brace made from a board or wooden slats to avoid deformation of the structure at the time of its installation in the garage doorway.
If a lift in the form of loads suspended on cables will be used in the folding gate system, one pin with a groove roller with a diameter of 30-50 mm must be welded to the upper part of the frame.
Particular attention should be paid to the manufacture of the main panel of the folding gate. Structurally, the folding panel is a frame made of a pipe or a metal tubular profile with outriggers-brackets welded to the lower and upper parts.
The tubular frame of the panel must be marked and welded exactly to the dimensions of the stationary frame. The main condition is to carry out welding in three steps so that the frame of the folding panel does not turn out like a “propeller” due to overheating.
First, the cut pieces of the profile are laid out on a flat area and fixed together spot welding. At the second stage, the joints are boiled on one side of the folding frame, after 30 minutes they are turned over and boiled from reverse side. If the panel frame turns out to be strictly in one plane, you can attach sheet metal, otherwise you will need careful straightening using blowtorch and sledgehammers.
Assembly and installation of folding gates
Before installing a tilt gate system, you will need to complete pre-assembly designs. To do this, a stationary frame with welded corner guides is laid out on a flat horizontal platform. A freshly welded movable panel is placed on top of the frame, its position is aligned so that it will stand in the closed position in doorway garage.
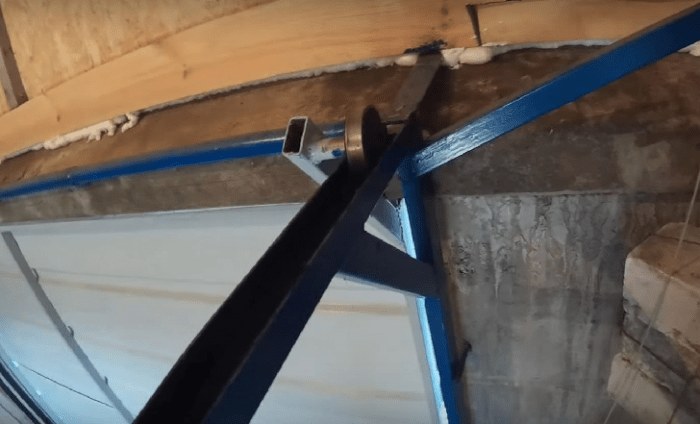
To connect the two parts of the gate, you will need to weld oblique brackets with roller or bearing rollers to the upper profile of the panel.
The reliability and smooth operation of the lifting mechanism depends on how accurately the supports are installed. Groove rollers are placed on the studs welded to the stationary frame. Additional L-shaped brackets are welded to the bottom beam of the panel, to which the support gate lift-lift cable will be attached.
All that remains is to install the stationary frame in the garage doorway and secure it with anchor bolts to the side walls of the garage. Subsequently, the fastening points will need to be carefully filled concrete mortar and plaster. Until the stationary frame is finally fixed, it will be necessary to align its position with the building level. Next, you need to make a U-shaped device, with which the ends of the corner guides are fixed to the ceiling.
When buying a car, every owner thinks about how and where to store it. The ideal place has always been and remains the garage. Its convenience determines the quality of life, no worse than other rooms in the house. The installation of garage doors is becoming more and more convenient and practical every day due to the fact that the industry does not stand still. Classic swing gates fade into the background. Practical overhead garage doors are becoming increasingly popular today. Creating them yourself does not seem difficult if you have minimal skills in performing such construction work. To find out how to arrange them correctly, quickly and efficiently, read this article.
To make a homemade overhead garage door, first determine suitable option designs.
Based on this principle, the following types are distinguished:

Features of sectional structures
The most common type of garage door at the moment is the overhead sectional garage door. They are made in the form of panels 40-60 cm high. 
Panels are made from several types of materials:
- plastic;
- metal;
- wood.
Important! They determine the choice of a specific type of material to create a garage door design, the dimensions of the car, the expected number of machines, as well as features design idea design of both the garage itself and the architectural ensemble on the site as a whole.
To maximize the quality of thermal insulation, such panels are filled with polyurethane, and the surface is protected with a special coating. Between themselves individual elements fastened with hinged hinges. All moving parts, such as clutches and rollers, are made from reinforced plastic combined with steel components, and the guide skids are made from materials that do not corrode. 
The operating mechanism of sectional garage doors is quite simple - they are pulled along runners to the ceiling when opened and fall vertically down when closed.
Advantages
The main advantages of such gates include the following features:

Flaws
In addition to the advantages, sectional doors of the lifting type also have a couple of disadvantages:

Distinctive characteristics of lift-and-turn solid mechanisms
When determining the features of such structures, it is certainly worth noting the following nuances:

Advantages
The solid-panel type garage door has a lot of advantages:

Flaws

Important! The main difference between these two designs is that sectional garage doors need to be installed only as a kit, whereas all elements of up and over doors can be prepared and installed with my own hands.

Video
Watch a video review of overhead gates to get a clearer picture of their operation and design.
Garage door installation tools
To install any type of garage door you will need the following tools:

Installation rules for overhead sectional garage doors
To correctly install sectional overhead garage doors, follow these steps in exact sequence:
Video
The video below will help you quickly complete the task of creating overhead garage doors. Please read it carefully.
Installation technology for overhead gates
Considering the fact that the construction of this type of gate will have to be done entirely on your own, we will highlight the main stages of the work in somewhat more detail. 
What type of rotary mechanism should I choose?
Homemade garage doors are the most economical option filling the garage opening without restrictions in convenience, functionality and design solutions. 
Before you start work, decide on the choice of mechanism by which the gate is directly opened:

How to make a project correctly?
To properly design a garage door, do the following:

What materials should I prepare?
Once you have drawn up or selected a sketch, purchase following materials and tools for work:

Installation procedure

Additional equipment
If you want to increase the attractiveness and reliability of the door leaf, equip it with the following additions:

Additional reinforcement
If necessary, strengthen the structure itself using one of the appropriate methods:

How to save money when installing garage doors?
The only thing you can do to save money when choosing overhead sectional garage doors is to install such a mechanism yourself. All other points, when trying to save money, will still require sacrificing certain advantages, although some options are quite acceptable. It all depends on your personal vision of the garage design and the regularity of its use.
Check out some of the most popular solutions to reduce the cost of garage door construction:

Conclusion
Overhead garage doors - modern way protect your garage from burglary with a convenient and beautiful shield. Whether you entrust installation and installation to specialists or do the work yourself is up to you to decide. The main requirement for further convenient operation is right choice suitable type of garage arrangement, competent interior layout and compliance with all assembly instructions.