One way to protect the foundation is to create a blind area around the house. This design can prevent the penetration of moisture into the supporting base and protect the foundation of the house from deformation and destruction.
Blind area device and selection rules
The main elements of the blind area are the substrate and the covering, each of them is assigned a specific function.
The substrate creates a strong and even base, on which a protective coating is subsequently laid. The substrate is made of clay or a mixture of sand and crushed stone.

The second layer – the protective coating – can be made from any material that has high strength characteristics and excellent waterproofing properties. Therefore, in most cases you can find concrete, asphalt, stone or tiled blind areas.
There are several types of construction, each of which can be used on soil with certain characteristics.
Rigid blind area
This design is made of hard surfaces, such as concrete or asphalt, which increases resistance to mechanical stress. IN mandatory a thermal insulation and waterproofing layer is installed, so the service life of the rigid blind area in most cases is equal to operational period main building. This type can only be installed on soils of medium or high density.
Soft blind area
A structure of this type is constructed using simplified technology and does not require large material and labor costs. To create it, several layers are poured bulk material. The average service life is about 5 years, so most often a soft blind area is used as a temporary option. In addition, the appearance of such a design is not attractive special attention. As for the type of soil on which a soft blind area can be laid, there are no restrictions.
Semi-rigid blind area
Already by the name we can say that this option is intermediate between the previous types of blind area. This applies to both material and physical costs. Protective layer can be made from paving slabs, stone or reinforced concrete slabs. This allows you to repair any section of the blind area without damaging the entire structure. A semi-rigid blind area cannot be installed in areas where there is a high location groundwater and deep freezing of the soil. In addition, it is used with restrictions on heaving soil.
Materials for making blind areas
Different materials can be used as a protective covering for the blind area; its choice depends on several factors. In particular we are talking about the following:
- Construction budget. If the arrangement of the blind area is not limited by material costs, then it is best to use expensive materials. In this case, the emphasis is on the quality of the design. If you have a small budget, preference is given to cheaper options.
- Specifications. If the structure will be constantly exposed to mechanical stress, then choose a material with high strength characteristics.
- Aesthetic requirements. In some cases, the main criterion for evaluating a structure is its attractiveness, therefore, when choosing a covering for a blind area, the aesthetic characteristics of the material are taken into account.

In addition, the positive and negative aspects of the coating used should be studied and taken into account.
Concrete paving stones
One of popular types covering for the blind area is concrete paving stones. The high demand for this material is explained by wide choice colors and shapes. In addition, the elements have different lengths and width, which allows you to realize any design solution. Installing paving stones does not seem difficult, so it is possible to carry out the work process yourself. The main advantage of the material is its strength and resistance to low air temperatures.

Elements of this type of coating have a natural appearance, as they are made from natural materials, granite and basalt. It is worth noting that such a coating requires significant material costs, so it is used if there is a sufficient construction budget.
Concrete
More economical option is a concrete blind area. The advantage of such a coating is maximum water resistance, the disadvantage is that it does not have a very attractive appearance. In some cases, to improve aesthetics, concrete is decorated with natural stone.
Paving slabs
This blind area has many positive characteristics, among them the following can be highlighted:

- Different sizes of elements.
- Wide choice of colors.
- Different surface texture.
- Possibility of replacement individual element without dismantling the entire structure.
Crushed stone
The simplest and most affordable option is to use crushed stone as the top layer of the blind area. In addition, this material is most suitable when groundwater is high and there is a drainage system around the house.
Making a concrete blind area with your own hands
In most cases, private developers prefer concrete blind areas. Such a design can be made with your own hands if you follow the technology and listen to the recommendations of experienced craftsmen. The construction process is divided into several stages.
Excavation
To arrange a blind area along the outer perimeter of the house, they dig a trench about 30-35 cm deep. As for the width of the trench, it depends on the size of the eaves and gable overhang and should protrude beyond the edges of these roof elements. Experts recommend using a value equal to half the depth of the foundation, but not less than 0.6 meters. On subsiding soils, it is allowed to make a blind area up to 2 meters wide.
At the bottom of the finished trench, a clay castle up to 12 cm high is made; for this, high-fat clay should be used. A kind of cushion is formed on top of the clay, which will reduce the impact of seasonal soil movements. First, pour a layer of crushed stone 5-6 cm thick and compact it well. Next, sand is poured in a layer of up to 10 cm and also compacted thoroughly. In the process of creating the bedding, the level must be controlled; the thickness of the layer of sand and crushed stone must be the same at all points of the trench. The upper level of the finished pillow should be located 5-6 cm below the planned level of the blind area.
A groove is made along the outer edge of the trench, 2 cm wide and about 2 cm deep.
To prevent sand and crushed stone from mixing with each other and reducing the strength characteristics of the blind area, you can separate them with a cloth of geological textiles.
Creation of formwork and armored belt
To create the formwork, boards measuring 2*10 cm are used, they are knocked together into panels of two pieces and connected with jumpers every half meter. The structure is installed along the side of the trench parallel to the foundation. The height of the formwork must correspond to the final level of the blind area. To strengthen with outside Shields are placed with wooden stakes at intervals of 1.5 meters and covered with soil.
To create an armored belt, steel rods with a cross-section of 8 mm are used, from which a mesh with a cell size of 20*20 cm is made. The reinforcing structure is laid in one row on special substrates about 5 cm high.
Preparation and pouring of concrete
Before preparing the concrete mixture, the required volume should be calculated. You can do this in a simple way mathematical formula, multiplying the height by the length and the width of the blind area.
Concrete must have a strength class of at least B25, so cement, sand and crushed stone are taken in a ratio of 1: 2: 3.5 (read also our article about). In some cases, when preparing concrete, liquid is used detergent, adding it 1 tbsp. spoon onto a bucket of solution. Experienced craftsmen believe that in this case the frost resistance of concrete and its resistance to water absorption increases.
Poured concrete mortar immediately before top level, then pierce the entire area bayonet shovel to remove voids. You can use deep vibrators for this.
The formation of transverse expansion joints will prevent deformation and destruction of the blind area. This is especially true for areas located in the open sun.
After pouring, it is necessary to level the surface of the blind area and remove depressions in which water can accumulate.
The finished structure is left for 7-10 days to gain the necessary strength. At this time, the surface should be protected from the hot sun and precipitation by regularly spraying and covering the blind area with film.
Two weeks after pouring, the formwork is removed and wet ironing is carried out. To do this, take equal amounts of sand and cement, dilute with lime milk with the addition of liquid glass. Ready composition should have the consistency of heavy cream.
The ironing process is performed as follows:
- The surface is moistened.
- Using a metal brush, break the structure of the top layer.
- The resulting dust is removed and the blind area is moistened again.
- After drying, the mixture for ironing is poured onto the surface and leveled with a wide spatula, moving it along the structure.
Soft blind area device
Unlike a rigid structure, a soft blind area does not have a hard top covering. To make a soft structure yourself, you must adhere to the following scheme:
- Mark the area.
- They dig a trench about 0.8 meters wide and about 0.4 meters deep.
- A clay castle is made at the bottom.
- The clay layer is covered with waterproofing material, placing its edges on the wall.
- Pour a small layer of sand and compact it.
- Cover the sand with geotextiles.
- Set up a bed of crushed stone.
- The geological textile is laid again and covered with sand.
- Equipping upper layer blind areas from the selected material.
A blind area made with your own hands will not only protect the foundation from getting wet and cracking, but will also delight you with its appearance throughout its entire service life.
Any homeowner (bathhouses, garages and other buildings are also considered) really wants his building to require repairs as little as possible. And the first concern is the safety of the foundation. To do this, it is important not only to plan and build correctly, but also to drain water - groundwater and precipitation. Responsible for groundwater drainage drainage system, and sediment is removed using a blind area. This equipment does not have the most complicated design: a blind area of any type is easy to make with your own hands. There is not a lot of work and costs, but it solves several problems.
Functions and tasks
We have long been accustomed to the fact that there should be a path around the house: it gives the entire layout a finished look. Especially if combined with finishing materials, which decorate the building. In addition, it is practical: you can walk along the path. And the fact that the path is a blind area, and its main purpose is to drain water, is good combination properties and qualities of materials and thoughtful design.
The main function of the foundation blind area is to remove sediment from it
If you look at it from a utilitarian point of view, the blind area drains rain and melt water from the foundation. The second very important practical task that can be solved with its help is to insulate the foundation. If you put insulation under the walkway, it will protect the house from freezing, which will greatly reduce heating costs.
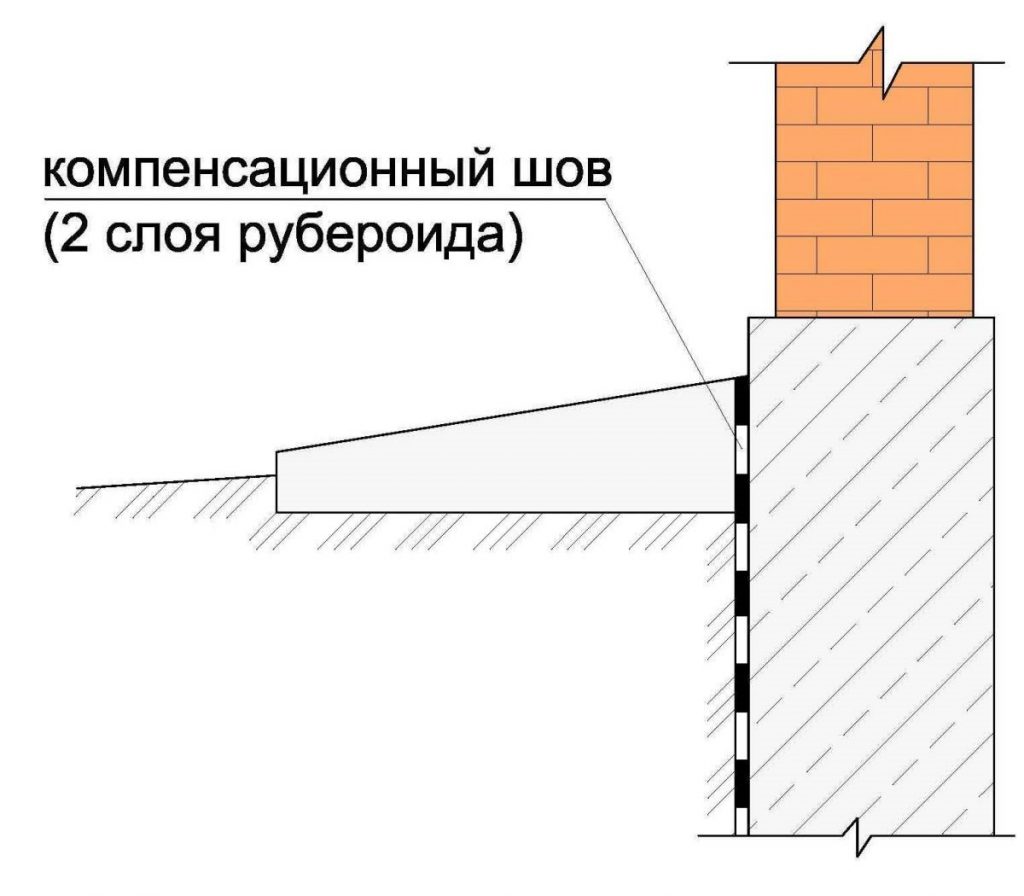
When should a blind area be done? Immediately after finishing the external walls, but before finishing the basement. Why is that? Because a compensation gap must be left between the finishing of the blind area and the wall of the house. This is an excellent path for water that flows down the wall of the house (falls on the walls during slanting rain, for example). But it is impossible not to make this gap - the foundation will collapse. It is also unrealistic to seal the gap hermetically. The solution is to make sure that water does not get into the gap in any case. This can only be achieved if the base trim hangs over the seam. Then the water will flow a few centimeters further from the seam, and then fall into the drainage grooves. This can only be done if you first organize the blind area and then finish the base.
Why do you need a foundation blind area, when to do it, we figured it out, now it remains to understand how to do it correctly.
Blind area dimensions
It is necessary to remove sediment from the foundation along the entire perimeter. That’s why a protective belt is made around the house. The width of the blind area is determined depending on the type of soil on the site and the length of the eaves overhang. In general, it should be 20 cm wider than the roof overhang. But SNiP sets minimum standards: on normal soils the width of the blind area is at least 60 cm, on subsidence soils - at least 100 cm.

The width of the blind area of the house is at least 60 cm on normal soils and at least 100 cm on subsiding soils
Also in the manual for SNiP 2.02.01-83 there is paragraph 3.182. There are the following instructions:
Blind areas around the perimeter of buildings must be prepared from local compacted soil with a thickness of at least 0.15 m. Blind areas should be arranged with a slope in the transverse direction of at least 0.03. The edge mark of the blind area must exceed the planning mark by at least 0.05 m. Water falling on the blind area must flow freely into the storm drainage network or trays.
From this passage it is clear that the depth depends on the technology chosen, but cannot be less than 15 cm.
Device technology
Any blind area consists of an underlying layer and a protective coating.
Backfill: what materials to use
The purpose of the underlying layer is to create a level base for laying the protective coating. Its thickness is about 20 cm. Sand and crushed stone are often used for these purposes, but native soil or clay can also be used.

Sand and crushed stone are used on well-draining soils. In this case, sand is first laid, spilled and compacted. Then there is a layer of crushed stone, which is also compacted.
If the soil on the site is clay or loam, then it is better to use native soil. If, with such soils, crushed stone or sand is laid around the foundation, then water will certainly be present near the house. Because it turns out that the density of the soil outside the underlying layer will be higher. This will cause water to accumulate under the blind area. If, with this design, a drainage pipe is laid around the perimeter of the bedding, the problem will be solved. And it’s effective. But there will be more work, and the cost of the blind area with drainage will be higher.
Types of protective coating
The covering for the blind area must meet many requirements:
- should not allow water to pass through;
- must be frost-resistant;
- have increased abrasion resistance;
- should not be destroyed by water.
This could be paving slabs or paving stones. The shape and color can be very different - choose based on general design territory, houses of nearby buildings. The thickness of these materials is at least 6 cm; only in this case will they withstand harsh operating conditions.

You can use slabs or tiles made from natural or artificial stone, you can lay out the paths with large pebbles or pour crushed stones on top of all layers.
There is another type that is becoming increasingly popular - this is a soft blind area. It has few layers but works effectively. There may not be any hard or waterproofing layer on top: you can pour soil and plant grass or flowers. Interesting solution for a summer house or country cottage.

All these options are not bad, but the cost of their arrangement is quite high. If there is a need or desire to do it cheaply and cheerfully, your choice is a concrete blind area. There will be a lot of work, but the total cost is low.
General principles
Depending on the soil on the site and the purpose of the building, they can be used different materials and structure of layers, but there are some points that are always present:

How to make a blind area at home with your own hands
First, markings are made along the perimeter of the building using pegs and laces. The following is the order of work:
- The plant layer and some soil are removed. The depth of the trench depends on the size of the underlying layer and the thickness of the protective coating. Usually - 25-30 cm.
- The bottom is treated with herbicides. This is necessary to prevent plants from growing in this area. They are able to destroy even concrete and asphalt, and they grow instantly between tiles or paving stones.
- The bottom of the trench is leveled, forming the required slope and compacted.
- The underlying layer is laid and compacted, maintaining the slope. It is advisable to compact everything using a vibrating platform. Manual tamping ineffective. Density is especially important when laying concrete, but it is advisable to compact it well under tiles or paving stones: it will not collapse or warp.
- A protective coating is laid.
- A drainage groove is formed.
It's very short and sketchy. Each coating has its own characteristics, and each needs to be discussed separately.
Concrete blind area around the house
The most widespread covering is concrete. It turns out to be the most inexpensive. Traditionally, the underlying layer consists of poured compacted sand (10 cm) sand, on top of which compacted crushed stone (10 cm) is laid. As already mentioned above, this scheme works normally on well-draining soils.

If there is clay or loam around the house, make the underlying layer from native soil. To reduce the effect of heaving and avoid cracking, pour 10 cm of sand on top of the compacted soil, and then lay concrete on it. This way the concrete will crack less, but you will not get rid of cracking completely: especially in regions with harsh winters. In such conditions, it is better to make a blind area from crushed stone or pebbles - there will be no problems with cracking. If funds allow, they make it from tiles. For harsh winters, with correctly selected layers of substrate, they stand well.
In general, on heaving soils it is advisable to make drainage that will drain the water flowing from the tape. This will be an effective and reliable solution. All the rest are just half measures. The drainage pipe is positioned so that water from the coating enters it.
Rules for concreting a blind area
Formwork is installed and secured along the perimeter of the marked area. Most often, the board is of sufficient height, secured with pegs and spacers.
To reduce surface cracking, reinforcement is often used. To do this, a mesh of steel wire with a cell size of 10-25 cm is laid out on the finished underlying layer.

Treated with antiseptics are laid out on top of the mesh (if there is one). wooden planks. The thickness of the planks is 2.5 cm, and they can be treated with hot drying oil. These strips are damper joints that will prevent the concrete from cracking when temperatures change.
The planks are set while maintaining the slope from the house. The rule is then “pulled” along them, leveling the solution.
To make the surface strong and smooth, ironing is carried out. Almost immediately after pouring, while cement laitance is still on the surface, the concrete is sprinkled with cement (can be crushed several times) and rubbed with a trowel or plaster float. A thin but strong, smooth and slightly shiny surface is formed on top. It is very resistant to abrasion.

The last stage is concrete care. The path is covered with a damp cloth. During the week, it is regularly moistened (sprayed from a hose or watering can). The fabric should remain damp. To avoid hassle with watering, you can cover it with film, but it is more difficult to keep it in one place.
Concrete for blind area
For the blind area, standard sand and gravel concrete is used. Darkness is preferably at least M150. It can be higher: the higher the grade, the more durable the protective coating will be. The proportions for preparing the solution for the blind area can be selected from the table. They are given for concrete grade M400 - not very expensive, the characteristics are normal.

Insulated blind area
It only makes sense to install an insulated blind area in a heated house. In buildings for seasonal residence, in which above-zero temperatures are not maintained in winter, this makes no sense. The meaning of adding a double layer of insulation:

If the insulated blind area of the house is laid at the design stage, then one more reason is added: if this detail is present, reduction factors are applied in the calculation. That is, the foundation has a lower height, and therefore less cost.
Insulated device option concrete blind area with a drainage system is demonstrated in the video. Everything is described normally, they just didn’t specify what to do if the layer of loose soil is more than 40 cm, which is required for the blind area. In this case, it must be filled with soil having a density higher than that located on the site. If there is clay on the site, then only that can be used. If it is loam, you can take either clay or loam.
One point: lay the clay not in a dry state, but diluted to a paste. The technology is old, but nothing better has been invented yet. It is laid out in layers, trying to avoid the formation of air pockets - water will certainly stagnate in them (or someone will settle).
Blind area made of crushed stone or pebbles
This is one of the types soft blind area. It's easy to do it yourself. This system is used if there is a drainage system or the soil drains water well, and there is no clay or loam under the plant layer.

The order of work is as follows. A layer is laid in a dug trench on a leveled and compacted bottom. This material is not thick, but very elastic. It will prevent crushed stone or pebbles from being pressed into the ground. And the path will not sag. Crushed stone is poured on top and compacted. Layer thickness 10-15 cm, fraction 10-80 mm. All.
If desired, the gravel blind area can also be insulated. Then 50 mm thick EPS (extruded polystyrene foam) is laid in a trench on compacted and leveled soil, a high-density geomembrane is laid on top, and pebbles or crushed stone can be placed on top of it. But it is not advisable to walk along such a path.
Do-it-yourself blind area made of tiles or paving stones
There are several device options, but the most optimal and versatile are “pies” using geotextiles.
For example, one of them is shown in the figure. It can be used to construct a blind area on heaving soils with harsh winters. Note:

It is advisable to use geomembranes as waterproofing. They are made from high density polyethylene. By brand: you can take Tefond, Isostud, Fundalin, TechnoNIKOL Planter Standart, etc. They cost around 150-250 rubles/m2.
Geotextiles available different brands and different densities, with different functional purpose. Choose based on the geology of the site. Their price is from 15 to 50 rubles/m2.
When constructing a blind area with your own hands, the main thing is to make sure that the water leaves the foundation and does not collect in the sand or crushed stone layer near the house. What will definitely happen if the soil is heaving (clay or loam), the underlying layer is made of sand and crushed stone, and there is no drainage.
The longevity of a building depends on the condition of the foundation, the health of which is determined by reliable and efficient drainage surface waters from home at any time. This task is performed by the blind area, which primarily has protective function. One of the most common and accessible is the technology of arranging a concrete blind area around a building. Its correct design, created with your own hands, will effectively perform the functions long years.
What does it represent?
The blind area is an external waterproof basement concrete structure in the form of a continuous path along the perimeter of the building, sloping from the wall towards the surrounding terrain adjoining plot. Its arrangement involves a tight but movable connection to the base of the house.
The structure is a layered “pie” consisting of materials that together keep the foundation dry. The basis of such protection is in proportion: a compacted, even underlying layer of sand (crushed stone, clay), waterproofing and a coating - concrete, which ensures the waterproofness of the structure.
Functions performed
A properly equipped blind area ensures the longevity of the structure, preventing the destruction of the foundation and structures of the house by precipitation moisture, melt water. A blind area without concrete, created with your own hands, is a temporary measure that does not solve the entire complex of problems of such a design.
Main function correct blind area- divert and transport water a sufficient distance from the foundation towards the lowest place on the site or into a storm drain.
In addition to the function of a horizontal hydrobarrier, the blind area (especially insulated) reduces the freezing of the soil around the house, which reduces the likelihood of it swelling (rising), and also reduces the thermal conductivity of the building. A blind area without concrete does not prevent periodic moistening of the soil close to the foundation and, as a result, harmful effects which can be caused by hard plant roots. Safety device also gives the building an aesthetically complete look and can be used as a pedestrian path.
Requirements for the blind area and design rules
 Scheme of the structure using reinforced concrete.
 Shingles protective structure must have the same width, the value of which is 20–30 cm greater than the overhang of the roof eaves beyond the wall of the building. It is generally accepted that it is about 1 m (or more on subsiding soils). The blind area is buried to no more than half the depth of soil freezing in the area. The thickness of the concrete coating is selected within the range of 7 - 10 cm (up to 15 cm if used as a path).
The recommended slope of the coating is 92 - 94 degrees relative to the wall of the building (or 10 - 100 mm per 1 meter of blind area width). The height of the base above the blind area at the junction of the structure is set to 50 cm. Its outer lower edge should be raised approximately 50 mm above ground level, which prevents the accumulation of water at the edge. The technology for creating a structure assumes the possibility of its integral movement following soil deformations relative to the foundation, which ensures near-wall.
How to make a blind area?
Markings are made on the area, the fertile layer of soil is removed. The underlying (clay) is laid. Geotextiles (for example, roofing felt) are laid. The formwork is formed taking into account expansion joints. The area is reinforced. Concrete for the blind area is prepared in the correct proportion and poured into the formwork. The coating surface is drawn out with the selected slope along the edge of the formwork and leveled. The concrete is given time to dry.
Preparation of tools and materials
 The marking quality is checked building level.
 For earthworks You will need shovels, a pick, twine, a tape measure, a tamper, and pegs. The required volume of geotextile (waterproof film) for the water seal should be calculated. Required in the right amount and proportions of components for mixing concrete (washed sand, water, gravel, crushed stone of fractions 5 - 10 mm, cement) or (for example, grade M400 and higher). Tools also include a mixer (container) for forming the solution, buckets, carts (stretchers), and a measuring bucket. The laying of the underlying layer must be provided with sufficient sand (clay).
The formwork is formed from boards, but a hacksaw, level, nails, and hammer are also useful. (steel wire), which should be delivered. Will be needed welding machine, a tool for cutting pieces of reinforcement. A long rule, trowel, and spatulas will help in laying and leveling concrete. The construction of seams will require polyurethane sealant.
A trench is marked around the house with pegs and string. The level at which the blind area adjoins the plinth is marked with beacons in increments of 1.5 m. Layer fertile soil is removed around the building, taking into account the layout of the surrounding surface. The bottom of the trench is compacted and leveled with the already formed slope (herbicides can be added). The depth of the passage can be 500 mm (on heaving soils).
Creation and compaction of a sand cushion
The bottom of the trench is lined with sand, the surface of which is also profiled with a slope. The material is abundantly moistened and compacted. The operation should be repeated at least twice. The thickness of the layer can be up to 20 cm. Its surface is carefully leveled.
 Using roll waterproofing materials for blind area.
 Its device involves laying two layers of waterproofing (for example, roofing felt) on a sand substrate, which are slightly folded onto the wall to create an expansion joint. At the joints the material is overlapped. Next, the geotextile is covered more thin layer sand, and then gravel (about 10 cm thick) with a slope of the top layer and compacted. It is advisable to place a drainage system close to such a water seal.
Creating formwork
Removable wooden mold protects the place where concrete is poured. It is reinforced with strong pegs with outside. The form provides for transverse expansion joints(after 2 - 2.5 m), which are installed, including at the corners of the formwork diagonally. Their tightness is formed by placing them on edge wooden blocks(butyl rubber belts), impregnated with waste oil and coated with bitumen.
The edges of the mold must be straight for the rule to apply. The difference in its height must correspond to the slope of the blind area. The height of the formwork corresponds to the thickness of the concrete. The expansion joint near the wall (10 - 20 mm wide) is filled with roofing material (hydro-swelling cord).
Reinforcement and filling
 The process of pouring the blind area of a house with concrete.
 A metal mesh of 50x50 (100x100) mm is used, which can be tied to pieces of reinforcement driven into the base in increments of 0.75 m. The mesh is raised above the level of crushed stone by 30 mm. Concrete is mixed and poured with your own hands in portions into the formwork sections to the level of its upper edge.
There should be no air pockets in the concrete. Correct proportions The concrete mixture for the blind area must correspond to frost resistance. The composition of concrete for the blind area is traditional (corresponding grade from M400 and above). Components that increase strength and durability can be added to the solution in proportion.
During construction, it is very important to properly make the blind area around the house. It allows you to reduce the amount of splashes of dirt during rain, which reduces contamination of the facade. However, poor design can lead to waterlogged foundation walls. There are several opinions among specialist builders about how to make a blind area around a house correctly with your own hands.
Some believe that making a moisture-proof blind area, for example from concrete, will effectively drain rainwater from the wall. Others argue that this element is built purely for aesthetic reasons, serving as narrow “sidewalks” along the façade.
The third popular opinion is that the main function of the blind area is to keep the house clean, as it helps to avoid contamination during rain.
So, how to make a simple blind area around a house from stone, tiles and other materials, what to pay attention to, how to prepare the base and what materials to choose - this will be discussed in the article.

Blind area around the house - how to do it correctly and what is it for?
First of all, it’s worth figuring out how rainwater affects external walls building. When it rains, water soaks into the ground (through the lawn or permeable strip around the house made of crushed stone, tiles or other materials). Some of the water will be absorbed to the groundwater level. However, some of it will rise up through the soil capillaries and evaporate from the surface, which is sometimes called “self-draining” of the soil. If a waterproof blind area is made, for example, from concrete, a constantly wet zone of soil may appear directly under the house, in contact with the foundation walls. In practice this will have adverse effect on the foundation walls, moisture can penetrate into the building and contribute to the development of fungus, especially if the house has a basement.
How to properly make a blind area around the house - video
Many specialists in last years It is recommended to insulate foundations using a waterproofing membrane film. Diffusion film membranes allow the walls to “breathe” and better drain water from the foundations (through a system of channels in their structure). This is only true if there is a place for the water to pass through to evaporate. If we place a membrane film under a waterproof blind area, it will not do its job.

In this case, the blind area must be made water-permeable, for example, from decorative stone or tiles laid on sand, gravel or gravel mixture (concrete or cement-sand bedding cannot be used). The border of the blind area must also be made, for example, a concrete rim or a plastic rim.

Functions of the blind area
According to most experts, the blind area of a house performs two main functions:
- First of all, it allows you to leave the facade clean, since rainwater splashes, bouncing off tiles or stones, which leads to mud splashing the walls.
- The second function is to improve the aesthetics of the building (of course, this is a matter of taste for each of us).
This is not the only thing possible application. This building element can also serve as an auxiliary path around the house, as well as a support for stairs or scaffolding for façade maintenance or window cleaning. Every year it becomes more and more important, since mechanical ventilation is becoming widespread, in which non-opening windows are often installed in the house. In this case, the only access to them is outer wall building.
How to choose the correct blind area width?
In order for the blind area to perform these functions, it cannot be too narrow. However, the most commonly used width is 40-60 cm, it will be enough to complete the main task, but it will not work in any of those listed above additional functions. A width of 80 - 90 cm will make the blind area relatively comfortable. For the passage of two people, this width increases to at least 120, but better to 150 cm. As for the “path around the house” function, in practice it does not have much practical use, since it is much more convenient to move along paths built directly in the garden than on the narrow sidewalks at the front.
It should be borne in mind that paths leading to the entrance to the building located too close to the wall will lead to much faster contamination of the facade. For the same reason, you should not connect the blind area to the group of the main communication line. If there is enough space, it is better to separate it with a narrow strip of greenery from the sidewalk. This will greatly improve ease of use and help maintain cleanliness.
Finally, the width of the blind area is selected to match the module of the selected tile or stone format. For example, we decided to use 18.2 x 18.2 cm tiles - then there is no point in creating a 70 cm wide strip, because this means cutting out almost all elements and significantly increasing the cost of labor and waste. Instead, it is better to choose 55 cm (18.2 × 3), 73 cm (18.2 × 4) or 91 cm (18.2 × 5). This will reduce the amount of waste to almost zero (tile elements will be laid whole or cut in half). For the same reason, when choosing trapezoidal tiles or other uneven-sided shapes, it is better to place them along the facade.
How to make a blind area around the house with tiles or stones?
We already know how to choose the shape of the blind area and what functions should correspond to it. Therefore, the only question is how to properly make a blind area? This is not particularly difficult, since it is structurally no different from other sidewalks and paths made of stone or paving slabs.
The best choice is a blind area made of paving slabs or stone; it can be made of decorative stone, pebbles or the more popular paving slabs. The main function of this design is to protect the facade from dirt and slush, as well as protect the foundation from moisture.

The most popular blind areas are natural stone, gravel, and paving slabs.
Work begins with a trench (it is important to remove all humus, which is quite simple to do), then a foundation, a leveling pad and a surface of tiles or stone are made. However, there are some additional rules.
First of all, you need to make sure that the level of the planned strip will be below the top edge of the vertical foundation insulation. Otherwise, the walls of the building may become damp. To protect against snow, it is recommended to perform vertical insulation at least 30 cm above the level of the blind area.
Second important point– slope. It must provide drainage from the building. For normal conditions the slope should be 2%. This means a 2 cm height difference for a strip width of 1 m. It is also important that the top edge of the curb does not protrude above the plane of the tile. It should be flush with its bottom edge.

- External wall of the building.
- Border of the blind area.
- Tile, stone.
- Priming.
- Vertical building insulation.
- Sand bedding.
- Bedding with a slope.
- Foundation of the building.
This design is very simple to implement and does not require precise compliance with height differences. This is due to the fact that water penetrates very quickly through the stone layer into the soil. What is the best way to make a blind area around a house from decorative stone? The top layer can be made using decorative stones or coarse gravel. The most aesthetic solution is white stone, but at the same time it can quickly become dirty.

It is recommended that the top layer of stone has a thickness of about 15 cm. The stones should be scattered on an even layer of sand about 10-15 cm thick. This solution will ensure that the flow of rainwater quickly penetrates into the ground, as well as the rapid drying of the substrate.
The structure should be surrounded by a concrete or granite border. Lack of a border will quickly lead to the rocks "spreading" into the garden. However, any stones that fall on the lawn can damage the lawn mower.
For a gravel and stone strip, install a curb so that it protrudes about 2 cm above the level of the stones. This will protect the blind area from stones or gravel falling onto the grass. At the same time, you need to make sure that the lawn behind it is also located about 2 cm lower, which will prevent dirt from being deposited on the layer of stones.

To keep the side stable and ensure a constant width of the blind area for many years, it is worth strengthening it from the outside with concrete, or building a support. In addition, this design will allow you to later work in the garden directly next to the house (for example, digging a trench for drainage or laying cables, etc.) without damaging it.
Paving slabs are much easier to maintain than stone structures. In the case of stones, after a few years it is often necessary to replace their top layer (about 5 cm) with new, clean stones in the desired color (usually white stones). At the same time, we must not forget that it is undesirable to use concrete pouring or a cement/sand mixture, as this will interfere with the free movement and evaporation of water.
You can use paving slabs or granite 4-6 cm thick to pave the house. There is no need to use road slabs (8 cm thick), since there is no traffic or other extreme impact.

Geotextiles can be laid under paving slabs and sand. The cost of creating such a structure depends mainly on the material of its top layer.


In terms of functionality, both solutions are similar. Therefore, it is better to make a choice mainly by considering the decision from the point of view financial issues, since the cost of sand and sand-gravel mixture in each region is different, as is the availability of any of these materials on the construction market.
In the case of paving slabs, it is important to maintain the proper height difference between the blind area and the lawn. It is recommended that this difference be 1-2% or even 2-4%, which means with a strip width of 0.5 m, the difference in levels will be 1-2 cm. You cannot tilt the angle of the height difference to the wall of the building so that the water does not stand along walls and foundations (water penetrates into the cracks between the tiles much more slowly than through a stone path).

When laying tiles, it is very important to thoroughly compact the layer sand bedding, because if the sand is not compacted, the tiles will settle unevenly. If the blind area is made of decorative stone, careful compaction of the sand is not necessary (only slight compaction of the surface is required).
The tile must be limited by a side. In the case of a concrete border, it is recommended that it be slightly lower than the tiles (0.5-1 cm), which will improve the drainage of rainwater onto the lawn.

Border for paving slabs - concrete, granite or plastic?
In the case of a decorative blind area made of stone, the best solution would be a concrete sidewalk curb 6 or 4 cm thick. A granite option is also available. In turn, in the case of paving slabs, you can use both concrete and plastic curbs for paving slabs.

Laying geotextiles in the blind area of a house
Placing geotextiles (or so-called permeable agrofiber) under a layer of sand will limit the growth of weeds and other vegetation. However, it is important that the fabric is permeable in both directions (top and bottom). Sealed insulating films must not be placed in this location.
Geotextiles can be laid out along the entire length of the blind area of the house, with an overlap of subsequent strips of about 30-50 cm. This material will not completely limit the growth of vegetation, but will significantly reduce the scale of this phenomenon. In practice, this will make it easier to maintain a good appearance of the structure.
To improve the appearance, you can mark between the elements of paving slabs or stones lighting, diversify the design with flower beds and other garden decor.

When it comes to aesthetic issues, color is of paramount importance. It should be remembered that the blind area around the house is not the most important element whole, therefore should not dominate environment. It should be harmonized with the facade, but it should merge with it, since this can greatly spoil the proportions of the building. If we don't have great experience in choosing colors, and we are afraid of experiments - “safer” will be a little more dark color than the facade of the house. It is also good if it is made of a material and color that matches garden paths around the house.


Building a house is a complex process. It consists of several main stages, most often obvious and necessary. But there are a few things that can be overlooked that, if done, will greatly improve the aesthetics and comfort of the building. These include the blind area around the house. It will, first of all, protect the lower part of the facade from dirt, and also provide an aesthetic separation of the house from the garden. However, in order for the architecture of the building to be complemented and not spoiled, it is important to carefully consider the project and choose the appropriate material.
He needs additional protection from moisture in the form of a blind area. Otherwise, when it freezes, cracks will quickly appear in it, and the base will become unusable. There is no point in postponing the construction of such protection until later - its production begins after the building is cladding. We will tell you in detail how to properly make a blind area around the house with your own hands.
What is a blind area?
The main task of the blind area is to protect the foundation of the house and basement from erosion by groundwater. Externally, it looks like a wide concrete strip or a strip of paving stones or gravel, which has a slight slope from the building. In its absence, soil saturated with water, in winter time will swell and destroy the structure.
A building with a blind area looks more decorative and has a finished look. It also serves as a sidewalk. Its width depends on the type of soil and the extension of the roof eaves. This strip is made wider than the roof overhang by at least 30 cm. Optimal width – 0.6-1.0 m. On heaving soils – at least 1 m. In complex subsidence soils and the presence of karsts (voids) in them, the width increases to 1.5-3 m.
The depth of the structure is selected depending on the type of soil and the thickness of the finishing layer. On average it is 30-40 cm.

Depending on the type of materials used, blind areas can be of two types:
- soft: using clay, crushed stone, gravel or even lawn grass; similar designs less durable and require periodic topping up and repairs
- hard: made of concrete, stone or paving stones with a thickness of 6 cm
To protect the foundation from frost heaving, thermal insulation is placed in the blind area. You can use any materials that do not rot: polystyrene foam, polystyrene foam, expanded clay, etc.
A stronger and more durable home blind area, made with your own hands, is a rigid monolithic slab. However, on marshy areas This option is unacceptable. Concrete will quickly deteriorate when exposed to moisture. In these cases, it is replaced with crushed stone or gravel.

Design Features
The rigid blind area consists of 3 layers. As first Clay with waterproof properties is used as the underlying material. Its thickness is 10-15 cm.

Second layer - ASG (a mixture of crushed stone and sand). Its thickness is 15 cm. When using paving slabs, so that they lay flat, sand is poured on top of it and compacted. You can also use prance - a mixture for preparing masonry mortars. Since a large load on the surface is not provided, the thickness third The protective concrete layer is 5-10 cm.
To ensure water drainage, the blind area is made at an angle. According to the standards, it should be at least 5-10%. For example, with a strip width of 1 m, the height difference should be 10 cm. To drain water, gutters (depressions in concrete) are prepared or pipes are laid around the perimeter of the entire building.
Determining the overhang of a roof is not difficult. A plumb line in the form of a cord with a weight attached to it is attached to its edge anywhere. A peg is driven in at the point of contact with the ground, and then the resulting distance from it to the building is measured. To determine the width of the blind area, you need to add 30 cm to the resulting figure.
Main stages of production
You should start making a blind area around the house as early as possible, preferably immediately after the construction of the building. It is better to do this simultaneously with cladding the walls and base.

Manufacturing of formwork
A monolithic concrete strip is more durable and will last longer. You can also use ready-made concrete slabs.

Formwork with expansion joints ready for concrete pouring
To make a concrete strip, formwork is prepared:
- Before you begin installing a concrete blind area, you should determine its thickness
- When calculating, it is assumed that reinforcement will be laid inside it, for which a 30 cm retreat should be made on both sides. Thus, minimum thickness the blind area will be 70 mm
- Used as reinforcement metal mesh with cells 100x100 mm or rods with wire binding. When using rods, the mesh size is at least 50x50 cm. Durable metal carcass required to ensure that concrete does not crack under severe temperature changes and under the influence of physical factors
- To make formwork, pegs are driven around the perimeter of the pit, to which boards mounted on the edge are screwed with self-tapping screws. They are connected using 40 cm wooden blocks and self-tapping screws
- In the corners and at joints it is necessary to further strengthen the formwork using stakes and metal corners
- To protect against cracks, thin blocks of wood must be laid across the formwork, impregnated with bitumen. They will act as expansion joints. The distance between the bars is 2.5-3 m. The structure, divided into squares, will not be afraid of soil movements. They are laid in such a way that the upper ribs are flush with the concrete surface. Its slope must also be taken into account. When pouring the solution, they will serve as beacons for leveling
- The formwork can also be made permanent. It is often used as borders dug into the ground. They also need to provide expansion joints. They are subsequently filled with sealant.
- Using drainage pipes to collect and drain water from the blind area, they are placed in formwork
Subsequently, such an expansion joint is filled with sand or sealed with sealant or covered with roofing felt.
Preparation of the solution
Strength and service life of concrete blind area, directly depends on the quality of the solution. It is advisable to use cement marked VRC - waterproof.
According to SNiP, the use of cement M200 and higher is allowed for the blind area. But, since its quality has not been up to par in recent years, it is better to play it safe and use material of the M300-400 grades. For pouring on difficult soils, it is better to purchase M400 cement. It is not afraid of moisture and tolerates sudden temperature changes.

When calculating the amount of concrete, it is taken into account that about 350 kg of solution will be needed per cubic meter of the structure. Recommended pouring thickness is 10-15 cm.
Key points when making concrete:
- Crushed stone or rubble stone is used as a filler to relieve concrete stress. It is not advisable to use gravel. It is too smooth and does not adhere well to the solution.
- The proportions of the solution are selected depending on the brand of cement. For example, for M400 cement with the addition of crushed stone and sand, the proportions will be 1: 3.2: 1.6. Please note that the calculation is based on volume as an example, i.e. in liters and not in kilograms. To calculate the weight, use the table (see photo)
- To avoid the formation of lumps, you must first mix the dry materials, and only then add water to the mixture
- After adding water, the solution should not stick to the shovel, but should not run off it either
- It must be kneaded at a temperature not lower than 5°C, so it is not worth working in cold weather for years. Otherwise, the quality of the concrete will not be up to par.
- Only clean sand is used, preferably river sand, without any admixture of clay or debris. To test, mix it with water. If the liquid becomes very cloudy, you should not use sand - it contains clay impurities
- To increase frost resistance and reduce water resistance, special additives can be added to the solution, for example, powdered “Betonoprav” or “Dehydrol”. For 200 kg of dry ingredients you will need 0.4 liters. The procedure for adding them can be clarified in the instructions.
- The solution should be used within an hour. After this time, it will set and will be unsuitable for work.
Solution proportion table
| Concrete grade | Mass composition (C:P:SH) kg | Volume composition for 10 l. cement (P:SH) l. | Concrete yield from 10 liters. cement, l. |
|---|---|---|---|
| M100 | 1:5,8:8,1 | 53:71 | 90 |
| M150 | 1:4,5:,6,6 | 40:58 | 73 |
| M200 | 1:3,5:5,6 | 32:49 | 62 |
| M250 | 1:2,6:4,5 | 24:39 | 50 |
| M300 | 1:2,4:4,3 | 22:37 | 47 |
| M350 | 1:1,6:3,2 | 14:28 | 36 |
| M400 | 1:1,4:2,9 | 12:25 | 32 |
Pouring the solution

The order of pouring the solution:
- Since the concrete layer has small height, correct filling of the blind area is done in one step
- Wooden cross bars serve as beacons when pouring, with the help of which the concrete is leveled. For this they use metal rule(a tool in the form of a long metal strip) or a flat board
- To avoid the formation of voids after pouring, the solution is compacted with a shovel or a metal pin
- After pouring, the concrete is covered with film or a damp cloth and left to dry for a week. During all this time, it is periodically (preferably a couple of times a day) watered with water. This will ensure uniform drying of the concrete and protect it from cracks.
- Remove the formwork no earlier than a week later. But concrete gains full strength only after a month
- After preparing the trench, curbs are laid along it. They can be replaced with a small ditch dug around the entire perimeter of the building
- A 15-20 cm layer of damp compacted clay is poured into the bottom of the hole. So that it mixes well with water, it is left for several days, stirring occasionally. For these purposes, clay is required to be clean, without sand impurities, otherwise the layer may swell over time. On loose soils, pour a small layer of sand on top of the clay.
- When leveling it, it is necessary to provide a slope away from the building
- On simple soils, clay can be replaced with a layer of well-compacted soil
- The next layer is waterproofing made of polypropylene film. It is laid with an overlap and overlaps the foundation walls
- To stabilize the coating, a layer of coarse crushed stone or pebbles is first poured. It will help distribute the load evenly and protect the coating from subsidence.
- A layer of crushed stone or pebbles of a finer fraction is poured on top of it
- The final leveling of the blind area is done using screenings or sand
- To stabilize the layer between sand and crushed stone, it is advisable to lay a layer of geotextile
- The last layer is crushed stone 20-25 mm in size. Its thickness is 60 mm
- A groove is immediately formed in a layer of clay or compressed soil for laying perforated drainage pipes. You can replace them metal pipes, in which 20 mm holes are made
- To protect the holes of drainage pipes from silting and clogging with soil, they are wrapped in geotextiles
- Water is discharged into a trench dug to a depth of 1 m, which is filled with a mixture of crushed stone and soil in a ratio of 7:3
Making a soft blind area
We will tell you in detail how to make a soft blind area. If water drainage using a concrete coating is often carried out using open trays located on the surface, then in soft blind area uses a drainage system in the form of perforated pipes, which are laid along the entire perimeter of the building.

On wet marshy soils, when installing a concrete covering is impossible, such structures are the only way out. Moreover, their cost is an order of magnitude lower, and the manufacturing process is much simpler. It will not be damaged even when the ground moves and will not move from the wall.
The only drawback is that you will have to add it regularly. It is curious that in Finland this type of foundation protection is most common.
The order of the blind area with the drainage system:

When using crushed stone or gravel as a blind area, it is required additional installation borders.