How to easily assemble and install an electrical panel in an apartment
In the apartment modern man A huge number of electrical appliances are running, which create a large load on the network.
To ensure increased electrical safety, you can install an individual electrical panel in an apartment or house, this will allow you to control electrical appliances separately.
You can do this yourself, for example, during repairs or after replacing old wiring.
Electrical panel elements
An ordinary electrical panel for an apartment does not contain many elements, and almost anyone can assemble it. The electrical panel includes:
- Introductory circuit breaker . As a rule, it is double, de-energizing two electrical cables at once - zero and phase. The power is selected depending on the total consumption load of all appliances in the apartment.
- Residual current device (RCD). differentiated relay. De-energizes electrical wiring literally in milliseconds after detecting voltage leaks, for example, when the neutral wire is shorted to ground. Is not required element electrical panel, however, it is worth purchasing one to ensure electrical safety.
- Additional circuit breakers. Control electrical appliances high power, such as boilers, electric stoves, air conditioners, washing machines, and electrical circuits in individual rooms. The rating is selected depending on the power of the consumer.
Wall-mounted enclosures are easy to install, but they do not always fit well into the interior of the apartment. Built-in ones require more preparation for installation, including construction works, but they are practically invisible.
Requirements for distribution panels
One of the main purposes of installing a switchboard in an apartment is to increase the level of electrical safety, therefore you need to take the requirements for its installation very seriously.
The electrical panel must comply with all the rules of GOST 51778-2001 and PUE
- The shield must be accompanied by technical documentation . which describes the installed equipment, namely the number of devices and their rated current.
- The shield must have electrical safety sign with the specified voltage.
- The materials from which the shield is made must be non-flammable. The shield covering must not allow electric current to pass through. As a rule, it is heat-resistant plastic or metal with a polymer coating.
- The wires must be marked, for example, using tags indicating the connected devices.
- Ground and neutral terminal blocks should have no more than one wire per terminal. When choosing pads, you need to ensure that there are free terminals when connecting. Tires must be marked according to PUE rules .
- The electrical panel must be grounded. this applies to both the body and its doors.
- The doors of the electrical panel must include elements for sealing.
- You should pay attention to Availability of a technical passport indicating certification data and characteristics.
- To connect the machines to each other, you need to use special “comb” busbars.
Following the rules described in the PUE and GOST, you can install the electrical panel yourself; for this you need to develop a connection diagram.
Assembly and connection diagram
To create an electrical panel diagram, you need to determine the type of power supply system in the house, divide electricity consumers into several groups, and based on this data create a diagram, using GOST 21.614 for graphic designation of all elements of the shield.
The type of power supply system may be indicated in the panel on the landing, otherwise this can be found out by contacting the housing office. There are three types of system, which differ in the way they are powered and grounded: TN-C, TN-S, TN-C-S.
TN-C - old type of power supply. The wiring in the apartment includes a two-core copper or aluminum cable; the cable in the switchboard combines zero and ground.
TN-S, TN-C-S - this is more modern systems supplies. They use a three-core cable for wiring in the apartment and a separate cable for neutral and grounding in the switchboard on the floor.

Then you should divide electricity consumers into several groups. For example, you can divide into groups the connection points for sockets in each individual room, switches, large consumers electric current like an air conditioner or boiler. Considering all these characteristics, for each group is selected separate machine .
After this, they begin to draw a diagram of the electrical panel. It indicates all the elements using graphic symbols according to GOST 21.614. as well as all current consumers that are connected to them.
Scheme for assembling and connecting the electrical panel in the apartment:

Using the connection diagram, you can begin installing the electrical panel.
DIY installation and installation
First you need to select an electrical panel. For this you need to decide on the type of shield. Hidden shields It is recommended to install with hidden wiring, when open wiring It is better to install a hinged shield.
If the apartment does not have a special niche for installation built-in shield. then you will have to do it yourself, which creates additional difficulties, but such a shield will be well camouflaged. Mounted distribution board much easier to install in an apartment. all you need to do is secure it with a few screws, but it doesn’t always look good in the interior.

The next stage depends on how many groups all electricity consumers were divided into at the stage of developing the panel diagram. The number of machines used depends on the number of zones. as well as the size of the housing where they will be installed.
The case should be selected with a reserve for the number of installed machines, this will save money if you have to upgrade the power supply system. Before installing the shield, you must select its location in the apartment.
The shield should be located in an easily accessible place at a height of 1.5-1.7 meters from the floor level, so that it is not blocked by furniture or doors. The location for placing the shield is selected only once, so it is worth choosing it responsibly.
You should also consider how other pieces of furniture and interior will be placed. If a hidden type switchboard is installed, then it is necessary to select a place where a niche can be built for it.
The following steps must only be carried out when power supply is off. After turning off the electricity, you should insert the cable into the housing through the cable entries, after removing the plugs.
This completes the installation of the electrical panel. the further task is to install and connect the machines .
Installing an electrical panel is not difficult; it can be done independently. You just need to understand its structure, comply with all GOST and PUE requirements. as well as electrical safety rules. And after installation, check whether all elements work correctly.
DIY distribution panel assembly for an apartment
This article will step by step review the entire process of selecting and installing an electrical panel in an apartment, and will also describe common mistakes made by beginners in order to independently assemble an apartment electrical panel with your own hands, without resorting to the services of an electrician.

Preparatory stage
Usually, switch box it is installed in the apartment after the electrical wiring has been laid, and the necessary cables have been brought together into one place planned for the installation of the electrical panel. If for some reason the shield is installed before the wiring, then it will need to be protected from contamination during repairs.
There will be a lot of dust especially when cutting walls for hidden electrical wiring. Regarding the cables to be laid, it is necessary to correctly calculate the cross-section of the wires and divide the electricity consumers in the apartment into groups.

hidden wiring in the apartment to the electrical panel
The installed wiring must include a PE ground wire. It is advisable to do the wiring with cables with multi-colored cores, and it is critically important to label each wire going to the panel.

ground bolt for El. shield
If this is not done (a common mistake for beginners), then, even without having an electrical panel, you can already begin work by checking and marking the wires.

example of the location of automatic circuit breakers and RCDs in a panel with grounding
Choosing a safe distribution panel for an apartment
Many users, when choosing this device, are mistakenly guided primarily by aesthetic considerations, pushing other criteria into the background.
If you use the phrase to search the Internet:
« residential electrical panel“, then the search engine will return many options for elegant products that will organically fit into the interior of the room. But you need to remember that the apartment panel, first of all, must meet fire safety criteria, so it is necessary that it be made of metal or fire-resistant plastic.

installation of metal electrical shield indoor installation lockable
The electrical panel cover should provide not only the aesthetics of the apartment design, but also be quite reliable, because its main function is protection from accidental contact with the current-carrying surfaces of the terminals for connecting modular devices.
This is especially important if children live in the apartment, therefore, even if the panel is installed at a height inaccessible to them, you should take additional precautions and choose an electrical panel with a lid that can be locked with a key.
Selecting a shield by capacity
The housing panel usually comes with a built-in DIN rail. If it is not there, then mounting holes must be provided; in this case, it will be necessary to purchase an additional DIN rail of the required length.

Automatic machine on DIN rail
Also, the electrical panel kit, as a rule, includes distribution buses - zero on insulators (if the shield is metal) and a PE bus for connecting grounding conductors.

installation of a panel with grounding and grounding buses
Some electrical panels for apartments are sold with a built-in electricity meter and have a sealable compartment. In most cases, users choose circuit breakers and residual current devices, called RCDs, independently, based on their own calculations of the load on the electrical wiring.

Shield with built-in electric meter. energies

It is also customary to install a voltage control relay in the apartment electrical panel. power limiters, various signaling devices and modular sockets.
Very often, communications not related to power supply are installed in such panels - distribution boxes for Internet connection cables, cable television, wired radio. 
Therefore, the electrical panel installed in the apartment must be chosen to be capacious enough and with some reserve for the possible future installation of additional modules and devices.

Open panel
There is absolutely no point in using an overhead panel for hidden wiring, and vice versa, so the solution to this issue will be given at the stage of planning the electrical wiring in the apartment. It is worth paying special attention to the choice of the manufacturer of the electrical panel - many apartment owners, trying to save money, buy a product of “nameless” Chinese production, and then, in despair, full of remorse, they do not know what to do.

Distribution shield hidden installation
For example, you can imagine a situation where, in a renovated apartment, against the background beautiful wallpaper the cover of the electrical panel suddenly falls off, or the internal electronic “stuffing” of the panel tends to fall out due to low-quality plastic that does not hold screws and other fastening devices.
It must be remembered that replacing the shield is tantamount to local repair, so you should be very careful in your choice, guided by the criteria of quality and reliability.
Draw wiring diagram shield
Many beginners, especially those who already have some experience in electrical installation, feeling like professionals, do electrical installation in an apartment panel, keeping the diagram in their heads, which is a gross mistake that real masters never make.

An example of a switchboard assembly diagram
No matter what skills and memory a professional electrician has, he will always draw up a wiring diagram, if only so that he (or someone else) in the future, when servicing, repairing or upgrading the panel, does not waste time on proceedings tangle of wires.
In addition, wandering in the labyrinths of your own memory, it is easy to make a mistake, which later, without having a diagram of the shield, will be very difficult to detect. There cannot be a universal scheme for an apartment panel due to individual needs, but there are generally accepted principles for combining electrical panels.

The connection of the electric meter and devices before it in the panel must be carried out by official services; we will assume that it has already been done.
After the meter (or before it), there is an input circuit breaker, then they often install an RCD (common for all groups) and from it, using jumpers, connections are made to circuit breakers for individual consumer lines connected to the apartment panel, which can also be protected own RCDs.

Grounding and grounding bus
You should avoid the common mistake with zeros when connecting RCDs and automatic circuit breakers, and provide in the apartment panel for each similar device individual zero isolated bus.
Electrical installation
When installing the external version of the electrical panel, it is screwed onto dowels. When mounting a hidden installation panel, before fixing it, it is necessary to bring all incoming wires inside the housing, and then fix it in a pre-hollowed niche using alabaster mortar.

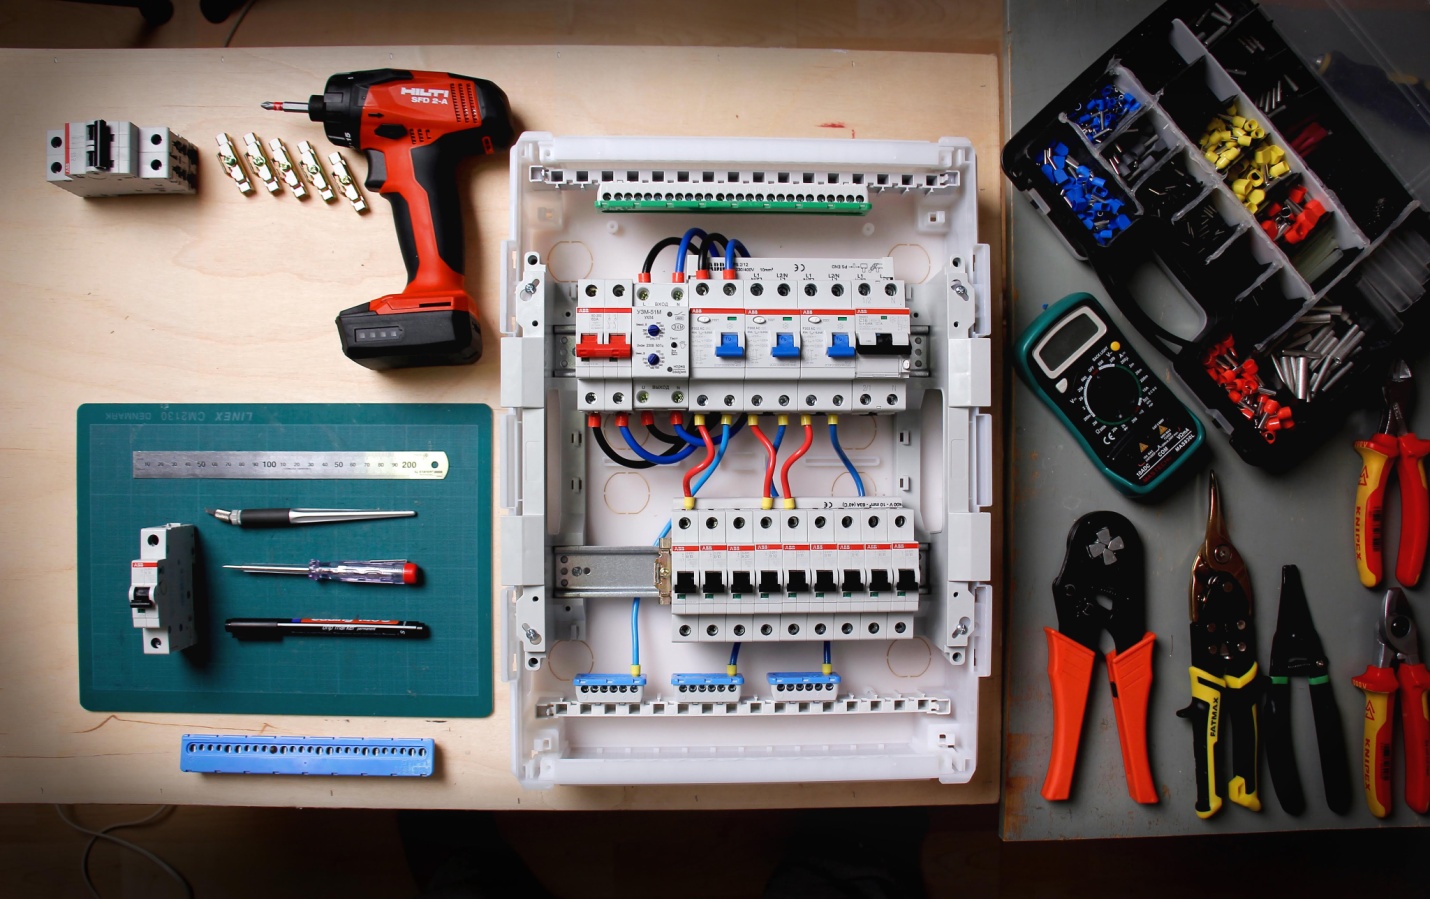
For electrical installation you will need a minimum set of tools:
- Phillips and straight screwdriver;
- Wire cutters or pliers;
- Assembly knife for removing insulation, or a special tool;
- Multimeter for testing wires.

It wouldn't hurt to buy a set heat shrink tubing for marking. By placing modular devices in in the right order, it is necessary to arrange the wires in the shield rationally and ergonomically, preventing them from intertwining many times.

Heat shrink tube set
You should start by connecting the input line, making sure that there is no voltage on the wires. Connecting to the connection terminals necessary wires and having bent them properly, bite off the excess, taking into account the margin for the wire to fit into the mounting socket of the modular machine.
After this, the insulation is removed from the wire with such a wire that the bare conductor fits entirely into the connection socket, without protruding above the machine. The process of stripping wires should be given special attention, avoiding cuts or breaks in the metal cores, otherwise the cable will overheat in this place.

Stripper for stripping wires from insulation
The wires should be clamped with care, being careful not to damage the clamps or push through the back wall of the shield.
Repeat this procedure for all wires one by one, one after the other. Jumpers are cut and connected in the same way.
Checking and preventing the shield
After completing the connections, you should load the switchboard circuit breakers by connecting to the internal electrical lines apartments, the existing load (electrical equipment) for which the protective switches were designed.

Checking the apartment panel
After keeping an eye on the panel for an hour in this operating mode, you should make sure that there is no characteristic smell of burnt insulation and check how hot the machines are.
If there are no complaints about the operation of the electrical panel, then its connection can be considered successful.
Once every six months, preventive maintenance of the connections should be carried out in the panel - tighten the screw terminals of the wires at the terminals of the modular devices.
It is difficult to imagine a distribution board without modern modular protection devices, such as circuit breakers, residual current devices, differential circuit breakers and all kinds of protection relays. But these modular devices are not always connected correctly and reliably.
In view of servicing electrical panels, I sometimes have to deal with errors in connecting the circuit breakers that are installed in them. It would seem, how can you connect an ordinary single-pole circuit breaker incorrectly? I stripped the cable to a certain length, inserted it into the terminals, and tightened the screws securely.
But no matter how strange it may sound, most people have “clumsy” hands and the build quality of the shields leaves much to be desired. Although in fact we all make or have made mistakes in one industry or another, and as the famous proverb says: “he who does nothing makes no mistakes.”
I welcome all friends to the “Electrician in the House” website. In this article we will look at and analyze several options for the most common and serious mistakes.
Connecting machines in the panel - entrance from above or below?
The first thing I would like to start with is the correct connection of the machine in principle. As you know, a circuit breaker has two contacts for connection, movable and fixed. Which pin should be connected to the top or bottom? To date, there has been a lot of controversy regarding this matter. There are a lot of questions and opinions on this matter on any electrical forum.
Let's turn to for advice regulatory documents. What does the PUE say about this? In the 7th edition of the PUE, clause 3.1.6. said:
As you can see, the rules say that supply wire when connecting machines in the shield should be connected, as a rule, to fixed contacts. This also applies to all ouzo, difavtomat and other protection devices. From this entire clipping, the expression “as a rule” is not clear. That is, it seems to be as it should be, but in some cases there may be an exception.
To understand where the moving and fixed contacts are located, you need to imagine the internal structure of the circuit breaker. Let's use the example of a single-pole circuit breaker to look at where the fixed contact is located.

Before us is an automatic machine of the BA47-29 series from iek. From the photo it is clear that its fixed contact is the upper terminal, and the moving contact is the lower terminal. If you look at the electrical symbols on the switch itself, you can also see here that the fixed contact is on top.

Circuit breakers from other manufacturers have similar markings on the housing. Take, for example, a machine from Schneider Electric Easy9; its fixed contact is also located on top. For Schneider Electric RCDs, everything is similar on top there are fixed contacts and moving ones below.

Another example, protective devices from Hager. On the housing of the hager circuit breakers and RCDs you can also see symbols, from which it is clear that fixed contacts are on top.
Let's figure out whether it makes sense from the technical side, how to connect the machine from above or below.
The circuit breaker protects the line from overloads and short circuits. When overcurrents occur, the thermal and electromagnetic releases located inside the housing react. From which side the power will be connected from above or below to trigger the releases there is absolutely no difference. That is, we can say with confidence that the operation of the machine is not affected by which contact the power is supplied to.
In truth, I should note that manufacturers of modern “branded” modular devices, such as ABB, Hager and others, allow power to be connected to the bottom terminals. For this purpose, the machines have special clamps designed for comb tires.
Why do the PUE recommend connecting to fixed contacts (top)? This rule was approved for the purpose of general order. Any educated electrician knows that when performing work it is necessary to remove voltage from the equipment on which he will work. When “climbing” into the shield, a person intuitively assumes the presence of a phase at the top on automatic machines. Having turned off the AV in the panel, he knows that there is no voltage at the lower terminals and everything that comes from them.
Now let’s imagine that Uncle Vasya, an electrician, did the work for you and connected the phase to the lower AB contacts. Some time has passed (a week, a month, a year) and you have a need to replace one of the machines (or add a new one). Electrician Uncle Petya comes, turns off the necessary machines and confidently reaches into the voltage with his bare hands.
In the recent Soviet past, all machine guns had a fixed contact at the top (for example, AP-50). Nowadays, based on the design of modular AVs, you can’t tell where the movable and where the fixed contact is. For the ABs that we discussed above, the fixed contact was located on top. Where are the guarantees that Chinese machines will have a fixed contact located on top?
For those who do not agree with me, the question is why on electrical diagrams The power supply to the machines is connected precisely to the fixed contacts.
If we take, for example, a regular switch of the RB type, which is installed at every industrial facility, then it will never be connected upside down. Connecting power to switching devices of this kind relies only on the upper contacts. I turned off the switch and you know that the lower contacts are without voltage.
We connect the wires to the machine - a cable with a monolithic core
How do most users connect machines in the control panel? What mistakes can be made in this case? Let's look at the most common errors here.
Error – 1. Insulation coming into contact.
Everyone knows that before you need to remove the insulation from the connected wires. It would seem that there is nothing complicated here, I stripped the core to the required length, then insert it into the clamping terminal of the machine and tighten it with a screw, thereby ensuring reliable contact.

But there are cases when people are perplexed why the machine burns out when everything is connected correctly. Or why the power in the apartment periodically disappears when the wiring and filling in the panel are completely new.
One of the reasons for the above contact with wire insulation under the contact terminal of the circuit breaker. Such a danger in the form of poor contact carries the threat of melting of the insulation, not only of the wire, but also of the machine itself, which can lead to a fire.

To eliminate this, you need to monitor and check how the wire is tightened in the socket. Correct connection circuit breakers in the distribution board should exclude such errors.
Error - 2. You cannot connect several wires of different sections to one AB terminal.
If the need arises connect several machines standing in the same row from one source (wire) for this purpose is impossible would be better suited comb tire. But such tires are not always at hand. How to combine several group machines in this case? Any electrician, answering this question, will tell you to make homemade jumpers from cable cores.

To make such a jumper, use pieces of wire of the same cross-section, or better yet, do not break it along its entire length. How to do it? Without removing the insulation from the wire, form a jumper the desired shape and sizes (according to the number of branches). Then we strip the insulation from the wire at the bend to the required length, and we get an unbreakable jumper from a single piece of wire.
An example of connecting circuit breakers with jumpers from different cable sections. The first machine receives a “phase” with a 4 mm2 wire, and the other machines already have jumpers with a 2.5 mm2 wire. The photo shows that jumper made of wires of different sections. As a result, poor contact, increased temperature, melting of insulation not only on the wires, but also on the machine itself.

For example, let's try to tighten two wires with a cross-section of 2.5 mm2 and 1.5 mm2 into the terminal of the circuit breaker. No matter how hard I tried to ensure reliable contact in this case, nothing worked. A wire with a cross section of 1.5 mm2 was hanging loosely.


Another example in the photo is a difavtomat, into the terminal of which they plugged two wires of different sections and tried to tighten the whole thing securely. As a result, the wire with a smaller cross-section dangles and sparks.
Error – 3. Formation of the ends of wires and cables.
This point most likely refers not to an error, but to a recommendation. To connect the cores of outgoing wires and cables to the machines, we remove the insulation from them by about 1 cm, insert the bare part into the contact and tighten it with a screw. According to statistics, 80% of electricians make connections this way.

The contact at the junction is reliable, but it can be further improved without extra costs time and money. When connecting to machines cables with solid core make a U-shaped bend at the ends.

This formation of the ends will increase the area of contact of the wire with the surface of the clamp, which means the contact will be better. P.S. The inner walls of the AB contact pads have special notches. When the screw is tightened, these notches cut into the core, thereby increasing the reliability of the contact.
Connecting stranded wires to the machine
For wiring panels, electricians often prefer a flexible wire with a stranded core of type PV-3 or PuGV. It is easier and easier to work with than with a monolithic core. But there is one peculiarity here.
The main mistake that beginners make in this regard is connecting stranded wire to the circuit breaker without termination. If you crimp a bare stranded wire as it is, then when tightening, the strands are crushed and break off, and this leads to loss of cross-section and deterioration of contact.


Experienced “specialists” know that it is impossible to tighten a bare stranded wire into a terminal. And for terminating stranded conductors, you need to use special tips NShV or NShVI.

In addition, if there is a need to connect two stranded wires to one terminal of the machine for this you need to use a double tip NSHVI-2. Using NSHVI-2 it is very convenient to form jumpers for connecting several group circuit breakers.
Soldering wires to the terminal of the machine - ERROR (error)
Separately, I would like to dwell on this method of terminating wires in a shield, such as soldering. Human nature is such that people try to save money on everything and do not always want to spend money on all kinds of tips, tools and all sorts of modern small things for installation.
For example, consider the case when an electrician from the housing office, Uncle Petya, wires the electrical panel with a multi-core wire (or connects outgoing lines to the apartment). He does not have NShVI tips. But you always have a good old soldering iron at hand. And the electrician, Uncle Petya, finds no other way out than to tin the multi-wire core, pushes the whole thing into the contact clamp of the machine and tightens it with a screw. Why is this dangerous?

When assembling distribution boards, DO NOT solder or tin the stranded core. The fact is that a tinned connection begins to “float” over time. And for such contact to be reliable, it must be constantly checked and tightened. But as practice shows, this is always forgotten. The soldering begins to overheat, the solder melts, the joint weakens even more and the contact begins to “burn out.” In general, such a connection can lead to a FIRE.
Therefore, if a stranded wire is used during installation, then NShVI lugs must be used to terminate it.
Each house is equipped with an electrical system. The wiring is usually installed from scratch or replaced with a new one. The electrical wiring system must not only distribute electricity correctly, but also be highly safe. Protective function performs an electrical panel. It must be installed in every home. Perform high-quality assembly electrical panels professional electricians, however, subject to certain rules, such work can be done independently.
When creating high-quality wiring, you should understand how the physics of the process is carried out. Engineering knowledge consists of understanding the basics of physics and mathematics. Therefore, you can carry out wiring yourself only if you have full knowledge of certain knowledge. It is important to use specific recommendations and follow certain rules. Requirements for electrical panels are specified in the relevant GOSTs.
What is the shield for?
Several systems can be called an electrical panel. These include the distribution panel, main and group. They all work on the same principle. What is the purpose of the electrical panel? It has several functions:
- It must receive energy from an external source.
- The electrical panel is used to distribute energy to different groups of consumers;
- Another function of the shield is to protect the wiring. It prevents short circuits.
- Modern panels are able to monitor the quality of energy supplied to the consumer and, if necessary, respond to this.
- The electrical panel must guarantee absolute safety and protect people from many damaging factors.

A small device must meet many requirements. This requires a careful and thoughtful approach to working with the electrical panel. Installation of the device will not be complete without carrying out an accurate scientific calculation. However, all complex concepts and processes can be presented in the form of simple recommendations. The basic requirements are specified in GOST.
How is electricity distributed?
Distributing energy among user groups is one of the main tasks of an electrical panel. If you decide to install it yourself, you should know a few mandatory rules distributions:


Many may think that this approach to installing the shield and carrying out electrical cables quite redundant. However, in reality, this method is the only correct one, given the need to ensure the safety and comfort of control prescribed in GOST.
Many inexperienced electricians, unfamiliar with the principles of wiring, purchase small cross-section cables instead of high-quality products in order to save money. In addition, amateurs often purchase RCDs and low-cost automatic devices. Such decisions may affect the safety of the residents of the house in which electricity is installed.

One example should be considered before wiring. A cable with a cross section of 1.5 square meters comes out of the shield. mm, which is protected by a 10 A circuit breaker. It can be intended for lighting in one room. The line goes into a junction box. If in the next room the load on the electrical network is expected to be less, an inexperienced electrician may decide to reduce the cross-section of the cable leading from distribution box, up to 0.75 sq. mm.
For unknown reasons in electrical network is happening short circuit. The wires can simply be flooded from above the apartment. The cable begins to experience strong currents, reaching up to 10 A. It cannot withstand it and catches fire. The cable insulation melts, and a fire may start in the apartment. It follows from this that the line should not have a reduction in cable cross-section under any circumstances.

Electrical panel diagram
When installing the panel and electrical wiring, you should draw up the diagram correctly. Such work is usually entrusted to a specialist engineer. However, subject to certain principles, it is performed independently. The wiring diagram and panel must be accurate. This will ensure safe operation of the system.
One of the simplest is the single-line diagram of the shield. You can understand it quite quickly. The name “single-line” appeared because in such a diagram one line denotes a group of wires at once, and not individual electrical cables. How many wires there are are shown using slashes. Below the diagram shows the power, cable type and consumer lines.

To protect the electrical system from overvoltage, circuit breakers are used to open the electrical network under load. It is not recommended to use them everywhere, since they react quite painfully to shutdown under load. It is better to install electric machines.
To understand the connection diagram of the electrical panel with all current consumers, you should look at its more attractive option. This diagram shows all electrical devices and conductors. The electrical panel diagram must meet the requirements of GOST.
The need for an RCD for an electrical panel
An RCD is a device that turns off the power when certain values are exceeded. It is able to detect leaks in the electrical network. It must be installed on all electrical outlets and power lines. You need to know several rules for selecting and operating such a device:

The use of differential automatic machines is not justified from the economic point of view. It is better to buy RCDs and automatic devices separately. You can install a differential automatic machine only if there is an acute lack of free space in the panel. Such a device can also be used to protect particularly important electrical lines.
Advice! After developing the electrical panel diagram, you should consult an experienced electrician. This will avoid many problems in creating high-quality electrical wiring.

Number of seats in the shield
Each device installed in an electrical panel is standard sizes. All elements are located in a metal profile. Its width is 35 mm. This width is enough to install a single-line circuit breaker in the panel. The main parameter of the electrical panel is the number of landing modules. To find out how many such places are needed, you should use a special table.
It is better if a modular socket is installed in the panel. It is necessary to allocate 3 places for it. Such a device may be needed when performing repairs. With such equipment, you can easily disconnect all lines and connect a power tool to the panel. To do this you will need an extension cord.

In addition, you should install a voltage relay that will monitor its readings in the network. If the voltage goes beyond the specified limits, the load will be turned off. After a certain period of time, the tension will appear again. This saves valuable energy consumers.
Even when installing a simple shield, 20 places will be required. However, professional electricians recommend choosing shields with a reserve so that you can add a line later. Therefore, it is better to purchase a shield for 24 or 36 seats.

Choosing a good electrical panel
Once the number of seats has been determined, you should think about the design of the product. There are several types of shields, distinguished by installation method:
- Mounted panels, for which it is not necessary to prepare a special niche. They can simply be hung on the wall using screws or anchors. When installing a shield on the street, you should make it hinged. If it is installed indoors, the wiring must be open.
- Built-in shields- a niche in the wall is prepared for such devices. Similar products are installed exclusively in rooms with hidden wiring.
Shields are often made with a metal body. They are manufactured different types- built-in and wall-mounted. Due to the increased strength of the body, they have a certain advantage over models made from other materials. They are especially often installed outdoors. Such shields are much easier to protect from vandals. Outdoor models are usually equipped with a glass window that allows you to read meter data.
Shields made of plastic are very popular today. They can be wall-mounted or built-in. Such devices are intended for both outdoor and indoor installation. Thanks to the wide variety of models, they can fit into almost all interiors. They usually look very aesthetically pleasing. However, after a few years, the white plastic may turn yellow.

There are several tips on how to choose an electrical panel:
- First you should pay attention to the seller. From a trusted supplier you can immediately purchase an electrical panel and modular equipment, and many components. It is better if the purchase is made in a large store that has quite a a large assortment. These sellers care about their reputation, so they won’t be able to find low-quality products.
- It is also important to consider the manufacturer. Among the world brands we can highlight Hager, Makel, ABB. However, there are also several proven domestic manufacturers.
- Each manufacturer offers shields with different configurations. It is better to choose products with rich functionality. For such a shield, the slats should be in a frame that can be easily dismantled. This design solution simplifies the installation and dismantling of the structure. Additionally, you should choose a shield that has proper organization and locking mechanism for incoming cables. It is better if the shield has cable organizers, which will save space inside the structure.

Many famous manufacturers They also produce related products - locks, combs, doors.
Assembly and installation of the shield
An electrical panel is a complex device that requires precise assembly and correct installation. Do not install modular equipment in a dirty or dusty area where construction work is taking place. It is better for these processes to take place in a clean and well-lit room, on a sturdy table. That is why it is better for the shield to be equipped with a removable frame with slats.
Installation of the shield housing
Hanging structures can be installed in a few minutes. This work is no different from hanging a regular cabinet. Therefore, a built-in design was chosen as an example. The technology for installing it in a brick or concrete wall is no different.
Installation of the shield in concrete structure it's a little more difficult to do. First you should find out whether it is a load-bearing wall or not. In the first case, installing a shield in it is prohibited. Upon approval, it will be necessary to carry out reinforcement according to the new project and carry out various works. This will take a lot of time and financial costs.

It is better if the shield is installed in a false wall. All necessary cables can be laid in it in such a way as to ensure maximum efficiency operation of the shield. At the same time, the wall will become 10 cm thicker. This solution can be used advantageously from a design point of view.
First, you should consider the rules for assembling an electrical panel with your own hands:
- Shields should be placed in ventilated rooms, placing the structure close to the entrance to the home. It is better if the shield is installed in the vestibule.
- The room in which the shield will be mounted must have a humidity of 60%.
- From doorways, corners and slopes, there must be a distance of at least 15 cm to the side surfaces of the shield. In addition, easy access to the device must be provided. It is not recommended to install shields in cabinets or wardrobes.
- Highly flammable objects and substances should not be placed near the shield.
- Installation should be carried out at a height of 1.4 to 1.7 m above the finished floor.

Installing an electrical panel is a complex procedure that is performed in strict sequence. Each stage of work should be performed as accurately as possible, without missing details. The procedure for installing the housing is as follows:
- Mark the installation location of the shield. To do this, use a level to draw the bottom line of the structure and the vertical of either side.
- Attach the housing to the wall. Align the bottom and side edges with the markings. Outline the body around the perimeter. To do this, use a construction marker.
- Using a grinder, cuts are made along the perimeter of the niche. For this work, a grinder with a diamond blade is used.
- Using a hammer drill, you need to hollow out the entire surface of the niche and then level the bottom.
- Try on the housing in the niche, check how optimal the installation depth is.
- Install the standard mount on the shield, and then insert the shield into the niche, level it and make marks in the wall for the dowels.
- Using a hammer drill, drill holes for fastenings, insert dowels, install the shield and secure it.
- Remove the frame with the slats inserted into it from the shield.
- Fill the space between the niche and the body with polyurethane foam.

Situations often arise when wall mountings are not supplied with the shield. You can install the shield on the dowels, punching them through the back wall. For fastenings there are places in which holes are drilled.
Entering cables into the panel
This procedure requires special attention. At proper organization cable entry, installation of modular equipment will be significantly facilitated. This will allow you to correctly install the necessary devices.

Standard shields are made in such a way that it is convenient to insert cables into them. In the lower and upper parts of such structures there are special perforated holes. To insert the pipe, you just need to press them in with your finger. Typically, such holes are designed for pipe diameters of 16 and 20 mm.
Inserting the cable into the wall-mounted electrical panel is quite simple. The electrical cable only needs to be fixed and methodically insert the cables one by one. When entering a cable into a built-in device, a certain technology must be followed. In this case, the body of the shield must be fixed to alabaster. In addition, it must be leveled. This type of work is best done by a professional.

If you buy a cheap panel, inserting electrical cables will be problematic. You will have to cut the holes yourself. Then you need to install special plates. All difficulties can be avoided if you immediately purchase a more expensive design that meets all GOST requirements.
Another problem faced by inexperienced electricians is inserting an electrical cable into an electrical panel while passing technological holes the cable has a certain degree of freedom when moving in the pipe. At the same time, it is difficult to organize the wires in the electrical panel itself. This problem can be solved quite simply - you need to put alabaster in the groove near the place where the electrical cables enter the panel. However, this solution is not very modern and not the most effective.

Pre-assembly of electrical panel
There are many photographs on the Internet that illustrate the assembly of electrical panels already installed in place. In this case, it is necessary to arrange the equipment modularly and perform switching various elements wire PV1. Its cross-section should be from 4 to 6 square meters. mm. The equipment is installed at a height of 1.5-1.7 m from the floor. This must be taken into account, knowing that painters and puttyers will be walking around at the same time. In reality, electrical panel installation is very difficult to carry out even for an experienced professional.

Conclusion
Considering all the problems that you may encounter during the work process, it should be recalled that it is better to purchase only high-quality components. Modular equipment must be installed on a table in a clean room. Experience in such work will allow you to connect all lines to an existing panel.
However, I would like to touch on it again. You can find a huge amount on the Internet various examples performing apartment panels, especially on YouTube. Some craftsmen go to the point of absurdity when drawing up apartment panels.
In my opinion, this topic will primarily be useful to customers, because... The customer, often, does not particularly understand electrics and is ready to believe everything that the electrician offers. And careless electricians are only too happy to lay hundreds of meters of cables in your apartment and earn as much as possible from it.
Some people install protective devices on almost every outlet, and then brag about their work. Is this necessary? Why waste money when it could be spent on more useful things.
There are 2 main types of apartments:
- apartments with gas stoves (6 kW);
- apartments with electric stoves (10 kW).
Superior apartments are quite rare, so they need to be considered individually. I was once sent to look at a project for a private house, I think for 250 kW
In accordance with the latest standards, for an apartment with gas stove 6 kW is allocated, 10 kW is allocated for an apartment with an electric stove.
What is 6 or 10 kW? This means that at the same time you can have electrical appliances on with a total power of up to 6 kW if you have an apartment with a gas stove or 10 kW if you have an electric stove.
No matter how many household appliances you have, in general you will not be able to use more than 6/10 kW. In most cases this is quite enough. It rarely happens that you decide to do the laundry, heat up food in microwave oven, drink tea, etc. If you turn everything on at the same time, then, of course, the input circuit breaker will trip and turn off the entire apartment. In practice, this practically never happens.
On my YouTube channel there is a section: How much do they consume? If you're interested, take a look at how much household appliances actually consume. Soon I will add a video about a toaster, multicooker, candy bar, coffee grinder and other small ones household appliances, which I have at home.
A typical electrical panel diagram for an apartment with a gas stove will look like this:

At the entrance to the apartment panel, I propose installing a 300 mA selective fire protection RCD. Don't skimp on this product. It's not cheap, but think about what could happen to your apartment in the event of a fire? Anything can happen and problems with household appliances There may also be problems with the electrical wiring...
PUE 7: 7.1.84. To increase the level of fire protection during short circuits to grounded parts, when the current value is insufficient to trigger the maximum current protection, at the entrance to an apartment, individual house, etc. It is recommended to install an RCD with a trip current of up to 300 mA.
To reduce the cost of the housing panel, a common RCD is provided for the first three groups.
This group includes:
- oven;
- kitchen sockets;
- room sockets.
The so-called “wet sockets” are separated into a separate group, on which their own difavtomat is installed. For example, the power of a washing machine is about 2 kW, but this does not mean that it consumes that much power during operation. The washing machine consumes 2 kW only when heating the water, which is approximately 10% of the time of the entire washing cycle; during washing, consumption is about 150-300 W. The operating mode of a dishwasher (DMM) is similar to the operation of a washing machine. The PMM consumes the most power when heating water. The power of the electric heated towel rail is 100-300 W. There is no need to worry that a 16A difavtomat is not enough for the socket group in which the washing machine, Dishwasher, electric towel drying.
We also provide a separate line with automatic protection for lighting the bathroom or bathroom and toilet.
For lighting the kitchen, corridor, rooms - a separate group, protected by an automatic switch. For lighting, a 6-10A circuit breaker is sufficient.
Why not install a common RCD instead of two automatic devices? I think it’s not worth it, because... the probability of these groups being triggered is higher than the first three. If we suddenly have problems with washing machine, then only this group will turn off, which will allow you to quickly identify problematic equipment and will not cause discomfort to those in the bathroom.
Regardless of how many rooms there are in the apartment, 2 lighting groups and one socket group for all rooms are enough. For 1-3 room apartments, this rule must always be followed. IN living rooms There are no powerful consumers, so there is no point in splitting up several groups.
The electrical panel diagram for an apartment with an electric stove will look like this:

This scheme differs from the previous one in the presence separate group for an electric stove, protected by a 32A circuit breaker.
These are standard schemes for apartment panels that have nothing superfluous, are made in accordance with all norms and requirements, are economical and easy to use. In cases where there are air conditioners, heated floors and other customer wishes, these schemes are very easy to transform into more complex ones.
To implement these schemes, a modular panel with 18 modules is sufficient. When completing a switchboard, always provide reserve spaces for installing additional devices. They may come in handy in the future.
For more information about the schemes of apartment panels, see the video:
I also want to note that this diagram You can modify it and make it a little more expensive, but I’ll tell you about that in a separate video.
Today I will tell you in detail how to independently assemble and connect an electrical panel in a house, apartment, cottage, office, garage, etc.
And now We will start with the fact that you have already installed the switchboard body and inserted the electrical cables into it. You should get something similar to what is shown in the picture on the left.
Step-by-step instructions for assembling and connecting an electrical panel.
- We comply!
- The first thing to do is install Din rails 35 mm in size, on which the -, and busbars will be attached to each other, separately the neutral wires and.
The busbars, as you see in the picture below, are copper strips with holes for wires with bolts for clamping them. They are located on the dielectric plastic base, which snaps onto the Din rail.
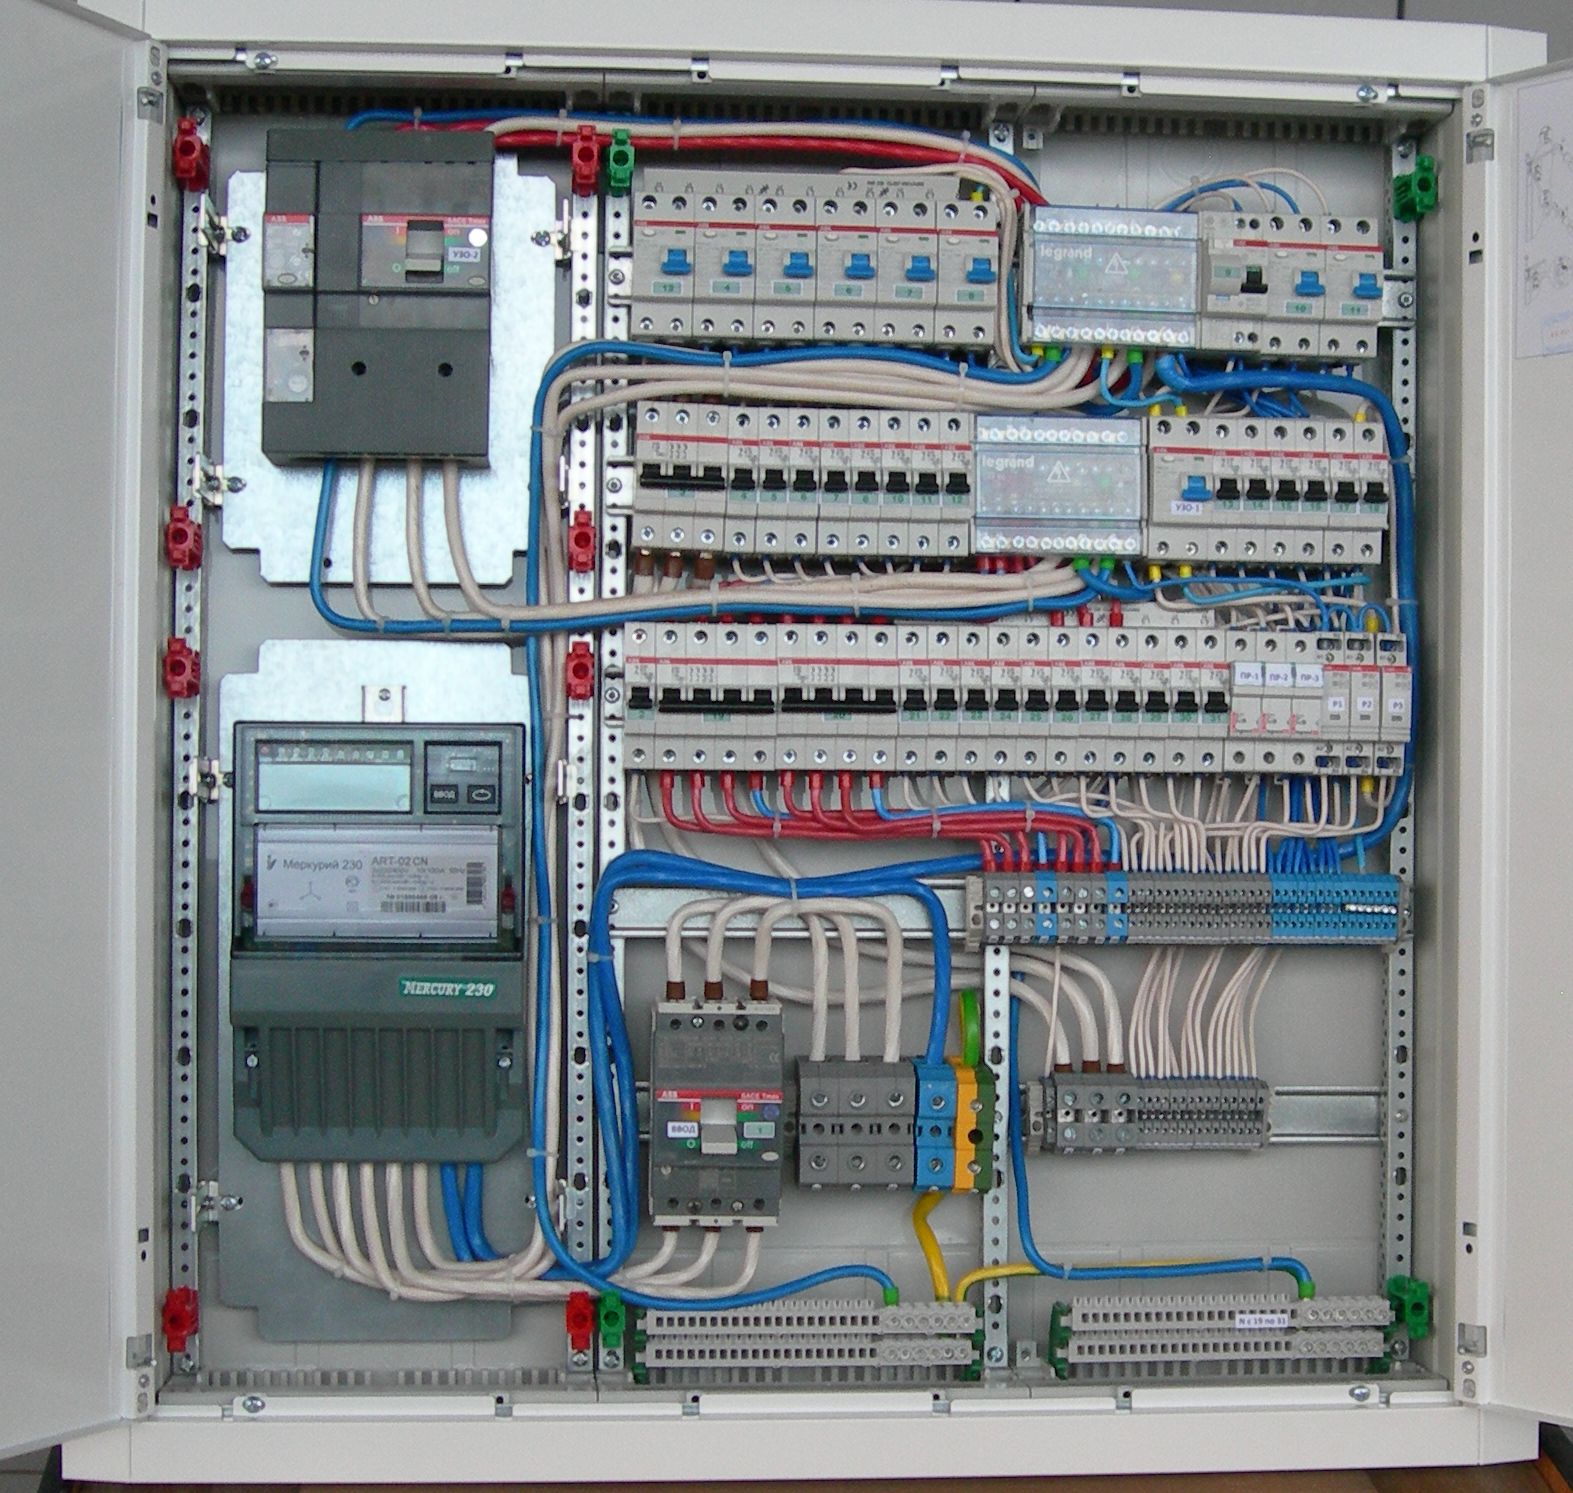
The latches, as can be seen in the picture, are arranged as follows: they snap into place on their own, and in order to remove the machine you need to carefully lift it up flat screwdriver latch with a spring inside. The circuit breakers can be easily moved to the left or right if necessary. - After installing the rails, it is necessary, according to the electrical panel diagram you have chosen, to install required amount automatic machines, RCD and 2 separate busbars with bolts on an insulating basis. Grounding and neutral conductors will be connected to them accordingly. If it remains free place Special plastic plugs are installed in the protective cover. Moreover, the input circuit breaker, which receives the cable that powers the entire electrical panel, is always placed first from the top left. For ease of connection, I advise you to insert the input cable above it from above.
- We connect the input machine, if it is two-pole, we connect phase and zero to it (designation N), if it is single-pole, we connect only the phase wire. If the shield is 380 volts, then you need to connect three phases to the input machine in the appropriate places. I recommend connecting the phases to the input circuit breaker from below, for convenience when later installing jumpers between the circuit breakers from above.
- We combine all machines and RCDs using specially designed copper bars in insulation.
 Or, as is more often done, we make jumpers from wires of sufficient cross-section and assemble an electrical panel diagram. Neutral wire of blue color We screw it directly from the water cable to the zero busbar, and when connecting RCDs and differential circuit breakers, the zero is taken from the zero busbar to each of them separately. And we connect the yellow-green wire to the ground bus. We also connect the body and door of the panel with a flexible metal copper wire, if they are made of metal, for the protective purpose of grounding.
 - We cut and connect outgoing electrical cables to the machines, according to the diagram below.

In the diagram, neutral conductors are highlighted in blue, phase conductors are highlighted in red, and ground conductors are highlighted in black and yellow. If a meter is installed in the switchboard, it must be connected according to the instructions on.
If you have installed differential circuit breakers or RCDs in the switchboard for sockets in your house, apartment, office, etc., the connection diagram will be slightly different.
In order not to make a mistake, always make zero jumpers in blue, and phase jumpers to others color - red, For example. Grounding conductors are made of yellow-green wires. Always tighten the bolts on machines and tires well, check the connection is secure.
In private homes and offices, 380 Volt input is often used for the electrical panel, i.e. the electrical panel is supplied with power by a 4-wire or 5-wire cable (5 wires are grounding). An approximate common wiring diagram in the picture.
 3 different phases are connected to the input machine, which are then connected to the electric meter. From the metering device they go to a common machine, after which the phases diverge into single-phase machines for connecting equipment to a voltage of 220 Volts. Sometimes it is necessary to connect 380 Volt equipment; for these purposes, a 3-phase machine is used. Between opposite phases there will always be a voltage of 380 Volts, and between Zero and any phase = 220 V.
Be careful if you supply 2 phase or 380 V to household appliances instead Zero and Phase or 220 V - it will quickly fail.
The grounding conductor always passes by machines directly from the grounding bus. The zero is connected from another bus directly when the line is connected through a regular circuit breaker, but if the connection is made through an RCD or a differential circuit breaker, the zero goes through them to the connected line.
Attention! Installation and connection of an electrical panel is a complex and important stage electrical work, which is carried out only after the tension has been relieved! If you doubt your capabilities, then it’s better to call a specialist!
As a result, after all the work is completed, your electrical panels will look like this.

All that remains is to screw on the protective cover and check your work by applying voltage to the electrical panel!
Related materials:
