From plastic bottles You can make a huge number of all kinds of crafts. They can be beautiful, useful, unusual, or all three.
A flight of fancy and a little ingenuity is all you need to make a good craft.
Such material as a plastic bottle is probably found in every home, which means everyone can make good craft, so let's get started.
Craft from a plastic bottle. Butterfly.
You will need:
Transparent plastic bottle (preferably light)
Butterfly stencil
Felt pen or outline for stained glass
Scissors
Glue (preferably "Moment")
Glass paints
Acrylic paints
Wire

1. Cut off part of a plastic bottle, place a butterfly stencil and outline it with a felt-tip pen.
2. Cut along the outline.

3. Color and decorate the butterfly.

4. Bend the wings of your plastic butterfly. This must be done so that the outline is on top.
6. Using glass paints or acrylic paints, begin decorating the butterfly.
7. Using beads different sizes, you can make the body of a butterfly, and antennae can be made from wire. The glue will help hold it all together.
8. You can decorate the butterfly with sparkles, rhinestones, beads, etc. on top.
This gift can be decorated with gift wrapping or placed on the refrigerator door.
Plastic bottles. DIY crafts. Turtle with candies.

You will need:
Plastic bottle
Velvet paper
Candies
Clusters from tablets
White paper
Scissors
Thick paper or cardboard

1. Cut off the bottom of the bottle - this part will be used as a shell.
2. Preparing a turtle stencil. Draw a silhouette on cardboard and cut it out.

3. Use a stencil to draw a silhouette of a turtle onto green velvet paper. Cut it out and glue it to the cardboard part.

4. Making eyes for a plastic turtle. Prepare a pill cluster and peel off the foil backing. Next, you need to cut out 2 fragments for the eyes from the cluster.
5. Prepare white paper and use it as a backing, and use black velvet paper to cut out the moving eyes. Next, simply glue the structure together.
6. We collect and glue all the details of the craft. Use glue to attach the turtle's eyes and mouth. Fill the bottom of the bottle with sweets and tape it to the turtle.
Crafts from a plastic bottle (master class). Toy "Catch the ball".

You will need:
Flexics
Ping pong ball
Scissors

1. Prepare your flexics orange color and cut out the petals for the flower.

2. Using glue or double-sided tape, attach the petals and string to the bottle.
3. Attach a table tennis ball to the other end of the thread.
That's it - play by trying to catch the ball in the flower.
How to make a craft from plastic bottles. Vane.

For those who want to know which way the wind blows.
You will need:
Plastic bottle (preferably a pot-bellied one)
Scissors
1. Prepare a clean bottle and use scissors to cut windows in it. It is desirable that they be approximately similar to the blades of a weather vane.


2. Attach the weather vane to suitable place- on the balcony. This can be done using an iron pole. Make a hole in the bottom of the bottle and put a pole on it.
Now you will always know which direction the wind is blowing.
Crafts from plastic bottles for children. 3D glasses.

You will need:
Transparent plastic bottle
Unnecessary sunglasses
Colored markers
Scissors

1. Cut two parts from a plastic bottle as shown in the image.
2. Take the glasses out of the glasses and outline them on the cut part of the plastic bottle.

3. Use a red marker to color both sides of the left glass.

4. Color the right glass with a marker Blue colour on one side and green on the other.
5. Insert the glass back and enjoy 3D pictures.
Children's crafts from plastic bottles. Frog.

You will need:
2 plastic green bottles (volume 2 liters)
Scissors, knife
Centimeter tape
Felt pen
Needle and thread
Acrylic paint
Brush
Traffic jam from wine bottle

1. First you need to wrap plastic bottles with tape at a height of about 7 cm from the bottom. The higher you want to make the frog, the more you need to move away from the bottom, thereby making the box more spacious, but not very proportional. Next, use scissors to cut off the bottoms along the top edge of the tape.
2. Using a measuring tape and a felt-tip pen, make marks for the future seam. You need to mark on both parts at a distance of 5-7 cm from the edge, leaving 1 cm between the marks.
3. Make holes at the marks with an awl. Try piercing the plastic through a napkin after folding it in half, so the bottle will not slide, which will prevent you from getting hurt. When the holes are made, remove the tape.
4. Prepare a zipper and wrap it around one of the parts of the future craft. Temporarily attach it with tape to the body.
Sew the fastener with stitches along the holes made with an awl.
When you have sewn the zipper in a circle, remove the tape. Next, tie and secure the ends of the thread and trim off any excess.
Unzip the zipper and sew the other half in the same way.
5. The frog's eyes can be made from a wine bottle cork. You can paint the cork in green color. Once you have glued the eyes to your box frog, leave the glue to dry.
Crafts from a plastic bottle (photo). Bracelets.


Crafts from plastic bottles (photo). Cherry blossom.

Crafts from plastic bottles (instructions). Casket.


Palm tree made from plastic bottles. Option 1.

You will need:
Plastic bottles Brown(1.5-2 liters)
Green plastic bottles (the larger the bottle, the more luxuriant the leaves)
Thick rod (for the base of the trunk)
Awl or drill
Scissors
1. To make tree bark, you need to prepare brown plastic bottles and cut them into pieces 10-15 cm high.


3. To make palm leaves, you need to cut off the bottoms of green bottles. On one workpiece you need to leave a rigid neck with a lid, since it will play the role of fastening.
4. Start cutting out the leaves - you need to do this so that there is about 5-7 cm left to the edge.
5. Start collecting green blanks, putting them on the same blank with a neck. Screwing the lid will hold everything together and you will have a palm tree crown.

6. Now you need to make connecting holes. Their diameter must match the diameter of the base rod. Such holes can be made using a drill or a hot awl. Make a hole so that the crown of the palm tree does not fall through.

7. We begin to collect the palm tree. When you have strengthened the rod, begin to place blanks of brown plastic bottles on it. The design ends with a green crown.


Lovers of dachas and suburban areas are constantly looking for interesting ideas for decorating your summer cottages, so we are pleased to offer several master classes DIY crafts from plastic bottles. We have already talked about how to make a palm tree and cats for the garden, and in this article you will learn how else you can beautifully decorate a flower bed.
Craft materials:
- plastic bottles;
- scissors;
- glue;
- scotch;
— paint for facades or acrylic;
- brushes.
Have you ever thought that a garden is not just a place for growing fruits, flowers and other plants, but also an area for creativity that fully reflects the tastes and preferences of the owner? It is easy to make many little things from plastic bottles that will give the site an original appearance.

Experienced gardeners use bottles for growing seedlings, as well as flower pots. A flowerpot can be made not only by cutting off the neck of a bottle, but also in the shape of some kind of animal, for example, a pig. If you cut off the bottom of the bottle, you get a cylinder, and if you cut off the top, you get a cone-shaped pot. You can decorate the plastic with fabric, corrugated paper or paint.
In stores today you can find many figurines for garden decoration, which have relatively high cost. With the help of our master classes, you can make animals with your own hands at minimal cost.
To make a pig, you need to make several blanks from plastic bottles: a whole eggplant - a body, 4 necks from the floor liter bottles- for the legs, the neck of a convex one and a half liter bottle, cut in half - for the ears. Cover by ready product You need acrylic paint for working on plastic, wood and metal.

Fill the body bottle with sand so that the figurine does not get carried away by the wind, or when the pig is ready, dig it into the ground. Make slits in the eggplant and insert ears and legs into them. You can make a twisted ponytail out of wire. Secure the parts with tape or glue. Half beads can be used as eyes. Now paint the product and wait until it dries completely. You can paint a pig not only in pink color, but also in brown with spots or white. Since all elements are made of plastic, the finished product is durable when decorating exteriors.
Garden bunnies from bottles
The simplest method is to make a bunny from plastic bottles. Depending on the shape and size of the bottle, you can make a hare for garden decoration or a toy for a child.
1. Remove the labels from the bottle and clean it of glue.
2. Coat the bottle with spray paint or enamel.

Hares from a plastic bottle
3. Fill with sand to make the hare stable.
4. You can paint the face and paws with paints.
5. If the craft will be used outdoors, make the ears out of plastic and glue them with hot glue. If the bunny is intended to decorate the room, you can cut out ears and paws from cardboard.
A hare made from a milk or kefir bottle will look original. Clean the surface of the bottles from dirt and paint. Instead of a cap, screw a deodorant cap onto a bottle and the hare will have a round head. Eyes can be drawn or used special fittings. Decorate the bunny with ribbons and the craft is ready.
Hedgehog from a plastic bottle
Materials:
— eggplant 5 l;
— 1.5 l bottle;
- toothpicks;
- putty;
- dye;
- scotch;
- newspapers;
- plaster bandage;
— cardboard tray for eggs;
- eyes from old toys;
- scissors.
Master class garden hedgehog
1. First of all, you need to make a frame for the hedgehog’s body. If you plan to place it in a flower bed, pour sand into the body.
2. Cut off the top part of a 1.5 liter bottle and glue it to the eggplant. This will be the face of a hedgehog.
3. Now glue an egg tray on top of the bottle and use newspaper to form a shape. Secure everything with tape and apply a plaster bandage so that toothpicks can be inserted and the surface is smooth.
4. Blind the face using a plaster bandage.
5. After the mixture has dried, coat the product gypsum putty.
6. Insert needle-shaped toothpicks into the body of the hedgehog while the putty is still wet.
7. All that remains is to paint the craft and glue the eyes.
You can create a whole family of hedgehogs that will decorate personal plot. The hedgehog will be a great idea for participating in crafts competitions, as well as for connoisseurs garden decor and souvenirs.
Useful video: Cool decorations for cottages and gardens made from bottles
By applying the basic principles of working with bottles, you can easily make any figurine for the garden. If you cut holes in a craft, it will turn into original flowerpot or a flowerbed. Following our instructions with photos, even a beginner or parents with children can make a product from plastic bottles. Fantasize and don’t be afraid of anything!
Plastic bottles are not just containers for water, but also an excellent material for creativity and. Some craftsmen manage to make something out of them that is difficult for many to imagine. All you need in this matter is the actual material, scissors, sometimes paint, glue and free time. It would also be a good idea to turn on your creativity and stop looking at the container of your favorite soda as an ordinary thing. So let's get started!
Piglets-pots
This craft is easy to make, so that’s where we start. You can plant flowers in this for the summer or use piglets as a container. This will revive anyone, especially children will be happy with this creation.
Tools and materials:
- Five liter plastic bottle. Their number is based on the number of piglets that will be created. 1 container – 1 pig.
- A sharp knife, a stationery knife is most convenient.
- Bottles - 0.5 l or 1.5 l, 4 pieces for each pig.
- Glue.
- White enamel and red or pink paint.
Manufacturing sequence
The container should be rinsed and dried, and if there are labels on them, they should be removed as they will get in the way. If you decide to make a flowerpot, then you should cut a hole in the upper part so that there is room to plant flowers and add soil. If you create garden sculpture, we skip this step.
Smaller bottles will be used to create the legs. They need to be cut from the neck by 10-15 cm or to the length that is needed.
Advice! The larger the hooves, the taller the pig will be. Moreover, containers should be selected of the same volume so that the limbs come out smooth and beautiful.
Advice! To make it more convenient to glue the legs, you should cut each neck at the widest point with a fringe and bend the edges.
Now the important task is gluing. For this you can use:
- Glue "Moment".
- Glue "Titan".
- Terpomistolet. It is the most convenient to work with, although hot silicone can deform the plastic, so it should be handled with extreme care.
Advice! It is more convenient to glue two limbs at a time, since after applying the adhesive composition they need to be held for some time for high-quality bonding. Use glue according to the instructions.
After everything has dried, you can cut out the ears; they will be made of the same material as the whole pig. It is convenient to cut them out from the lower parts, since there is a factory bulge there. The shape is natural, the size is arbitrary. For ease of gluing, you can also make a fringe at the bottom - like on the legs.
On a note! It is most convenient to glue if you are making flower pots. In this case, the cuts must be glued to the container from the inside with the same composition.
Now the creative stage - painting. Natural color – pink, but you can use another one if you wish. Experienced craftsmen advise using it, it fits well on plastic and is more durable. You only need to tint the outside, but carefully so that the color of the bottle does not show through. It is very convenient to hold it by the lid-pocket. Don't forget to cut and glue the tail, it is also made of plastic, it is more convenient to paint it before gluing. You can draw the eyes or buy them; these are sold in any sewing store.
Important! If the pig will be used as flower pot, it is necessary to make holes in the lower and side parts for the free outflow of water.
Fly agarics for garden decoration
A detailed master class on making fly agarics from bottles is on video:
Many summer residents use a variety of available materials to decorate their plots, one of the most simple options is manufacturing various decorations from plastic bottles. The use of this option has a lot of advantages: low cost and availability of the material, ease of operation and the ability to make a wide variety of crafts. You don't need to have any special skills or use special tool, everything is very, very simple.
What do you need for work?
As you know, plastic bottles are often simply thrown away, however, the material can be given a second life, especially since very little is needed:
| Bottles | The most suitable products for work are: different colors and sizes - from small to large. In some cases, the color of the products matters, but if desired, you can use any materials |
| Scissors and sharp knife | Almost any work involves a lot of cutting; sometimes it is more convenient to use scissors, but sometimes a knife is better. It all depends primarily on what is more convenient for you to work with. |
| Rigid wire or metal rods | These materials are needed when creating products that are additionally reinforced with a frame to impart reliability and resistance to deformation. It is important to choose the optimal elasticity option so that it can ensure sufficient stability of the frame |
| Paint for plastic | Any composition that fits well on plastic will do. The choice of colors depends on what color scheme you have chosen for future designs. The most commonly used compositions are acrylic base, their price is low, but the quality is quite high |
Important!
Please remember that all products will be located outdoors and will be exposed to a variety of adverse effects: Sun, high humidity, temperature changes and so on.
That is why it is necessary to use weather-resistant compounds that can maintain color and structure for at least several years.

Main Use Cases
As noted above, you can make the most various crafts from plastic bottles for the garden. It is important to choose an option that you like and that will organically fit into the decor of your site.
Palm trees
A very popular option due to the fairly simple workflow and excellent result ultimately. The most important thing is that, having learned how to make palm trees, you can easily make any other tree, since the principle of operation is exactly the same.
Let's consider the manufacturing technology step by step:
- To work you need a knife or scissors, wire or metal rod to make the frame and the bottles themselves. It is best to use green products for leaves, and brown for the body. As a last resort, the trunk can be painted, but it is still better to make the branches initially green.
- First, brown bottles are cut in half and teeth are cut along the top edge as shown in the photo. It is worth considering that for work you will need quite a large number of blanks, so take care of the necessary supply in advance so that the work does not stop halfway.

- Next, take a strong pin with a diameter of 5-8 mm, you can use reinforcement, or you can use any other metal element suitable for height. It is worth considering that part of the element will go into the ground, for reliable fixation; for large crafts, it may even be necessary to concrete the base in order to give the necessary stability.
- Next, the blanks are strung onto a pin, after which the corner elements are bent to give the trunk even more naturalness and resemblance to a real tree.. Of course, you don’t have to make folds, but with them similar crafts from plastic bottles for a summer residence they look much more interesting.

Important!
Be sure to remove labels from bottles in advance, as they can ruin the appearance of the finished product.
Sometimes they come off easily, but if they are difficult to remove, you can place the products in hot water for a few seconds - then the process will be much easier and faster.
- Next, green products are taken, first of all, the bottom is cut off, after which the petals of future branches are cut. They can have a wide variety of configurations - from straight to figuredly carved. Everything again depends on your desires and preferences; your imagination is not limited to anything.

- Next, the finished leaves are strung on pins, after which they can be bent to make them even more naturalistic.. IN last resort All elements are connected to each other, the easiest way to do this is by welding, but if you don’t have the equipment, you can use special clamps, which are sold in all construction fastener stores.

Flowerbeds
Compact flower bed:
- You can take any container as a base, the main thing is to choose optimal size, a barrel cut in half, a stack will do car tires or anything else.
- Next, the base is installed in in the right place and getting ready cement-sand mortar in a ratio of 1 part cement to 2 parts sand. Water is added until the consistency of thick sour cream is obtained.
- Next, take bottles, and you can use both plastic and glass products . The walls of the container are coated with a thick layer of solution, after which the necks of the bottles are stuck into it. The rows are arranged in a checkerboard pattern; you can use variations of different colors to create a pattern or ornament.

- After the solution hardens (after 1-2 days), the container can be filled, the bottom layer is gravel or crushed stone, it will serve as drainage, and the top layer fertile soil, in which flowers will be planted. The solution, which is visible from above, can be decorated with any available material.
Compositions from bottoms
The instructions for making such a composition are quite simple:
- Take half bottles, they can be the most various colors, this allows you to create the most unusual compositions.
- A hill of soil is poured, and the halves are stuck into it, depending on the shape of the slide and the color of the elements, you can create any flower beds.

Design of flower beds and beds
You don’t have to make full-fledged crafts from bottles for your dacha, but use them as decorative element, which, among other things, also has a practical function, which we will consider below:
- You can take products of the same color, or you can use any options, but later they will have to be painted to improve appearance compositions. The most important thing is that the size and shape of the bottles are approximately the same.
- Next, you need to cut off the necks approximately at the point where the narrowing begins, after which the resulting containers are filled with white sand or black soil– this will give them rigidity and simplify installation.
- Filled blanks are dug in around the perimeter of flower beds or beds; this design will help give the summer cottage originality. In addition, such improvised fences prevent soil from spilling onto the paths - they can be sprinkled with gravel to further improve the appearance of the garden.

Flowerpots
Another very attractive option is a flowerpot; such crafts from plastic bottles for the garden are very easy to work with, but the result is excellent.
There are several options:
- The simplest solution is to cut off the top of the bottle(then you will get a straight pot) or its bottom (then you will get a cone-shaped one). Naturally, it is best to use large containers; almost any plant can fit in them. Products can be decorated with paints, pebbles or shells - it all depends on your imagination.
- Can be cut side part bottles and make hanging flower pots, this way you can decorate any wall. This option allows you to decorate nondescript surfaces.

- From large containers you can make flowerpots in the shape of various animals or birds, this option is somewhat more difficult to implement, but the result is much more interesting and attractive.

Other options
Do-it-yourself country crafts from plastic bottles do not always have big size, these can be very tiny decorative elements.
There are a huge number of options, and we will look at just a few of them:
- From the bottoms, which often remain during the work process, you can make various figurines of animals or fairy-tale characters. In this case, coloring is also required in order to achieve maximum similarity.

- Using a grid with large cells, you can create flower arrangement . You can do it even simpler: just create flowers, in which the middle will be the bottom of the bottle, and the petals will be the cut elements. The final result depends on how the plastic is cut.

- If necessary, you can even decorate a fence with bottles- such a fence will last long years and will perfectly fulfill its intended purpose - protection from the penetration of animals. (See also article.)

- You can do this: simply decorate the products in the form of fairy-tale characters and place them in the garden or vegetable garden. Children really like these figures, and in just a few hours you can create a whole fairy-tale world.

Using traffic jams
During the work process, very often a large number of caps remain, which can also be used to make quite interesting products and compositions:
- Corks are great for creating bright and elegant garden curtains. The process of their manufacture is extremely simple: each cap is punched using an awl or a screwdriver with thin drill, after which all the elements are strung on a fishing line or cord.

- Another fun option is to create paintings from caps.. You can make any composition; the more elements are used, the more colorful the picture will be.

Conclusion
You shouldn’t throw away plastic containers, because with their help you can make your own country cottage area unique. The video in this article will clearly show some of the manufacturing options being considered.


You will need bottles of different sizes - 2l, 1l and 0.5l. Cut with scissors or sharp knife The bottom of each bottle is 3-4 centimeters high. Then, in the center of each resulting “saucer”, drill a hole corresponding to a pre-prepared threaded rod.

It is better to place the saucers on the rod between two washers and two nuts. If you simply use as a rod metal pin, a wooden knitting needle or something like that, then the saucers can be placed on hot glue.

The bottom of a 2-liter bottle will act as the base of the stand, so simply turn the saucer over to stabilize the entire structure.

2. Boxes for pastries and cakes made from plastic bottles.
 Cakes and cupcakes tend to get stale, and it can be difficult to bring such beauty to guests safe and sound. Not scary! Make these crafts from plastic bottles with your own hands - boxes for sweets. A cardboard circle and half a bottle make a box for one cake, and two halves of a bottle can hold delicious macarons!
 3. Small box - a case made from plastic bottles with your own hands.
Cut bottoms 5 - 7 cm high from two liter bottles. inside hand sew on a small zipper.


4. DIY organizers and stands made from plastic bottles
Plastic bottles give huge opportunities in organizing the workplace. From bottles you can make a variety of organizers for magazines and correspondence, tools and sewing accessories, stands for stationery and cosmetics, boxes - baskets for toys and other small things. We simply cut off the neck of the bottles, and then - at your discretion. A few simple options below will give you ideas.


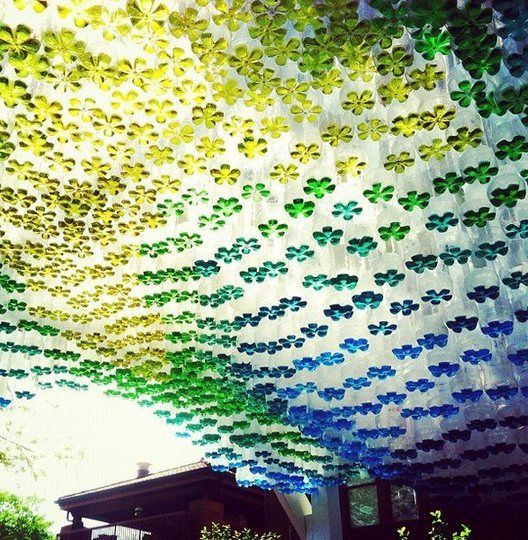
5. DIY curtains made from plastic bottles.
Unusual DIY crafts made from plastic bottles - curtains or light partitions for zoning space. Such curtains look like floating transparent flowers, shimmering in sun rays. Interesting decor not only the interior of the house, but also the veranda or terrace at the dacha. Detailed master class with photographs you can see.


DIY crafts from plastic bottles for the garden and cottage.
1. DIY bird feeders and drinkers.
You won’t surprise anyone with such a craft made from bottles. In the surrounding parks and forests, as well as on balconies, you can see various feeders made from bottles and milk cartons everywhere, especially in winter time. But perhaps you will still be interested in taking a look at what other feeders you can build with your own hands from plastic.


2. Vertical garden on the wall
Empty concrete walls houses, garages or fences are just begging to be decorated. A good idea would be to arrange on bare lifeless walls vertical garden from plastic bottles with your own hands!

You will need a couple dozen two-liter plastic bottles, scissors, rope (twine or wire) and two washers per bottle. The process is shown schematically in the figure:

For drainage, you can make a couple of holes in the bottom of a container - a bottle, and place small pebbles, sand or a special filler in front of the soil. And grow in such hanging gardens You can have a whole garden: herbs, spices, flowers, berries and medicinal plants!


3. Caps for seedlings.
Half a plastic bottle makes excellent seedling caps that will protect young sprouts from wind and bad weather.

4. Boat made from plastic bottles.
An extraordinary invention is a boat made of plastic bottles, which is practically in no way inferior to a factory model made of wood or rubber. If you have a desire to acquire such a boat almost free of charge in order to plow the nearby lake or river, you will find a master class.


5. DIY flower beds made from plastic bottles
To decorate the garden and fence off flower beds or beds, you can use halves of plastic bottles. Moreover, seedlings can grow under the bottles. Such garden crafts from plastic crafts Even children can do it with their own hands.


6. The nozzle for the hose is a waterer made from a plastic bottle.
Beautiful garden idea for soft watering of plants in the garden. Take a plastic bottle and make many small holes in it. Then place the bottle on wheels, such as those from an old cart, toy stroller, or roller skates. Attach a hose to the neck and turn on the water. Small jets from the holes will water the plants like rain, and the wheels will allow the watering attachment to be mobile.

Can human waste in the form of plastic bottles become interesting project for home and garden? How can they! American designer Garth Britzman created an unusual canopy made of plastic bottles with his own hands for parking cars.

Such a canopy made of plastic bottles provides shade, which is important for preventing the car from heating up, but it will not save you from rain. In addition, the canopy below looks bright thanks to the tinted water at the bottom of the bottles.
How to make a canopy from plastic bottles with your own hands?
- Build as a base for the canopy wooden frame of four vertical bars and horizontal crossbars.
- Stretch a mesh, fabric or wire, over the crossbars - we will hang bottles on the stack.
- Prepare plastic bottles with caps. In this canopy project, 1500 liter bottles of various drinks were used. Remove labels and wash bottles.
- Think it over color scheme your canopy. This could be a specific pattern, image (smile, sun, symbol) or simply an abstract pattern, a gradient transition of shades, and so on. It is not easy to imagine the whole picture. However, based on the desired result, start filling the bottles with colored water. You can pour water to the very bottom. You can color the water as food coloring, and water-soluble paints for painting.
- Make two holes in the middle of each lid and tie a strong thin rope or fishing line. You can punch one hole at a time, thread the rope and reverse side tie the lids in a large knot.
- Screw the caps with the rope onto the bottles and begin hanging them by the mesh according to the diagram. Bottles can also be hung on different heights, this will give the canopy volume. Bottles can be glued together. Then the canopy made of plastic bottles will not be so blown around by the wind and get tangled in the threads.


7 ways to use plastic bottles in the garden
1. Make a plant watering system
Majority garden plants you need to water at the roots, especially if you combine watering with fertilization. A plastic bottle can be turned into a system drip irrigation, with which you can deliver moisture and fertilizer directly to the roots of plants for a long time. Make several small holes along the entire length of the bottle with any convenient tool. Bury at the same time as planting the seedlings. Water from the bottle will slowly flow to the roots. This simple device solves the problem of withered leaves and prevents fungi and mold from developing.

This system can be used in open ground and in flower pots, slightly changing the design. Cut the bottom of the bottle so that the neck buried in the ground does not reach the bottom. Fill the reservoir with water if you leave the plants without watering for a long time. From the bottle, water will slowly seep into the ground and nourish the flowers.

2. Make flower pots
Old bottles and containers will act as molds for filling homemade flower pots. Take plastic bottles interesting shape, trim the top. Prepare cement mortar and fill the molds about a third full. Then insert another one inside plastic container smaller diameter to create a bowl. The next day, the inner inserts can be removed to make a drainage hole in the bottom (using a drill or any convenient tool). After another couple of days, you can remove the outer plastic shell.

3. Make a system for growing seedlings
It’s not enough to just pour soil into a jar and stick the seeds in there. They still need to be germinated. For everything to sprout, do it in plastic jars drainage holes, fill the containers with soil and plant the seeds. Place the jars on a tray covered with small stones or pebbles. Cover with cling film to make a mini greenhouse. The high-speed system for seedlings is ready.

4. Make a self-watering system for seedlings
The methods of growing seedlings can be improved and a structure can be made from plastic bottles that will save you from the need for watering. Cut the bottle in half. Punch a hole in the lid. Take a thin cord 25 cm long, fold it in half, tie a knot approximately in the middle to form a loop on one side. Thread the loose ends of the string through the hole in the lid and close it. Place the top of the bottle, cap down, into the bottom. Fill with water so that the ends of the rope are immersed in it. Lay the soil, plant the seeds, water the plants to saturate the soil with water. Ready!

5. Grow onions in a plastic bottle
Make it universal vertical bed for fresh herbs. Cut off the neck of a large plastic bottle and make holes in the body (not too low). Fill the soil up to the first hole, cover them with bulbs inserted with roots inside the bottle. Continue filling the soil. Fill the entire container and place it on a tray. Don't forget to water and harvest fresh greens.

6. Make a wasp trap
Find vespiary in the garden or on suburban area It can be difficult, and clouds of insects interfere with work and rest. Make traps out of unwanted bottles. Cut off the top of the bottle, place it neck down in the second part (without the cap). Pour some honey into the bottom. The wasps will be able to descend, but not get out.

7. Make another irrigation system
It's simple. As children, we splashed water by punching several holes in the bottle cap. If you make holes in the bottle itself and attach it to the hose, you will get a watering can with a wide range of action.
