A crossbow is a throwing weapon that is an improved design of a bow. Its advantage is the ability to aim without unnecessary effort. The technical characteristics of the gun increase the destructive power and shooting accuracy. In our country, the use of this type of throwing weapon is unpopular, since it is difficult to find the necessary design. There is very little inventory, but user interest is quite high. Crossbows are quite expensive. However, the design of the weapon is quite simple, so you can easily make it yourself.
What is a crossbow used for?
First of all, it is worth noting that the use of throwing weapons with a tension force of more than 43 kgf is illegal, whether it is homemade or purchased from official manufacturers. Today, the main uses of the crossbow are sports competitions and outdoor activities.
The device itself was first created two and a half thousand years ago in China. In Europe, the weapon gained popularity only at the beginning of the twelfth century and was used exclusively for military purposes. Later, homemade crossbows were used for hunting. However, only rich people could afford expensive mechanisms and special arrows.

Arrows for this type of weapon are much heavier and are more often called bolts. Their use is necessary since the tension force of the bowstring is much higher and requires the use of heavy projectiles. They, in turn, provide increased power upon impact. Now, the ban on hunting with throwing weapons in Russia and the CIS countries does not allow the use of a crossbow to catch game. Throwing weapons are used exclusively for sporting purposes.
Differences and adaptations
A bow and a crossbow have several obvious differences that must be taken into account when creating a weapon with your own hands. The main differences are:
Tension force. Since the crossbow design allows the bowstring to be pulled with greater force, it is required reliable mechanism, which does not fail. When purchasing it, you should not skimp, because it guarantees not only safety, but also durability. It is also convenient to use a device for tensioning the bowstring.  Use of bolts. By adding a spring to hold the projectile, the gun can be used under any required angle. Aim. Installation additional equipment will ensure accuracy and make it easier to shoot from the shoulder, similar to a firearm.
In addition, when creating a throwing weapon with your own hands, it is worth Special attention pay attention to the method of tensioning the bowstring. There are several of them. The most reliable and popular are:
Leg or hand braces. A very popular type of tension. However, its use is only available for crossbows with low power. Strap and hook. This method allows you to fix the machine tool with your feet, similar to the first example. When bent, the hook clings to the bowstring, and restoring the position is done by tightening and fixing it. An improved type of the second method is a rope using rollers. The mount is also installed on the belt. The use of two curved arms placed on pins is called a goat leg. The pins protrude on both sides of the stock. The owner pulls the opposite side towards himself, thereby exerting tension. Release lever. The essence of the method is to connect the hook and bracket to the front of the stock. Thus, the bowstring is pressed back. Using rack and pinion gates. Very ancient technology, which appeared in the fifteenth century in Germany. The tension is carried out by a collar, which allows the method to be used for very powerful crossbows. Very suitable for hunting because it has killing power.
There are also many other ways to tension the bowstring for certain types of weapons. However, they are used much less frequently and have been used in ancient times. Their safety is significantly lower, which does not guarantee the correct use of weapons. To create a crossbow with your own hands, it is recommended to use one of the above methods.
How to create a throwing weapon
When creating a crossbow with your own hands, it is important to understand that the design must be strong and reliable. Making homemade throwing weapons is not difficult, but it requires a very responsible approach to the work.
First you need to decide on the purpose of using the tool. If it is used for hunting, then special emphasis should be placed on the tension mechanism and stock. If you make the design correctly, then the shooting technique will be much easier to cope with.
After determining the required characteristics, you need to make drawings of the future weapon or find ready-made ones on the Internet. They will not only facilitate the creation process, but also organize the workflow. It is best to use carefully designed drawings with dimensions..
Devices and materials
Before making a throwing weapon for hunting with a small pulling force, you need to organize workplace and prepare the necessary materials. Here are the main items you will need:
- two meter-long blocks of coniferous wood; a thin strip 6x1 cm; a polyurethane tube with a diameter of 3 cm; nylon fishing line; wheels with a groove in the middle of the edge; screws and nails 5 centimeters long; glue; wooden dowels (6 pieces); tape and foam; vice and rasp; hammer, chisel, saw and drill; pen or pencil.
Also during the work you may need Additional materials to give an aesthetic appearance to the weapon. However, you can do this at your own discretion. When using a crossbow for hunting, appearance is not so important. However, it can be polished and decorated as desired.
The working process
First of all, you need to make a gun bed. This is the main part to which the rest of the structure is attached. Take one of the prepared bars and apply it to your shoulder to determine a comfortable length. Make a mark with a pencil and saw off unnecessary part. With your other hand, mark a comfortable position for the trigger. When creating a weapon with your own hands, it is worth considering that the power depends on the length of the stock. The longer the length, the stronger the tension force. For hunting, it is better to use a longer bar. At the location of the trigger, use a chisel and rasp to cut a rectangle measuring 10x2.5 cm. Across the resulting hole, cut a strip in which the bowstring will be located.


Now you need to cut a groove for the arrow along the beam. Since the work is done with your own hands, it is extremely important to approach this stage responsibly. The accuracy of shooting depends on the correct position. Using a drill and hammer, knock out a 5mm deep groove exactly in the center and sand it.
Cut another block to a length of 60 cm and glue it to the main part of the crossbow. Let the glue dry. After complete fixation, if desired, you can polish the parts. You can do it with your own hands or with special polishing devices.


Now that the main part of the structure is ready, we need to make the shoulders. To do this, use two polymer pipes, 90 cm long each. Make cuts at the ends of one side into which the bowstring will be placed. Their width should correspond to the prepared screws. Insert them into the cuts you made and attach the wheels with the groove.


Take a nylon fishing line. Secure it to one of the screws, then wrap it around each wheel, going from one side to the other. After wrapping it around the wheels, secure the line to another screw with tension. The result should be a curved structure with three rows of strings. When tensioned, the pipes should bend; if this does not happen, repeat the procedure again.


After completing the stage, it is necessary to secure the resulting structure to the main part of the crossbow. To do this, cut a hole at the end of the beam into which the arc will be attached. Insert the pipe into the hollow and wrap it securely with tape. Keep in mind that one string (more taut) should be on top, and the other two on the bottom.


Now you can move on to the trigger mechanism. Take the prepared strip and cut out the letter “L” from it. At the base of the bend, cut a groove so that it is centered and has a width equal to one-third of the full base. Now you need to cut out the part so that it coincides with the hole in the stock. On the side of the bend, drill a hole the thickness of the nail. Place the piece in the hole of the stock and drive a nail into it so that it goes through drilled hole in detail.

All that remains is to focus. It will be a sawn-off 20-centimeter block, which must be sanded for convenience. It can be attached to the main part using nails or glue. Wrap the stop with foam and secure with tape.
This completes the creation of a crossbow for hunting. All that remains is to make the arrows. They can be easily made from wooden dowels and trims to the required length. On one side a cut is made for the bowstring, on the other the end is sharpened.
The main thing is not to use the weapon in public places and near places of residence and objects where people may be found. By following safety rules, you can have a great time not only hunting, but also engaging in active recreation.
Video instructions on how to make arrows for a crossbow
Video instructions on how to make a toy crossbow
One of the most popular types small weapon is a crossbow. And although hunting with such a device is prohibited in our country, there are still many who want to acquire such a “toy” in order to shoot at targets. At the moment, you can buy such weapons on many websites or in stores, but such a purchase will be very expensive. It is much more profitable to make a crossbow with your own hands at home, and you will find out what is required for this below.
Preparation
Today there are many varieties of this sporting weapon. First of all, these are classic models familiar to us from historical films and block crossbows - modern weapons equipped complex mechanisms. The last option will be quite difficult to create at home, so let's focus on the classic one.
What parts does a crossbow consist of:
- Trigger;
- Bowstring;
- Crossbow stock;
- Bolts and arrows.
Making a crossbow at home will be much easier if you immediately stock up on all the necessary materials and tools. For this you will need:
- Well sharpened knife;
- Hammer;
- Drill or brace;
- A regular hacksaw, which can be replaced with a grinder with a wood disc;
- Plane;
- Chisel.
How to make a crossbow with your own hands
In addition to the tools to create this small weapon, you will need a piece of wood measuring 900 mm in length and 30 mm in thickness. In this case it will do:
- ash;
- hazel;
- poplar.
- birch.
First of all, you need to prepare a wooden blank. To do this, cut the branch to the required size and paint over the cuts. This must be done so that the liquid comes out of the wood slowly and evenly. Please note that the wood must lie in dark place for at least a year, only in this case the weapon will fire with special power. After this, the bark is removed from the workpiece and left to dry for another week. Next, the log is sawn into two parts and the crossbow itself is made from the northern part - the strongest.

Draw the stock of the weapon on the board and cut it out using a hacksaw or grinder, then make a small groove for arrows on the top of the workpiece. On the front side, cut a groove in which you will attach the arc. If knots or chips appear on the stock during the process, remove them with a knife and treat the area sandpaper.
How to make an arc
For this part you will need a flat board with a length of at least 750 mm, a width of 200 mm, and a thickness of 60 mm. We dry the workpiece well and let it stand for several days, and level it. The width of the part in the middle is 40 cm, and at the edges it narrows to 15 cm.
At a distance of 100 mm from the cut groove for this part we create through hole, through which we stretch the rope - it will become the main fixation for the crossbow arc. Then we insert the part into the groove and fasten it firmly with a rope, as shown in the bottom figure.

This part plays a fairly significant role in the “lethality” of the weapon, and to create it you will need the following materials:
- nylon threads;
- wooden plank;
- two nails without a head;
- rubber glue.
First of all, you need to do special machine to weave this part: take a rope and measure the length of the bowstring. After this, saw off a board with dimensions slightly larger than this parameter. Next, mark the length of the string on the board and drill two holes in these places - this is where you need to insert your nails.
Take a thread, tie it to one of the nails, and leave a reserve, equal to length bowstrings. After this, begin to evenly wrap the threads around the nails (Dacron is best). Continue this process until the base of the bowstring reaches 5mm. To do this you will need to make 5-6 full turns. Try to keep the threads equally tight.
Next, wrap the base near the nails on both sides several times with wrapping material. This will create loops at the ends. You can understand how to do this from top diagram. Do not forget to wrap the middle of the bowstring, because this part suffers greatly from friction. Tie the cut ends of the threads maritime hub and grease thoroughly with glue so that the entire structure is strong. After which you can pull the bowstring onto the arc and adjust the degree of its tension.

How to make a trigger mechanism
The most simple option will be a pin type lock, we will choose it for our weapon. Pull the string as far as possible and drill a through hole in this place. Also make a small transverse recess at the top of the crossbow stock. Now secure the lever at the bottom of the part. Make a wooden axle and secure it with wire.
Secure the stock and lever with ropes so that the latter moves with maximum friction. The depth of the “ammunition” groove should be equal to 1/4 of the volume of the arrow, and this recess must be “sawed” from the top of the lock to the front edge of the crossbow.

How to make arrows
In order to get ammunition for your small arms, you don’t have to run to a sports store, because you can easily make it at home. To do this you will need several ordinary wooden blanks, which need to be well planed and treated with fine sandpaper. It is better to choose light types of wood for arrows; in this case, shooting will be more accurate. As for the tip, if you don’t have special ones, then sharpen the tip of the arrow - with such ammunition it will be quite possible to shoot at targets. You should not drive nails into the head, because this increases the chance that the arrow will split when it hits the target.
Be that as it may, you should remember that in our country, shooting with crossbows is equivalent to using firearms. So if you want to make such a device, then under no circumstances use it for its intended purpose. Treat your crossbow as a beautiful souvenir, and then the law will not have any claims against you.
In addition, it will be interesting to shoot from such a weapon yourself. Everything is done quite simply, you can get by quite well here hand tools. The crossbow turned out to be quite powerful, as for target practice. Double limbs are used here, which increases the rigidity of the bow and allows you to throw wooden arrows at high speed. The author uses self-tapping screws as arrowheads, but you can use your imagination and come up with something more interesting.
Materials and tools used
List of materials:
- timber;
- PVC pipe;
- two self-tapping screws;
- strong rope;
- wooden rods for arrows;
- adhesive tape (for feathers).
List of tools:
- hacksaw or pendulum saw;
- jigsaw;
- belt grinder;
- drill;
- marker;
- roulette;
- screwdriver;
- construction hair dryer;
- vice;
- oil for wood processing;
- paint for painting onions (optional).
Crossbow making process:
Step one. Cutting out blanks
First of all, let's cut the wooden beam, it will be used to make the base. We also need to cut the pipe. You should have two parts, long and short. See photos for dimensions.


Step two. Making a bed
We make the bed from a wooden beam. First of all, we will make the necessary markings using a marker. Well, then we cut out the extra parts using a jigsaw; a jigsaw will cope with this task perfectly.


Step three. Let's make a bow
Our bow consists of two parts, which increases its rigidity. Everything is made from PVC pipes that need to be made flat. To do this, we will need a vice with a wooden insert so that there are no marks left on the pipes. We heat the pipe with a hair dryer until it becomes soft, and then squeeze it in a vice. Step by step we heat the areas and compress them. Finally, we form the desired bow profile.


Step four. Bow mount
To attach the bow, look for its center, and then drill two holes, like the author. For fastening we use two self-tapping screws and washers. But don’t fasten the bow tightly yet, it still needs to be modified.


Step five. Finalizing the bow
The essence of the modification is to make grooves at the ends of the arms, to which the bowstring can be tied. We make markings and cut out excess parts using a jigsaw. As for the short arm, you need to make grooves at the ends so that the string does not fly off.


Step six. Installing the bowstring
We use synthetic strong rope as a bowstring. Cut two pieces of the required length and melt the ends using a lighter. Well, then we tie the main string to the ends of the shoulder with a slight tension. As for the additional shoulder, in order to use it, you will need another rope. You can see how everything connects in the photo.


Step seven. Arrangement of the trigger mechanism
The trigger mechanism is of the trigger type. It consists of two parts, one is the trigger, and the second is a part with teeth, one of which holds the bowstring, and the other rests against the trigger. These parts can be cut from plywood using a jigsaw.


Step eight. Making arrows
We make arrows from wooden rods. To stabilize the flight, make plumage for them, the author used for this duct tape. Well, you need to install some kind of weight on the end of the arrow; the author put a self-tapping screw there. If desired, you can cut off the head and sharpen the rod.
Designer and gunsmith Bogdan Khmelnitsky often has to deal with mistrust. Having seen his bows and crossbows, people refuse to believe that the inventor made them with his own hands and that the development and manufacture of weapons is just a hobby for him, and not his life’s work. Indeed, with his high-tech samples in his hands, Khmelnitsky looks more like the head of a design bureau or the owner of a small arms factory. So the master has to constantly remind him that he makes his prototypes exclusively at home, and his house is very ordinary - without CNC machines, painting booths and “clean rooms”.
Although it would be possible not to explain anything: Bogdan Khmelnitsky’s weapons can withstand the harshest criticism of an industrial scale without any discounts on the hobby. We could verify this by studying the bows “Phantom” (PM No. 5"2011) and “Cobra” (No. 1"2014). The inventor's know-how is to use steel or gas springs instead of traditional flexible arms as energy sources for the shot. The result of this approach is a weapon that is as close as possible to sports bows in terms of characteristics and shooting technique, but is much more compact and easy to transport.
Khmelnytsky's bows are complex and elegant designs with paradoxical properties. For example, the stroke of the Cobra's string tension significantly exceeds the dimensions of the weapon itself thanks to a block with parallel grooves (the string rests twice on the same block) and a composite eccentric module complex shape.
This time Bogdan brought a crossbow to our editorial office, and, at first glance, there is nothing complicated about it: no eccentrics, just a few simple pulleys. However, Condor is not as simple as it seems. To figure it out, it’s worth remembering what crossbows of classical design are.
 Member of the Russian national team and European champion in crossbow sports, Vladislav Liber, like no one else, is able to understand and appreciate the inventive talent of Bogdan Khmelnitsky. After all, he also has a crossbow in his hands own design. Vladislav's know-how is rigid aluminum guides combined with a narrow runner made of good sliding resin.
Get itchy, shoulder!
A classic crossbow is also called a recurve crossbow. In it, the bowstring is attached directly to the ends of the flexible arms. The shoulders obey the same physical law as a spring, the elastic force of which is greater the more it is compressed. This means that the crossbow only develops maximum force when the bowstring is fully drawn. As soon as the arrow begins to move, the force begins to drop rapidly, so the speed of the arrow in recurve crossbows is relatively low.
To somehow combat this annoying effect, the Japanese made their two-meter (and sometimes larger) “yumi” bows. The long and very powerful arms had a small stroke, so the force remained more or less uniform throughout most of the bowstring's stroke. With recurve crossbows, everything is the same: the wider the shoulders, the more effective the weapon.

Compound crossbows (like bows) use a pulley system. The bowstring in them passes through rotating eccentrics, which work like a lever with a shoulder that changes along the tension. With the help of a chain hoist, the force curve can be adjusted to your liking. After the shot, the force on the bowstring constantly increases, and the arrow accelerates with effort throughout the entire stroke. Therefore, block crossbows can boast high speed arrow flight with the most compact shoulders.
In terms of its properties, Khmelnitsky’s “Condor” is something between a recurve crossbow and a “block gun”. It does not have eccentrics, but the gas spring itself has a much more even force characteristic than a flexible arm. At the very beginning of the stroke, it already develops more than 75% of the maximum force, so during acceleration it is able to transfer much more energy to the projectile than traditional shoulders. At the same time, the width of the Condor is smaller than that of the most compact block cars. But in terms of weight (4.5 kg), it is definitely closer to “block crossbows” - recurve crossbows are much lighter.
 To charge the Condor, a tensioner is used - a special device that is a strong cord with handles at the ends and hooks in the middle for gripping the bowstring. A stirrup helps hold the crossbow motionless.
Of course, Bogdan is thinking about installing eccentrics instead of conventional pulleys. With them, the Condor could demonstrate miracles of efficiency. The law allows citizens to operate crossbows with a force of up to 43 kgf without a permit, and it is better to have these 43 kg at the end of the stroke than at the beginning - after all, this gives up to a 40% increase in the speed of the arrow.
Word to the champion
“Who are the judges?” — we remembered the classic and decided to turn to the Russian Crossbow Union for expert comments. On the territory of the Hunter shooting center, Condor met face to face with professional crossbows of the Russian team, and Bogdan Khmelnitsky met with Vladislav Liber from the Cheetah team, an international master of sports, a member of the Russian national team, and European champion in the team championship. At first, Vladislav also mistook the inventor for an enterprising businessman and did not make any concessions to the weapon.
 Bogdan Khmelnitsky // Age: 37 years old // Profession: milling operator // Hobbies: archery, invention of weapons. Bogdan became interested in archery as a child. Soon his interest grew into a serious passion for sports shooting. Bogdan even trained at work during his lunch break, but in a cramped room it was difficult to turn around with the Olympic bow. This is how a professional milling machine operator came up with the idea of inventing a compact weapon for archery athletes.
The athlete's main criticism was that the guides were too long. “The longer the arrow moves along the guides, the longer the shooter must hold the weapon motionless after firing. This is not an easy task, so the longer the weapon and the greater the stroke of the bowstring, the lower the accuracy,” explained Vladislav.
Looking at the Condor disassembled, it is easy to understand that the length of the crossbow is dictated by the dimensions of the gas spring. But the stroke of the bowstring tension can be reduced by using additional blocks or installing wider “shoulders”. However, it should be remembered that extra blocks will reduce the speed of the arrow due to friction, and increased “shoulders” will deprive the weapon of perhaps its main advantage - compactness.

Criticism also affected the material of the guides. According to Vladislav, aluminum is not for them the best choice. Firstly, it is far from ideal in terms of friction. When abraded, microscopic irregularities form on it, which prevent the arrow from sliding freely. Sports crossbows use polymer resins and plastics, which, due to their molecular structure, remain smooth for a long time.
Secondly, with prolonged use, a barely noticeable depression is machined into aluminum guides, and a vertical component appears in the trajectory of the arrow, which negatively affects accuracy and takes away some of the energy. Vladislav himself designs sporting crossbows and uses hybrid guides with external aluminum rails and a resin head. Hard aluminum bears the main weight of the projectile, and soft resin is responsible for sliding.
Of course, members of the Russian crossbow sports team noted high quality production of the Condor, and head coach Sergei Chikishev even suggested that a reliable and unpretentious crossbow with long guides could be useful when training shooters - to train hand steadiness.

Exactly!
When shooters talk about weapons, even nightingales fall silent. Bogdan and the members of the team enthusiastically discussed the features of the Condor, shooting at targets from 25-50 m. Having reached a consensus on the issue of zeroing the weapon (strictly at the center of the target!), they decided to give the newcomers a chance.
The first to go to the firing line was our photographer Dima, who that day picked up a crossbow for the first time. I remembered all the shooters’ recommendations, held my breath, pulled the trigger and... hit the target at a distance of 25 m right on the bull’s eye! It is difficult to describe how wildly Dima rejoiced at such a pleasant “accident”.
Then it was the turn of your humble servant, who had also never held a crossbow in his life. The result is the same - right on target. Agree, a repeating result can no longer be attributed to chance. Despite the criticism, Condor proved its worth in action.
We will be looking forward to Bogdan's visit for the fourth time to shoot from another hitherto unseen weapon.
The editors thank the President of the Russian Crossbow Union Valery Ashikhmin for his assistance in preparing the material.
Retail outlets sell many different crossbows to suit every taste. But you can not only buy it, but also make it yourself, if you were inspired to create it by a movie or a visit to a museum. Of course, manufacturing requires certain skills in handling tools, but if you really want it, there are no barriers.
When making a crossbow, start with an arc. Since it was decided that it should be powerful, then for the arc you need to take a leaf from the spring of a UAZ car. Then, using a grinder, we cut out an arc from this petal. It should be 85 cm long, 3 cm wide in the center and 1.5 cm at the edges. Next, using a sharpener, give the thickness in the center 0.8 cm with a gradual transition to 0.4 cm at the edges. Further processing of the arc is done using files of different grain sizes and sandpaper. It is good to process a spring lengthwise; it is almost impossible to process it crosswise with a file. Then, using a pobedit-tipped drill, make holes for attaching the arc to the stock and for fixing the bowstring holders.

The next step will be making the stock. It is better to make it from ash. This is enough strong tree, does not prick or crack. Take a board 90 cm long, 20 cm wide and 6 cm thick, plan it on a jointer until it is level. Then draw a drawing of the stock with a pencil; you can take a hunting rifle as a sample. Further with a hand jigsaw cut the bed out of the board. Using a woodworking rasp, finely process the stock, giving it the necessary and convenient shape. The process is long and quite labor-intensive. Make a finer grind various types sandpaper. A groove for the arrow needs to be made whetstone. Take a used soft abrasive stone, give it a round profile using a harder stone, and place it on a sharpener to make a cut. The groove will be smooth and of the same depth.
Next we will work on manufacturing the trigger mechanism. Using a chisel in the stock, make a recess for the “nut” and the spring. Make the “nut” that will hold the bowstring from a piece of iron without welding so that it is stronger, since it will bear the entire main load. On the stock, where the “nut” is attached, install iron “cheeks” so that the force of tension does not tear it out of the wood. Place the return spring under it and connect it to the trigger guard with a rod. Further trigger cover with metal decorative plates. Screw the pads to the stock with powerful screws to make it stronger.

Then start making fastenings, with the help of which the arc is fixed to the stock. To do this, take two iron bars and bend them in an L-shape. Use a tire with a thickness of 6 mm and a width of 25 mm. Drill holes in them for attachment to the stock and to the arc. First, secure the L-shaped parts with two M6 bolts to the stock. Then make a “stirrup” for the leg and weld a tire to it, which was supposed to become an additional mount for the crossbow arc. Then secure the “stirrup” and the bow to the stock with two M8 bolts and nuts. To hold the arrow, make a piece of spring steel. Bend the iron bar into an L-shape and attach it to the stock with a bolt, and a piece of spring tape to the bar. As a bowstring, use an iron cable 4 mm thick. Paint all metal parts with black paint, and the wooden stock with stain and clear varnish, which will give the crossbow a rather elegant look.

Make arrows from pine. File on circular saw smooth slats of dry boards. Then use glass and sandpaper to give them a round shape. required thickness. Make the feathering on the arrows from thin fiberglass, and the tips from old files. Attach the tips to the shaft with epoxy glue and thin wire. They will turn out light with right center heavy and strong enough, they should be 40 cm long and 1 cm thick.
In general, it will turn out to be a great crossbow. The target combat range of such a device is about 70 meters, the arrow's flight range is close to 400 meters, it pierces a slate sheet from 10 meters, and if the arrow is driven into a tree, then it must be removed with a hammer and chisel. The accuracy is also quite good, and if you use it as a sight laser pointer, is made generally fantastic.
To assemble a real rapid-fire combat crossbow at home, which you can do without extra effort to quickly automatically reload, you need to have a lot of spare parts that you naturally won’t find at home (rollers for a nylon cable instead of a bowstring, a sight and a high-quality trigger). In this article I will tell you how to assemble a simple crossbow in a home workshop or in the utility room, I will describe some practical basic subtleties that will make your toy crossbow fighting machine!)

The shoulders of a crossbow can be made from the same material as for a bow: wood, iron or fiberglass (iron - a spring from a Moskvich car is good for this, and fiberglass is good polypropylene pipe, which can be purchased at any hardware store). The crossbow stock, the recess where the arrow will be inserted in the future, is perhaps the most difficult part to manufacture, which requires very precise processing and a lot of time spent.
In the absence of a well-processed metal stock on a factory machine, you can use a well-turned and then sanded wooden stock. Do not forget that the advantage of a combat crossbow over a wooden bow is not only in shooting power (although a homemade crossbow without rollers and a block system is unlikely to exceed a bow in this indicator), but primarily in the convenience of its design and the ability to conduct aimed fire.
To do this, you need to calculate the flight path of the arrow, adjust the stock so that it is located at an angle (average value 5-6 degrees), but I advise you to decide on the distance at which you are going to send the arrows, and what is called “shooting” ready product, after each series of shots, changing the angle of the stock, until the crossbow made by your hands begins to shoot at the center of the bull's eye.

You can come up with your own trigger mechanism for a simple crossbow. Usually this is a lever that holds the bowstring, which can be removed by pressing the trigger. Prerequisite so that it fires exactly when you need it (if the string tension is high, a weak trigger can break and shoot on its own). The string should move so that when it is released it returns close to the stock, but without any friction. Below is a diagram and drawing of making a simple combat crossbow at home:
Attention! Manufacturing this type of weapon may be punishable by law! Information for peaceful purposes only. All responsibility falls on the shoulders of the person.
Below are more detailed drawings and diagrams (with indicated dimensions) that can be used to make a professional crossbow.
Despite the abundance of online stores selling throwing weapons, as well as a fantastic range of products, there are many who want to make a crossbow on their own. Most of them don't know where to start. Today we will tell you about the main design features crossbow. This knowledge will help you avoid manufacturing errors, as well as frustration and injury when using it.

Before starting work, there are two main points to know.
1. In our country, a crossbow is an entertaining and sporting weapon. Hunting with it is prohibited. Any throwing weapon with a tension force of more than 43 kilograms is considered a combat weapon, the right to use which is given by the licensing authorities of the Ministry of Internal Affairs.
2. A crossbow is a structure that experiences enormous loads during operation. Therefore, any carelessness in its manufacture will most likely lead to injury. Any part of it must have a multiple safety margin.
So, let's learn how to make a simple crossbow at home.
The video below will tell you how to make a crossbow at home:
Onion
The crossbow's energy source is the bow - an elastic plate of complex shape, having one main bend and, as an option, two additional ones at the ends. You need to start making a crossbow with this particular part and adjust everything else to it - choosing the type of tension (recurve or block), the size of the stock, the type of trigger.

Wood and composite
The urgent question is what to use as a material for the bow: wood, composite or metal?
· Wood is the worst choice. Available “pieces of wood” lying underfoot are garbage, suitable only for lighting stoves. Branches cut down in the forest lose their elasticity as they dry, crack and fall apart. From this material you can only make something for short-term entertainment in the country.
· A composite made from fiberglass and epoxy resin is very attractive and simple in appearance. But there is an obstacle - the need to scrupulously adhere to the technology of all work. Mix proportions, drying, aging. At home this is almost impossible.
Metal
There is only one option left - metal. If you have an old Moskvich with a set of leaf springs on hand, consider yourself lucky. One sheet is taken from the entire package - the second. If you are not too scared by the dimensions, then the first one will do. Moreover, it has tubes at the ends - an almost ready-made bracket for attaching blocks or bowstrings.

A block is used to attach the bow to the stock. This is a U-shaped design that wraps around the stock from the front. It can be welded tightly to the spring leaf, but in this case, when bending the bow welds will experience excessive pull-out stress. Therefore, it is better to attach the ball joint from the VAZ 2108 to the block. The bow is attached to its pin. This is also convenient because there is a hole on the spring leaf.
If you are very strong, then you can choose the recursive method of tensioning the bowstring. To attach the blocks to the bow, if you have chosen a second spring leaf, you need to attach brackets to its ends. A bolted (or even better, rivet) connection is preferable to welding, since this unit experiences strong vibration loads. As pulleys, use parts of the window lifting mechanism of the same Moskvich.
Regarding the bowstring, an obvious solution arises: a thin metal cable. But it is not entirely correct, since steel cables do not withstand variable loads well. It is better to choose a climbing cord with a diameter of 5-8 mm.

Once you've made your bow and attached the string to it, you can conduct full-scale bending tests. It’s great if you have a dynamometer of 100-150 kilograms. As a result, you will know the two parameters required for further work: string stroke length and load.
Read below to learn how to make a stock for a powerful crossbow at home.
Lodge
For this part of a homemade crossbow, wood is the only option. But not everything. In any case, not aspen, alder, spruce or pine. Beech is better, elm, oak. The product has been dried for twenty years. It is clear that you will never find something like this anywhere. Therefore, use moisture-resistant plywood with a thickness of 7-9 mm. 3 or 5 contours of the stock are cut out of it, and then this package is glued together epoxy resin. Not very pretty, but extremely reliable.
· Regarding the shape - give up the semi-pistol style and use a straight English stock. It is not only easier to manufacture, but also stronger.
· When assembling the stock package, it is necessary to take into account both the stroke of the bowstring and the load. The first determines the distance from the block to the slot for the trigger mechanism. The second is the thickness of the stock walls at the place of its attachment. It is the straight English stock that will allow you to avoid excessive thinning when moving from the forearm to the butt.
· The most important part of a crossbow stock is the arrow guide. It should be smooth and durable. For it, you can use the plates framing the side windows of the Moskvich, furniture fittings, other similar shaped parts.

· If you use a block type of bowstring tension, then there should be a groove in the forend under the guide for the cable system. This is another element that weakens the stock, so give up the idea of making the forend dainty. High will protect your fingers from getting caught under the bowstring and traumatic amputation of the phalanges.
Typically crossbows have a plastic stock.
Below we will tell you how to make a homemade trigger mechanism for a crossbow at home.
This video will tell you how to make a crossbow from wood (plywood) with your own hands:
Trigger
If you are not a sixth-class mechanic, then give up the idea of making this element yourself. Make an effort and find the trigger for any spring-piston air rifle. In the very difficult case you will only have to modify its tooth that holds the piston - it may be too small for a thick bowstring.
A casing with a height of 2 to 5 cm is placed above the trigger mechanism, which is necessary to protect it from moisture and dirt, and also serves as the basis for sighting devices - rails for optics or rear sights. Weaver, Picatinny or dovetail can be purchased at any online store that sells pneumatics.

The front part of the casing above the trigger mechanism is made in the form of a long (no more than 10 cm) elastic “tail”, which holds the back of the arrow on the guide.
Making arrows
Canonically correct crossbow ammunition is called a “bolt”. But many online stores sell crossbow arrows. For crossbows with a rifle stock, lengths of 14, 16, 20, 22 inches are suitable. To be completely honest, you won't find better magazine arrows. Unfortunately, none of them are worth less than 150 rubles. Therefore, it is worth trying to make them yourself.
They can be made from straight-layer wood without knots. As an option, use furniture parts - balusters from chairs, railings of cribs. Good arrows are made from aluminum tubes up to 2 cm in diameter. If desired, you can even use electrodes of the maximum diameter, but they bend hopelessly when hit and it is difficult to attach the feathers to them.
Thin plastic is used for the plumage. Natural bird feathers can give the unexpected effect of chaotic changes in flight direction, since they have natural curves that must be taken into account.
The main condition for a good, smooth flight is balancing. The center of gravity of a crossbow bolt should be after the first third of its length from the tip. If it is not metal, the end of the arrow can be loaded with lead wire wrapped around the shaft.
The issue of equipping an arrow with a tip must be treated without fanaticism. Sharpening metal on lathes, milling and polishing, giving it exquisite shapes - these operations are accessible to few. In addition, such a tip is extremely dangerous. If you do not need to pierce knight's armor, then wooden bolt you can simply sharpen it at a 30 degree angle using a regular knife.

There are classic models, they look like ancient ones, and their design is simple. There are also modern crossbows, they are called "block" crossbows. Such weapons have more complex design because of the blocks and other innovations that enhance its power. It will be much more difficult to make such a crossbow at home, but the description of this process and the drawings, which will be detailed in the article, will help you with this. The crossbow has many components: onion; bed; trigger mechanism; bowstring; some modern models have blocks at the ends of the bow.
All of these rocks are dense enough to withstand the enormous stress that will be placed on the bow and crossbow stock. Material Preparation For a weapon to fire long and powerfully, its material must be properly dried for a year. Cutting off required trunk or a branch, both cuts must be painted over. To do this, you can use any glue, paint or varnish. If you close the cuts in this way, moisture will not be able to quickly leave the workpiece, so the wood will dry more slowly and evenly. So it is not formed in the material internal cracks, and a crossbow made with your own hands at home will serve for a very long time. After this, the log is placed in a dry place where it will not be dropped on. Sun rays. It should remain like this for a year. After time, the bark is removed from the workpiece, so it dries for another week. The log is then sawn in half. It sits like that for another week, only after that you can start creating a crossbow. Tools for making a crossbow Knife. Saw. Plane. Sandpaper of different grits. Carpenter's cutter. Chisel. Drill. Making a bow On the workpiece, choose the side in which the annual rings of the tree are thinner.

This is the north side, the fibers on it are denser than in other parts. This is what we will use when creating a crossbow with our own hands at home. From this part you need to make a bow. Mark the middle, put about two centimeters on both sides of it, marking the part that will be clamped in the crossbow stock. This will be the thickest part of the onion. They begin to cut the material from it, gradually moving towards the edges. They chip the workpiece gradually on both sides, checking until it begins to bend at least a little. After this, you need to take a strong rope and make loops at its ends. This will be a test string. It is necessary to check the bow tension. It is very important that his shoulders bend evenly. By putting on an improvised bowstring and drawing the bow, you can see where to remove the material. They are marked and carefully cut with a knife. This must be continued until the product begins to bend evenly on both sides. Processing of knots Very often there are knots on the material: some are visible immediately, others can open during the processing of the material. What makes them dangerous is that they can cause chips. Therefore, you need to treat such places with a well-sharpened knife. If you don't have confidence or experience, it's better to tinker a little longer and sand them down with sandpaper.
You can also use a file for this purpose. Bed When the bow is ready, put it aside and begin making the stock. To begin with, they choose where there will be a groove through which the arrow will fly out, and make this place perfectly level. It will depend on him how accurately the crossbow will shoot. To understand everything, it is better to look at the drawing of the crossbow. How to make its stock is shown in detail here. After this, the gutter is cut to the required length. Usually it is about 30 cm. Then a recess is made for the bow and trigger mechanism. They are convenient to cut with a chisel and a carpenter's knife. Trigger As mentioned above, it can be made of dense wood or, if the crossbow is powerful, of metal. The simplest mechanism is the so-called “nut”. It consists of a cylinder, where on one side there is a hook for the bowstring, and on the other there is a stop for the trigger. In high-power crossbows, the trigger is more refined for an easier trigger pull when loaded. We looked in detail at how to make a crossbow with your own hands. A master class with drawings, we hope, will help you understand all the intricacies. This is a common medieval model. Now we’ll find out how to make the same weapon, only modern model. Compound crossbow Such a device is much more difficult to make; it will require many more tools than a regular one. So, we create a crossbow with our own hands at home from fiberglass.

This material is ideal for making bows because it is tough and yet lightweight. It can be cut from whole piece fiberglass 1 cm thick or make it yourself. If you’re not too lazy to tinker, it’s better to make it yourself. Making fiberglass shoulders for a crossbow You need to take fiberglass or Kevlar and cut it into strips. You need from 30 to 40 of them. In general, it is better to try everything experimentally. These strips are glued with epoxy resin so that everything becomes monolithic when it hardens. You also need to think about how to put this entire “sandwich” under the press. It is best to use boards, place the shoulders between them, and clamp everything with clamps. IN epoxy glue There should be less thickener than usual, ranging from 8 to 10%. Everything hardens within 24 hours, but if the room is cold, the time may increase. When everything has hardened, the shoulders are finalized by cutting off the protruding edges with a knife and sanding with sandpaper. Now let’s look in detail at how to make a crossbow with your own hands at home and what additional elements its designs need to be made.
Let's do figured stock To do this, you need to take a board at least 4 cm thick. Mark where the butt, handle, trigger mechanism and mounts for the arms of the bow will be. In general, everything is according to the drawings. After that you need to drill everything out required holes and cut. Blocks These can be made from aluminum. It would be better if they were on bearings. The middle parts of roller skate wheels are perfect. They are strong enough to withstand heavy loads and are the perfect size. The axles for them need to be 5 mm thick. You can take them from rollers or make them yourself. Fasteners are made of sheet steel or similar durable material. You can also make the ends of the bow arms thicker before pouring epoxy resin to install the blocks, in which case fastenings will not be needed. After this, you need to install a trigger mechanism with a trigger and an arrow holder on the crossbow you made yourself at home. In general, all parts are connected with bolts; washers are always used. They will allow you to twist everything more tightly without damaging the material. In compound crossbows, the bowstring is longer and is tensioned differently. It seems to cross, and when drawn, this system allows the arrow to give twice as much energy to flight as in the case of a conventional crossbow with the same bow. In powerful block models, the bowstring is a steel cable, only it is able to withstand enormous sharp pressure when fired. In crossbows whose power is no more than 40-50 kg, it can be woven from nylon threads.
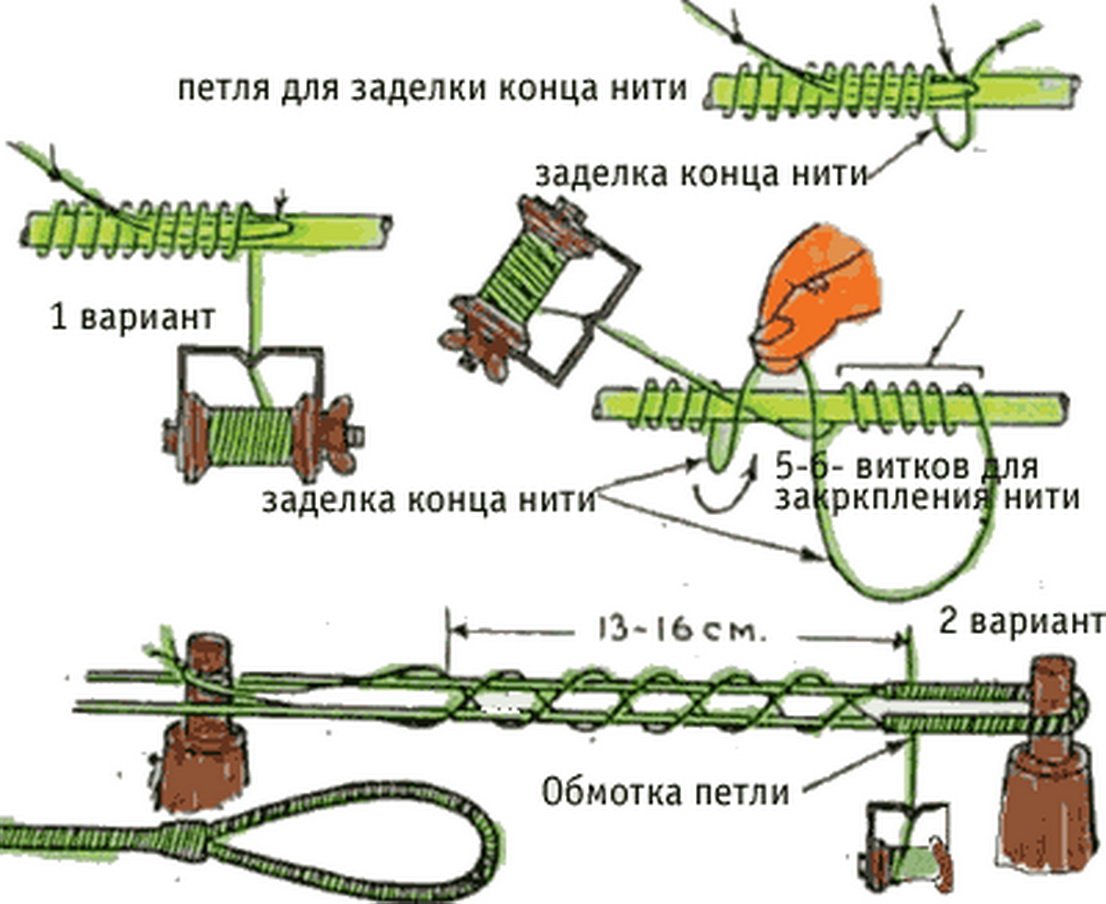
Making a bowstring for a crossbow Using the described method, you can make a bowstring for both a recurve and a classic crossbow. It’s just that their length will be different due to the design features of both models. They take a board the length of the planned bowstring, drive in two pegs, onto which a nylon thread is wound in a circle. When the thickness of this long oval becomes 5 mm, it is wrapped, leaving a gap of 2-3 mm between the turns. Near the pegs you need to braid without gaps, because there will be loops for hooking. Regarding the bowstring, one can also say that if you make it too thick, the strength of the crossbow is reduced. However, thin ones can tear.
So in this case you need to choose an intermediate thickness. It is better to study similar sports models with the same tension and make a bowstring of their thickness. When this is done, the two halves are joined and wrapped together. Again, special care is needed near the hinges. Then they wrap the middle where the string will catch and push the arrow. This place is also done carefully, because it will be subject to a tremendous frictional force. All cut edges of the threads must be coated with glue. This will make them denser and more monolithic. This article provides drawings and a description of how to make real crossbow at home. It's not that difficult, especially if you're making wooden weapons. If the product is manufactured for hunting in order to achieve enormous power, then you should choose a block model. Its design is a little more complicated; you may need a machine to make some parts.