Chaise lounges are comfortable, lightweight chairs that are often used for relaxation areas. They are installed on beaches and near outdoor pools. For a dacha, this item can be part of the exterior. On it you can relax after a busy, tiring day, swim in the gentle rays of the sun or take a nap in a shaded place away from human eyes. In this article we will look at how to make a chaise lounge from wood with your own hands, demonstrate drawings, as well as photo and video instructions.
First, you should decide on the type of sun lounger. It can be made of wood, aluminum, plastic and synthetic fabrics. We will focus on a practical and easy-to-manufacture option - a wooden chaise lounge.
The wood for the product and its design is selected depending on:
- your preferences;
- availability of available materials;
- financial capabilities;
- style of your garden.
When choosing wood for a future sun lounger, you should take into account the physical and mechanical properties certain types tree. For example, beech, ash, larch or oak will last the longest. It's durable and durable materials, besides, they have an aesthetic appearance. But this type of wood is quite expensive and weighs more than other types of wood, which makes the finished products more difficult to move.
Chaise lounge made with my own hands, will not only save your money, but also improve the garden and give it exclusivity. There is a varied variety of wooden chaise lounge designs.

A folding chair is more convenient, since moving it will not be difficult, and in rainy weather it can be easily folded and hidden (which is important for wooden products). With just one move, you can turn your lounge chair into a comfortable chair.
Materials

So, from the materials we need:
For the back legs:
- 2×4×122 cm – 2 pcs.
- 2×4×61 cm – 1 pc.
- 2×4×65 cm – 1 pc.
- 2×6×61 cm – 1 pc.
For seat legs:
- 2×4×112 cm – 2 pcs.
- 2×4×60 cm – 4 pcs.
- 2×4×57 cm – 1 pc.
- 2×6×57 cm – 1 pc.
Back support:
- 2×4×38 cm – 2 pcs.
- Wooden rod with a diameter of 1.2 cm, a length of 65 cm - 1 pc.
Fabric seat:
- Fabric 137×116 cm.
- Wooden rod with a diameter of 1.2 cm, a length of 55.9 cm - 2 pcs.
To secure parts:
- Bolts and nuts – 4 pcs.
- Washers (for the bolt head and nut) – 8 pcs.
- Carpenter's glue.
- Screws.
Tools:
- Drill.
- Sandpaper or sanding machine.
- Needle file round section.
Preparatory processes
All parts must be pre-treated, namely sanded and treated with special impregnations to protect the wood from corrosion. Then the product will serve you much longer.
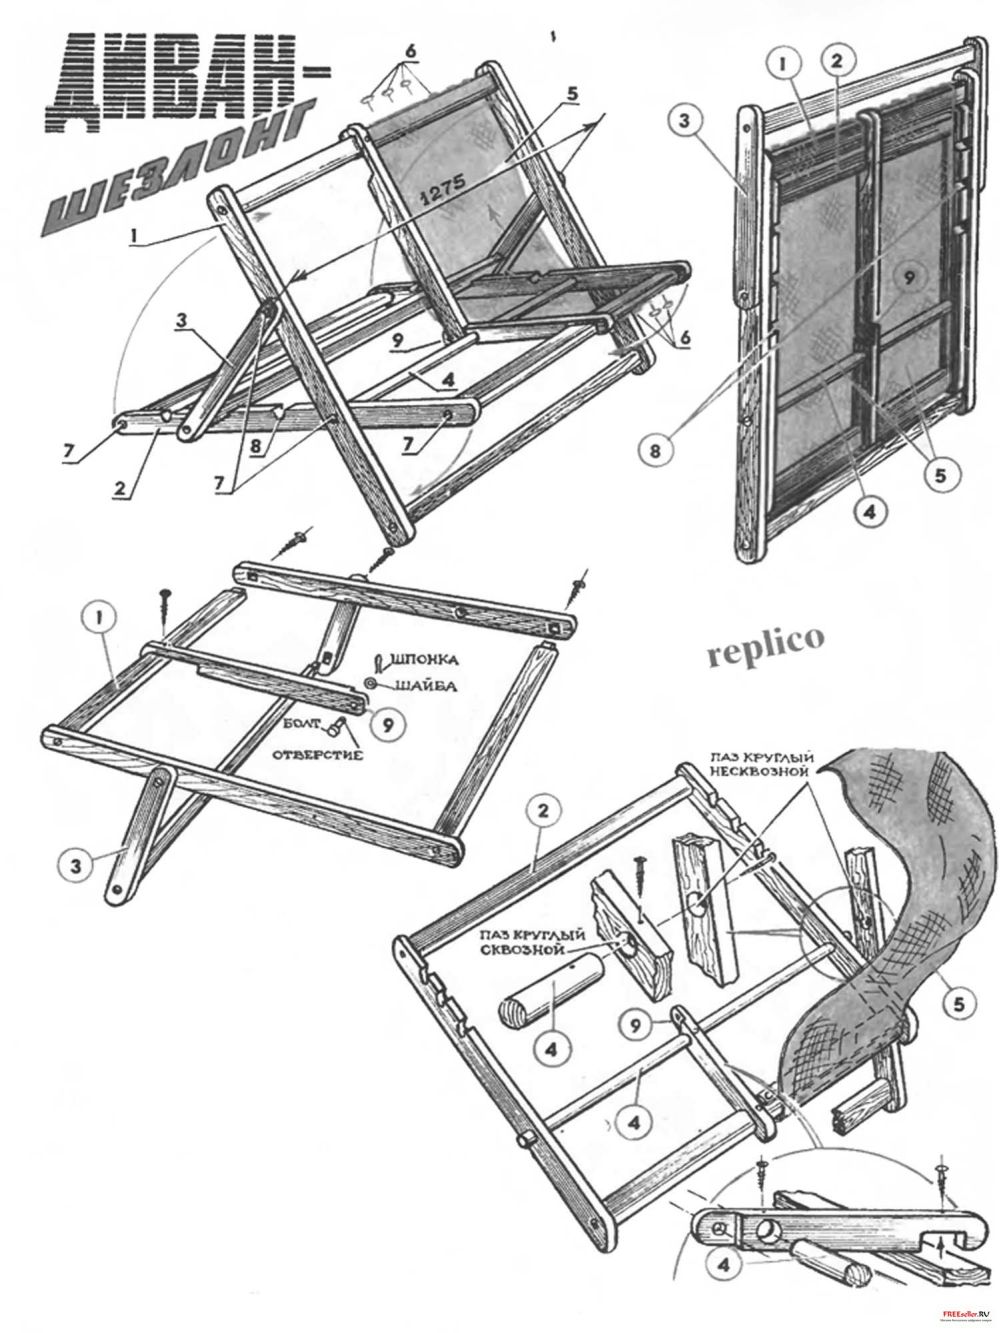
As can be seen in the drawing, crossbars are installed at the bottom of the seat legs, thanks to which the position of the backrest is fixed. If you plan to install only one plank, you should first make cuts in place of the planks: 20 cm from the edge, then 25, 30 and 35. Also on the back frame you need to make holes for bolts, retreating 41 cm on each side. On the seat frame you should retreat 43 cm from the top. And on the support of the back of the chaise, make a hole in the center from the edges.
Frame assembly

First of all, the back frame is assembled. A plank with a size of 2x6x61 cm will bear the main load, so you should pay attention to its fastening Special attention. Its fixation should be done as securely as possible. Be sure to leave a gap of 1 cm between the two slats. This will be necessary for attaching the fabric.

Based on the above diagram, assemble the seat frame. After this, fold the frame of the back and seat. Pre-mounted on the backrest frame from top bar drill holes on both sides at a distance of 41 cm, and on the seat 43 cm. Fasten them with bolts and a nut. Be sure to place a washer between the frame posts.

During operation, the nuts may become loose. To prevent this, tighten one more locknut at a time. Nuts can also be mounted with Moment paint or glue. To adjust the free play, first tighten the nut and then loosen it slightly. After this, let the glue/paint dry.

Now you can install the backrest support. Attach the slats to the back with bolts and use washers in the same way. A large dowel is pressed into the prepared hole in the planks using glue.
The fabric for the seat should be strong enough. Canvas, tarpaulin, jeans and other types of wear-resistant fabrics are suitable.
The fabric should be folded in half and stitched, retreating 1.5 cm from the edge. Then we turn it inside out. We bend the edge of the fabric for the rod that secures the fabric seat between the slats and stitch it. We do the same with the reverse edge.
Then the edge of the fabric should be inserted between the slats and a rod should be installed in the fold. This way, the seat will be firmly fixed, but at the same time removing it for washing will not be difficult.
Final proceedings

At the final stage of manufacturing the sun lounger, it is advisable to eliminate the remaining or formed irregularities and roughness with a file or sandpaper. After this, if desired, the product can be coated with paint or varnish.
Of course, using this design, you have many opportunities to improvise. For example, instead of a fabric seat, you can simply install more slats all the way up to the joint. It depends on your preference.

This design is completely different from the previous one. But nevertheless, making it with your own hands is no more difficult. Such a chaise lounge is not very convenient to move, but, if carefully executed and carefully processed, it is quite aesthetically pleasing and easy to implement.
The tools we need are:
- drill;
- sandpaper;
- saw;
- roulette;
- marker.
From materials:
- 2.5×8×60 cm – 13 pcs. (slats for seating);
- 5×10×21 cm – 2 pcs. (longitudinal bars for the frame);
- 5×10×50 cm – 2 pcs. ( cross beams for the frame);
- 5×10×35 cm – 6 pcs. (chaise lounge legs);
- 5×10×88 cm – 2 pcs. (back of the product);
- 5×10×39 cm – 3 pcs. (back of the product);
- 2.5×8×88 cm – 6 pcs. (slats on the back frame);
- 5×10×60 cm – 1 pc. (bar for fixing the backrest in the desired position);
- wood screws;
- pins for fixation;
- paint or varnish;
- impregnation for wood.
The first step is to treat the wood. Then you need to make a frame. To do this, take 2 longitudinal beams of 215 cm each and 2 transverse beams of 50 cm each. We connect them with screws.

Next, take 13 60 cm strips and secure them to the frame with self-tapping screws, leaving a 1 cm gap between them. To make the distance even, you can use centimeter spacers in the form of planks. So we got a seat.

The next step is to install 35 cm legs from timber (the length of the legs can be changed as desired). On the seat side, to strengthen the structure, we make double legs.
Next, we make the backrest from two beams 88 cm long and three beams 39 cm long. The frame of the backrest should fit freely into the main structure, and it is also necessary to leave a small gap between these blanks.

Now fix the back boards in the longitudinal direction. The edge planks can be rounded to give them a more aesthetic appearance.

To ensure that the backrest can be raised and lowered easily, make through holes at a distance of 9 cm from the edge of the seat through both structures. Fastening is carried out using special pins.

After this, you need to make 2 grooves in the base of the sun lounger into which the support bars will be placed. Due to this, the backrest can be fixed in different positions. One groove is made at a distance of 9 cm from the stud, measuring 5x10 cm. The next groove is made at a distance of 20 cm from the previous one, 5x5 cm.

A horizontal beam 60 cm long is placed in the first groove, which will hold the backrest in the desired position. If you want to change the position of the backrest, then the beam is shifted into the second groove.

Following this pattern, the process of making a wooden chaise longue is almost complete. All that remains is to sand the structure, varnish or paint it.
Original ideas

We bring to your attention a review original design making a sun lounger. To make it you will need logs Ø75–120 mm. To do this you will need to prepare the following tool:
- logs;
- electric saw;
- drill;
- self-tapping screws;
- staples;
- set of drills.

The manufacturing process is as follows:
- First, cut the logs 45 cm long.
- Then you create a layout future design. To do this, take electrical tape and use it to draw an outline directly on the floor.

- Next, make holes in the cut logs.

- All elements are connected to each other. 4 long self-tapping screws are screwed into each log. You can use a socket wrench to tighten them.

- Now you can turn the resulting design over and test it. If it is unstable, then eliminate this defect.
- To give the chaise lounge greater stability, fix the brackets on the back side.

Although this work process is quite troublesome and time-consuming, the result will please your eye. At the same time, such a chaise lounge will be a wonderful addition to a summer cottage.
If you have your own ideas for making a sun lounger, write about them in the comments to this article. If you're having a hard time coming up with own design, then use the drawings presented below. We hope the information provided will help you make your own chaise longue.
Video
In the video provided, you can familiarize yourself with the technology in more detail:
Blueprints
The presented drawings will help you design a sun lounger yourself:


After a hard week of work, everyone wants to forget about business for a while. And nothing helps restore strength like resting on fresh air. But first you need to find appropriate place. The thought of dragging a bed out into the street is unlikely to occur to anyone. It is much better to install a special sun lounger - a chaise longue. Wooden or plastic - of great importance does not have. Any furniture will provide you with the most comfortable conditions for relax.
Main advantages
In my own way functional purpose sun loungers are the same chairs, but more stable and low seat. You can relax in them in a semi-lying position, which allows you to relax your spine and all muscle groups as much as possible.
The undeniable advantage of sun loungers is their comfortable shape. The garden chair can be folded in such a way that it can be used for sitting or lying down, depending on the person’s personal preferences.
Traditionally, deck chairs for summer cottages are made of wood, because since ancient times it has been considered the most environmentally friendly, economical and easy-to-use material.
Sun loungers are ideal for observing nature as they are light weight and very comfortable. Therefore, it is not surprising that many owners install them in their gardens or dachas. Such furniture can stand outdoors throughout the summer, and winter period it can be put away in some suitable premises, for example, a storage room.
More often garden loungers are made from materials such as:
- tree;
- plastic;
- rattan.
If you don't want to waste time and effort on self-assembly garden lounger, you can always order it from a furniture showroom.
Types of structures
If you have finally decided to start making a sun lounger for yourself, then first it won’t hurt you to get acquainted with the main types of sun loungers for your dacha. There are quite a lot of them, so only the most popular ones will be discussed below:

These are just some of the sun loungers that you can purchase for your summer cottage. If you wish, you can make your own chaise lounge in the form of a swing, and also using ordinary tree branches as material. It all depends on your preferences.
Making a wooden sun lounger
First, you need to prepare a certain set of materials and tools that you will need to make a homemade sun lounger:
- self-tapping screws;
- jigsaw and screwdriver;
- boards for covering the frame, 2.5 cm wide;
- timber 40x40 mm for the frame;
- corners for fastening boards (4 pcs.); wood slabs 20 mm thick.
When going to the store to buy boards and slabs, we advise you to choose a material made from coniferous species tree. He tolerates it much better Negative influence precipitation and has a wonderful aroma.
Stages of work
 Now that you have everything you need prepared, you can proceed to assembling the wooden lounger.
First you should decide on the size of the garden chair. you can use finished drawing or create it yourself. Typically standard sun loungers measure 60 x 200 cm.
Now you can start making the frame. For it you will need bars, from which you need to make four sidewalls - two of them should be 200 cm long, and two more should be 60 cm long. The finished sidewalls must be subsequently connected to each other using fastening corners.
WITH outside the frame must be sheathed with a board 2.5 cm wide.
We take the long sidewalls and attach 4 legs to them, having first stepped back 8 cm from the edge. The legs can be made from beams 10 cm long. We use self-tapping screws to attach them to the frame.
Having finished making the frame, we begin to assemble the lattice. For it we need wooden slabs, from which we need to cut boards measuring 60 x 10 cm using a jigsaw.
We attach the boards to the chaise lounge frame using self-tapping screws. Be sure to leave a gap of about 1.5 cm between the boards. Then the lattice of the sun lounger will look neat and beautiful.
If desired, you can make a chaise lounge with an adjustable back. In this case, the lattice must be divided into two parts. One of them will serve as a lounger, and the other as a headboard. We mount both parts to the connecting boards. To securely connect elements, it is best to use door hinges.
So that the headboard can be fixed in a certain position, the frame design with inside a crossbar should be added. You need to attach a support post for the headboard to it using self-tapping screws. If you don’t have one, you can buy it at any hardware store.
Now that your homemade sun lounger ready for the dacha, all that remains is to sand the boards, cover them with drying oil or special paint and varnish material for protection against moisture.
Making a fabric lounger
If for some reason a wooden folding lounge chair is not suitable for you, then you can try making a fabric lounge chair instead.
Materials and tools
To make a sun lounger from fabric material you will need the following:
- bolts with nuts 8 mm;
- piece durable fabric 200x60 cm;
- round slats 2 cm thick (one strip 700 mm long, two 650 and two 550 mm);
- rectangular boards 30x60 cm thick (two boards 1200 mm long, two 1000 mm long and two 600 mm long);
- sandpaper.
To make a frame lounger, it is best to use tarpaulin, camouflage or denim fabric. They have sufficient strength and are resistant to wear.
Algorithm of actions
Now you can proceed directly to assembling the fabric lounger.

As you can see above, making a chaise lounge for a summer house from fabric is no more difficult than a similar lounge chair made from wood.
Processing of the finished product
To extend the life of your homemade garden chair, we advise you to immediately treat the material from which it was made. To do this, you can use the following compositions:
- For wood, we recommend purchasing special protective impregnations and antiseptics that will reduce negative impact external factors on the material. Wood materials are best processed before assembling the product.
- To increase the service life of a wooden chaise longue, it can be treated with paint, drying oil or varnish. It is advisable to coat the product with one of the selected products immediately after production.
- Water-repellent impregnations for fabrics. With their help, you will not only increase the wear resistance of the fabric material, but also maintain the brightness of the colors. The effect of such treatments lasts for 2-3 weeks.
Buying a garden chair
 Perhaps some summer residents will not want to spend time and money making a sun lounger with their own hands. In this case, you can go to the store and buy there ready-made garden bed. The furniture showroom will offer you a variety of such products to choose from. Surely among them you will find both budget options and unusual designs of designer models of outdoor loungers.
After studying the proposed options and comparing their characteristics, all you have to do is decide on the amount you are willing to pay for a sun lounger. The cost of such sun loungers depends on the size and material of manufacture:
- wooden sun loungers will cost you between 6,000-15,000 rubles;
- for plastic sun loungers you will have to pay from 1500 to 9000 rubles;
- Folding frame sun loungers, which can be purchased for RUB 1,350-9,500, won’t hurt your pocket too much.
When traveling to the countryside, many are warmed by the thought that they will have the opportunity to lie in the fresh air for at least a few minutes and enjoy surrounding nature. But everyone has the power to make their vacation more enjoyable if they prepare a place for it in advance. To do this, you must have special furniture like a chaise lounge.
The easiest way is to buy such a sun lounger at the nearest furniture store, although some owners often make their own sun loungers and thereby save a lot. You can do the same, especially since you don’t need to have special skills and knowledge to do this. Even the most ordinary wooden lounger for the dacha can be made from a material that is likely to be found in any household.
But in any case, you will have to prepare for this work, because without drawings you are unlikely to be able to make exactly the chaise longue that you want, especially if you do not have the slightest experience in this matter.
Homemade chaise lounge for a dacha it is much preferable to a store-bought lounger, because you can decide for yourself how it should turn out, and upon completion of the work, decorate it at your discretion. Of course, this will require some effort on your part, but in the end all this will be compensated by the comfort that your homemade chaise lounge will provide you with.
On the beach by the sea or in the garden to relax, enjoy the sounds of nature and unwind.
And which piece of garden furniture is most suitable for comfortable rest and contemplation of nature? This is a sun lounger.
Besides everything else, it's comfortable and lightweight. garden chair will effective element exterior that will highlight the style of this site. In this article we will look at several easy-to-make chaise lounges for the garden, among which you can choose the one you want to make with your own hands.
Inflatable pools are probably the most popular way to cool off on summer cottage. find out from our article.
What you need to know about garden peony: planting and care, plant propagation. Of all the variety of varieties, are they promising for our latitudes?
Functional need
Chaise lounges are similar to armchairs, but lower and more stable. You can sit in a semi-lying position, allowing the spine and all muscle groups to rest.
Another advantage is that the garden chair can be folded as needed, adjusting the angle of the backrest for a sitting or lying position.
Most best material for the manufacture of a sun lounger, it is wood, since it is the most environmentally friendly, economical, and also easy to use material.
They are very good for observing nature, and they are light and comfortable, so they are often placed in your garden or dacha. It’s good to take such a chaise lounge outdoors in the summer, and keep it somewhere indoors in the winter, for example, in a closet or in a shed.
The following materials are used in production:
- plastic;
- tree;
- rattan

In the photo, a wooden chaise lounge for a summer house, made by yourself
Popular drawings

Drawing of a rocking chair
A rocking chair made of wood, which you can assemble with your own hands, would be very good. This chair is an excellent option, thanks to it you can relax all the back muscles while reclining and at the same time sway (back angle 200).
The rocking chair must have great strength and in no case become loose during rocking; for this it is necessary to strengthen the structure of the chair with the help of crosses and corners.
In order to increase stability, it is best to leave the rear legs straight and do not round them. This garden chair has a rather small swing amplitude and to enhance it, you need to make the radius of curvature smaller and the runners wider.
You can also add a rocking chair with a pendulum (for this we attach a load weighing 2 kg). You can additionally create a removable table. But still this type a garden chair is not fully a chaise longue, since you cannot change the angle of the backrest to a semi-recumbent state.
But imagine how amazing a rocking chair looks in the garden and how comfortable it is to read a book, light a pipe, drink tea and enjoy the nature around you; such a chair will stand spectacularly by the fireplace in winter - imagine these pictures again and you will understand that this type of chaise lounge is just a fairy tale.
They will help you do it quality sun lounger do it yourself these drawings with dimensions:


Creative sun lounger with canopy
The drawing shows a creative chaise lounge, which is easy to make with your own hands and which will definitely become a wonderful decoration for your garden.

A creative chaise lounge will cover you in the summer heat
The design of this lightweight garden chair consists of smooth lines and radii, thanks to which every muscle in your body is completely relaxed. But the most important thing about this chaise lounge is that it’s beautiful: thanks to the roof, a shadow is created that protects from the scorching heat of the sun.
There are also additional amenities such as a small pillow made of natural fabric and a comfortable mattress; it also combines the advantages of a rocking chair.

Creative chair on the drawing
There are many sun loungers that you can make yourself: by type beach loungers or cozy seats. Let's look at a few of the simplest options.
How to build a simple chaise longue for a summer house with your own hands:
Fabric chair on frame
Let's consider one of the most convenient options– a fabric seat on a frame that can be moved from place to place and folded almost flat.

In order to make a sun lounger you need to prepare the following details:
- furniture bolts and nuts D8 mm;
- round slats (length – 65 cm, two 50 cm, two 60 cm);
- slats rectangular section(length – 65 cm 25x60 mm);
- a piece of durable fabric 200 x50 cm;
- round needle file and fine-grained sandpaper;
- PVA glue;
- slats are best made from species that have hard wood: oak, beech, birch.
In order to make a chaise lounge, you need to use fabrics that are abrasion-resistant and have increased strength: teak mattress, tarpaulin, denim, camouflage, canvas.
The process has started
We cut the slats to the required length and carefully sand them.
We make slats of the required length and carefully sand the surface using sandpaper.
At a distance of 70 and 40 cm from the corners of the structure, we drill eight-millimeter holes, and then grind them using a round needle file. In order to be able to change the position of the backrest, at a distance of 7-10 cm we make 3-4 cutouts in frame B.
Then, stepping back from the two ends of the slats, we drill holes with a diameter of 2 cm in order to arrange the seat. Then we take round slats (lubricate the ends with PVA) and install them in the holes.

After assembling the frame, you need to sew and cut out the seat. The length of the material depends on the possibility of folding. In order to understand what cut length is needed, you need to fold the chaise longue and at the same time measure the fabric, and do not forget to make sure that the fabric is slightly stretched.
Then, we nail a piece of fabric, the edges of which have already been processed, to the round slats that are located on parts B and A.
We wrap the crossbars with the edge of the cut and secure them with small nails with thick heads. An option is possible when the cut is attached to the crossbars thanks to peculiar “loops”.
This garden chair is very good because it can be used instead of a bed - what else could there be for an afternoon rest?
How to make a wooden sun lounger with your own hands - video instructions.
Kentucky chair
Let's consider original version– a Kentucky chair, which is assembled entirely from bars. If necessary, the chair can be folded at any time and put away where it is needed for storage.

Kentucky chair
In order to make a chair you will need the following material:
- Galvanized wire with a diameter of 4 mm and 16 galvanized staples to secure the wire.
- Hammer and wire cutters.
- Fine grit sandpaper.
- You also need to take 50x33 mm bars, which are obtained if you cut a 50x100 mm board into three equal parts. If all the bars are put together, you should get 13 meters.
Build process
When the bars are ready for assembly, they need to be processed for strength (and protection from ultraviolet radiation, moisture, weathering) and to give them additional beauty.

Size and quantity table
To do this, the tree is treated with a stain called Beitz. To treat a sun lounger, you need to buy an external stain, the best of which are based on oils and wax). Among other things, you can use parquet oils, which are ideal for all wooden products.

Assembly diagram
You can apply a protective coating to the bars either with a brush or with a spray gun (the best option).

Assembling the chair
The diameter of the holes should be made one and a half to two millimeters larger than the thickness of the wire used.

We thread the wire into the bars
After preparation required quantity bars, it is necessary that the edges be carefully processed sandpaper with fine grain. We begin to assemble the structure.

You can also use galvanized studs (the edges are secured with eight nuts and washers) instead of staples and galvanized wire.

After assembly, carefully lift the chair.

Beauty in a summer cottage
The chaise longue is the most best furniture for relaxing in nature or in the country, it gives the garden special style and an atmosphere of comfort.
In this article, we looked at several designs and drawings of sun loungers, any of which can be made with your own hands, and examined many of the nuances associated with assembly.
Spend some time putting together a beautiful garden chair for relaxing in your backyard, and you will enjoy the fruits of your labor and creativity for a very long time.
Sun loungers are attractive because they are light in weight and can be used for relaxing anywhere - on the veranda, in the garden, when going out of town, and so on. Based on this, the appropriate design is selected - monolithic, sliding, portable (a very convenient option for transportation) and a number of others.
The cost of the simplest models of sun loungers available for sale starts from 3,080 rubles. On the one hand, it’s attractive. But main drawback finished products the fact that many of them are simply not suitable for the buyer - one in size, another in design, and another in frame material. The conclusion suggests itself - make a chaise longue with your own hands, just “for yourself”.
Tree
This is a general concept. An important question is which breed to focus on. Before you look at the drawings of a chaise longue and the progress of work on its manufacture, it is worth clarifying which wood is best suited.
Firstly, mostly those who make things with their own hands (if we are not talking about a professional working on orders) are those who want to save money wisely. Consequently, it is unlikely that anyone will use expensive wood (for example, beech or oak).
Secondly, all breeds are different various properties and characteristics, including the density of the structure (and this means the weight and ease of moving the sun lounger). Consequently, when choosing a tree, you need to take into account the specifics of its operation, depending on which the corresponding drawing is developed.

Thirdly, such sunbeds for a home (apartment) are not purchased or assembled with your own hands. The main place for installing a sun lounger is outside the building (near the pool, in a summer cottage, etc.). Consequently, the tree will be exposed not only to dampness, but also to sun rays. And here there is some contradiction. Coniferous trees less susceptible to rotting, but when heated they “resin”. Even if the lounger is made and (painted), this is not a way out.

Therefore, for example, cheap It is not advisable to use spruce to make a sun lounger. In addition, not everyone can easily tolerate the tart smell of resin. There are numerous tips on the Internet for assembling a sun lounger with your own hands from this very tree. The author has already outlined his arguments against. Well, it’s up to you, the reader, to decide whether to take them into account or not.
- Larch. Strength and durability will be ensured.
- Ash. Good texture and ease of processing are advantages. Disadvantages - it will cost a little more, and it is not very suitable for a portable chaise lounge model due to the density (and therefore weight) of the wood. Although for a stationary lounger it is one of the best options.

Plywood
There are quite a lot of different schemes and drawings of sun loungers. In some cases, when making such a lounge chair with your own hands, for individual structural elements, not solid wood is used, but materials based on it. Mainly multilayer plywood. This partially reduces the overall weight of the product. The range of such products is quite large, but this does not mean that you can take any type of it. From budget options In the private sector, two types of plywood are popular -.
The sizes of their sheets and basic characteristics are almost identical. The fundamental difference is in the adhesive composition that holds the veneer layers together. The FSF used in the manufacture is somewhat toxic. That is why this type of plywood is recommended only for external works (continuous lathing under soft roof, facade cladding and so on). Therefore, it is definitely not suitable for a sun lounger - only FC. In terms of “environmental friendliness” there are no complaints about it.

Textile
It is also used in some models of sun loungers. There are few criteria here - strength, minimal stretchability and susceptibility to fading. Therefore, you should focus primarily on material that is fairly dense and monochromatic. The fact is that coloring substances (pigments) fade with different intensities, and “bald spots” may gradually appear on a canvas with bright designs.
Fastening elements
Briefly on this point - with protective coating or from stainless metals (alloys). Since sun loungers are often made for installation outdoors, corrosion of the “iron” cannot be avoided. “Rust” will quickly appear even through the paint, and in terms of maintainability (with the replacement of individual parts) difficulties will arise.

Examples of drawings of sun loungers
It is not difficult for an owner who is used to doing everything with his own hands to develop his own model. Moreover, if you accurately imagine what the result should be. Examples may suggest some ideas, features engineering solutions– and nothing more.


- A chaise longue is almost always made for one user. Therefore, his optimal length(in the unfolded position) – 200±10, width – 65±5 (cm).
- The optimal parameters of lumber are (in mm): sheets (slabs) with a thickness of 10 to 15, bars - from 3 x 4 to 5 x 5, boards - 15. This is quite enough to ensure the reliability of the sun lounger in combination with a low weight. The use of larger samples (similar models are found, judging by the drawings) is impractical. Children will not jump on such pieces of furniture, unlike armchairs, beds, and sofas. A wooden blanks the indicated dimensions will fully support the weight of one person, especially in “static” conditions.


Do-it-yourself chaise longue - progress of work
Tree marking
During production simple models This is easy to do for sun loungers, having a ready-made drawing and, accordingly, the dimensions of all components. The only thing that needs to be taken into account is the rational use of lumber. In other words, make markings in such a way as to minimize the amount of waste.
It’s more difficult if the chaise longue has some kind of curly structural elements- handles, supports, etc. In this case, you will have to make patterns. First, a given part is drawn on a sheet of graph paper, then its dimensions are projected onto thick cardboard. A blank is cut out of it, placed on lumber, on which its outline is outlined. Next is a selection of wood. If we are talking about plywood, then the easiest way is to make the cutouts yourself using.

Parts processing
- This applies to both grinding surfaces and rounding all edges. No matter what tool you use to cut the wood, its microscopic fractions along the cut line will certainly remain. And these are potential thorns.
- Wood, regardless of the variety, is affected by mold and mildew. It's all a matter of time, and this largely depends on the breed and operating conditions. But in any case it is necessary.

Drying lumber
IN in this case This means additional exposure before assembling the sun lounger, after impregnation. Even if the tree was initially selected dry, there is a high probability that during storage it was partially saturated with moisture. Therefore, drying after processing will not hurt. At the same time, you can make sure that the geometry of the parts is not broken. If any distortions appear, it is better to level them out immediately than to later disassemble the finished chaise longue and eliminate the shortcomings (or completely replace the part).

Assembly of the structure
There is a drawing that shows, in addition to the dimensions, the joints of the parts, so the algorithm of actions is chosen independently. Some features worth noting:
The specifics of fastening structural elements raise many questions. What to use?
Firstly, only self-tapping screws, and for wood, are used as fasteners. Nails are not suitable for these purposes because they easily split dry material. And it’s not always possible to hammer them strictly vertically. Taking into account the small thickness of the wood blanks, it is not a fact that the tips of the fasteners will not come out. In terms of maintainability, self-tapping screws also benefit - disassembling/replacing parts/assembling a chaise longue is not difficult.
Secondly, you shouldn’t limit yourself to just one fastener. You definitely need to think about strengthening the structure. How to do this depends on the skills of the master and the specific scheme. Tenon-groove joints (with adhesive fit), corners, strips, earrings – there are plenty of options.
Installation of fasteners also has its own peculiarity. To prevent cracks from appearing in the wood and to ensure that the self-tapping screw goes without distortions, a channel is first drilled. The cross-section is slightly smaller than that of the hardware leg. Next is a chamfer (according to the diameter of its head), with the expectation that it will “sink” by about 0.5 - 1 mm. Disguising fasteners in wood is easy. There are not only sealants and mastics on sale, but also mini plastic plugs designed specifically for hiding connecting elements in furniture. And any color, so you can match it general design sun lounger.
If it turns out to be quite massive, you should think about installing roller bearings in the lower parts of the legs. IN furniture showrooms can be found suitable option. This chaise longue will be easy to move alone.
These are the main recommendations, since assembling it yourself is a creative process. Having a ready-made drawing of a sun lounger and minimal skills in working with the simplest household tool, it is not difficult to manufacture individual structural elements and assemble them. The main thing is to think everything through carefully, and success is guaranteed.
When arranging a place to relax near a private house, it is impossible to do without a sunbed. This is where the ability to make a comfortable lounge chair with your own hands will come in handy. It is a folding lounge chair on which you can sit in a reclining position.
Sun loungers come in metal, plastic and wood. Often these materials are combined with strong textile inserts, or complemented with light pads in the form of pillows and mattresses.
When you decide to make a chaise longue for your dacha with your own hands, choose wood as the material of manufacture. It's easy to use. A completely wooden lounger will be reliable, strong, and will last you for a long time. Detailed description how you can make a sunbed with your own hands, diagrams, design drawings and photos will help you avoid problems at work.
Lounge chair for relaxing in the garden or by the pool
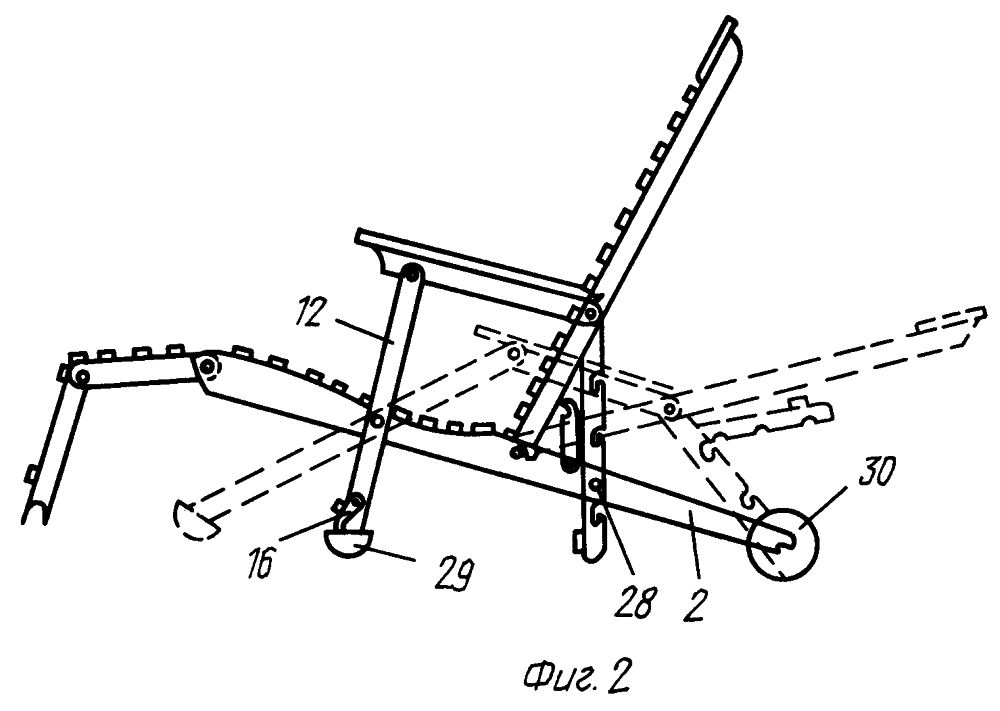
On such a chaise longue for a summer residence, it is convenient to sit in the shade of plants while reading a book or take a place in a sunny meadow to get a beautiful summer tan. Despite the fact that this is a very simple design, the lounger can be installed in three positions: completely horizontal or with two options for raising the backrest. Moreover, for lifting one of the most simple designs. But we know what simpler mechanism, the less susceptible it is to breakdowns.

Even an inexperienced craftsman can make such a chaise lounge with his own hands. He will have convenient parameters even for an adult tall man: width – 60 cm, length – 215 cm.
Materials and tools
The material from which we will make the lounge chair will be pine beams and boards. Their dimensions, along with a list of tools and fasteners, are presented in the list:
- 3 bars 4000x100x50 mm;
- 4 boards 4000x80x25 mm;
- 2 studs for attaching the back to the frame;
- drill with drills;
- self-tapping screws;
- sandpaper;
- wood putty;
- paint (color of your choice);
- wood glue to strengthen fixed joints;
- roulette;
- square;
- marker;
- saw or power saw.
Description of work
Before starting work, carefully examine similar drawings to understand the logic of subsequent actions.

- First of all, we assemble the frame from the timber. We take 2 parts of 2150 mm each and the same number of 500 mm each. We make connections using a drill using self-tapping screws. To increase reliability, pre-coat the joints with glue.
- Let's start working with the stationary part of the surface. We cut a board with dimensions 4000x80x25 mm with a saw into 60 cm pieces. In total, 13 such parts need to be made.
- Leaving centimeter gaps between the boards (60 cm long), we fasten them to the frame with self-tapping screws. We control the angle of connection of the planks at 90 degrees.
- Let's start installing the legs of the chaise lounge. For greater stability, the legs in the seat area should be made double. For them, we take 4 bars 35 cm long. We glue them in pairs, then fasten them to the base with glue and self-tapping screws. Any excess adhesive should be wiped off immediately. This will help in the future to avoid problems with processing these areas of wood.
- On the side of the headboard we also attach single bars-legs 35 cm long. Then we attach second bars to them, which are 20 cm shorter than the first ones. We fasten them so that the lower edge of the parts coincides (as shown in the figure).

- Let's start creating the back of the chaise lounge. The frame of this part will be assembled from pine beams measuring 100x50 mm. Prepare 2 parts of 880 mm and 3 parts of 390 for the back frame.
The dimensions of the backrest base are chosen so that it can fit inside the main part of the chaise longue (with small gaps for free movement).
- Back covering. If you want to give the product a more attractive look, attach the trim strips in the direction of the length of the frame. In this case, round the top edge of each board on both sides. Maintain a distance of 10 mm between the slats.
- To secure the backrest to the frame so that it can move freely, you need to prepare the holes. Measure 70-80 mm from the edge last board seats. At the indicated distance, use a drill to make holes that pass through the frame of the backrest and chaise lounge. Place a pin in them on each side.
- The mechanism for raising and fixing the moving part is based on placing bars in special recesses that will not allow the backrest to fall down. The first selections should be made on both sides of the main frame of the sun lounger, retreating 7-8 cm from the hairpin. The dimensions of the recess should be 10 cm wide and 5 cm deep. We make the second recesses at a distance of 20 cm from the first, 5 cm deep and 5 cm wide.
If you place the first support bar, 60 cm long, horizontally in the first recess, the back of the chaise lounge will lock into the “chair” position. The person sitting on the chair will be able to sit comfortably. To change the level of raising the backrest, you should move the first block onto the shortened legs, and insert the second support block (60 cm) vertically into the second recess. You can fully unfold the chaise longue by removing the second bar and lowering the backrest. In this case, the small frame will stand on the first block placed on the shortened components of the legs.

- Finally, start finishing the chaise lounge. Use putty to smooth out any uneven surfaces and hide the screws. After drying, sand the corners and surfaces with sandpaper so that there are no sharp parts, burrs or roughness. Cover wooden product stain, this will protect the material from harmful influences. Paint the lounge chair the color of your choice.
The garden chaise lounge for the dacha is ready. You can equip it with a picturesque corner of your garden plot and enjoy a pleasant holiday.
Compact sun lounger: comfort wherever you want
A folding chaise longue, of course, cannot be called a sun lounger; it is more like an armchair. But the product has a number of other advantages. The design is very simple, so making it yourself will not be difficult.
The chaise longue is light in weight and compact, so you can easily move it to a new place. And if you show diligence in your work and care when choosing materials, the product will serve you for a long time. personal plot dachas for more than one year.

What do you need to make a folding lounge chair?
Before starting work, prepare:
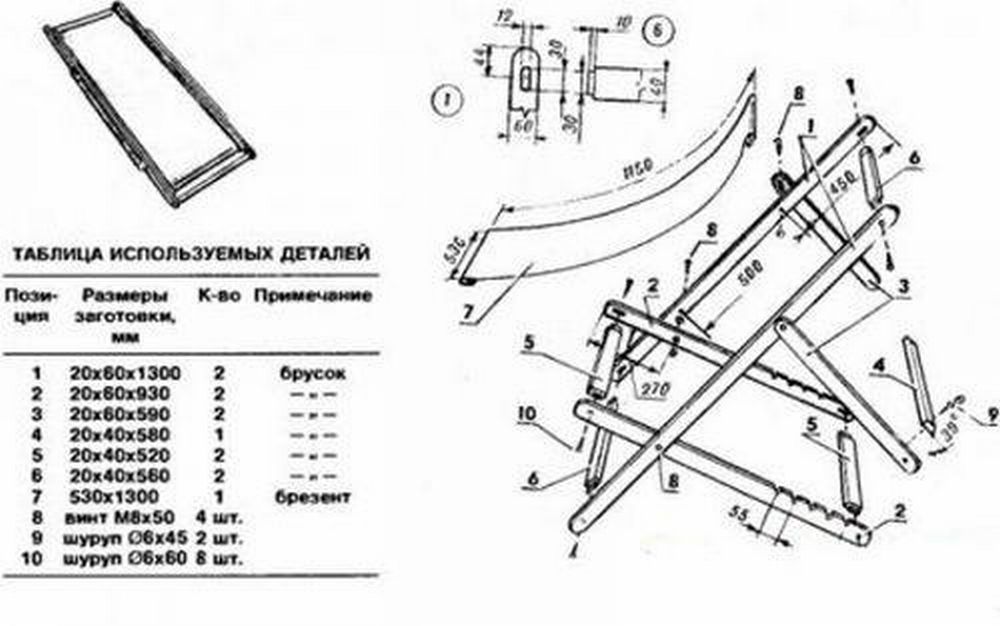
- For the back frame: 2 parts – 1219x38x19 mm, 1 – 610x38x19, 1 – 648x38x19, 1 – 610x64x19.
- For the seat frame: 2 parts – 1118x38x19 mm, 4 – 603x38x19, one – 565x38x19 mm, one – 565x64x19 mm.
- To support the back: 2 parts – 381x38x19 mm, wooden dowel with a diameter of 12 mm and a length of 648.
- 2 pieces of thick fabric, 1372x578 mm each.
- 2 wooden dowels with a diameter of 12 mm, length - 559.
- 4 bolts with nuts 50x6 mm.
- 12 washers.
- Screws 50x4 mm.
- Glue.
Work sequence
The joints must be additionally glued. After pressing the parts, immediately remove excess glue.

- Consider in detail the drawings and diagrams with the dimensions of the chaise lounge. They will help you understand the principle of its folding.
- Drill pilot holes, then countersink them for screws.
- Assemble the frame for the back of the chaise lounge. Attach the bottom bar 50 mm from the bottom edge. Leave a distance of 10 mm between the 610x64x19 mm strip and the top piece to secure the fabric.

- Assemble the upper part of the seat frame in the same way as the backrest. First bottom bar attach 203 mm from the bottom edge of the side strip. We fasten the next 3 boards with a gap of 13 mm from the previous one.
- We connect the frames of the seat and backrest by tightening them with bolts and installing washers under the bolt heads. We also place washers between the frame posts.
- We use bolts and washers to secure the support strips for the backrest.
- We place the round dowel on the glue in the drilled hole of the planks without gaps.

- It's time to make a fabric seat. Place 2 pieces of fabric together right sides inward, sew, retreating 60 mm from the edge. On one side we leave a section of about 100 mm unsewn.
- We turn the workpiece inside out and sew the sides along the length.
- We lay cavities (for wooden dowels) along the width on both sides and stitch them.
- We thread the dowels into long holes fabrics.
- After finishing finishing work With wooden base(sanding, coating with a protective agent, painting) put the seat in place.
A folding chaise lounge for your dacha is ready. Drawings and images helped create a practical, comfortable, lightweight chair for outdoor recreation.