Birds such as quail, chickens, ducks, geese, turkeys. Such diversity was made possible thanks to microcontroller automation.
Case materials:
- sheet of laminated chipboard or old furniture panels(like mine)
- laminate flooring board
- aluminum sheet with perforation
- two furniture canopies
- self-tapping screws
Tools:
- A circular saw
- Drill, drills, furniture drill (for awnings)
- screwdriver
Automation materials:
- circuit board, soldering iron, radio components
- transformer for 220->12v
- electric drive DAN2N
- two 40W incandescent lamps
- 12V computer fan, medium size
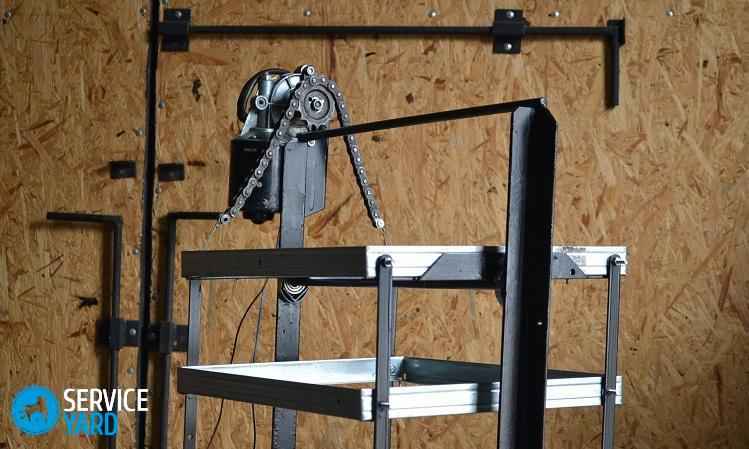
Point 1. Manufacturing of the body.
With help circular saw from laminated chipboard sheet We cut out the blanks in accordance with the dimensions in Fig. 1.
In the resulting blanks, in accordance with Fig. 2, drill holes D=4 mm. for self-tapping screws, they are marked with red circles, green circles indicate the place where the lid canopies are attached. We assemble the housing in accordance with the diagram. We install the cover on two furniture hinges.


We drill rows of ventilation holes D=5 mm. front and back, along the top and bottom of the body.
The result is a completely finished case for the incubator; there is no need to insulate it additionally; the electronics do an excellent job of heating the box with just two light bulbs.

Item 2. Egg tray.

The main part of the tray is the base, aluminum sheet with frequent openings for unhindered circulation of heated air. If there is no similar material, then you can make the bottom from any sheet material sufficient rigidity and drill many holes in it D = 10 mm.
I made the sides from laminate, in which cuts are made to the middle with a pitch of 50 mm, a mesh for holding eggs is woven into them from garden twine, and at the end the twine in the cuts is glued with Titan glue. The result is a cell of 50x50 mm, the size of large duck eggs, so as not to make many different trays for different birds, so in some places the chicken eggs have to be expanded a little with foam blocks. The capacity of this tray is 50 eggs. Goose eggs are laid in a checkerboard pattern; a mesh of twine compresses the laying well.
For quails, a separate tray similar to this is made, but with a cell pitch of 30x30 mm, the capacity of which is 150 eggs.
The capacity of the incubator does not end there, because there is also a second tier, a second tray which, if necessary, is installed on top of the first tray.
In the photo: Fastening (V) for the upper tray and a metal bracket for attaching to the axis of the tilting mechanism.

This (V) shaped fastener is located at both ends of the tray and is only needed if a second tray is planned. The upper additional tray has the same fastening only directed downwards and fits with a wedge into the " dovetail" bottom tray.
Also visible in the photo is a metal eye for attaching the tray to the flag of the rotating mechanism.
In the photo: Flag of the rotating mechanism.

In the photo: The opposite side of the tray.

Here you can see (V) the fastening and the hole of the tray support axis.


Item 3. Device for tilting the tray with eggs.
To rotate the axis with the flag, which in turn tilts the tray with eggs 45 degrees in one direction or the other, I used a DAN2N electric drive, used for ventilation pipes.
In the photo: Standard place of application of DAN2N, opening and closing a pipe valve.

He's perfect for the job.

This drive slowly turns the axis 90 degrees from one extreme point to the other, and when it hits the rotation angle limiter, when the current in the motor exceeds, it goes into stop mode until the control contact changes its state to the opposite.

To control the change of position on the control contact, any timer is suitable that will close and open the contact after a specified period of time. For this purpose, I found a French timer with adjustment from a split second to several days. But all these functions are already in our microcontroller control unit, so to rotate the tray we just need to use any small motor with a gearbox, and the BU will take control of it.
Point 4. Control unit.
The control unit or the heart of the incubator, which determines whether you get chickens or not.
With the release of the popular Atmel microcontroller, many interesting projects, including simple and very reliable thermostats. So the March project from Radio magazine 2010 grew into a full-fledged, complete incubator control module with all possible functionality. And these are: adjustment range 35.0C - 44.5C, indication and alarm in case of an emergency, temperature adjustment using a complex algorithm with a self-learning effect, automatic tray rotation, humidity adjustment.
When heating the heating element (in our case, incandescent lamps), the algorithm selects the heating power, due to which the temperature comes into balance and can be constant with an accuracy of 0.1 g.
The emergency mode will help out if the output triacs are damaged; control switches to an analog relay and will maintain the temperature in the acceptable range until the failure is eliminated.
To control the rotation of trays, the controller provides an adjustment range of up to ten hours, supports the presence of tilt limit switches, and without them, for setting the time the motor is turned on to cover the required distance.
Automatic humidity adjustment is controlled from a second electronic wet thermometer, a psychrometric calculation method and, when necessary, the load is turned on - a sprayer or an ultrasonic fog generator with a fan.
All adjustment manipulations are performed using three buttons.
The circuit uses DS18B20 temperature sensors, the error of which can be set with an accuracy of 0.1 degrees from the control unit menu.

Diagram of the incubator control unit on the Atmega 8 MK.


Depending on the used output power switches, you can use different variants output circuits with different connection points and firmware options.
* If pulse transformers MIT-4, 12 with connection point (A) are used to control thyristors/triacs, then this circuit is used.

*Management of MOS optocouplers.
Firmware - Phase pulse, connection at point (A), MOC3021, MOC3022, MOC3023 are used (without Zero-Cross)
Firmware - Low frequency switching, connection at point (B), MOC3041, MOC3042, MOC3043, MOC3061, MOC3062, MOC3063 (with Zero-Cross)
Homemade incubators use several types of automatic trays for turning eggs, which are divided into two types. The device can turn eggs one at a time, or in tiers. The first type turned out to be ineffective and is used only in small incubators for 5 - 20 eggs. Trays of the second type have proven themselves well in both industrial and home-made devices.
To ensure that the embryos develop and warm up evenly, the eggs must be turned every 2-4 hours. Very often used in small incubators manual method revolution, and in machines designed for 50 or more eggs it is optimal to use automatic system coup. It is divided into two types: frame and inclined.
Each type of tray has its own pros and cons. Frame rotation consumes less energy, and the rotation mechanism is very easy to operate. Another advantage: can be used in small incubators. Disadvantages include the influence of the shift step on the radius of rotation of the egg. If the frame is low, the eggs may hit each other. Eggs can also be damaged by sudden movements of the frames.
The inclined tray ensures guaranteed rotation at a given angle, regardless of the size of the eggs.
The horizontal movement of the trays along the guides reduces the level of egg damage by 75-85%. The disadvantages include more complex maintenance and high energy consumption. The design is heavier, which is not always convenient for use in small incubation machines.

Frame swing system
The incubator tray is suitable for those who use lightweight models made of foam or plywood. To make a machine for 200 eggs, you will need:
- Gearmotor,
- Galvanized profile,
- Boxes of fruits or vegetables,
- Angle made of steel and rods,
- Clamps with bearings,
- Sprocket with chain,
- Fastening materials.
How to make a tray: the base is welded first from the corner. Its dimensions are selected individually, depending on the number of trays and dimensions of the home incubator. The turning device is assembled from a pair of axes to which the first and last tray are attached. The rest are hung on the rods themselves. From the edges of the corner, a platform is made for landing the bearings, which is welded on both sides on the axle.

The frame itself is made of aluminum corner - it is lighter. If vegetable boxes are used as trays, then the frame size will be 30.5 * 40.5 cm. If the trays are homemade, then the size is adjusted to fit them + 0.5 cm for free entry. Pros of vegetable boxes: accessibility and durability. Cons: poor ventilation. Homemade trays can be made from metal mesh with a rod thickness of 1.5 mm, and a cross-section, equal size eggs. The finished frame is placed on an axis, in which several holes are drilled for fastening. To prevent rust, it is recommended to paint the structure.
The axle is welded to the frame through a bearing, which is tightened with a clamp for strength. A mount for the gearbox is mounted to the left of the base. The first and last frames are connected by rods, the rest are hung between them every 15 cm. To ensure reliable fastening, it is recommended to lock the nuts.
The trays are driven either chain drive, or using a pin.
Which method to choose depends on the gearmotor used, but usually homemade devices chain transmission is used.
On a piece of plastic at the bottom of the frame, switches are installed that stop the gear motor when the trays are tilted at an angle of 45°. More detailed diagrams and drawings can be found on thematic forums - this will help to understand the features of fastening and connecting nodes.

A regular relay can be used together with the control unit. It will have to be modified a little: three wires are brought out, and the tracks leading to the contacts are cut. The unit is programmed to turn on every 2.5-3.5 hours. Two toggle switches are connected to the relay: without fixation and with fixation. The first one is used to manually move the frames to a horizontal position, and the second one is used to switch them to automatic operation mode.
The power source for the flip mechanism is a pair of power supplies from a personal computer.
Depending on the size of the incubator and the number of trays, additional heating elements installed on one or more frames. In a larger space, this will provide additional control over temperature and humidity. A small fan is also attached to the frame, which will provide ventilation. Lack of ventilation can lead to the death of up to 50% of the brood, as favorable conditions for the development of pathogenic bacteria.
Tilt turning system
You can automate the rotation of trays in a home incubator using a built-in electromechanical drive, which operates after a specified period of time. Usually the timer is set for 2.5 - 3 hours. A time relay is responsible for accuracy. You can buy it, or you can make it from a mechanical or electronic watch.

The rotation mechanism for the incubator can be made from a clock with an electromechanical relay. There is usually a socket on the case where you can connect the consumer. Place time intervals on the dial. The engine will transmit torque through the gearbox.
The egg trays in the incubator rotate along guides, which are the walls of the chamber. The design can be improved by attaching a metal strip longer than the grille to the axis. The axis itself is inserted into grooves cut on the sides of each tray.
In order for the grid to move, a working unit is assembled from a rod, a gearbox, a crank element and a motor. For this model, a motor from car wipers or microwave oven. As a battery, you can use a computer power supply or attach a cord to connect to an outlet.

The device works like this: the electrical circuit is closed using a relay after a specified period of time.
The mechanism comes into action and turns the eggs in the tray until they come into contact with the end position stops. The frame is fixed until the working cycle is repeated.
Inclined tray for 50 eggs
The main part is an aluminum base, with holes drilled in it for better air circulation. The maximum diameter is 1 cm. The sides are made of laminate. A cut is made to the middle in increments of 5 cm, through which a mesh of twine is woven to hold the eggs.

For smaller eggs, you can make a grid in increments of 2.5 or 3 cm. A DAN2N electric drive is used to rotate the axis. It is usually used for ventilation in pipes. The drive power is enough to slowly tilt the tray by 45°. The change of position is controlled by a timer, which opens and closes the contacts every 2.5-3 hours.
Any kind poultry you need to know and take into account many nuances. For example, many novice poultry farmers are interested in how to turn eggs in an incubator. There is no clear answer to this question, since each educational literature provides different information. However, it must be taken into account that when incubating eggs it is important to create conditions that are as close to natural as possible. For example, a laying hen turns her eggs several dozen times a day when hatching.
The problem of turning over is solved by using modern automatic device, but you still need to know how often to turn the eggs in the incubator.
Experienced poultry farmers recommend turning eggs up to 96 times a day to achieve maximum results incubation and up to 24 times a day - for optimal. If the eggs are turned more often, the hatching result may worsen.
It is impossible to turn it over manually so many times. So what should those who hatch in conventional incubators without automatic turning do?
The success of the entire incubation process depends on how many times you turn the eggs in the incubator. The eggs are usually turned by hand every 4 hours during the daytime. The coup is not carried out at night.
How to turn eggs in an incubator
There are several ways to turn around. For example, if the tray has a vertical rotation, then its axis, when turned over, is tilted 45 degrees in one direction or the other. This method has a significant drawback - after turning, the upper part of the eggs will heat up to 40 degrees, and overheating, as you know, is unacceptable during incubation. In this case, in the lower part the temperature will be 36 degrees, and in the middle - 38. Still, the method is used, but only by those who have a fan in the incubator.
If the tray has a horizontal position, then it rotates approximately 180 degrees around its axis. With such a revolution, uneven heating is also possible. Therefore, additional heating elements are installed in the lower part of the incubator.
How to turn eggs in an incubator manually video
Proper turning of eggs leads to improved metabolic processes, more better development circulatory system and, as a result, the successful hatching of healthy and active young animals.
Many farmers are experimenting with making their own incubators. The Internet is literally replete with drawings and descriptions - from the simplest techniques to high-tech circuits. Today the topic will be somewhat highly specialized, relating only to one component of the incubator - the egg tray. Do-it-yourself incubator trays can be made different ways, each of which has its own advantages and disadvantages. Let's look at the most common and effective methods.
Why turn eggs in an incubator?
People of the older generation probably remember the kind and clever children's story by N. Nosov about a family of chickens. So, observant young naturalists, having built an incubator with their own hands, tried to solve the problem of how exactly and how often the eggs should be turned (similar to how a hen does it).
Why turn over the material placed in the incubator? There are several reasons for this:
- When turning, uniform heating of the embryos occurs, since the heat source in the device is fixed motionless on only one side.
- Uniform flow of fresh air around the eggs. This problem is relevant both when hatching chicks and when using a hen.
- Periodic turning over prevents the embryo from adhering to the shell membrane. If this is neglected, the percentage of chicks hatching is significantly reduced as the embryos die.
You can monitor the process of formation and closure of the embryonic membrane using an ovoscope. The complete closure of the allantois is indicated by an increase in the air chamber at the blunt end. From the sharp end the eggs become dark.
Selecting a mechanism for turning eggs in the incubator:
- The minimum frequency of turning is twice a day.
- For horizontal laying make a half turn of the incubation material.
- Some farmers practice turning up to 6 times a day.
Turning eggs by hand is a very difficult task, especially if there are a lot of them. It is much more convenient to use a mechanical or automated turner.
There are 2 types of mechanical flippers:
- Frame.
- Inclined.
Let's look at both mechanisms in more detail.
Frame
The principle of operation of the frame mechanism is based on the rolling of eggs by a frame, they scroll around an axis.
Important! This mechanism is effective only for horizontal placement of incubation material. The frame can simply move or rotate around its axis.
Pros of frame rotation:
- Low energy intensity. In case of a power outage, you can use a backup energy source.
- Functionality, ease of maintenance of the mechanism.
- Compact, small size.
Disadvantages of the frame mechanism:
- For efficient work mechanism, the shell must be perfectly clean. Even slight contamination impairs turning efficiency.
- The connection between turning efficiency and egg size is a problem completely eliminated in the frame rotating machine.
- There is a risk of damage to the eggs when turning - this applies to incorrectly adjusted equipment.
Inclined
The tilting mechanism works on the principle of a swing. It is used for top-loading equipment.
Advantages:
- Guaranteed rotation of eggs by a given degree, regardless of diameter. This is a universal technique that is suitable for all types of poultry.
- Safety, the risk of damage to the incubation material is small, since the amplitude of movement of the eggs is small, the eggs do not touch each other so much.
- Difficult to maintain.
- Relatively high cost.
- The equipment is large.
Important! The choice of a specific incubator model, in addition to the turning mechanism, depends on many other factors: energy consumption, size, tray capacity, cost of the device, as well as the individual preferences of the poultry farmer.
Specifics of the incubation tray
The frame turning mechanism is quite convenient and at the same time inexpensive. When choosing trays with a frame mechanism, consider the following:
- Load volume. This is the most important indicator. You need to choose one or another characteristic based on the size of the poultry house. If you are not going to increase the population, then buying equipment with a significant supply is pointless.
- The cheapest models are made in the form of thin frames. At the same time, their reliability is minimal. The frames bend easily, which can cause the mechanism to fail.
Important! The best option- models in which the cells are completely insulated and the sides are high.
- The cell size should correspond to the diameter of the egg. For example, quail eggs should not be placed in a cell for turkey eggs. The effectiveness of the mechanism depends on this.
Important! If you want to purchase a universal device that is suitable for different types eggs, then your option is a device with removable partitions in trays. In such an incubator you can lay eggs of different sizes at the same time.
DIY incubator tray with frame rotating mechanism
For self-made An automated rotary mechanism will require retrieving knowledge of mechanics and electrical engineering from the back of my mind. The choice of electric motors is quite large, so choosing materials is not difficult. It is important to observe the following principles:
- Converting the circular motion of the rotor part of the electric motor into reciprocating movement of the frame in the horizontal plane. This can be achieved by the connecting rod mechanism, when a rod fixed at one of the points of the circle converts one type of movement into another.
- Since the rotor of the electric motor makes big number revolutions, to convert frequent rotations into rare movements, a system of gears with different gear ratios is used. In this case, the turning time of the last gear should correspond to the frequency of turning the eggs (4 hours).
- The amount of reciprocating movement of the frame in one direction is equal to the full diameter of the egg.
Do-it-yourself rotating tray for an incubator with an electric drive is a troublesome task, but necessary. So, the operating principle automated system that's how it is.
In homestead farms, the use of large incubators industrial production may not be practical due to their large capacity. To raise a small number of poultry, you need compact devices, which you can make with your own hands, using available tools and materials.
We will present several methods for making incubators. However, even a homemade device must meet certain requirements, which you will learn about from this article.
How to make your own chicken egg incubator
Breeding poultry is a fairly profitable activity, but in order to uninterruptedly produce productive young animals, you need to buy or make your own device in which the young animals will be raised.
How to make an incubator for chicken eggs or quails with your own hands, using available materials, you will learn from the sections below.
What to pay attention to
To fully breed young poultry, you should adhere to certain recommendations and requirements regarding the use of the apparatus and its manufacture:
- The temperature at a distance of two centimeters from the eggs should not exceed 38.6 degrees, and minimum temperature is 37.3 degrees;
- Suitable for incubation only fresh eggs, which should not be stored for more than ten days;
- It is necessary to maintain an optimal level of humidity in the chamber. Before biting it is 40-60%, and after the start of biting it is 80%. Humidity levels must be reduced before chicks are collected.
The hatching of young poultry also depends on the location of the eggs. They must be placed vertically (sharp end down) or horizontally. If they are located vertically, they should be tilted to the right or left by 45 degrees (when laying goose or duck eggs, the tilt degree is up to 90 degrees).
If the eggs are placed horizontally, they must be turned at least three times a day by 180 degrees. However, it is best to carry out the revolution every hour. A few days before biting, turns are stopped.
Rules
If you are interested in how to make a homemade incubator, you should know that this device is made according to certain rules.
To make it you will need:
- Body material, which retains heat well (wood or foam). This is necessary so that the temperature inside the device does not change during the hatching process. Can be used as a body old refrigerator, microwave or even TV.
- For heating they use ordinary lamps (from 25 to 100 W depending on the size of the chamber), and to control the temperature, a regular thermometer is placed inside the device.
- So that it constantly comes in Fresh air , you need to arrange ventilation. For small devices, it is enough to drill holes in the side walls and bottom, and for large incubators (for example, made from a refrigerator), install several fans (under and above the grille).
 Figure 1. Common types of incubators: 1 - with automatic rotation, 2 - mini-incubator, 3 - industrial model
 Trays or grates can be purchased or made from metal mesh. It is important that there is space between the trays for free air circulation.
Peculiarities
It is necessary to establish high-quality ventilation in the incubator. Preference should be given forced ventilation, since constant air movement will provide support required temperature and humidity inside.
Figure 1 shows the main types of incubators that can be used for breeding young poultry on a backyard farm.
How to auto-rotate eggs in an incubator
Models without manual rotation not very convenient, since a person needs to constantly monitor the process of hatching chicks and manually turn all the eggs. It is much easier to immediately make a homemade incubator with auto-rotation (Figure 2).
Instructions
There are several options for arranging auto-rotation. For small devices, you can simply equip a movable grid, which is driven by a small roller. As a result, the eggs move slowly and gradually turn over.
Note: The disadvantage of this method is that you still have to control the overturn, since the eggs can simply move from their place, but not turn over.
Roller rotation is considered more modern, for the arrangement of which special rotating rollers are installed under the grille. To prevent shell damage, all rollers are covered mosquito net. However, this method also has a significant drawback: to manufacture the auto-rotation system, you will have to borrow free place in the chamber, installing rollers.
 Figure 2. Diagram automatic rotation eggs
 The best way is considered to be the inversion method, in which the entire tray is tilted 45 degrees at once. Rotation is activated special mechanism, located outside, and all eggs are guaranteed to warm up.
How to properly lay eggs in an incubator
Poultry incubation should be carried out taking into account certain characteristics and an optimal breeding regime should be maintained. The table in Figure 3 shows the basic requirements for breeding chickens, ducks and geese.
First of all, the correct temperature should be maintained (minimum 37.5 - maximum 37.8 degrees). It is also necessary to regularly check the humidity, determining it by the difference in temperature on the “wet” and “dry” bulbs. If the “wet” bulb shows a temperature of up to 29 degrees, then the humidity is about 60 percent.
 Figure 3. Optimal modes incubation
 The breeding regime for young animals must also meet the following requirements:
- Rotation must be done at least 8 times a day;
- When hatching young geese and ducks, the eggs must be periodically cooled using a combined method: the first half of incubation is air-cooled for half an hour, and then irrigated with a weak solution of potassium permanganate;
- During breeding of young animals, the air temperature on the “dry” thermometer should not exceed 34 degrees, and humidity - within 78-90 degrees.
It is important that insufficient warming, regardless of the stage, can slow down the growth and development of embryos, since the chicks absorb and use protein less well. As a result of insufficient warming, most chicks die before hatching, and the surviving chicks hatch later, their umbilical cord does not heal and their abdomen enlarges.
Depending on the stage, underheating can cause some disturbances. In the first stage they include:
- The intestines fill with fluid and blood;
- The kidneys become enlarged and the liver becomes unevenly colored;
- Swelling appears on the neck.
During the second stage, underheating can provoke:
- Swelling of the umbilical ring;
- The intestines fill with bile;
- Enlargement of the heart due to underheating in the last few days of incubation.
Overheating can cause external deformities (eyes, jaws and head), and chicks begin hatching prematurely. If the temperature has been elevated in the last few days, the chicks' internal organs (heart, liver and stomach) may be deformed and the walls of the abdominal cavity may not heal.
Severe and short-term overheating can lead to the fact that the embryo dries to the inside of the shell, the chick will develop swelling and hemorrhages on the skin, and the embryo itself is located with its head in the yolk, which is not normal.
 Figure 4. Normal development of the embryo (left) and possible defects if the humidity regime is violated (right)
 Long term exposure high temperatures in the second half of incubation leads to early movement of the embryo in the air chamber, and unused protein can be seen under the shell. In addition, in the brood there are many chicks that pecked the shell, but died without retracting the yolk.
Violations of the humidity regime can also cause serious problems(Figure 4):
- High humidity causes slow development of embryos, embryos do not use protein well and often die in the middle and end of incubation;
- If the humidity was increased during pecking, the chicks' beaks may begin to stick to the shell, a goiter may develop, and excess fluid may be observed in the intestines and stomach. Swelling and hemorrhages may develop in the neck;
- Increased humidity often causes late hatching and the hatching of lethargic young with a swollen belly and too light down;
- If the humidity was low, the peck begins in the middle part, and the shell membranes are dry and too strong;
- When humidity is low, small and dry young hatch.
It is especially important to maintain optimal humidity (80-82%) during the hatching period. It is worth noting that during all hatching periods one should strive to maintain the temperature and humidity conditions that exist during natural incubation.
 Figure 5. Possible defects when examined with an ovoscope
 The duration of incubation depends on the type of poultry. For example, for meat breed chickens it is 21 days and 8 hours. If the normal regime was maintained, the beginning of pipping begins on the 19th day and 12 hours after laying, the chicks begin to hatch already on the 20th day, and after another 12 hours most of the young appear. During incubation, it is necessary to periodically check with an ovoscope in order to detect damage in time (Figure 5).
What is needed for this
To properly lay eggs, you need to warm up the device in advance and prepare the eggs.
For breeding young animals of any poultry, only eggs that have been stored for no longer than a week in a dark room with good ventilation at room temperature. Before laying, they must be examined with an ovoscope and specimens without damage, cracks or growths on the shell are selected.
Peculiarities
Only eggs of the correct shape and with a characteristic shell color can be placed in the incubator. certain type birds.
In addition, you need to choose the right grill that will match the size of the eggs. For example, quail requires a smaller grille, and turkey requires a larger one. It is also necessary to familiarize yourself in advance with the temperature and humidity conditions of incubation for each type of bird.
How to make a homemade incubator from a refrigerator
Very often, home incubators are made from old refrigerators, since the body of this household appliances It is quite spacious and allows you to simultaneously breed large batches of young poultry.
See how to make an incubator from a refrigerator with your own hands with detailed instructions, you can in the video.
Instructions
Before starting production, you need to draw up a drawing and plan for connecting all necessary elements. You also need to wash the body and remove all the shelves and freezer from it.
The procedure for making an incubator from an old refrigerator includes next steps (Figure 6):
- Several holes are drilled in the ceiling for mounting lamps and arranging ventilation;
- The interior of the walls is finished thin sheets polystyrene foam to retain heat inside the device longer;
- Trays or grates are installed on the shelves;
- A temperature sensor is placed inside, and the thermostat is brought outside;
- Several ventilation holes are drilled in the lower part of the side walls, and in order to provide more high level air flow, fans are installed at the top and bottom.
 Figure 6. Scheme for making a household incubator from an old refrigerator
 It is also advisable to cut a small viewing window in the door to make it more convenient to observe the incubation process without opening the door.
How to make an incubator from foam plastic step by step
Frame homemade device can be made from an old TV box or polystyrene box, strengthening it with a frame made of wooden slats. Four porcelain light bulb sockets need to be fixed into the frame. Heating bulbs are screwed into three sockets, and the fourth bulb is used to heat the water in the bath. The power of all light bulbs should not exceed 25 W. Examples and drawings for manufacturing simple models are shown in Figure 7.
Note: The middle lamp is often turned on only when certain time: from 17 to 23-00. A bath of water to maintain humidity can also be made from scrap materials. For example, using a herring jar and cutting off part of its lid. Water will evaporate better from such a container, and the lid will prevent local overheating.
A grille is installed inside the homemade incubator. The surface of eggs on the grill should be at least 17 centimeters from the light bulb, and for eggs under the grill - at least 15 centimeters.
To measure the temperature inside the chamber, use a regular thermometer. To make it convenient to use the device, its front wall must be made removable and covered with cardboard or other dense material. Twists are used for fastening. Such a removable wall allows you to place trays inside the incubator, place a bath and change the water in it, as well as carry out all other manipulations.
 Figure 7. Manufacturing diagrams simple incubators from the refrigerator and box
 You need to make a window in the lid that will serve for ventilation and control. temperature conditions. The length of the window is 12 centimeters and the width is 8 centimeters. It is better to cover it with glass, leaving a small gap along the width.
For additional ventilation along the long wall near the floor you should also make three small square holes(each side - 1.5 centimeters). They must be open at all times for a constant flow of fresh air.
How to make an incubator from a microwave oven
A microwave incubator is made according to the same principle as an appliance from a refrigerator. But it is worth considering that such a device will not fit many eggs, so at home it is used mainly for breeding quails.
When making an incubator from a microwave oven, you need to consider some features(Figure 8):
- The outside of the housing must be lined with thin sheets of foam to stabilize the temperature inside;
- Ventilation holes are left in the upper part, and the door is not insulated or sealed for additional fresh air;
- A tray is installed inside, but since there is not enough space in the chamber for cans of water, a container with liquid for moisturizing is placed directly under the tray.
 Figure 8. The procedure for making an incubator from a microwave oven with your own hands
 It is also necessary to provide protection against overheating by installing barriers on incandescent lamps.
How to make ventilation in an incubator with your own hands
IN homemade incubator also not provided special system cooling the eggs, as they cool for several minutes during the turning process. During the entire incubation, the temperature should be maintained at 39 degrees.
For ease of use, legs can be attached to the device. And since this equipment is very compact, and the incubation process is not accompanied by secretion unpleasant odors, young poultry can be raised even in a city apartment (Figure 9). The procedure for making a simple homemade incubator is shown in the video.
How to make a humidifier in an incubator
For normal operation a homemade incubator should be filled with half a glass of water per day into the bath. If you need to increase the humidity level, you can put a rag in the bath, which is washed every two days.
To lay eggs, special slats with gaps between them are placed. The slats should be made rounded on the sides. To make it easier to carry out the coup, you need to leave free space in the tray corresponding to one egg.
Note: Eggs in a homemade incubator are manually turned 180 degrees. It is better if the revolution is carried out up to 6 times a day with an equal time interval (every 2-4 hours).
 Figure 9. Drawings for making simple do-it-yourself incubators
 To maintain humidity, no devices are provided in the homemade incubator, and this mode is maintained approximately. To evaporate the liquid, it is recommended to install 25 or 15 Watt bulbs. Before hatching begins, the evaporator is not turned on, and if you turn it off too early, the eggs will develop a shell that is too hard, which the chicks will not be able to break.