The fencing of the dacha plot is erected first. It defines the boundaries of the site and hides it from prying eyes. You can make it yourself or order it on a turnkey basis. The first option is often chosen, since building a fence at the dacha with your own hands is not at all difficult. About how to make a simple and beautiful hedge will be discussed in this material.
Fencing options for garden plots
Types of fences for dachas can be divided into three categories: light, heavy and combined. Lightweight fences are made of wood, mesh, or corrugated sheets. Heavy ones are stone and brick. Combined ones use both light and heavy materials.
If the question arises of how to make a fence at your dacha inexpensively and quickly, then preference should be given to lightweight fencing. Such structures do not require preliminary fabrication of the foundation, and they are very easy to install with your own hands.

Fig.1.
Heavy fences are also not difficult to make yourself, but construction time and costs will increase significantly. For the reason that you will have to make a strip foundation for brick or stone masonry.

Fig.2.
Quite often, heavy fencing structures are installed on the facade of the site, and light ones are used to delimit neighboring areas. Combined types can be used in both cases.
How to make a simple site fence
Having understood the types of fences, you can proceed to the question of how to make a fence at the dacha with your own hands. Structurally, any fence consists of supporting pillars and spans. The entire construction process is divided into installing pillars and assembling spans. The construction procedure and design depend on what materials will be used. The only thing that is common is the distance between adjacent pillars and is 2 - 2.5 m.
The simplest fence at the dacha can be made from chain-link mesh. To do this, you will need metal poles with a length of 2.5 - 3 m and a diameter of 50 mm. You can use a regular water pipe or purchase ready-made fence posts; the latter option is preferable. Under the pillars, holes with a depth of 1 m and a diameter of 150 - 200 mm are drilled with a garden drill in increments of 2 m. Pillars are installed in them and covered with earth, compacting it thoroughly; this option is well suited for heaving soils (clay, loam). If the soil is not heaving, then the pillars can be sealed with concrete, which can be easily prepared on site from cement, sand and crushed stone in a ratio of 1: 3: 5-7.

Fig.3.
The mesh can be attached to the supports using special hooks (possibly if special poles are installed), or with clamps if a water pipe is used.
Another option is to purchase ready set mesh fencing. It includes posts, mesh and fasteners. Putting up a fence at your dacha with your own hands using a ready-made kit will not be difficult.
The main disadvantage of such a fence is that it will not hide the area from prying eyes. To eliminate this drawback, a camouflage mesh is used for the fence at the dacha. It is stretched onto the supports along the top of the steel mesh. The camouflage mesh perfectly hides the area and does not stand out against the general background of vegetation.

Fig.4.
The disadvantage of camouflage netting is its low durability; cats and other living creatures can easily enter the area through it. They can even get stuck in it and die. Therefore, facade mesh for fences in the countryside is very popular, which has the same ease of installation, but does not have the disadvantages of camouflage. Given the variety of colors, it can become a wonderful decoration not only for the fence, but also for the entire site.
How to make a fence from corrugated sheets
Another equally popular option is fencing a summer cottage from corrugated sheets. It is somewhat more difficult to make a fence at the dacha from corrugated sheets with your own hands than from a mesh. This is due to the fact that for this fencing option, only support pillars are not enough, but horizontal crossbars are also needed, to which the corrugated sheet will be attached.
To attach a profiled sheet, you need at least 2 transverses. In order for the profiled sheet to hold the wind load well, it is advisable to install them at a distance of 1 m from each other. Therefore, for a 2-meter fence it is advisable to install 3 transverses. The first is installed at a distance of 20 - 30 cm from the ground level, the second in the middle of the support pillar, the third at the top of the pillars.

Fig.5.
A square pipe with dimensions from 20x20 to 40x40 mm or metal corner sizes from 30x30 mm.
The crossbars are traditionally attached to the support pillars by welding. If there is no welding, then you can secure them with bolts. Of course, such a connection will have less rigidity, and you will have to tinker a lot.
The corrugated sheet is secured to the assembled structure using self-tapping screws. It is good to use roofing fasteners for this purpose. It is galvanized and equipped with rubber gaskets, which extends its service life and eliminates unpleasant sounds. Which a corrugated sheet can make in the wind. Before fastening the sheet, you need to drill a hole and then secure it with a self-tapping screw.
When installing a corrugated sheet fence at your dacha, it is important to take into account one more point. It is not good if the corrugated sheet touches the ground. Due to constant moisture, it will quickly rust and lose its appearance, but leaving a gap is also not good. Therefore, the corrugated sheet is installed with a gap of 5–10 cm from the ground, and a strip of rubber 15–20 cm wide is fixed to the lower edge of the corrugated sheet. The strip of rubber is buried in the ground. Thus, the corrugated sheet does not rot, and there is no gap left.
How to build a wooden fence
A beautiful fence at the dacha can be made from boards. There are many options for wooden site fencing; they can be divided into two types with vertical and horizontal fastening of boards.
Wooden fencing, like the previously discussed types, is installed on support posts. However, in this case, not metal poles, but wooden ones can be used.
Timber with a cross section of 80x80 mm is usually used as wooden supports. Before fixing the timber in the ground, it must be treated to prevent rotting, otherwise the fence will not last long.
Only the part that will be below ground level can be processed. The first stage is treatment with an antiseptic, then the timber is covered with mastic and wrapped in roofing material. Only after this can it be installed in the ground.
Under wooden poles it is necessary to drill holes at a depth lower than the freezing depth of the soil, approximately 1.2 -1.5 m. At the bottom of the hole, drainage is arranged from a layer of sand and crushed stone. After that, a wooden fence support is installed and filled with concrete.
Once all the pillars are installed, you can proceed to lining the spans. At this stage, it’s time to think about how to decorate the fence at the dacha. The main decoration is the special order of attaching the facing board. There are many options, here are some of them.

Fig.6.

Fig.7.

Fig.8.

Fig.9.

Fig. 10.

Fig. 11.
We looked at what you can use to make a cheap fence at your dacha. If you want to have a stronger, more durable and impregnable fence, then your only option is to use brick or stone.
Brick fencing on a strip foundation
Brick fencing differs from the previously discussed options in the presence of a strip reinforced concrete foundation, on which brick or stone masonry is erected. All the complexity and high cost of construction lies precisely in it.

Fig. 12.
Strip foundation for country fence made in the same way as for home. A shallow strip foundation is used. Its depth is approximately 50 cm.
The order of its construction is as follows:
- A trench 70 - 80 cm deep and 20 cm wide is dug along the perimeter of the site.
- A 20 cm layer of sand is poured onto the bottom of the trench, then a 10 - 20 cm layer of crushed stone.
- Formwork 10–20 cm high is erected above the trench.
- The trench and formwork are laid with roofing felt. It is necessary so that the concrete does not sink into the ground.
- They make the strapping. Concrete reinforcement is performed with a 12 mm thick rod. The rod is installed 10 cm from the bottom of the trench and 10 cm from the top. It is fastened with wire or welding.
- Concrete is poured. On days 2-3, the formwork is removed and the foundation is left to dry and gain strength for another 30 days.
- After the strip foundation has dried, you can lay stone or brick.

Fig. 13.
An analogue of a strip foundation, but a simpler option is a columnar foundation with a grillage. This foundation consists of piles buried below the freezing depth of the soil (1.2 - 1.5 m). Piles can serve steel pipes or special screw piles. The grillage is made of concrete. The advantage of a foundation with a grillage is that it is cheaper and less labor-intensive to manufacture.
As you can see, installing a fence at your dacha is quite simple. It is important to decide on the design and purpose. If you do not want to spend a lot of effort on installing a fence, then preference should be given to lightweight materials such as corrugated sheets, mesh or wood. If you want to have a fundamental building, then you should consider building a fence made of brick or stone, or make a combined option.
Every owner of a plot of land, even a very small one, strives to define the boundaries of his property. In most cases, owners erect fences that will hide the territory from prying eyes and intrusions from strangers from the street. And most often such a fence is a fence.
To build a high-quality and aesthetically pleasing fence, you don’t need to immediately turn to specialists. With your own hands you can create a unique design that will become your pride. To do this, you should find a good consultant, which is our site, and strictly follow his step-by-step instructions. According to our recommendations, you will independently build a wooden fence, from which you are now a few steps away.
The big step is choosing the material.
A large selection of materials for building a fence sometimes puts owners in a difficult position - what is better to choose? The choice depends on how you want the fence to look. Therefore, it is necessary to have at least a little information about each of modern materials.
Brick fences are high-quality, durable buildings. From this traditional building material a major, strong building is being erected that will last for decades.
Fences made of lightweight, durable and beautiful materials have become especially popular recently. corrugated sheets, which is universal for the construction of this structure. The result is an easy-to-install, lightweight and aesthetic barrier.

Fencing structures made of tree. Until recently, this was the most common type of building material, which is gradually, although undeservedly, being replaced by modern ones.
Quite often in the construction of facade and internal fences they use chain-link mesh. But this type of construction, unfortunately, will expose your entire site to the public.
Modern construction of fences involves the combined inclusion of different materials using stone and brickwork. Companies specializing in the construction of fence structures offer the most various options combined fences.
How to start construction correctly
Whatever material you choose for your fence, the beginning of construction always requires compliance of a certain order. The first is laying the foundation for the future fence - the foundation. This step is preceded by determining the corners and precise markings along the entire perimeter, taking into account the boundaries of the site.
If you decide to install a temporary fence and later build a permanent one, then it is not necessary to install a strip foundation, which will then need to be destroyed. It will be enough to install and concrete free-standing pillars, which will become the base of the fence.
To determine the boundaries of your fence frame, you need to dig holes in the corners into which the supporting posts will be installed and concreted.
What you need to know about racks
When choosing or self-production racks should also take into account some points.
The most durable and stable are metal racks. They are able to support the structure for a long time without repairs.

Wooden supports, as practice has shown, are less durable. The part of the post that is in the ground requires separate processing. Therefore, it is most practical to install wooden racks during the construction of temporary fencing.
Bases made from pipes of various diameters or square metal profiles are extremely practical and durable.
For self-construction For a fence structure, you will need a welding machine, with which you can assemble the load-bearing part of the structure and install fastenings for the spans. The video provides instructions for the correct installation and concreting of support pillars.
Now let’s mount the frame on which the fence will be installed
When the first stage of work on installing the load-bearing part of the structure is completed, it is necessary to install the fasteners to which the spans will be attached. Here, too, there are several options for welding fasteners.
When installing wooden beams as guides, they are fixed on “ears” welded to the support.
When a metal corner is used, it is also welded to the post, securing wooden blocks to it.

Guide from profile pipe provides maximum strength and rigidity of the entire structure. The spans are quite easily mounted on the base using self-tapping screws.
Helpful information! When assembling a metal fence, you must first calculate its cost, as the structure may be more expensive than desired.
The pinnacle of your creation
When the frame of your structure is already ready, the most important but enjoyable step remains - installing the spans. Our recommendations are focused on corrugated sheets, although solutions can be very different - slate, wood, mesh.

To make the fence even, you must first stretch a strong thread along the top edge, along which the sheet will be installed. To set the horizontal direction, you can use a laser level or level.
At proper preparation and assembly, even a non-specialist should not have any difficulties with installation, connection and appearance of the structure.
Be proud - you are a jack of all trades!
We really hope that you have consistently followed all our recommendations and built a unique fence with your own hands and are enjoying the fruits of your labor.
The need to build a new fence arises not only from those who have just bought a summer cottage. Sometimes you just need to replace an outdated fence with a new one. On six hundred square meters of a country house, the fence must fulfill all its functions, be neat and attractive. Well, there is no need to make expensive luxurious fencing there! So the happy owners are puzzled summer cottages, what to make a fence from in a day. Usually for dacha work we choose weekends. That’s why I want to install the fence in one day. Based on the experience of some summer residents who talk about their summer cottage achievements on the Internet, we can highlight several of the easiest options.
A fence made of a wooden picket fence with wooden veins is one of the options for “quick” organization
Budget frame option
For anyone simple fence we need the same simple and cheap frame. Most a budget option– wooden or metal poles. Most often for this purpose they are used with a round or square cross-section, with a diameter of 50 to 100 mm. For light intake, you can use a pipe with a smaller diameter; for heavy filling, a pipe is needed large diameter. The distance between the support pillars is made from 2 to 2.5 meters.
To reduce the cost of the fence construction process, you can use old water pipes, cleaning them from rust and carrying out anti-corrosion treatment.
The beauty of light, simple fences is that support posts are installed quickly, because they are not needed. It is enough to dig holes about 1 meter deep, dig supports into them, and compact the earth around well.
To secure the fence, you need to install horizontal jumpers. Wooden lintels can be attached to pre-welded elements. Other methods are fastening with bolts or using clamps and steel mesh. Now you can begin installing the fence itself.
Rabitz
 Galvanized chain-link fence mesh
 This is one of the most available options fence installation in 1 day. Despite its low cost, chain-link mesh has a lot of advantages:
- Resistance to climate disasters
- Reliability
- Strength
- Easy to install
- Wide range of heights and cell sizes
Many people believe that steel mesh best suited for quickly and permanently installing a fence with your own hands. After all, it does not need painting, and its service life is very long.
Plastic mesh

Another option to fence your plot in one day is plastic mesh. Among the advantages of this material are the following:
- Possibility of DIY installation
- Affordable price category
- Sold in rolls, which facilitates transportation and installation process
- Not subject to atmospheric influences or corrosive processes
- Does not require maintenance or painting
Plastic mesh is produced in different colors. The most popular is the green mesh. Many people claim that this material fades over time. But practice says otherwise.
Welded steel mesh
 Sectional fence welded mesh
 A fence can easily be built from welded steel mesh in a day. This material is produced in rolls and in separate sections. In both cases, it is easy to install. In addition, welded mesh has a number of other advantages:
- Strength, durability
- Sold complete with mounting hardware
- The polymer coating extends the service life and eliminates the need to paint the fence
- On sale you can find a mesh with a 3D pattern
Climbing plants can be planted near fences made of any type of mesh. The site will be well-groomed and beautiful, and the fence will not overshadow the luxury of flowers and ornamental plants.
Metal picket fence
 Green metal picket fence
 To put up a fence or fence, it won’t take much time, and it won’t take much effort either. The result is a neat fence that:
- Will last a long time
- Looks attractive
- Does not require painting or any maintenance
A metal picket fence can be easily installed in one day without involving specialists or relatives, friends, or neighbors. The material is affordable.
Corrugated sheet
 Green fence made of corrugated sheets
 - Affordable price
- Easy to install
- Weather resistance
- Variety of colors and imitations of natural materials
- Variety of sheet sizes
- No maintenance required
You can erect a simple fence from corrugated sheets quite quickly. But to install it you will need a welding machine and the ability to use it.
PVC
 Plastic wattle
 PVC fences are not yet very common in our country. However, if it is possible to purchase ready-made sections, then both the work and further contemplation of the fruits of your labor will bring pleasure. PVC fences have a number of advantages:
- They are inexpensive
- There are different sizes, colors, textures
- Durable
- Requires no maintenance
- Not afraid of cold, heat, moisture, hail
- Easy to install
Such fences look very neat and presentable. They can become a real calling card of your site.
Facade mesh

Some craftsmen suggest fencing their site with a façade mesh. This idea is interesting because erecting a fence requires very little investment. The fenced area will not be visible from the street.
The success of this venture lies in the following:
- You can build a fence yourself in one or two days
- Its installation does not require digging holes, pouring foundations, or welding work.
- You don’t have to spend money on buying a profile pipe
- The material can be purchased at any hardware store and delivered to the site in your car
All stages of work are quite simple:
- Smooth reinforcement 3 meters high and 16 mm in diameter is painted to prevent corrosion processes.
- Such posts are driven 1 meter into the ground using a sledgehammer at a distance of 2 meters from each other.
- All posts are connected to each other with twine in 4 lines
- A cable is pulled along the top with a slight slack
- Throw over the top of the structure facade mesh, grabbing the lower part with twine
To prevent the wind from tearing the façade mesh, it is grabbed only at the bottom, without being screwed to the posts. Experience shows that such a fence can withstand strong gusts of wind and snow loads.
Some owners of summer cottages make it simpler - they throw a facade mesh over a chain-link mesh, making it opaque.
If desired, you can use other materials, including recycled materials, to build a simple fence. The main thing is that the fence performs all its functions and looks neat. And the simplest fence can be decorated with fresh flowers, applied patterns, and painted pictures.
A fence made of corrugated sheets is the optimal solution for protecting the territory country house or dachas from prying eyes and unauthorized visits. Fences made of this material last at least 30 years. The metal profile is extremely easy to process, and the simple installation method allows you to install a fence around a house or summer cottage quickly and with your own hands, without the involvement of additional work force. Possessing high performance characteristics and durability measured over decades, the metal profile also performs decorative function, with which you can refine private territory, making it not only inaccessible to prying eyes, but also homely.
Construction of a metal profile fence: pros and cons
A distinctive feature of metal profiles (profiled sheets, corrugated sheets) is versatility. In addition to the arrangement of roofing slabs and the construction of temporary utility structures (hangars, sheds, garages, etc.), this material is widely used in the construction of fences and enclosures for various purposes.
The metal profile is made from cold-rolled sheet steel, which is special technology covered with a layer of zinc and a protective polymer film of various colors. The thickness of the profiled sheet is 0.4–1.2 cm. At the final stage of production, the sheet, laid in rolls, receives a certain profile (trapezoid or wave) using roll forming equipment (manual or automatic).
Good to know: The steel base and stiffening ribs provide increased resistance of the material to deformation and force, and galvanization and polymer coating reliably protect the corrugated sheet from rust and mechanical wear.
For the construction of fences, profiled wall sheets with a profile height of 8 to 44 mm are used. The final cost of the material is influenced by such parameters as:
- thickness of the steel base;
- availability and quality of galvanization;
- quality of polymer coating;
- profile shape and height.
Advantages of metal profiles
The main advantages of using corrugated sheets in the construction of fences and fences include:
- High performance characteristics.
- Low specific gravity.
- Ease of processing and installation.
- Durability and resistance to aggressive operating factors.
- Relatively low cost of material.
The corrugated sheet is well protected from rust, deformation, damage and climatic factors. The material is produced in a wide range of sizes, which allows it to be used for the construction of fences of any height and length.
Good to know: The lightness of the profiled sheet, as well as its mechanical rigidity, greatly simplifies the installation process. In addition, when building a fence from this material, the requirements for the strength of the supporting frame are reduced.
Disadvantages of wall corrugated sheets
The disadvantages of metal profiles used in the construction of fences and enclosures include:
- Low level of sound insulation (a fence made of corrugated sheets will not be able to protect the internal area from noise coming from the street).
- Low resistance to destructive influence(it’s easy to break a fence made of such material, say, with a heavy car, or cut a hole in it using special tool for subsequent penetration into the fenced area).
- Low presentability (corrugated sheeting is significantly inferior in visual appeal to traditional materials used in the construction of fences: wooden and plastic picket fences, metal, brick or stone).
Good to know: Despite the obvious disadvantages, corrugated sheets have no equal in terms of efficiency and are absolutely fire resistant. The material is available in a wide range color solutions and a wide range of profile shapes and sizes, which allows you to satisfy almost any aesthetic needs of the buyer.
Photo: types of fences, ideas for implementation on the site
 Profiled sheets as decorative cladding on entrance gate Oh
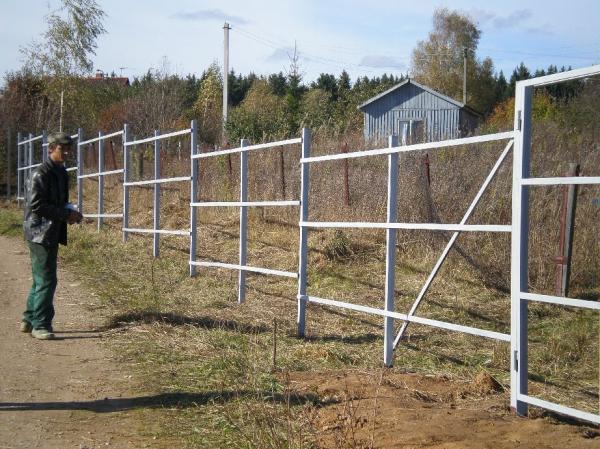
  Fence made of metal profiles on metal supports: view from the inside
  Decorative design of corrugated sheets as part of a country fence
  Metal profile fence with decorative design: inside view
  Fence made of corrugated sheets with decorative design
  A fence made of corrugated sheets on a site with a slope
  Corrugated fence with brick pillars
  Metal profile fence on a concrete foundation
Fence design and preparation for construction
It is necessary to carefully prepare for the construction of a metal profile fence. Errors during the design and installation process are unacceptable, since they entail unplanned costs of time, nerves and money.
To ensure that the construction of the fence is carried out quickly and does not take an unreasonably large amount of effort and resources, preparatory stage construction it is necessary:
- Decide on the type and required characteristics of the metal profile.
- Develop a construction project.
- Calculate the required amount of materials.
- Prepare a set of tools and auxiliary materials necessary for construction.
- Carry out precise marking of the fenced area for construction, taking into account the location of gates, entrance gates, terrain slope, etc.
It is important to remember: After purchasing and delivering the main material to the construction site, it must be carefully stacked and covered to protect it from premature wear and climatic factors before construction. installation work. The location of the stacks should not interfere with the passage, passage or placement of other building materials, elements building structures, transport, etc.
Which corrugated sheet should I choose?
If the decision to build a fence from a metal profile has been made, all that remains is to choose a material that is suitable in terms of cost and quality. To do this, it is necessary to determine the requirements regarding its protective characteristics, as well as the reliability, durability and resistance of the future fence to wear and damage.
But first it won’t hurt to pre-install:
- conditional life of the fence;
- priority on aesthetics appearance or operational reliability;
- design features of the fence and the possibility of replacing it individual elements during operation.
The list of key factors determining the choice of profiled sheet for fence construction includes:
- Brand of material.
- Steel thickness.
- The quality of galvanization of the steel base of the corrugated sheet.
- Type of polymer coating.
- Sheet sizes and profile parameters
- Price-quality ratio.
- Durability and wear resistance.
- Aesthetic preferences of the owner of the fenced area.
Profiled sheet marking
The metal profile has a special marking, which determines its main characteristics and purpose. So, for the construction of a fence, grade C (wall) or NS (universal) material is suitable. The numbers in the marking of the profiled sheet mean:
- profile height in mm;
- usable sheet width;
- thickness of the steel base.
Important to remember: The thicker the steel base and the higher the zinc content in protective layer, the more resistant to corrosion and deformation the corrugated sheet is. However, nowadays galvanizing technology is used less and less in the production of materials. A much more reliable protection against corrosion, damage and wear is a special polymer coating, which, moreover, can be given a color and even texture that matches the purpose of the metal profile.
Polymer coating and price/quality ratio
The polymer can be applied on one or both sides of the sheet, which significantly affects the overall cost of the material. In addition, the price of the metal profile is determined by the type of this polymer coating:
- Polyester (PE) - film thickness is about 25 microns. The coating is used to protect the inner surface of the material. The film has low resistance to mechanical damage and exposure to ultraviolet radiation, which is compensated by the low cost of the profiled sheet.
- Matte polyester (PEM) is a 35 micron thick coating that is characterized by its lack of shine and resistance to direct sunlight.
- Pural - protective film about 50 microns thick. It is characterized by elasticity, a high degree of anti-corrosion protection and excellent color quality.
- Polyvinyl fluoride (PVF, PVDF, PVF2) is a coating with high strength and elasticity. Meets increased operational requirements, having excellent resistance to ultraviolet radiation, as well as rust and mechanical damage.
- Plastisol (PVC200) is a universal film with a thickness of 200 microns, designed to protect surfaces of any type. It has high decorative qualities and elasticity, providing reliable protection of steel from corrosion.
Important to know: The dependence of price on the type of polymer coating, which largely determines the durability and wear resistance of the material, is obvious. The greatest demand in the construction of fences and barriers is metal profiles coated with matte polyester, which has an optimal price/quality ratio. Material coated with pural is also popular, since the latter provides not only high aesthetic performance of the corrugated sheet, but also increases the service life of the fence.
Profiled sheet parameters
The strength of wall corrugated sheeting depends not so much on the thickness of the steel base (0.1 cm is enough for building a fence), but on the size, shape and thickness of the ribs (waves) of the profile. Therefore, when purchasing, the main attention should be paid to the height of the latter. For the construction of a fence in an area with normal wind loads, a material with an edge whose height does not exceed 21 mm is suitable. As for the required sheet sizes and amount of material, they are determined based on the required height of the fence, as well as its perimeter. It should be taken into account that the corrugated sheet will be mounted with an overlap.
For the construction of fences and enclosures, four grades of wall corrugated sheeting are used. Their design parameters are given in the table:
Good to know: Wall corrugated sheeting It is produced in sheets 12 m long, but before sale it is cut into pieces 2–3 m long that are more convenient for transportation and installation.
Correct fence design and calculation of materials, diagram
Before you go to a hardware store to buy materials, you should correctly calculate their quantity, as well as determine the amount of work to manufacture the main elements of the fence structure. This can only be done if there is a detailed project. The latter is easy to develop independently, without involving expensive specialists.
The first and main thing that is necessary for design is the value of the perimeter of the fenced area. If it is not indicated in the cadastral plan, you will have to measure it yourself. For this you will need:
- hammer marks (metal or wooden pegs) into the ground at the corners of the site, as well as at points where the fence changes direction;
- tie the tags with nylon or linen cord;
- calculate the length of the cord between the marks, which will correspond to the perimeter of the area.
The next step is to determine the location and required dimensions of the entrance gates and wickets. It is necessary to place marks on the sides of the latter, measure the distance between them and subtract the resulting value from the total perimeter.
Calculation of the number and sizes of sections
- For example, let’s assume that the plot has a rectangular shape with sides of 20 and 15 m. Let’s take the width of the gate equal to 2.5 m, and set the value for the gate to 1.5 m. In this case, the length of the fence will be equal to: L=(20+15) *2 - (2.5+1.5)=66 m.
- The standard length of the profiled sheet is 12 m, so for ease of transportation and installation it will have to be divided into segments. Therefore, at this stage it is necessary to calculate how many segments will fit in one section along the length.
- We will establish that the gate will be located next to the gate on the 20-meter side of the perimeter. In this case, the length of the fence in this area will be equal to: l=20–4=16 m. Thus, we take the number of sections equal to 3 meters: 2 sections will have a 5-meter length, and the size of the remaining one will be 6 m.
- If we take the length of the sections on the opposite side of the perimeter to be 5 m, their number here will be 4.
- It remains to calculate the number of sections on 15-meter segments of the perimeter. The calculation is carried out in a similar way: we take the length of the section to be 5 m. This means that the width of the rectangle will result in only 6 sections - 3 on each side.
- Let's calculate the total number of sections: n=2+4+6+1=12+1. Thus, the fence will have 12 sections 5 m long and one 6 meter section adjacent to the gate.
Calculation of supports
Having the number of sections, we calculate the required number of supports using the formula:
It follows from this that to install the fence you will need: K=13+1=14 supports.
Important to know: It is convenient to use a profile pipe of square (50*50 mm) or round (d=50 mm) cross-section as support posts for a fence made of corrugated sheets. It should be noted that the length of the supports is a composite value. The outer part should be at least 10–15 cm longer than the corrugated sheet. This is necessary to leave a gap of 5–10 cm high at the bottom and a headroom of about 5 cm in the upper part. So, for a fence 2 m high, the height of the supports will be 210–215 cm. For installation in the ground, another 80–120 cm will be required (depending on the type of soil, freezing depth and level groundwater), and if the fence is installed on strip foundation- 40–50 cm.
Subject to necessary requirements to the structure of the supports, their length will be:
L og =200+15+80=295 cm (when installing supports in the ground);
L op =200+15+40=255 cm (when installed on a foundation).
Calculation of corrugated sheets
Using the height of the fence, as well as the number and length of sections, the required dimensions and number of profiled sheets are determined.
The height of the fence is equal to the length of the section of corrugated sheet. If the fence being designed has a height of 2 m, a standard 12-meter sheet will need to be cut into 6 2-meter pieces. If a profiled sheet of grade C21 is chosen for construction, each 5-meter section will require 5 such sheets and the remaining 6-meter section will require another 6 sections 1 m wide.
As a result, the total number of sections of corrugated sheets 2 m long will be:
N=n 5 *5+n 6 *6=12*5+1*6=66 segments
where n 5 and n 6 are the number of 5- and 6-meter fence sections.
It is important to remember: Installation of the corrugated sheet is carried out with an overlap. This means that each sheet will lose a little length during installation. Thus, when calculating the number and size of sheets relative to the length of the section, the value of the joint size multiplied by 2 should be subtracted from the total length of the sheathing.
Calculation of transverse joists
For fences made of corrugated sheets, a metal profile pipe with a cross-section of 40*20 mm and a length corresponding to the dimensions of each section is used as transverse logs. At the same time, to install a fence 2 m high, you will need no more than 2 tiers of crossbars.
This means that the number of logs for the calculated fence will be:
k=k s *2=13*2=26 lag
where k c is the number of fence sections.
Final result
As a result of the research, it was found that to build a fence around the area in question it is necessary:
- 26 crossbars;
- 14 support pillars;
- 66 sheathing sheets, 2 m long.
Next, all that remains is to re-draw the diagram of the site and apply a projection of the fence on it indicating the number and size of sections, the location of gates and gates and other important data. The construction project can be considered ready.
Necessary tools and auxiliary materials
In order to independently make and install a fence from corrugated sheets, you need to prepare the tools in advance, which you cannot do without during the work process.
This list should include:
- bayonet and shovel;
- concrete mixer (if the fence is installed on a foundation or the supports will be installed on concrete);
- earth drill (for installing support pillars in the ground);
- electric scissors;
- metal scissors;
- electric drill with a set of metal drills;
- screwdriver;
- welding machine;
- circular saw with metal discs;
- construction tape;
- measuring cord;
- building level;
- plumb line
In addition to the basic materials of corrugated sheets and profile pipes for the manufacture of supports and transverse joists for the construction of the fence, auxiliary tools will be needed.
The list of the latter contains:
- sand;
- crushed stone;
- cement;
- primer for metal racks and crossbars;
- paint;
- metal screws or other fasteners for mounting the casing.
It is important to remember: When cutting metal, during the construction of a foundation or installing supports in the ground, as well as when installing crossbars and fixing profiled sheets, it is very important to follow safety precautions. This will avoid injury, as well as material damage and tool breakage. When performing work operations, you should use safety glasses, gloves and protective clothing. And most importantly: you need to prepare a free area for work, where nothing will interfere with the manufacture of fence elements, and supply electricity to it to connect power tools.
How to build a fence from corrugated sheets with your own hands: step-by-step instructions
After marking the territory and preparing materials, it’s time to start construction. The general algorithm of actions is as follows:
- pouring the foundation with installation of vertical supports on it;
- installation of support pillars in the ground;
- installation of transverse joists;
- priming and painting of the metal frame;
- installation of sheathing;
- decorative design of the fence.
Good to know: If the installation of the supporting frame is carried out by welding, the welds must be cleaned. You should also weld appropriately shaped plugs onto the support posts, which will prevent moisture from getting inside the pipe. It is better to make holes in the metal before assembly, although, if you have a powerful drill and a high-quality drill bit, they can be made after. It is advisable to apply primer and paint to the metal frame before installing the sheathing so as not to stain the new profiled sheet.
Laying the foundation for a corrugated fence
If the conditional service life of the fence exceeds 20 years or the nature of the soil or the layout of the site do not allow installation in another way, the fence is installed on a strip reinforced concrete foundation.
The foundation is poured in several stages:
Using a concrete mixer, sand, crushed stone, cement and water are used to make concrete mortar, with which the trench is filled to the required level. During the process, you should periodically check the vertical support posts or fix it to the formwork with a lock made from waste boards.
It is important to know: The soil will not take moisture away from the concrete if the bottom of the trench is moistened abundantly before pouring. Ready foundation should be allowed to dry for at least 3 days, after which you can begin installing the transverse joists.
Installation of support pillars in the ground
If the fence is planned to be used for no more than 15–20 years, the fence is temporary, or the soil or layout of the site allows installation without pouring the foundation, the support pillars are installed in the soil.
There are several ways to install supports, the choice of which depends on the nature of the soil, the depth of groundwater and the height of the fence:
- driving;
- partial concreting (combined installation);
- butting (installation on a bed of sand and crushed stone);
- full concreting (with reinforcement);
The algorithm for installing fence supports in the soil looks like this:
- Plugs are welded at the upper and lower ends of the supports, which will prevent moisture and soil from entering the pipe.
- The corner supports and pillars along the edges of the gates and gates are installed first. In this case, it is necessary to carefully monitor the vertical level of the supports.
- The installed corner posts are tied with twine or rope to mark the fence line.
- The remaining support posts of the fence are mounted along the perimeter in the same way, observing the vertical level and the line set from the corner supports.
Important to know: To enhance the load-bearing capacity of concrete or partially concreted supports, the hole can be reinforced using thin (d=10 mm) reinforcement.
Installing fence supports on a sloped area
If land plot has a slope, when pouring the foundation or installing support pillars it is necessary to perform a number of additional actions. In particular, with a slight slope, the soil should be simply leveled.
When installing a fence on a foundation on an area with an average slope, the procedure will be as follows:

When installing supports in the ground on a site with a slope, the depth of the holes is adjusted in the same way: the bottom of the hole of the first support of the next level should be at the level of the middle of the hole of the last support of the previous one.
Important to know: The difference in height levels should be the same along the entire length of the fence.
Installation of supporting frame
After installing the support pillars in the ground or on the foundation, the transverse joists are installed. They can be installed by welding or using special “crab” fasteners.
When installing on "crabs" in the supports and transverse joists, it is necessary to make holes of the appropriate diameter for bolted connections.
Installation of crossbars for welding is carried out in one of three ways: the logs are butt-welded on the sides of the support column, or they are fixed using a holder (segment) pre-welded to the support U-shaped profile required sizes).
Good to know: The location of the logs and the distance between them depends on the height of the fence. If the latter is 2 m, you need to subtract 40–50 cm from the upper edge of the support - the upper line of the crossbars will be attached at this level. Further down we retreat 100–120 mm and mark the level of installation of the lower logs. Then the distance from the lower cross member to the ground will be: l=200–40–120=40 cm.
Sheathing with metal profiles and finishing, painting the fence
If the installation of the frame is completed, and plugs are welded on top of the supports, you can proceed to final stage construction of fence cladding. To do this, holes for fastening elements are made in the transverse logs with a pitch equal to the pitch of the profiled sheet. Before starting work, it is important not to forget to calculate the location of the joints of the metal profile; its sheets are attached directly to each other, bypassing the crossbars.
After installing the sheathing, the fence can be decorated decorative elements. For example, by forging or beading along the upper and/or lower edge of the profiled sheet. You can also additionally protect the screw heads and bolted connections with special plastic plugs.
It is important to remember: When joining sheets with an overlap, installation is carried out on the upper wave of the profile. The corrugated sheet is fixed to the crossbars in the center of the lower wave of the profile.
The construction of a fence from corrugated sheets requires thorough preparation and, most importantly, correctly performed calculations. Then, if you do not make gross mistakes during installation, the work will not take much time and effort. For example, to fence an area with a perimeter of 60–70 m, it will take only 3–4 days, of course, provided that you don’t have to dig a lot to level the soil. The result should be a reliable and durable fence that will serve as excellent protection for the site from prying attention and will greatly complicate unauthorized entry into the fenced area.
The question of how to make a fence on a garden plot worries both summer residents and owners of private cottages to the same extent. In addition to the functions of dividing areas or protecting against the entry of strangers into the territory of a household, the fence also serves an aesthetic purpose. Creative ideas home craftsmen sometimes lead to the creation of real masterpieces from available materials. But both the elite and the simplest fences are built according to the same principles. Therefore, it is useful to know how to properly install a fence on a site.
How to choose the right material?
Among the materials offered on the construction markets there are a wide variety of products that are perfect for constructing fences. Among them, the following can be particularly noted:
- lumber (boards, slabs, picket fences) are considered the most affordable and convenient, since almost anyone can process it without the use of special equipment and with a minimum set of tools;
- corrugated sheeting, metal picket fence, forged sections or polycarbonate during installation require preliminary installation of metal supports, which means working with materials that are difficult to process;
- the chain-link mesh is convenient in itself, but installing supports involves the same manipulations as in the previous case;
- scrap materials various kinds leave room for imagination, but require non-standard solutions during installation;
- brick, reinforced concrete and stone need to be connected using cement mortar or mesh.
In the latter case, the structure will turn out to be quite heavy, so it is necessary to lay a foundation under it. The construction of this structural element requires earthen and concrete works, which significantly complicates the process of erecting a fence. Such massive structures are usually made for a country house in which people live permanently. They are an element of the overall design and are often created from materials that are in harmony with the decoration of the facade.
The combined designs look very nice.
They include fence elements made of different materials. The most common options are combining brick or stone pillars with metal or lumber.
In each individual case, the owner of the site decides how to choose a fence for the cottage, focusing solely on his own needs. The cost of parts and the entire structure as a whole also plays a significant role in the choice.
Do I need permission to build a fence?
Building rules and regulations regulate many aspects of the construction of fences: distance to reservoirs and trees, to buildings for other purposes, to roads, etc. But SNiP for the construction of a fence is not a law, but only advisory acts, on the basis of which the administration of each settlement creates construction rules. Most often, permission is applied for if you want to install a fence more than 2 m high. The city architect must allow construction on a corner plot, since an incorrectly installed fence can obstruct the view at a street intersection.

The production of fences between areas is also regulated. So that neighbors' beds and green spaces do not suffer from lack of sun, building codes stipulate that the maximum height of the fence should not exceed 1.5 m. For the same purpose, there is another rule: it must be as transparent as possible. This quality of fencing depends both on what material to choose and on the design of the structure itself. For a fence separating 2 neighboring areas, it is recommended to choose different meshes, picket fences, openwork sections made of concrete or metal. In any case, the gap between the opaque elements must be no less than the width of the part itself.
A blind fence can only be installed on the street side, but with an agreement with neighbors, it is possible to build it between properties.
In this case, it is better to draw up a written contract even before making a fence at the dacha.
To avoid a dispute between neighbors regarding land surveying issues, before making fences, you need to contact the BTI. After accurate measurements of the boundaries of the site, you need to mark the area. This part is required in preparation for the main stages of construction.
Preparatory work
Before you build a fence at your dacha, you should familiarize yourself with the options for its design. For inspiration, an illustration in a book, stills from your favorite films, your own imagination or a beautiful fence near a cottage are suitable. Fence projects for country houses are also available in the architectural bureau: when applying for permission, you can simultaneously resolve the issue of choosing the appearance of the fence for the dacha. By looking at sketches of fences or creating them yourself, you can draw up a site plan and determine its length and width.
Based on these data, it is easy to calculate how much material is required for the posts and fencing fabric. The fence diagram should be drawn to scale so that the calculation is as accurate as possible. In some cases, you will need to take into account how high the fence should be. When purchasing reinforced concrete products, boards and sheet materials, you have to take into account standard sizes individual elements.

Once the plan has been drawn up, you can mark the area. To do this you will need pegs (poles) and a thin cord. If the border along which fences and fences for the house are erected is a straight line, then it will be enough to drive stakes at the corners of the site. If the outlines of a private household are curved, markers will have to be placed on relatively straight parts of the border. A cord is pulled tightly between the stakes, along which the entire row of support posts for the fence will subsequently be aligned.
Using a tape measure, you need to find and mark the location of each support and the location of the entrance group.
Usually the column spacing is 2 m, but this is an optional figure. Sections can be made smaller, but it is not recommended to install long spans: the mesh may sag, and blind fences will have too much windage with a minimum of fastenings. When choosing components for a fence with fixed dimensions, you need to determine the pitch depending on the length of the material. A peg must be driven in at the location of each post, since the mark on the ground can be washed away by rain or accidentally rubbed off during the movements of people and animals.
What is needed for construction?
Building a fence with your own hands must begin with the acquisition of some materials and tools that may be needed in the work. In order not to make a mistake with your choice, you need to know what the fence is made of, and based on this, decide what you can build it from. The main details of any structure are the supporting elements (pillars), veins or slabs (horizontal fastenings) and the fence web (a plane made of some material).
Having decided what to make the fence from and determining the quantity necessary materials, House master goes to the store and buys the following tools and components for the fence:
- shovel;
- plumb and level;
- roulette;
- wood saw or grinder (for metal fence);
- hammer and nails or screws and screwdriver;
- pillars for support (10x10 cm block or steel pipe with a diameter of 10 cm);
- cement, sand and crushed stone;
- corner or thin pipe for metal veins;
- 5x5 cm block for wooden parts;
- materials for the fence fabric - of your own choice.
When building a fence made of polycarbonate, corrugated sheets or chain-link, you will definitely need a welding machine to attach the veins to the posts. But this service can be ordered at trade organization, providing dimensions and a sketch, or call a specialist to your home, because not everyone knows how to make welds correctly.
When building a country fence with your own hands from non-traditional materials, you will have to think through the method of attaching the canvas to the supports yourself. If a heavy stone structure is planned, then bricks or natural material will be required.
For gabion structures you will have to purchase a special mesh.
Fencing installation technology
Light fences and fences for the house are built according to the same principles. Regardless of what material is chosen for fencing the site, the construction of fences is carried out according to the following scheme:
- After the markings have been made and the location of each pillar is indicated, you need to dig holes for the supports. Since deep pits have to be expanded when working with a shovel and the pole may move during installation, the mark can be transferred to the cord, marking the center of the support with colored electrical tape or thread. After this, the pole must be pulled out and a hole must be dug at least 50 cm deep. It is advisable that its bottom be below the freezing point of the soil.
- Backfill by pouring crushed stone into the hole in a layer of 15–20 cm. Compact the material.
- Place the post in the hole, aligning it with the mark and vertical. In order for it to maintain its position, you need to prop it up with large stones or wooden wedges. If the work is carried out with an assistant, he can hold the support in the desired position. Fill the pit with crushed stone mixed with sand and dry cement (4:3:1, respectively) to the top, tamping it down during the filling process. Check the verticality of the column again and lightly pour water over the cement-crushed stone mixture (the amount of liquid is approximately 1/10 of the volume of the mixture).
- Install the remaining pillars in the same way. It will be possible to continue work after 24–48 hours.
- When the footing has set, you can begin attaching the veins. It is advisable to calculate their installation locations so that the ends of the boards or edges sheet material were no more than 30–40 cm above and below them. If the canvas is chosen to be partially transparent (picket fence, polycarbonate, mesh), the same distance from the upper and lower edges of the canvas to the veins will look beautiful. Check with a level that each layer is horizontal.
- After installing the horizontal structural elements, you can begin attaching the fence panel. Individual parts (board, picket fence) are installed individually, fastening is done with nails or self-tapping screws. Before making a fence with your own hands, it is advisable to tighten the cord to level the piece elements in height. It is easier to check the horizontality of a profiled sheet or polycarbonate with a level.
- To install a wooden gate, you need to lay the bars parallel to each other and fill them with pickets, making sure that the parts do not move. Turn it wrong side up and measure the block to make a diagonal stiffener. Cut its ends at an angle, lay it between horizontal bars and attach it with nails or self-tapping screws to each vertical plank at the intersection. For a wicket or gate made of sheet material, you need to weld a metal frame on which to fasten a profiled sheet, mesh or polycarbonate cut to the size of the product.

Using these rules you can build budget fence on a summer cottage from relatively cheap materials. You can complement and decorate it with decorative columns made of brick or stone. To do this, after installing the vertical supports and attaching the veins, the steel pipes are covered with building material, connecting the masonry elements cement mortar(1 part cement and 3 parts sand). In the presence of large quantity You can also lay a decorative plinth under the sections using bricks.
Thanks to this design, a fence placed near the house with your own hands looks much more solid than a conventional fence made of a metal profile or chain-link on a frame. Brickwork can be combined with wood, but the supports still need to be made of steel, by welding short sections of angle onto them, to which after construction brick pillars sections can be attached.
It will be especially stylish and elegant homemade fence from openwork bent or forged sections. This is not the most cheap option, but the owner has the right to decide for himself which fence is in better harmony with his house. Ready-made sections can be purchased or ordered according to your own sketches at construction company or a blacksmith shop.
They are installed by welding.
You can build an original fence for your dacha with your own hands from waste material. Many people collect empty ones plastic bottles in order to make the best out of them various items. Country fences are no exception: by connecting empty containers with wire or cement, people make reliable fences for their plots in a gardening cooperative.
To make 1 fencing element, you can cut off the bottoms of bottles same size. After this, the parts are strung on a fishing line or wire, passing it through the lid. The bottles are pushed one into the other through the cut off lower parts until they stop. The line is fixed.

Having made many of these “pickets,” they should be strung on thick steel wire tied to the posts. Aligning the piece elements in height, the wire is passed through the side surfaces of the bottles at the top and bottom. If the plastic picket fence is very high, you can make 3-4 horizontal rows of wire to make the fence stronger.
Plastic fences for a private home can be made differently. This will require a concrete solution of sand and cement. Having filled the foundation and a low base (about 20 cm), PET bottles are laid horizontally in the formwork, placing their bottoms in the same vertical plane. After this a series empty container pour the solution and repeat the procedure until the desired height is reached.
Decorative wooden fences
If the plot in a private house is registered in rustic style, then a wattle fence or a fence made of poles will be an excellent addition to the garden design. The first option involves creating a fence of vertical posts intertwined flexible material. Clearing a new property or neighborhood of American maple, willow, or other shrubs with long, straight branches can simultaneously remove debris and create a beautiful fence.
How to install correctly decorative wattle fence, many people know: this is the most common type of fence in Russian villages. Even the availability of modern materials has not reduced the popularity of durable and cheap fencing. To make a fence, a series of thick stakes are driven into the ground. The step between them is small, only 50–60 cm. After all the stakes are installed along the marking line, they are intertwined with horizontally arranged flexible rods.
A fence made of poles has a rather symbolic meaning, marking the boundary of the site.
Several horizontal crossbars are tied or nailed to the dug posts. The distance between them is quite large (up to 50 cm), so such a fence will not save you from unauthorized entry. It can be used as a fence between areas.
Gabion fences
There is another way to put up a fence without extra costs time and money using waste raw materials. To create a gabion, use rigid galvanized welded mesh. The most important thing is to choose a cell size such that the contents do not fall out.
To install the structure, you need to dig in steel posts, as for a regular fence.
The grid is positioned so that the columns are between its 2 layers. The space inside can be filled with cobblestones or stone fragments, broken glass, crushed stone, etc.
Having filled 50 cm of the gabion height, you need to install a series of hooks (braces) so that the mesh does not deform during further filling. The step between the braces is 30-50 cm. After this, you can fill another 50 cm of volume and again strengthen the wall with hooks. Continue this way until the end, raising the layer of filler to the very top of the mesh.
Fence designs can be very different. It is important to monitor the verticality of the columns at the very first stage of construction. Knowing how to install the supports correctly, the master will be able to cope with other operations without much effort.