


Rafter system gable roof It is considered one of the simplest in purely constructive terms. It consists of only a few elements, the number of which decreases or increases due to the size of the roof itself. But despite its apparent simplicity, the process of erecting a gable roof requires knowledge of some nuances that affect the quality of the final result.

Rafter system for a gable roof
What is a gable roof?
From the name it becomes clear that the roof structure consists of two slopes with rectangular shape in a plane. More often, the slopes have the same dimensions, but there are so-called asymmetrical designs in which the slopes differ in size from each other.
In this case, the slopes are installed to each other at a certain angle, which is called inclination. The line of contact is ridge beam, which is part of the rafter system. Simply called the ridge, it is the highest point of the roof.
The side planes formed by the slopes are called pediments. They have a triangular shape. After constructing the roof, the sides are lined with sheet or panel materials: plywood, OSB, even boards, etc.
What is a gable roof rafter system?
The basis of the structures of the slopes are the rafter legs, also known as rafters. They are made either from lumber (timbers, boards), or from steel profile(corner, channel). Wood is used in private house construction. It’s easier to work with, plus the lumber is cheaper.
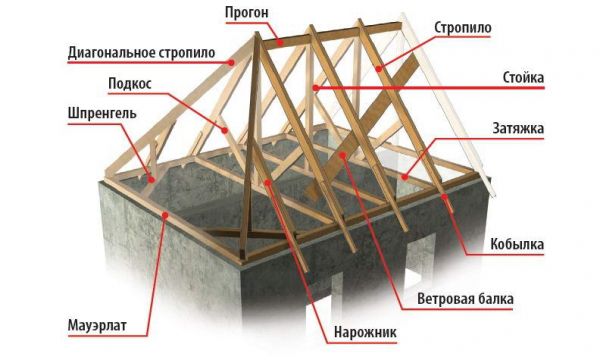
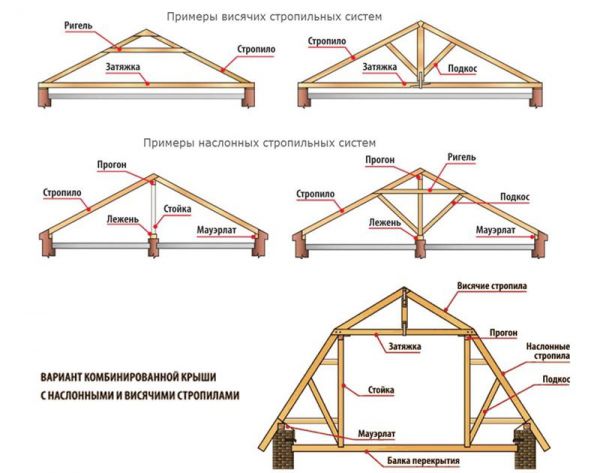
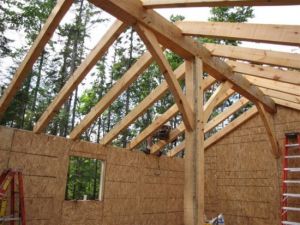
The construction of a gable roof rafter system is not only about rafters. Besides them there are several more mandatory elements. In the photo below all the elements gable roof shown. Let's label them.

Each roof element has its own purpose
Elements of a gable roof rafter system
Mauerlat. Essentially, this is a beam on which the rafters rest. Its purpose is to evenly distribute the loads from rafter legs on the walls of the house. If the Mauerlat is not used, then the rafters will put pressure on the walls pointwise, that is, large stresses will arise at the installation sites, which will lead to cracking of the walls.
Rafters installed at an angle.
Horse, aka ridge beam or purlin. Its task is to form the joining point of the rafter legs. Ridge beam is an optional element of a gable roof. There are designs in which it is not installed. But more on that below.
Puffs. They are not always used, but only on hanging rafters or if the rafter system is installed on a wide house.
Floor beams, which form the ceiling in the room and the floor in the attic.
One of the floor beams, called let's lie down. It additionally serves as a base for the support posts that support the rafters. Not always used.
Support posts, they are also the headstocks that support the rafter legs. They are installed only if the span of the house is at least 6 m.
Struts, they are also diagonal supports. They are used only if the support posts cannot ensure the overall reliability of the rafter system.
There is one more element that is clearly visible in the photo below. These are support posts for the ridge girder. They are installed if the structure of the rafter system is heavy. That is, the entire structure is assembled under heavy roofing material, for example, ceramic tiles.

Layered rafters with support posts under the ridge girder
You might be interested! A warm roof is an important detail when building an energy-efficient house. From the article at the following link you can find out.
Types of rafters
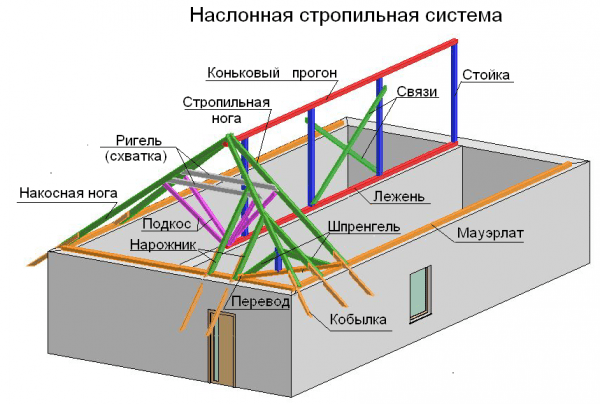
The roof rafter system (gable) can be assembled from layered or hanging rafters.
Layered
They got their name because their lower ends rest on the walls of the house, their upper ends on ridge run. Wherein rafter elements are subjected to loads that bend them. The design is reliable, durable, with high load-bearing capacity.
The photo above just shows a layered rafter system. It is clearly visible that the legs rest on the ridge at the top. In this case, there are two types of fastening of the rafters themselves in the upper part:
fastening is done to the ridge:
fastening is done to each other with emphasis on the ridge (photo above).
Hanging
It is necessary to immediately indicate that this type rafter system can be used if the distance between the walls of the house does not exceed 12 m. Because the rafters rest with their lower ends on the walls, and their upper ends only with each other (there is no ridge girder in the design). Hence the low load-bearing capacity with a large spread.
Hanging roof rafters have one purely design drawback - a large support load on the walls of the house. To reduce it, strings are installed between the legs to form a rigid triangle. Often the functions of tie bars are performed by load-bearing floor beams.
If it is necessary to strengthen the hanging rafters, racks and struts are installed under them.

Hanging rafters of a gable roof
Installation of a gable roof rafter system
Two types of rafter systems determine two types of assembly technology. Let's look at each one separately.
Installation of layered rafters
There is a certain sequence for assembling layered rafters.
Two outer support posts are installed under the ridge beam. They will not only support the timber, but will also be the elements that form the gables of the building. They are attached at the bottom to the Mauerlat. In this case, they are strictly aligned vertically, and the upper ends are in the same horizontal plane. To do this, stretch a strong thread between the posts and check it with a level to ensure it is horizontal. If there are deviations, then one of the supports (low) is raised using wooden supports.
Horizontally taut thread install intermediate support posts in increments of 2-2.5 m. To prevent the beams of the posts from moving, they are supported with temporary fastening elements: supports or tie-downs.
A ridge beam is placed on the racks, which is also attached to them.
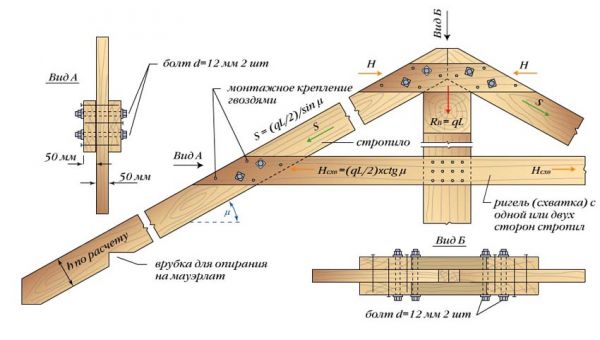
Produced in pairs installation of gable roof rafters. Installation can begin from any side. The fastening is carried out immediately to the Mauerlat and to the ridge. The main thing is to maintain the distance between the legs, which is determined depending on the weight and load-bearing capacity of the roofing material. Usually this parameter is indicated in the house design.
If necessary, intermediate support posts and struts are installed.

Installing rafters on a ridge along a tensioned thread
Installation of hanging rafters
The technology for installing hanging rafters is different. To do this, the entire structure, assembled from two rafters and a tie, is assembled on the ground. That is, roof trusses are prepared in required quantity, which then rise to the roof. Sometimes craftsmen assemble roof trusses. They assembled one, installed it, and assembled the next one.
It should be noted that such farms have a significant mass. Lifting them manually is difficult and dangerous, so they use the services of a crane. And this increases the cost of construction.

Gathered on the ground roof trusses hanging type
The most difficult thing is to display the farms. All of them are installed at the installation site with a planned step, where they are temporarily secured with jibs and supports. Then a thread is stretched between the outer trusses. It must be positioned so that, firstly, it is stretched strictly along the horizon, and secondly, along a structure that is higher than the rest.
All that remains is to raise the rafter structures that are below the tension level. And the last thing is the installation of the sheathing, which will secure all the trusses into one rafter system. Please note that in the lower part of the rafters will be fixed to the Mauerlat.
This might interest you! When the installation of the rafter system is completed, the turn of roofing work comes. From the article at the following link you can find out.
Calculation of rafters
length of rafter legs;
step of their installation;
cross-section of the lumber used.
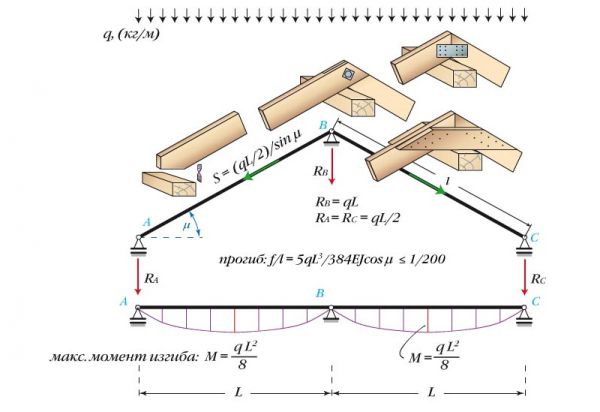
With length, everything is simple; for this you will have to use the Pythagorean theorem, which is based on the formula: c 2 =a 2 +b 2, where c is the hypotenuse of the triangle (this is the rafters), a and b are the legs. The latter are the height of the roof and half the width of the house. All parameters can be easily measured.

The length of the rafter is l 2 +H 2
The installation pitch is more difficult, because much will depend on the weight of the roofing material and the loads from natural precipitation. The greater both loads, the smaller the installation step. But, as practice shows, this parameter varies from 60 cm to 2 m. The latter indicator is used if corrugated sheeting with large corrugation parameters, for example, H75, is used as a roofing material.
As for the cross-section of the rafter legs, here, as in the case of the installation step, the loads are taken into account, as well as the length of the legs and the step of their installation. Here the relationship is as follows: the greater the load, pitch and length, the larger the cross-section.
Video description
In the video, the installation process of the rafter system:
And one moment. Rafters for a gable roof are laid at a certain angle (indicated by the letter “a” in the photo). The slope is selected based on the choice of roofing material. That is, some coatings cannot be laid on roofs if the angle of inclination is less than the required one. Here are some ratios:
the minimum angle of inclination of the rafter system for slate is 22°;
for corrugated sheets – 12°;
for metal tiles – 14°;
soft tiles– 15°.

Ratio of roof slope to type of roofing material
On our website you can find contacts of construction companies that offer turnkey roof design and repair services. You can communicate directly with representatives by visiting the “Low-Rise Country” exhibition of houses.
Generalization on the topic
Gable roofs are traditional designs. But from the article it becomes clear that there are two rafter systems that form the basis for the construction of roofs. The one that fits the size of the house is selected. The loads pressing on them are also taken into account as a selection criterion. Therefore, it is important to correctly correlate everything, taking into account the nuances of construction processes.
Roof installation is a complex multi-step process. To independently assemble and install a rafter system, you need to carefully study the methods of connecting elements, calculate the length of the rafters and the slope angle, and select the appropriate materials. If you don’t have the necessary experience, you shouldn’t take on complex designs. The best option for a small residential building is a do-it-yourself gable roof.

A standard roof of this type consists of the following elements:

Mauerlat is a timber laid on top of the walls along the perimeter of the building. It is secured using threaded steel rods embedded in the wall or anchor bolts. The timber must be made of coniferous wood and have a square section of 100x100 mm or 150x150 mm. The Mauerlat takes on the load from the rafters and transfers it to the external walls.

Rafter legs- these are long boards with a cross section of 50x150 mm or 100x150 mm. They are attached to each other at an angle and give the roof a triangular shape. The structure of their two rafter legs is called a truss. The number of trusses depends on the length of the house and the type of roofing. Minimum distance between them is 60 cm, the maximum is 120 cm. When calculating the pitch of the rafter legs, you should take into account not only the weight of the covering, but also the wind load, as well as the amount of snow in winter.

It is located at the highest point of the roof and most often represents a longitudinal beam connecting both slopes. The beam is supported from below by vertical posts, and the ends of the rafters are attached to the sides. Sometimes the ridge consists of two boards that are nailed to the top of the rafters on both sides and connected at a certain angle.

Racks are vertical beams with a cross section of 100x100 mm, located inside each truss and used to transfer the load from the ridge run to the load-bearing walls inside the house.
The struts are made from scraps of timber and installed at an angle between the posts and rafters. The side edges of the truss are strengthened with struts and the load-bearing capacity of the structure is increased.
Tie - a beam connecting the lower parts of the rafters, the base of the truss triangle. Together with the struts, such a beam serves to strengthen the truss and increase its resistance to loads.
A log is a long beam with a cross-section of 100x100 mm, laid along the central load-bearing wall, on which vertical posts rest. Lezhen is used when installing layered rafters when the run between the outer walls is more than 10 m.
The sheathing consists of boards or timber placed on the rafters. The sheathing can be continuous or with gaps, depending on the type of roof. It is always attached perpendicular to the direction of the rafters, most often horizontally.
If there is no more than 10 m between the external walls and there is no load-bearing wall in the middle, arrange hanging rafter system. With this system, the upper ends of adjacent rafters are sawn at an angle and connected to each other using nails, excluding the installation of racks and ridge beams. The lower ends of the rafter legs rest on the external walls. Due to the absence of racks, attic space can be used to furnish an attic. Very often, the function of tightening is performed by floor beams. To strengthen the structure, it is recommended to install the top tie at a distance of 50 cm from the ridge.

If there is a central supporting wall, the arrangement is more justified layered rafter system. A bench is laid on the wall, support posts are attached to it, and a ridge beam is nailed to the posts. This installation method is quite economical and easier to implement. If ceilings in interior spaces are designed at different levels, the racks are replaced brick wall, dividing the attic into two halves.

The roof installation process includes several stages: attaching the Mauerlat to the walls, assembling the trusses, installing the rafters on the floors, installing the ridge, and attaching the sheathing. All wooden elements Before assembly begins, they are thoroughly treated with any antiseptic composition and dried in air.
To work you will need:
- timber 100x10 mm and 150x150 mm;
- boards 50x150 mm;
- boards 30 mm thick for lathing;
- roofing felt;
- metal studs;
- jigsaw and hacksaw;
- hammer;
- nails and screws;
- square and building level.

IN wooden houses The functions of the mauerlat are performed by the logs of the last row, which significantly simplifies the work process. To install the rafters, just cut inside log grooves of the appropriate size.

IN brick houses or buildings made of blocks, installation of the Mauerlat occurs as follows:

The mauerlat bars must form a regular rectangle and be in the same horizontal plane. This will facilitate further installation of the roof and provide the structure with the necessary stability. Finally, markings are made on the beams for the rafters and grooves are cut along the thickness of the beam.

When choosing a hanging rafter system, it is necessary to assemble the trusses on the ground and then install them above the floors. First you need to draw up a drawing and calculate the length of the rafter legs and the angle of their connection. Typically, the roof slope is 35-40 degrees, but in open, heavily blown areas it is reduced to 15-20 degrees. To find out at what angle to connect the rafters, you should multiply the angle of the roof by 2.

Knowing the length of the purlin between the external walls and the angle of connection of the rafters, you can calculate the length of the rafter legs. Most often it is 4-6 m, taking into account the eaves overhang 50-60 cm wide.

The upper ends of the rafters can be fastened in several ways: overlapping, end-to-end and “into the paw”, that is, with grooves cut out. Metal plates or bolts are used for fixation. Next, the lower and upper ties are installed, and then the finished trusses are lifted up and installed above the floors.

The outer trusses are attached first: using a plumb line, the rafters are aligned vertically, the length of the overhang is adjusted and attached to the mauerlat with bolts or steel plates. To prevent the truss from moving during installation, it is reinforced with temporary beams made of timber. After installing the outer rafters, the rest are set, keeping the same distance between them. When all the trusses are secured, take a board with a cross-section of 50x150 mm, the length of which is 20-30 cm longer than the length of the cornice, and nail it along the upper edge of the slope. The same is done on the other side of the roof.


The first option: a rectangular groove is cut out on the rafter leg at the point where it touches the mauerlat, 1/3 of the width of the beam. Stepping back 15 cm from the top of the box, a steel spike is driven into the wall. The rafter is leveled, the grooves are aligned, then a wire clamp is placed on top and the beam is pulled close to the wall. The ends of the wire are securely fastened to the crutch. The lower edges of the rafters are carefully cut off circular saw, leaving an overhang of 50 cm.

Second option: the upper rows of walls are laid out with a stepped cornice of bricks, and the mauerlat is placed flush with the inner surface of the wall and a groove is cut out in it for the rafter. The edge of the rafter leg is cut to the level of the upper corner of the cornice. This method is simpler than others, but the overhang is too narrow.

Third option: beams ceilings are released over the edge outer wall by 40-50 cm, and the trusses are installed on the beams. The ends of the rafter legs are cut at an angle and rest against the beams, secured with metal plates and bolts. This method allows you to slightly increase the width of the attic space.
Installation of layered rafters

Figure 1 shows the cutting of rafter struts into a beam laid on intermediate supports, and Fig. 2 - resting the rafter leg on the mauerlat
The procedure for installing a layered rafter system:

When the main elements are fixed, the surface of the rafters is treated with fire retardants. Now you can start making the sheathing.

For the sheathing, timber 50x50 mm is suitable, as well as boards 3-4 cm thick and 12 cm wide. Waterproofing material is usually laid under the sheathing to protect the rafter system from getting wet. The waterproofing film is laid in horizontal strips from the eaves to the roof ridge. The material is spread with an overlap of 10-15 cm, after which the joints are secured with tape. The lower edges of the film should completely cover the ends of the rafters.

It is necessary to leave a ventilation gap between the boards and the film, so first stuff them onto the film. wooden slats 3-4 cm thick, placing them along the rafters.

The next stage is covering the rafter system with boards; they are stuffed perpendicular to the slats, starting from the roof eaves. The pitch of the sheathing is influenced not only by the type of roofing, but also by the angle of inclination of the slopes: the greater the angle, the greater the distance between the boards.

After completing the installation of the sheathing, they begin cladding the gables and overhangs. You can cover the gables with boards, plastic panels, clapboard, waterproof plywood or corrugated sheeting - it all depends on financial capabilities and personal preferences. The sheathing is attached to the side of the rafters; nails or screws are used as fasteners. Overhangs are also hemmed various materials– from wood to siding.
Video - DIY gable roof
Rafter system - powerful roof frame for holding roofing and other elements.
How well is the roof frame constructed? The strength of the roof as a whole depends.
Otherwise, its functionality and ability to protect the building from external influences and provide warmth in the house.
Therefore, you need to correctly approach the choice of rafter systems and correctly draw up a rafter plan.
You can read how to calculate the rafter system.
Depending on the purpose of the room, the size of the gable roof, the structure of the rafter system is classified as follows: hanging system and layered.
Hanging system
Hanging rafter system for a gable roof has support only on the load-bearing external walls of the building.
Depending on the width of the span and the design of the roof, the installation of hanging systems has features.
For small houses
It is advisable to erect a hanging structure for buildings where the distance from one wall to the opposite does not exceed 6 meters. The frame has the shape of a triangle.
To strengthen bearing capacity faces of the frame triangle, use several methods:
- The bases of the rafter legs at the top are secured with overlays;
- Use bars of a larger cross-section on the side parts;
- The bars are secured by cutting them into the ridge element;
- The slopes for the canopy equipment are increased by cutting out an opening for the frame beams in the extended boards so that they converge behind a line running from the edge of the inner wall to the slope of the rafters.
Using these methods, it is possible to distribute the load throughout the entire structure.

Strengthening the frame triangle
For mansard roofs
When arranging the frame, you should pay attention to some points:
- Mandatory installation of a mauerlat on which the frame beam is installed by cutting;
- Installation of the crossbar - the base for the ceiling canopy of the floor. The most effective fastening option is to cut the crossbar into the rafter half-square;
- The length of the bevel board should be longer than the wall line;
- The cross-section of the frame bars should be maximum;
- The tie should be secured with a pendant. If the string is long, it needs to be strengthened in the center with nailed boards at the top and bottom.
CAREFULLY!
Particular attention should be paid to fastening the elements, since the attic experiences loads both outside and inside.
In addition, the rafter system of a gable roof with an attic is equipped with insulation, which increases the load.

Rafter frame for mansard roofs
For large houses
When spanning more than 6.5 meters, installing a hanging system requires installing more fastening elements to prevent sagging of the tie, which is caused by its own weight.
Points to consider:
- It is advisable to make the tie from two beams by cutting and secure it with metal plates;
- A headstock should be installed in the central part of the frame;
- To reliably distribute weight to the headstock and rafter boards, it is better to attach struts, as well as other retaining elements.
When installing a suspended system, sometimes you can do without installing a Mauerlat and limit yourself to installing boards on film. In addition, the hanging system is characterized by the absence complex nodes, which facilitates the installation work roof frame.
Hanging system
Layered system
The difference between a layered structure and a hanging one is that the structure has additional support points inside the room. Required condition installation of a layered system is the installation of a Mauerlat.
The system design provides for the installation of both spacer and non-spacer frames.
Spaceless frame
A non-thrust frame should be installed in houses with log walls. When installing rafters, their bases must be attached to the Mauerlat.
Options for attaching the system base to the Mauerlat:
- By beveling the sole of the rafter leg so that its area with the mauerlat is the same, and the cut does not exceed 0.25 cm of the height of the beam. In this case, the rafters, without connecting to each other, are attached to the ridge element on both sides;
- By connecting the rafter beams at the ridge with one nail - at the top, and by hinged connection with a flexible metal plate to the mauerlat - at the bottom.
When attaching rafter legs without connecting them at the ridge part special attention should be paid to the accuracy of calculations.
Even for minor discrepancies in the scheme, expansion pressure will act on the walls of the building, which may lead to the destruction of walls.
Spaceless frame
With contractions
To strengthen the structure and give it stability, Screws are mounted to the pillars of the structure. You should use timber of the same cross-section as for the rafters. To increase strength, the screeds are nailed on both sides of the beam.
The same fastening option is effective for firmly fixing the ridge element, which prevents the roof from moving horizontally.
Frame with contractions
With struts
The struts enhance the load-bearing capacity of the wooden frame and ensure the strength of the rafter board.
An important requirement when installing a strut is a correctly measured cutting angle, which makes it possible for the strut to fit tightly to the elements being connected.
ATTENTION!
If, with a layered system, the supporting part is located in the center of the base of the frame, then the strut is attached at an angle of 45° to horizontal line, if the support is located closer to one of the load-bearing walls, then the mounting angle may be different: from 45° to 53°.
It is advisable to erect a frame with struts in places where there is a possibility of the foundation landing, or in wooden buildings, where slight shrinkage of the walls is acceptable.

Frame with struts
With two indoor supports
When there are two supports in the form interior walls, then when arranging the rafter legs, beams are placed under them. If the beams are not installed, then a post resting on the internal support is nailed to the base of the rafters.
Rafter beams are installed on load-bearing supports. On the supports inside the room, beds are installed, onto which the load from the rafter beams from the racks falls. The rafters are cut so that they fit snugly against each other and secured.
With this design, the ridge girder is not installed.
To ensure that the structure is non-thrust, tie downs are attached.
The stability of the structure is ensured with the help of racks, which are installed horizontally from the inner base to the rafter leg, and joints, - wooden beams, which connect the bases of the racks diagonally.
If the structure is spacer, then a beam is attached above the purlin, connecting the frame legs - a crossbar.
Layered system
Types of rafter systems
Installation of rafters for an attic roof
Before installing the rafter system under the attic, it is necessary to correctly calculate the roof load and take into account other factors, which may affect its functionality. All wooden elements must be treated with antiseptics.
Installation of the rafter system is carried out in stages:
- Install the Mauerlat on the waterproofing layer. The board is fastened to the walls with staples or nails and tied with metal wire to hooks prepared in advance in the wall;
- Frame elements are cut out;
- The main rectangle is made from tie rods and racks;
- Two middle purlins are mounted, to which the lower rafters are attached;
- The structure can be lifted to the roof, where it can already be installed upper rafters, connecting them at the upper base, securing the ridge beam and side girder;
- Strengthen the structure necessary elements: puffs, racks, struts, additional stops.
After installing the frame, they lay it on it vapor barrier film, install , elements and covering material.

Mansard roof installation
Installation of rafters for the attic
The attic of a gable roof has the simplest hanging system.
For attic floor It is advisable to make ready-made trusses on the ground, and then lift them to the roof, having previously installed the Mauerlat.
Trusses consist of rafter legs, firmly secured with a tie at the lower base. You can additionally use struts or headstocks.
Securing the tie rods to the rafters is of great importance. It is recommended to install the tie rods so that their beams are located half a meter behind the wall line, then there will be no need to additionally install an overhang.
You can read how to make rafters yourself.
The trusses are secured using upper and lower purlins.

Rafter system for the attic
Gable roof rafter system: elements
When arranging the frame of a gable roof, the following elements are used:
- Mauerlat. An element that is attached to a load-bearing wall. The entire structure of the rafter frame is mounted to it;
- Run. Beam connecting the rafter legs on the sides and in the ridge element;
- Puff. A beam attached to the rafter legs, preventing them from diverging;
- Grandma. A beam located vertically and secured at the ridge and tie;
- Strut. A plank connecting the beam and the rafter at an angle;
- Rack. Vertically rests on the bed and rafters;
- . Beam connecting the upper bases of the rafters;
- Filly. Extensible part of the rafter for overhang;
- Overhang. An additional structure serves to protect the outer wall from rain;
- Lathing. Grille installed on rafter frame for attaching the top layer.
The combination of several elements (rafters, racks, braces) in one plane is called a truss.
Rafter system of a gable roof, drawings and photos below:

Drawing of rafter system elements
Knots of the rafter system of a gable roof
Reliable fastening of structural components ensures the strength and durability of the structure and helps to increase its service life.
The strength of the base of a gable roof depends not only on proper fastening.
It also consists of correct calculation of all frame elements, from a verified determination of the type of structure at the project stage.
Rafters for a gable roof are connected to different structural elements.
Main structural components:
- With beam: secured either with a spiked tooth or a tooth with a stop. Additionally, corners are used. They are mounted to the beam by cutting out a stop for the tenon in the beam with a socket. A single tooth is attached with a tenon and a stop. If a notch is made, then the distance from the edge of the block should be 0.2 - 0.4 m;
- With Mauerlat: for rigid fastening, use corners or make cuts, which is secured with nails or staples, with a hinge - a moving metal fastener, with a saw - a nail or staple;
- With a skate: cut the edge at an angle and fasten it end-to-end with nails, secured with a bracket or overhead board. Overlapping boards are fastened with a bolt or studs.
Depending on the span, the elements are attached:
- Grandma. Top - with staples and a clamp, bottom - with a clamp;
- With a brace. The top is attached to the rafter, the bottom to the headstock;
Is it time to install a roof? The very first thing you need to do is install the rafter system. This work is very important and complex, and therefore you need to carefully read our advice.
A little theory - what do you need to know about the rafter system?
First of all, we need to talk about the types of rafter systems and their characteristics. So, this system consists of the following elements:
- rafter legs;
- racks and vertical supports;
- struts;
- puffs - an element that connects the rafter legs.
You should also distinguish between rafters by type. Rafter systems are divided into:
- Layered. They should be used if the building has internal partitions or other supports. In this case, the “legs” of the structure must rest on both the external and internal walls.
- Hanging - in which the “legs” of the structure rest only on the outer walls. A distinctive feature of this design is that its construction requires tightening due to high thrust loads.
Several important technical characteristics
When choosing a method for installing rafters, it is necessary to evaluate the complexity of the work and the weight future design. If the product is in assembled form will be light in weight, or you can bring special lifting equipment to the site, then it is best to assemble the rafters on the ground, and then lift them to the roof of the building, where you can do all the other work. If the structure is heavy, then it will have to be assembled directly on the roof - this is easier and safer.
It is very important to connect the upper parts of the rafters correctly. This work can be done using several methods. First of all, butt jointing, when cuts are made on opposite rafter legs at the required angle. Next, the rafters need to be joined along the resulting ends and secured with several nails. For a safer connection, secure the products with a metal pad.
You can attach the rafter legs with an overlap - in this case, the structural elements touch each other with planes. If you are going to make a rafter system in a house with fronts that are made of logs, then the rafters must be installed on the walls using the sliding fastening method. Thanks to this, you will be able to avoid deformation of the roof in the event of shrinkage of the house.
If you decide to use this method, then you need to keep in mind that it is quite difficult to do it yourself. Fastening is done as follows: the “legs” of the rafters must be placed with a gap, fastening them together using a specialized movable metal element. Now we proceed to the actual construction of the rafter system with our own hands.
Mauerlat - what is it and what is it for?
The construction of the rafter system must begin with the installation of the Mauerlat - this is the basis for the future structure. Mauerlat is a log or beam that is fastened along the entire perimeter of the external walls. Undoubtedly, it is possible to make a structure without a Mauerlat, but building such a structure with your own hands will be quite difficult and even risky. It is very important to follow all the recommendations exactly so that the base for the rafter system 100% fulfills the functions assigned to it.
Important Tips:
- Before laying the Mauerlat, you need to insulate the walls using a suitable waterproof material. To save money, you can put several layers of roofing felt.
- Installation of logs is carried out on a reinforced belt with a slight indentation from the edges of the walls.
- It is best to choose logs of antiseptic wood with a cross section of 10*15 cm.
To make it easier to do the work yourself, the beams must first be laid out from one front to the other along the entire length of the wall. After this, you can take measurements: lay out the beams level, making sure the distance between them is even. Next you can attach the beams to the walls. As we have already said, it is preferable to carry out installation on a reinforced belt, using it as a product for fastening anchor bolts– it is better to fasten them when pouring reinforced belt. Also, do not forget to drill holes in the beam itself.
Important: if you want to achieve a perfectly even position of the bolts, before pouring the “belt”, attach the board to the bolts and give the fasteners a vertical position using a square.
We place the base prepared with our own hands on stands consisting of planks, after which we carefully lower the beams onto the bolts, removing a plank each time. Finally, screw the washer onto the bolt. Now it’s time to learn how to make a rafter system with your own hands.
Do-it-yourself rafter system installation
We have already talked about installing the Mauerlat. Now it’s time to move on to the main point of installing the rafter system - the installation of floor beams and ridge beams. But first things first. Floor beams are beams with a cross section of 20*10 or 15*10 cm. The length of the products should be such that when laid on the walls, the beams form a projection that will correspond to the width of the cornice.
If we talk in simple words, the bars must extend beyond the walls at a certain distance. The bars are installed in one direction, leaving an equal distance between them.
To avoid errors while performing work, you should follow a clear sequence of actions:
- We install the boards with our own hands, retreating from the edge of the walls by an average of half a meter.
- We stretch a cord between the beams - it will serve as a kind of “beacon” for installing the next beams.
- The distance between the “legs” of the structure must be selected based on the cross-section of the rafters. So, if you decide to choose “floor” boards measuring 5*15 cm, then the step should be approximately 60 cm. It is worth noting that this will greatly simplify all further work. And all thanks to the fact that the width is most often 60 cm, which means there will be no need to trim anything.
- Let's move on to installation cross beams, which with one part should be in contact with the outer beam, and the second should extend beyond the walls. The gap between such jumpers should be about 1 m.
- We attract the beams to the base (mauerlat) using nails, you can also use self-tapping screws and steel corners (for reliability).
To make your work as convenient as possible during the construction of the rafter system with your own hands, lay ordinary boards on the beams.
Now it's time to talk about installing ridge beams. This stage consists of several steps:
- Installation of auxiliary racks, which are U-shaped struts made of wood. Professional specialists It is recommended that the height of the struts be equal to the height of the first floor.
- We assemble the racks at opposite ends of the structure and install intermediate beams, maintaining a step of 2.5 meters.
- After installing the racks, we lay the ridge beam on top ( wooden plank with a section of 5*20 cm). Secure the structure with self-tapping screws.
Since the rafters must be the same length, it is advisable to make a template in advance to determine the length. To do this, take one board measuring 2.5 * 15 cm, apply it to the beam and to the ridge, and put marks at the points of contact and saw it off unnecessary part– You can make blanks using this template. However, it is worth noting that not everyone can achieve perfect evenness, so be prepared for the fact that during the installation process you will have to use a saw more than once.
If you neglect this advice, the ridge may bend, which may make the structure not so reliable.
After you have installed the rafter system, you need to waterproof it, create a sheathing and cover the structure with roofing material. Now you know how to assemble the rafter system - the roof is almost ready. We hope our tips will help even you do the job yourself.
The construction of a reliable rafter system is one of the most complex tasks when building a roof country house, cottage or garage. And yet, do not rush to give up - today we will refute the popular belief that similar work not for a beginner. Knowing the rules for calculating, sawing and installing a roofing frame, you can build a roof no worse than specialists. In turn, we will try not only to talk about the structure, design and construction features of rafter systems various types, but we will also share the secrets of experienced masters.
What is called a rafter system and how is it structured?
Any, even the most shabby roof is based on a strong power frame called a rafter system. The rigidity of the roof, and therefore its ability to withstand even the strongest wind and snow loads, depends on how correctly this structure is installed.
The rafter system is the roof’s power frame, which absorbs all wind and snow loads
The best material for making rafters (trusses) is considered to be timber or a thick board made of wood. coniferous species. And there is an explanation for this - pine or spruce lumber is relatively light in weight, and the presence of natural resins makes it quite durable. Even if the timber has a slight residual moisture, it will not move when drying, which is no less important a factor than ease of use and long term services.
Depending on the size of the roof, the supporting elements of the structure can have a cross-section from 50x100 mm to 200x200 mm or more. In addition, the length of the roof directly affects the number of rafters, because they are installed in small increments - from 60 cm to 1.2 m.
Structural elements of the rafter system
The main requirement for a wooden frame is the ability to withstand bending and torsion. For this reason, a triangle shape is best for timber frame trusses. Moreover, they can consist of several parts:
- rafter legs - the base of the roof frame, which has the greatest influence on the size and geometry of the slopes;
- crossbars (bolts) - boards that tie together a pair of rafter legs;
- purlins are transversely installed beams, due to which the rafters are connected into a single structure;
- racks - vertical supports that serve to support rafter legs or prevent purlins from deflecting;
- struts - the same racks, only placed at an angle to the vertical;
- beds - boards attached to the attic floor on which supports are installed;
- Mauerlat - a support beam installed on load-bearing walls, to which the lower parts of the rafter legs are attached;
- fillies - pieces of timber or boards that are nailed to the lower ends of the trusses and are used to arrange roof overhangs.
Additional elements of the rafter system make the roof frame more durable, rigid and stable
When choosing a roof frame design, it is important to find that golden mean that will allow you to obtain a strong and reliable structure with minimum costs. For this reason, you can deviate a little from the established canons, if the matter does not concern the rigidity of the entire structure. For example, it is quite possible to do without fillies, and form the eaves overhang using longer rafter legs. Or use not a solid Mauerlat, but pieces of timber laid only in the places where the rafter legs are attached - it all depends on the engineering ingenuity and experience of the roofer.
Rafter classification
Depending on the roof structure and the purpose of the attic space, a wooden frame can consist of several types of rafters:

Features and types of rafter systems
To make an informed choice, you need to understand the features of various types of rafter systems and know the strengths and weak sides each design.
Roof frame with hanging rafters
Since the principle of fastening hanging rafters does not require additional support points, this design is used for buildings no more than 6 m wide. Installation of unsupported trusses involves attaching each pair of legs to opposite main walls, while their upper parts are fixed directly to the ridge girder.
A roof frame with hanging rafters transfers only vertical forces to the walls, therefore it has simpler attachment points to load-bearing walls
During operation, a force acts on the hanging rafters, tending to push the structure apart. To compensate for the bursting force, a crossbar made of wooden beams or a metal profile pipe is installed between the rafter legs. If the attic space will be used for household purposes, then the upper lintel is secured as close to the ridge as possible, and the lower edges of the pairs of rafter legs are connected with ties. This scheme allows you to increase the useful height of the attic without at all reducing the strength of the frame. By the way, if the lower lintels are made from timber with a cross-section of more than 100x100 mm, then they can also be used as load-bearing beams. It is necessary to ensure a reliable connection between the tie rods and the rafter legs, since significant pushing forces are also applied to the place where they are attached.
Roof with layered rafters
Layered rafters require the installation of at least one support, so they are used for buildings with internal load-bearing walls. Maximum length a single span should not exceed 6.5 m, otherwise the strength and rigidity of the roof frame will suffer. To increase the width of the roof, the rafter system is reinforced with intermediate supports. Even one additional post allows you to increase the width of the roof up to 12 m, and two - by more than 15 m.
The system with layered rafters is ideal option when it is necessary to build a roof of large width
The stability of layered trusses can be increased by using a sub-rafter frame with purlins, racks and struts. In addition, this rafter system requires much lower lumber costs. Versatility, durability and cost-effectiveness have long been appreciated as construction companies, and individual developers, most often using in their projects roofing structures with layered beams.
Combined options
Roofs today country houses surprise with the elegance of design, whimsicality of shapes and variety of configurations. Such complex structures can be built in only one way - by combining both types of rafter systems in one frame.
The combination of layered and hanging trusses allows you to obtain a rafter system of any configuration
Even for the construction of not the most complex sloping roofs, both rafter systems are used at once. Right triangles located on the sides are layered rafter structures. And they are connected due to the upper tie, which at the same time plays the role of a tightening for the upper hanging rafters.
Procedure and rules for installing roof frames
Since two types of roof frames are used in the construction of roofs, we will consider the installation technology of each structure separately. However, before starting construction work, it is necessary to study ways of attaching structural elements to each other.
Construction of a roof with hanging rafters
It was already mentioned above that hanging rafters are most often used in the construction of small or undemanding buildings. In this case, a log house is an almost ideal option, since you can do without a mauerlat. The lower part of the rafter legs is attached to the upper crown or the edges protruding beyond the perimeter of the walls ceiling beams(matits). In the latter case, the tie must be moved upward - this will allow the timber to be placed over the finishing log and make the attic more comfortable.
To increase the height of the attic space, the tie should be installed as close to the top of the roof as possible
Preparatory work
The geometry of the slopes depends on how well the beams for the rafters are prepared. A cord stretched between nails driven into the outer beams will help to level the supporting surfaces.
- It is necessary to cut down the slab, obtaining flat areas for installing trusses. After this, you should definitely check how accurately they lie in the same plane. This can be done with the help of a long, even rod and a level.
Before installing the trusses, the supporting surfaces are aligned with the cord
- After removing excess wood, you need to make a recess in each beam for the rafter tenon. You can draw the locations of future nests using the same nails and cord as in the previous case. Although recesses for the rafters can be made both before and after the manufacture of the trusses, experts advise doing them first - this will allow fitting to be carried out with higher accuracy and convenience.
The method of fastening the rafters depends on many factors - the type of support beams, their cross-section, features of the roof overhang, etc.
- Professional roofers recommend installing an additional guide - a vertical strip - in the center of the span of each gable. One of its sides is used as an axis of symmetry, which will make it possible to ensure strict adherence to the geometry of the structure.
In order to simplify the process of marking and installing the roof frame, use vertical slats installed along the center line of the roof
Making rafters
In order for the rafters to have the same dimensions and configuration, they are made according to a pre-made template. To make it, we suggest using the following instructions:
- Take two shawl boards and bolt them together to create a structure similar to a drop-down compass. The threaded connection should not be overtightened - the structure should rotate around the top. Be sure to check that the slats are 10–15 cm longer than the rafters - this will be needed to take into account the height of the abutment tooth.
The simplest template allows you to get roof trusses of the same size and configuration
- Make two marks on the staff installed as a guide. The lower one should correspond to the height of the rafter system, and the upper one should be spaced from it to the height of the mounting protrusion.
- Place the template on the matrix so that the corners of the boards rest against the recesses for the rafter teeth.
In order for the structure to successfully cope with thrust loads, the thrust tooth at the end of the rafter leg is inserted into a recess on the floor beam
- Align the axis of rotation of the “compass” with the top mark on the rail and set the height of the tenon from the lower corners of the jig.
- Lower the template down and cut the teeth along the drawn line. After this, lift the device onto the roof and insert the spikes into the sockets on the motherboard. Check that the sample axis coincides with the bottom mark on the vertical staff. If necessary, move the bolt in the desired direction and fix the angle between the boards with a cross member.
Several methods are used to fasten trusses - it all depends on the type of support beams, the design of the roof frame and the cross-section of its elements
- Having adjusted the template to the height, apply vertical joining lines to each board. Finally, measure the length of the transom and use scrap boards to create a template for making caps for the tops of the trusses.
To attach the crossbar to the rafters, overlays from sections of inch boards are used
After the template is lowered to the ground, it is disassembled and cuts are made according to the applied markings. In addition, a separate pattern is constructed according to which the ends of the rafter legs will be cut. The manufacture and assembly of hanging rafters is most often done below, lifting to the roof ready-made designs. If the weight and dimensions collected farms do not allow them to be pulled up manually, then assembly is carried out on site. In this case, the components of the rafter system are fixed with nails ranging in size from 100 to 200 mm.
How to install rafters on a roof
In order to lift and install the trusses, you will need the help of at least one person. Trying and plumbing the rafters alone is an extremely difficult task - you will have to attach them to the struts more than once and descend from the roof many times to check the deviation from the vertical plane.
With the help of a rafter tooth, it is possible to obtain such a reliable connection that only one nail can be used for final fixation
Lifting assembled rafters upward, first mount the outer structural elements, and then the central and intermediate ones. To strengthen the structure, a support is installed under each leg:

Having aligned the hanging rafters to the level, they are fixed with temporary spacers. After this, the lower ends of the beams are nailed to the matrix or floor beams.
Various temporary structures significantly simplify the process of installing rafters at level
There is no need to resort to newfangled methods of fixation using various corners and perforated plates. The reliable “old-fashioned” method of fastening using nails 200 mm long or construction staples will be much better both in terms of strength and reliability, and in cost. At this stage, you don’t have to worry about the structure looking flimsy.. After the remaining elements of the rafter system are installed and the sheathing is completed, the structure will acquire the necessary rigidity and stability.
Video: making and installing hanging rafters with your own hands
Features of installation of layered rafters
The process of manufacturing and installing layered rafters is generally very similar to the construction of a suspended roof frame. The main difference is at the top point and is due to the fact that the tops of the layered beams rest on the ridge girder. In this case, the connection with the latter is performed in several ways:
- simple adjoining apart (in parallel to each other);
- with making a vertical joint (the same as when connecting the paired legs of a hanging truss);
- by tightly fitting the beams to the upper beam (using a vertical cut or notch).
If the design of the wooden frame provides for the support of trusses on the side purlin, then the rafters are connected end-to-end, and in the places adjacent to the purlin, recesses are made.
To fasten layered rafters, use nails, construction staples or linings made of wood and metal
To ensure structural strength, the notches should not be too deep. Experts recommend making recesses no more than a quarter of the thickness of the timber or a third of the width of the board.
Individual developers most often resort to installing rafters in the following way:
- the upper part rests on the ridge beam through a vertical cut;
- From below, the rafter legs are held in place by a corner notch.
It is convenient to use a construction square for marking. After the scale is selected, the values of the slope rise and half the span are plotted on the sides of the right triangle. Thanks to this, it will be possible to obtain the slope angle of the slope without resorting to mathematical calculations.
To make rafters, we suggest using the most convenient method:

At first glance, this method is very tricky. However, even a quick glance at the instructions provided is enough to master it perfectly. Of course, you can set aside the necessary distances and make markings using a calculation method, but it will be much easier to get confused when calculating angles and distances.
It should be remembered that the cuts made in the rafter legs must be absolutely identical, otherwise the roof slope will be uneven. For this you can use wooden block as a template. It is only important that its thickness does not exceed 1/3 of the thickness of the workpiece.
For the most common slope angles, there are templates, the configuration of which has already been calculated by professionals. By using one of these patterns, you can significantly simplify the task of marking the corners of notches.
Templates with marked notch angles allow you to simplify the process of making rafters
Assembly and installation of a layered structure

Video: installation of rafter legs of a layered roofing system
Methods for connecting rafter joists
When choosing timber for large roof trusses, you have to look for a reasonable compromise between the length and thickness of the rafters. The reason for this is the features of the standard range of lumber, in which longer beams have an increased cross-section. On the other hand, their use is not always justified both technologically and due to the increased cost of the structure. The way out of this situation is to lengthen the rafter legs by splicing. The rigidity and mechanical strength of the beam depends on how correctly the joint is made, so the connection is made strictly according to a certain method.
Oblique cutting method
The method of splicing with an oblique cut is that inclined cuts (cuts) are formed on the mating parts of the beams. They should be carried out especially carefully - after combining both parts of the beam, there should be no gaps left, otherwise deformation will appear at the junction.
When splicing with an oblique cut, there should be no gaps or gaps between the mating surfaces, which could weaken the rafter and cause its deformation.
When making cuts, leave a small transverse section with a height of at least 15% of the rafter thickness - the presence of the end part will make the connection more durable. For calculation optimal length For an oblique cut, the height of the beam at the cut site must be multiplied by two. The truss is fastened with nails, clamps or bolted connections.
Connection by rallying
To lengthen the rafter using the joining (stitching) method, the edges of the boards are overlapped and a stand is installed in the center of the junction area. The elements are fastened using nails, which are driven in according to a certain pattern:
- along the edges of the ends - every 45–90 mm;
- along the edges of the sewn boards - in a zigzag pattern, in increments of 50 cm.
Connecting boards by joining allows you to do without additional pads, but requires the installation of additional support in the center of the junction area
In order for the beam to successfully cope with operational loads after joining, the length of the joining section (T) is calculated using the formula T = 0.42 × L, where L is the length of the overlapped span.
Frontal support
The connection by frontal extension is that the edges individual parts the rafters are carefully trimmed and butted together. For fastening, lumber linings with a thickness of at least 1/3 of the section of the main beam are used. The length of the overlays is determined by the formula L = 3 × h, where h is the width of the board.
When splicing with a frontal stop, a monolithic structure will be obtained only with the correct placement of fasteners
All parts are fixed using nails or bolted connections. In the first case, nails are driven in two parallel rows, trying to place the fasteners in a zigzag pattern. Threaded connection performed in a checkerboard pattern, determining the number of bolts depending on the length of the linings.
Composite length extension
To build up a rafter leg, it is not at all necessary to use both parts of the same section. With a composite extension, a single element can be lengthened by using two boards that are sewn onto its side planes. The resulting gap is filled with scraps of lumber of length l = 2 × h in increments of L = 7 × h, where h, as before, is the thickness of the element being extended.
Composite extension of rafters allows you to attach crossbars, supports and other structural elements in the most convenient way
Expert advice on making rafters and assembling roof frames
Getting started independent design and installation of the rafter system, be sure to consult with experienced roofers regarding the specifics of roof construction in your area. Perhaps their advice will save you from trouble and help you save time and money. In turn, we offer several recommendations that will help make the structure more reliable and durable:
- If timber is used to make the Mauerlat or top trim minimum section, then cuts can weaken it. For this reason, cutouts should only be made at the lower ends of the rafter legs.
- To prevent precipitation from falling on the wooden frame and walls of the house, the roof must have an overhang. To equip it, use pieces of timber (fillies), which increase the length of the rafter legs, or make trusses of increased size.
- Connections using cuts at an angle of 90 o cannot be used.- in this case, the resistance of the element to load forces is significantly reduced.
- If the elements of the rafter system are connected with threaded fasteners, then wide washers or metal plates are installed under the heads of the bolts and nuts. Thanks to the increased area, the fasteners will not be pressed into the wood.
- All wooden parts of the structure must be thoroughly impregnated with antiseptic and fire retardant.
- When determining the cross-section of the puffs, they are guided by how close they will be to the ridge. The shorter the connecting beam, the greater the load it bears and the more powerful the lumber and bolted fasteners are used.
- When determining the cross-section of the timber for the manufacture of rafters, do not forget to take into account the thickness of the thermal insulation layer.
Video: recommendations from experts on the correct connection of roof frame elements
https://youtube.com/watch?v=GbTAu5-flfsModern materials and technologies make it possible to build a roof of any configuration and purpose. Given such diversity, it is simply impossible to consider all options in detail within one article. However, based on the ones discussed here basic principles construction, you can easily cope with the most complex structures. The main thing is to pay attention to detail, be attentive and careful in your work. And then the roof will not only be a reliable functional superstructure, but also a true decoration of your home.
Thanks to my varied hobbies, I write on various topics, but my favorites are engineering, technology and construction. Perhaps because I know many nuances in these areas, not only theoretically, as a result of studying at a technical university and graduate school, but also from the practical side, since I try to do everything with my own hands.